[WebApi] 捣鼓一个资源管理器–服务器端分割压缩图片
最后更新于:2022-04-01 06:57:14
# History
[[WebApi] 捣鼓一个资源管理器--数据库辅助服务器文件访问](http://blog.csdn.net/qiujuer/article/details/41744733)
# In This
在做网站开发时,我常常会做一些这样的工作:一张大图中包含了许多的小图,而网站中为了使用其中一张小图我不得不把大图切成一张张的小图。虽然这样的工作不多;但对于我来说在服务器端莫名的存储了一大堆小文件是很反感的事情;或许你会说使用css来完成大图中的小图显示;当然这是可以的。但是我假如需要下载该小图呢?这时无能为力了吧!
所以有了今天的服务器端剪切压缩图片的一章。
# CodeTime
##### 更改

本次版本相对上一张主要两个地方更改:新增 ImageUtils.cs,修改 ResourceApiController.cs
##### ImageUtils.cs
~~~
using System;
using System.Collections.Generic;
using System.Drawing;
using System.Drawing.Drawing2D;
using System.Drawing.Imaging;
using System.IO;
namespace WebResource.Models
{
public class ImageUtils
{
/// <summary>
/// 图片类型对应的ImageFormat
/// </summary>
/// <param name="type">类型</param>
/// <returns>ImageFormat</returns>
public static ImageFormat GetFormat(string type)
{
Dictionary<string, ImageFormat> types = new Dictionary<string, ImageFormat>();
types.Add("bmp", ImageFormat.Bmp);
types.Add("gif", ImageFormat.Gif);
types.Add("ief", ImageFormat.Jpeg);
types.Add("jpeg", ImageFormat.Jpeg);
types.Add("jpg", ImageFormat.Jpeg);
types.Add("jpe", ImageFormat.Jpeg);
types.Add("png", ImageFormat.Png);
types.Add("tiff", ImageFormat.Tiff);
types.Add("tif", ImageFormat.Tiff);
types.Add("djvu", ImageFormat.Bmp);
types.Add("djv", ImageFormat.Bmp);
types.Add("wbmp", ImageFormat.Bmp);
types.Add("ras", ImageFormat.Bmp);
types.Add("pnm", ImageFormat.Bmp);
types.Add("pbm", ImageFormat.Bmp);
types.Add("pgm", ImageFormat.Bmp);
types.Add("ppm", ImageFormat.Bmp);
types.Add("rgb", ImageFormat.Bmp);
types.Add("xbm", ImageFormat.Bmp);
types.Add("xpm", ImageFormat.Bmp);
types.Add("xwd", ImageFormat.Bmp);
types.Add("ico", ImageFormat.Icon);
types.Add("wmf", ImageFormat.Emf);
types.Add("exif", ImageFormat.Exif);
types.Add("emf", ImageFormat.Emf);
try
{
ImageFormat format = types[type];
if (format != null)
return format;
}
catch { }
return ImageFormat.Bmp;
}
/// <summary>
/// 图片转换为字节
/// </summary>
/// <param name="bitmap">图片</param>
/// <param name="type">类型</param>
/// <returns>字节码</returns>
public static byte[] ToBytes(Bitmap bitmap, string type)
{
using (MemoryStream stream = new MemoryStream())
{
bitmap.Save(stream, GetFormat(type));
byte[] data = new byte[stream.Length];
stream.Seek(0, SeekOrigin.Begin);
stream.Read(data, 0, Convert.ToInt32(stream.Length));
return data;
}
}
/// <summary>
/// 调整图片宽度高度
/// </summary>
/// <param name="bmp">原始Bitmap </param>
/// <param name="newW">新的宽度</param>
/// <param name="newH">新的高度</param>
/// <returns>处理Bitmap</returns>
public static Bitmap Resize(Bitmap bmp, int newW, int newH)
{
try
{
Bitmap b = new Bitmap(newW, newH);
Graphics g = Graphics.FromImage(b);
// 插值算法的质量
g.InterpolationMode = InterpolationMode.Default;
g.DrawImage(bmp, new Rectangle(0, 0, newW, newH), new Rectangle(0, 0, bmp.Width, bmp.Height), GraphicsUnit.Pixel);
g.Dispose();
return b;
}
catch
{
return null;
}
}
/// <summary>
/// 切片Bitmap:指定图片分割为 Row 行,Col 列,取第 N 个图片
/// </summary>
/// <param name="b">等待分割的图片</param>
/// <param name="row">行</param>
/// <param name="col">列</param>
/// <param name="n">取第N个图片</param>
/// <returns>切片后的Bitmap</returns>
public static Bitmap Cut(Bitmap b, int row, int col, int n)
{
int w = b.Width / col;
int h = b.Height / row;
n = n > (col * row) ? col * row : n;
int x = (n - 1) % col;
int y = (n - 1) / col;
x = w * x;
y = h * y;
try
{
Bitmap bmpOut = new Bitmap(w, h, PixelFormat.Format24bppRgb);
Graphics g = Graphics.FromImage(bmpOut);
g.DrawImage(b, new Rectangle(0, 0, w, h), new Rectangle(x, y, w, h), GraphicsUnit.Pixel);
g.Dispose();
return bmpOut;
}
catch
{
return null;
}
}
}
}
~~~
该类的作用就是压缩和剪切图片,其具体实现也都注释清楚了;如果不明白的地方,还望在评论中提出。
然后来看看这次的API更改。
##### ResourceApiController.cs
~~~
/// <summary>
/// Get Image
/// </summary>
/// <param name="name">MD5 Name</param>
/// <returns>File</returns>
[HttpGet]
[Route("{Id}/Img")]
public async Task<HttpResponseMessage> GetImage(string Id, int w = 0, int h = 0, int r = 1, int c = 1, int n = 1)
{
// Return 304
var tag = Request.Headers.IfNoneMatch.FirstOrDefault();
if (Request.Headers.IfModifiedSince.HasValue && tag != null && tag.Tag.Length > 0)
return new HttpResponseMessage(HttpStatusCode.NotModified);
// 判断参数是否正确
if (w < 0 || h < 0 || r < 1 || c < 1 || n < 1)
return new HttpResponseMessage(HttpStatusCode.BadRequest);
// 默认参数情况直接返回
if (w == 0 && h == 0 && r == 1 && c == 1 && n == 1)
return await Get(Id);
// 查找数据库
Resource model = await db.Resources.FindAsync(Id);
// 判断
if (model == null || !GetContentType(model.Type).StartsWith("image"))
return new HttpResponseMessage(HttpStatusCode.BadRequest);
// 加载文件信息
FileInfo info = new FileInfo(Path.Combine(ROOT_PATH, model.Folder, model.Id));
if (!info.Exists)
return new HttpResponseMessage(HttpStatusCode.BadRequest);
// 打开图片
Bitmap bitmap = new Bitmap(info.FullName);
// 剪切
if (r > 1 || c > 1)
{
bitmap = ImageUtils.Cut(bitmap, r, c, n);
}
// 放大缩小
if (w > 0 || h > 0)
{
w = w == 0 ? bitmap.Width : w;
h = h == 0 ? bitmap.Height : h;
bitmap = ImageUtils.Resize(bitmap, w, h);
}
try
{
// Copy To Memory And Close.
byte[] bytes = ImageUtils.ToBytes(bitmap, model.Type);
// Get Tag
string eTag = string.Format("\"{0}\"", HashUtils.GetMD5Hash(bytes));
// 构造返回
HttpResponseMessage result = new HttpResponseMessage(HttpStatusCode.OK);
ContentDispositionHeaderValue disposition = new ContentDispositionHeaderValue(GetDisposition(model.Type));
disposition.FileName = string.Format("{0}.{1}", model.Name, model.Type);
disposition.Name = model.Name;
// 这里写入大小为计算后的大小
disposition.Size = bytes.Length;
result.Content = new ByteArrayContent(bytes);
result.Content.Headers.ContentType = new MediaTypeHeaderValue(GetContentType(model.Type));
result.Content.Headers.ContentDisposition = disposition;
// Set Cache 这个同Get方法
result.Content.Headers.Expires = new DateTimeOffset(DateTime.Now).AddHours(1);
result.Content.Headers.LastModified = new DateTimeOffset(DateTime.Now);
result.Headers.CacheControl = new CacheControlHeaderValue() { Public = true, MaxAge = TimeSpan.FromHours(1) };
result.Headers.ETag = new EntityTagHeaderValue(eTag);
return result;
}
catch { }
finally
{
if (bitmap != null)
bitmap.Dispose();
}
return new HttpResponseMessage(HttpStatusCode.BadRequest);
}
~~~
由于代码量较多,我就不全部贴出来了;就把更改的地方写出来了;其中主要就是新增了一个 GetImage 方法。
在方法中,根据传入的参数我们进行一定的判断然后剪切压缩图片;最后打包为 Http 返回。
代码修改的地方就这么多。
# RunTime
##### API

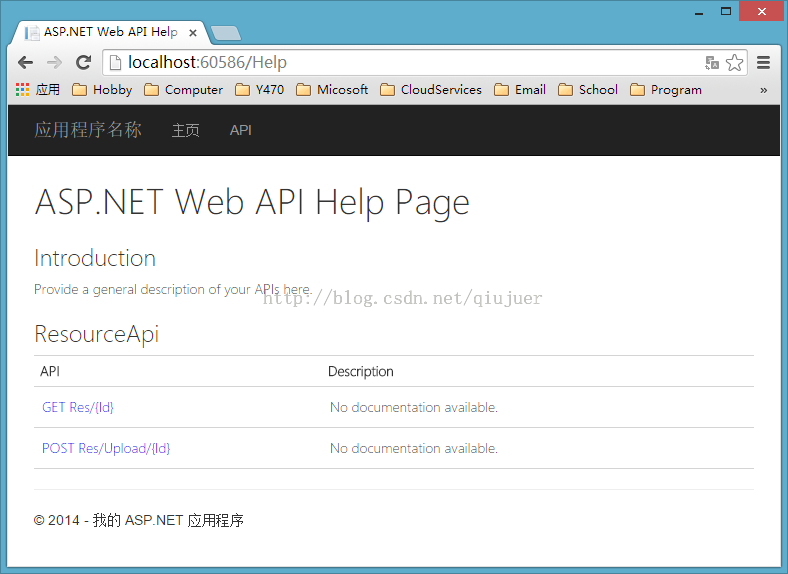
可以看见多API中多了一个接口;进入看看。

可以看见除了 Id 是必须,其他参数都是有默认值,可以不用传入。
* Id:文件的MD5值,用于接口寻找对应文件
* w:返回的图片宽度
* h:返回的图片高度
* r:row 行,代表横向分割为多少行;默认为1
* c:column 列,代表纵向分割为多少列;默认为1
* n:代表分割后取第N个图片
##### 上传

惯例,首先上传一个图片。
##### 访问

访问地址,可以使用原来的也可以使用新的地址,新的地址无非就是在后面加上“/img”
##### 压缩

上面是改变宽度和高度后的结果;你可以右键保存图片看看图片是否是被改变了。
##### 剪切
再来看看剪切的效果:

说说原理:

再来一张:

这样也就实现了,服务器端一张图片;客户端无数张图片;可以根据需求进行分割压缩;当然复杂一点你还可以加上一些特效;比如模糊;水印等等;这些服务端都可以做。
# END
##### 资源
[[WebApi] 捣鼓一个资源管理器--服务器端分割压缩图片](http://download.csdn.net/detail/qiujuer/8240911)
##### 下一章
[WebApi] 捣鼓一个资源管理器–数据库辅助服务器文件访问
最后更新于:2022-04-01 06:57:11
# History
[[WebApi] 捣鼓一个资源管理器--文件下载](http://blog.csdn.net/qiujuer/article/details/41621781)
[[WebApi] 捣鼓一个资源管理器--多文件上传](http://blog.csdn.net/qiujuer/article/details/41675299)
[[WebApi] 捣鼓一个资源管理器--多文件上传+数据库辅助](http://blog.csdn.net/qiujuer/article/details/41721165)
# In This
##### 序
文件可以上传了,下一步就是文件的访问了;只有文件上传没有文件访问。那么数据就是浪费!
##### 目标
1. 文件访问要能通过上一章文件的那些东西访问磁盘中的文件
2. 文件要能区分图片文件和其他文件;分别是直接打开和附件保存
3. 文件要能有浏览器缓存,如打开同一个图片不用重复从服务器加载
##### 分析
1. 文件的访问这个当然要借助上一章中在数据库中保存的数据进行组合成文件返回流
2. 直接打开和附件无非就是设置返回头中的**Disposition:inline/attachment**
3. 浏览器缓存这个就是设置返回头中的缓存信息了
# CodeTime
##### 改动

这次简单,只更改了一个文件;不过更改较大。
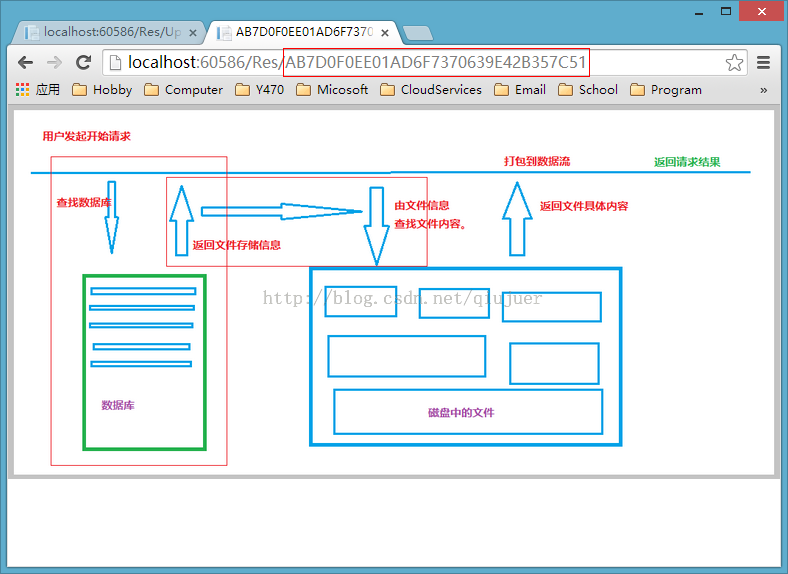
##### 流程
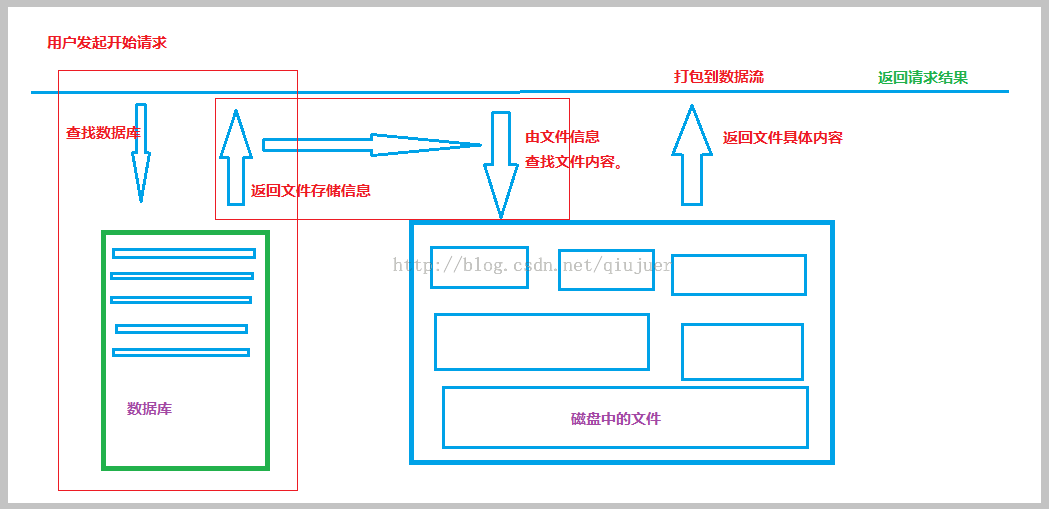
简单画了一个;凑合着看啊;就是一个请求来了,先查找数据库,找到该文件的信息;根据这些信息去查找文件。然后返回;没有找到数据 或者没有找到文件都直接返回404。
##### Get()
~~~
/// <summary>
/// Get File
/// </summary>
/// <param name="name">MD5 Name</param>
/// <returns>File</returns>
[HttpGet]
[Route("{Id}")]
public async Task<HttpResponseMessage> Get(string Id)
{
// Return 304
// 判断是否含有Tag,有就返回浏览器缓存
var tag = Request.Headers.IfNoneMatch.FirstOrDefault();
if (Request.Headers.IfModifiedSince.HasValue && tag != null && tag.Tag.Length > 0)
return new HttpResponseMessage(HttpStatusCode.NotModified);
//查找该文件
Resource model = await db.Resources.FindAsync(Id);
//未找到文件
if (model == null)
return new HttpResponseMessage(HttpStatusCode.BadRequest);
// 加载文件信息
FileInfo info = new FileInfo(Path.Combine(ROOT_PATH, model.Folder, model.Id));
// 文件没有找到
if (!info.Exists)
return new HttpResponseMessage(HttpStatusCode.BadRequest);
FileStream file = null;
try
{
// 打开文件
file = new FileStream(info.FullName, FileMode.Open, FileAccess.Read, FileShare.Read);
// 新建http响应
HttpResponseMessage result = new HttpResponseMessage(HttpStatusCode.OK);
// 设置头部信息
// GetDisposition() 用于决定文件是直接打开还是提示下载
// 一般来说图片文件就直接打开,其他文件就提示下载
ContentDispositionHeaderValue disposition = new ContentDispositionHeaderValue(GetDisposition(model.Type));
// 设置文件名+扩展
disposition.FileName = string.Format("{0}.{1}", model.Name, model.Type);
// 文件名
disposition.Name = model.Name;
// 文件大小
disposition.Size = file.Length;
if (file.Length < MEMORY_SIZE)
{
// 如果 小于64MB 就直接拷贝到内存流中返回
// Copy To Memory And Close.
byte[] bytes = new byte[file.Length];
await file.ReadAsync(bytes, 0, (int)file.Length);
file.Close();
MemoryStream ms = new MemoryStream(bytes);
result.Content = new ByteArrayContent(ms.ToArray());
}
else
{
// 如果不是就直接打包为文件流返回
result.Content = new StreamContent(file);
}
// 设置文件在网络中的ContentType
// GetContentType() 方法是根据扩展名去查找字典
// 字典中我收集了大概150种,基本足够使用了
result.Content.Headers.ContentType = new MediaTypeHeaderValue(GetContentType(model.Type));
result.Content.Headers.ContentDisposition = disposition;
// 设置浏览器缓存相关
// 设置缓存Expires
result.Content.Headers.Expires = new DateTimeOffset(DateTime.Now).AddHours(1);
// 缓存最后修改时间
result.Content.Headers.LastModified = new DateTimeOffset(model.Published);
// 缓存控制
result.Headers.CacheControl = new CacheControlHeaderValue() { Public = true, MaxAge = TimeSpan.FromHours(1) };
// 设置ETag,这里的ETag为了方便就直接使用MD5值
result.Headers.ETag = new EntityTagHeaderValue(string.Format("\"{0}\"", model.Id));
// 返回请求
return result;
}
catch
{
if (file != null)
{
file.Close();
}
}
return new HttpResponseMessage(HttpStatusCode.BadRequest);
}
~~~
**Get()**方法是这次的精髓部分;其中的作用也都加上了注释了。
##### ResourceApiController.cs
~~~
using System;
using System.Collections.Generic;
using System.Globalization;
using System.IO;
using System.Linq;
using System.Net;
using System.Net.Http;
using System.Net.Http.Headers;
using System.Threading.Tasks;
using System.Web;
using System.Web.Http;
using System.Web.Http.Description;
using WebResource.Models;
namespace WebResource.Controllers
{
[RoutePrefix("Res")]
public class ResourceApiController : ApiController
{
// 操作 数据库
private WebResourceContext db = new WebResourceContext();
// 最大内存使用大小
private static readonly long MEMORY_SIZE = 64 * 1024 * 1024;
// 文件默认存储位置
private static readonly string ROOT_PATH = HttpContext.Current.Server.MapPath("~/App_Data/");
// ContentType字典
private static Dictionary<string, string> CONTENT_TYPE = null;
/// <summary>
/// 初始化字典
/// </summary>
static ResourceApiController()
{
CONTENT_TYPE = new Dictionary<string, string>();
CONTENT_TYPE.Add("ex", "application/andrew-inset");
CONTENT_TYPE.Add("hqx", "application/mac-binhex40");
CONTENT_TYPE.Add("cpt", "application/mac-compactpro");
CONTENT_TYPE.Add("doc", "application/msword");
CONTENT_TYPE.Add("docx", "application/msword");
CONTENT_TYPE.Add("bin", "application/octet-stream");
CONTENT_TYPE.Add("dms", "application/octet-stream");
CONTENT_TYPE.Add("lha", "application/octet-stream");
CONTENT_TYPE.Add("lzh", "application/octet-stream");
CONTENT_TYPE.Add("exe", "application/octet-stream");
CONTENT_TYPE.Add("class", "application/octet-stream");
CONTENT_TYPE.Add("so", "application/octet-stream");
CONTENT_TYPE.Add("dll", "application/octet-stream");
CONTENT_TYPE.Add("oda", "application/oda");
CONTENT_TYPE.Add("pdf", "application/pdf");
CONTENT_TYPE.Add("ai", "application/postscript");
CONTENT_TYPE.Add("eps", "application/postscript");
CONTENT_TYPE.Add("ps", "application/postscript");
CONTENT_TYPE.Add("smi", "application/smil");
CONTENT_TYPE.Add("smil", "application/smil");
CONTENT_TYPE.Add("mif", "application/vnd.mif");
CONTENT_TYPE.Add("xls", "application/vnd.ms-excel");
CONTENT_TYPE.Add("xlsx", "application/vnd.ms-excel");
CONTENT_TYPE.Add("ppt", "application/vnd.ms-powerpoint");
CONTENT_TYPE.Add("wbxml", "application/vnd.wap.wbxml");
CONTENT_TYPE.Add("wmlc", "application/vnd.wap.wmlc");
CONTENT_TYPE.Add("wmlsc", "application/vnd.wap.wmlscriptc");
CONTENT_TYPE.Add("bcpio", "application/x-bcpio");
CONTENT_TYPE.Add("vcd", "application/x-cdlink");
CONTENT_TYPE.Add("pgn", "application/x-chess-pgn");
CONTENT_TYPE.Add("cpio", "application/x-cpio");
CONTENT_TYPE.Add("csh", "application/x-csh");
CONTENT_TYPE.Add("dcr", "application/x-director");
CONTENT_TYPE.Add("dir", "application/x-director");
CONTENT_TYPE.Add("dxr", "application/x-director");
CONTENT_TYPE.Add("dvi", "application/x-dvi");
CONTENT_TYPE.Add("spl", "application/x-futuresplash");
CONTENT_TYPE.Add("gtar", "application/x-gtar");
CONTENT_TYPE.Add("hdf", "application/x-hdf");
CONTENT_TYPE.Add("js", "application/x-javascript");
CONTENT_TYPE.Add("skp", "application/x-koan");
CONTENT_TYPE.Add("skd", "application/x-koan");
CONTENT_TYPE.Add("skt", "application/x-koan");
CONTENT_TYPE.Add("skm", "application/x-koan");
CONTENT_TYPE.Add("latex", "application/x-latex");
CONTENT_TYPE.Add("nc", "application/x-netcdf");
CONTENT_TYPE.Add("cdf", "application/x-netcdf");
CONTENT_TYPE.Add("sh", "application/x-sh");
CONTENT_TYPE.Add("shar", "application/x-shar");
CONTENT_TYPE.Add("swf", "application/x-shockwave-flash");
CONTENT_TYPE.Add("flv", "application/x-shockwave-flash");
CONTENT_TYPE.Add("sit", "application/x-stuffit");
CONTENT_TYPE.Add("sv4cpio", "application/x-sv4cpio");
CONTENT_TYPE.Add("sv4crc", "application/x-sv4crc");
CONTENT_TYPE.Add("tar", "application/x-tar");
CONTENT_TYPE.Add("tcl", "application/x-tcl");
CONTENT_TYPE.Add("tex", "application/x-tex");
CONTENT_TYPE.Add("texinfo", "application/x-texinfo");
CONTENT_TYPE.Add("texi", "application/x-texinfo");
CONTENT_TYPE.Add("t", "application/x-troff");
CONTENT_TYPE.Add("tr", "application/x-troff");
CONTENT_TYPE.Add("roff", "application/x-troff");
CONTENT_TYPE.Add("man", "application/x-troff-man");
CONTENT_TYPE.Add("me", "application/x-troff-me");
CONTENT_TYPE.Add("ms", "application/x-troff-ms");
CONTENT_TYPE.Add("ustar", "application/x-ustar");
CONTENT_TYPE.Add("src", "application/x-wais-source");
CONTENT_TYPE.Add("xhtml", "application/xhtml+xml");
CONTENT_TYPE.Add("xht", "application/xhtml+xml");
CONTENT_TYPE.Add("zip", "application/zip");
CONTENT_TYPE.Add("rar", "application/zip");
CONTENT_TYPE.Add("gz", "application/x-gzip");
CONTENT_TYPE.Add("bz2", "application/x-bzip2");
CONTENT_TYPE.Add("au", "audio/basic");
CONTENT_TYPE.Add("snd", "audio/basic");
CONTENT_TYPE.Add("mid", "audio/midi");
CONTENT_TYPE.Add("midi", "audio/midi");
CONTENT_TYPE.Add("kar", "audio/midi");
CONTENT_TYPE.Add("mpga", "audio/mpeg");
CONTENT_TYPE.Add("mp2", "audio/mpeg");
CONTENT_TYPE.Add("mp3", "audio/mpeg");
CONTENT_TYPE.Add("aif", "audio/x-aiff");
CONTENT_TYPE.Add("aiff", "audio/x-aiff");
CONTENT_TYPE.Add("aifc", "audio/x-aiff");
CONTENT_TYPE.Add("m3u", "audio/x-mpegurl");
CONTENT_TYPE.Add("rmm", "audio/x-pn-realaudio");
CONTENT_TYPE.Add("rmvb", "audio/x-pn-realaudio");
CONTENT_TYPE.Add("ram", "audio/x-pn-realaudio");
CONTENT_TYPE.Add("rm", "audio/x-pn-realaudio");
CONTENT_TYPE.Add("rpm", "audio/x-pn-realaudio-plugin");
CONTENT_TYPE.Add("ra", "audio/x-realaudio");
CONTENT_TYPE.Add("wav", "audio/x-wav");
CONTENT_TYPE.Add("wma", "audio/x-wma");
CONTENT_TYPE.Add("pdb", "chemical/x-pdb");
CONTENT_TYPE.Add("xyz", "chemical/x-xyz");
CONTENT_TYPE.Add("bmp", "image/bmp");
CONTENT_TYPE.Add("gif", "image/gif");
CONTENT_TYPE.Add("ief", "image/ief");
CONTENT_TYPE.Add("jpeg", "image/jpeg");
CONTENT_TYPE.Add("jpg", "image/jpeg");
CONTENT_TYPE.Add("jpe", "image/jpeg");
CONTENT_TYPE.Add("png", "image/png");
CONTENT_TYPE.Add("tiff", "image/tiff");
CONTENT_TYPE.Add("tif", "image/tiff");
CONTENT_TYPE.Add("djvu", "image/vnd.djvu");
CONTENT_TYPE.Add("djv", "image/vnd.djvu");
CONTENT_TYPE.Add("wbmp", "image/vnd.wap.wbmp");
CONTENT_TYPE.Add("ras", "image/x-cmu-raster");
CONTENT_TYPE.Add("pnm", "image/x-portable-anymap");
CONTENT_TYPE.Add("pbm", "image/x-portable-bitmap");
CONTENT_TYPE.Add("pgm", "image/x-portable-graymap");
CONTENT_TYPE.Add("ppm", "image/x-portable-pixmap");
CONTENT_TYPE.Add("rgb", "image/x-rgb");
CONTENT_TYPE.Add("xbm", "image/x-xbitmap");
CONTENT_TYPE.Add("xpm", "image/x-xpixmap");
CONTENT_TYPE.Add("xwd", "image/x-xwindowdump");
CONTENT_TYPE.Add("igs", "model/iges");
CONTENT_TYPE.Add("iges", "model/iges");
CONTENT_TYPE.Add("msh", "model/mesh");
CONTENT_TYPE.Add("mesh", "model/mesh");
CONTENT_TYPE.Add("silo", "model/mesh");
CONTENT_TYPE.Add("wrl", "model/vrml");
CONTENT_TYPE.Add("vrml", "model/vrml");
CONTENT_TYPE.Add("css", "text/css");
CONTENT_TYPE.Add("html", "text/html");
CONTENT_TYPE.Add("htm", "text/html");
CONTENT_TYPE.Add("asc", "text/plain");
CONTENT_TYPE.Add("txt", "text/plain");
CONTENT_TYPE.Add("rtx", "text/richtext");
CONTENT_TYPE.Add("rtf", "text/rtf");
CONTENT_TYPE.Add("sgml", "text/sgml");
CONTENT_TYPE.Add("sgm", "text/sgml");
CONTENT_TYPE.Add("tsv", "text/tab-separated-values");
CONTENT_TYPE.Add("wml", "text/vnd.wap.wml");
CONTENT_TYPE.Add("wmls", "text/vnd.wap.wmlscript");
CONTENT_TYPE.Add("etx", "text/x-setext");
CONTENT_TYPE.Add("xsl", "text/xml");
CONTENT_TYPE.Add("xml", "text/xml");
CONTENT_TYPE.Add("mpeg", "video/mpeg");
CONTENT_TYPE.Add("mpg", "video/mpeg");
CONTENT_TYPE.Add("mpe", "video/mpeg");
CONTENT_TYPE.Add("qt", "video/quicktime");
CONTENT_TYPE.Add("mov", "video/quicktime");
CONTENT_TYPE.Add("mxu", "video/vnd.mpegurl");
CONTENT_TYPE.Add("avi", "video/x-msvideo");
CONTENT_TYPE.Add("movie", "video/x-sgi-movie");
CONTENT_TYPE.Add("wmv", "video/x-ms-wmv");
CONTENT_TYPE.Add("asf", "video/x-ms-asf");
CONTENT_TYPE.Add("ice", "x-conference/x-cooltalk");
}
/// <summary>
/// Get ContentType
/// </summary>
/// <param name="type">Type</param>
/// <returns>ContentType</returns>
private static string GetContentType(string type)
{
// 获取文件对应的ContentType
try
{
string contentType = CONTENT_TYPE[type];
if (contentType != null)
return contentType;
}
catch { }
return "application/octet-stream" + type;
}
/// <summary>
/// Get ContentDisposition
/// </summary>
/// <param name="type">Type</param>
/// <returns>ContentDisposition</returns>
private static string GetDisposition(string type)
{
// 判断使用浏览器打开还是附件模式
if (GetContentType(type).StartsWith("image"))
{
return "inline";
}
return "attachment";
}
/// <summary>
/// Get File
/// </summary>
/// <param name="name">MD5 Name</param>
/// <returns>File</returns>
[HttpGet]
[Route("{Id}")]
public async Task<HttpResponseMessage> Get(string Id)
{
// Return 304
// 判断是否含有Tag,有就返回浏览器缓存
var tag = Request.Headers.IfNoneMatch.FirstOrDefault();
if (Request.Headers.IfModifiedSince.HasValue && tag != null && tag.Tag.Length > 0)
return new HttpResponseMessage(HttpStatusCode.NotModified);
//查找该文件
Resource model = await db.Resources.FindAsync(Id);
//未找到文件
if (model == null)
return new HttpResponseMessage(HttpStatusCode.BadRequest);
// 加载文件信息
FileInfo info = new FileInfo(Path.Combine(ROOT_PATH, model.Folder, model.Id));
// 文件没有找到
if (!info.Exists)
return new HttpResponseMessage(HttpStatusCode.BadRequest);
FileStream file = null;
try
{
// 打开文件
file = new FileStream(info.FullName, FileMode.Open, FileAccess.Read, FileShare.Read);
// 新建http响应
HttpResponseMessage result = new HttpResponseMessage(HttpStatusCode.OK);
// 设置头部信息
// GetDisposition() 用于决定文件是直接打开还是提示下载
// 一般来说图片文件就直接打开,其他文件就提示下载
ContentDispositionHeaderValue disposition = new ContentDispositionHeaderValue(GetDisposition(model.Type));
// 设置文件名+扩展
disposition.FileName = string.Format("{0}.{1}", model.Name, model.Type);
// 文件名
disposition.Name = model.Name;
// 文件大小
disposition.Size = file.Length;
if (file.Length < MEMORY_SIZE)
{
// 如果 小于64MB 就直接拷贝到内存流中返回
// Copy To Memory And Close.
byte[] bytes = new byte[file.Length];
await file.ReadAsync(bytes, 0, (int)file.Length);
file.Close();
MemoryStream ms = new MemoryStream(bytes);
result.Content = new ByteArrayContent(ms.ToArray());
}
else
{
// 如果不是就直接打包为文件流返回
result.Content = new StreamContent(file);
}
// 设置文件在网络中的ContentType
// GetContentType() 方法是根据扩展名去查找字典
// 字典中我收集了大概150种,基本足够使用了
result.Content.Headers.ContentType = new MediaTypeHeaderValue(GetContentType(model.Type));
result.Content.Headers.ContentDisposition = disposition;
// 设置浏览器缓存相关
// 设置缓存Expires
result.Content.Headers.Expires = new DateTimeOffset(DateTime.Now).AddHours(1);
// 缓存最后修改时间
result.Content.Headers.LastModified = new DateTimeOffset(model.Published);
// 缓存控制
result.Headers.CacheControl = new CacheControlHeaderValue() { Public = true, MaxAge = TimeSpan.FromHours(1) };
// 设置ETag,这里的ETag为了方便就直接使用MD5值
result.Headers.ETag = new EntityTagHeaderValue(string.Format("\"{0}\"", model.Id));
// 返回请求
return result;
}
catch
{
if (file != null)
{
file.Close();
}
}
return new HttpResponseMessage(HttpStatusCode.BadRequest);
}
/// <summary>
/// Post File
/// </summary>
/// <param name="Id">Md5</param>
/// <returns>Resource</returns>
[HttpPost]
[Route("Upload/{Id?}")]
[ResponseType(typeof(Resource))]
public async Task<IHttpActionResult> Post(string Id = null)
{
List<Resource> resources = new List<Resource>();
// multipart/form-data
var provider = new MultipartMemoryStreamProvider();
await Request.Content.ReadAsMultipartAsync(provider);
foreach (var item in provider.Contents)
{
if (item.Headers.ContentDisposition.FileName != null)
{
//Strem
var ms = item.ReadAsStreamAsync().Result;
using (var br = new BinaryReader(ms))
{
if (ms.Length <= 0)
break;
var data = br.ReadBytes((int)ms.Length);
//Md5
string id = HashUtils.GetMD5Hash(data);
Resource temp = await db.Resources.FindAsync(id);
if (temp == null)
{
//Create
Resource resource = new Resource();
resource.Id = id;
resource.Size = ms.Length;
resource.Cursor = resource.Size;
resource.Published = DateTime.Now;
//Info
FileInfo info = new FileInfo(item.Headers.ContentDisposition.FileName.Replace("\"", ""));
resource.Type = info.Extension.Substring(1).ToLower();
resource.Name = info.Name.Substring(0, info.Name.LastIndexOf("."));
//Relative
resource.Folder = DateTime.Now.ToString("yyyyMM/dd/", DateTimeFormatInfo.InvariantInfo);
//Write
try
{
string dirPath = Path.Combine(ROOT_PATH, resource.Folder);
if (!Directory.Exists(dirPath))
{
Directory.CreateDirectory(dirPath);
}
File.WriteAllBytes(Path.Combine(dirPath, resource.Id), data);
//Save To Datebase
db.Resources.Add(resource);
await db.SaveChangesAsync();
temp = await db.Resources.FindAsync(resource.Id);
}
catch { }
}
if (temp != null)
resources.Add(temp);
}
}
}
if (resources.Count == 0)
return BadRequest();
else if (resources.Count == 1)
return Ok(resources.FirstOrDefault());
else
return Ok(resources);
}
}
}
~~~
这个是修改后的**API**文件,**Post**相对上一章没有进行修改;添加了**Get**,和其他几个方法以及变量。
# RunTime
##### Api
运行之后首先来看看现在的API,一个是上传,一个是访问;简单吧?
##### Home/Upload
上传两个,一个图片一个Zip
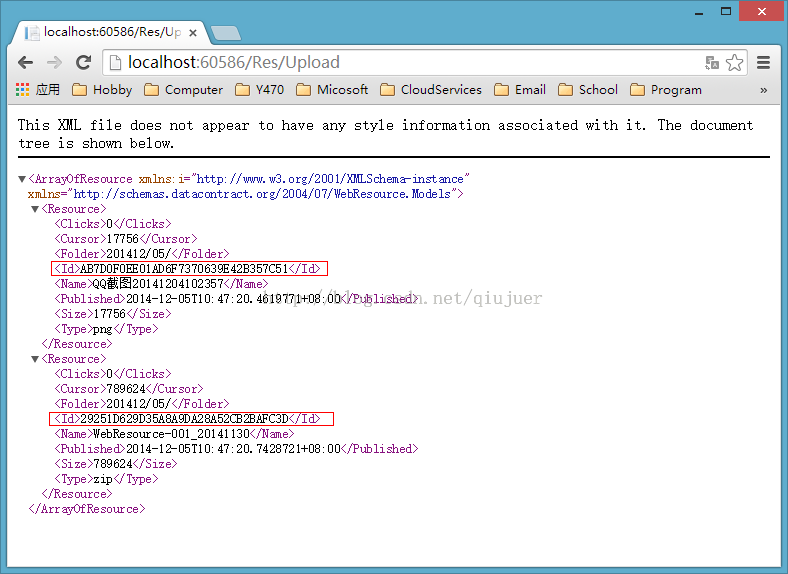
可以看见返回了两个文件的信息,分别记住两个文件的ID,来访问一下试试。
##### Image
可以看见图片是直接打开在浏览器中的;下面来看看**Zip**的文件咋样。
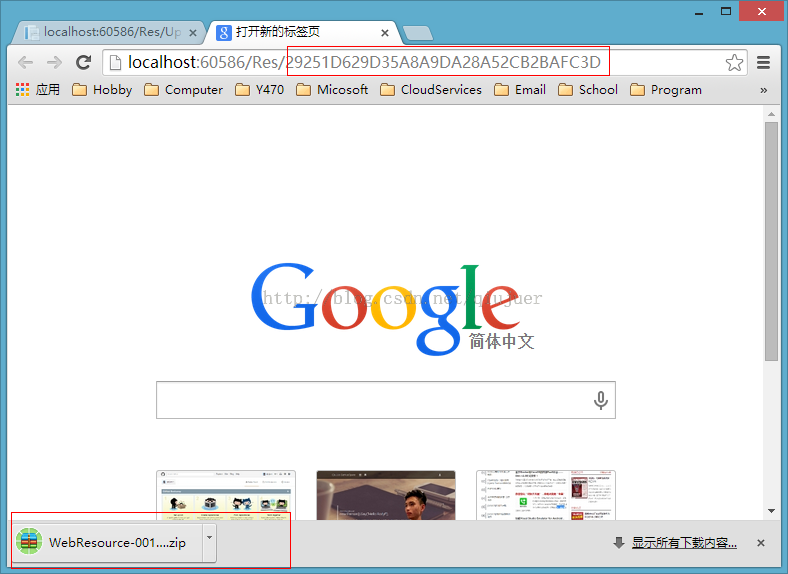
可以看见是以下载文件的方式返回的。
##### 请求返回
###### Zip
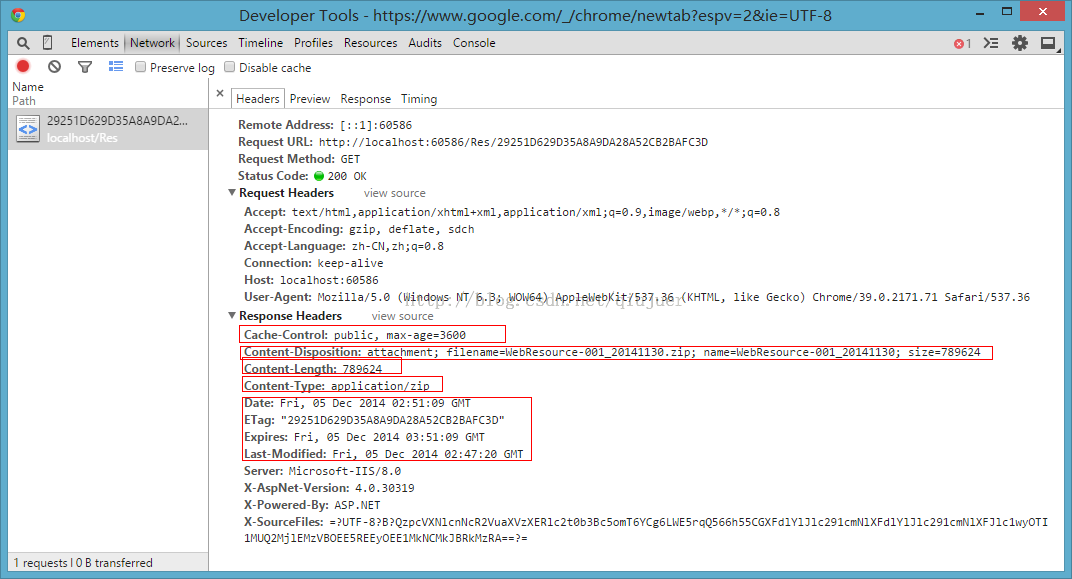
通过浏览器调试,我们可以看见Zip文件的返回信息与上面Get方法中设置的参数是一样的;代表了方法正确执行。
###### Image
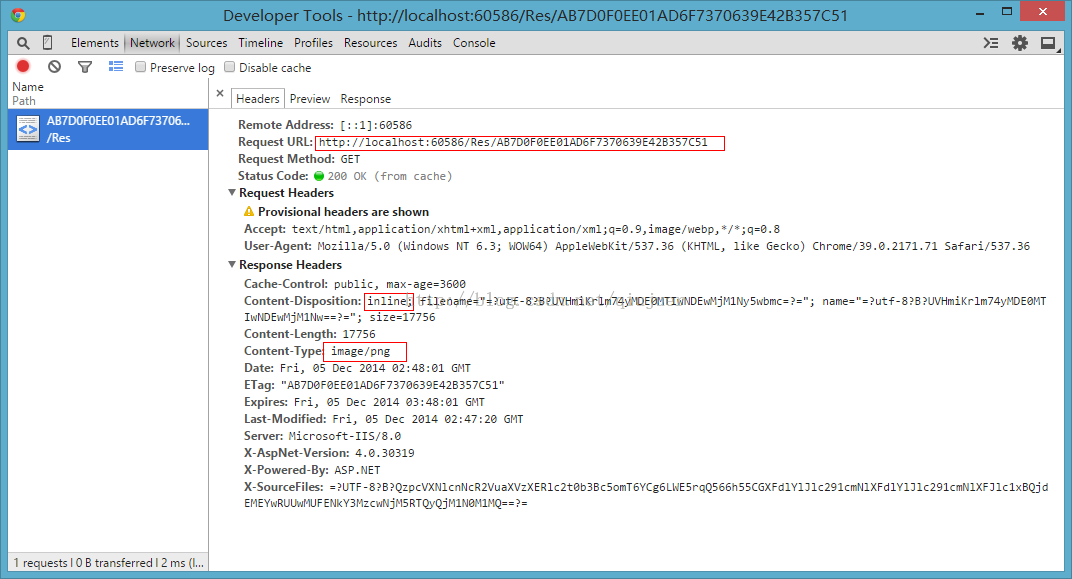
可以看见图片的是以** Inline** 的形式打开的;所以是在浏览器中直接显示。
再次请求图片:

通过再次请求图片;可以看见服务器返回的是304.意思就是浏览器自己使用自己的缓存信息;无需重复从服务器加载。这个无疑试用与图片的情况。
所有的工作都是按照我们预想的进行;能得到这样的结果是不错的。
以后你的网站中就能使用:**.../Res/.....**简单的一个地址就**OK**了;无论是图片;附件;css;js;等等都是可行的。而且也没有暴露你的文件存储信息,
你敢说不爽?反正我是觉得挺爽的!
# END
有到了结束的时候了。
##### 资源
[WebResource-004_20141205](http://download.csdn.net/detail/qiujuer/8227347)
##### 下一章
针对于下一章,有两个方向:
* 一个是开发一个管理界面
* 还有就是开发针对图片的Get方法(这个方法能实现图片的压缩,分割等功能)
但是没有想好,大伙想看关于那个的?
[WebApi] 捣鼓一个资源管理器–多文件上传+数据库辅助
最后更新于:2022-04-01 06:57:09
# History
[[WebApi] 捣鼓一个资源管理器--文件下载](http://blog.csdn.net/qiujuer/article/details/41621781)
[[WebApi] 捣鼓一个资源管理器--多文件上传](http://blog.csdn.net/qiujuer/article/details/41675299)
# In This
##### 序言
在上一章中我们讲解了怎么实现文件的上传;在文件上传到服务器后似乎不好管理;每次要下载一个文件也似乎不知从何处下手。
在这一章中将会讲解如何结合数据进行文件的上传存储,保证文件的存储足够安全以及足够简单;同时增加不重复保存同一个文件。
##### 简要分析
1. 在我们想来,一个文件存储到数据库后如何才能保证其有一定的安全性呢?这个简单,最简单的做法就是去除掉后缀名。虽然和加密比起来相差甚远;但是如果有人得到了想要知道其中的东西似乎还是需要花些心思才行。
2. 在满足上面需求的情况下却增加了额外的负担,比如文件全部都没有后缀了那么我们需要下载文件时又怎么办?这时我们就需要记录下文件的基本信息了。
3. 我们知道在一般的上传文件控件上都是按照年月日进行文件夹分开存储的;但是你是否想过同一个文件重复提交的问题呢?针对这样的问题似乎在其他插件上都不行;不是不能做,而是没有这样做!我们这里既然要做那就要做好才行;所以我们需要具有这样的功能,那么怎么唯一标识一个文件呢?最简单的方法莫过于MD5.
4. 针对以上的问题;似乎我们都有思路了;所以现在我们应该知道数据库不是用来存储文件,而是用来存储文件的存储信息,用来标识管理文件。
# CodeTime
好了又到了我们的代码模块了。
##### 改动
先来看看这一次我们做了哪些文件的改动;当然是相对上一版本。

可以看出,共更改了**6**个文件;其中修改:**Web、Upload、Resouce、ResouceApi**;添加:**HashUtils、WebResouceContext**。
##### Model
###### Resource.cs
~~~
using System;
using System.ComponentModel.DataAnnotations;
namespace WebResource.Models
{
/// <summary>
/// 文件存储信息表
/// </summary>
public class Resource
{
/// <summary>
/// Id 用于唯一标识
/// 存储时记录文件MD5
/// 在断点续传下存储文件名称+文件大小的MD5值
/// </summary>
[Key]
public string Id { get; set; }
/// <summary>
/// 文件名称
/// </summary>
[Required]
public string Name { get; set; }
/// <summary>
/// 文件大小
/// </summary>
[Required]
public long Size { get; set; }
/// <summary>
/// 当前存储位置
/// 断点续传下用于判断是否传输完成
/// </summary>
[Required]
public long Cursor { get; set; }
/// <summary>
/// 文件类型
/// </summary>
[Required]
public string Type { get; set; }
/// <summary>
/// 存储文件夹
/// </summary>
[Required]
public string Folder { get; set; }
/// <summary>
/// 点击数
/// </summary>
[Required]
public int Clicks { get; set; }
/// <summary>
/// 存储日期
/// </summary>
[Required]
public DateTime Published { get; set; }
}
}
~~~
这个是在上一个版本基础上进行修改后的数据库表结构;在我看来一个文件的存储信息应该包含上面的信息;当然其中用于断点续传的Cursor属性暂时是虚的,没有投入实际使用;当然这个在后续版本将会详细讲解如何添加断点续传。针对文件的基本信息各位如有更好的方案还请提出来。
###### HashUtils.cs
~~~
using System;
using System.IO;
using System.Security.Cryptography;
namespace WebResource.Models
{
public class HashUtils
{
/// <summary>
/// 获取文件的MD5-格式[大写]
/// </summary>
/// <param name="fileStream">文件FileStream</param>
/// <returns>MD5Hash</returns>
public static string GetMD5Hash(FileStream fileStream)
{
try
{
MD5 md5Provider = new MD5CryptoServiceProvider();
byte[] buffer = md5Provider.ComputeHash(fileStream);
md5Provider.Clear();
return BitConverter.ToString(buffer).Replace("-", "");
}
catch { return null; }
}
/// <summary>
/// 获取字符串的MD5-格式[大写]
/// </summary>
/// <param name="str">字符串</param>
/// <returns>MD5Hash</returns>
public static string GetMD5Hash(string str)
{
try
{
MD5 md5Provider = new MD5CryptoServiceProvider();
byte[] buffer = md5Provider.ComputeHash(System.Text.Encoding.UTF8.GetBytes(str));
md5Provider.Clear();
return BitConverter.ToString(buffer).Replace("-", "");
}
catch { return null; }
}
/// <summary>
/// 计算Byte数组的MD5-格式[大写]
/// </summary>
/// <param name="bytes">byte[]</param>
/// <returns>MD5Hash</returns>
public static string GetMD5Hash(byte[] bytes)
{
try
{
MD5 md5Provider = new MD5CryptoServiceProvider();
byte[] buffer = md5Provider.ComputeHash(bytes);
md5Provider.Clear();
return BitConverter.ToString(buffer).Replace("-", "");
}
catch { return null; }
}
}
}
~~~
顾名思义,这个类就是用来进行计算**MD5**值而准备的;当然实际使用中只会使用第3个方法;前面两个只是一并写出来说不定以后要用上。
###### WebResourceContext.cs
~~~
using System.Data.Entity;
namespace WebResource.Models
{
public class WebResourceContext : DbContext
{
public WebResourceContext() : base("name=WebResourceContext")
{
}
public System.Data.Entity.DbSet<WebResource.Models.Resource> Resources { get; set; }
}
}
~~~
这个类简单明了;用过EF Db的应该一看就懂了;这个类是用来进行数据表查询使用的类;当然使用的是EF。
其中指定了"name=WebResourceContext",这个就是用来对应配置文件中的数据库连接字段的。下面就会讲解。
##### Web.config
~~~
<?xml version="1.0" encoding="utf-8"?>
<configuration>
...
<connectionStrings>
<add name="WebResourceContext" connectionString="Data Source=(localdb)\v11.0; Initial Catalog=WebResourceContext-20141204104407; Integrated Security=True; MultipleActiveResultSets=True; AttachDbFilename=|DataDirectory|WebResourceContext-20141204104407.mdf"
providerName="System.Data.SqlClient" />
</connectionStrings>
...
</configuration>
~~~
在这个文件中,有很多的配置;但是其中简单的来说,就是上面的那一条语句;在这条语句中现在指定的是本地的数据库;你也可以指定一个远程的数据连接。
##### Controllers
###### ResourceApiController.cs
~~~
using System;
using System.Collections.Generic;
using System.Globalization;
using System.IO;
using System.Linq;
using System.Net.Http;
using System.Threading.Tasks;
using System.Web;
using System.Web.Http;
using System.Web.Http.Description;
using WebResource.Models;
namespace WebResource.Controllers
{
[RoutePrefix("Res")]
public class ResourceApiController : ApiController
{
private WebResourceContext db = new WebResourceContext();
private static readonly long MEMORY_SIZE = 64 * 1024 * 1024;
private static readonly string ROOT_PATH = HttpContext.Current.Server.MapPath("~/App_Data/");
/// <summary>
/// Post File
/// </summary>
/// <param name="Id">Md5</param>
/// <returns>Resource</returns>
[HttpPost]
[Route("Upload/{Id?}")]
[ResponseType(typeof(Resource))]
public async Task<IHttpActionResult> Post(string Id = null)
{
List<Resource> resources = new List<Resource>();
// multipart/form-data
var provider = new MultipartMemoryStreamProvider();
await Request.Content.ReadAsMultipartAsync(provider);
foreach (var item in provider.Contents)
{
if (item.Headers.ContentDisposition.FileName != null)
{
//Strem
var ms = item.ReadAsStreamAsync().Result;
using (var br = new BinaryReader(ms))
{
if (ms.Length <= 0)
break;
var data = br.ReadBytes((int)ms.Length);
//Md5
string id = HashUtils.GetMD5Hash(data);
Resource temp = await db.Resources.FindAsync(id);
if (temp == null)
{
//Create
Resource resource = new Resource();
resource.Id = id;
resource.Size = ms.Length;
resource.Cursor = resource.Size;
resource.Published = DateTime.Now;
//Info
FileInfo info = new FileInfo(item.Headers.ContentDisposition.FileName.Replace("\"", ""));
resource.Type = info.Extension.Substring(1).ToLower();
resource.Name = info.Name.Substring(0, info.Name.LastIndexOf("."));
//Relative
resource.Folder = DateTime.Now.ToString("yyyyMM/dd/", DateTimeFormatInfo.InvariantInfo);
//Write
try
{
string dirPath = Path.Combine(ROOT_PATH, resource.Folder);
if (!Directory.Exists(dirPath))
{
Directory.CreateDirectory(dirPath);
}
File.WriteAllBytes(Path.Combine(dirPath, resource.Id), data);
//Save To Datebase
db.Resources.Add(resource);
await db.SaveChangesAsync();
temp = await db.Resources.FindAsync(resource.Id);
}
catch { }
}
if (temp != null)
resources.Add(temp);
}
}
}
if (resources.Count == 0)
return BadRequest();
else if (resources.Count == 1)
return Ok(resources.FirstOrDefault());
else
return Ok(resources);
}
}
}
~~~
这个类才是本次讲解的核心部分。
在这个类中,首先看第一个修改的地方,我把API地址重定向为:[RoutePrefix("Res")],这个是为了方便以后使用,输入**Res**总是要比**Resource**要舒服些的。
另外我删除了**Get()**方法,因为这个版本中主要讲解上传;另外下载的话也将集合数据进行操作;所以在下一个版本将会添加新的**Get()**。
来看看现在的API接口:

现在只有一个接口了。
说说流程:
1. 触发上传接口时;服务端会把上传的文件全部存储到内存中;而后遍历上传的每一个文件。
2. 计算每个文件的MD5,使用MD5去数据库查询是否有该记录;如果有就直接返回数据库中的信息,且不保存该文件。
3. 如果没有,提取文件的基本信息,并添加到类Resource Model中,而后保存文件且保存该文件的信息到数据库。
4. 循环完成返回保存结果。
##### View
###### Upload.cshtml
~~~
@{
ViewBag.Title = "Upload";
}
<h2>Upload</h2>
<div id="body">
<h1>多文件上传模式</h1>
<section class="main-content clear-fix">
<form name="form1" method="post" enctype="multipart/form-data" action="/Res/Upload">
<fieldset>
<legend>File Upload Example</legend>
<div>
<label for="caption">File1</label>
<input name="file1" type="file" />
</div>
<div>
<label for="image1">File2</label>
<input name="file2" type="file" />
</div>
<div>
<input type="submit" value="Submit" />
</div>
</fieldset>
</form>
</section>
</div>
~~~
这个文件中只改动了一个地方,就是 action="/Res/Upload"。
# RunTime
终于到了这里了,说实话写一个这个挺累的。
运行:localhost:60586/Home/Upload

提交后:

数据库

文件


可以看见文件是按照:年月/日/文件MD5 进行存储的。
# END
与往常一样。
##### 资源文件
[[WebApi] 捣鼓一个资源管理器--多文件上传+数据库辅助](http://download.csdn.net/detail/qiujuer/8223605)
##### 下一章
在下一章中将会讲解;怎么在这一章的基础上进行文件的访问。
已发布:[[WebApi] 捣鼓一个资源管理器--数据库辅助服务器文件访问](http://blog.csdn.net/qiujuer/article/details/41744733)
[WebApi] 捣鼓一个资源管理器–多文件上传
最后更新于:2022-04-01 06:57:07
# History
[[WebApi] 捣鼓一个资源管理器--文件下载](http://blog.csdn.net/qiujuer/article/details/41621781)
# In This
既然访问文件接口有了,怎么能少的了文件的上传接口呢!
既然是文件上传接口那就肯定要来一个猛一点的接口--多文件上传

# CodeTime
##### 改动
进入正题前先来看看本次改动的文件有哪些:

可以看见一共有4个文件进行了改动,其中Home与ResourceApi是添加了方法,Model/Resource是新增,View/Upload也是新增。
##### Model部分
为了返回数据简单方便,所以**New** 了一个类 **Resource.cs**
~~~
namespace WebResource.Models
{
public class Resource
{
public string Id { get; set; }
public string Type { get; set; }
}
}
~~~
**If Easy?**
##### ResourceApi 部分
然后来看看咱们的**ResourceApi**类:
~~~
namespace WebResource.Controllers
{
[RoutePrefix("Resource")]
public class ResourceApiController : ApiController
{
private static readonly long MEMORY_SIZE = 64 * 1024 * 1024;
private static readonly string ROOT_PATH = HttpContext.Current.Server.MapPath("~/App_Data/");
[HttpGet]
[Route("{Id}")]
public async Task<HttpResponseMessage> Get(string Id)
{
// 进入时判断当前请求中是否含有 ETag 标识,如果有就返回使用浏览器缓存
// Return 304
var tag = Request.Headers.IfNoneMatch.FirstOrDefault();
if (Request.Headers.IfModifiedSince.HasValue && tag != null && tag.Tag.Length > 0)
return new HttpResponseMessage(HttpStatusCode.NotModified);
// 进行模拟 App_Data/Image/{id}.png
// 打开找到文件
FileInfo info = new FileInfo(Path.Combine(ROOT_PATH, "Image", Id + ".png"));
if (!info.Exists)
return new HttpResponseMessage(HttpStatusCode.BadRequest);
FileStream file = null;
try
{
// 打开文件
file = new FileStream(info.FullName, FileMode.Open, FileAccess.Read, FileShare.Read);
HttpResponseMessage result = new HttpResponseMessage(HttpStatusCode.OK);
// 在浏览器中显示 inline
ContentDispositionHeaderValue disposition = new ContentDispositionHeaderValue("inline");
// 写入文件基本信息
disposition.FileName = file.Name;
disposition.Name = file.Name;
disposition.Size = file.Length;
// 判断是否大于64Md,如果大于就采用分段流返回,否则直接返回
if (file.Length < MEMORY_SIZE)
{
//Copy To Memory And Close.
byte[] bytes = new byte[file.Length];
await file.ReadAsync(bytes, 0, (int)file.Length);
file.Close();
MemoryStream ms = new MemoryStream(bytes);
result.Content = new ByteArrayContent(ms.ToArray());
}
else
{
result.Content = new StreamContent(file);
}
// 写入文件类型,这里是图片png
result.Content.Headers.ContentType = new MediaTypeHeaderValue("image/png");
result.Content.Headers.ContentDisposition = disposition;
// 设置缓存信息,该部分可以没有,该部分主要是用于与开始部分结合以便浏览器使用304缓存
// Set Cache
result.Content.Headers.Expires = new DateTimeOffset(DateTime.Now).AddHours(1);
// 这里应该写入文件的存储日期
result.Content.Headers.LastModified = new DateTimeOffset(DateTime.Now);
result.Headers.CacheControl = new CacheControlHeaderValue() { Public = true, MaxAge = TimeSpan.FromHours(1) };
// 设置Etag,这里就简单采用 Id
result.Headers.ETag = new EntityTagHeaderValue(string.Format("\"{0}\"", Id));
// 返回请求
return result;
}
catch
{
if (file != null)
{
file.Close();
}
}
return new HttpResponseMessage(HttpStatusCode.BadRequest);
}
[HttpPost]
[Route("Upload")]
[ResponseType(typeof(Resource))]
public async Task<IHttpActionResult> Post()
{
List<Resource> resources = new List<Resource>();
// multipart/form-data
// 采用MultipartMemoryStreamProvider
var provider = new MultipartMemoryStreamProvider();
//读取文件数据
await Request.Content.ReadAsMultipartAsync(provider);
foreach (var item in provider.Contents)
{
// 判断是否是文件
if (item.Headers.ContentDisposition.FileName != null)
{
//获取到流
var ms = item.ReadAsStreamAsync().Result;
//进行流操作
using (var br = new BinaryReader(ms))
{
if (ms.Length <= 0)
break;
//读取文件内容到内存中
var data = br.ReadBytes((int)ms.Length);
//Create
//当前时间作为ID
Resource resource = new Resource() { Id = DateTime.Now.ToString("yyyyMMddHHmmssffff", DateTimeFormatInfo.InvariantInfo) };
//Info
FileInfo info = new FileInfo(item.Headers.ContentDisposition.FileName.Replace("\"", ""));
//文件类型
resource.Type = info.Extension.Substring(1).ToLower();
//Write
try
{
//文件存储地址
string dirPath = Path.Combine(ROOT_PATH);
if (!Directory.Exists(dirPath))
{
Directory.CreateDirectory(dirPath);
}
File.WriteAllBytes(Path.Combine(dirPath, resource.Id), data);
resources.Add(resource);
}
catch { }
}
}
}
//返回
if (resources.Count == 0)
return BadRequest();
else if (resources.Count == 1)
return Ok(resources.FirstOrDefault());
else
return Ok(resources);
}
}
}
~~~
与上一章比较看来,只是增加了一个方法 Post ,而后将其重定向为**Resource/Upload **
其中主要干了些什么我都在方法中注明了;应该是足够简单的。
现在运行一下,看看我们的**Api**是怎样的:

下面我们来调用它试试。
##### HomeController部分
修改HomeController 添加一个Upload 方法:
~~~
namespace WebResource.Controllers
{
public class HomeController : Controller
{
public ActionResult Index()
{
ViewBag.Title = "Home Page";
return View();
}
public ActionResult Upload()
{
return View();
}
}
}
~~~
##### Upload.cshtml部分
而后在方法上点击右键添加视图,然后进入**View/Home/Upload.cshtml** 视图中修改为:
~~~
@{
ViewBag.Title = "Upload";
}
<h2>Upload</h2>
<div id="body">
<h1>多文件上传模式</h1>
<section class="main-content clear-fix">
<form name="form1" method="post" enctype="multipart/form-data" action="/Resource/Upload">
<fieldset>
<legend>File Upload Example</legend>
<div>
<label for="caption">File1</label>
<input name="file1" type="file" />
</div>
<div>
<label for="image1">File2</label>
<input name="file2" type="file" />
</div>
<div>
<input type="submit" value="Submit" />
</div>
</fieldset>
</form>
</section>
</div>
~~~
在该视图中,我们建立了一个 **Form** 表单,然后指定为 **Post** 模式;同时指定
**enctype="multipart/form-data" action="/Resource/Upload"**
# RunTime
写完了代码当然是调试运行喽!
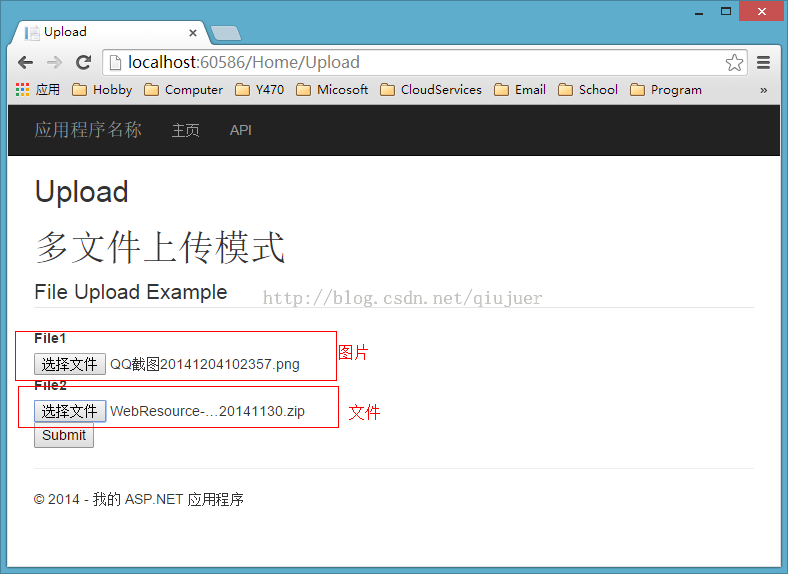
运行 **localhost:60586/Home/Upload**
这里我们添加文件,还是使用上一章中的两种图片吧:

运行后:

当然,这里是因为我的浏览器是谷歌浏览器,所以返回的是 **XML **数据,如果你的事IE浏览器那么应该返回的是**Json** 文件。
**WebApi**会根据请求返回不同的数据。

可以看到,现在 **App_Data**文件夹下,多了两个文件了;不过这两个文件是没有加上文件类型的;你可以手动给他加上个**.png** 然后打开看看是不是那两张图片。
# END
OK,这一章就到此为止了!
##### 资源文件
[第一章资源文件(说好了这章中添加)](http://download.csdn.net/detail/qiujuer/8215741)
[第二章资源文件](http://download.csdn.net/detail/qiujuer/8215787)
##### 下一章
下一章将会把上传与下载查看两个方法相互结合,搭配起来;同时将会结合数据进行辅助存储文件信息。
同时,会讲如何避免文件重复上传的问题。
已更新:[[WebApi] 捣鼓一个资源管理器--多文件上传+数据库辅助](http://blog.csdn.net/qiujuer/article/details/41721165)
[WebApi] 捣鼓一个资源管理器–文件下载
最后更新于:2022-04-01 06:57:05
# In This
访问一个网上的图片资源,我想你应该遇到过这样的情况:
常规情况下:[http://www.qiujuer.net/Statics/Image/Home/HeadPortrait.png](http://www.qiujuer.net/Statics/Image/Home/HeadPortrait.png)
当然还有这样:[http://www.qiujuer.net/Resource/75CDF243C30750D397A90E58D412B22E](http://www.qiujuer.net/Resource/75CDF243C30750D397A90E58D412B22E)


可以看到得到同样的一张图片却能采用不一样的地址,特别是在第二个地址中却没有文件的后缀。
这个奇葩了吧?有感觉到很奇怪的么?
##### 其实很简单
在**第一种情况**中是访问的当前图片存储在网站服务器中的地址。
换言之其在”cdn.duitang.com“网站的服务器中存储的地址应该是文件夹"uploads/item/201403/04”下的“20140304122431_XMCuj.jpeg”文件。
而输入第一张图片中的地址的时候,web服务器将会在其指定文件夹下去搜寻该文件,然后返回图片。
而**第二种情况**中你能说是在”www.qiujuer.net“网站的“Resource”文件夹下的”75CDF243C30750D397A90E58D412B22E“文件么?
有这样的可能,但是在这个情况下不是!
其工作原理是访问当前URL的时候触发的是“Resource”接口,然后传入了ID=”75CDF243C30750D397A90E58D412B22E“。
然后WebApi服务器根据该ID通过一定的方式去寻找图片资源,然后通过资源的方式返回图片;
而其图片究竟是存在哪里你并不知道,有可能是在当前网站目录下的某个文件夹,也可能是其他盘;总之是不固定的。
请问针对第二种情况你能使用爬虫软件去爬该图片么?如果可以;但是我给这个接口加上指定的用户权限呢?
说了这么多,我们来实现一下!
# CodeTime
首先打开VS-新建项目-web应用程序-名称“WebResource”-WebApi

进入项目-删除**ValuesController**
添加一个webapi控制器-**ResourceApiController**

在其中实现Get方法:
~~~
[RoutePrefix("Resource")]
public class ResourceApiController : ApiController
{
private static readonly long MEMORY_SIZE = 64 * 1024 * 1024;
private static readonly string ROOT_PATH = HttpContext.Current.Server.MapPath("~/App_Data/");
[HttpGet]
[Route("{Id}")]
public async Task<HttpResponseMessage> Get(string Id)
{
// 进入时判断当前请求中是否含有 ETag 标识,如果有就返回使用浏览器缓存
// Return 304
var tag = Request.Headers.IfNoneMatch.FirstOrDefault();
if (Request.Headers.IfModifiedSince.HasValue && tag != null && tag.Tag.Length > 0)
return new HttpResponseMessage(HttpStatusCode.NotModified);
// 进行模拟 App_Data/Image/{id}.png
// 打开找到文件
FileInfo info = new FileInfo(Path.Combine(ROOT_PATH, "Image", Id + ".png"));
if (!info.Exists)
return new HttpResponseMessage(HttpStatusCode.BadRequest);
FileStream file = null;
try
{
// 打开文件
file = new FileStream(info.FullName, FileMode.Open, FileAccess.Read, FileShare.Read);
HttpResponseMessage result = new HttpResponseMessage(HttpStatusCode.OK);
// 在浏览器中显示 inline
ContentDispositionHeaderValue disposition = new ContentDispositionHeaderValue("inline");
// 写入文件基本信息
disposition.FileName = file.Name;
disposition.Name = file.Name;
disposition.Size = file.Length;
// 判断是否大于64Md,如果大于就采用分段流返回,否则直接返回
if (file.Length < MEMORY_SIZE)
{
//Copy To Memory And Close.
byte[] bytes = new byte[file.Length];
await file.ReadAsync(bytes, 0, (int)file.Length);
file.Close();
MemoryStream ms = new MemoryStream(bytes);
result.Content = new ByteArrayContent(ms.ToArray());
}
else
{
result.Content = new StreamContent(file);
}
// 写入文件类型,这里是图片png
result.Content.Headers.ContentType = new MediaTypeHeaderValue("image/png");
result.Content.Headers.ContentDisposition = disposition;
// 设置缓存信息,该部分可以没有,该部分主要是用于与开始部分结合以便浏览器使用304缓存
// Set Cache
result.Content.Headers.Expires = new DateTimeOffset(DateTime.Now).AddHours(1);
// 这里应该写入文件的存储日期
result.Content.Headers.LastModified = new DateTimeOffset(DateTime.Now);
result.Headers.CacheControl = new CacheControlHeaderValue() { Public = true, MaxAge = TimeSpan.FromHours(1) };
// 设置Etag,这里就简单采用 Id
result.Headers.ETag = new EntityTagHeaderValue(string.Format("\"{0}\"", Id));
// 返回请求
return result;
}
catch
{
if (file != null)
{
file.Close();
}
}
return new HttpResponseMessage(HttpStatusCode.BadRequest);
}
}
~~~
基本上都进行了注释,如果有不了解的还请评论中写下。
# RunTime
### 准备工作
在运行前我们需要在“**App_Data**”下建立文件夹“**Image**”。然后拷贝两张图片“**001.png**”\"002.png"进去。
### 运行
点击运行-浏览器中输入URL:http://localhost:60586/Resource/001

把ID换成002再次输入:http://localhost:60586/Resource/002

OK,基本的功能我们实现了。
# END Time
### 为什么是“App_Data”文件夹?
在这里有必要说的是“App_Data”在.NET Web 中是受保护的对象。无法直接通过URL访问;不信?
来试试,输入URL:http://localhost:60586/App_Data/Image/002.png

所以说,一般数据库文件是可以放在该文件夹下的;当然现在你可以把图片放在下面,然后通过接口访问。
### 是否太简单了?
的确,在这里第一章只是一个开始;后面会逐渐的进行扩大化。
比如增加:上传、其他非图片文件、以及不是001,002等名称,而是运算一个Id出来、当然还有加上数据的管理等等。
### 代码
这次的代码打包了;但是CSDN死活传不上去,我去啊!不过好在也简单;就一个方法;下一章中一起打包吧。
### 下一章
下一章已经更新,资源文件也在下一章中;
[[WebApi] 捣鼓一个资源管理器--多文件上传](http://blog.csdn.net/qiujuer/article/details/41675299)
前言
最后更新于:2022-04-01 06:57:02
> 原文出处:[Web前端专栏文章](http://blog.csdn.net/column/details/webapi-resource.html)
> 作者:[邱炬](http://blog.csdn.net/qiujuer)
**本系列文章经作者授权在看云整理发布,未经作者允许,请勿转载!**
#WebAPI资源管理器
> 使用 ASP.NET Web API 技术,打造一款服务器资源管理器,并使用 Web 端进行一定的管理。 其中包含:上传下载、多功能访问、自动识别资源、服务器端隐藏资源,数据库管理、以及避免重复上传等技术。