技术扩展阅读
最后更新于:2022-04-02 01:47:38
> # 技术扩展阅读
- 公众号回复关键字【000】获取技术扩展阅读

';
十七节 GRPC PHP客户端
最后更新于:2022-04-02 01:47:35
>[success] # GRPC PHP客户端
- [GRPC 官方文档中文版](http://doc.oschina.net/grpc?t=58008)
- GRPC 是一款语言中立、平台中立、开源的远程过程调用(RPC)系统
- 有了 GRPC, 我们可以一次性的在一个 .proto 文件中定义服务并使用任何支持它的语言去实现客户端和服务器; 可以很容易地用Go创建一个 GRPC 服务端,用 PHP、Go、Python、Ruby 来创建客户端
- PHP没有GRPC的服务端, 本案例的服务端用Go来实现
> ### 客户端下载
- Tip:公众号回复【026】获取源代码
- GRPC Go的服务端
- GRPC PHP的客服端

> ### GRPC PHP客户端
- [安装GRPC 扩展](http://pecl.php.net/package/gRPC)
- 先运行main_go.exe(gRPC Go的服务端), 在运行GRPC PHP的客服端

> ### 相关阅读
- [GRPC的PHP客户端](https://my.oschina.net/laixhe/blog/1476644)
';
代码2
最后更新于:2022-04-02 01:47:33
- 视频转化: https://cloudconvert.com/avi-to-mp4
~~~
import os
import cv2
from cv2 import VideoWriter, VideoWriter_fourcc, imread, resize
from PIL import Image, ImageFont, ImageDraw
# 图片填充的字符
#ascii_char = list("#ABCDEFGHIJKLMNOPQRSTUVWXYZ@$%??__ff--++~~'' ::.. `` ")
ascii_char = list("MNHQ$OC67+>!:-. ")
# 将像素转换为ascii码
def get_char(r, g, b, alpha=256):
if alpha == 0:
return ''
length = len(ascii_char)
gray = int(0.2126 * r + 0.7152 * g + 0.0722 * b)
unit = (256.0 + 1) / length
return ascii_char[int(gray / unit)]
# 将txt转换为图片
def txt2image(file_name):
im = Image.open(file_name).convert('RGB')
# gif拆分后的图像,需要转换,否则报错,由于gif分割后保存的是索引颜色
raw_width = im.width
raw_height = im.height
width = int(raw_width / 6)
height = int(raw_height / 15)
im = im.resize((width, height), Image.NEAREST)
txt = ""
colors = []
for i in range(height):
for j in range(width):
# 获取当前位置的三原色
pixel = im.getpixel((j, i))
# 字符上颜色
#colors.append((pixel[0], pixel[1], pixel[2]))
# 字符上黑色
colors.append((0, 0, 0))
if len(pixel) == 4:
txt += get_char(pixel[0], pixel[1], pixel[2], pixel[3])
else:
txt += get_char(pixel[0], pixel[1], pixel[2])
txt += '\n'
colors.append((255, 255, 255))
im_txt = Image.new("RGB", (raw_width, raw_height), (255, 255, 255))
dr = ImageDraw.Draw(im_txt)
# font = ImageFont.truetype(os.path.join("fonts","汉仪楷体简.ttf"),18)
font = ImageFont.load_default().font
x = y = 0
# 获取字体的宽高
font_w, font_h = font.getsize(txt[1])
font_h *= 1.37 # 调整后更佳
# ImageDraw为每个ascii码进行上色
for i in range(len(txt)):
if txt[i] == '\n':
x += font_h
y = -font_w
dr.text((y, x), txt[i], fill=colors[i])
y += font_w
name = file_name
im_txt.save(name)
# 将视频拆分成图片
def video2txt_jpg(file_name):
vc = cv2.VideoCapture(file_name)
c = 1
if vc.isOpened():
r, frame = vc.read()
if not os.path.exists('Cache'):
os.mkdir('Cache')
os.chdir('Cache')
else:
r = False
while r:
# 生成拆分的图片
cv2.imwrite(str(c) + '.jpg', frame)
# 将图片转换为ascii图
txt2image(str(c) + '.jpg')
r, frame = vc.read()
c += 1
os.chdir('..')
return vc
# 将图片合成视频
def jpg2video(outfile_name, fps):
fourcc = VideoWriter_fourcc(*"MJPG")
images = os.listdir('Cache')
im = Image.open('Cache/' + images[0])
vw = cv2.VideoWriter(outfile_name + '.avi', fourcc, fps, im.size)
os.chdir('Cache')
for image in range(len(images)):
frame = cv2.imread(str(image + 1) + '.jpg')
vw.write(frame)
os.chdir('..')
vw.release()
# 递归删除目录
def remove_dir(path):
if os.path.exists(path):
if os.path.isdir(path):
dirs = os.listdir(path)
for d in dirs:
if os.path.isdir(path + '/' + d):
remove_dir(path + '/' + d)
elif os.path.isfile(path + '/' + d):
os.remove(path + '/' + d)
os.rmdir(path)
return
elif os.path.isfile(path):
os.remove(path)
return
if __name__ == '__main__':
# 输入视频路径
INPUT = r"D:\video\demo2.mp4"
# 将视频拆分成图片, 将图片转像素,
vc = video2txt_jpg(INPUT)
# 将像素图片合成视频
jpg2video(INPUT.split('.')[0], vc.get(cv2.CAP_PROP_FPS))
# 移出拆分出来的图片
remove_dir("Cache")
~~~
';
源代码
最后更新于:2022-04-02 01:47:31
> Python 视频转代码视频
- 代码来源: https://blog.csdn.net/mp624183768/article/details/81161260
```
# -*- coding:utf-8 -*-
#coding:utf-8
import argparse
import os
import cv2
import subprocess
from cv2 import VideoWriter, VideoWriter_fourcc, imread, resize
from PIL import Image, ImageFont, ImageDraw
# 命令行输入参数处理
# aparser = argparse.ArgumentParser()
# aparser.add_argument('file')
# aparser.add_argument('-o','--output')
# aparser.add_argument('-f','--fps',type = float, default = 24)#帧
# aparser.add_argument('-s','--save',type = bool, nargs='?', default = False, const = True)
# 是否保留Cache文件,默认不保存
# 获取参数
# args = parser.parse_args()
# INPUT = args.file
# OUTPUT = args.output
# SAVE = args.save
# FPS = args.fps
# 像素对应ascii码
ascii_char = list("$@B%8&WM#*oahkbdpqwmZO0QLCJUYXzcvunxrjft/\|()1{}[]?-_+~<>i!lI;:oa+>!:+. ")
# ascii_char = list("MNHQ$OC67+>!:-. ")
# ascii_char = list("MNHQ$OC67)oa+>!:+. ")
# 将像素转换为ascii码
def get_char(r, g, b, alpha=256):
if alpha == 0:
return ''
length = len(ascii_char)
gray = int(0.2126 * r + 0.7152 * g + 0.0722 * b)
unit = (256.0 + 1) / length
return ascii_char[int(gray / unit)]
# 将txt转换为图片
def txt2image(file_name):
im = Image.open(file_name).convert('RGB')
# gif拆分后的图像,需要转换,否则报错,由于gif分割后保存的是索引颜色
raw_width = im.width
raw_height = im.height
width = int(raw_width / 6)
height = int(raw_height / 15)
im = im.resize((width, height), Image.NEAREST)
txt = ""
colors = []
for i in range(height):
for j in range(width):
pixel = im.getpixel((j, i))
colors.append((pixel[0], pixel[1], pixel[2]))
if (len(pixel) == 4):
txt += get_char(pixel[0], pixel[1], pixel[2], pixel[3])
else:
txt += get_char(pixel[0], pixel[1], pixel[2])
txt += '\n'
colors.append((255, 255, 255))
im_txt = Image.new("RGB", (raw_width, raw_height), (255, 255, 255))
dr = ImageDraw.Draw(im_txt)
# font = ImageFont.truetype(os.path.join("fonts","汉仪楷体简.ttf"),18)
font = ImageFont.load_default().font
x = y = 0
# 获取字体的宽高
font_w, font_h = font.getsize(txt[1])
font_h *= 1.37 # 调整后更佳
# ImageDraw为每个ascii码进行上色
for i in range(len(txt)):
if (txt[i] == '\n'):
x += font_h
y = -font_w
# self, xy, text, fill = None, font = None, anchor = None,
#*args, ** kwargs
dr.text((y, x), txt[i], fill=colors[i])
#dr.text((y, x), txt[i], font=font, fill=colors[i])
y += font_w
name = file_name
#print(name + ' changed')
im_txt.save(name)
# 将视频拆分成图片
def video2txt_jpg(file_name):
vc = cv2.VideoCapture(file_name)
c = 1
if vc.isOpened():
r, frame = vc.read()
if not os.path.exists('Cache'):
os.mkdir('Cache')
os.chdir('Cache')
else:
r = False
while r:
cv2.imwrite(str(c) + '.jpg', frame)
txt2image(str(c) + '.jpg') # 同时转换为ascii图
r, frame = vc.read()
c += 1
os.chdir('..')
return vc
# 将图片合成视频
def jpg2video(outfile_name, fps):
fourcc = VideoWriter_fourcc(*"MJPG")
images = os.listdir('Cache')
im = Image.open('Cache/' + images[0])
vw = cv2.VideoWriter(outfile_name + '.avi', fourcc, fps, im.size)
os.chdir('Cache')
for image in range(len(images)):
# Image.open(str(image)+'.jpg').convert("RGB").save(str(image)+'.jpg')
frame = cv2.imread(str(image + 1) + '.jpg')
vw.write(frame)
#print(str(image + 1) + '.jpg' + ' finished')
os.chdir('..')
vw.release()
# 递归删除目录
def remove_dir(path):
if os.path.exists(path):
if os.path.isdir(path):
dirs = os.listdir(path)
for d in dirs:
if os.path.isdir(path + '/' + d):
remove_dir(path + '/' + d)
elif os.path.isfile(path + '/' + d):
os.remove(path + '/' + d)
os.rmdir(path)
return
elif os.path.isfile(path):
os.remove(path)
return
# 调用ffmpeg获取mp3音频文件
def video2mp3(file_name):
outfile_name = file_name.split('.')[0] + '.mp3'
subprocess.call('ffmpeg -i ' + file_name + ' -f mp3 ' + outfile_name, shell=True)
# 合成音频和视频文件
def video_add_mp3(file_name, mp3_file):
outfile_name = file_name.split('.')[0] + '-txt.mp4'
subprocess.call('ffmpeg -i ' + file_name + ' -i ' + mp3_file + ' -strict -2 -f mp4 ' + outfile_name, shell=True)
if __name__ == '__main__':
INPUT = r"G:\py\学习python\视频到代码\video39.mp4"
OUTPUT = r"G:\py\学习python\视频到代码\video39_2.mp4"
SAVE = r"G:\py\学习python\视频到代码\\video39_3"
FPS = "24"
vc = video2txt_jpg(INPUT)
FPS = vc.get(cv2.CAP_PROP_FPS) # 获取帧率
print(FPS)
vc.release()
jpg2video(INPUT.split('.')[0], FPS)
print(INPUT, INPUT.split('.')[0] + '.mp3')
video2mp3(INPUT)
video_add_mp3(INPUT.split('.')[0] + '.avi', INPUT.split('.')[0] + '.mp3')
if (not SAVE):
remove_dir("Cache")
os.remove(INPUT.split('.')[0] + '.mp3')
os.remove(INPUT.split('.')[0] + '.avi')
```
';
十六节 Python 视频转代码视频
最后更新于:2022-04-02 01:47:29
[源代码](%E6%BA%90%E4%BB%A3%E7%A0%81.md)
[代码2](%E4%BB%A3%E7%A0%812.md)
';
十四节 图片转ASCII码图
最后更新于:2022-04-02 01:47:26
>[success] # 图片转ASCII码图
* [案例图](http://www.degraeve.com/img2txt.php)
* [手把手教你图片转ASCII码图](https://www.cnblogs.com/jelly7723/p/5657891.html)
* [图片转字符](https://segmentfault.com/a/1190000007692741)


~~~php
= $len) {
$index = $len - 1;
}
return $char[(int)$index];
}
function tosmallim($const = 100, $width, $height, $image)
{
if ($width > $const) {
$times = floor($width / $const);
$smwidth = $const;
$smheight = floor($height / $times);
$im = imagecreatetruecolor($smwidth, $smheight);
imagecopyresampled($im, $image, 0, 0, 0, 0, $smwidth, $smheight, $width, $height);
return [$im, $smwidth, $smheight];
}
return [$image, $width, $height];
}
$imname = 'http://images2015.cnblogs.com/blog/763758/201606/763758-20160612082543871-1901077809.png';
//返回一图像标识符,代表了从给定的文件名取得的图像
$image = ImageCreateFromPng($imname);
//$im = ImageCreateFromJpeg($imname);
$size = getimagesize($imname);
$width = $size[0];
$height = $size[1];
list($image, $width, $height) = tosmallim(100, $width, $height, $image);
$arr = [];
for ($i = 0; $i < $height; $i++) {
for ($j = 0; $j < $width; $j++) {
$rgb = ImageColorat($image, $j, $i);
$r = ($rgb >> 16) & 0xFF;
$g = ($rgb >> 8) & 0xFF;
$b = $rgb & 0xFF;
$arr[] = floor(($r + $g + $b) / 3);
}
}
$num = count(array_unique($arr));
$str = '';
for ($i = 0; $i < $height; $i++) {
for ($j = 0; $j < $width; $j++) {
$rgb = ImageColorat($image, $j, $i);
$r = ($rgb >> 16) & 0xFF;
$g = ($rgb >> 8) & 0xFF;
$b = $rgb & 0xFF;
$str .= tochars($r, $g, $b, $num);
}
$str .= '
'; } echo $str . ''; ~~~
';
'; } echo $str . ''; ~~~
十三节 实战笔记 – MySQL 篇
最后更新于:2022-04-02 01:47:24
>[success] # [实战笔记 - MySQL 篇](https://www.kancloud.cn/xiaohuamao/mysql)
- 一条 SQL 语句的执行流程
- InnoDB 数据读取和写入过程
- 误删表数据如何恢复
- 基本数据结构介绍
- 存储引擎 InnoDB、MyISAM、Memory、NDB、Archive 介绍
- Join 语句还能不能用
- EXPLAIN 分析 SQL 语句
- SQL优化工具SQLAdvisor
- 事务 ACID:原子性、一致性、隔离性、持久性
- 乐观锁和悲观锁
- 视图
- 分区分表
- 高并发高可用方案:MyCat、MySQL-Proxy
- 应用场景
- 代码示例
- MySQL 相关阅读
';
十二节 实战笔记 – Redis 篇
最后更新于:2022-04-02 01:47:22
>[success] # [实战笔记 - Redis 篇](https://www.kancloud.cn/xiaohuamao/source-open-6)
- 数据结构以及应用场景
- 为什么需要缓存
- Redis 和 Memcached 对比分析
- 缓存雪崩、缓存击穿、缓存穿透
- Key 的过期淘汰机制
- 全量模式 RDB 冷备份(内存快照)
- 增量模式 AOF 热备份(文件追加)
- 集群模式: Redis Sentine 和 Redis Cluster
- 为什么会出现类似 MOVED 2602 127.0.0.1:8001 错误
- 集群中如何将两个 Key 存储在同一个 slot 中
- 如何定位大 Key
- 假如 Redis 里面有 1 亿个 key,其中有 10w 个 key 是以某个固定的已知的前缀开头的,如何将它们全部找出来
- 三主三从集群部署过程
- 可视化工具 Redis Desktop Manager
- 代码示例
- Redis 相关阅读
';
十一节 实战笔记 – Kafka 篇
最后更新于:2022-04-02 01:47:20
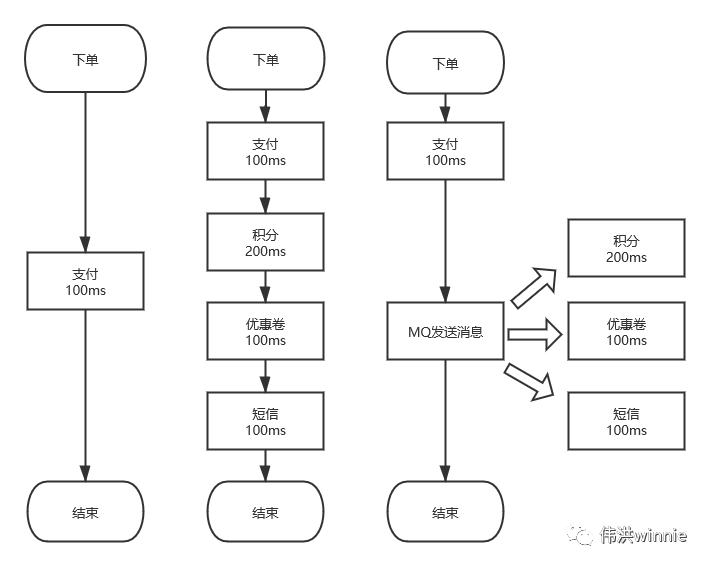
>[success]# 为什么需要消息队列
- 异步 :一个下单流程,你需要扣积分,扣优惠卷,发短信等,有些耗时又不需要立即处理的事,可以丢到队列里异步处理。
- 削峰 :按平常的流量,服务器刚好可以正常负载。偶尔推出一个优惠活动时,请求量极速上升。由于服务器 Redis,MySQL 承受能力不一样,如果请求全部接收,服务器负载不了会导致宕机。加机器嘛,需要去调整配置,活动结束后用不到了,即麻烦又浪费。这时可以将请求放到队列里,按照服务器的能力去消费。
- 解耦 :一个订单流程,需要扣积分,优惠券,发短信等调用多个接口,出现问题时不好排查。像发短信有很多地方需要用到, 如果哪天修改了短信接口参数,用到的地方都得修改。这时可以将要发送的内容放到队列里,起一个服务去消费, 统一发送短信。
>[success] # [实战笔记 - Kafka 篇](https://www.kancloud.cn/xiaohuamao/phpapi)
- 为什么需要消息队列
- ActiveMQ、RabbitMQ、RocketMQ、Kafka、ZeroMQ 对比分析
- Kafka 相关概念
- 分区、副本、消费组
- Zookeeper 上与 Kafka 相关的节点
- 偏移量的最大值,消息的存储策略
- 如何解决重复消费和数据丢失问题
- 如何确保一条消息只被一个服务消费
- 如何让一条消息被多个服务消费
- Kafka 相关命令行操作示例
- Windows 可视化工具 Kafka Tool
- 生产者代码示例
- 消费者代码示例
- Kafka 相关阅读
';
第二章
最后更新于:2022-04-02 01:47:17
[十一节 实战笔记 - Kafka 篇](%E5%8D%81%E4%B8%80%E8%8A%82Kafka%E7%9F%A5%E8%AF%86%E7%82%B9.md)
[十二节 实战笔记 - Redis 篇](%E5%8D%81%E4%BA%8C%E8%8A%82Redis%E7%9F%A5%E8%AF%86%E7%82%B9.md)
[十三节 实战笔记 - MySQL 篇](%E5%8D%81%E4%B8%89%E8%8A%82MySQL%E7%9F%A5%E8%AF%86%E7%82%B9.md)
[十四节 图片转ASCII码图](1.14%E5%9B%BE%E7%89%87%E8%BD%ACASCII%E7%A0%81%E5%9B%BE.md)
[十六节 Python 视频转代码视频](%E5%8D%81%E5%85%AD%E8%8A%82python%E8%A7%86%E9%A2%91%E8%BD%AC%E4%BB%A3%E7%A0%81%E8%A7%86%E9%A2%91.md)
[十七节 GRPC PHP客户端](GRPCPHP%E5%AE%A2%E6%88%B7%E7%AB%AFPHP.md)
';
第十节 PHPExcel 表格导入和导出
最后更新于:2022-04-02 01:47:15
>[success] # PHPExcel导入导出
* PHPExcel 是用来操作Office Excel 文档的一个PHP类库,它基于微软的OpenXML标准和PHP语言。可以使用它来读取、写入不同格式的电子表格,如 Excel (BIFF) .xls, Excel 2007 (OfficeOpenXML) .xlsx, CSV, Libre/OpenOffice Calc .ods, Gnumeric, PDF, HTML等等


> ### 相关阅读
* [PHP操作Excel – PHPExcel 基本用法详解](http://blog.csdn.net/diandian_520/article/details/7827038)
> ### 源码下载
- Tip:公众号回复【027】获取源代码

';
第九节 PHP 跟踪调试代码 XDebug
最后更新于:2022-04-02 01:47:13
>[success] # PHP 跟踪调试代码 XDebug
- [下载XDebug扩展](https://xdebug.org/download.php)
- 下载对应PHP版本的Xdebug

- 线程安全(TS)和非线程安全(NTS)

- 安装Xdebug扩展-php.ini
```
[XDebug]
xdebug.profiler_output_dir="D:\phpStudy\tmp\xdebug"
xdebug.trace_output_dir="D:\phpStudy\tmp\xdebug"
zend_extension="D:\phpStudy\php\php-7.1.7-nts-64\ext\php_xdebug-2.5.3-7.1-vc14-nts-x86_64.dll"
xdebug.idekey=PHPSTORM
xdebug.remote_port=9005
xdebug.remote_enable=on
```
- 配置PHPStorm


- 配置Debug

- 运行Debug

- 调试

- return 处 Step into F7 跳进去
> ### 相关阅读
- [为PHPStorm配置Xdebug调试环境](http://blog.csdn.net/zhyh1986/article/details/45172685)
- [Configure Xdebug Helper for Chrome to be used with PhpStorm](https://confluence.jetbrains.com/display/PhpStorm/Configure+Xdebug+Helper+for+Chrome+to+be+used+with+PhpStorm)
';
第八节 PHP 接口调试工具 SocketLog
最后更新于:2022-04-02 01:47:11
>[success] # PHP 接口调试工具 SocketLog
- demo1下载: 链接:https://pan.baidu.com/s/1ZdCpU4cH7pXxEFib5rRneA 密码:8e0c
> ### 安装Node
- 下载链接: http://nodejs.cn/download/
- 因为服务端是Node.Js写的, 所以要安装Node
> ### 启动SocketLog服务端


> ### 安装扩展插件

> ### 配置SocketLog

> ### 运行程序

';
第七节 百度地图
最后更新于:2022-04-02 01:47:08
>[success] # 百度地图
* 百度地图API是一套为开发者免费提供的基于百度地图的应用程序接口,包括JavaScript、iOS、Andriod、静态地图、Web服务等多种版本,提供基本地图、位置搜索、......
- [百度地图文档](http://lbsyun.baidu.com/)
* [地图API示例](http://lbsyun.baidu.com/jsdemo.htm#a1_2)
* [申请密匙](http://lbsyun.baidu.com/apiconsole/key/create)


> ### 项目源码下载
- Tip:公众号回复【024】获取源代码

';
第六节 ThinkPHP 验证码
最后更新于:2022-04-02 01:47:06
>[success] # ThinkPHP 验证码
* 验证码可以防止机器人的恶意请求(恶意表单提交、破解密码、刷票、论坛灌水......)

>[info] # 源码下载
- Tip:公众号回复【023】获取源代码

>[success] # 原生PHP 实现验证码
* 字体文件下载msjh.ttf 链接:https://pan.baidu.com/s/1jHLpYku 密码:el2k
```php
font = 'msjh.ttf';//注意字体路径要写对,否则显示不了图片
}
//生成验证码
private function createCode()
{
$len = strlen($this->charset) - 1;
for ($i = 0; $i < $this->codelen; $i++) {
$this->code .= $this->charset[mt_rand(0, $len)];
}
}
//生成背景
private function createBg()
{
$this->img = imagecreatetruecolor($this->width, $this->height);
//imagecreatetruecolor — 新建一个真彩色图像
$color = imagecolorallocate($this->img, mt_rand(157, 255), mt_rand(157, 255), mt_rand(157, 255));
//imagecolorallocate — 为一幅图像分配颜色
imagefilledrectangle($this->img, 0, $this->height, $this->width, 0, $color);
}
//生成文字
private function createFont()
{
//每个字符的平均宽度
$x = $this->width / $this->codelen;
for ($i = 0; $i < $this->codelen; $i++) {
//字体的颜色
$this->fontColor = imagecolorallocate($this->img, mt_rand(0, 156), mt_rand(0, 156), mt_rand(0, 156));
imagettftext($this->img, $this->fontSize, mt_rand(-10, 10), $i * $x + mt_rand(1, 3), $this->height / 1.3, $this->fontColor, $this->font, $this->code[$i]);
//imagestring($this->img,5,$i*$x+mt_rand(1,5),5,$this->code[$i],$this->fontColor);
}
}
//生成线条、雪花
private function createDisturb()
{
for ($i = 0; $i < 6; $i++) {
$color = imagecolorallocate($this->img, mt_rand(0, 156), mt_rand(0, 156), mt_rand(0, 156));
imageline($this->img, mt_rand(0, $this->width), mt_rand(0, $this->width), mt_rand(0, $this->width), mt_rand(0, $this->width), $color);
//imageline() 用 color 颜色在图像 image 中从坐标 x1,y1 到 x2,y2(图像左上角为 0, 0)画一条线段。
}
for ($i = 0; $i < 100; $i++) {
$color = imagecolorallocate($this->img, mt_rand(200, 255), mt_rand(200, 255), mt_rand(200, 255));
imagestring($this->img, mt_rand(1, 5), mt_rand(0, $this->width), mt_rand(0, $this->height), '*', $color);
//imagestring — 水平地画一行字符串
}
}
//输出
private function outPut()
{
header("Content-Type:image/png");
imagepng($this->img);
imagedestroy($this->img);
}
//显示验证码
public function showCode()
{
$this->createBg();
echo $this->code;
$this->createCode();
//$_SESSION['code'] = $this->getCode();
$this->createDisturb();
$this->createFont();
$this->outPut();
}
//获取验证码
public function getCode()
{
return strtolower($this->code);
}
}
$code = new VerificationCode();
$code->showCode();
```

';
第五节 UEditor 文本编辑器
最后更新于:2022-04-02 01:47:04
>[success] # UEditor文本编辑器
* UEditor是由百度WEB前端研发部开发的所见即所得的开源富文本编辑器,具有轻量、可定制、用户体验优秀等特点。开源基于BSD协议,所有源代码在协议允许范围内可自由修改和使用
- [官网介绍](http://ueditor.baidu.com/website/)

>[info] # 简单应用
```html
```
>[info] # 相关阅读
* [定制工具栏图标](http://fex.baidu.com/ueditor/#start-toolbar)
* [上传路径配置](http://fex.baidu.com/ueditor/#server-path)
>[info] # 源码下载
- Tip:公众号回复【022】获取源代码

';
第四节 WebUpload 文件上传
最后更新于:2022-04-02 01:47:02
>[success] # WebUpload文件上传
- WebUploader是由Baidu WebFE(FEX)团队开发的一个简单的以HTML5为主,FLASH为辅的现代文件上传组件
- 分片与并发结合(将一个大文件分割成多块,并发上传,提高大文件的上传速度)
- [官网介绍](http://fex.baidu.com/webuploader/)
>[info] # 效果图1

>[info] # 效果图2


>[info] # 源码下载
- Tip:公众号回复【021】获取源代码

';
第三节 ThinkPHP 自定义分页模板
最后更新于:2022-04-02 01:46:59
>[success] # 默认分页模板

>[success] # 自定义分页模板

```php
currentPage() <= 1) {
return $this->getDisabledTextWrapper($str);
}
$url = $this->url(1);
return $this->getPageLinkWrapper($url, $str);
}
//TODO : 上一页
protected function getPreviousButton($text = "«")
{
if ($this->currentPage() <= 1) {
return $this->getDisabledTextWrapper($text);
}
$url = $this->url(
$this->currentPage() - 1
);
return $this->getPageLinkWrapper($url, $text);
}
//TODO : 页码
protected function getLinks()
{
if ($this->total > $this->listRows) {
if ($this->lastPage < $this->bnumber) {
return $this->getUrlLinks($this->getUrlRange(1, $this->lastPage));
} else {
$min = 1;
if ($this->currentPage > $this->bnumber / 2) $min = $this->currentPage - floor($this->bnumber / 2);
if ($this->lastPage - $this->currentPage < $this->bnumber / 2) $min = $this->lastPage - $this->bnumber + 1;
return $this->getUrlLinks($this->getUrlRange($min, $min + $this->bnumber - 1));
}
}
}
//TODO : 下一页
protected function getNextButton($text = '»')
{
if (!$this->hasMore) {
return $this->getDisabledTextWrapper($text);
}
$url = $this->url($this->currentPage() + 1);
return $this->getPageLinkWrapper($url, $text);
}
//TODO : 末页
protected function getlastButton($text = '')
{
if (!$this->hasMore) {
return $this->getDisabledTextWrapper($text);
}
$url = $this->url($this->lastPage());
return $this->getPageLinkWrapper($url, $text);
}
//TODO : 渲染页
public function render()
{
//数据是否足够分页
if ($this->hasPages()) {
return sprintf(
'' . $text . ' ';
}
//TODO : 生成普通按钮
protected function getPageLinkWrapper($url, $page)
{
if ($page == $this->currentPage()) {
return $this->getActivePageWrapper($page);
}
return $this->getAvailablePageWrapper($url, $page);
}
//TODO : 生成当前页按钮
protected function getActivePageWrapper($text)
{
return '' . $text . ' ';
}
//TODO : 可点击按钮
protected function getAvailablePageWrapper($url, $page)
{
return '' . $page . ' ';
}
//TODO : 批量生成页码按钮
protected function getUrlLinks(array $urls)
{
$html = '';
foreach ($urls as $page => $url) {
$html .= $this->getPageLinkWrapper($url, $page);
}
return $html;
}
}
```
* 将 TpPageHelper.php 放在extend\tool下

* 修改默认模板

> ### 项目源码下载
- Tip:公众号回复【025】获取源代码

';
- %s %s %s %s %s
第二节 PHP 实现日历功能
最后更新于:2022-04-02 01:46:57
>[success] # PHP 实现日历功能

~~~php
//show_calendar.php
12) {
$month = 1;
$year++;
} elseif ($month < 0) {
$month = 12;
$year--;
}
$t = strtotime("$year-$month-1");
$last = date('t', strtotime('-1 month', $t));
$start = date('w', $t) ? range($last - date('w', $t) + 1, $last) : range($last - 6, $last);
$days = range(1, date('t', $t));
$end = range(1, 6 * 7 - count($start) - count($days));
$daytable = "";
$w = 1;
for ($i = 0; $i < count($start); $i++) {
if ($w % 7 == 0) {
$daytable .= "$start[$i] ";
} else {
$daytable .= "$start[$i] ";
}
$w++;
}
for ($i = 0; $i < count($days); $i++) {
if ($w % 7 == 0) {
$daytable .= "$days[$i] ";
} else {
$daytable .= "$days[$i] ";
}
$w++;
}
for ($i = 0; $i < count($end); $i++) {
if ($w % 7 == 0) {
$daytable .= "$end[$i] ";
} else {
$daytable .= "$end[$i] ";
}
$w++;
}
$daytable .= "
~~~
';
| 上一月 | 年月份 | 下一月 | ||||
|---|---|---|---|---|---|---|
| 星期日 | 星期一 | 星期二 | 星期三 | 星期四 | 星期五 | 星期六 |
第一节 PHP与Golang 项目案例 – 留言板
最后更新于:2022-04-02 01:46:55
>[success] # PHP与Golang 项目案例 - 留言板
- 简单的增删改查

>[info] # 源码下载
- Tip:公众号回复【020】获取源代码
- 留言板-Html模板源码
- 留言板-原生PHP
- 留言板-PHP-ThinkPHP5
- 留言板-Go-Gin

';