HTML5 Canvas中实现绘制一个像素宽的细线
最后更新于:2022-04-01 16:10:09
正统的HTML5 Canvas中如下代码
~~~
ctx.lineWidth = 1;
ctx.beginPath();
ctx.moveTo(10, 100);
ctx.lineTo(300,100);
ctx.stroke();
~~~
运行结果绘制出来的并不是一个像素宽度的线

感觉怎么好粗啊,跟常常见到的网页版各种绘制线效果很不一样,难道HTML5 Canvas就没想到搞好点嘛其实这个根本原因在于Canvas的绘制不是从中间开始的而是从0~1,不是从0.5~1 + 0~0.5的绘制方式,所以导致fade在边缘,看上去线很宽。
解决方法有两个,一个是错位覆盖法,另外一种是中心平移(0.5,0.5)。实现代码如下:
错位覆盖法我已经包装成一个原始context的函数
~~~
/**
* <p> draw one pixel line </p>
* @param fromX
* @param formY
* @param toX
* @param toY
* @param backgroundColor - default is white
* @param vertical - boolean
*/
CanvasRenderingContext2D.prototype.onePixelLineTo = function(fromX, fromY, toX, toY, backgroundColor, vertical) {
var currentStrokeStyle = this.strokeStyle;
this.beginPath();
this.moveTo(fromX, fromY);
this.lineTo(toX, toY);
this.closePath();
this.lineWidth=2;
this.stroke();
this.beginPath();
if(vertical) {
this.moveTo(fromX+1, fromY);
this.lineTo(toX+1, toY);
} else {
this.moveTo(fromX, fromY+1);
this.lineTo(toX, toY+1);
}
this.closePath();
this.lineWidth=2;
this.strokeStyle=backgroundColor;
this.stroke();
this.strokeStyle = currentStrokeStyle;
};
~~~
中心平移法代码如下:
~~~
ctx.save();
ctx.translate(0.5,0.5);
ctx.lineWidth = 1;
ctx.beginPath();
ctx.moveTo(10, 100);
ctx.lineTo(300,100);
ctx.stroke();
ctx.restore();
~~~
要特别注意确保你的所有坐标点是整数,否则HTML5会自动实现边缘反锯齿
又导致你的一个像素直线看上去变粗了。
运行效果:

现在效果怎么样,这个就是HTML5 Canvas画线的一个小技巧觉得不错请顶一下。
HTML5 Canvas自定义圆角矩形与虚线(Rounded Rectangle and Dash Line)
最后更新于:2022-04-01 16:10:06
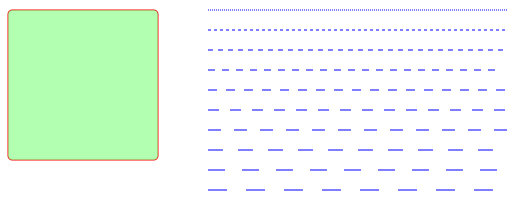
HTML5 Canvas自定义圆角矩形与虚线(RoundedRectangle and Dash Line)实现向HTML Canvas 2d context绘制对象中添加自定义的函数功能演示,如何绘制虚线以及控制虚线间隔大小,学会绘制圆角矩形的技巧。
HTML5 Canvas绘制对象中提供的原生功能没有实现绘制圆角矩形与虚线的功能,但是通过JavaScript语言的Object.prototype可以实现对对象CanvasRenderingContext2D添
加这两个函数功能。代码的演示效果如下:
组件fishcomponent.js的代码如下:
~~~
CanvasRenderingContext2D.prototype.roundRect =
function(x, y, width, height, radius, fill, stroke) {
if (typeof stroke == "undefined") {
stroke = true;
}
if (typeof radius === "undefined") {
radius = 5;
}
this.beginPath();
this.moveTo(x + radius, y);
this.lineTo(x + width - radius, y);
this.quadraticCurveTo(x + width, y, x + width, y + radius);
this.lineTo(x + width, y + height - radius);
this.quadraticCurveTo(x + width, y + height, x + width - radius, y+ height);
this.lineTo(x + radius, y + height);
this.quadraticCurveTo(x, y + height, x, y + height - radius);
this.lineTo(x, y + radius);
this.quadraticCurveTo(x, y, x + radius, y);
this.closePath();
if (stroke) {
this.stroke();
}
if (fill) {
this.fill();
}
};
CanvasRenderingContext2D.prototype.dashedLineTo = function (fromX, fromY, toX, toY, pattern) {
// default interval distance -> 5px
if (typeof pattern === "undefined") {
pattern = 5;
}
// calculate the delta x and delta y
var dx = (toX - fromX);
var dy = (toY - fromY);
var distance = Math.floor(Math.sqrt(dx*dx + dy*dy));
var dashlineInteveral = (pattern <= 0) ? distance : (distance/pattern);
var deltay = (dy/distance) * pattern;
var deltax = (dx/distance) * pattern;
// draw dash line
this.beginPath();
for(var dl=0; dl<dashlineInteveral; dl++) {
if(dl%2) {
this.lineTo(fromX + dl*deltax, fromY + dl*deltay);
} else {
this.moveTo(fromX + dl*deltax, fromY + dl*deltay);
}
}
this.stroke();
};
~~~
HTML中调用演示:
~~~
<!DOCTYPE html>
<html>
<head>
<meta http-equiv="X-UA-Compatible" content="chrome=IE8">
<meta http-equiv="Content-type" content="text/html;charset=UTF-8">
<title>Canvas Rounded Rectangle Demo</title>
<script src="fishcomponent.js"></script>
<link href="default.css" rel="stylesheet" />
<script>
var ctx = null; // global variable 2d context
var imageTexture = null;
window.onload = function() {
var canvas = document.getElementById("text_canvas");
console.log(canvas.parentNode.clientWidth);
canvas.width = canvas.parentNode.clientWidth;
canvas.height = canvas.parentNode.clientHeight;
if (!canvas.getContext) {
console.log("Canvas not supported. Please install a HTML5 compatible browser.");
return;
}
var context = canvas.getContext('2d');
context.strokeStyle="red";
context.fillStyle="RGBA(100,255,100, 0.5)";
context.roundRect(50, 50, 150, 150, 5, true);
context.strokeStyle="blue";
for(var i=0; i<10; i++) {
var delta = i*20;
var pattern = i*2+1;
context.dashedLineTo(250, 50+delta, 550, 50+delta, pattern);
}
}
</script>
</head>
<body>
<h1>HTML5 Canvas Dash-line Demo - By Gloomy Fish</h1>
<pre>Dash line and Rounded Rectangle</pre>
<div id="box_plot">
<canvas id="text_canvas"></canvas>
</div>
</body>
</html>
~~~
**转载请注明**
HTML5 Canvas阴影用法演示
最后更新于:2022-04-01 16:10:04
**HTML5 Canvas阴影用法演示**
HTML5 Canvas中提供了设置阴影的四个属性值分别为:
context.shadowColor = “red” 表示设置阴影颜色为红色
context.shadowOffsetX = 0表示阴影相对TEXT的水平距离,0表示两者水平位置重合
context.shadowOffsetY = 0表示阴影相对TEXT的垂直距离,0表示两者垂直位置重合
context.shadowBlur = 10 阴影模糊效果,值越大模糊越厉害。
一个最简单的带有阴影的矩形代码如下:
context.shadowColor = "RGBA(127,127,127,1)";
context.shadowOffsetX = 3;
context.shadowOffsetY = 3;
context.shadowBlur = 0;
context.fillStyle = "RGBA(0, 0, 0, 0.8)";
context.fillRect(10, hh+10, 200,canvas.height/4-20);
效果如下:

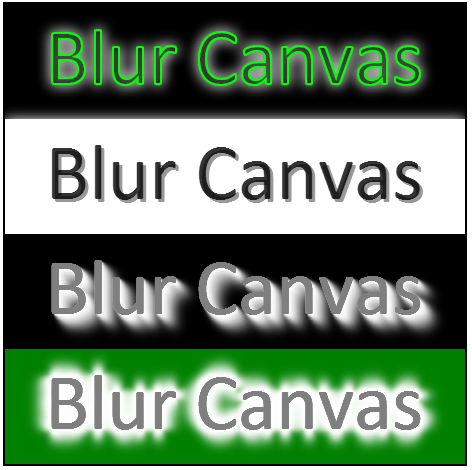
**阴影文字:**
只要设置shadowOffsetX与shadowOffsetY的值,当值都正数时,阴影相对文字的右下方偏移。当值都为负数时,阴影相对文字的左上方偏移。
**3D拉影效果:**
在同一位置不断的重复绘制文字同时改变shadowOffsetX、shadowOffsetY、shadowBlur的值,从小到大不断偏移不断增加,透明度也不断增加。就得到了拉影效果文字。
**边缘模糊效果文字:**
在3D拉影效果的基础上在四个方向重复,就得到了边缘羽化的文字效果。
运行效果:
程序代码:
~~~
<!DOCTYPE html>
<html>
<head>
<meta http-equiv="X-UA-Compatible" content="chrome=IE8">
<meta http-equiv="Content-type" content="text/html;charset=UTF-8">
<title>Canvas Clip Demo</title>
<link href="default.css" rel="stylesheet" />
<script>
var ctx = null; // global variable 2d context
var imageTexture = null;
window.onload = function() {
var canvas = document.getElementById("text_canvas");
console.log(canvas.parentNode.clientWidth);
canvas.width = canvas.parentNode.clientWidth;
canvas.height = canvas.parentNode.clientHeight;
if (!canvas.getContext) {
console.log("Canvas not supported. Please install a HTML5 compatible browser.");
return;
}
var context = canvas.getContext('2d');
// section one - shadow and blur
context.fillStyle="black";
context.fillRect(0, 0, canvas.width, canvas.height/4);
context.font = '60pt Calibri';
context.shadowColor = "white";
context.shadowOffsetX = 0;
context.shadowOffsetY = 0;
context.shadowBlur = 20;
context.fillText("Blur Canvas", 40, 80);
context.strokeStyle = "RGBA(0, 255, 0, 1)";
context.lineWidth = 2;
context.strokeText("Blur Canvas", 40, 80);
// section two - shadow font
var hh = canvas.height/4;
context.fillStyle="white";
context.fillRect(0, hh, canvas.width, canvas.height/4);
context.font = '60pt Calibri';
context.shadowColor = "RGBA(127,127,127,1)";
context.shadowOffsetX = 3;
context.shadowOffsetY = 3;
context.shadowBlur = 0;
context.fillStyle = "RGBA(0, 0, 0, 0.8)";
context.fillText("Blur Canvas", 40, 80+hh);
// section three - down shadow effect
var hh = canvas.height/4 + hh;
context.fillStyle="black";
context.fillRect(0, hh, canvas.width, canvas.height/4);
for(var i = 0; i < 10; i++)
{
context.shadowColor = "RGBA(255, 255, 255," + ((10-i)/10) + ")";
context.shadowOffsetX = i*2;
context.shadowOffsetY = i*2;
context.shadowBlur = i*2;
context.fillStyle = "RGBA(127, 127, 127, 1)";
context.fillText("Blur Canvas", 40, 80+hh);
}
// section four - fade effect
var hh = canvas.height/4 + hh;
context.fillStyle="green";
context.fillRect(0, hh, canvas.width, canvas.height/4);
for(var i = 0; i < 10; i++)
{
context.shadowColor = "RGBA(255, 255, 255," + ((10-i)/10) + ")";
context.shadowOffsetX = 0;
context.shadowOffsetY = -i*2;
context.shadowBlur = i*2;
context.fillStyle = "RGBA(127, 127, 127, 1)";
context.fillText("Blur Canvas", 40, 80+hh);
}
for(var i = 0; i < 10; i++)
{
context.shadowColor = "RGBA(255, 255, 255," + ((10-i)/10) + ")";
context.shadowOffsetX = 0;
context.shadowOffsetY = i*2;
context.shadowBlur = i*2;
context.fillStyle = "RGBA(127, 127, 127, 1)";
context.fillText("Blur Canvas", 40, 80+hh);
}
for(var i = 0; i < 10; i++)
{
context.shadowColor = "RGBA(255, 255, 255," + ((10-i)/10) + ")";
context.shadowOffsetX = i*2;
context.shadowOffsetY = 0;
context.shadowBlur = i*2;
context.fillStyle = "RGBA(127, 127, 127, 1)";
context.fillText("Blur Canvas", 40, 80+hh);
}
for(var i = 0; i < 10; i++)
{
context.shadowColor = "RGBA(255, 255, 255," + ((10-i)/10) + ")";
context.shadowOffsetX = -i*2;
context.shadowOffsetY = 0;
context.shadowBlur = i*2;
context.fillStyle = "RGBA(127, 127, 127, 1)";
context.fillText("Blur Canvas", 40, 80+hh);
}
}
</script>
</head>
<body>
<h1>HTML5 Canvas Clip Demo - By Gloomy Fish</h1>
<pre>Fill And Stroke Clip</pre>
<div id="my_painter">
<canvas id="text_canvas"></canvas>
</div>
</body>
</html>
~~~
**转载请注明**
HTML5 Canvas 填充与描边(Fill And Stroke)
最后更新于:2022-04-01 16:10:02
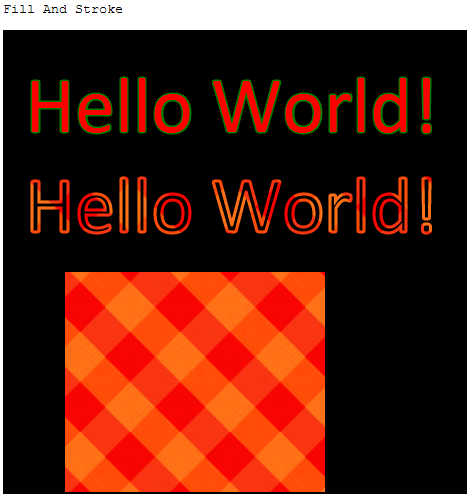
**HTML5 Canvas 填充与描边(Fill And Stroke)**
演示HTML5 Canvas Fill 与Stroke文字效果,基于Canvas如何实现纹理填充与描边。
**一:颜色填充与描边**
颜色填充可以通过fillStyle来实现,描边颜色可以通过strokeStyle来实现。简单示例
如下:
~~~
// fill and stroke text
ctx.font = '60pt Calibri';
ctx.lineWidth = 3;
ctx.strokeStyle = 'green';
ctx.strokeText('Hello World!', 20, 100);
ctx.fillStyle = 'red';
ctx.fillText('Hello World!', 20, 100);
~~~
**二:纹理填充与描边**
HTML5 Canvas还支持纹理填充,通过加载一张纹理图像,然后创建画笔模式,创建纹理模式的API为ctx.createPattern(imageTexture,"repeat");第二参数支持四个值,分别为”repeat-x”, ”repeat-y”, ”repeat”,”no-repeat”意思是纹理分别沿着X轴,Y轴,XY方向沿重复或者不重复。纹理描边与填充的代码如下:
~~~
var woodfill = ctx.createPattern(imageTexture,"repeat");
ctx.strokeStyle = woodfill;
ctx.strokeText('Hello World!', 20, 200);
// fill rectangle
ctx.fillStyle = woodfill;
ctx.fillRect(60, 240, 260, 440);
~~~
纹理图片:
三:运行效果
代码:
~~~
<!DOCTYPE html>
<html>
<head>
<meta http-equiv="X-UA-Compatible" content="chrome=IE8">
<meta http-equiv="Content-type" content="text/html;charset=UTF-8">
<title>Canvas Fill And Stroke Text Demo</title>
<link href="default.css" rel="stylesheet" />
<script>
var ctx = null; // global variable 2d context
var imageTexture = null;
window.onload = function() {
var canvas = document.getElementById("text_canvas");
console.log(canvas.parentNode.clientWidth);
canvas.width = canvas.parentNode.clientWidth;
canvas.height = canvas.parentNode.clientHeight;
if (!canvas.getContext) {
console.log("Canvas not supported. Please install a HTML5 compatible browser.");
return;
}
// get 2D context of canvas and draw rectangel
ctx = canvas.getContext("2d");
ctx.fillStyle="black";
ctx.fillRect(0, 0, canvas.width, canvas.height);
// fill and stroke text
ctx.font = '60pt Calibri';
ctx.lineWidth = 3;
ctx.strokeStyle = 'green';
ctx.strokeText('Hello World!', 20, 100);
ctx.fillStyle = 'red';
ctx.fillText('Hello World!', 20, 100);
// fill and stroke by pattern
imageTexture = document.createElement('img');
imageTexture.src = "../pattern.png";
imageTexture.onload = loaded();
}
function loaded() {
// delay to image loaded
setTimeout(textureFill, 1000/30);
}
function textureFill() {
// var woodfill = ctx.createPattern(imageTexture, "repeat-x");
// var woodfill = ctx.createPattern(imageTexture, "repeat-y");
// var woodfill = ctx.createPattern(imageTexture, "no-repeat");
var woodfill = ctx.createPattern(imageTexture, "repeat");
ctx.strokeStyle = woodfill;
ctx.strokeText('Hello World!', 20, 200);
// fill rectangle
ctx.fillStyle = woodfill;
ctx.fillRect(60, 240, 260, 440);
}
</script>
</head>
<body>
<h1>HTML5 Canvas Text Demo - By Gloomy Fish</h1>
<pre>Fill And Stroke</pre>
<div id="my_painter">
<canvas id="text_canvas"></canvas>
</div>
</body>
</html>
~~~
HTML5 Canvas动画效果演示
最后更新于:2022-04-01 16:09:59
**HTML5 Canvas动画效果演示**
**主要思想:**
首先要准备一张有连续帧的图片,然后利用HTML5 Canvas的draw方法在不同的时间间隔绘制不同的帧,这样看起来就像动画在播放。
**关键技术点:**
JavaScript 函数setTimeout()有两个参数,第一个是参数可以传递一个JavaScript方法,另外一个参数代表间隔时间,单位为毫秒数。代码示例:
setTimeout( update, 1000/30);
Canvas的API-drawImage()方法,需要指定全部9个参数:
ctx.drawImage(myImage, offw, offh, width,height, x2, y2, width, height);
其中offw, offh是指源图像的起始坐标点,width, height表示源图像的宽与高,x2,y2表示源图像在目标Canvas上的起始坐标点。
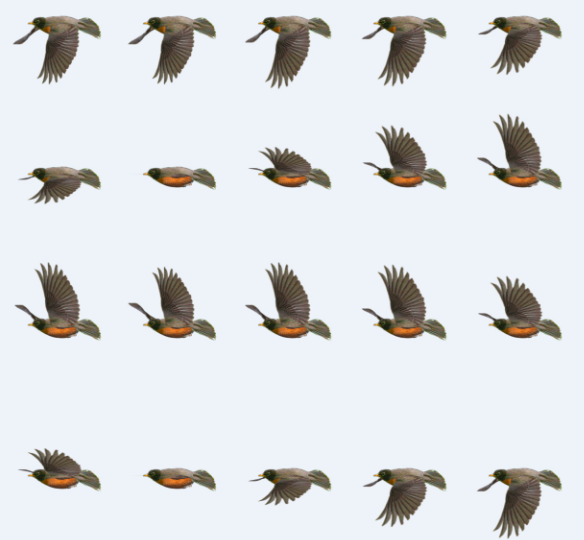
一个22帧的大雁飞行图片实现的效果:
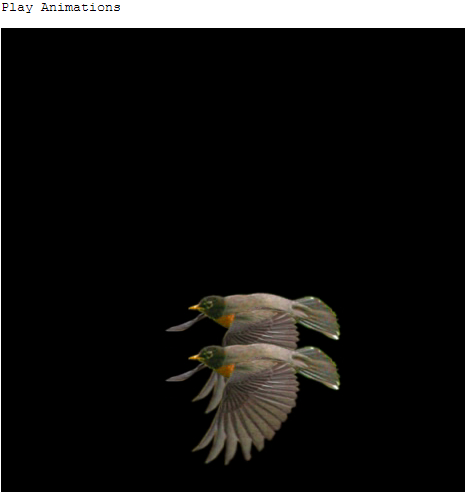
源图像:
程序代码:
~~~
<!DOCTYPE html>
<html>
<head>
<meta http-equiv="X-UA-Compatible" content="chrome=IE8">
<meta http-equiv="Content-type" content="text/html;charset=UTF-8">
<title>Canvas Mouse Event Demo</title>
<link href="default.css" rel="stylesheet" />
<script>
var ctx = null; // global variable 2d context
var started = false;
var mText_canvas = null;
var x = 0, y =0;
var frame = 0; // 22 5*5 + 2
var imageReady = false;
var myImage = null;
var px = 300;
var py = 300;
var x2 = 300;
var y2 = 0;
window.onload = function() {
var canvas = document.getElementById("animation_canvas");
console.log(canvas.parentNode.clientWidth);
canvas.width = canvas.parentNode.clientWidth;
canvas.height = canvas.parentNode.clientHeight;
if (!canvas.getContext) {
console.log("Canvas not supported. Please install a HTML5 compatible browser.");
return;
}
// get 2D context of canvas and draw rectangel
ctx = canvas.getContext("2d");
ctx.fillStyle="black";
ctx.fillRect(0, 0, canvas.width, canvas.height);
myImage = document.createElement('img');
myImage.src = "../robin.png";
myImage.onload = loaded();
}
function loaded() {
imageReady = true;
setTimeout( update, 1000/30);
}
function redraw() {
ctx.clearRect(0, 0, 460, 460)
ctx.fillStyle="black";
ctx.fillRect(0, 0, 460, 460);
// find the index of frames in image
var height = myImage.naturalHeight/5;
var width = myImage.naturalWidth/5;
var row = Math.floor(frame / 5);
var col = frame - row * 5;
var offw = col * width;
var offh = row * height;
// first robin
px = px - 5;
py = py - 5;
if(px < -50) {
px = 300;
}
if(py < -50) {
py = 300;
}
//var rate = (frame+1) /22;
//var rw = Math.floor(rate * width);
//var rh = Math.floor(rate * height);
ctx.drawImage(myImage, offw, offh, width, height, px, py, width, height);
// second robin
x2 = x2 - 5;
y2 = y2 + 5;
if(x2 < -50) {
x2 = 300;
y2 = 0;
}
ctx.drawImage(myImage, offw, offh, width, height, x2, y2, width, height);
}
function update() {
redraw();
frame++;
if (frame >= 22) frame = 0;
setTimeout( update, 1000/30);
}
</script>
</head>
<body>
<h1>HTML Canvas Animations Demo - By Gloomy Fish</h1>
<pre>Play Animations</pre>
<div id="my_painter">
<canvas id="animation_canvas"></canvas>
</div>
</body>
</html>
~~~
发现上传透明PNG格式有点问题,所以我上传
不透明的图片。可以用其它图片替换,替换以后
请修改最大帧数从22到你的实际帧数即可运行。
HTML5 Canvas渐进填充与透明
最后更新于:2022-04-01 16:09:57
详细解释HTML5 Canvas中渐进填充的参数设置与使用,Canvas中透明度的设置与使用,结合渐进填充与透明度支持,实现图像的Mask效果。
**一:渐进填充(Gradient Fill)**
Canvas支持两种渐进填充方式,一种为线性渐进填充(Line Gradient Fill),另外一种称为经向渐变填充(RadialGradient Fill)。其API分别为:
createLinearGradient(x1, y1, x2, y2);
其中x1,y1为第一个点坐标,x2,y2为第二个点坐标。
createRadialGradient(x1, y1, r1, x2, y2, r2);
其中x1, y1为第一个中心点坐标,r1为半径,x2, y2为第二个中心点坐标,r2为半径。
为每个点设置颜色addColorStop(position, color);
其中position表示位置,大小范围[0~1]其中0表示第一个点,1表示第二个点坐标Color表示颜色值,任何CSS的颜色值。
渐进填充对象创建与配置之后可以用来设置context的strokeStyle与fillStyle实现文字,
几何形状的渐进颜色填充。
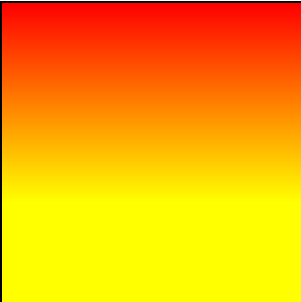
线性渐进方式的代码演示:
1.垂直(Y)方向颜色渐进
~~~
// vertical/Y direction
var lineGradient = ctx.createLinearGradient (50, 0, 50, 200);
lineGradient.addColorStop(0, 'rgba(255, 0, 0, 1)');
lineGradient.addColorStop(1, 'rgba(255, 255, 0, 1)');
ctx.fillStyle = lineGradient;
ctx.fillRect(0, 0, 300, 300);
~~~
2.水平(X)方向颜色渐进
~~~
// horizontal/X direction
var lineGradient = ctx.createLinearGradient (0, 50, 200, 50);
lineGradient.addColorStop(0, 'rgba(255, 0, 0, 1)');
lineGradient.addColorStop(1, 'rgba(255, 255, 0, 1)');
ctx.fillStyle = lineGradient;
ctx.fillRect(0, 0, 300, 300);
~~~

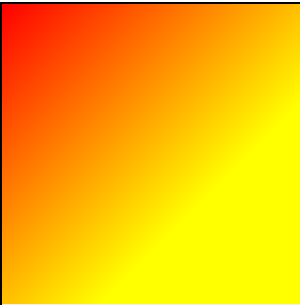
3.垂直与水平同时(XY方向)颜色渐进
~~~
// vertical and horizontal direction
var lineGradient = ctx.createLinearGradient (0, 0, 200, 200);
lineGradient.addColorStop(0, 'rgba(255, 0, 0, 1)');
lineGradient.addColorStop(1, 'rgba(255, 255, 0, 1)');
ctx.fillStyle = lineGradient;
ctx.fillRect(0, 0, 300, 300);
~~~
**二:透明度(Transparent)**
Canvas中透明度支持分为全局与局部透明设置,全局透明度的设置可以通过设置Context.globalAlpha来实现。局部透明度可以通过fillStyle设置颜色值中alpha值通道
来实现。两种方式代码如下:
~~~
// change global alpha value
ctx.globalAlpha=0.5;
ctx.fillRect(50,50,75,50);
// change fill style color's alphachannel
ctx.fillStyle = 'rgba(225,225,225,0.5)';
ctx.fillRect(50,50,75,50);
~~~
两个效果是一样的。
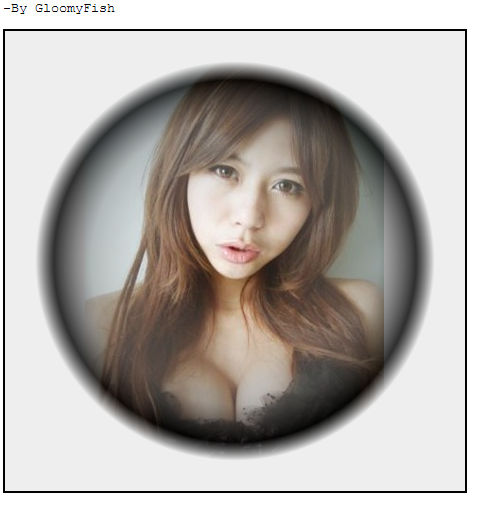
**三:照片透明渐进Mask效果**
使用径向颜色渐变与透明度变化,实现在图像上的半透明面罩效果,脚本运行效果:
~~~
var myImage = document.createElement('img');
myImage.src = "../test.png";
myImage.onload = function() {
ctx.drawImage(myImage, 80, 30, myImage.naturalWidth, myImage.naturalHeight);
var radialGradient = ctx.createRadialGradient (canvas.width/2, canvas.height/2, 10, canvas.width/2, canvas.height/2, 200);
radialGradient.addColorStop(0, 'rgba(247, 247, 247, 0)');
radialGradient.addColorStop(0.7, 'rgba(120, 120, 120, 0.5)');
radialGradient.addColorStop(0.9, 'rgba(0, 0, 0, 0.8)');
radialGradient.addColorStop(1, 'rgba(238, 238, 238, 1)');
ctx.beginPath();
ctx.arc(canvas.width/2, canvas.height/2, 300, 0, Math.PI * 2, true);
ctx.closePath();
ctx.fillStyle = radialGradient;
ctx.fill();
}
~~~
HTML5 Canvas鼠标与键盘事件
最后更新于:2022-04-01 16:09:55
演示HTML5 Canvas鼠标事件,获取Canvas对象上的鼠标坐标,演示键盘事件
通过键盘控制Canvas上对象移动。
Canvas对象支持所有的JavaScript的鼠标事件,包括鼠标点击(MouseClick), 鼠标按下(Mouse Down), 鼠标抬起(Mouse Up),鼠标移动( Mouse Move)对Canvas添加鼠标事件方式有两种,一种方式是通过API来完成:
~~~
// mouse event
canvas.addEventListener("mousedown",doMouseDown,false);
canvas.addEventListener('mousemove', doMouseMove,false);
canvas.addEventListener('mouseup', doMouseUp,false);
~~~
另外一种方式在JavaScript中称为反模式:
~~~
canvas.onmousedown = function(e){
}
canvas.onmouseup = function(e){
}
canvas.onmousemove = function(e){
}
~~~
**获取鼠标在Canvas对象上坐标:**
由于Canvas上鼠标事件中不能直接获取鼠标在Canvas的坐标,所获取的都是基于整个屏幕的坐标。所以通过鼠标事件e.pageX与e.pageY来获取鼠标位置,然后通过Canvas. getBoundingClientRect()来获取Canvas对象相对屏幕的相对位置,通过计算得到鼠标在Canvas的坐标,代码如下:
~~~
function getPointOnCanvas(canvas, x, y) {
var bbox =canvas.getBoundingClientRect();
return{ x: x- bbox.left *(canvas.width / bbox.width),
y:y - bbox.top * (canvas.height / bbox.height)
};
}
~~~
键盘事件:
HTML5 Canvas本身不支持键盘事件监听与获取,常用的有两种方法来解决这个问题:
一:通过windows对象来实现Canvas键盘事件监听与处理
~~~
// key event - use window as object
window.addEventListener('keydown', doKeyDown,true);
~~~
二:通过在Canvas对象上添加其它支持键盘事件的DOM元素实现键盘事件支持
~~~
<canvasid=*"event_canvas"*tabindex=*"0"*></canvas>
// key event - use DOM element asobject
canvas.addEventListener('keydown', doKeyDown,**true**);
canvas.focus();
~~~
其中tabindex为HTML5 DOM元素,支持键盘事件。
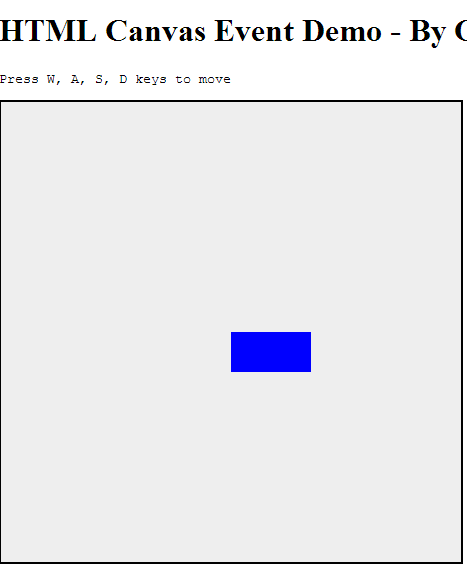
演示,一个可以根据键盘上下左右移动的矩形块:
一个完整的鼠标与键盘事件演示代码如下:
~~~
var tempContext = null; // global variable 2d context
var started = false;
var mText_canvas = null;
var x = 0, y =0;
window.add
window.onload = function() {
var canvas = document.getElementById("event_canvas");
console.log(canvas.parentNode.clientWidth);
canvas.width = canvas.parentNode.clientWidth;
canvas.height = canvas.parentNode.clientHeight;
if (!canvas.getContext) {
console.log("Canvas not supported. Please install a HTML5 compatible browser.");
return;
}
// get 2D context of canvas and draw rectangel
tempContext = canvas.getContext("2d");
tempContext.fillStyle="blue";
x = canvas.width/2;
y = canvas.height/2;
tempContext.fillRect(x, y, 80, 40);
// key event - use DOM element as object
canvas.addEventListener('keydown', doKeyDown, true);
canvas.focus();
// key event - use window as object
window.addEventListener('keydown', doKeyDown, true);
// mouse event
canvas.addEventListener("mousedown", doMouseDown, false);
canvas.addEventListener('mousemove', doMouseMove, false);
canvas.addEventListener('mouseup', doMouseUp, false);
}
function getPointOnCanvas(canvas, x, y) {
var bbox = canvas.getBoundingClientRect();
return { x: x - bbox.left * (canvas.width / bbox.width),
y: y - bbox.top * (canvas.height / bbox.height)
};
}
function doKeyDown(e) {
var keyID = e.keyCode ? e.keyCode :e.which;
if(keyID === 38 || keyID === 87) { // up arrow and W
clearCanvas();
y = y - 10;
tempContext.fillRect(x, y, 80, 40);
e.preventDefault();
}
if(keyID === 39 || keyID === 68) { // right arrow and D
clearCanvas();
x = x + 10;
tempContext.fillRect(x, y, 80, 40);
e.preventDefault();
}
if(keyID === 40 || keyID === 83) { // down arrow and S
clearCanvas();
y = y + 10;
tempContext.fillRect(x, y, 80, 40);
e.preventDefault();
}
if(keyID === 37 || keyID === 65) { // left arrow and A
clearCanvas();
x = x - 10;
tempContext.fillRect(x, y, 80, 40);
e.preventDefault();
}
}
function clearCanvas() {
tempContext.clearRect(0, 0, 500, 500)
}
function doMouseDown(event) {
var x = event.pageX;
var y = event.pageY;
var canvas = event.target;
var loc = getPointOnCanvas(canvas, x, y);
console.log("mouse down at point( x:" + loc.x + ", y:" + loc.y + ")");
tempContext.beginPath();
tempContext.moveTo(loc.x, loc.y);
started = true;
}
function doMouseMove(event) {
var x = event.pageX;
var y = event.pageY;
var canvas = event.target;
var loc = getPointOnCanvas(canvas, x, y);
if (started) {
tempContext.lineTo(loc.x, loc.y);
tempContext.stroke();
}
}
function doMouseUp(event) {
console.log("mouse up now");
if (started) {
doMouseMove(event);
started = false;
}
}
~~~
HTML部分:
~~~
<body>
<h1>HTML Canvas Event Demo - By Gloomy Fish</h1>
<pre>Press W, A, S, D keys to move</pre>
<div id="my_painter">
<canvas id="event_canvas" tabindex="0"></canvas>
</div>
</body>
~~~
**觉得不错请支持一些,谢谢!!**
HTML5 Canvas平移,放缩,旋转演示
最后更新于:2022-04-01 16:09:53
HTML5 Canvas中提供了实现图形平移,旋转,放缩的API。
**平移(translate)**
平移坐标translate(x, y)意思是把(0,0)坐标平移到(x, y),原来的(0,0)坐标则变成(-x, -y)
图示如下:
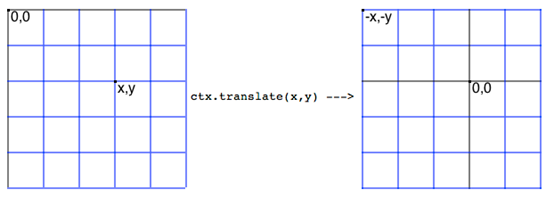
任何原来的坐标点p(ox, oy)在translate之后的坐标点为p(ox-x, oy-y),其中点(x, y)为平移
点坐标translate(x, y)。
代码演示:
~~~
// translate is move the startpoint to centera and back to top left corner
**function**renderText(width, height, context) {
context.translate(width/ 2, height / 2);// 中心点坐标为(0, 0)
context.font="18px Arial";
context.fillStyle="blue";
context.fillText("Please Press <Esc> to Exit Game",5,50);
context.translate(-width/2,-height/2); // 平移恢复(0,0)坐标为左上角
context.fillText("I'm Back to Top",5,50);
}
~~~
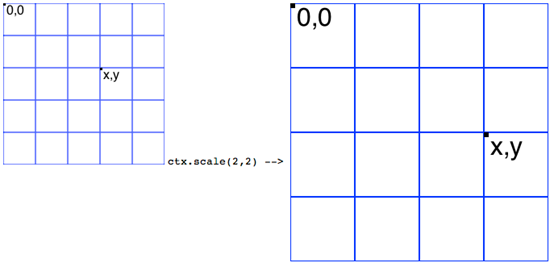
**放缩(Scale)**
Scale(a, b)意思是将对象沿着XY轴分别放缩至a*x, b*y大小。效果如图示:
~~~
// translation the rectangle.
**function**drawPath(context) {
context.translate(200,200);
context.scale(2,2);// Scale twice size of original shape
context.strokeStyle= "green";
context.beginPath();
context.moveTo(0,40);
context.lineTo(80,40);
context.lineTo(40,80);
context.closePath();
context.stroke();
}
~~~
**旋转(rotate)**
旋转角度rotate(Math.PI/8)
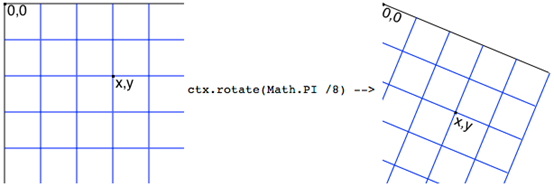
旋转前的坐标p(x, y)在对应的旋转后的坐标P(rx, ry)为
Rx = x * cos(-angle)- y * sin(-angle);
Ry = y * cos(-angle) + x * sin(-angle);
旋转90度可以简化为:
Rx = y;
Ry = -x;
Canvas中旋转默认的方向为顺时针方向。演示代码如下:
~~~
// new point.x = x * cos(-angle) -y * sin(-angle),
// new point.y = y * cos(-angle) +x * sin(-angle)
**function**renderRotateText(context) {
context.font="24px Arial";
context.fillStyle="red";
context.fillText("i'm here!!!",5,50);
// rotate -90 degreee
// context.rotate(-Math.PI/2);
// context.fillStyle="blue";
// context.fillText("i'm here!!!", -400,30);
// rotate 90 degreee
context.rotate(Math.PI/2);
context.fillStyle="blue";
context.fillText("i'm here!!!",350,-420);
console.log(Math.sin(Math.PI/2));
// rotae 90 degree and draw 10 lines
context.fillStyle="green";
**for**(**var**i=0; i<4; i++) {
**var**x = (i+1)*20;
**var**y = (i+1)*60;
**var**newX = y;
**var**newY =-x;
context.fillRect(newX,newY, 200, 6);
}
}
~~~
通常做法是旋转与平移一起使用,先将坐标(0,0)平移到中心位置
translate (width/2, height/2)然后再使用rotate(Math.PI/2)完成旋转
代码示例如下:
~~~
**function**saveAndRestoreContext(context) {
context.save();
context.translate(200,200);
context.rotate(Math.PI/2);
context.fillStyle="black";
context.fillText("2D Context Rotate And Translate", 10, 10);
context.restore();
context.fillText("2D Context Rotate And Translate", 10, 10);
}
~~~
**全部JavaScript代码:**
~~~
var tempContext = null; // global variable 2d context
window.onload = function() {
var canvas = document.getElementById("target");
canvas.width = 450;
canvas.height = 450;
if (!canvas.getContext) {
console.log("Canvas not supported. Please install a HTML5 compatible browser.");
return;
}
// get 2D context of canvas and draw image
tempContext = canvas.getContext("2d");
// renderText(canvas.width, canvas.height, tempContext);
saveAndRestoreContext(tempContext);
// drawPath(tempContext);
}
// translate is move the start point to centera and back to top left corner
function renderText(width, height, context) {
context.translate(width / 2, height / 2);
context.font="18px Arial";
context.fillStyle="blue";
context.fillText("Please Press <Esc> to Exit Game",5,50);
context.translate(-width / 2, -height / 2);
context.fillText("I'm Back to Top",5,50);
}
// translation the rectangle.
function drawPath(context) {
context.translate(200, 200);
context.scale(2,2); // Scale twice size of original shape
context.strokeStyle = "green";
context.beginPath();
context.moveTo(0, 40);
context.lineTo(80, 40);
context.lineTo(40, 80);
context.closePath();
context.stroke();
}
// new point.x = x * cos(-angle) - y * sin(-angle),
// new point.y = y * cos(-angle) + x * sin(-angle)
function renderRotateText(context) {
context.font="24px Arial";
context.fillStyle="red";
context.fillText("i'm here!!!",5,50);
// rotate -90 degreee
// context.rotate(-Math.PI/2);
// context.fillStyle="blue";
// context.fillText("i'm here!!!", -400,30);
// rotate 90 degreee
context.rotate(Math.PI/2);
context.fillStyle="blue";
context.fillText("i'm here!!!", 350,-420);
console.log(Math.sin(Math.PI/2));
// rotae 90 degree and draw 10 lines
context.fillStyle="green";
for(var i=0; i<4; i++) {
var x = (i+1)*20;
var y = (i+1)*60;
var newX = y;
var newY = -x;
context.fillRect(newX, newY, 200, 6);
}
}
function saveAndRestoreContext(context) {
context.save();
context.translate(200,200);
context.rotate(Math.PI/2);
context.fillStyle="black";
context.fillText("2D Context Rotate And Translate", 10, 10);
context.restore();
context.fillText("2D Context Rotate And Translate", 10, 10);
}
~~~
提高HTML5 Canvas性能的技巧
最后更新于:2022-04-01 16:09:50
一:使用缓存技术实现预绘制,减少重复绘制Canvs内容
很多时候我们在Canvas上绘制与更新,总是会保留一些不变的内容,对于这些内容应该预先绘制缓存,而不是每次刷新。
直接绘制代码如下:
~~~
context.font="24px Arial";
context.fillStyle="blue";
context.fillText("Please press <Esc> to exit game",5,50);
requestAnimationFrame(render);
~~~
使用缓存预绘制技术:
~~~
function render(context) {
context.drawImage(mText_canvas, 0, 0);
requestAnimationFrame(render);
}
function drawText(context) {
mText_canvas = document.createElement("canvas");
mText_canvas.width = 450;
mText_canvas.height = 54;
var m_context = mText_canvas.getContext("2d");
m_context.font="24px Arial";
m_context.fillStyle="blue";
m_context.fillText("Please press <Esc> to exit game",5,50);
}
~~~
使用Canvas缓存绘制技术的时候,一定记得缓存Canvas对象大小要小于实际的Canvas大小。尽量把绘制直线点的操作放在一起,而且尽量一次绘制完成,一个不好的代码如下:
~~~
for (var i = 0; i < points.length - 1; i++) {
var p1 = points[i];
var p2 = points[i+1];
context.beginPath();
context.moveTo(p1.x, p1.y);
context.lineTo(p2.x, p2.y);
context.stroke();
}
~~~
**修改以后性能较高的代码如下:**
~~~
context.beginPath();
for (var i = 0; i < points.length - 1; i++) {
var p1 = points[i];
var p2 = points[i+1];
context.moveTo(p1.x, p1.y);
context.lineTo(p2.x, p2.y);
}
context.stroke();
~~~
避免不必要的Canvas绘制状态频繁切换,一个频繁切换绘制style的例子如下:
~~~
var GAP = 10;
for(var i=0; i<10; i++) {
context.fillStyle = (i % 2 ? "blue" : "red");
context.fillRect(0, i * GAP, 400, GAP);
}
~~~
避免频繁切换绘制状态,性能更好的绘制代码如下:
~~~
// even
context.fillStyle = "red";
for (var i = 0; i < 5; i++) {
context.fillRect(0, (i*2) * GAP, 400, GAP);
}
// odd
context.fillStyle = "blue";
for (var i = 0; i < 5; i++) {
context.fillRect(0, (i*2+1) * GAP, 400, GAP);
}
~~~
绘制时,只绘制需要更新的区域,任何时候都要避免不必要的重复绘制与额外开销。
对于复杂的场景绘制使用分层绘制技术,分为前景与背景分别绘制。定义Canvas层的
HTML如下:
~~~
<canvas id="bg" width="640" height="480" style="position: absolute; z-index: 0">
</canvas>
<canvas id="fg" width="640" height="480" style="position: absolute; z-index: 1">
</canvas>
~~~
如果没有必要,要尽量避免使用绘制特效,如阴影,模糊等。
**避免使用浮点数坐标。**
绘制图形时,长度与坐标应选取整数而不是浮点数,原因在于Canvas支持半个像素绘制会根据小数位实现插值算法实现绘制图像的反锯齿效果,如果没有必要请不要选择浮点数值。
**清空Canvas上的绘制内容:**
context.clearRect(0, 0, canvas.width,canvas.height)
但是其实在Canvas还有一种类似hack的清空方法:
canvas.width = canvas.width;
也可以实现清空canvas上内容的效果,但是在某些浏览器上可能不支持。
纯JavaScript实现HTML5 Canvas六种特效滤镜
最后更新于:2022-04-01 16:09:48
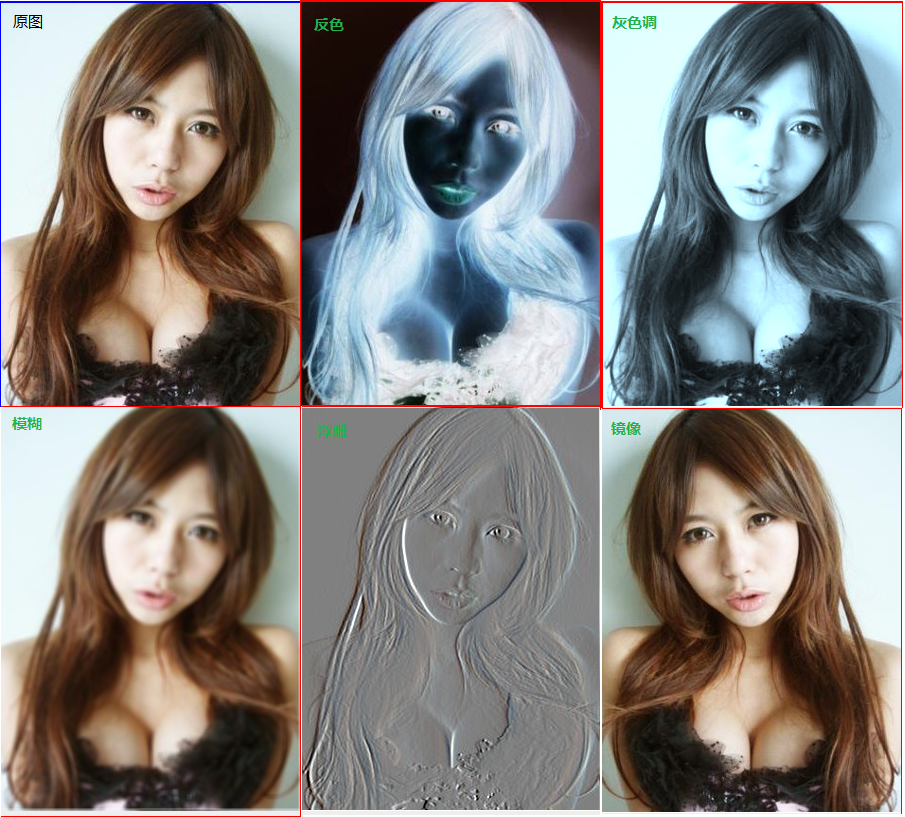
**纯JavaScript实现HTML5 Canvas六种特效滤镜**
小试牛刀,实现了六款简单常见HTML5 Canvas特效滤镜,并且封装成一个纯JavaScript可调用的API文件gloomyfishfilter.js。支持的特效滤镜分别为:
1. 反色
2. 灰色调
3. 模糊
4. 浮雕
5. 雕刻
6. 镜像
**滤镜原理解释:**
1. 反色:获取一个像素点RGB值r, g, b则新的RGB值为(255-r, 255-g, 255-b)
2. 灰色调:获取一个像素点RGB值r, g, b则新的RGB值为
newr = (r * 0.272) + (g * 0.534) + (b * 0.131);
newg = (r * 0.349) + (g * 0.686) + (b * 0.168);
newb = (r * 0.393) + (g * 0.769) + (b * 0.189);
3. 模糊:基于一个5*5的卷积核
4. 浮雕与雕刻:
基于当前像素的前一个像素RGB值与它的后一个像素的RGB值之差再加上128
5. 镜像:模拟了物体在镜子中与之对应的效果。
**杂项准备**
1.如何获取Canvas 2d context对象
~~~
var canvas = document.getElementById("target");
canvas.width = source.clientWidth;
canvas.height = source.clientHeight;
**if**(!canvas.getContext) {
console.log("Canvas not supported. Please install a HTML5compatible browser.");
**return**;
}
// get 2D context of canvas and draw image
tempContext = canvas.getContext("2d");
~~~
2.如何绘制一个DOM img对象到Canvas对象中
~~~
var source = document.getElementById("source");
tempContext.drawImage(source, 0, 0, canvas.width,canvas.height);
~~~
3.如何从Canvas对象中获取像素数据
~~~
var canvas = document.getElementById("target");
var len = canvas.width * canvas.height * 4;
var canvasData = tempContext.getImageData(0, 0, canvas.width, canvas.height);
var binaryData = canvasData.data;
~~~
4.如何对DOM对象实现鼠标Click事件绑定
~~~
function bindButtonEvent(element, type, handler)
{
if(element.addEventListener){
element.addEventListener(type, handler,**false**);
}else{
element.attachEvent('on'+type, handler);// for IE6,7,8
}
}
~~~
5.如何调用实现的gfilter API完成滤镜功能
~~~
<scriptsrc=*"gloomyfishfilter.js"*></script> //导入API文件
gfilter.colorInvertProcess(binaryData, len); //调用 API
~~~
6.浏览器支持:IE, FF, Chrome上测试通过,其中IE上支持通过以下标签实现:
~~~
<meta http-equiv="X-UA-Compatible"*content=*"chrome=IE8">
~~~
**效果演示:**
**应用程序源代码:**
CSS部分:
~~~
#svgContainer {
width:800px;
height:600px;
background-color:#EEEEEE;
}
#sourceDiv { float: left; border: 2px solid blue}
#targetDiv { float: right;border: 2px solid red}
~~~
**filter1.html中HTML源代码:**
~~~
<!DOCTYPE html>
<html>
<head>
<meta http-equiv="X-UA-Compatible" content="chrome=IE8">
<meta http-equiv="Content-type" content="text/html;charset=UTF-8">
<title>Canvas Filter Demo</title>
<link href="default.css" rel="stylesheet" />
<script src="gloomyfishfilter.js"></scrip>
</head>
<body>
<h1>HTML Canvas Image Process - By Gloomy Fish</h1>
<div id="svgContainer">
<div id="sourceDiv">
<img id="source" src="../test.png" />
</div>
<div id="targetDiv">
<canvas id="target"></canvas>
</div>
</div>
<div id="btn-group">
<button type="button" id="invert-button">反色</button>
<button type="button" id="adjust-button">灰色调</button>
<button type="button" id="blur-button">模糊</button>
<button type="button" id="relief-button">浮雕</button>
<button type="button" id="diaoke-button">雕刻</button>
<button type="button" id="mirror-button">镜像</button>
</div>
</body>
</html>
~~~
**filter1.html中JavaScript源代码:**
~~~
var tempContext = null; // global variable 2d context
window.onload = function() {
var source = document.getElementById("source");
var canvas = document.getElementById("target");
canvas.width = source.clientWidth;
canvas.height = source.clientHeight;
if (!canvas.getContext) {
console.log("Canvas not supported. Please install a HTML5 compatible browser.");
return;
}
// get 2D context of canvas and draw image
tempContext = canvas.getContext("2d");
tempContext.drawImage(source, 0, 0, canvas.width, canvas.height);
// initialization actions
var inButton = document.getElementById("invert-button");
var adButton = document.getElementById("adjust-button");
var blurButton = document.getElementById("blur-button");
var reButton = document.getElementById("relief-button");
var dkButton = document.getElementById("diaoke-button");
var mirrorButton = document.getElementById("mirror-button");
// bind mouse click event
bindButtonEvent(inButton, "click", invertColor);
bindButtonEvent(adButton, "click", adjustColor);
bindButtonEvent(blurButton, "click", blurImage);
bindButtonEvent(reButton, "click", fudiaoImage);
bindButtonEvent(dkButton, "click", kediaoImage);
bindButtonEvent(mirrorButton, "click", mirrorImage);
}
function bindButtonEvent(element, type, handler)
{
if(element.addEventListener) {
element.addEventListener(type, handler, false);
} else {
element.attachEvent('on'+type, handler); // for IE6,7,8
}
}
function invertColor() {
var canvas = document.getElementById("target");
var len = canvas.width * canvas.height * 4;
var canvasData = tempContext.getImageData(0, 0, canvas.width, canvas.height);
var binaryData = canvasData.data;
// Processing all the pixels
gfilter.colorInvertProcess(binaryData, len);
// Copying back canvas data to canvas
tempContext.putImageData(canvasData, 0, 0);
}
function adjustColor() {
var canvas = document.getElementById("target");
var len = canvas.width * canvas.height * 4;
var canvasData = tempContext.getImageData(0, 0, canvas.width, canvas.height);
var binaryData = canvasData.data;
// Processing all the pixels
gfilter.colorAdjustProcess(binaryData, len);
// Copying back canvas data to canvas
tempContext.putImageData(canvasData, 0, 0);
}
function blurImage()
{
var canvas = document.getElementById("target");
var len = canvas.width * canvas.height * 4;
var canvasData = tempContext.getImageData(0, 0, canvas.width, canvas.height);
// Processing all the pixels
gfilter.blurProcess(tempContext, canvasData);
// Copying back canvas data to canvas
tempContext.putImageData(canvasData, 0, 0);
}
function fudiaoImage()
{
var canvas = document.getElementById("target");
var len = canvas.width * canvas.height * 4;
var canvasData = tempContext.getImageData(0, 0, canvas.width, canvas.height);
// Processing all the pixels
gfilter.reliefProcess(tempContext, canvasData);
// Copying back canvas data to canvas
tempContext.putImageData(canvasData, 0, 0);
}
function kediaoImage()
{
var canvas = document.getElementById("target");
var len = canvas.width * canvas.height * 4;
var canvasData = tempContext.getImageData(0, 0, canvas.width, canvas.height);
// Processing all the pixels
gfilter.diaokeProcess(tempContext, canvasData);
// Copying back canvas data to canvas
tempContext.putImageData(canvasData, 0, 0);
}
function mirrorImage()
{
var canvas = document.getElementById("target");
var len = canvas.width * canvas.height * 4;
var canvasData = tempContext.getImageData(0, 0, canvas.width, canvas.height);
// Processing all the pixels
gfilter.mirrorProcess(tempContext, canvasData);
// Copying back canvas data to canvas
tempContext.putImageData(canvasData, 0, 0);
}
~~~
**滤镜源代码(gloomyfishfilter.js):**
~~~
var gfilter = {
type: "canvas",
name: "filters",
author: "zhigang",
getInfo: function () {
return this.author + ' ' + this.type + ' ' + this.name;
},
/**
* invert color value of pixel, new pixel = RGB(255-r, 255-g, 255 - b)
*
* @param binaryData - canvas's imagedata.data
* @param l - length of data (width * height of image data)
*/
colorInvertProcess: function(binaryData, l) {
for (var i = 0; i < l; i += 4) {
var r = binaryData[i];
var g = binaryData[i + 1];
var b = binaryData[i + 2];
binaryData[i] = 255-r;
binaryData[i + 1] = 255-g;
binaryData[i + 2] = 255-b;
}
},
/**
* adjust color values and make it more darker and gray...
*
* @param binaryData
* @param l
*/
colorAdjustProcess: function(binaryData, l) {
for (var i = 0; i < l; i += 4) {
var r = binaryData[i];
var g = binaryData[i + 1];
var b = binaryData[i + 2];
binaryData[i] = (r * 0.272) + (g * 0.534) + (b * 0.131);
binaryData[i + 1] = (r * 0.349) + (g * 0.686) + (b * 0.168);
binaryData[i + 2] = (r * 0.393) + (g * 0.769) + (b * 0.189);
}
},
/**
* deep clone image data of canvas
*
* @param context
* @param src
* @returns
*/
copyImageData: function(context, src)
{
var dst = context.createImageData(src.width, src.height);
dst.data.set(src.data);
return dst;
},
/**
* convolution - keneral size 5*5 - blur effect filter(模糊效果)
*
* @param context
* @param canvasData
*/
blurProcess: function(context, canvasData) {
console.log("Canvas Filter - blur process");
var tempCanvasData = this.copyImageData(context, canvasData);
var sumred = 0.0, sumgreen = 0.0, sumblue = 0.0;
for ( var x = 0; x < tempCanvasData.width; x++) {
for ( var y = 0; y < tempCanvasData.height; y++) {
// Index of the pixel in the array
var idx = (x + y * tempCanvasData.width) * 4;
for(var subCol=-2; subCol<=2; subCol++) {
var colOff = subCol + x;
if(colOff <0 || colOff >= tempCanvasData.width) {
colOff = 0;
}
for(var subRow=-2; subRow<=2; subRow++) {
var rowOff = subRow + y;
if(rowOff < 0 || rowOff >= tempCanvasData.height) {
rowOff = 0;
}
var idx2 = (colOff + rowOff * tempCanvasData.width) * 4;
var r = tempCanvasData.data[idx2 + 0];
var g = tempCanvasData.data[idx2 + 1];
var b = tempCanvasData.data[idx2 + 2];
sumred += r;
sumgreen += g;
sumblue += b;
}
}
// calculate new RGB value
var nr = (sumred / 25.0);
var ng = (sumgreen / 25.0);
var nb = (sumblue / 25.0);
// clear previous for next pixel point
sumred = 0.0;
sumgreen = 0.0;
sumblue = 0.0;
// assign new pixel value
canvasData.data[idx + 0] = nr; // Red channel
canvasData.data[idx + 1] = ng; // Green channel
canvasData.data[idx + 2] = nb; // Blue channel
canvasData.data[idx + 3] = 255; // Alpha channel
}
}
},
/**
* after pixel value - before pixel value + 128
* 浮雕效果
*/
reliefProcess: function(context, canvasData) {
console.log("Canvas Filter - relief process");
var tempCanvasData = this.copyImageData(context, canvasData);
for ( var x = 1; x < tempCanvasData.width-1; x++)
{
for ( var y = 1; y < tempCanvasData.height-1; y++)
{
// Index of the pixel in the array
var idx = (x + y * tempCanvasData.width) * 4;
var bidx = ((x-1) + y * tempCanvasData.width) * 4;
var aidx = ((x+1) + y * tempCanvasData.width) * 4;
// calculate new RGB value
var nr = tempCanvasData.data[aidx + 0] - tempCanvasData.data[bidx + 0] + 128;
var ng = tempCanvasData.data[aidx + 1] - tempCanvasData.data[bidx + 1] + 128;
var nb = tempCanvasData.data[aidx + 2] - tempCanvasData.data[bidx + 2] + 128;
nr = (nr < 0) ? 0 : ((nr >255) ? 255 : nr);
ng = (ng < 0) ? 0 : ((ng >255) ? 255 : ng);
nb = (nb < 0) ? 0 : ((nb >255) ? 255 : nb);
// assign new pixel value
canvasData.data[idx + 0] = nr; // Red channel
canvasData.data[idx + 1] = ng; // Green channel
canvasData.data[idx + 2] = nb; // Blue channel
canvasData.data[idx + 3] = 255; // Alpha channel
}
}
},
/**
* before pixel value - after pixel value + 128
* 雕刻效果
*
* @param canvasData
*/
diaokeProcess: function(context, canvasData) {
console.log("Canvas Filter - process");
var tempCanvasData = this.copyImageData(context, canvasData);
for ( var x = 1; x < tempCanvasData.width-1; x++)
{
for ( var y = 1; y < tempCanvasData.height-1; y++)
{
// Index of the pixel in the array
var idx = (x + y * tempCanvasData.width) * 4;
var bidx = ((x-1) + y * tempCanvasData.width) * 4;
var aidx = ((x+1) + y * tempCanvasData.width) * 4;
// calculate new RGB value
var nr = tempCanvasData.data[bidx + 0] - tempCanvasData.data[aidx + 0] + 128;
var ng = tempCanvasData.data[bidx + 1] - tempCanvasData.data[aidx + 1] + 128;
var nb = tempCanvasData.data[bidx + 2] - tempCanvasData.data[aidx + 2] + 128;
nr = (nr < 0) ? 0 : ((nr >255) ? 255 : nr);
ng = (ng < 0) ? 0 : ((ng >255) ? 255 : ng);
nb = (nb < 0) ? 0 : ((nb >255) ? 255 : nb);
// assign new pixel value
canvasData.data[idx + 0] = nr; // Red channel
canvasData.data[idx + 1] = ng; // Green channel
canvasData.data[idx + 2] = nb; // Blue channel
canvasData.data[idx + 3] = 255; // Alpha channel
}
}
},
/**
* mirror reflect
*
* @param context
* @param canvasData
*/
mirrorProcess : function(context, canvasData) {
console.log("Canvas Filter - process");
var tempCanvasData = this.copyImageData(context, canvasData);
for ( var x = 0; x < tempCanvasData.width; x++) // column
{
for ( var y = 0; y < tempCanvasData.height; y++) // row
{
// Index of the pixel in the array
var idx = (x + y * tempCanvasData.width) * 4;
var midx = (((tempCanvasData.width -1) - x) + y * tempCanvasData.width) * 4;
// assign new pixel value
canvasData.data[midx + 0] = tempCanvasData.data[idx + 0]; // Red channel
canvasData.data[midx + 1] = tempCanvasData.data[idx + 1]; ; // Green channel
canvasData.data[midx + 2] = tempCanvasData.data[idx + 2]; ; // Blue channel
canvasData.data[midx + 3] = 255; // Alpha channel
}
}
},
};
~~~
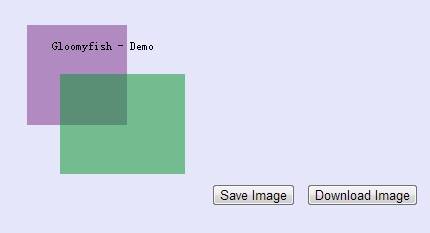
将HTML5 Canvas的内容保存为图片
最后更新于:2022-04-01 16:09:46
主要思想是借助Canvas自己的API - toDataURL()来实现,整个实现HTML + JavaScript的代码很简单。
~~~
<html>
<meta http-equiv="X-UA-Compatible" content="chrome=1">
<head>
<script>
window.onload = function() {
draw();
var saveButton = document.getElementById("saveImageBtn");
bindButtonEvent(saveButton, "click", saveImageInfo);
var dlButton = document.getElementById("downloadImageBtn");
bindButtonEvent(dlButton, "click", saveAsLocalImage);
};
function draw(){
var canvas = document.getElementById("thecanvas");
var ctx = canvas.getContext("2d");
ctx.fillStyle = "rgba(125, 46, 138, 0.5)";
ctx.fillRect(25,25,100,100);
ctx.fillStyle = "rgba( 0, 146, 38, 0.5)";
ctx.fillRect(58, 74, 125, 100);
ctx.fillStyle = "rgba( 0, 0, 0, 1)"; // black color
ctx.fillText("Gloomyfish - Demo", 50, 50);
}
function bindButtonEvent(element, type, handler)
{
if(element.addEventListener) {
element.addEventListener(type, handler, false);
} else {
element.attachEvent('on'+type, handler);
}
}
function saveImageInfo ()
{
var mycanvas = document.getElementById("thecanvas");
var image = mycanvas.toDataURL("image/png");
var w=window.open('about:blank','image from canvas');
w.document.write("<img src='"+image+"' alt='from canvas'/>");
}
function saveAsLocalImage () {
var myCanvas = document.getElementById("thecanvas");
// here is the most important part because if you dont replace you will get a DOM 18 exception.
// var image = myCanvas.toDataURL("image/png").replace("image/png", "image/octet-stream;Content-Disposition: attachment;filename=foobar.png");
var image = myCanvas.toDataURL("image/png").replace("image/png", "image/octet-stream");
window.location.href=image; // it will save locally
}
</script>
</head>
<body bgcolor="#E6E6FA">
<div>
<canvas width=200 height=200 id="thecanvas"></canvas>
<button id="saveImageBtn">Save Image</button>
<button id="downloadImageBtn">Download Image</button>
</div>
</body>
</html>
~~~
**运行效果如下:**
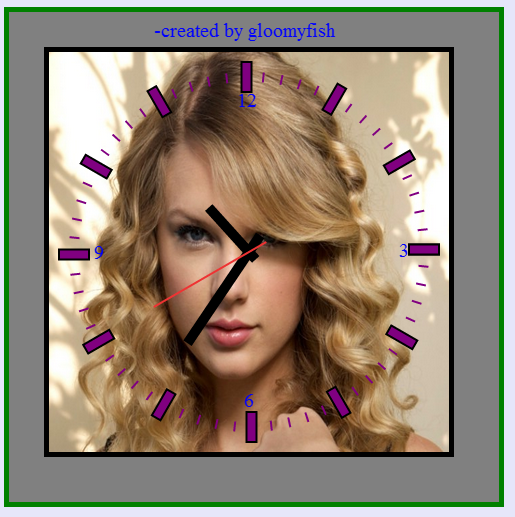
HTML5 组件Canvas实现电子钟
最后更新于:2022-04-01 16:09:44
**基本思路:**
首先绘制一个矩形背景,设置颜色为灰色。在背景上绘制一个简单的矩形外边框,然后再绘制一个内边框,接着加载选定的图像做为电子钟内部的背景图片。然后开始绘制时钟刻度,绘制分钟刻度,最后获取当前系统时间,绘制时分秒三个手柄。
**技术要点:**
使用HTML5的Canvas 2D绘制对象,主要使用context.save()与context.restore()方法来保存绘制状态和重置绘制状态,使用Transform和fillRect()方法来绘制时钟和分钟刻度。使用drawImage()方法来绘制背景图片,使用setTimeout()方法来刷新时间显示。
**代码详解:**
**获取HTML5 Canvas绘制对象的代码如下:**
**
~~~
var canvas = document.getElementById("canvas1");
ctx = canvas.getContext("2d");
ctx.clearRect(0, 0, 500, 500);
~~~
**绘制时钟刻度的代码如下:**
~~~
var sin = Math.sin(Math.PI/6);
var cos = Math.cos(Math.PI/6);
ctx.translate(245, 245);
for (var i=0; i <= 12; i++) {
// top
ctx.fillRect(160,-7.5,30,10);
ctx.strokeRect(160,-7.5,30,10);
ctx.transform(cos, sin, -sin, cos, 0, 0);
}
~~~
**绘制分钟分钟刻度的代码如下:**
~~~
var sin = Math.sin(Math.PI/30);
var cos = Math.cos(Math.PI/30);
for (var i=0; i <= 60; i++) {
ctx.fillRect(170,-5,10,2);
ctx.transform(cos, sin, -sin, cos, 0, 0);
}
~~~
**保存制状态代码如下:**
~~~
ctx.translate(245, 245);
ctx.save();
~~~
**恢复绘制状态代码如下:**
~~~
ctx.restore();
~~~
**运行效果如下:**
**程序完全源代码如下:**
~~~
<html>
<head>
<script>
window.onload = function() {
clockHand();
};
function clockHand() {
var canvas = document.getElementById("canvas1");
ctx = canvas.getContext("2d");
ctx.clearRect(0, 0, 500, 500);
// create background rectangle
// ctx.lineWidth = 10;
ctx.fillStyle = "gray";
ctx.fillRect(0,0,500,500);
// draw frame
ctx.lineWidth = 10;
ctx.strokeStyle = "green";
ctx.strokeRect(0,0,500,500);
// draw author infomation
ctx.fillStyle = "blue";
ctx.font = "20px Times New Roman";
ctx.fillText("-created by gloomyfish", 150, 30);
// draw inner rectangle
ctx.lineWidth = 10;
ctx.strokeStyle = "black";
ctx.strokeRect(45,45,400,400);
// create background image
var img=new Image();
img.src="background.png";
img.onload = function() {
ctx.drawImage(img,45,45,400,400);
ctx.save();
// draw marker unit
ctx.lineWidth = 2;
ctx.fillStyle = "purple";
ctx.strokeStyle = "black";
var sin = Math.sin(Math.PI/6);
var cos = Math.cos(Math.PI/6);
ctx.translate(245, 245);
for (var i=0; i <= 12; i++) {
// top
ctx.fillRect(160,-7.5,30,10);
ctx.strokeRect(160,-7.5,30,10);
ctx.transform(cos, sin, -sin, cos, 0, 0);
}
// transform back center point
// ctx.translate(245, 245);
var sin = Math.sin(Math.PI/30);
var cos = Math.cos(Math.PI/30);
for (var i=0; i <= 60; i++) {
ctx.fillRect(170,-5,10,2);
ctx.transform(cos, sin, -sin, cos, 0, 0);
}
ctx.restore();
// top
ctx.fillText("12", 233,100);
// bottom
ctx.fillText("6", 240,400);
// left
ctx.fillText("9", 90,252);
// right
ctx.fillText("3", 395,250);
// get time
ctx.save();
ctx.translate(245, 245);
ctx.save();
// dynamic show time
var now=new Date();
var hrs=now.getHours();
var min=now.getMinutes();
var sec=now.getSeconds();
//Draw hour hand
ctx.rotate(Math.PI/6*(hrs+(min/60)+(sec/3600)));
ctx.beginPath();
ctx.moveTo(0,10);
ctx.lineTo(0,-60);
ctx.stroke();
ctx.restore();
ctx.save();
//Draw minute hand
ctx.rotate(Math.PI/30*(min+(sec/60)));
ctx.beginPath();
ctx.moveTo(0,20);
ctx.lineTo(0,-110);
ctx.stroke();
ctx.restore();
ctx.save();
//Draw second hand
ctx.rotate(Math.PI/30*sec);
ctx.strokeStyle="#E33";
ctx.lineWidth = 2;
ctx.beginPath();
ctx.moveTo(0,20);
ctx.lineTo(0,-110);
ctx.stroke();
ctx.restore();
// finally store to originall point
ctx.restore();
setTimeout(clockHand,1000);
};
}
</script>
</head>
<body bgcolor="#E6E6FA">
<canvas id="canvas1" width="500" height="500">electronic clock</canvas>
</body>
</html>
~~~
**不足之处:**
每次都刷新加载image对象不怎么好,我是在google浏览器中测试的,建议在google浏览器中运行上面代码。
HTML5 Canvas组件绘制太极图案
最后更新于:2022-04-01 16:09:41
**一实现思路:**
实现原理主要是利用HTML5的Canvas组件提供的path函数功能来绘制圆,首先绘制两个半圆,分别为黑色和白色,组成一个圆,绘制完成以后再分别绘制一个黑色和白色的圆在绘制好的黑白圆之内,半径恰好是黑白大圆一半。 最后在绘制好的两个黑白小圆内分别填充白色和黑色的点,半径大小为10pixel左右。
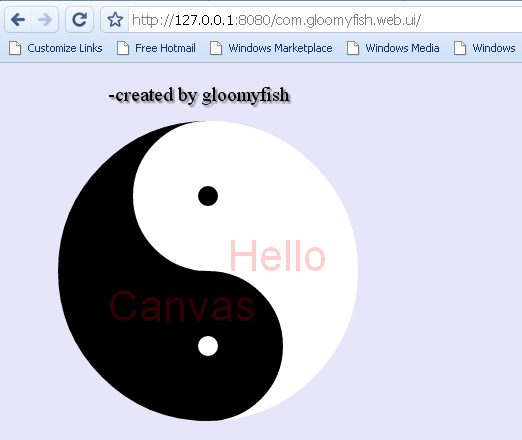
**二程序效果如下:**
**三关键程序解析:**
绘制半圆的程序,其中200,200表示开始绘制圆心点坐标,第三个参数150表示绘制圆的半径第四个参数表示开始角度,第五个参数表示结束角度,最后一个参数表示是否为顺时针或者逆时针绘制白色半圆的代码如下:
~~~
ctx.fillStyle="#fff";
ctx.beginPath();
ctx.arc(200, 200, 150, 1.5*Math.PI, Math.PI/2, false);
ctx.closePath();
ctx.fill();
~~~
绘制黑色半圆的代码如下:
~~~
ctx.fillStyle="#000";
ctx.beginPath();
ctx.arc(200, 200, 150, Math.PI/2, 1.5*Math.PI, false);
ctx.closePath();
ctx.fill();
~~~
在太极图案中添加文字的代码使用了透明处理,Canvas全局透明度设置函数
如下:
~~~
// set transparency value
ctx.globalAlpha = 0.2;
~~~
绘制文字的代码如下:
~~~
// Draw semi transparent text
ctx.fillStyle = "#f00";
ctx.font = "32pt Arial";
ctx.fillText("Hello", 220, 200);
ctx.fillText("Canvas", 100, 250);
~~~
程序完全JavaScript代码如下:
~~~
window.onload = function() {
var cvs = document.getElementById("canvas-path");
ctx = cvs.getContext("2d");
// Create circle, radius = 150
// start point(x, y), radius, start angle, end angle, boolean antiClockWise
ctx.fillStyle="#fff";
ctx.beginPath();
ctx.arc(200, 200, 150, 1.5*Math.PI, Math.PI/2, false);
ctx.closePath();
ctx.fill();
ctx.fillStyle="#000";
ctx.beginPath();
ctx.arc(200, 200, 150, Math.PI/2, 1.5*Math.PI, false);
ctx.closePath();
ctx.fill();
// draw sub circle
// start point(x, y), radius, start angle, end angle, boolean antiClockWise
ctx.fillStyle="#000";
ctx.beginPath();
ctx.arc(200, 275, 75, 0, Math.PI*2, false);
ctx.closePath();
ctx.fill();
ctx.fillStyle="#fff";
ctx.beginPath();
ctx.arc(200, 125, 75, 0, Math.PI*2, false);
ctx.closePath();
ctx.fill();
// fill black and white point
ctx.fillStyle="#fff";
ctx.beginPath();
ctx.arc(200, 275, 10, 0, Math.PI*2, false);
ctx.closePath();
ctx.fill();
ctx.fillStyle="#000";
ctx.beginPath();
ctx.arc(200, 125, 10, 0, Math.PI*2, false);
ctx.closePath();
ctx.fill();
// set transparency value
ctx.globalAlpha = 0.2;
// Draw semi transparent text
ctx.fillStyle = "#f00";
ctx.font = "32pt Arial";
ctx.fillText("Hello", 220, 200);
ctx.fillText("Canvas", 100, 250);
ctx.globalAlpha = 1.0;
ctx.shadowOffsetX = 2;
ctx.shadowOffsetY = 2;
ctx.shadowBlur = 2;
ctx.shadowColor = "rgba(0, 0, 0, 0.5)";
ctx.fillStyle = "#000";
ctx.font = "20px Times New Roman";
ctx.fillText("-created by gloomyfish", 100, 30);
};
~~~
我为什么要在插图上加上我的名字,因为发现文章被转载的时候居然没有被标出来!
HTML5 组件Canvas实现图像灰度化
最后更新于:2022-04-01 16:09:39
HTML5发布已经有很长一段时间了,一直以来从来没有仔细的看过,过年刚来随便看看发现HTML5中的Canvas组件功能是如此的强大,不怪很多牛人预言Flash已死,死不死不是我要关心的,我关心的Canvas可以很轻松在网页中实现简单相框和图像灰度化。
一起来看看HTML5 Canvas是怎么做到的吧!
**1. 新建一个html页面,在body tag之间加入**
~~~
<canvas id="myCanvas" >Gray Filter</canvas>
~~~
**2. 添加一段最简单的JavaScript代码:**
~~~
window.onload = function() {
var canvas = document.getElementById("myCanvas");
// do something here!!
}
~~~
**从Canvas对象获取绘制对象上下文Context的代码如下:**
~~~
var context = canvas.getContext("2d");
~~~
**在html页面中加入一幅图像的html代码如下:**
~~~
<img id="imageSource" src="hanjiaren.jpg" alt="Canvas Source" />
~~~
**从html img对象中获取image 对象的javascript代码如下:**
~~~
var image = document.getElementById("imageSource");
~~~
**将得到的图像绘制在Canvas对象中的代码如下:**
~~~
context.drawImage(image, 0, 0);
~~~
**从Canvas对象中获取图像像素数据的代码如下:**
~~~
var canvasData = context.getImageData(0, 0, canvas.width, canvas.height);
~~~
**读取像素值与实现灰度计算的代码如下:**
~~~
for ( var x = 0; x < canvasData.width; x++) {
for ( var y = 0; y < canvasData.height; y++) {
// Index of the pixel in the array
var idx = (x + y * canvasData.width) * 4;
var r = canvasData.data[idx + 0];
var g = canvasData.data[idx + 1];
var b = canvasData.data[idx + 2];
// calculate gray scale value
var gray = .299 * r + .587 * g + .114 * b;
// assign gray scale value
canvasData.data[idx + 0] = gray; // Red channel
canvasData.data[idx + 1] = gray; // Green channel
canvasData.data[idx + 2] = gray; // Blue channel
canvasData.data[idx + 3] = 255; // Alpha channel
// add black border
if(x < 8 || y < 8 || x > (canvasData.width - 8) || y > (canvasData.height - 8))
{
canvasData.data[idx + 0] = 0;
canvasData.data[idx + 1] = 0;
canvasData.data[idx + 2] = 0;
}
}
}
~~~
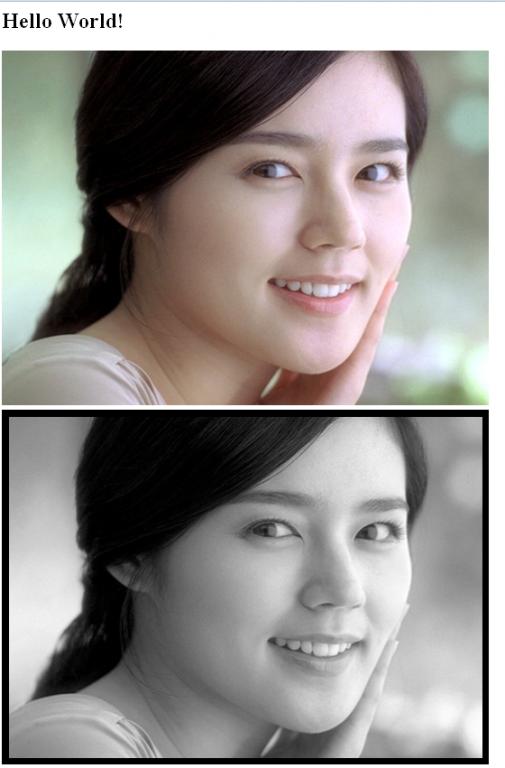
其中计算灰度公式为 gray color = 0.299 × red color + 0.578 × green color + 0.114 * blue color
读取出来的像素值顺序为RGBA 分别代表red color, green color, blue color, alpha channel
处理完成的数据要重新载入到Canvas中。代码如下:
~~~
context.putImageData(canvasData, 0, 0);
~~~
**程序最终的效果如下:**
完全源代码如下:
~~~
<html>
<head>
<script>
window.onload = function() {
var canvas = document.getElementById("myCanvas");
var image = document.getElementById("imageSource");
// re-size the canvas deminsion
canvas.width = image.width;
canvas.height = image.height;
// get 2D render object
var context = canvas.getContext("2d");
context.drawImage(image, 0, 0);
var canvasData = context.getImageData(0, 0, canvas.width, canvas.height);
alert(canvasData.width.toString());
alert(canvasData.height.toString());
// gray filter
for ( var x = 0; x < canvasData.width; x++) {
for ( var y = 0; y < canvasData.height; y++) {
// Index of the pixel in the array
var idx = (x + y * canvasData.width) * 4;
var r = canvasData.data[idx + 0];
var g = canvasData.data[idx + 1];
var b = canvasData.data[idx + 2];
// calculate gray scale value
var gray = .299 * r + .587 * g + .114 * b;
// assign gray scale value
canvasData.data[idx + 0] = gray; // Red channel
canvasData.data[idx + 1] = gray; // Green channel
canvasData.data[idx + 2] = gray; // Blue channel
canvasData.data[idx + 3] = 255; // Alpha channel
// add black border
if(x < 8 || y < 8 || x > (canvasData.width - 8) || y > (canvasData.height - 8))
{
canvasData.data[idx + 0] = 0;
canvasData.data[idx + 1] = 0;
canvasData.data[idx + 2] = 0;
}
}
}
context.putImageData(canvasData, 0, 0); // at coords 0,0
};
</script>
</head>
<body>
<h2>Hello World!</h2>
<img id="imageSource" src="hanjiaren.jpg" alt="Canvas Source" />
<br />
<canvas id="myCanvas" >Gray Filter</canvas>
</body>
</html>
~~~
代码中的文件可以替换任意你想要看到的图片文件,HTML5, 原来如此神奇。
程序在google浏览器中测试通过千万不要在本地尝试运行上面的代码,google
浏览器的安全检查会自动阻止从浏览器中读写非domain的文件最好在tomcat或
者任意个web container的server上发布以后从google浏览器查看效果即可。
前言
最后更新于:2022-04-01 16:09:37
> 原文出处:[HTML5 Canvas编程](http://blog.csdn.net/column/details/canvas-programming.html)
作者:[贾志刚](http://blog.csdn.net/jia20003)
**本系列文章经作者授权在看云整理发布,未经作者允许,请勿转载!**
# HTML5 Canvas编程
> 演示基于Canvas的图形与图像编程API应用与技巧
包括各种画笔,填充与描边,鼠标与键盘事件,动画
绘制,透明设置,简单图像处理,复杂图表数据。