Swift初学习
最后更新于:2022-04-01 07:05:30
距离swift发布10天了,也简单看了一下swift的语法,个人感觉相对于object-c很是简单明了。Swift的出现并不能说明iOS开发简单了很多,有可能会变得复杂,你需要学习两门编程语言,因为在程序员的世界里,务实并不是最重要的,在找工作中,可能面试官会问你OC的知识,还有Swift的知识,这将是一件糟糕的事情。Swift的语法上可能更精简一些,但是iOS开发并不是只有Swift就能实现的,还是需要CocoaTouch框架,iOS开发还是需要以前的UIkit、Sqlite、UrlConnction等等。虽然我学习Swift时间不长,总时间也就几个小时,但是我感觉很是愿意使用Swift去实现iOS程序。Swift语法同JS、Java、C#有很多相似之处,作为经常使用Java开发的我来说,Swifi与Java之间的转换要比OC与Java之间的转换方便多了。
附上一些swift的一下学习资料:
1、Swift语法介绍官方英文版:
The Swift Programming Language
2、Swift与Objective-C相互调用
Using Swift with Cocoa and Objective-C
3、Swift语法中文版
http://www.swiftguide.cn/
4、来自苹果的编程语言——Swift
http://zh.lucida.me/blog/an-introduction-to-swift/
5、关于Swift的初步看法
http://onevcat.com/2014/06/my-opinion-about-swift/
6、行走于Swift的世界
http://onevcat.com/2014/06/walk-in-swift/
7、github部分资料
7.1 2048
https://github.com/austinzheng/swift-2048
7.2 swift for Facebook
https://github.com/facebook/swift
7.3 FlappySwift
https://github.com/fullstackio/FlappySwift
7.4 糗事百科
https://github.com/YANGReal/JokeClient-Swift
8、Swift中文社区
[https://www.v2ex.com/go/swift](https://www.v2ex.com/go/swift)
[http://swift.sh](http://swift.sh/)
[http://swift-china.org](http://swift-china.org/)
(十七)——文件操作(NSFileManager)
最后更新于:2022-04-01 07:05:27
iOS的沙盒机制,应用只能访问自己应用目录下的文件。iOS不像android,没有SD卡概念,不能直接访问图像、视频等内容。iOS应用产生的内容,如图像、文件、缓存内容等都必须存储在自己的沙盒内。默认情况下,每个沙盒含有3个文件夹:Documents, Library 和 tmp。Library包含Caches、Preferences目录。
 
上面的完整路径为:用户->资源库->Application Support->iPhone Simulator->6.1->Aplications
Documents:苹果建议将程序创建产生的文件以及应用浏览产生的文件数据保存在该目录下,iTunes备份和恢复的时候会包括此目录
Library:存储程序的默认设置或其它状态信息;
Library/Caches:存放缓存文件,保存应用的持久化数据,用于应用升级或者应用关闭后的数据保存,不会被itunes同步,所以为了减少同步的时间,可以考虑将一些比较大的文件而又不需要备份的文件放到这个目录下。
tmp:提供一个即时创建临时文件的地方,但不需要持久化,在应用关闭后,该目录下的数据将删除,也可能系统在程序不运行的时候清除。

APP Sandbox
iOS怎么获取沙盒路径,怎么操作文件呢?下面给出答案。
**获取应用沙盒根路径:**
~~~
-(void)dirHome{
NSString *dirHome=NSHomeDirectory();
NSLog(@"app_home: %@",dirHome);
}
~~~
**获取Documents目录路径:**
~~~
//获取Documents目录
-(NSString *)dirDoc{
//[NSHomeDirectory() stringByAppendingPathComponent:@"Documents"];
NSArray *paths = NSSearchPathForDirectoriesInDomains(NSDocumentDirectory, NSUserDomainMask, YES);
NSString *documentsDirectory = [paths objectAtIndex:0];
NSLog(@"app_home_doc: %@",documentsDirectory);
return documentsDirectory;
}
~~~
**获取Library目录路径:**
~~~
//获取Library目录
-(void)dirLib{
//[NSHomeDirectory() stringByAppendingPathComponent:@"Library"];
NSArray *paths = NSSearchPathForDirectoriesInDomains(NSLibraryDirectory, NSUserDomainMask, YES);
NSString *libraryDirectory = [paths objectAtIndex:0];
NSLog(@"app_home_lib: %@",libraryDirectory);
}
~~~
**获取Cache目录路径:**
~~~
//获取Cache目录
-(void)dirCache{
NSArray *cacPath = NSSearchPathForDirectoriesInDomains(NSCachesDirectory, NSUserDomainMask, YES);
NSString *cachePath = [cacPath objectAtIndex:0];
NSLog(@"app_home_lib_cache: %@",cachePath);
}
~~~
**获取Tmp目录路径:**
~~~
//获取Tmp目录
-(void)dirTmp{
//[NSHomeDirectory() stringByAppendingPathComponent:@"tmp"];
NSString *tmpDirectory = NSTemporaryDirectory();
NSLog(@"app_home_tmp: %@",tmpDirectory);
}
~~~
**创建文件夹:**
~~~
//创建文件夹
-(void *)createDir{
NSString *documentsPath =[self dirDoc];
NSFileManager *fileManager = [NSFileManager defaultManager];
NSString *testDirectory = [documentsPath stringByAppendingPathComponent:@"test"];
// 创建目录
BOOL res=[fileManager createDirectoryAtPath:testDirectory withIntermediateDirectories:YES attributes:nil error:nil];
if (res) {
NSLog(@"文件夹创建成功");
}else
NSLog(@"文件夹创建失败");
}
~~~
**创建文件**
~~~
//创建文件
-(void *)createFile{
NSString *documentsPath =[self dirDoc];
NSString *testDirectory = [documentsPath stringByAppendingPathComponent:@"test"];
NSFileManager *fileManager = [NSFileManager defaultManager];
NSString *testPath = [testDirectory stringByAppendingPathComponent:@"test.txt"];
BOOL res=[fileManager createFileAtPath:testPath contents:nil attributes:nil];
if (res) {
NSLog(@"文件创建成功: %@" ,testPath);
}else
NSLog(@"文件创建失败");
}
~~~
**写数据到文件:**
~~~
//写文件
-(void)writeFile{
NSString *documentsPath =[self dirDoc];
NSString *testDirectory = [documentsPath stringByAppendingPathComponent:@"test"];
NSString *testPath = [testDirectory stringByAppendingPathComponent:@"test.txt"];
NSString *content=@"测试写入内容!";
BOOL res=[content writeToFile:testPath atomically:YES encoding:NSUTF8StringEncoding error:nil];
if (res) {
NSLog(@"文件写入成功");
}else
NSLog(@"文件写入失败");
}
~~~
**读文件数据:**
~~~
//读文件
-(void)readFile{
NSString *documentsPath =[self dirDoc];
NSString *testDirectory = [documentsPath stringByAppendingPathComponent:@"test"];
NSString *testPath = [testDirectory stringByAppendingPathComponent:@"test.txt"];
// NSData *data = [NSData dataWithContentsOfFile:testPath];
// NSLog(@"文件读取成功: %@",[[NSString alloc] initWithData:data encoding:NSUTF8StringEncoding]);
NSString *content=[NSString stringWithContentsOfFile:testPath encoding:NSUTF8StringEncoding error:nil];
NSLog(@"文件读取成功: %@",content);
}
~~~
**文件属性:**
~~~
//文件属性
-(void)fileAttriutes{
NSString *documentsPath =[self dirDoc];
NSString *testDirectory = [documentsPath stringByAppendingPathComponent:@"test"];
NSFileManager *fileManager = [NSFileManager defaultManager];
NSString *testPath = [testDirectory stringByAppendingPathComponent:@"test.txt"];
NSDictionary *fileAttributes = [fileManager attributesOfItemAtPath:testPath error:nil];
NSArray *keys;
id key, value;
keys = [fileAttributes allKeys];
int count = [keys count];
for (int i = 0; i < count; i++)
{
key = [keys objectAtIndex: i];
value = [fileAttributes objectForKey: key];
NSLog (@"Key: %@ for value: %@", key, value);
}
}
~~~
**删除文件:**
~~~
//删除文件
-(void)deleteFile{
NSString *documentsPath =[self dirDoc];
NSString *testDirectory = [documentsPath stringByAppendingPathComponent:@"test"];
NSFileManager *fileManager = [NSFileManager defaultManager];
NSString *testPath = [testDirectory stringByAppendingPathComponent:@"test.txt"];
BOOL res=[fileManager removeItemAtPath:testPath error:nil];
if (res) {
NSLog(@"文件删除成功");
}else
NSLog(@"文件删除失败");
NSLog(@"文件是否存在: %@",[fileManager isExecutableFileAtPath:testPath]?@"YES":@"NO");
}
~~~
(十六)——数据库操作(使用FMDB)
最后更新于:2022-04-01 07:05:25
iOS中原生的SQLite API在使用上相当不友好,在使用时,非常不便。于是,就出现了一系列将SQLite API进行封装的库,例如FMDB、PlausibleDatabase、sqlitepersistentobjects等,FMDB ([https://github.com/ccgus/fmdb](https://github.com/ccgus/fmdb)) 是一款简洁、易用的封装库,这一篇文章简单介绍下FMDB的使用。
在FMDB下载文件后,工程中必须导入如下文件,并使用 libsqlite3.dylib 依赖包。

FMDB同时兼容ARC和非ARC工程,会自动根据工程配置来调整相关的内存管理代码。
**FMDB常用类:**
FMDatabase : 一个单一的SQLite数据库,用于执行SQL语句。
FMResultSet :执行查询一个FMDatabase结果集,这个和android的Cursor类似。
FMDatabaseQueue :在多个线程来执行查询和更新时会使用这个类。
**创建数据库:**
~~~
db = [FMDatabase databaseWithPath:database_path];
~~~
1、当数据库文件不存在时,fmdb会自己创建一个。
2、 如果你传入的参数是空串:@"" ,则fmdb会在临时文件目录下创建这个数据库,数据库断开连接时,数据库文件被删除。
3、如果你传入的参数是 NULL,则它会建立一个在内存中的数据库,数据库断开连接时,数据库文件被删除。
**打开数据库:**
~~~
[db open]
~~~
返回BOOL型。
**关闭数据库:**
~~~
[db close]
~~~
## 数据库增删改等操作:
除了查询操作,FMDB数据库操作都执行executeUpdate方法,这个方法返回BOOL型。

看一下例子:
**创建表:**
~~~
if ([db open]) {
NSString *sqlCreateTable = [NSString stringWithFormat:@"CREATE TABLE IF NOT EXISTS '%@' ('%@' INTEGER PRIMARY KEY AUTOINCREMENT, '%@' TEXT, '%@' INTEGER, '%@' TEXT)",TABLENAME,ID,NAME,AGE,ADDRESS];
BOOL res = [db executeUpdate:sqlCreateTable];
if (!res) {
NSLog(@"error when creating db table");
} else {
NSLog(@"success to creating db table");
}
[db close];
}
~~~
**添加数据:**
~~~
if ([db open]) {
NSString *insertSql1= [NSString stringWithFormat:
@"INSERT INTO '%@' ('%@', '%@', '%@') VALUES ('%@', '%@', '%@')",
TABLENAME, NAME, AGE, ADDRESS, @"张三", @"13", @"济南"];
BOOL res = [db executeUpdate:insertSql1];
NSString *insertSql2 = [NSString stringWithFormat:
@"INSERT INTO '%@' ('%@', '%@', '%@') VALUES ('%@', '%@', '%@')",
TABLENAME, NAME, AGE, ADDRESS, @"李四", @"12", @"济南"];
BOOL res2 = [db executeUpdate:insertSql2];
if (!res) {
NSLog(@"error when insert db table");
} else {
NSLog(@"success to insert db table");
}
[db close];
}
~~~
**修改数据:**
~~~
if ([db open]) {
NSString *updateSql = [NSString stringWithFormat:
@"UPDATE '%@' SET '%@' = '%@' WHERE '%@' = '%@'",
TABLENAME, AGE, @"15" ,AGE, @"13"];
BOOL res = [db executeUpdate:updateSql];
if (!res) {
NSLog(@"error when update db table");
} else {
NSLog(@"success to update db table");
}
[db close];
}
~~~
**删除数据:**
~~~
if ([db open]) {
NSString *deleteSql = [NSString stringWithFormat:
@"delete from %@ where %@ = '%@'",
TABLENAME, NAME, @"张三"];
BOOL res = [db executeUpdate:deleteSql];
if (!res) {
NSLog(@"error when delete db table");
} else {
NSLog(@"success to delete db table");
}
[db close];
}
~~~
**数据库查询操作:**
查询操作使用了executeQuery,并涉及到FMResultSet。
~~~
if ([db open]) {
NSString * sql = [NSString stringWithFormat:
@"SELECT * FROM %@",TABLENAME];
FMResultSet * rs = [db executeQuery:sql];
while ([rs next]) {
int Id = [rs intForColumn:ID];
NSString * name = [rs stringForColumn:NAME];
NSString * age = [rs stringForColumn:AGE];
NSString * address = [rs stringForColumn:ADDRESS];
NSLog(@"id = %d, name = %@, age = %@ address = %@", Id, name, age, address);
}
[db close];
}
~~~
FMDB的FMResultSet提供了多个方法来获取不同类型的数据:

**数据库多线程操作:**
如果应用中使用了多线程操作数据库,那么就需要使用FMDatabaseQueue来保证线程安全了。 应用中不可在多个线程中共同使用一个FMDatabase对象操作数据库,这样会引起数据库数据混乱。 为了多线程操作数据库安全,FMDB使用了FMDatabaseQueue,使用FMDatabaseQueue很简单,首先用一个数据库文件地址来初使化FMDatabaseQueue,然后就可以将一个闭包(block)传入inDatabase方法中。 在闭包中操作数据库,而不直接参与FMDatabase的管理。
~~~
FMDatabaseQueue * queue = [FMDatabaseQueue databaseQueueWithPath:database_path];
dispatch_queue_t q1 = dispatch_queue_create("queue1", NULL);
dispatch_queue_t q2 = dispatch_queue_create("queue2", NULL);
dispatch_async(q1, ^{
for (int i = 0; i < 50; ++i) {
[queue inDatabase:^(FMDatabase *db2) {
NSString *insertSql1= [NSString stringWithFormat:
@"INSERT INTO '%@' ('%@', '%@', '%@') VALUES (?, ?, ?)",
TABLENAME, NAME, AGE, ADDRESS];
NSString * name = [NSString stringWithFormat:@"jack %d", i];
NSString * age = [NSString stringWithFormat:@"%d", 10+i];
BOOL res = [db2 executeUpdate:insertSql1, name, age,@"济南"];
if (!res) {
NSLog(@"error to inster data: %@", name);
} else {
NSLog(@"succ to inster data: %@", name);
}
}];
}
});
dispatch_async(q2, ^{
for (int i = 0; i < 50; ++i) {
[queue inDatabase:^(FMDatabase *db2) {
NSString *insertSql2= [NSString stringWithFormat:
@"INSERT INTO '%@' ('%@', '%@', '%@') VALUES (?, ?, ?)",
TABLENAME, NAME, AGE, ADDRESS];
NSString * name = [NSString stringWithFormat:@"lilei %d", i];
NSString * age = [NSString stringWithFormat:@"%d", 10+i];
BOOL res = [db2 executeUpdate:insertSql2, name, age,@"北京"];
if (!res) {
NSLog(@"error to inster data: %@", name);
} else {
NSLog(@"succ to inster data: %@", name);
}
}];
}
});
~~~
[demo下载](http://download.csdn.net/detail/xyz_lmn/5760293)
(十五)——数据库操作(SQLite)
最后更新于:2022-04-01 07:05:23
SQLite ([http://www.sqlite.org/docs.html](http://www.sqlite.org/docs.html)) 是一个轻量级的关系数据库。SQLite最初的设计目标是用于嵌入式系统,它占用资源非常少,在嵌入式设备中,只需要几百K的内存就够了,目前应用于Android、iOS、Windows Phone等智能手机。iOS 使用时SQLite,只需要加入 libsqlite3.dylib 依赖以及引入 sqlite3.h 头文件即可。
数据库操作包含打开数据库、创建表,表的增、删、改、查。下面代码给出了数据库操作。
创建并打开数据库:
~~~
-(BOOL) openDB{
//获取数据库路径
NSArray *paths = NSSearchPathForDirectoriesInDomains(NSDocumentDirectory, NSUserDomainMask, YES);
NSString *documents = [paths objectAtIndex:0];
NSString *database_path = [documents stringByAppendingPathComponent:DBNAME];
//如果数据库存在,则用sqlite3_open直接打开(不要担心,如果数据库不存在sqlite3_open会自动创建)
//打开数据库,这里的[path UTF8String]是将NSString转换为C字符串,因为SQLite3是采用可移植的C(而不是
//Objective-C)编写的,它不知道什么是NSString.
if (sqlite3_open([database_path UTF8String], &db) == SQLITE_OK) {
return YES;
}else{
return NO;
NSLog(@"数据库打开失败");
sqlite3_close(db);
}
}
~~~
iOS中没有提供创建数据库的命令,当使用sqlite3_open时,如果数据库文件不存在会自行创建数据库,如果存在会打开数据库。打开数据库后就可以创建表并操作表内容了,iOS中的sqlite3使用sqlite3_exec来创建表、插入表内容、修改表内容、删除表内容等操作,使用sqlite3_prepare_v2来查询表。下面给给出了sqlite3_exec的封装:
~~~
-(void)execSql:(NSString *)sql
{
if ([self openDB]) {
char *err;
if (sqlite3_exec(db, [sql UTF8String], NULL, NULL, &err) != SQLITE_OK) {
NSLog(@"数据库操作数据失败!");
}else{
NSLog(@"%@",sql);
}
sqlite3_close(db);
}
}
~~~
创建表:
~~~
NSString *sqlCreateTable = [NSString stringWithFormat:@"CREATE TABLE IF NOT EXISTS '%@' ('%@' INTEGER PRIMARY KEY AUTOINCREMENT, '%@' TEXT, '%@' INTEGER, '%@' TEXT)",TABLENAME,ID,NAME,AGE,ADDRESS];
[self execSql:sqlCreateTable];
~~~
插入数据:
~~~
-(void) insertData{
NSString *insertSql1= [NSString stringWithFormat:
@"INSERT INTO '%@' ('%@', '%@', '%@') VALUES ('%@', '%@', '%@')",
TABLENAME, NAME, AGE, ADDRESS, @"张三", @"13", @"济南"];
[self execSql:insertSql1];
NSString *insertSql2 = [NSString stringWithFormat:
@"INSERT INTO '%@' ('%@', '%@', '%@') VALUES ('%@', '%@', '%@')",
TABLENAME, NAME, AGE, ADDRESS, @"李四", @"12", @"济南"];
[self execSql:insertSql2];
}
~~~
修改表:
~~~
-(void) updateData{
NSString *updateSql = [NSString stringWithFormat:
@"UPDATE '%@' SET '%@' = '%@' WHERE '%@' = '%@'",
TABLENAME, AGE, @"15" ,AGE, @"13"];
[self execSql:updateSql];
}
~~~
删除表内容:
~~~
-(void) deleteData{
NSString *sdeleteSql = [NSString stringWithFormat:
@"delete from %@ where %@ = '%@'",
TABLENAME, NAME, @"张三"];
[self execSql:sdeleteSql];
}
~~~
上面实现了表内容的增、改、删,下面实现表内容查询。
~~~
-(void) selectData{
[self openDB];
NSString *sqlQuery = [NSString stringWithFormat:
@"SELECT * FROM %@",TABLENAME];
sqlite3_stmt * statement;
if (sqlite3_prepare_v2(db, [sqlQuery UTF8String], -1, &statement, nil) == SQLITE_OK) {
//查询结果集中一条一条的遍历所有的记录,这里的数字对应的是列值,注意这里的列值
while (sqlite3_step(statement) == SQLITE_ROW) {
char *name = (char*)sqlite3_column_text(statement, 1);
NSString *nsNameStr = [[NSString alloc]initWithUTF8String:name];
int age = sqlite3_column_int(statement, 2);
char *address = (char*)sqlite3_column_text(statement, 3);
NSString *nsAddressStr = [[NSString alloc]initWithUTF8String:address];
NSLog(@"name:%@ age:%d address:%@",nsNameStr,age, nsAddressStr);
}
}else{
NSLog(@"select error:%@",sqlQuery);
}
sqlite3_close(db);
}
~~~
好了,这就是全部了,iOS中数据库操作的类封装的并不太好用,希望大家尽量封装自己的类,。
[Demo下载](http://download.csdn.net/detail/xyz_lmn/5751891)

(十四)——打电话、发短信
最后更新于:2022-04-01 07:05:21
电话、短信是手机的基础功能,iOS中提供了接口,让我们调用。这篇文章简单的介绍一下iOS的打电话、发短信在程序中怎么调用。
**1、打电话**
~~~
[[UIApplication sharedApplication] openURL:[NSURL URLWithString:@"tel://10010"]];//打电话
~~~
使用openURL这个API打电话结束后,返回的是系统的拨打电话界面,如何才能返回自己的应用呢?有两种方法与大家分享。
第一种是用UIWebView加载电话,这种是合法的,可以上App Store的。
代码如下:
~~~
UIWebView*callWebview =[[UIWebView alloc] init];
NSURL *telURL =[NSURL URLWithString:@"tel:10010"];
[callWebview loadRequest:[NSURLRequest requestWithURL:telURL]];
//记得添加到view上
[self.view addSubview:callWebview];
~~~
第二种是私有方法,不能上App Store的(自己没试过)。
~~~
[[UIApplication sharedApplication] openURL:[NSURL URLWithString:@"telprompt://10010"]];
~~~
上面的代码只是把第一个方法中的tel为telprompt.
**2、发短信**
iOS中可以使用两种方式发送短信,最简单是使用openURL:
~~~
[[UIApplication sharedApplication]openURL:[NSURL URLWithString:@"sms://10010"]];//发短信
~~~
上面方式无法指定短信内容,iOS4.0新加入了MFMessageComposeViewController和MFMessageComposeViewControllerDelegate,提供了发送短信的接口,可以像发送邮件那样不用跳出程序来发送短信. 介绍可参阅[Message UIFramework Reference](http://developer.apple.com/library/ios/#documentation/MessageUI/Reference/MFMessageComposeViewController_class/Reference/Reference.html)

MFMessageComposeViewController提供了操作界面使用前必须检查canSendText方法,若返回NO则不应将这个controller展现出来,而应该提示用户不支持发送短信功能.
messageComposeDelegate :代理,处理发送结果
recipients :收信人
body :短信内容
Frameworks中要引入MessageUI.framework
#import
添加协议:rollerDelegate>
~~~
#import <MessageUI/MessageUI.h>
@interface DemoViewController : UIViewController <MFMessageComposeViewControllerDelegate>
@end
~~~
调用MFMessageComposeViewController,同时实现协议MFMessageComposeViewControllerDelegate。
~~~
- (void)showMessageView
{
if( [MFMessageComposeViewController canSendText] ){
MFMessageComposeViewController * controller = [[MFMessageComposeViewController alloc]init]; //autorelease];
controller.recipients = [NSArray arrayWithObject:@"10010"];
controller.body = @"测试发短信";
controller.messageComposeDelegate = self;
[self presentModalViewController:controller animated:YES];
[[[[controller viewControllers] lastObject] navigationItem] setTitle:@"测试短信"];//修改短信界面标题
}else{
[self alertWithTitle:@"提示信息" msg:@"设备没有短信功能"];
}
}
//MFMessageComposeViewControllerDelegate
- (void)messageComposeViewController:(MFMessageComposeViewController *)controller didFinishWithResult:(MessageComposeResult)result{
[controller dismissModalViewControllerAnimated:NO];//关键的一句 不能为YES
switch ( result ) {
case MessageComposeResultCancelled:
[self alertWithTitle:@"提示信息" msg:@"发送取消"];
break;
case MessageComposeResultFailed:// send failed
[self alertWithTitle:@"提示信息" msg:@"发送成功"];
break;
case MessageComposeResultSent:
[self alertWithTitle:@"提示信息" msg:@"发送失败"];
break;
default:
break;
}
}
- (void) alertWithTitle:(NSString *)title msg:(NSString *)msg {
UIAlertView *alert = [[UIAlertView alloc] initWithTitle:title
message:msg
delegate:self
cancelButtonTitle:nil
otherButtonTitles:@"确定", nil];
[alert show];
}
~~~
(十三)——获取手机信息(UIDevice、NSBundle、NSLocale)
最后更新于:2022-04-01 07:05:18
iOS的APP的应用开发的过程中,有时为了bug跟踪或者获取用反馈的需要自动收集用户设备、系统信息、应用信息等等,这些信息方便开发者诊断问题,当然这些信息是用户的非隐私信息,是通过开发api可以获取到的。那么通过那些api可以获取这些信息呢,iOS的SDK中提供了UIDevice,NSBundle,NSLocale。
**UIDevice**
UIDevice提供了多种属性、类函数及状态通知,帮助我们全方位了解设备状况。从检测电池电量到定位设备与临近感应,UIDevice所做的工作就是为应用程序提供用户及设备的一些信息。UIDevice类还能够收集关于设备的各种具体细节,例如机型及iOS版本等。其中大部分属性都对开发工作具有积极的辅助作用。下面的代码简单的使用UIDevice获取手机属性。
~~~
//设备相关信息的获取
NSString *strName = [[UIDevice currentDevice] name];
NSLog(@"设备名称:%@", strName);//e.g. "My iPhone"
NSString *strId = [[UIDevice currentDevice] uniqueIdentifier];
NSLog(@"设备唯一标识:%@", strId);//UUID,5.0后不可用
NSString *strSysName = [[UIDevice currentDevice] systemName];
NSLog(@"系统名称:%@", strSysName);// e.g. @"iOS"
NSString *strSysVersion = [[UIDevice currentDevice] systemVersion];
NSLog(@"系统版本号:%@", strSysVersion);// e.g. @"4.0"
NSString *strModel = [[UIDevice currentDevice] model];
NSLog(@"设备模式:%@", strModel);// e.g. @"iPhone", @"iPod touch"
NSString *strLocModel = [[UIDevice currentDevice] localizedModel];
NSLog(@"本地设备模式:%@", strLocModel);// localized version of model
~~~
**NSBundle**
bundle是一个目录,其中包含了程序会使用到的资源. 这些资源包含了如图像,声音,编译好的代码,nib文件(用户也会把bundle称为plug-in). 对应bundle,cocoa提供了类NSBundle.一个应用程序看上去和其他文件没有什么区别. 但是实际上它是一个包含了nib文件,编译代码,以及其他资源的目录. 我们把这个目录叫做程序的main bundle。通过这个路径可以获取到应用的信息,例如应用名、版本号等。
~~~
//app应用相关信息的获取
NSDictionary *dicInfo = [[NSBundle mainBundle] infoDictionary];
// CFShow(dicInfo);
NSString *strAppName = [dicInfo objectForKey:@"CFBundleDisplayName"];
NSLog(@"App应用名称:%@", strAppName);
NSString *strAppVersion = [dicInfo objectForKey:@"CFBundleShortVersionString"];
NSLog(@"App应用版本:%@", strAppVersion);
NSString *strAppBuild = [dicInfo objectForKey:@"CFBundleVersion"];
NSLog(@"App应用Build版本:%@", strAppBuild);
~~~
**NSLocale**
NSLocale可以获取用户的本地化信息设置,例如货币类型,国家,语言,数字,日期格式的格式化,提供正确的地理位置显示等等。下面的代码获取机器当前语言和国家代码。
~~~
//Getting the User’s Language
NSArray *languageArray = [NSLocale preferredLanguages];
NSString *language = [languageArray objectAtIndex:0];
NSLog(@"语言:%@", language);//en
NSLocale *locale = [NSLocale currentLocale];
NSString *country = [locale localeIdentifier];
NSLog(@"国家:%@", country); //en_US
~~~
(十二)——iOS国际化
最后更新于:2022-04-01 07:05:16
开发的移动应用更希望获取更多用户,走向世界,这就需要应用国际化,国际化其实就是多语言。这篇文章介绍Xcode4.5以后的国际化,包括应用名国际化和应用内容国际化。如果是Xcode4.5之前版本[请参考](http://http//mmz06.blog.163.com/blog/static/12141696201212695459645/)。
**应用内容国际化**
1、新建一个名为Localizable.strings的资源文件

2、在右侧属性选择器中可以看到多了个按钮 Localize:

3、点击Localize按钮,如果没做过国际化处理,选项只有English,做过了国际化处理会有多个选项。
 
4、点击Localize按钮,点击工程根目录,并选择PROJECT,然后选择INFO选项卡,底部我们就看到了Localizations,点击“+”号选择一门语言。

5、这时看Localizable.strings,

6、在相应的里面添加内容
首先选择Localizable.strings(English)文件,添加如下内容:
"language" ="english";
然后选择Localizable.strings(Chinese)文件,添加如下内容:
"language" ="中文";
7、使用NSLocalizedString获取内容
NSLog(@"%@",NSLocalizedString(@"language", @""));
系统会根据当前设备的语言环境来识别使用中文还是英文。
**应用名国际化**
1、在上面操作的的基础上,选中InfoPlist.strings.

InfoPlist.strings(English)中添加:
CFBundleDisplayName="English";
InfoPlist.strings(Chinese)中添加:
CFBundleDisplayName="中文";
2、为什么是CFBundleDisplayName?

通过上图步骤可查看应用名的key。
至此,应用名和应用内容的国际化都完成了。
(十一)——JSON数据解析
最后更新于:2022-04-01 07:05:14
在之前的[《](http://blog.csdn.net/xyz_lmn/article/details/9164019)[iOS学习——xml数据解析(九)》](http://blog.csdn.net/xyz_lmn/article/details/9164019)介绍了xml数据解析,这一篇简单介绍一下Json数据解析。JSON 即 JavaScript Object Natation,它是一种轻量级的数据交换格式,非常适合于服务器与客户端的交互,[Json语法参考](http://blog.csdn.net/xyz_lmn/article/details/JSON)。关于在iOS平台上进行JSON解析,已经有很多第三方的开源项目,比如TouchJson,JSONKit,SBJon等,自从iOS5.0以后,苹果SDK推出了自带的JSON解决方案NSJSONSerialization,这是一个非常好用的JSON生成和解析工具,效率也是比其他第三方开源项目的高很多,详情可看下图。

[图片详情可查看](http://arthurchen.blog.51cto.com/2483760/723910)
NSJSONSerialization提供了Json数据封包、Json数据解析,NSJSONSerialization将JSON数据转换为NSDictionary或NSArray解包方法,将NSDictionary、NSArray对象转换为JSON数据(可以通过调用isValidJSONObject来判断NSDictionary、NSArray对象是否可以转换为JSON数 据)封包。这一篇将做简单介绍。

**Json数据封包**
~~~
NSDictionary *dic = [NSDictionary dictionaryWithObjectsAndKeys:@"value1",@"key1",@"value2",@"key2",@"value3",@"key3", nil];
// isValidJSONObject判断对象是否可以构建成json对象
if ([NSJSONSerialization isValidJSONObject:dic]){
NSError *error;
// 创造一个json从Data, NSJSONWritingPrettyPrinted指定的JSON数据产的空白,使输出更具可读性。
NSData *jsonData = [NSJSONSerialization dataWithJSONObject:dic options:NSJSONWritingPrettyPrinted error:&error];
NSString *json =[[NSString alloc] initWithData:jsonData encoding:NSUTF8StringEncoding];
NSLog(@"json data:%@",json);
}
~~~
**Json数据解析**
~~~
NSError *error;
//加载一个NSURL对象
NSURLRequest *request = [NSURLRequest requestWithURL:[NSURL URLWithString:@"http://m.weather.com.cn/data/101120101.html"]];
//将请求的url数据放到NSData对象中
NSData *response = [NSURLConnection sendSynchronousRequest:request returningResponse:nil error:nil];
//IOS5自带解析类NSJSONSerialization从response中解析出数据放到字典中
NSDictionary *weatherDic = [NSJSONSerialization JSONObjectWithData:response options:NSJSONReadingMutableLeaves error:&error];
NSDictionary *weatherInfo = [weatherDic objectForKey:@"weatherinfo"];
NSString *text = [NSString stringWithFormat:@"今天是 %@ %@ %@ 的天气状况是:%@ %@ ",[weatherInfo objectForKey:@"date_y"],[weatherInfo objectForKey:@"week"],[weatherInfo objectForKey:@"city"], [weatherInfo objectForKey:@"weather1"], [weatherInfo objectForKey:@"temp1"]];
NSLog(@"weatherInfo:%@", text );
~~~
(十)——iOS真机调试
最后更新于:2022-04-01 07:05:11
前面一直使用模拟器运行,今天使用了真机调试,这一篇介绍一下真机调试。真机调试需要99$注册,如果有注册过的账号,也可以使用注册账号邀请你加入一个账号下,注册账号可以给你分配权限,我也是使用的邀请成为开发者的。
**1、登录:首先登录**
[https://developer.apple.com/ios/manage/overview/index.action](https://developer.apple.com/ios/manage/overview/index.action)
登录后会进入如下界面:

图一
**2、制作证书,提前准备好证书,也可以用时制作。**
1)Finder->应用->钥匙串访问

图二
这将会打开如下图所示的页面,按照图示内容进行填写:

图三
继续后生成证书,注意选择存储到磁盘。
**3、提交证书**
在图一中点击 Certificates进入如下界面,按顺序完成Certificates、Idetifiers、Devices、Provisioning Profiles。

图四
点击Certificates进入如下界面

图五
点击上图右上角的加号,进入下面界面,可看到如下:

图六
这张图截的不全,上面还有“iOS App Development”,选中,并且下载“Worldwide Developer Relations Certificate Authority”证书(蓝色字体),下载完双击,在钥匙串访问中可看到:

图七
进入下一步,

图八
上传第二步制作的证书,上传后,进入下一步。
**4、下载证书**
上传制作的证书后进入如下界面,点击“Download”,下载证书,下载完成,双击证书。

图九
**5、创建appId**
点击Idetifiers,进入下面界面:

图十
点击右上角加号完成添加appid。
**6、添加Device**
添加 真机的ID到这,也是点击右上角加号,真机ID使用iTuns获取(UDID)。

图十一
**7、制作Provisioning Profiles**
最后可以生成Provisioning Profiles了,这个最为重要,上面做的一切都是为了它,进入Provisioning Profiles,点击右上角的加号进入下一步,按顺序生成Provisioning Profiles,生成后下载后双击。
进入Xcode,点击Xcode右上角的Organizer进入下面界面,看后面Status为“Valid profile”,表示安装成功,可以进行真机调试了。

图十二
(九)—— xml数据解析
最后更新于:2022-04-01 07:05:09
在iPhone开发中,XML的解析有很多选择,iOS SDK提供了NSXMLParser和libxml2两个类库,另外还有很多第三方类库可选,例如TBXML、TouchXML、KissXML、TinyXML和GDataXML。这篇文章使用了NSXMLParser。
解析 XML 通常有两种方式,DOM 和 SAX:
* DOM解析XML时,读入整个XML文档并构建一个驻留内存的树结构(节点树),通过遍历树结构可以检索任意XML节点,读取它的属性和值。而且通常情况下,可以借助XPath,直接查询XML节点。
* SAX解析XML,是基于事件通知的模式,一边读取XML文档一边处理,不必等整个文档加载完之后才采取操作,当在读取解析过程中遇到需要处理的对象,会发出通知对其进行处理。
NSXMLParser是基于SAX的解析方式。NSXMLParser采用了委托设计模式,因此他的实现类需要采用协议并支持委托。NSXMLParser解析XML需要委托NSXMLParserDelegate实现。
1、初始化NSXMLParser
要使用NSXMLParser要先创建它,设置各种属性,主要用到以下几个方法:
initWithContentsOfURL 通过NSURL创建解析器
initWithData 通过NSData创建解析器
setDelegate 为解析器定义委托
parse 运行解析器
~~~
NSXMLParser *parser=[[NSXMLParser alloc] initWithData:[xml dataUsingEncoding:NSUTF8StringEncoding]];
// NSXMLParser *parser=[[NSXMLParser alloc] initWithContentsOfURL:[NSURL URLWithString:@"http://earthquake.usgs.gov/earthquakes/catalogs/7day-M2.5.xml"]];
[parser setDelegate:self];//设置NSXMLParser对象的解析方法代理
[parser setShouldProcessNamespaces:NO];
[parser parse];//开始解析
~~~
2、委托方法
主要使用一下委托方法:
~~~
//发现元素开始符的处理函数 (即报告元素的开始以及元素的属性)
- (void)parser:(NSXMLParser *)parser
didStartElement:(NSString *)elementName
namespaceURI:(NSString *)namespaceURI
qualifiedName:(NSString *)qName
attributes:(NSDictionary *)attributeDict
//处理标签包含内容字符 (报告元素的所有或部分内容)
- (void)parser:(NSXMLParser *)parser foundCharacters:(NSString *)string
//发现元素结束符的处理函数,保存元素各项目数据(即报告元素的结束标记)
- (void)parser:(NSXMLParser *)parser
didEndElement:(NSString *)elementName
namespaceURI:(NSString *)namespaceURI
qualifiedName:(NSString *)qName
//报告解析的结束
- (void)parserDidEndDocument:(NSXMLParser *)parser
//报告不可恢复的解析错误
- (void)paser:parserErrorOccured
~~~
执行[parser parse]后会依序执行:
1、didStartElement
2、foundCharacters
3、didEndElement
示例如下:
~~~
-(void)parser:(NSXMLParser *)parser didStartElement:(NSString *)elementName namespaceURI:(NSString *)namespaceURI qualifiedName:(NSString *)qName attributes:(NSDictionary *)attributeDict {
NSLog(@"xml_parser start %@ ",elementName);
if ( [elementName isEqualToString:@"person"] ) {
NSLog(@"xml_parser person ");
if(personNameArrary==nil){
personNameArrary=[[NSMutableArray alloc] init];
}
}
if(itemValue!=nil){
itemValue=nil;
}
itemValue=[[NSMutableString alloc] init];
if ( [elementName isEqualToString:@"phone"] ) {
NSString *atr=[attributeDict valueForKey:@"type"];
NSLog(@"xml_parser phone type: %@",atr);
}
}
- (void)parser:(NSXMLParser *)parser foundCharacters:(NSString *)string {
NSLog(@"xml_parser value:%@",string);
[itemValue appendString:string];
}
- (void)parser:(NSXMLParser *)parser didEndElement:(NSString *)elementName namespaceURI:(NSString *)namespaceURI qualifiedName:(NSString *)qName {
NSLog(@"xml_parser end %@ ",elementName);
if ( [elementName isEqualToString:@"firstName"] ) {
[personNameArrary addObject:itemValue];
}
if ( [elementName isEqualToString:@"person"] ) {
NSLog(@"xml_parser person end");
}
}
~~~
(八)——iOS网络通信http之NSURLConnection
最后更新于:2022-04-01 07:05:07
移动互联网时代,网络通信已是手机终端必不可少的功能。我们的应用中也必不可少的使用了网络通信,增强客户端与服务器交互。这一篇提供了使用NSURLConnection实现http通信的方式。
NSURLConnection提供了异步请求、同步请求两种通信方式。
**1、异步请求**
iOS5.0 SDK NSURLConnection类新增的sendAsynchronousRequest:queue:completionHandler:方法,从而使iOS5支持两种异步请求方式。我们先从新增类开始。
1)sendAsynchronousRequest
iOS5.0开始支持sendAsynchronousReques方法,方法使用如下:
~~~
- (void)httpAsynchronousRequest{
NSURL *url = [NSURL URLWithString:@"http://url"];
NSString *post=@"postData";
NSData *postData = [post dataUsingEncoding:NSASCIIStringEncoding allowLossyConversion:YES];
NSMutableURLRequest *request = [NSMutableURLRequest requestWithURL:url];
[request setHTTPMethod:@"POST"];
[request setHTTPBody:postData];
[request setTimeoutInterval:10.0];
NSOperationQueue *queue = [[NSOperationQueue alloc]init];
[NSURLConnection sendAsynchronousRequest:request
queue:queue
completionHandler:^(NSURLResponse *response, NSData *data, NSError *error){
if (error) {
NSLog(@"Httperror:%@%d", error.localizedDescription,error.code);
}else{
NSInteger responseCode = [(NSHTTPURLResponse *)response statusCode];
NSString *responseString = [[NSString alloc] initWithData:data encoding:NSUTF8StringEncoding];
NSLog(@"HttpResponseCode:%d", responseCode);
NSLog(@"HttpResponseBody %@",responseString);
}
}];
}
~~~
sendAsynchronousReques可以很容易地使用NSURLRequest接收回调,完成http通信。
2)connectionWithRequest
iOS2.0就开始支持connectionWithRequest方法,使用如下:
~~~
- (void)httpConnectionWithRequest{
NSString *URLPath = [NSString stringWithFormat:@"http://url"];
NSURL *URL = [NSURL URLWithString:URLPath];
NSMutableURLRequest *request = [NSMutableURLRequest requestWithURL:URL];
[NSURLConnection connectionWithRequest:request delegate:self];
}
- (void)connection:(NSURLConnection *)theConnection didReceiveResponse:(NSURLResponse *)response
{
NSInteger responseCode = [(NSHTTPURLResponse *)response statusCode];
NSLog(@"response length=%lld statecode%d", [response expectedContentLength],responseCode);
}
// A delegate method called by the NSURLConnection as data arrives. The
// response data for a POST is only for useful for debugging purposes,
// so we just drop it on the floor.
- (void)connection:(NSURLConnection *)theConnection didReceiveData:(NSData *)data
{
if (mData == nil) {
mData = [[NSMutableData alloc] initWithData:data];
} else {
[mData appendData:data];
}
NSLog(@"response connection");
}
// A delegate method called by the NSURLConnection if the connection fails.
// We shut down the connection and display the failure. Production quality code
// would either display or log the actual error.
- (void)connection:(NSURLConnection *)theConnection didFailWithError:(NSError *)error
{
NSLog(@"response error%@", [error localizedFailureReason]);
}
// A delegate method called by the NSURLConnection when the connection has been
// done successfully. We shut down the connection with a nil status, which
// causes the image to be displayed.
- (void)connectionDidFinishLoading:(NSURLConnection *)theConnection
{
NSString *responseString = [[NSString alloc] initWithData:mData encoding:NSUTF8StringEncoding];
NSLog(@"response body%@", responseString);
}
~~~
connectionWithRequest需要delegate参数,通过一个delegate来做数据的下载以及Request的接受以及连接状态,此处delegate:self,所以需要本类实现一些方法,并且定义mData做数据的接受。
需要实现的方法:
1、获取返回状态、包头信息。
~~~
- (void)connection:(NSURLConnection *)connection didReceiveResponse:(NSURLResponse *)response;
~~~
2、连接失败,包含失败。
~~~
- (void)connection:(NSURLConnection *)connection didFailWithError:(NSError *)error;
~~~
3、接收数据
~~~
- (void)connection:(NSURLConnection *)connection didReceiveData:(NSData *)data;
~~~
4、数据接收完毕
-(void)connectionDidFinishLoading:(NSURLConnection *)connection;
connectionWithRequest使用起来比较繁琐,而iOS5.0之前用不支持sendAsynchronousRequest。有网友提出了[AEURLConnection](https://github.com/adamjernst/AEURLConnection)解决方案。
~~~
AEURLConnection is a simple reimplementation of the API for use on iOS 4. Used properly, it is also guaranteed to be safe against The Deallocation Problem, a thorny threading issue that affects most other networking libraries.
~~~
**2、同步请求**
同步请求数据方法如下:
~~~
- (void)httpSynchronousRequest{
NSURLRequest * urlRequest = [NSURLRequest requestWithURL:[NSURL URLWithString:@"http://google.com"]];
NSURLResponse * response = nil;
NSError * error = nil;
NSData * data = [NSURLConnection sendSynchronousRequest:urlRequest
returningResponse:&response
error:&error];
if (error == nil)
{
// 处理数据
}
}
~~~
同步请求数据会造成主线程阻塞,通常在请求大数据或网络不畅时不建议使用。
从上面的代码可以看出,不管同步请求还是异步请求,建立通信的步骤基本是一样的:
1、创建NSURL
2、创建Request对象
3、创建NSURLConnection连接。
NSURLConnection创建成功后,就创建了一个http连接。异步请求和同步请求的区别是:创建了异步请求,用户可以做其他的操作,请求会在另一个线程执行,通信结果及过程会在回调函数中执行。同步请求则不同,需要请求结束用户才能做其他的操作。
(七)——UI基础UIButton
最后更新于:2022-04-01 07:05:05
前面写了UIWindow、UIViewController,那些都是一些框架,框架需要填充上具体的view才能组成我们的应用,移动应用开发中UI占了很大一部分,最基础的UI实现是使用系统提供的各种控件,其他的就是自定义实现了,作者目前是入门状态,只能写写基础控件了。
iOS中提供了UIButton、UILable、UITextField、UIImageView等基础UI控件,继承于UIView。这里先拿UIButton练练手,为什么拿UIButton呢,因为UIbutton继承自UIControl,UIControl派生自UIView类,每个控件都有很多视图的特性,包括附着于其他视图的能力,所有控件都拥有一套共同的属性和方法,包含显示内容,点击事件等等,UIControl的子类都有事件处理能力。
图、UIControl

**UIButton的定义:**
UIButton可使用 initWithFrame、buttonWithType两种方式创建:
1)initWithFrame
~~~
UIButton *btn=[[UIButton alloc]initWithFrame:CGRectMake(60, 60, 200, 60)];
btn.backgroundColor=[UIColor greenColor];
[btn setTitle:@"btn1" forState:UIControlStateNormal];
[self.view addSubview:btn];
~~~
2)buttonWithType
~~~
UIButton *btn2=[UIButton buttonWithType:UIButtonTypeRoundedRect];
CGRect rect=CGRectMake(60, 160, 200, 60);
btn2.frame=rect;
btn2.tag=1001;
btn2.backgroundColor=[UIColor colorWithRed:30/255.0 green:200/255.0 blue:125/255.0 alpha:1.0];
[btn2 setTitle:@"btn2" forState:UIControlStateNormal];
[btn2 addTarget:self action:@selector(btn2Pressed) forControlEvents:UIControlEventTouchDown];
[self.view addSubview:btn2];
~~~
btn2Pressed方法:
~~~
-(void)btn2Pressed{
NSLog(@"button pressed");
}
~~~
UIButtonType:
~~~
typedef enum {
UIButtonTypeCustom = 0, // no button type 自定义,无风格
UIButtonTypeRoundedRect, // rounded rect, flat white button, like in address card 白色圆角矩形,类似偏好设置表格单元或者地址簿卡片
UIButtonTypeDetailDisclosure,//蓝色的披露按钮,可放在任何文字旁
UIButtonTypeInfoLight,//微件(widget)使用的小圆圈信息按钮,可以放在任何文字旁
UIButtonTypeInfoDark,//白色背景下使用的深色圆圈信息按钮
UIButtonTypeContactAdd,//蓝色加号(+)按钮,可以放在任何文字旁
} UIButtonType;
}
~~~
**UIButton常用属性:**
//设置对应状态的标题内容default is nil. title is assumed to be single line
-(void)setTitle:(NSString *)title forState:(UIControlState)state;
//设置对应状态的标题颜色
-(void)setTitleColor:(UIColor *)color forState:(UIControlState)state;
//设置对应状态的标题阴影颜色
-(void)setTitleShadowColor:(UIColor *)color forState:(UIControlState)state;
//设置对应状态的按钮的图片
-(void)setImage:(UIImage *)image forState:(UIControlState)state;
//设置对应状态的按钮背景图片
-(void)setBackgroundImage:(UIImage*)image forState:(UIControlState)state;
UIButton的UIControlState :
~~~
typedef enum {
UIButtonTypeCustom = 0, // no button type 自定义,无风格
UIButtonTypeRoundedRect, // rounded rect, flat white button, like in address card 白色圆角矩形,类似偏好设置表格单元或者地址簿卡片
UIButtonTypeDetailDisclosure,//蓝色的披露按钮,可放在任何文字旁
UIButtonTypeInfoLight,//微件(widget)使用的小圆圈信息按钮,可以放在任何文字旁
UIButtonTypeInfoDark,//白色背景下使用的深色圆圈信息按钮
UIButtonTypeContactAdd,//蓝色加号(+)按钮,可以放在任何文字旁
} UIButtonType;
~~~
更多属性可参考官方文档。
**UIButton添加事件:**
UIButton使用如下方法添加事件。
~~~
[btn addTarget:<#(id)#> action:<#(SEL)#> forControlEvents:<#(UIControlEvents)#>]
~~~
这些事件都是基于触摸、基于值、基于编辑。可相应如下事件。
~~~
typedef NS_OPTIONS(NSUInteger, UIControlEvents) {
UIControlEventTouchDown = 1 << 0, // on all touch downs
UIControlEventTouchDownRepeat = 1 << 1, // on multiple touchdowns (tap count > 1)
UIControlEventTouchDragInside = 1 << 2,
UIControlEventTouchDragOutside = 1 << 3,
UIControlEventTouchDragEnter = 1 << 4,
UIControlEventTouchDragExit = 1 << 5,
UIControlEventTouchUpInside = 1 << 6,
UIControlEventTouchUpOutside = 1 << 7,
UIControlEventTouchCancel = 1 << 8,
UIControlEventValueChanged = 1 << 12, // sliders, etc.
UIControlEventEditingDidBegin = 1 << 16, // UITextField
UIControlEventEditingChanged = 1 << 17,
UIControlEventEditingDidEnd = 1 << 18,
UIControlEventEditingDidEndOnExit = 1 << 19, // 'return key' ending editing
UIControlEventAllTouchEvents = 0x00000FFF, // for touch events
UIControlEventAllEditingEvents = 0x000F0000, // for UITextField
UIControlEventApplicationReserved = 0x0F000000, // range available for application use
UIControlEventSystemReserved = 0xF0000000, // range reserved for internal framework use
UIControlEventAllEvents = 0xFFFFFFFF
};
~~~
(六)——ViewController
最后更新于:2022-04-01 07:05:02
ViewController是iOS应用程序中重要的部分,是应用程序数据和视图之间的重要桥梁,ViewController管理应用中的众多视图。iOS的SDK中提供很多原生ViewController,以支持标准的用户界面,例如表视图控制器(UITableViewController)、导航控制器(UINavigationController)、标签栏控制器(UITabbarController)和iPad专有的UISplitViewController等。
按结构可以对iOS的所有ViewController分成两类:
1、主要用于展示内容的ViewController,这种ViewController主要用于为用户展示内容,并与用户交互,如UITableViewController,UIViewController。
2、用于控制和显示其他ViewController的ViewController。这种ViewController一般都是一个ViewController的容器。如UINavigationController,UITabbarController。它们都有一个属性:viewControllers。其中UINavigationController表示一种Stack式结构,push一个ViewController或pop一次,因此后一个ViewController一般会依赖前一个ViewController。而UITabbarController表示一个Array结构,各个ViewController是并列的。
**ViewController使用**
UIViewController可以使用两种方式创建,1、xib方式,2、代码方式
1)xib方式
Command+N 新建文件,选Cocoa Touch UIViewController subclass,SubClass of UIViewController,勾选with XIB for user interface。定义ViewController名字是MainViewController,最终生成MainViewController.h MainViewController.m MainViewController.xib三个文件。在AppDelegate.m文件的
didFinishLaunchingWithOptions方法中加载xib文件。
~~~
self.window = [[UIWindow alloc] initWithFrame:[[UIScreen mainScreen] bounds]];
// Override point for customization after application launch.
self.window.backgroundColor = [UIColor whiteColor];
MainUIViewController *vc=[[MainUIViewController alloc]initWithNibName:@"MainUIViewController" bundle:nil];
self.window.rootViewController=vc;
[self.window makeKeyAndVisible];
return YES;
~~~
加载xib文件后,在xib文件拖拽几个控件可看到效果。
2)代码创建
Command+N 新建文件UIViewController文件,在AppDelegate.m文件的didFinishLaunchingWithOptions方法中使用。在UIViewController的loadView方法中使用代码创建view。
~~~
- (BOOL)application:(UIApplication *)application didFinishLaunchingWithOptions:(NSDictionary *)launchOptions
{
self.window = [[UIWindow alloc] initWithFrame:[[UIScreen mainScreen] bounds]];
// Override point for customization after application launch.
self.window.backgroundColor = [UIColor whiteColor];
// MainUIViewController *vc=[[MainUIViewController alloc]initWithNibName:@"MainUIViewController" bundle:nil];
// self.window.rootViewController=vc;
RootViewController *rc=[[RootViewController alloc] init];
self.window.rootViewController=rc;
[self.window makeKeyAndVisible];
return YES;
}
~~~
**创建View**
~~~
- (void)loadView{
[super loadView];
UIView *view=[[UIView alloc]initWithFrame:[UIScreen mainScreen].applicationFrame];
view.alpha=0.5;
view.backgroundColor=[UIColor cyanColor];
self.view=view;
}
~~~
**ViewController的生命周期**
前面写了[iOS应用程序的生命周期](http://blog.csdn.net/xyz_lmn/article/details/8916752),这里会写到ViewController的生命周期,这个更像Android的Activity的生命周期(见文章最后的图)。ViewController生命周期会经历初始化、加载视图、销毁视图、生命结束等过程。
1)init方法
初始化ViewController本身。
2)loadView方法
当view需要被展示而它却是nil时,viewController会调用该方法。
如果代码维护View的话需要重写此方法,使用xib维护View的话不用重写。
3)viewDidLoad方法
执行完loadView后继续执行viewDidLoad,loadView时还没有view,而viewDidLoad时view已经创建好了。
4)viewDidUnload方法
当系统内存吃紧的时候会调用该方法,内存吃紧时,在iPhone OS 3.0之前didReceiveMemoryWarning是释放无用内存的唯一方式,但是OS 3.0及以后viewDidUnload方法是更好的方式。
在该方法中将所有IBOutlet(无论是property还是实例变量)置为nil(系统release view时已经将其release掉了)。
在该方法中释放其他与view有关的对象、其他在运行时创建(但非系统必须)的对象、在viewDidLoad中被创建的对象、缓存数据等。
一般认为viewDidUnload是viewDidLoad的镜像,因为当view被重新请求时,viewDidLoad还会重新被执行。
5)dealloc
释放其他资源或内存。

viewController的生命周期图
ViewController加载view过程,见下图(loadView)
1)loadView

ViewController卸载View过程见(unLoadView)
2)unLoadView

(五)——UI基础UIWindow、UIView
最后更新于:2022-04-01 07:05:00
在PC中,应用程序多是使用视窗的形式显示内容,手机应用也不例外,手机应用中要在屏幕上显示内容首先要创建一个窗口承载内容,iOS应用中使用UIWindow、UIView来实现内容显示。
**UIWindow:**
UIWindow对象是所有UIView的根视图,管理和协调的应用程序的显示、分发事件给View。UIWindow类是UIView的子类,可以看作是特殊的UIView。一般应用程序只有一个UIWindow对象,即使有多个UIWindow对象,也只有一个UIWindow可以接受到用户的触屏事件。UIWindow初始化在appDeleDgate里面的 didFinishLaunchingWithOptions方法。
~~~
self.window = [[[UIWindow alloc] initWithFrame:[[UIScreen mainScreen] bounds]] autorelease];
// Override point for customization after application launch.
self.window.backgroundColor = [UIColor whiteColor];
[self.window makeKeyAndVisible];//显示出UIWindow
~~~
**UIView:**
UIView类继承自UIResponder,负责在屏幕上 定义一个矩形区域,视图用于展示界面及响应用户界面交互。每个视图对象都要负责渲染视图区域的内容,并响应该区域中发生的操作事件。
除了显示内容和处理事件之外,视图可以嵌套并管理子视图。子视图是指嵌入到另一视图对象内部的视图对象,而被嵌入的视图对象是父视图。视图添加到window中就会显示出来,iOS中是怎么实现视图显示的,看下面的代码:
~~~
- (BOOL)application:(UIApplication *)application didFinishLaunchingWithOptions:(NSDictionary *)launchOptions
{
self.window = [[[UIWindow alloc] initWithFrame:[[UIScreen mainScreen] bounds]] autorelease];
// Override point for customization after application launch.
self.window.backgroundColor = [UIColor whiteColor];
CGRect rect=[UIScreen mainScreen].applicationFrame;
NSLog(@"NSScreen application %@",NSStringFromCGRect(rect));
CGRect rect2=[UIScreen mainScreen].bounds;
NSLog(@"NSString mainScreen %@",NSStringFromCGRect(rect2));
NSLog(@"iOS_didFinishLaunchingWithOptions");
UIView *view1=[[UIView alloc]initWithFrame:CGRectMake(60, 50, 200, 100)];
view1.backgroundColor=[UIColor greenColor];
[self.window addSubview:view1];
[view1 release];
UIView *view2=[[UIView alloc]initWithFrame:CGRectMake(60, 100, 200, 200) ];
view2.alpha=0.5;
view2.backgroundColor=[UIColor cyanColor];
[self.window addSubview:view2];
UIView *view3=[[UIView alloc]initWithFrame:CGRectMake(100, 50, 60, 50)];
view3.backgroundColor=[UIColor colorWithRed:25/255.0 green:60/255.0 blue:150/255.0 alpha:1.0];
[view2 addSubview:view3];
[view3 release];
[view2 release];
[self.window makeKeyAndVisible];
return YES;
}
~~~
上面添加了三个视图,view1、view2、view3,view3嵌套在view2中。
(四)——iOS应用程序生命周期
最后更新于:2022-04-01 07:04:58
开发应用程序都要了解其生命周期,开始接触android时也是从应用程序生命周期开始的,android的应用程序生命周期更多是其组件的生命周期,例如Activity、Service。今天我们接触一下iOS应用程序的生命周期,
iOS的入口在main.m文件:
~~~
int main(int argc, char *argv[])
{
@autoreleasepool {
return UIApplicationMain(argc, argv, nil, NSStringFromClass([AppDelegate class]));
}
}
~~~
main函数的两个参数,iOS中没有用到,包括这两个参数是为了与标准ANSI C保持一致。
UIApplicationMain函数,前两个和main函数一样,重点是后两个,官方说明是这样的:
~~~
// If nil is specified for principalClassName, the value for NSPrincipalClass from the Info.plist is used. If there is no
// NSPrincipalClass key specified, the UIApplication class is used. The delegate class will be instantiated using init.
UIKIT_EXTERN int UIApplicationMain(int argc, char *argv[], NSString *principalClassName, NSString *delegateClassName);
~~~
后两个参数分别表示程序的主要类(principal class)和代理类(delegate class)。如果主要类(principal class)为nil,将从Info.plist中获取,如果Info.plist中不存在对应的key,则默认为UIApplication;如果代理类(delegate class)将在新建工程时创建。
根据UIApplicationMain函数,程序将进入AppDelegate.m,这个文件是xcode新建工程时自动生成的。下面看一下AppDelegate.m文件,这个关乎着应用程序的生命周期。
~~~
- (BOOL)application:(UIApplication *)application didFinishLaunchingWithOptions:(NSDictionary *)launchOptions
{
self.window = [[[UIWindow alloc] initWithFrame:[[UIScreen mainScreen] bounds]] autorelease];
// Override point for customization after application launch.
self.window.backgroundColor = [UIColor whiteColor];
[self.window makeKeyAndVisible];
NSLog(@"iOS_didFinishLaunchingWithOptions");
return YES;
}
- (void)applicationWillResignActive:(UIApplication *)application
{
// Sent when the application is about to move from active to inactive state. This can occur for certain types of temporary interruptions (such as an incoming phone call or SMS message) or when the user quits the application and it begins the transition to the background state.
// Use this method to pause ongoing tasks, disable timers, and throttle down OpenGL ES frame rates. Games should use this method to pause the game.
NSLog(@"iOS_applicationWillResignActive");
}
- (void)applicationDidEnterBackground:(UIApplication *)application
{
// Use this method to release shared resources, save user data, invalidate timers, and store enough application state information to restore your application to its current state in case it is terminated later.
// If your application supports background execution, this method is called instead of applicationWillTerminate: when the user quits.
NSLog(@"iOS_applicationDidEnterBackground");
}
- (void)applicationWillEnterForeground:(UIApplication *)application
{
// Called as part of the transition from the background to the inactive state; here you can undo many of the changes made on entering the background.
NSLog(@"iOS_applicationWillEnterForeground");
}
- (void)applicationDidBecomeActive:(UIApplication *)application
{
// Restart any tasks that were paused (or not yet started) while the application was inactive. If the application was previously in the background, optionally refresh the user interface.
NSLog(@"iOS_applicationDidBecomeActive");
}
- (void)applicationWillTerminate:(UIApplication *)application
{
// Called when the application is about to terminate. Save data if appropriate. See also applicationDidEnterBackground:.
NSLog(@"iOS_applicationWillTerminate");
}
~~~
1、application didFinishLaunchingWithOptions:当应用程序启动时执行,应用程序启动入口,只在应用程序启动时执行一次。若用户直接启动,lauchOptions内无数据,若通过其他方式启动应用,lauchOptions包含对应方式的内容。
2、applicationWillResignActive:在应用程序将要由活动状态切换到非活动状态时候,要执行的委托调用,如 按下 home 按钮,返回主屏幕,或全屏之间切换应用程序等。
3、applicationDidEnterBackground:在应用程序已进入后台程序时,要执行的委托调用。
4、applicationWillEnterForeground:在应用程序将要进入前台时(被激活),要执行的委托调用,刚好与applicationWillResignActive 方法相对应。
5、applicationDidBecomeActive:在应用程序已被激活后,要执行的委托调用,刚好与applicationDidEnterBackground 方法相对应。
6、applicationWillTerminate:在应用程序要完全推出的时候,要执行的委托调用,这个需要要设置UIApplicationExitsOnSuspend的键值。
初次启动:
2013-05-24 20:20:31.550 LifeIOS[451:c07] iOS_didFinishLaunchingWithOptions
2013-05-24 20:20:31.551 LifeIOS[451:c07] iOS_applicationDidBecomeActive
按下home键:
2013-05-24 20:22:17.349 LifeIOS[451:c07] iOS_applicationWillResignActive
2013-05-24 20:22:17.350 LifeIOS[451:c07] iOS_applicationDidEnterBackground
点击程序图标进入:
2013-05-24 20:22:56.913 LifeIOS[451:c07] iOS_applicationWillEnterForeground
2013-05-24 20:22:56.914 LifeIOS[451:c07] iOS_applicationDidBecomeActive
程序中没有设置UIApplicationExitsOnSuspend的值,程序不会彻底退出。
看上面iOS的生命周期,是不是和Android的Activity生周期也相似,所以说程序是相通的,对比着学习也是收获最大的。
(三)——iOS系统架构
最后更新于:2022-04-01 07:04:55
iOS的系统架构分为四个层次:核心操作系统层(Core OS layer)、核心服务层(Core Services layer)、媒体层(Media layer)和可触摸层(Cocoa Touch layer)。下面是IOS系统结构图。

iOS结构图
1、Core OS是位于iOS系统架构最下面的一层是核心操作系统层,它包括内存管理、文件系统、电源管理以及一些其他的操作系统任务。它可以直接和硬件设备进行交互。作为app开发者不需要与这一层打交道。
2、Core Services是核心服务层,可以通过它来访问iOS的一些服务。
3、Media是媒体层,通过它我们可以在应用程序中使用各种媒体文件,进行音频与视频的录制,图形的绘制,以及制作基础的动画效果。
4、Cocoa Touch是可触摸层,这一层为我们的应用程序开发提供了各种有用的框架,并且大部分与用户界面有关,本质上来说它负责用户在iOS设备上的触摸交互操作。
iOS是基于UNIX内核,android是基于Linux内核,iOS和android作为两款优秀的手机操作系统,他们有共性有区别,下面分享一张android系统架构图:

(二)——Hello iOS
最后更新于:2022-04-01 07:04:53
前面写了iOS开发环境搭建,只简单提了一下安装Xcode,这里再补充一下,点击下载Xcode的dmp文件,稍等片刻会有图一(拖拽Xcode至Applications)的提示,拖拽至Application即可,在Finder-应用程序-Xcode找到Xcode图标。点击Xcode图表,下一步操作即可进入开发界面。
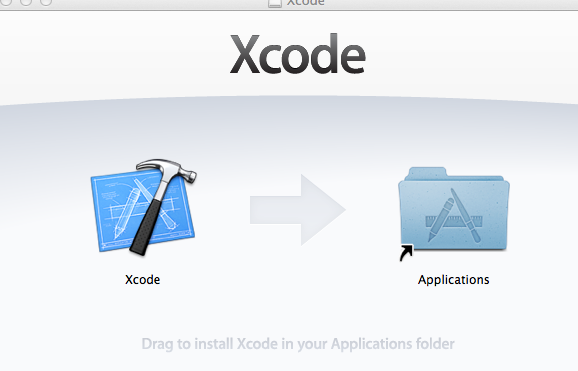
图一(拖拽Xcode至Applications)
安装完Xcode,首先熟悉一下Xcode界面(这张是网上看到的一张图):
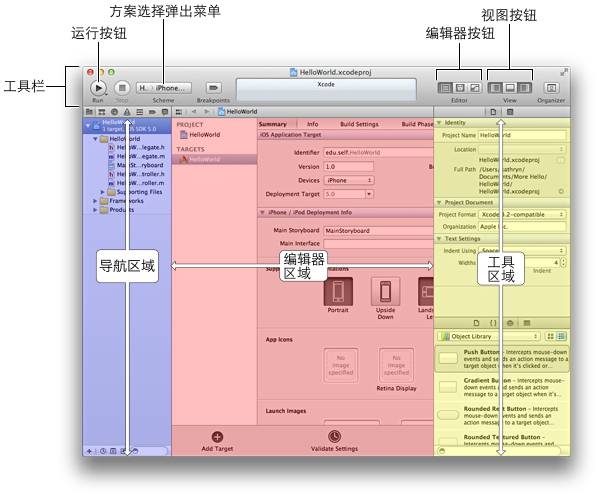
从上图看,Xcode和开发windows phone的Visual Studio、开发Android的Eclipse很像,如果是从那两个方向转过来做iOS开发的应该很快就能熟悉。
创建iOS项目:
1\. 打开XCode,选择File->New Project,然后选择iOS->Application->Single View Application,然后点Next,如下图所示:
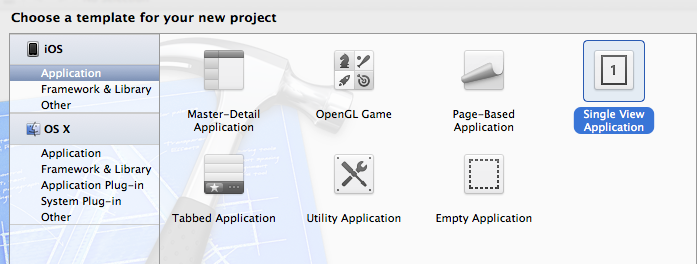
从上图看出,可以创建7种项目,我也是初学者,不能一一说出他们的不同,等熟悉了再补充。
2\. 填写应用信息
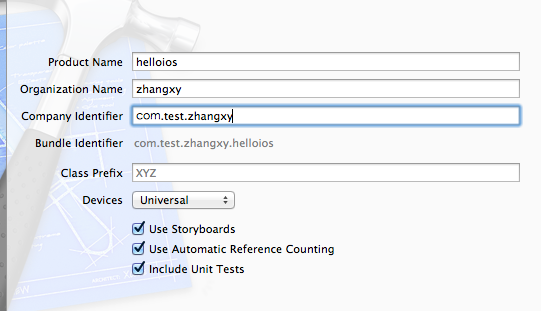
Product Name:项目名称;
Organization Name:组织名,一般显示计算机名;
Company Identifier: 公司标示,此处输入一个唯一标示即可,也可以在项目中统一修改;
Class Prefix: 默认类前缀,为了避免与其他类混淆,此处最好输入一个前缀名称,默认使用全大写字母,保留为空也可以;
Device : 设备类型,可以选择“iPhone”“iPad”或者“Universal”(通用,同时支持iPhone和iPad) ;
Storyboard: 是Xcode 4.x新增特性,是以前版本的xib的一个扩展升级,让程序的UI设计更加的简化;注意:基于Storyboard的应用只能在iOS5以上版本的设备上运行。
ARC: 是Xcode 4.x新增特性,对于以前版本的iOS程序员每alloc一个对象,都会下意识地先去release它,这是一个非常讨厌的事情。现在有了 ARC,一切都变得更加简单,程序员可以更加专注地处理自己应用的表现。
Include Unit Tests:生成项目时会包含测试包。
生成项目:
项目结构如下图:
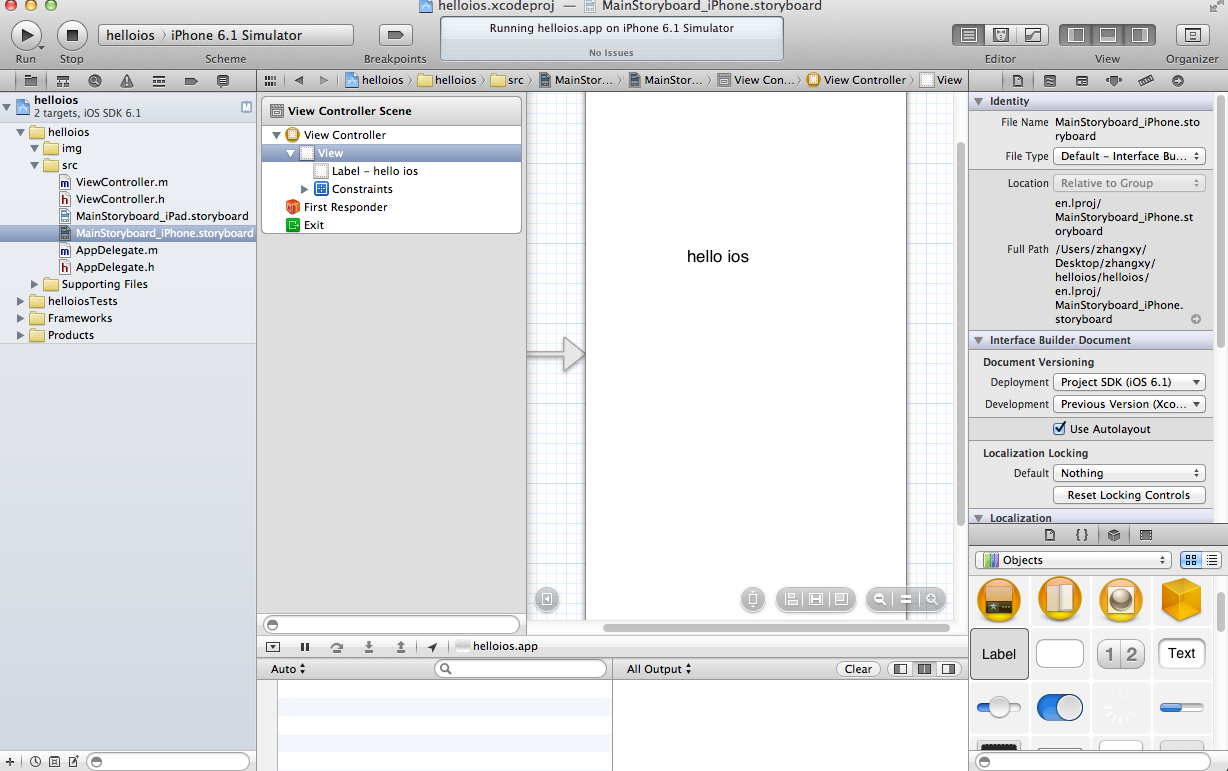
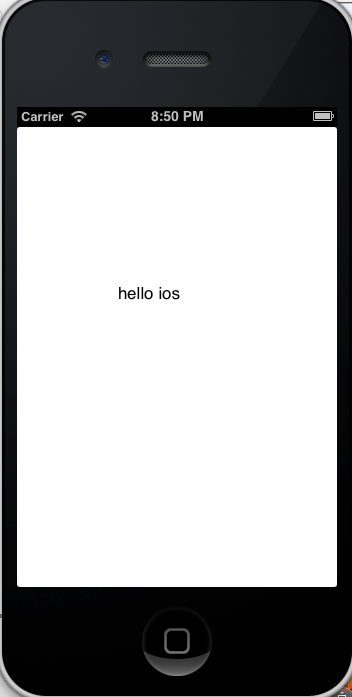
选择MainStoryboard_iPhone.storyboard,初始时是一个空白,选择右下角的Label标签,双击,修改标签,点上面的运行按钮,模拟器就出现了Hello iOS,自己没写一行代码。Xcode开发工具还是很强大的。
(一)——ios搭建开发环境
最后更新于:2022-04-01 07:04:51
好久就想试水IOS开发了,由于开发环境限制,一直局限于理论和虚拟机,近来入手了MacBook Pro,也来尝尝鲜,笔者也是现学现总结,如果有不足,请指正。
IOS开发必备MAC OS X 另加一部iPhone手机,windows操作系统也可以开发,需要安装虚拟机,安装虚拟机请参考[Windows 7下虚拟机安装MAC](http://blog.csdn.net/xyz_lmn/article/details/7219833) 。笔者的开发硬件配置:MacBook Pro+iphone 3gs,手机有点落后了。
我们来看一下MAC下建立iOS开发环境:
首先进入官网[https://developer.apple.com](https://developer.apple.com/),这也是任何程序入门必走的一步,进入官网找到iOS Dev Center,下图

图一(iOS Dev Center)
点击进入。进入后,如果没有登录,会有Sign In的提示,使用注册的帐号登录即可,如果没有帐号,可自行注册。登录后会显示iOS开发的资源(图三)。

图二(提示登录)
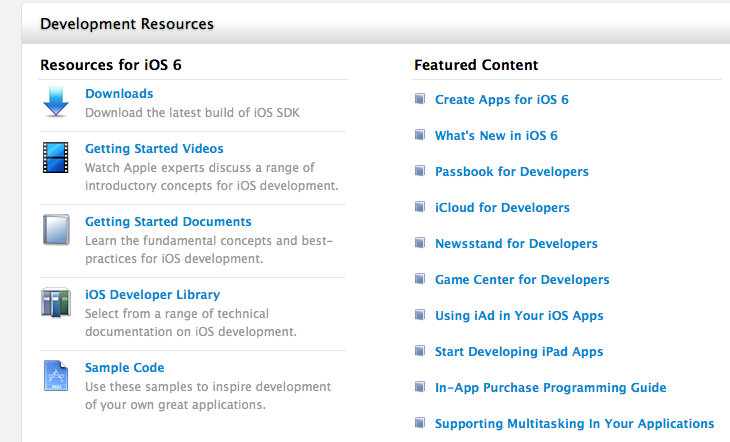
在资源里面看到Downloads,点击会引导到下载Xcode,Xcode是开发iOS必备的开发工具,当前最新版本是4.6.2。
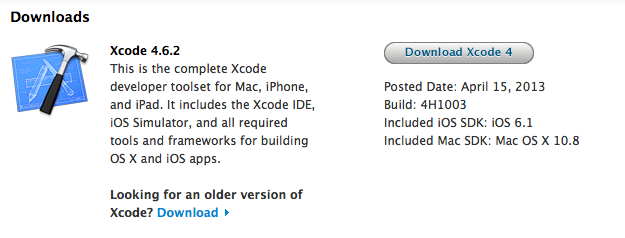
这个文件大约1.8G.下载需要一段时间。下载完成点击即可完成安装。
前言
最后更新于:2022-04-01 07:04:49
> 原文出处:[移动开发专栏文章](http://blog.csdn.net/column/details/xyzlmnios.html)
> 作者:[张兴业](http://blog.csdn.net/xyz_lmn)
**本系列文章经作者授权在看云整理发布,未经作者允许,请勿转载!**
#iOS学习
> iOS学习笔记,从零开始iphone开发。