Android之Fragment静态加载
最后更新于:2022-04-01 14:27:43
### 1、Fragment知识概要
Android3.0引入了Fragment,主要目的是用在大屏幕设备上,支持更加动态和灵活的UI设计。Fragment在你的应用中应当是一个模块化和可重用的组件,因为Fragment定义了它自己的布局,以及通过使用它自己的声明周期回调回调方法定义了它自己的行为,可以将Fragment包含到多个Activity中。
(1)Fragment可以作为Activity界面的一部分组成出现;
(2)可以在一个Activity中同时出现多个Fragment,并且一个Fragment也可以在多个Activity中使用;
(3)在Activity运行过程中,可以添加、移除或替换Fragment;
(4)Fragment可以响应自己的输入事件,并且有自己的声明周期,它们的生命周期受宿主Activity的生命周期影响;
(5)Fragment在第一次绘制它的用户界面时,系统会调用onCreateView()方法,此方法返回一个View。(如果不显示UI,返回null);
Fragment两种加载方式:静态加载、动态加载。
### 2、准备阶段:
本文以及后续将使用一个APP来讲解关于Fragment的知识,大致布局如下:

values添加color.xml:
~~~
<?xml version="1.0" encoding="utf-8"?>
<resources>
<color name="gray">#88000000</color>
<color name="white">#ffffff</color>
</resources>
~~~
drawable中添加radio_pressed.xml
~~~
<?xml version="1.0" encoding="utf-8"?>
<selector xmlns:android="http://schemas.android.com/apk/res/android">
<item android:drawable="@color/gray" android:state_checked="true"></item>
<item android:drawable="@color/white" android:state_pressed="true"></item>
<item android:drawable="@color/white"></item>
</selector>
~~~
main主布局:
~~~
<?xml version="1.0" encoding="utf-8"?>
<RelativeLayout xmlns:android="http://schemas.android.com/apk/res/android"
android:layout_width="match_parent"
android:layout_height="match_parent" >
<LinearLayout
android:id="@+id/frame"
android:layout_width="match_parent"
android:layout_height="wrap_content"
android:orientation="vertical" >
</LinearLayout>
<RadioGroup
android:id="@+id/radiogroup"
android:layout_width="match_parent"
android:layout_height="wrap_content"
android:layout_alignParentBottom="true"
android:gravity="center_horizontal"
android:orientation="horizontal" >
<RadioButton
android:id="@+id/first"
android:layout_width="0dp"
android:layout_height="wrap_content"
android:layout_weight="1"
android:background="@drawable/radio_pressed"
android:button="@null"
android:drawableTop="@drawable/ic_launcher"
android:gravity="center_horizontal"
android:text="静态加载" />
<RadioButton
android:id="@+id/second"
android:layout_width="0dp"
android:layout_height="wrap_content"
android:layout_weight="1"
android:background="@drawable/radio_pressed"
android:button="@null"
android:drawableTop="@drawable/ic_launcher"
android:gravity="center_horizontal"
android:text="动态加载" />
<RadioButton
android:id="@+id/thrid"
android:layout_width="0dp"
android:layout_height="wrap_content"
android:layout_weight="1"
android:background="@drawable/radio_pressed"
android:button="@null"
android:drawableTop="@drawable/ic_launcher"
android:gravity="center_horizontal"
android:text="生命周期" />
<RadioButton
android:id="@+id/fourth"
android:layout_width="0dp"
android:layout_height="wrap_content"
android:layout_weight="1"
android:background="@drawable/radio_pressed"
android:button="@null"
android:drawableTop="@drawable/ic_launcher"
android:gravity="center_horizontal"
android:text="传值通信" />
</RadioGroup>
</RelativeLayout>
~~~
MainActivity加载main:
~~~
package com.example.fragment;
import android.os.Bundle;
import android.app.Activity;
import android.view.Menu;
import android.widget.RadioGroup;
import android.widget.RadioGroup.OnCheckedChangeListener;
public class MainActivity extends Activity implements OnCheckedChangeListener {
private RadioGroup group;
@Override
protected void onCreate(Bundle savedInstanceState) {
super.onCreate(savedInstanceState);
setContentView(R.layout.main);
group=(RadioGroup) findViewById(R.id.radiogroup);
group.setOnCheckedChangeListener(this);
}
@Override
public boolean onCreateOptionsMenu(Menu menu) {
// Inflate the menu; this adds items to the action bar if it is present.
getMenuInflater().inflate(R.menu.main, menu);
return true;
}
@Override
public void onCheckedChanged(RadioGroup group, int checkedId) {
// TODO Auto-generated method stub
switch (checkedId) {
case R.id.first:
//演示静态加载
break;
case R.id.second:
//演示动态加载
break;
case R.id.thrid:
//演示生命周期
break;
case R.id.fourth:
//演示传值通信
break;
}
}
}
~~~
### 3、静态加载
在Activity的layout文件中声明Fragment(特别注意:在<fragment>标签中的android: name属性中指定了在layout中实例化的Fragment类),标识Fragment的方法:A.android: id 属性提供一个唯一ID;B.android: tag属性提供一个唯一字符串;
添加fragment.xml:
~~~
<?xml version="1.0" encoding="utf-8"?>
<LinearLayout xmlns:android="http://schemas.android.com/apk/res/android"
android:layout_width="match_parent"
android:layout_height="match_parent"
android:orientation="vertical" >
<TextView
android:id="@+id/text"
android:layout_width="wrap_content"
android:layout_height="wrap_content"
android:text="我的Fragment"/>
<Button android:layout_width="wrap_content"
android:layout_height="wrap_content"
android:id="@+id/button"/>
</LinearLayout>
~~~
添加MyFragment类,并加载fragment布局:
~~~
package com.example.fragment;
import android.app.Fragment;
import android.os.Bundle;
import android.view.LayoutInflater;
import android.view.View;
import android.view.View.OnClickListener;
import android.view.ViewGroup;
import android.widget.Button;
import android.widget.TextView;
public class MyFragment extends Fragment {
@Override
public View onCreateView(LayoutInflater inflater, ViewGroup container,
Bundle savedInstanceState) {
// layout布局文件转换成View对象
/**
* inflater.inflate(resource, root, attachToRoot)
* resource:Fragment需要加载的布局文件
* root:加载layout的父ViewGroup
* attactToRoot:false,不返回父ViewGroup
*/
View view = inflater.inflate(R.layout.fragment, container, false);
TextView text = (TextView) view.findViewById(R.id.text);
Button button = (Button) view.findViewById(R.id.button);
text.setText("静态加载Fragment");
button.setText("获取内容");
button.setOnClickListener(new OnClickListener() {
@Override
public void onClick(View v) {
// TODO Auto-generated method stub
// String value = getAaa();
// Toast.makeText(getActivity(), "value="+value,
// Toast.LENGTH_SHORT).show();
}
});
return view;
}
}
~~~
添加jigntai.xml:
~~~
<?xml version="1.0" encoding="utf-8"?>
<LinearLayout xmlns:android="http://schemas.android.com/apk/res/android"
android:layout_width="match_parent"
android:layout_height="match_parent"
android:orientation="vertical" >
<!-- android:id:静态加载必须指定一个ID -->
<!-- android:name:完整包名 -->
<fragment
android:id="@+id/fragment"
android:layout_width="wrap_content"
android:layout_height="wrap_content"
android:name="com.example.fragment.MyFragment"
/>
</LinearLayout>
~~~
添加JingTaiActivity类:
~~~
public class JingTaiActivity extends Activity {
private TextView tv;
@Override
protected void onCreate(Bundle savedInstanceState) {
// TODO Auto-generated method stub
super.onCreate(savedInstanceState);
setContentView(R.layout.jingtai);
Button button=(Button) findViewById(R.id.button);
tv=(TextView) findViewById(R.id.text);
button.setText("改变");
button.setOnClickListener(new OnClickListener() {
@Override
public void onClick(View v) {
// TODO Auto-generated method stub
tv.setText("TextView改变了");
}
});
}
}
~~~
主MainActivity中演示静态加载部分添加:
~~~
case R.id.first:
//演示静态加载
Intent jingtaiIntent=new Intent(MainActivity.this,JingTaiActivity.class);
startActivity(jingtaiIntent);
break;
~~~
MainActivity跳转到JingTaiActivity,里面加载了一个<fragment>,而其中android:name属性是com.example.fragment.MyFragment,在这个MyFragment中又有自己的text、button布局。再回到JingTaiActivity,在其中加载了jingtai.xml,并且可以直接通过findViewById找到MyFragment的布局文件fragment中的text、button。
也就是说,当一个布局文件中通过静态加载Fragment加载到Activity中来,Fragment中的布局文件对Activity也是共享的。
关于Activity回收造成View选中不对应的问题
最后更新于:2022-04-01 14:27:41
当遇到Activity被回收(横竖屏、内存不足)时,Activity会重建,而去调用onCreate()方法,在onCreate()方法中调用了设置首项透明度的方法。这样就会出现,选中的View和内容Fragment的不对应的。
~~~
//Bundle的键,作用:自定义的VIew继承的有可能不是View,有可能是TextView、ImageView,
//重写下面两个方法,以便记住原本的Bundle(不能抹掉原来的XXView的恢复和销毁的过程)
private static final String INSTANCE_STATUS="instance_status";
private static final String STATUS_ALPHA="status_alpha"; //Bundle的键
//当Activity重建的时候,恢复Alpha值
@Override
protected Parcelable onSaveInstanceState() {
Bundle bundle=new Bundle();
bundle.putParcelable(INSTANCE_STATUS, super.onSaveInstanceState()); //把父级存储的变量放到INSTANCE_STATUS中
bundle.putFloat(STATUS_ALPHA, mAlpha); //存储自己需要保存的东西
return bundle;
}
@Override
protected void onRestoreInstanceState(Parcelable state) {
if(state instanceof Bundle){
Bundle bundle=(Bundle) state;
mAlpha=bundle.getFloat(STATUS_ALPHA); //取出自己保存的东西
super.onRestoreInstanceState(bundle.getParcelable(INSTANCE_STATUS)); //取出系统保存的东西,并调用系统的恢复
return;
}
super.onRestoreInstanceState(state);
}
~~~
一个自定义的Topbar模板
最后更新于:2022-04-01 14:27:39
### 1、Topbar模板功能介绍:自定义UI布局,自定义UI属性,自定义按钮监听事件,自定义左、右button的显示!效果图如下:


### 2、自定义属性:values——mytopbar.xml:
~~~
<?xml version="1.0" encoding="utf-8"?>
<resources>
<!-- 自定义属性 -->
<declare-styleable name="MyTopBar">
<attr name="leftTextColor" format="color"/>
<!-- BackGround属性可以颜色,也可以是一个资源文件 -->
<!-- 所以BackGround是 format="reference|color"-->
<attr name="leftBackGround" format="reference|color"/>
<attr name="leftText" format="string"/>
<attr name="title" format="string"/>
<attr name="titleTextSize" format="dimension"/>
<attr name="titleTextColor" format="color"/>
<attr name="rightTextColor" format="color"/>
<attr name="rightBackGround" format="reference|color"/>
<attr name="rightText" format="string"/>
</declare-styleable>
</resources>
~~~
### 3、自定义VIew:MyTopBar.java
~~~
//继承RelativeLayout并重写构造方法
public class MyTopBar extends RelativeLayout {
// 自定义的控件和自定义的属性(values下mytopbar.xml)的声明
private Button leftButton, rightButton;
private TextView tvTitle;
private int leftTextColor;
private Drawable leftDrawable;
private String leftText;
private float titleTextSize;
private int titleTextColor;
private String title;
private int rightTextColor;
private Drawable rightDrawable;
private String rightText;
private LayoutParams leftLayoutParams, titleLayoutParams, rightLayoutParams;
private myTopbarClicklistenter clicklistenter;
//自定义click的监听回调接口
public interface myTopbarClicklistenter{
public void leftClick();
public void rightClick();
}
//自定义一个setOnClickListenter方法
public void setOnTopbarClickListenter(myTopbarClicklistenter clicklistenter){
this.clicklistenter=clicklistenter; //调用的时候通过一个匿名内部类映射进来
}
//重写构造方法
public MyTopBar(Context context, AttributeSet attrs) {
super(context, attrs);
// 获取自定义的属性,并将自定义的属性映射到自定义的属性值中去
// 通过obtainStyledAttributes获取自定义属性,并存到TypedArray
TypedArray ta = context.obtainStyledAttributes(attrs,R.styleable.MyTopBar);
leftTextColor = ta.getColor(R.styleable.MyTopBar_leftTextColor, 0); //从TypedArray中取出来,并对应到自定义的属性值上
leftDrawable = ta.getDrawable(R.styleable.MyTopBar_leftBackGround);
leftText = ta. getString(R.styleable.MyTopBar_leftText);
titleTextSize = ta.getDimension(R.styleable.MyTopBar_titleTextSize, 0);
titleTextColor = ta.getColor(R.styleable.MyTopBar_titleTextColor, 0);
title = ta.getString(R.styleable.MyTopBar_title);
rightTextColor = ta.getColor(R.styleable.MyTopBar_rightTextColor, 0);
rightDrawable = ta.getDrawable(R.styleable.MyTopBar_rightBackGround);
rightText = ta.getString(R.styleable.MyTopBar_rightText);
ta.recycle();
//组件定义
leftButton = new Button(context);
tvTitle = new TextView(context);
rightButton = new Button(context);
// 将自定义的属性设置到控件上
leftButton.setTextColor(leftTextColor);
leftButton.setBackground(leftDrawable);
leftButton.setText(leftText);
tvTitle.setTextColor(titleTextColor);
tvTitle.setTextSize(titleTextSize);
tvTitle.setText(title);
tvTitle.setGravity(Gravity.CENTER); // 设置文字居中
rightButton.setTextColor(rightTextColor);
rightButton.setBackground(rightDrawable);
rightButton.setText(rightText);
setBackgroundColor(0xFFF59563); // 设置背景颜色
//将自定义的控件放到Layout中(以LayoutParams的形式)
leftLayoutParams=new LayoutParams(ViewGroup.LayoutParams.WRAP_CONTENT,LayoutParams.WRAP_CONTENT);
leftLayoutParams.addRule(RelativeLayout.ALIGN_PARENT_LEFT,TRUE); //设置左对齐
addView(leftButton,leftLayoutParams); //leftButton以leftLayoutParams的形式加入到ViewGroup中
titleLayoutParams=new LayoutParams(LayoutParams.WRAP_CONTENT,LayoutParams.MATCH_PARENT);
titleLayoutParams.addRule(RelativeLayout.CENTER_IN_PARENT,TRUE); //设置居中对齐
addView(tvTitle,titleLayoutParams); //tvTitle以titleLayoutParams的形式加入到ViewGroup中
rightLayoutParams=new LayoutParams(LayoutParams.WRAP_CONTENT,LayoutParams.WRAP_CONTENT);
rightLayoutParams.addRule(RelativeLayout.ALIGN_PARENT_RIGHT,TRUE); //设置右对齐
addView(rightButton,rightLayoutParams);//rightButton以rightLayoutParams的形式加入到ViewGroup中
//设置监听事件
leftButton.setOnClickListener(new View.OnClickListener() {
@Override
public void onClick(View v) {
clicklistenter.leftClick();
}
});
rightButton.setOnClickListener(new View.OnClickListener() {
@Override
public void onClick(View v) {
clicklistenter.rightClick();
}
});
}
//设置左Button是否显示
public void setLeftIsVisible(boolean flag){
if(flag){
leftButton.setVisibility(View.VISIBLE);
}else{
leftButton.setVisibility(View.GONE);
}
}
// 设置右Button是否显示
public void setRightIsVisible(boolean flag) {
if (flag) {
rightButton.setVisibility(View.VISIBLE);
} else {
rightButton.setVisibility(View.GONE);
}
}
}
~~~
### 4、activity_main.xml引用自定义控件:
~~~
<!-- 引用自定义控件 -->
<com.example.topbar.MyTopBar
android:id="@+id/my_topbar"
android:layout_width="match_parent"
android:layout_height="40dp"
app:leftBackGround="@drawable/blue"
app:leftTextColor="#ffffff"
app:leftText="Back"
app:title="自定义标题"
app:titleTextSize="10sp"
app:titleTextColor="#123412"
app:rightBackGround="@drawable/blue"
app:rightTextColor="#ffffff"
app:rightText="More">
</com.example.topbar.MyTopBar>
~~~
### 5、MainActivity.java使用控件:
~~~
public class MainActivity extends Activity {
@Override
protected void onCreate(Bundle savedInstanceState) {
super.onCreate(savedInstanceState);
setContentView(R.layout.activity_main);
MyTopBar topBar =(MyTopBar) findViewById(R.id.my_topbar);
//调用自定义的Topbar的自定义的click监听事件
topBar.setOnTopbarClickListenter(new MyTopBar.myTopbarClicklistenter() {
@Override
public void leftClick() {
// TODO Auto-generated method stub
Toast.makeText(MainActivity.this, "点击了Back", Toast.LENGTH_SHORT).show();
}
@Override
public void rightClick() {
// TODO Auto-generated method stub
Toast.makeText(MainActivity.this, "点击了More", Toast.LENGTH_SHORT).show();
}
});
//topBar.setLeftIsVisible(false);
//topBar.setRightIsVisible(false);
}
}
~~~
6、使用Topbar模板提示:正如上面MainActivity中,实例化后,可以调用TopBar里面的方法。
[**完整代码下载:https://github.com/songshimvp/AndroidStudy/tree/master/TopBar**](https://github.com/songshimvp/AndroidStudy/tree/master/TopBar)
不同APP通过SharedPreferences传递数据(共享数据)
最后更新于:2022-04-01 14:27:36
### 1、写入数据APP
~~~
public class MainActivity extends Activity {
private SharedPreferences putPreferences;
private Editor putEditor;
@Override
protected void onCreate(Bundle savedInstanceState) {
super.onCreate(savedInstanceState);
setContentView(R.layout.activity_main);
// 将服务器信息写入serverInfo.xml
findViewById(R.id.buttonPut).setOnClickListener( new View.OnClickListener() {
@Override
public void onClick(View v) {
// TODO Auto-generated method stub
putPreferences = getSharedPreferences("serverInfo", Context.MODE_WORLD_READABLE);
putEditor = putPreferences.edit();
putEditor.putString("serverIP", "192.168.1.102");
putEditor.putString("password", "123456");
putEditor.commit();
Toast.makeText(MainActivity.this,"服务器信息成功写入serverInfo.xml", Toast.LENGTH_LONG).show();
}
});
}
@Override
public boolean onCreateOptionsMenu(Menu menu) {
// Inflate the menu; this adds items to the action bar if it is present.
getMenuInflater().inflate(R.menu.main, menu);
return true;
}
}
~~~


### 2、获取数据APP
~~~
public class MainActivity extends Activity {
private SharedPreferences getPreferences;
@Override
protected void onCreate(Bundle savedInstanceState) {
super.onCreate(savedInstanceState);
setContentView(R.layout.activity_main);
//从serverInfo.xml获取服务器信息
findViewById(R.id.buttonGet).setOnClickListener(new View.OnClickListener() {
@Override
public void onClick(View v) {
// TODO Auto-generated method stub
try {
Context context=createPackageContext("com.example.putprefapp", Context.CONTEXT_IGNORE_SECURITY);
getPreferences=context.getSharedPreferences("serverInfo", MODE_WORLD_READABLE);
String serverIP=getPreferences.getString("serverIP","");
String serverPwd=getPreferences.getString("password", "");
Toast.makeText(MainActivity.this, "服务器信息如下:IP地址:" +serverIP+"; 密码:"+serverPwd, Toast.LENGTH_LONG).show();
} catch (NameNotFoundException e) {
// TODO Auto-generated catch block
e.printStackTrace();
}
}
});
}
@Override
public boolean onCreateOptionsMenu(Menu menu) {
// Inflate the menu; this adds items to the action bar if it is present.
getMenuInflater().inflate(R.menu.main, menu);
return true;
}
}
~~~

### 3、关于android:sharedUserId
上面的两个工程中并没有对android:sharedUserId属性进行设置。这个属性是在查资料时看到的:意思是说,在manifest.xml里面将两个应用程序的android:sharedUserId属性设为相同的就可以对SharedPreferences文件进行写。(此处并没有验证)
Android手势识别之GestureDetector
最后更新于:2022-04-01 14:27:34
GestureDetector(手势识别器)
### (1)手势交互过程原理:
A.触屏一刹那,触发 MotionEvent事件;
B.上述事件被 OnTouchListenter 监听,在 nTouch() 中获得 MotionEvent对象;
C.GestureDetector 转发MotionEvent对象至 OnGestureListenter;
D.OnGestureListenter 获得该对象,根据该对象封装的信息作出合适的反馈;
### (2)MotionEvent:
1)、用于封装手势等动作事件;
2)、内部封装用于记录横轴和纵轴坐标的属性X和Y;
GestureDetector:
1)、识别各种手势;
OnGestureListenter:
1)、手势交互的监听接口,其提供多个抽象方法;
2)、根据GestureDetector的手势识别结果调用相对应的方法;
### (3)GestureDetector工作原理:
1)、GestureDetector.OnGestureListener接口
onDown(MotionEvent e):——单击
Notified when a tap occurs with the down MotionEvent that triggered it.
onFling(MotionEvent e1, MotionEvent e2, float velocityX, float velocityY):——滑动
Notified of a fling event when it occurs with the initial on down MotionEvent and the matching up MotionEvent.
onLongPress(MotionEvent e):——长按
Notified when a long press occurs with the initial on down MotionEvent that trigged it.
onScroll(MotionEvent e1, MotionEvent e2, float distanceX, float distanceY):——滚动
Notified when a scroll occurs with the initial on down MotionEvent and the current move MotionEvent.
onShowPress(MotionEvent e):——短按
The user has performed a down MotionEvent and not performed a move or up yet.
onSingleTapUp(MotionEvent e):——抬起
Notified when a tap occurs with the up MotionEvent that triggered it.
2)、GestureDetector.OnDoubleTapListener接口
onDoubleTap(MotionEvent e):——双击**
Notified when a double-tap occurs.
onDoubleTapEvent(MotionEvent e):——双击按下和抬起各触发一次
Notified when an event within a double-tap gesture occurs, including the down, move, and up events.
onSingleTapConfirmed(MotionEvent e):——单击确认(即很快的按下并抬起,但并不连续点击第二下)
Notified when a single-tap occurs.
3)、GestureDetector.SimpleOnGestureListener类
其实我们并不需要处理上面所有手势。问了方便起见,Android提供了另外一个类SimpleOnGestureListener。它实现了如上接口,我们只需要继承SimpleOnGestureListener类,然后重载感兴趣的手势。 implements [GestureDetector.OnGestureListener](http://developer.android.com/reference/android/view/GestureDetector.OnGestureListener.html) [GestureDetector. OnDoubleTapListener](http://developer.android.com/reference/android/view/GestureDetector.OnDoubleTapListener.html)[GestureDetector. OnContextClickListener](http://developer.android.com/reference/android/view/GestureDetector.OnContextClickListener.html)。A convenience class to extend when you only want to listen for a subset of all the gestures. This implements all methods in the `[GestureDetector.OnGestureListener](http://developer.android.com/reference/android/view/GestureDetector.OnGestureListener.html)`, `[GestureDetector.OnDoubleTapListener](http://developer.android.com/reference/android/view/GestureDetector.OnDoubleTapListener.html)`, and`[GestureDetector.OnContextClickListener](http://developer.android.com/reference/android/view/GestureDetector.OnContextClickListener.html)` but does nothing and return`false` for all applicable methods.
~~~
public class MainActivity extends Activity {
private ImageView imageView;
private GestureDetector mygestureDetector;
// 继承SimpleOnGestureListener类,然后重载感兴趣的手势。
class MyGestureListenter extends SimpleOnGestureListener {
@Override
// 重载滑动手势
public boolean onFling(MotionEvent e1, MotionEvent e2, float velocityX,
float velocityY) {
if (e1.getX() - e2.getX() > 50) {
Toast.makeText(MainActivity.this, "从右往左滑动", Toast.LENGTH_SHORT)
.show();
} else if (e2.getX() - e1.getX() > 50) {
Toast.makeText(MainActivity.this, "从左往右滑动", Toast.LENGTH_SHORT)
.show();
}
return super.onFling(e1, e2, velocityX, velocityY);
}
}
@Override
protected void onCreate(Bundle savedInstanceState) {
super.onCreate(savedInstanceState);
setContentView(R.layout.activity_main);
/*
* GestureDetector工作原理
* 1、当接收到用户触摸消息时,将消息交给GestureDetector加工;
* 2、通过设置监听器获得GestureDetector处理后的手势;
* 3、GestureDetector提供两个监听器:
* A.OnGestureListenter:处理单击类消息;
* B.OnDoubleTapListenter:处理双击类消息;
*/
imageView = (ImageView) findViewById(R.id.img);
mygestureDetector = new GestureDetector(new MyGestureListenter());
// MotionEvent——》setOnTouchListener捕获
// ——》onTouch中GestureDetector对象将监听事件转发给MyGestureListenter(extends SimpleOnGestureListener)
// ——》MyGestureListenter类中实现了要重载的手势
imageView.setOnTouchListener(new OnTouchListener() {
@Override
// 可以捕获触摸屏幕发生的Event
public boolean onTouch(View v, MotionEvent event) {
// TODO Auto-generated method stub
mygestureDetector.onTouchEvent(event); // 转发event事件,转发给MyGestureListenter(extends SimpleOnGestureListener)
return false;
}
});
}
//消除冲突
/*@Override
public boolean dispatchTouchEvent(MotionEvent ev) {
// TODO Auto-generated method stub
if(mygestureDetector!=null){
if(mygestureDetector.onTouchEvent(ev)){
return true;
}
}
return super.dispatchTouchEvent(ev);
}*/
//必须重写onTouchEvent方法,onFling才生效
@Override
public boolean onTouchEvent(MotionEvent event) {
// TODO Auto-generated method stub
return mygestureDetector.onTouchEvent(event);
}
}
~~~
为了让onFling才生效,必须重写onTouchEvent方法!
Android SharedPreferences存储数据的使用方法
最后更新于:2022-04-01 14:27:32
### 1、SharedPreferences类的介绍
对于软件配置参数的保存,如果是window软件通常我们会采用ini文件进行保存;如果是j2se应用,我们会采用properties属性文件或者xml进行保存。如果是Android应用,我们最适合采用什么方式保存软件配置参数呢?Android平台给我们提供了一个SharedPreferences类,它是一个轻量级的存储类,特别适合用于保存软件配置参数。使用SharedPreferences保存数据,其背后是用xml文件存放数据,文件存放在 /data/data/<package name>/shared_prefs 目录下(下面会对实际案例进行截图证明)。SharedPreferences是Android中最容易理解的数据存储技术,实际上SharedPreferences处理的就是一个key-value(键值对),SharedPreferences常用来存储一些轻量级的数据。
### 2、SharedPreferences类的说明及简单分析
(1)获取SharedPreferences的两种方式:
1 调用Context对象的getSharedPreferences()方法;
2 调用Activity对象的getPreferences()方法;
两种方式的区别:
调用Context对象的getSharedPreferences()方法获得的SharedPreferences对象可以被同一应用程序下的其他组件共享;
调用Activity对象的getPreferences()方法获得的SharedPreferences对象只能在该Activity中使用;
(2)SharedPreferences的四种操作模式:
Context.MODE_PRIVATE:为默认操作模式,代表该文件是私有数据,只能被应用本身访问,在该模式下,写入的内容会覆盖原文件的内容;
Context.MODE_APPEND:模式会检查文件是否存在,存在就往文件追加内容,否则就创建新文件;
Context.MODE_WORLD_READABLE:表示当前文件可以被其他应用读取;
Context.MODE_WORLD_WRITEABLE:表示当前文件可以被其他应用写入;
(3)将数据保存至SharedPreferences:
~~~
SharedPreferences preferences = getSharedPreferences("user",Context.MODE_PRIVATE);
Editor editor=preferences.edit();
String name="xixi";
String age="22";
editor.putString("name", name);
editor.putString("age", age);
editor.commit();
~~~
(4)从SharedPreferences获取数据:
~~~
SharedPreferences preferences=getSharedPreferences("user", Context.MODE_PRIVATE);
String name=preferences.getString("name", "defaultname");
String age=preferences.getString("age", "0");
~~~
### 3、简单案例展示:
~~~
findViewById(R.id.button1).setOnClickListener(new View.OnClickListener() {
@Override
public void onClick(View v) {
// TODO Auto-generated method stub
SharedPreferences sharedPreferences=getSharedPreferences("user", Context.MODE_PRIVATE); // 实例化SharedPreferences对象
Editor editor=sharedPreferences.edit(); // 实例化SharedPreferences.Editor对象
editor.putString("name", "张三"); // 用putString的方法保存数据
editor.putString("IP", "192.168.1.102");
editor.putString("password", "123456");
editor.commit(); // 提交当前数据
Toast.makeText(MainActivity.this, "写入数据成功!", Toast.LENGTH_SHORT).show();
}
});
findViewById(R.id.button2).setOnClickListener(new View.OnClickListener() {
@Override
public void onClick(View v) {
// 在读取SharedPreferences数据前要实例化出一个SharedPreferences对象
SharedPreferences preferences=getSharedPreferences("user", Context.MODE_PRIVATE);
String nameStr=preferences.getString("name", "dafultName"); // 使用getString方法获得value,注意第2个参数是value的默认值
String ipStr=preferences.getString("IP", ""); // getString()第二个参数为缺省值,如果preference中不存在该key,将返回缺省值
String pwStr=preferences.getString("password", "");
Toast.makeText(MainActivity.this, "用户信息:姓名:"+nameStr+",IP:"+ipStr+",密码:"+pwStr, Toast.LENGTH_LONG).show();
}
});
~~~
关于SharedPreferences背后是使用xml文件保存数据,getSharedPreferences(name,mode)方法的第一个参数用于指定该文件的名称,名称不用带后缀,后缀会由Android自动加上。方法的第二个参数指定文件的操作模式,共有四种操作模式,这四种模式前面介绍使用文件方式保存数据时已经讲解过。如果希望SharedPreferences背后使用的xml文件能被其他应用读和写,可以指定Context.MODE_WORLD_READABLE和Context.MODE_WORLD_WRITEABLE权限。
数据文件图示:


### 4、关于“记住用户登录信息”的案例:
xml:
~~~
<LinearLayout xmlns:android="http://schemas.android.com/apk/res/android"
xmlns:tools="http://schemas.android.com/tools"
android:layout_width="match_parent"
android:layout_height="match_parent"
android:orientation="vertical"
tools:context=".MainActivity" >
<LinearLayout
android:layout_width="match_parent"
android:layout_height="wrap_content"
android:orientation="horizontal" >
<TextView
android:layout_width="wrap_content"
android:layout_height="wrap_content"
android:layout_marginLeft="10dp"
android:text="用户名:" />
<EditText
android:id="@+id/name"
android:layout_width="wrap_content"
android:layout_height="wrap_content"
android:layout_marginRight="10dp"
android:layout_weight="1"
android:hint="请输入登录名" />
</LinearLayout>
<LinearLayout
android:layout_width="match_parent"
android:layout_height="wrap_content"
android:orientation="horizontal" >
<TextView
android:layout_width="wrap_content"
android:layout_height="wrap_content"
android:layout_marginLeft="10dp"
android:text="IP地址:" />
<EditText
android:id="@+id/ip"
android:layout_width="wrap_content"
android:layout_height="wrap_content"
android:layout_marginRight="10dp"
android:layout_weight="1"
android:hint="请输入IP地址" />
</LinearLayout>
<LinearLayout
android:layout_width="match_parent"
android:layout_height="wrap_content"
android:orientation="horizontal" >
<TextView
android:layout_width="wrap_content"
android:layout_height="wrap_content"
android:layout_marginLeft="10dp"
android:text="密 码:" />
<EditText
android:id="@+id/password"
android:layout_width="wrap_content"
android:layout_height="wrap_content"
android:layout_marginRight="10dp"
android:layout_weight="1"
android:hint="请输入密码"
android:inputType="textPassword" />
</LinearLayout>
<CheckBox
android:id="@+id/check"
android:layout_width="wrap_content"
android:layout_height="wrap_content"
android:text="记住用户名" />
<LinearLayout
android:layout_width="match_parent"
android:layout_height="wrap_content"
android:orientation="horizontal" >
<Button
android:id="@+id/login"
android:layout_width="wrap_content"
android:layout_height="wrap_content"
android:layout_weight="1"
android:text="登录" />
<Button
android:id="@+id/cancel"
android:layout_width="wrap_content"
android:layout_height="wrap_content"
android:layout_weight="1"
android:text="取消" />
</LinearLayout>
</LinearLayout>
~~~
Main.java
~~~
public class MainActivity extends Activity implements OnClickListener {
private EditText etName,etIP,etPw;
private CheckBox checkBox;
private Button btnLogin,btnCancel;
SharedPreferences sharedPreferences;
Editor editor;
@Override
protected void onCreate(Bundle savedInstanceState) {
super.onCreate(savedInstanceState);
setContentView(R.layout.activity_main);
etName=(EditText) findViewById(R.id.name);
etIP=(EditText) findViewById(R.id.ip);
etPw=(EditText) findViewById(R.id.password);
checkBox=(CheckBox) findViewById(R.id.check);
btnLogin=(Button) findViewById(R.id.login);
btnCancel=(Button) findViewById(R.id.cancel);
btnLogin.setOnClickListener(this);
btnCancel.setOnClickListener(this);
sharedPreferences = getSharedPreferences("UserInfo", MODE_PRIVATE);
editor = sharedPreferences.edit();
String getName = sharedPreferences.getString("name", ""); //此处是关于“记住登录信息”的操作
String getIP=sharedPreferences.getString("IP", "");
String getPassword=sharedPreferences.getString("password", "");
if(getName==null){
checkBox.setChecked(false);
}
else{
checkBox.setChecked(true);
etName.setText(getName);
}
}
@Override
public boolean onCreateOptionsMenu(Menu menu) {
// Inflate the menu; this adds items to the action bar if it is present.
getMenuInflater().inflate(R.menu.main, menu);
return true;
}
@Override
public void onClick(View v) {
// TODO Auto-generated method stub
switch (v.getId()) {
case R.id.login:
String name = etName.getText().toString().trim();
String IP = etIP.getText().toString().trim();
String password=etPw.getText().toString().trim();
if(name.equals("admin") /*&& IP.equals("192.168.1.102")*/ && password.equals("GO")){
if(checkBox.isChecked()){
editor.putString("name", name); //只记住登录名
//editor.putString("IP", IP);
//editor.putString("password", password);
editor.commit();
Toast.makeText(MainActivity.this, "登录名已保存", Toast.LENGTH_SHORT).show();
}
else{
editor.remove("name"); //如果没有勾选“记住登录信息”
//editor.remove("IP");
//editor.remove("password");
editor.commit();
Toast.makeText(MainActivity.this, "登录名未保存", Toast.LENGTH_SHORT).show();
}
Toast.makeText(MainActivity.this, "登陆成功", Toast.LENGTH_SHORT).show();
}else{
Toast.makeText(MainActivity.this, "登录失败", Toast.LENGTH_SHORT).show();
}
break;
case R.id.cancel:
break;
}
}
}
~~~
效果图:

登陆成功以后,返回退出,重新进入该应用程序,用户名已经存在!(勾掉“记住用户名”,则不会自动填写用户名一栏)
### 4、不同APP通过SharedPreferences传递数据(共享数据)
具体案例见:[http://blog.csdn.net/songshimvp1/article/details/50300521](http://blog.csdn.net/songshimvp1/article/details/50300521)
Android Menu中android:showAsAction属性
最后更新于:2022-04-01 14:27:30
1、android:showAsAction属性说明:
当你的应用程序目标设为[蜂巢](http://cpro.baidu.com/cpro/ui/uijs.php?adclass=0&app_id=0&c=news&cf=1001&ch=0&di=128&fv=18&is_app=0&jk=9423f21eda7fae36&k=%B7%E4%B3%B2&k0=%B7%E4%B3%B2&kdi0=0&luki=2&mcpm=0&n=10&p=baidu&q=65035100_cpr&rb=0&rs=1&seller_id=1&sid=36ae7fda1ef22394&ssp2=1&stid=9&t=tpclicked3_hc&td=1836545&tu=u1836545&u=http%3A%2F%2Fwww%2Ebubuko%2Ecom%2Finfodetail%2D784691%2Ehtml&urlid=0)平台(即 Android 3.0)时,你可以利用Action Bar部件提供的全部功能,将你的选项菜单项放在Action Bar的右上角,对用户来说使用更方便,控制该行为的主菜单项属性是android:showAsAction。 这个属性可接受的值有:
1).alaways:这个值会使菜单项一直显示在ActionBar上。
2).ifRoom:如果有足够的空间,这个值会使菜单显示在ActionBar上。
3).never:这个值菜单永远不会出现在ActionBar是。
4).withText:这个值使菜单和它的图标,菜单文本一起显示。
2、实际案例展示:
res ——》 menu ——》main.xml
~~~
<menu xmlns:android="http://schemas.android.com/apk/res/android" >
<item
android:showAsAction="always"
android:title="文件(F)">
<menu >
<item
android:id="@+id/new_file"
android:title="新建"/>
<item
android:id="@+id/open_file"
android:title="打开"/>
<item
android:id="@+id/save_file"
android:title="保存"/>
<item
android:id="@+id/rename_file"
android:title="重命名"/>
</menu>
</item>
<item
android:showAsAction="never"
android:title="编辑(E)">
<menu >
<item
android:id="@+id/v_file"
android:title="粘贴"/>
<item
android:id="@+id/c_edit"
android:title="复制"/>
<item
android:id="@+id/x_edit"
android:title="剪切"/>
<item
android:id="@+id/rename_edit"
android:title="重命名"/>
</menu>
</item>
</menu>
~~~
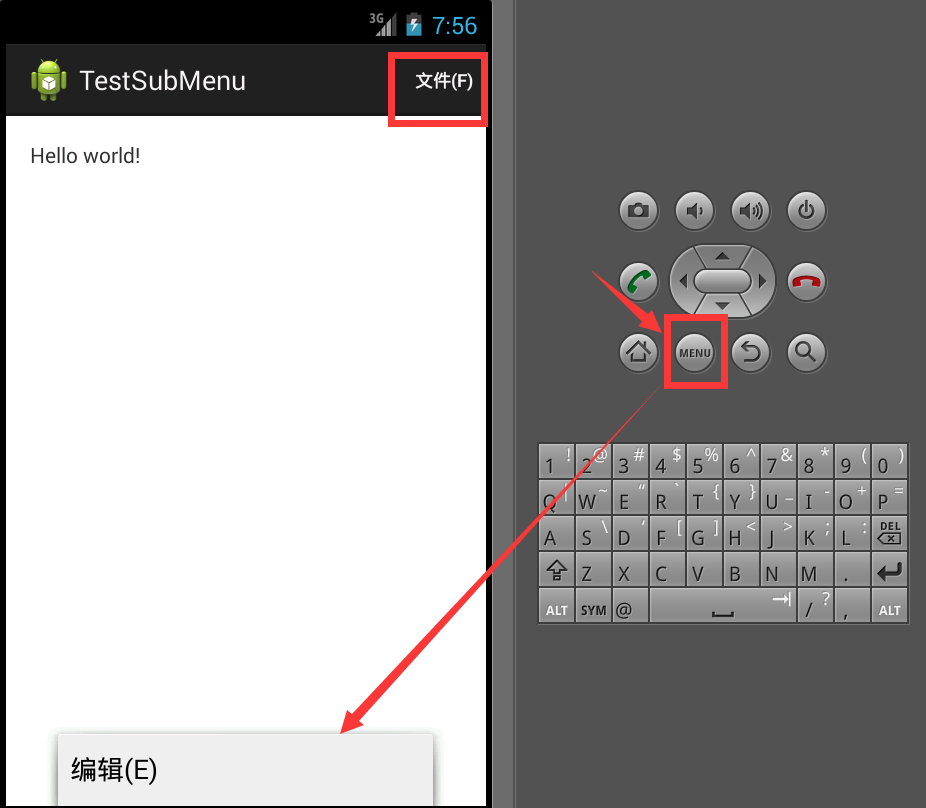
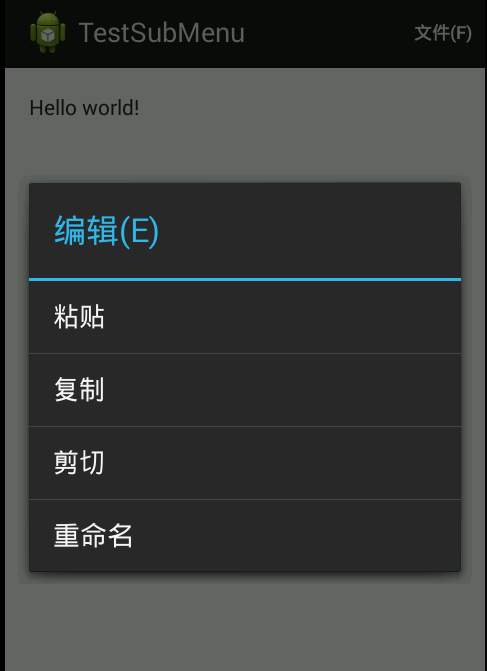
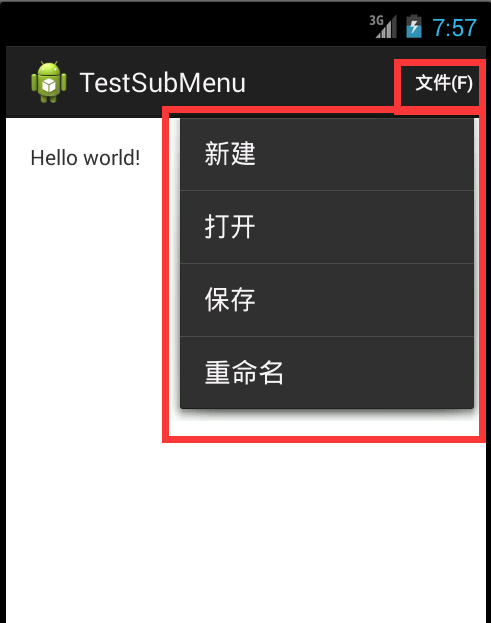
如上面代码所示:“文件(F)”的android:showAsAction属性是“always”;“编辑(E)”的android:showAsAction属性是“never”;
产生的效果图如下面所示:
Android之Menu
最后更新于:2022-04-01 14:27:27
### 1、选项菜单(OptionsMenu):
(1)创建选项菜单:重写onCreateOptionsMenu(Menu menu): 1)通过xml设置MenuInflater.inflate(); 2)动态设置;
(2)设置菜单项点击事件:onOptionsItemSelected();
(3)通过xml设置MenuInflater.inflate();
res ——> menu ——>main.xml
~~~
<menu xmlns:android="http://schemas.android.com/apk/res/android" >
<item
android:id="@+id/action_settings1"
android:orderInCategory="100"
android:showAsAction="never"
android:title="菜单一"/>
<item
android:id="@+id/action_settings2"
android:orderInCategory="100"
android:showAsAction="never"
android:title="菜单二"/>
</menu>
~~~
MainActivity.java
~~~
@Override
public boolean onCreateOptionsMenu(Menu menu) {
// Inflate the menu; this adds items to the action bar if it is present.
// 创建选项菜单
// (1)通过xml设置MenuInflater.inflate();
getMenuInflater().inflate(R.menu.main, menu);
return true;
}
// 设置菜单项点击事件:onOptionsItemSelected();
@Override
public boolean onOptionsItemSelected(MenuItem item) {
// TODO Auto-generated method stub
switch (item.getItemId()) {
case R.id.action_settings1:
Toast.makeText(this, "点击了菜单项一", Toast.LENGTH_SHORT).show();
break;
case R.id.action_settings2:
Toast.makeText(this, "点击了菜单项二", Toast.LENGTH_SHORT).show();
break;
}
return super.onOptionsItemSelected(item);
}
~~~
(4)动态添加菜单项
MainActivity.java
~~~
@Override
public boolean onCreateOptionsMenu(Menu menu) {
//menu.add(groupId, itemId, order, title):返回值是MenuItem
//(2)动态设置
MenuItem menuItem = menu.add(1, 100, 1, "菜单一");
menuItem.setTitle("Menu一");
menuItem.setIcon(R.drawable.ic_launcher); //API>=11时不显示图标
menu.add(1, 101, 2, "菜单二");
menu.add(1, 102, 3, "菜单三");
menu.add(1, 103, 4, "菜单四");
return super.onCreateOptionsMenu(menu);
}
@Override
public boolean onOptionsItemSelected(MenuItem item) {
// TODO Auto-generated method stub
switch (item.getItemId()) {
case 100:
Intent intent=new Intent(MainActivity.this,Menu1.class);
item.setIntent(intent); //设置点击跳转页面
Toast.makeText(this, "点击了菜单项一", Toast.LENGTH_SHORT).show();
break;
case 101:
Toast.makeText(this, "点击了菜单项二", Toast.LENGTH_SHORT).show();
break;
case 102:
Toast.makeText(this, "点击了菜单项三", Toast.LENGTH_SHORT).show();
break;
case 103:
Toast.makeText(this, "点击了菜单项四", Toast.LENGTH_SHORT).show();
break;
}
return super.onOptionsItemSelected(item);
}
~~~
### 2、上下文菜单(ContextMenu)
在一个Activity里面只有一个“选项菜单”,它是针对整个Activity的。如果长按Activity里面的某个View(ListView、GridView等),也会弹出一个菜单操作,这个就是上下文菜单。
(1)创建方法:
1)首先给View(ListView、GridView等)注册上下文菜单registerForContextMenu();
2)添加上下文菜单内容onCreateContextMenu(); A.通过加载xml文件中的菜单项; B.通过代码动态添加;
3)设置菜单点击后的响应事件:onContextItemSelected();
~~~
public class MainActivity extends Activity {
private ListView listView;
private SimpleAdapter simpleAdapter;
private List<Map<String, Object>> data;
@Override
protected void onCreate(Bundle savedInstanceState) {
super.onCreate(savedInstanceState);
setContentView(R.layout.activity_main);
listView = (ListView) findViewById(R.id.listView);
data = new ArrayList<Map<String, Object>>();
simpleAdapter = new SimpleAdapter(this, getData(), R.layout.item,
new String[] { "image", "text" }, new int[] { R.id.imageView,
R.id.textView });
listView.setAdapter(simpleAdapter);
// 为ListVIew注册上下文菜单
this.registerForContextMenu(listView);
}
private List<Map<String, Object>> getData() {
Map<String, Object> map1 = new HashMap<String, Object>();
map1.put("image", R.drawable.calendar);
map1.put("text", "日历");
data.add(map1);
Map<String, Object> map2 = new HashMap<String, Object>();
map2.put("image", R.drawable.camera);
map2.put("text", "照相机");
data.add(map2);
Map<String, Object> map3 = new HashMap<String, Object>();
map3.put("image", R.drawable.clock);
map3.put("text", "时钟");
data.add(map3);
Map<String, Object> map4 = new HashMap<String, Object>();
map4.put("image", R.drawable.games_control);
map4.put("text", "游戏");
data.add(map4);
Map<String, Object> map5 = new HashMap<String, Object>();
map5.put("image", R.drawable.world);
map5.put("text", "地图");
data.add(map5);
return data;
}
//选项菜单
@Override
public boolean onCreateOptionsMenu(Menu menu) {
// TODO Auto-generated method stub
return super.onCreateOptionsMenu(menu);
}
// 重写上下文菜单
@Override
public void onCreateContextMenu(ContextMenu menu, View v,
ContextMenuInfo menuInfo) {
menu.setHeaderTitle("应用程序扩展操作");
menu.setHeaderIcon(R.drawable.ic_launcher);
//动态添加菜单项
//menu.add(1, 100, 1, "粘贴");
//menu.add(1, 101, 1, "复制");
//menu.add(1, 102, 1, "剪切");
//menu.add(1, 103, 1, "重命名");
//通过XML加载菜单项
MenuInflater inflater=getMenuInflater();
inflater.inflate(R.menu.main_context, menu);
}
// 设置上下文菜单的点击事件
@Override
public boolean onContextItemSelected(MenuItem item) {
// TODO Auto-generated method stub
/*switch (item.getItemId()) {
case 100:
Toast.makeText(MainActivity.this, "点击了粘贴", Toast.LENGTH_SHORT).show();
break;
case 101:
Toast.makeText(MainActivity.this, "点击了复制", Toast.LENGTH_SHORT).show();
break;
case 102:
Toast.makeText(MainActivity.this, "点击了剪切", Toast.LENGTH_SHORT).show();
break;
case 103:
Toast.makeText(MainActivity.this, "点击了重命名", Toast.LENGTH_SHORT).show();
break;
}*/
switch (item.getItemId()) {
case R.id.action_settings1:
Toast.makeText(MainActivity.this, "点击了粘贴", Toast.LENGTH_SHORT).show();
break;
case R.id.action_settings2:
Toast.makeText(MainActivity.this, "点击了复制", Toast.LENGTH_SHORT).show();
break;
case R.id.action_settings3:
Toast.makeText(MainActivity.this, "点击了剪切", Toast.LENGTH_SHORT).show();
break;
case R.id.action_settings4:
Toast.makeText(MainActivity.this, "点击了重命名", Toast.LENGTH_SHORT).show();
break;
}
return super.onContextItemSelected(item);
}
}
~~~
### 3、子菜单(SubMenu)
res——》menu——》main.xml(子菜单的布局方法)
~~~
<menu xmlns:android="http://schemas.android.com/apk/res/android" >
<item
android:showAsAction="never"
android:title="文件">
<menu >
<item
android:id="@+id/new_file"
android:showAsAction="never"
android:title="新建"/>
<item
android:id="@+id/open_file"
android:showAsAction="never"
android:title="打开"/>
<item
android:id="@+id/save_file"
android:showAsAction="never"
android:title="保存"/>
<item
android:id="@+id/rename_file"
android:showAsAction="never"
android:title="重命名"/>
</menu>
</item>
<item
android:showAsAction="never"
android:title="编辑">
<menu >
<item
android:id="@+id/v_file"
android:showAsAction="never"
android:title="粘贴"/>
<item
android:id="@+id/c_edit"
android:showAsAction="never"
android:title="复制"/>
<item
android:id="@+id/x_edit"
android:showAsAction="never"
android:title="剪切"/>
<item
android:id="@+id/rename_edit"
android:showAsAction="never"
android:title="重命名"/>
</menu>
</item>
</menu>
~~~
MainActivity.java(以下代码将动态添加子菜单注释起来了)
~~~
package com.example.testsubmenu;
import android.os.Bundle;
import android.app.Activity;
import android.view.Menu;
import android.view.MenuInflater;
import android.view.MenuItem;
import android.view.SubMenu;
import android.widget.Toast;
public class MainActivity extends Activity {
@Override
protected void onCreate(Bundle savedInstanceState) {
super.onCreate(savedInstanceState);
setContentView(R.layout.activity_main);
}
@Override
public boolean onCreateOptionsMenu(Menu menu) {
// Inflate the menu; this adds items to the action bar if it is present.
// getMenuInflater().inflate(R.menu.main, menu);
//动态添加子菜单项
/*SubMenu subMenu1 = menu.addSubMenu("文件");
SubMenu subMenu2 = menu.addSubMenu("编辑");
subMenu1.setHeaderTitle("文件操作");
subMenu1.setHeaderIcon(R.drawable.ic_launcher);
subMenu1.add(1, 100, 1, "新建");
subMenu1.add(1, 101, 1, "打开");
subMenu1.add(1, 102, 1, "保存");
subMenu1.add(1, 103, 1, "重命名");
subMenu2.setHeaderTitle("编辑操作");
subMenu2.setHeaderIcon(R.drawable.ic_launcher);
subMenu2.add(2, 100, 1, "粘贴");
subMenu2.add(2, 101, 1, "复制");
subMenu2.add(2, 102, 1, "剪切");
subMenu2.add(2, 103, 1, "重命名");*/
//通过加载XML静态加载子菜单
MenuInflater menuInflater=getMenuInflater();
menuInflater.inflate(R.menu.main, menu);
return true;
}
@Override
public boolean onOptionsItemSelected(MenuItem item) {
// TODO Auto-generated method stub
//动态的点击事件
/*if (item.getGroupId()==1) {
switch (item.getItemId()) {
case 100:
Toast.makeText(this, "点击了新建", Toast.LENGTH_SHORT).show();
break;
case 101:
Toast.makeText(this, "点击了打开", Toast.LENGTH_SHORT).show();
break;
case 102:
Toast.makeText(this, "点击了保存", Toast.LENGTH_SHORT).show();
break;
case 103:
Toast.makeText(this, "点击了重命名", Toast.LENGTH_SHORT).show();
break;
}
}
else {
switch (item.getItemId()) {
case 100:
Toast.makeText(this, "点击了粘贴", Toast.LENGTH_SHORT).show();
break;
case 101:
Toast.makeText(this, "点击了复制", Toast.LENGTH_SHORT).show();
break;
case 102:
Toast.makeText(this, "点击了剪切", Toast.LENGTH_SHORT).show();
break;
case 103:
Toast.makeText(this, "点击了重命名", Toast.LENGTH_SHORT).show();
break;
}
}*/
//静态的点击事件
switch (item.getItemId()) {
case R.id.new_file:
Toast.makeText(this, "点击了新建", Toast.LENGTH_SHORT).show();
break;
case R.id.open_file:
Toast.makeText(this, "点击了打开", Toast.LENGTH_SHORT).show();
break;
case R.id.save_file:
Toast.makeText(this, "点击了保存", Toast.LENGTH_SHORT).show();
break;
case R.id.rename_file:
Toast.makeText(this, "点击了重命名", Toast.LENGTH_SHORT).show();
break;
case R.id.v_file:
Toast.makeText(this, "点击了粘贴", Toast.LENGTH_SHORT).show();
break;
case R.id.c_edit:
Toast.makeText(this, "点击了复制", Toast.LENGTH_SHORT).show();
break;
case R.id.x_edit:
Toast.makeText(this, "点击了剪切", Toast.LENGTH_SHORT).show();
break;
case R.id.rename_edit:
Toast.makeText(this, "点击了重命名", Toast.LENGTH_SHORT).show();
break;
}
return super.onOptionsItemSelected(item);
}
}
~~~
Android之Notification
最后更新于:2022-04-01 14:27:25
Android之Notification案例展示:
~~~
public class MainActivity extends Activity implements OnClickListener{
NotificationManager manager; //通知栏控制类
int notification_ID; //通知ID
@Override
protected void onCreate(Bundle savedInstanceState) {
super.onCreate(savedInstanceState);
setContentView(R.layout.activity_main);
manager=(NotificationManager) getSystemService(Context.NOTIFICATION_SERVICE); //获取系统通知服务
findViewById(R.id.btnSend).setOnClickListener(this);
findViewById(R.id.btnCancle).setOnClickListener(this);
}
@Override
public boolean onCreateOptionsMenu(Menu menu) {
// Inflate the menu; this adds items to the action bar if it is present.
getMenuInflater().inflate(R.menu.main, menu);
return true;
}
@Override
public void onClick(View v) {
// TODO Auto-generated method stub
switch (v.getId()) {
case R.id.btnSend:
sendNotification();
break;
case R.id.btnCancle:
cancleNotification();
break;
}
}
private void sendNotification() {
Builder builder=new Notification.Builder(this);
builder.setTicker("Hello"); // 设置手机状态栏的提示
builder.setSmallIcon(R.drawable.ic_launcher); // 设置手机状态栏的图标
builder.setWhen(System.currentTimeMillis()); // 设置时间
builder.setContentTitle("通知栏通知"); // 设置标题
builder.setContentText("通知栏提示的内容"); // 设置通知内容
Intent intent=new Intent(this,MainActivity.class); //设置点击后跳转到MainActivity
PendingIntent pendingIntent=PendingIntent.getActivity(this, 0, intent, 0);
builder.setContentIntent(pendingIntent); //设置点击后的意图
builder.setDefaults(Notification.DEFAULT_ALL); //直接设置成默认,就全部包含了以下设置
/* 添加权限
* <uses-permission android:name="android.permission.VIBRATE"/>
* <uses-permission android:name="android.permission.FLASHLIGHT"/>
* */
//builder.setDefaults(Notification.DEFAULT_SOUND); //设置提示音
//builder.setDefaults(Notification.DEFAULT_LIGHTS); //设置指示灯
//builder.setDefaults(Notification.DEFAULT_VIBRATE); //设置震动
Notification notification=builder.build(); //获取Notification // 4.1以上
//Notification notification2=builder.getNotification(); // 4.1以下
manager.notify(notification_ID, notification); //通过通知栏控制类显示通知
}
private void cancleNotification() {
// TODO Auto-generated method stub
manager.cancel(notification_ID); //取消通知
}
}
~~~
效果图:


Android之Dialog
最后更新于:2022-04-01 14:27:23
### 1、Dialog种类:
(1)确认对话框; (2)单选按钮对话框; (3)多选按钮对话框; (4)列表对话框;
### 2、Dialog常用方法:
(1)创建AlertDialog:AlertDialog.Builder中的create()方法;
(2)setTitle:设置对话框标题;
(3)setIcon:设置对话框图标;
(4)setMessage:设置对话框内容;
(5)setView:给对话框设置自定义样式;
(6)setItems:设置对话框要显示的一个list,一般用于显示几个命令时;
(7)setMultiChoiceItems:用来设置对话框显示一系列的复选框;
(8)setSingleChoiceItems:设置单选按钮;
(9)setNeutralButton:设置普通按钮;
(10)setPositiveButton:给对话框添加“确认”按钮
(11)setNegativeButton:给对话框添加“取消”按钮
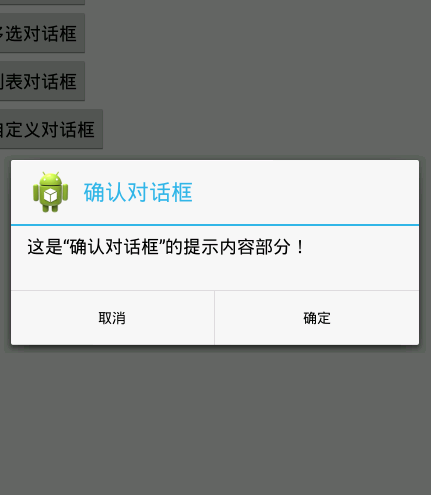
### 3、确认对话框
~~~
findViewById(R.id.btnOK).setOnClickListener(new View.OnClickListener() {
@Override
public void onClick(View v) {
// TODO Auto-generated method stub
AlertDialog.Builder builder = new AlertDialog.Builder(
MainActivity.this);
builder.setTitle("确认对话框");
builder.setIcon(R.drawable.ic_launcher);
builder.setMessage("这是“确认对话框”的提示内容部分!");
builder.setPositiveButton("确定",
new DialogInterface.OnClickListener() {
@Override
public void onClick(DialogInterface dialog,
int which) {
// TODO Auto-generated method stub
Toast.makeText(MainActivity.this, "点击了确定按钮",
Toast.LENGTH_LONG).show();
}
});
builder.setNegativeButton("取消",
new DialogInterface.OnClickListener() {
@Override
public void onClick(DialogInterface dialog,
int which) {
// TODO Auto-generated method stub
Toast.makeText(MainActivity.this, "点击了取消按钮",
Toast.LENGTH_LONG).show();
}
});
AlertDialog dialog = builder.create();
dialog.show();
}
});
~~~
效果图:
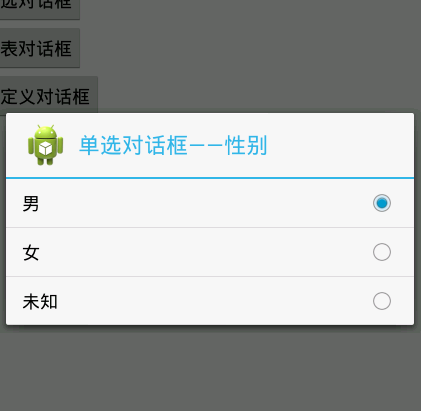
### 4、单选对话框
~~~
<span style="white-space:pre"> </span>private String[] single_list={"男","女","未知"}; //设置选项
findViewById(R.id.btnSingle).setOnClickListener(new View.OnClickListener() {
@Override
public void onClick(View v) {
// TODO Auto-generated method stub
AlertDialog.Builder builder = new AlertDialog.Builder(
MainActivity.this);
builder.setTitle("单选对话框");
builder.setIcon(R.drawable.ic_launcher);
builder.setSingleChoiceItems(single_list, 0, new DialogInterface.OnClickListener() {
@Override
public void onClick(DialogInterface dialog, int which) {
// TODO Auto-generated method stub
String str=single_list[which]; //which参数
Toast.makeText(MainActivity.this, "您选择的性别是:"+str , Toast.LENGTH_LONG).show();
}
});
AlertDialog dialog = builder.create();
dialog.show();
}
});
}
~~~
效果图:
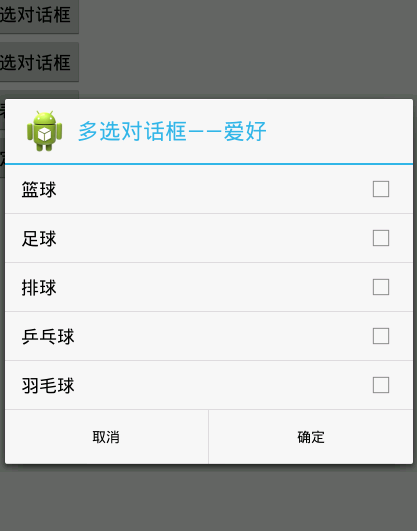
### 5、多选对话框
~~~
<span style="white-space:pre"> </span>private String[] multi_list={"篮球","足球","排球","乒乓球","羽毛球"};
private String like="";
findViewById(R.id.btnMulti).setOnClickListener(new View.OnClickListener() {
@Override
public void onClick(View v) {
// TODO Auto-generated method stub
AlertDialog.Builder builder = new AlertDialog.Builder(
MainActivity.this);
builder.setTitle("多选对话框——爱好");
builder.setIcon(R.drawable.ic_launcher);
builder.setMultiChoiceItems(multi_list,null,new DialogInterface.OnMultiChoiceClickListener() {
@Override
public void onClick(DialogInterface dialog, int which, boolean isChecked) {
// TODO Auto-generated method stub
if(isChecked){
like+=multi_list[which];
like+=",";
Toast.makeText(MainActivity.this, "您选择了"+multi_list[which], Toast.LENGTH_SHORT).show();
}
else{
Toast.makeText(MainActivity.this, "您取消了"+multi_list[which], Toast.LENGTH_SHORT).show();
}
}
});
builder.setPositiveButton("确定", new DialogInterface.OnClickListener() {
@Override
public void onClick(DialogInterface dialog, int which) {
// TODO Auto-generated method stub
Toast.makeText(MainActivity.this, "您的爱好有:"+like, Toast.LENGTH_SHORT).show();
}
});
builder.setNegativeButton("取消", new DialogInterface.OnClickListener() {
@Override
public void onClick(DialogInterface dialog, int which) {
// TODO Auto-generated method stub
dialog.dismiss();
}
});
AlertDialog dialog = builder.create();
dialog.show();
}
});
~~~
效果图:
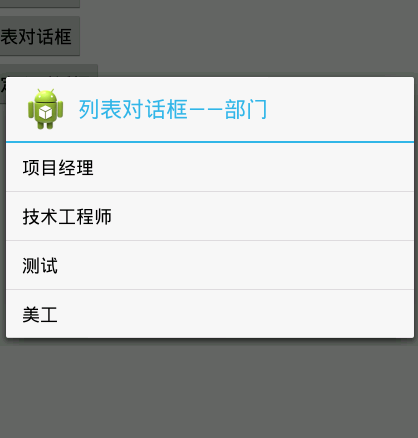
### 6、列表对话框
~~~
private String[] item_list={"项目经理","技术工程师","测试","美工"};
findViewById(R.id.btnList).setOnClickListener(new View.OnClickListener() {
@Override
public void onClick(View v) {
// TODO Auto-generated method stub
AlertDialog.Builder builder = new AlertDialog.Builder(
MainActivity.this);
builder.setTitle("列表对话框——部门");
builder.setIcon(R.drawable.ic_launcher);
builder.setItems(item_list, new DialogInterface.OnClickListener() {
@Override
public void onClick(DialogInterface dialog, int which) {
// TODO Auto-generated method stub
Toast.makeText(MainActivity.this, "您是:"+item_list[which], Toast.LENGTH_SHORT).show();
}
});
AlertDialog dialog = builder.create();
dialog.show();
}
});
~~~
效果图:
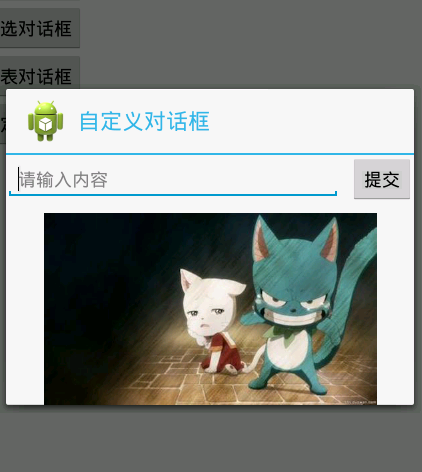
### 7、自定义对话框:
(1)先去自定义一个dialog布局——dialog_layout.xml
~~~
<?xml version="1.0" encoding="utf-8"?>
<LinearLayout xmlns:android="http://schemas.android.com/apk/res/android"
android:layout_width="match_parent"
android:layout_height="match_parent"
android:orientation="vertical" >
<LinearLayout
android:layout_width="match_parent"
android:layout_height="wrap_content"
android:orientation="horizontal" >
<EditText
android:layout_width="wrap_content"
android:layout_height="wrap_content"
android:layout_weight="1"
android:hint="请输入内容" />
<Button
android:layout_width="wrap_content"
android:layout_height="wrap_content"
android:layout_marginLeft="10dp"
android:text="提交" />
</LinearLayout>
<ImageView android:layout_width="match_parent"
android:layout_height="wrap_content"
android:src="@drawable/item11"
android:layout_marginTop="5dp"
android:layout_gravity="center"
/>
</LinearLayout>
~~~
(2)主代码:
~~~
findViewById(R.id.btnSelf).setOnClickListener(new View.OnClickListener() {
@Override
public void onClick(View v) {
//获取自定义的对话框布局,并转换成View对象
LayoutInflater inflater=LayoutInflater.from(MainActivity.this);
View view_dialog=inflater.inflate(R.layout.dialog_layout, null);
AlertDialog.Builder builder = new AlertDialog.Builder(
MainActivity.this);
builder.setTitle("自定义对话框");
builder.setIcon(R.drawable.ic_launcher);
builder.setView(view_dialog); //设置布局,把获取的自定义布局传进去
AlertDialog dialog = builder.create();
dialog.show();
}
});
~~~
效果图:
全部代码见:主页——我的GitHub——AndroidStudy。
Android之Toast
最后更新于:2022-04-01 14:27:21
### 1、Toast常用方法:
(1)Toast.makeText(context, text, duration); //返回值是Toast
(2)toast.setText(str); //设置提示内容
(3)toast.setDuration(duration); //设置持续时间(可以使用默认常量,也可以自己定义)
(4)toast.setGravity(gravity, xOffset, yOffset) //设置toast位置
(5)toast.show(); //显示
### 2、显示带图片的Toast
~~~
Toast toast=Toast.makeText(this, "click", Toast.LENGTH_LONG);
toast.setGravity(Gravity.CENTER, 0, 0);
LinearLayout toast_Layout=(LinearLayout) toast.getView();
ImageView imageView =new ImageView(this);
imageView.setBackgroundResource(R.drawable.ic_launcher);
toast_Layout.addView(imageView,0); //0是设置图片在toast_Layout中的位置
toast.show();
~~~
### 3、自定义Toast
toast.xml
~~~
<?xml version="1.0" encoding="utf-8"?>
<LinearLayout xmlns:android="http://schemas.android.com/apk/res/android"
android:layout_width="match_parent"
android:layout_height="match_parent"
android:orientation="vertical" >
<TextView android:layout_width="wrap_content"
android:layout_height="30dp"
android:gravity="center"
android:text="这个是自定义的Toast"/>
<ImageView
android:layout_width="wrap_content"
android:layout_height="wrap_content"
android:src="@drawable/ic_launcher"/>
<TextView android:layout_width="wrap_content"
android:layout_height="wrap_content"
android:gravity="center"
android:text="这是Toast的内容部分!"/>
</LinearLayout>
~~~
主代码:
~~~
LayoutInflater layoutInflater=LayoutInflater.from(this);
View toast_view=layoutInflater.inflate(R.layout.toast, null);
Toast toast=new Toast(this);
toast.setView(toast_view);
toast.show();
~~~
Gallery和ImageSwitcher
最后更新于:2022-04-01 14:27:18
activity_main.xml:
~~~
<LinearLayout xmlns:android="http://schemas.android.com/apk/res/android"
xmlns:tools="http://schemas.android.com/tools"
android:layout_width="match_parent"
android:layout_height="match_parent"
android:orientation="vertical"
tools:context=".MainActivity" >
<Gallery
android:id="@+id/gallery"
android:layout_width="match_parent"
android:layout_height="wrap_content" />
<ImageSwitcher
android:id="@+id/imageSwitcher"
android:layout_marginTop="150dp"
android:layout_width="match_parent"
android:layout_height="wrap_content" >
</ImageSwitcher>
</LinearLayout>
~~~
自定义的ImageAdapter:
~~~
public class ImageAdapter extends BaseAdapter {
private int[] res;
private Context context;
public ImageAdapter(int[] res,Context context) {
super();
this.res = res;
this.context=context;
}
@Override
public int getCount() {
// TODO Auto-generated method stub
return Integer.MAX_VALUE; //以便“无限”循环显示(一般情况下滚动不到这个最大值)
}
@Override
public Object getItem(int position) {
// TODO Auto-generated method stub
return res[position];
}
@Override
public long getItemId(int position) {
// TODO Auto-generated method stub
return position;
}
@Override
public View getView(int position, View convertView, ViewGroup parent) {
// TODO Auto-generated method stub
ImageView imageView=new ImageView(context);
imageView.setBackgroundResource(res[position%res.length]); //无限“循环”显示
imageView.setLayoutParams(new Gallery.LayoutParams(200, 150)); //
imageView.setScaleType(ScaleType.FIT_XY); //设置拉伸效果
return imageView;
}
}
~~~
MainActivity.java
~~~
public class MainActivity extends Activity implements OnItemSelectedListener,ViewFactory{
//准备数据源
private int[] resIcon = { R.drawable.item1, R.drawable.item2,
R.drawable.item3, R.drawable.item4, R.drawable.item5,
R.drawable.item6, R.drawable.item7, R.drawable.item8,
R.drawable.item9, R.drawable.item10, R.drawable.item11,
R.drawable.item12 };
private Gallery gallery;
private ImageAdapter adapter;
private ImageSwitcher imageSwitcher;
@Override
protected void onCreate(Bundle savedInstanceState) {
super.onCreate(savedInstanceState);
setContentView(R.layout.activity_main);
gallery=(Gallery) findViewById(R.id.gallery);
imageSwitcher=(ImageSwitcher) findViewById(R.id.imageSwitcher);
//gallery加载适配器
adapter=new ImageAdapter(resIcon, this);
gallery.setAdapter(adapter);
//设置监听器
gallery.setOnItemSelectedListener(this);
//ImageSwitcher
imageSwitcher.setFactory(this);
imageSwitcher.setInAnimation(AnimationUtils.loadAnimation(this, android.R.anim.fade_in));
imageSwitcher.setOutAnimation(AnimationUtils.loadAnimation(this, android.R.anim.fade_out));
}
@Override
public boolean onCreateOptionsMenu(Menu menu) {
// Inflate the menu; this adds items to the action bar if it is present.
getMenuInflater().inflate(R.menu.main, menu);
return true;
}
@Override
public void onItemSelected(AdapterView<?> parent, View view, int position,
long id) {
// imageView.setBackgroundResource(res[position%res.length]); //无限“循环”显示
imageSwitcher.setBackgroundResource(resIcon[position%resIcon.length]);
}
@Override
public View makeView() {
// TODO Auto-generated method stub
ImageView imageView=new ImageView(this);
imageView.setScaleType(ScaleType.FIT_CENTER);
return imageView;
}
@Override
public void onNothingSelected(AdapterView<?> parent) {
// TODO Auto-generated method stub
}
}
~~~
效果图:

Android重要控件概览(下)
最后更新于:2022-04-01 14:27:16
### 1、ViewFlipper——多页面管理控件,实现子界面的自动切换
(1)为ViewFlipper加入View:A.静态导入(在Layout布局文件中直接添加View控件); B.动态导入(addView())
(2)设置进入动画:setInAnimation();
设置退出动画:setOutAnimation();
设置视图切换自动播放时间间隔:setFlipInterval();
开始播放:startFlipping();
(3)设置支持手势活动:
~~~
@Override
public boolean onTouchEvent(MotionEvent event) {
// TODO Auto-generated method stub
switch (event.getAction()) {
//手指落下
case MotionEvent.ACTION_DOWN: {
startX=event.getX();
break;
}
//手指滑动
case MotionEvent.ACTION_UP:
{
//向右滑动
if(event.getX()-startX>50)
{
flipper.setInAnimation(this, R.anim.left_in);
flipper.setOutAnimation(this, R.anim.left_out);
flipper.showNext();
}
//向左滑动
if(startX-event.getX()>50)
{
flipper.setInAnimation(this, R.anim.right_in);
flipper.setOutAnimation(this, R.anim.right_out);
flipper.showPrevious();
}
break;
}
}
//手指离开
case MotionEvent.ACTION_UP:
{
break;
}
return super.onTouchEvent(event);
}
~~~
### 2、ScrollView——内容很多,屏幕显示不完,通过滚动来显示完整的视图
(1)ScrollView种类:A. HorizontalScrollView:水平滚动视图;B.ScrollView:垂直滚动视图;
(2)属性:设置不显示滚动条:Android:scrollbars="none";
(3)代码设置隐藏滚动条:setHorizontalScrollBarEnabled(false);setVerticalScrollBarEnabled(false);
(4)监听器:setOnTouchListenter()
~~~
scroll.setOnTouchListener(new OnTouchListener() {
@Override
public boolean onTouch(View v, MotionEvent event) {
// TODO Auto-generated method stub
switch (event.getAction()) {
case MotionEvent.ACTION_MOVE: {
/**
* (1)getScrollY()————滚动条滑动的距离
* (2)getMeasuredHeight()
* (3)getHeight()
*/
// 顶部状态
if (scroll.getScrollY() <= 0) {
Log.i("Main", "滑动到顶部");
}
// 底部状态
// TextView的总高度<=一屏幕的高度+滚动条的滚动距离
if (scroll.getChildAt(0).getMeasuredHeight() <= scroll.getHeight() + scroll.getScrollY()) {
Log.i("Main", "滑动到底部");
Log.i("Main",
"scroll.getChildAt(0).getMeasuredHeight()="
+ scroll.getChildAt(0)
.getMeasuredHeight()
+ "scroll,getHeight()="
+ scroll.getHeight()
+ "scroll.getScrollY()="
+ scroll.getScrollY());
tv.append(getResources().getString(R.string.content)); // 刷新、追加
}
break;
}
}
return false;
}
});
}
~~~
(5)scrollTo和scrollBy
scrollTo:以滚动视图起始位置开始计算;
scrollBy:相对前一次的位置,去滚动相应距离
### 3、Gallery——缩略图浏览器
[http://blog.csdn.net/songshimvp1/article/details/50233727](http://blog.csdn.net/songshimvp1/article/details/50233727)——实际案例
### 4、SeekBar——拖动条
(1)方法:setMax:设置最大数值;
(2)事件监听:OnSeekBarChangeListenter监听三个事件:
A. onProgressChanged(); //数值改变
B. onStartTrackingTouch(); //开始拖动
C. onStopTrackingTouch(); //停止拖动
(3)自定义SeekBar
看不到源码时,可以在G:\AndroidWork\adt-bundle-windows-x86-20130917\sdk\platforms\android-18\data\res\drawable中查找!
Android重要控件概览(中)
最后更新于:2022-04-01 14:27:14
### 1、ProgressBar
(1)属性:
android:max="100" ; ——最大显示进度
android:progress="50" ; ——第一显示进度
android:secondaryProgress="80" ; ——第二显示进度
android:indeterminate="true" ; ——设置是否精确显示(true表示不精确显示)
(2)方法:
setProgress(int) ; ——设置第一进度
setSecondaryProgress(int) ; ——设置第二进度
getProgress( ) ; ——获取第一进度
getSecondaryProgress( ) ; ——获取第二进度
incrementProgressBy( int ) ; ——增加或者减少第一进度
incrementSecondaryProgressBy (int ) ; ——增加或者减少第二进度
getMax( ) :获取最大进度
(3)在标题栏上上设置
~~~
protected void onCreate(Bundle savedInstanceState) {
super.onCreate(savedInstanceState);
//启用窗口特征,启用带进度和不带进度的进度条
requestWindowFeature(Window.FEATURE_PROGRESS);
requestWindowFeature(Window.FEATURE_INDETERMINATE_PROGRESS);
setContentView(R.layout.activity_main);
//显示两种进度条
setProgressBarVisibility(true);
setProgressBarIndeterminateVisibility(true);
//MAX=10000
setProgress(6000);
}
~~~
(4)对话框式进度条
~~~
btnDia=(Button) findViewById(R.id.btnDia);
btnDia.setOnClickListener(new View.OnClickListener() {
@Override
public void onClick(View v) {
/*设置页面显示风格*/
//新建ProgressDialog对象
progressDialog=new ProgressDialog(MainActivity.this);
//设置显示风格(横向)
progressDialog.setProgressStyle(ProgressDialog.STYLE_HORIZONTAL);
//设置标题
progressDialog.setTitle("对话框式进度条");
//设置图标
progressDialog.setIcon(R.drawable.ic_launcher);
//设置对话框里的文字信息
progressDialog.setMessage("欢迎你!");
//设置"确定"按钮
progressDialog.setButton(DialogInterface.BUTTON_POSITIVE,"确定", new DialogInterface.OnClickListener() {
@Override
public void onClick(DialogInterface dialog, int which) {
Toast.makeText(MainActivity.this, "这是对话框式进度条!", Toast.LENGTH_LONG).show();
}
});
//设置是否通过返回按钮退出对话框
progressDialog.setCancelable(true);
/*设置关于ProgressBar的属性*/
//设置最大进度
progressDialog.setMax(100);
//设置初始化已经增长到的进度
progressDialog.incrementProgressBy(20);
//进度条是明确显示进度的
progressDialog.setIndeterminate(false);
//显示对话框
progressDialog.show();
}
});
~~~
(5)自定义ProgressBar
~~~
style="@android:style/Widget.ProgressBar.Horizontal" //Ctrl+左键 查看
<style name="Widget.ProgressBar.Horizontal">
<item name="android:indeterminateOnly">false</item>
<item name="android:progressDrawable">@android:drawable/progress_horizontal</item>
<item name="android:indeterminateDrawable">@android:drawable/progress_indeterminate_horizontal</item>
<item name="android:minHeight">20dip</item>
<item name="android:maxHeight">20dip</item>
<item name="android:mirrorForRtl">true</item>
</style>
//继续查看@android:drawable
~~~
新建一个自己的progress_horizontal.xml文件,去覆盖系统的。(复制原来的,在原来的基础上进行修改)然后在ProgressBar属性中添加:
~~~
android:progressDrawable="@drawable/progress_horizontal"
~~~
### 2、WebView显示网页
(引言:可以通过Intent调用系统浏览器,直接实现跳转)
(1)权限: <uses-permission android:name="android.permission.INTERNET"/>
(2)加载:A.本地文件:webView.loadUrl( "file:///android_asset/example.html") //本地文件存放在assets目录下
B.加载Web资源:webView.loadUrl("http://www.baidu.com")
C.覆盖WebView默认通过第三方或者系统浏览器打开网页的行为,使得网页可以在WebView中打开
~~~
webView.setWebViewClient(new WebViewClient(){ //WebViewClient帮助WebView去处理一些页面控制和请求通知
......
return true
......
});
~~~
D.获得当前WebView的URL:webView.getUrl( );
(3)在WebView中使用Javascript
~~~
WebSettings webSettings = webView.getSettings(); //获取WebSettings的值
webSettings.setJavaScriptEnabled(true); //启用JavaScript
~~~
(4)改写物理按键——返回的逻辑

(5)

(6)WebView缓存的运用
A.优先使用缓存:webView.getSettings( ).setCacheMode(WebSettings.LOAD_CACHE_ELSE_NETWORK);
B. 不使用缓存 :webView.getSettings( ).setCacheMode(WebSettings.LOAD_NO_CACHE);
### 3、Fragment——主要目的是用在大屏幕设备上,支持更加动态和灵活的UI设计。
Fragment在应用中应当是一个模块化和可重用的组件,因为Fragment定义了自己的布局,以及通过使用它自己的生命周期回调方法定义了它自己的行为,所以可以将Fragment包含到多个Activity中。
(1)Fragment可以作为Activity界面的一部分组成出现;可以在一个Activity中同时出现多个Fragment,并且一个Fragment也可以在多个Activity中使用;在Activity运行过程中,可以添加、移除或者替换Fragment;Fragment可以相应自己的输入事件,并且有自己的声明周期,它们的生命周期会受宿主Activity的生命周期的影响。
(2)静态加载——在Activity的Layout文件中声明Fragment
A.android:name属性:指定了在layout中实例化的Fragment类
B.android:id属性:提供了一个唯一ID 来标识
C.android:tag属性:提供了一个唯一的字符串 来标识
(3)动态加载——撰写代码将Fragment添加到一个Activity
layout中(处理Fragment事务)
A.开启事务:FragmentManager fragmentManager =
getFragmentManager();
FragmentTransaction fragmentTransaction = fragmentManager.beginTransaction();
B.执行的操作:add(); remove(); replace(); addToBackStack(); commit();
(4)声明周期:
A. onCreateView:每次创建都会绘制Fragment的View组件时回调该方法
B. onAttach:当Fragment被添加到Activity时候会回调这个方法,并且只调用一次
C. onCreate:创建Fragment时会回调,只会调用一次
D. onActivityCreated:当Fragment所在的Activty启动完成后调用
E. onStart:启动Fragment
F. onResume:恢复Fragment时会被回调,调用onStart()方法后面一定会调用onResume()方法
G. onPause:暂停Fragment
H. onStop:停止Fragment
I. onDestroyView:销毁Fragment所包含的View组件时
J. onDestroy:销毁Fragment时会被回调
K. onDetach:Fragment从Activity中删除时会回调该方法,并且这个方法只会调用一次
(5)与Activity传值通信:
A. Fragment调用getActivity()方法获取它所在的Activity;
Activity调用FragmentManager的findFragmentById()或者findFragmentByTag()方法获取Fragment;
B. Activity——》Fragment:在Activity中创建Bundle数据包,并调用Fragment的setArguments(Bundle bundle)方法;
Fragment——》Activity:需要在Fragment中定义一个内部回调接口,让包含该Fragment的Activity实现该回调接口。这样Fragment可调用回调方法将数据传递给Activity。
### 4、ViewPager使视图左右滑动(类似微信界面)
(1)加载显示的页卡:
A. layoutInflater if = getLayoutInflater().from(this);
if.inflate(resource,root);
B. View.inflate(context,resource,root);
(2)配置Adapter:
A. PagerAdapter 数据源:List<View>;
B. FragmentPagerAdapter 数据源:List<Fragment>;
C. FragmentStatePagerAdapter 数据源:List<Fragment>;
(3)监听器
OnPageChangeListener
简单粘一下实现代码:
~~~
<android.support.v4.view.ViewPager
android:id="@+id/pager"
android:layout_width="wrap_content"
android:layout_height="wrap_content"
android:layout_gravity="center" >
<android.support.v4.view.PagerTabStrip
android:id="@+id/pagerTab"
android:layout_width="wrap_content"
android:layout_height="wrap_content"
android:layout_gravity="top" >
</android.support.v4.view.PagerTabStrip>
</android.support.v4.view.ViewPager>
~~~
数据适配器:
~~~
public class MyPagerAdapter extends PagerAdapter {
private List<View> viewList;
private List<String> titleList;
public MyPagerAdapter(List<View> viewList, List<String> titleList) {
this.viewList = viewList;
this.titleList = titleList;
}
// 返回的是页卡的数量
@Override
public int getCount() {
// TODO Auto-generated method stub
return viewList.size();
}
// View是否来自与对象
@Override
public boolean isViewFromObject(View arg0, Object arg1) {
// TODO Auto-generated method stub
return arg0 == arg1;
}
// 实例化一个页卡
@Override
public Object instantiateItem(ViewGroup container, int position) {
container.addView(viewList.get(position));
return viewList.get(position);
}
// 销毁页卡
@Override
public void destroyItem(ViewGroup container, int position, Object object) {
container.removeView(viewList.get(position));
}
//设置ViewPager页卡的标题
@Override
public CharSequence getPageTitle(int position) {
// TODO Auto-generated method stub
return titleList.get(position);
}
}
~~~
MainActivity :
~~~
public class MainActivity extends Activity {
private List<View> viewList;
private ViewPager viewPager;
private List<String> titleList;
private PagerTabStrip tabStrip;
@Override
protected void onCreate(Bundle savedInstanceState) {
super.onCreate(savedInstanceState);
setContentView(R.layout.activity_main);
viewList=new ArrayList<View>();
//通过View对象作为ViewPager的数据源
View view1=View.inflate(this, R.layout.view1, null);
View view2=View.inflate(this, R.layout.view2, null);
View view3=View.inflate(this, R.layout.view3, null);
View view4=View.inflate(this, R.layout.view4, null);
viewList.add(view1);
viewList.add(view2);
viewList.add(view3);
viewList.add(view4);
//初始化ViewPager
viewPager=(ViewPager) findViewById(R.id.pager);
//为ViewPager设置标题
titleList=new ArrayList<String>();
titleList.add("第一页");
titleList.add("第二页");
titleList.add("第三页");
titleList.add("第四页");
//为PagerTabStrip设置一些属性
tabStrip=(PagerTabStrip) findViewById(R.id.pagerTab);
tabStrip.setBackgroundColor(Color.BLUE);
tabStrip.setTextColor(Color.RED);
tabStrip.setDrawFullUnderline(false);
tabStrip.setTabIndicatorColor(Color.GREEN);
//创建PagerAdapter的适配器
MyPagerAdapter adapter=new MyPagerAdapter(viewList,titleList);
//ViewPager加载适配器
viewPager.setAdapter(adapter);
}
@Override
public boolean onCreateOptionsMenu(Menu menu) {
// Inflate the menu; this adds items to the action bar if it is present.
getMenuInflater().inflate(R.menu.main, menu);
return true;
}
}
~~~
动态引用APK文件
最后更新于:2022-04-01 14:27:11
不安装APK,仍然可以调用APK文件中的Java类,这种访问Java类的方式称为“动态引用APK文件”,——相当于传统的java程序动态调用jar文件。
APK文件本质上是ZIP格式的压缩文件,要想动态调用APK文件,在APK文件中必须包含一个classes.dex文件(classes.dex文件是Android应用中所有的Java源代码编译生成的Davlik虚拟机格式的二进制文件)。每一个编译过的Android工程目录的bin目录下都有一个classes.dex文件和一个相应的APK文件。
动态调用的APK文件的扩展名并不重要,也可以使用任何的扩展名,还甚至可以没有扩展名。比如XXXX.apk,XXXX.jar,XXXX.abcd,XXXX都没问题。
下面演示一个动态调用APK文件中的Java类的完整案例:
(1)编写Remote工程——新建一个Remote项目,并在其中添加一个如下类:
~~~
package songshi.remote;
public class ServiceClass {
public String addService(){
return "MyProject调用Remote工程的AddService方法成功";
}
}
~~~
运行Remote工程,生成Remote.apk(在bin目录下),将此APK文件push到Android模拟器DDMS的/mnt/sdcard/下。
(2)编写MyProject工程,布局文件添加一个按钮
~~~
package com.songshi.myproject;
import java.lang.reflect.Method;
import dalvik.system.DexClassLoader;
import android.media.RemoteControlClient.MetadataEditor;
import android.os.Bundle;
import android.os.Environment;
import android.app.Activity;
import android.view.Menu;
import android.view.View;
import android.widget.Button;
import android.widget.Toast;
public class MainActivity extends Activity {
/*
* 使用DexClassLoader类动态装载APK文件
* public DexClassLoader(String dexPath, String optimizedDirectory, String libraryPath, ClassLoader parent);
* dexPath参数:表示APK文件的路径;
* optimizedDirectory参数:表示一个用于写入优化后的APK文件的目录,通常为程序的私有数据目录;
* parent参数:通常为ClassLoader.getSystemClassLoader()
* */
private DexClassLoader dexClassLoader;
private Button btnAdd;
@Override
protected void onCreate(Bundle savedInstanceState) {
super.onCreate(savedInstanceState);
setContentView(R.layout.activity_main);
//第 1 步:装载APK文件
//定义优化目录:/data/data/com.songshi.myproject
String optimizedDirectory= Environment.getDataDirectory().toString() + "/data/" + getPackageName();
dexClassLoader=new DexClassLoader("/mnt/sdcard/Remote.apk", optimizedDirectory, null, ClassLoader.getSystemClassLoader());
btnAdd=(Button) findViewById(R.id.btnAdd);
btnAdd.setOnClickListener(new View.OnClickListener() {
@Override
public void onClick(View v) {
// TODO Auto-generated method stub
try{
//第 2 步:装载要访问的类
Class c=dexClassLoader.loadClass("songshi.remote.ServiceClass"); //Call requires API level 14 (current min is 8)
//第 3 步:创建类的对象
Object obj=c.newInstance();
//第 4 步:用Java反射技术调用ServiceClass类中的addService方法
Method method = obj.getClass().getMethod("addService", null);
String add =String.valueOf(method.invoke(obj, null));
Toast.makeText(MainActivity.this, add, Toast.LENGTH_LONG).show();
}
catch(Exception e){
Toast.makeText(MainActivity.this, "error:"+e.getMessage(), Toast.LENGTH_LONG).show();
}
}
});
}
/*
* APK文件并不是什么类都可以调用。例如,有Context类型参数的方法就不能动态访问,因为只有已经安装的APK程序才能获得Context对象。
* 还有四大组件类也不可以使用,例如,由于窗口类是由系统自动创建和维护的,所以 Activity的子类自然就不能通过动态访问的方式当做窗口类来使用。
* */
@Override
public boolean onCreateOptionsMenu(Menu menu) {
// Inflate the menu; this adds items to the action bar if it is present.
getMenuInflater().inflate(R.menu.main, menu);
return true;
}
}
~~~
运行

特别注意:APK文件并不是什么类都可以调用。例如,有Context类型参数的方法就不能动态访问,因为只有已经安装的APK程序才能获得Context对象。还有四大组件类也不可以使用,例如,由于窗口类是由系统自动创建和维护的,所以 Activity的子类自然就不能通过动态访问的方式当做窗口类来使用。
Android布局概览
最后更新于:2022-04-01 14:27:09
### 一、LinearLayout(线性布局)
常用属性:
A. android:orientation="vertical" 或者 android:orientation="horizontal" ——决定子类控件垂直或者水平排布
B. android:gravity = "center_horizontal | bottom" ——决定子类控件的X、Y位置 center:垂直水平都居中right(右)、left(左)、bottom(下面)
center_vertical:垂直(Y轴)居中
center_horizontal:水平(X轴)居中
C. android:layout_gravity="bottom" ——指的是子控件本身在当前父容器的X、Y位置
android:layout_weight="1" ——指的是子控件本身占当前父容器的一个比例(wrap_content正比、match_parent反比)
注意:即使设置了也不一定起作用。比如:水平的LinearLayout要从左边开始依次放置布局,所以设置TextView的layout_gravity属性为right也不起作用。
### 二、RelativeLayout(相对布局)
常用属性:(align 系列、margin系列、center系列)
(1)以下属性是 子类控件 相对于 父类(RelativeLayout)的)

(2)以下属性是 子类控件 相对于 子类控件的

### 三、FrameLayout(帧布局)
在这个布局中,所有的子元素都不能被指定防止的位置,它们统统放于这块区域的左上角,并且后面的子元素直接覆盖在前面的子元素之上,将前面的子元素部分和全部遮挡。
A.使用android:foreground——设置前景图,在所有子图的前面;
B.使用android:background——设置背景
C.使用android:keepScreenOn——保持屏幕唤醒
D.使用android:foregroundGravity——设置前景图的位置
### 四、AbsoluteLayout(绝对布局)
又可以称为坐标布局,可以直接指定子元素的 绝对位置(X、Y)。——由于手机屏幕尺寸差别较大,在屏幕的适配上有缺陷。所以很少用到。
android:layout_x="30dp" ——控制当前子控件的X位置
android:layout_y="29dp" ——控制当前子控件的Y位置
### 五、TableLayout(表格布局)
表格布局模型以行列的形式管理子控件,每一行为一个 TableRow 的对象,当然也可以是一个 View 的对象。索引从 0 开始。


Installation error: INSTALL_PARSE_FAILED_MANIFEST_MALFORMED
最后更新于:2022-04-01 14:27:07
**尝试下面三种解决方法:**
1. 有可能你的客户端已经安装过了,需要移调才能安装;
2. 你的清单文件AndroidManifest.xml写的有问题,检查一下;
3. 包名首字母不能大写;
Android重要控件概览(上)
最后更新于:2022-04-01 14:27:05
### 1、TextView
android:singleLine="true" //设置单行显示(默认可折行显示)
android:gravity= "right|center_vertical" //设置文本的位置(居右且居中)
### 2、EditView
android:hint="请输入姓名" //设置阴影提示属性
android:editable=“false” //设置不可编辑
另外,在ADT控件下的Text Fields中,有各种各样的EditView(也就是指定了输入格式,比如android:inputType="textPassword")。
### 3、ImageView
(1)属性:android:src = "@drawable/ " ——ImageView控件的内容图片;
android:background = "@drawable/ " ——ImageView控件的背景图片;
android:background = "#f0f0f0"
——ImageView控件的背景的RGB颜色;
(2) .setBackgroundResource(R.drawable.XXX);
### 4、Button 和 ImageButton
(1)Button有text属性,而ImageButton没有;
(2)ImageButton有 src属性,而Button没有;(可以做一个有文本内容的图片)
(3)两者都有background属性;
(4)两者都有点击效果;.setOnClickListenter()
—— A.匿名内部类的实现(new View.OnClickListener(){ ...onClick()... }; );
—— B.独立类的实现*( 自定义 MyOnClicklistener 点击事件监听类,让该类实现implements OnClickListener接口,重写onClick方法);这种做法的好处是:如果有很多个按钮,它们要执行一个共同的事件,还要执行自己特定的事件。
~~~
protected void onCreate(Bundle savedInstanceState) {
super.onCreate(savedInstanceState);
setContentView(R.layout.activity_main);
findViewById(R.id.button1).setOnClickListener(new MyOnClickListener(){ //自定义的监听类
@Override
public void onClick(View v) {
// 调用父类的onClick事件
super.onClick(v);
// 执行自己特定的任务
Toast.makeText(MainActivity.this, "这是子类的事件逻辑执行", 1).show();
}
});
}
//自定义监听点击事件的外部类
class MyOnClickListener implements OnClickListener{
@Override
public void onClick(View v) {
// 这是父类的onClick方法——公有的操作,减少代码的冗余
Log.i("parent", "这是父类的事件逻辑执行");
v.setAlpha(0.5); //设置透明度
}
}
........
}
~~~
—— C.还可以是 本类(this) 直接实现implements OnClickListener接口,重写onClick方法。
### 5、多个TextView实现跑马灯——自定义个性化控件
(1)设置TextView属性
~~~
android:singleLine="true"
android:ellipsize="marquee"
android:focusable="true"
android:focusableInTouchMode="true"
~~~
(2)实现继承自TextView的自定义类
~~~
public class Marquee extends TextView {
public Marquee(Context context, AttributeSet attrs, int defStyle) {
super(context, attrs, defStyle);
// TODO Auto-generated constructor stub
}
public Marquee(Context context, AttributeSet attrs) {
super(context, attrs);
// TODO Auto-generated constructor stub
}
public Marquee(Context context) {
super(context);
// TODO Auto-generated constructor stub
}
@Override
@ExportedProperty(category = "focus")
public boolean isFocused() {
// TODO Auto-generated method stub
return true; //设置return true。不断变换焦点
}
}
~~~
(3)使用自定义控件——com.example.testlongtext.Marquee
~~~
<!-- 多个控件跑马灯 -->
<com.example.testlongtext.Marquee
android:id="@+id/te1"
android:layout_width="wrap_content"
android:layout_height="wrap_content"
android:singleLine="true"
android:ellipsize="marquee"
android:focusable="true"
android:focusableInTouchMode="true"
android:text="@string/hello_world" />
<com.example.testlongtext.Marquee
android:id="@+id/te2"
android:layout_width="wrap_content"
android:layout_height="wrap_content"
android:singleLine="true"
android:ellipsize="marquee"
android:focusable="true"
android:focusableInTouchMode="true"
android:text="@string/hello_world" />
~~~
### 6、AutoCompleteTextView
(1)属性 android:hint = "请输入关键字"
android:completionThreshold = "2" //设置输入多少字符时自动匹配
(2)数据源:匹配文本框输入内容的数据源
~~~
private String[] resourceData={"C","C++","C#","C-Object","java SE","java EE","java-android"}; //初始化数据源
~~~
(3)适配器:适配下拉列表的内容(数据源)
~~~
private AutoCompleteTextView MyAutoCompleteTextView ;
ArrayAdapter<String> adapter = new ArrayAdapter<String> (this,android.R.layout.simple_list_item_1,resourceData); //数据源填充到适配器
~~~
(4)将适配器adapter 与 当前 AutoCompleteTextView 进行绑定
~~~
MyAutoCompleteTextView .setAdapter(adapter); //绑定
~~~
### 7、MultiAutoCompleteTextView
基本类似上面,但是因为可以匹配多个字符串,所以可以设置分隔符(以提醒什么时候开始下一次匹配)
~~~
myMultiAutoCompleteTextView.setTokenizer( new MultiAutoCompleteTextView.CommaTokenizer()); //设置以逗号为分隔符
~~~
### 8、ToggleButton
(1)属性:android:checked="true"
android:textOn="开启" //设置开、关的文本
android:textOff="关闭"
(2)监听器:ToggleButton.setOnCheckedChangeListener(this);
### 9、CheckBox
android:checked="false" //是否被选中
监听器:.setOnCheckedChangeListener(listener); //监听是否被选中
CheckBox.isChecked()——CheckBox.getText().toString()
### 10、RadioButton 和 RadioGroup(多选一机制)
android:checked="false" //是否被选中
RadioGroup..setOnCheckedChangeListener(listener); //监听是否被选中 (此时,如果是本类实现,implements OnCheckedChangeListener)
### 11、ListView显示信息列表
(1)数据适配器(ArrayAdapter、SimpleAdapter); ——把复杂数据(数组、列表、数据库等)填充到指定视图界面上;连接数据源和视图界面的桥梁;
过程:新建适配器(声明、配置)——>添加数据源到适配器——>视图加载适配器;
ArrayAdapter(上下文,当前ListView加载每一个列表项所对应的布局文件,数据源);——数组适配器
SimpleAdapter(上下文,数据源 List<? extends Map<String, ?>> data(一个Map所组成的List集合)、列表项布局文件ID、Map的键名、绑定数据视图中的ID(与from成对应关系));
(2)监听器(OnScrollListenter、OnItemClickListenter);
(3)适配器数据的刷新;
notifyDataSetChanged(); ——动态更新视图中所包含的数据
### 12、DatePicker 和 TimePicker 显示当前日期和时间
~~~
//获取日历的一个对象
calendar=Calendar.getInstance();
//获取年月日时分的信息
year=calendar.get(Calendar.YEAR);
month=calendar.get(Calendar.MONTH)+1; //注意:Calendar类的月份是按0开始计算的
day=calendar.get(Calendar.DAY_OF_MONTH);
hour=calendar.get(Calendar.HOUR_OF_DAY);
minute=calendar.get(Calendar.MINUTE);
//datePicker初始化并设置监听器(以init方法)
datePicker.init(year, calendar.get(Calendar.MONTH), day, new OnDateChangedListener() {
@Override
public void onDateChanged(DatePicker view, int year, int monthOfYear,
int dayOfMonth) {
// TODO Auto-generated method stub
setTitle(year+"-"+(monthOfYear+1)+"-"+dayOfMonth);
}
});
//timePicker设置监听器(直接设置)
timePicker.setOnTimeChangedListener(new OnTimeChangedListener() {
@Override
public void onTimeChanged(TimePicker view, int hourOfDay, int minute) {
// TODO Auto-generated method stub
setTitle(hourOfDay+":"+minute);
}
});
//用对话框形式展示日期、时间
/*new DatePickerDialog(this, new OnDateSetListener() {
@Override
public void onDateSet(DatePicker view, int year, int monthOfYear,
int dayOfMonth) {
// TODO Auto-generated method stub
setTitle(year+"-"+(monthOfYear+1)+"-"+dayOfMonth);
}
}, year, calendar.get(Calendar.MONTH), day).show();*/
new TimePickerDialog(this, new OnTimeSetListener() {
@Override
public void onTimeSet(TimePicker view, int hourOfDay, int minute) {
// TODO Auto-generated method stub
setTitle(hourOfDay+":"+minute);
}
}, hour, minute, true).show();
~~~
### 13、GridView表格形式显示多个组件

属性:
~~~
android:numColumns="3" //每行显示三列
android:horizontalSpacing="10dp" //设置列间距
android:verticalSpacing="10dp" //设置行间距
~~~
实现代码:
~~~
public class MainActivity extends Activity implements OnItemClickListener{
private GridView gridView;
private List<Map<String, Object>> dataList;
private int[] icon = { R.drawable.a, R.drawable.b, R.drawable.c,
R.drawable.d, R.drawable.e, R.drawable.f, R.drawable.erttre,
R.drawable.erwrw, R.drawable.lanqiu, R.drawable.niubi,
R.drawable.psb, R.drawable.qqq };
private String[] iconName = { "格1", "格2", "格3", "格4", "格5", "格6", "格7",
"格8", "格9", "格10", "格11", "格12", };
private SimpleAdapter simpleAdapter;
@Override
protected void onCreate(Bundle savedInstanceState) {
super.onCreate(savedInstanceState);
setContentView(R.layout.activity_main);
gridView = (GridView) findViewById(R.id.gridView);
// 1、准备数据源
// 2、新建适配器
// 3、GridView加载适配器
// 4、GridView配置时间监听器(OnItemClickListenter)
dataList = new ArrayList<Map<String, Object>>();
//getData();
simpleAdapter = new SimpleAdapter(this, getData(),
R.layout.gridview_item, new String[] { "image", "text" },
new int[] { R.id.image, R.id.text });
gridView.setAdapter(simpleAdapter);
gridView.setOnItemClickListener(this);
}
private List<Map<String, Object>> getData() {
// TODO Auto-generated method stub
for (int i = 0; i < icon.length; i++) {
Map<String, Object> map = new HashMap<String, Object>();
map.put("image", icon[i]);
map.put("text", iconName[i]);
dataList.add(map);
}
return dataList;
}
@Override
public void onItemClick(AdapterView<?> parent, View view, int position,
long id) {
// TODO Auto-generated method stub
Toast.makeText(this, "我是"+iconName[position], Toast.LENGTH_LONG).show();
}
}
~~~
### 14、Spinner实现下拉列表


(1)系统默认
~~~
public class MainActivity extends Activity implements OnItemSelectedListener{
private TextView textView;
private Spinner spinner;
private List<String> list;
private ArrayAdapter<String> arrayAdapter;
@Override
protected void onCreate(Bundle savedInstanceState) {
super.onCreate(savedInstanceState);
setContentView(R.layout.activity_main);
textView=(TextView) findViewById(R.id.text);
spinner=(Spinner) findViewById(R.id.spinner);
textView.setText("您选择城市是北京");
//1、设置数据源
list=new ArrayList<String>();
list.add("北京");
list.add("上海");
list.add("广州");
list.add("深圳");
//2、新建ArrayAdapter(数组适配器)
arrayAdapter=new ArrayAdapter<String>(this, android.R.layout.simple_spinner_item, list);
//3、arrayAdapter设置一个下拉列表样式
arrayAdapter.setDropDownViewResource(android.R.layout.simple_spinner_dropdown_item);
//4、spinner加载适配器
spinner.setAdapter(arrayAdapter);
//5、设置spinner监听器
spinner.setOnItemSelectedListener(this);
}
@Override
public void onItemSelected(AdapterView<?> parent, View view, int position,
long id) {
// TODO Auto-generated method stub
String cityName=arrayAdapter.getItem(position);
//String cityName=list.get(position)
textView.setText("您选择的城市是"+cityName);
}
}
~~~
(2)自定义下拉样式
利用SimpleAdapter。
Android工程A依赖B,B依赖C
最后更新于:2022-04-01 14:27:02
闲来无事,做了个实验。大致思路:A、B、C是三个较为庞大的工程。A工程(开源)需要用到B工程(开源),而又希望在B工程(开源)中引用C工程(开源)。也就是A是真个项目框架,B是其中一个模块,而在B中又希望集成C开源工程。
先看效果图:


在开始之前,请先参照[http://blog.csdn.net/songshimvp1/article/details/50015887](http://blog.csdn.net/songshimvp1/article/details/50015887)——[Android 中一个工程引用另一个工程](http://blog.csdn.net/songshimvp1/article/details/50015887)
完成B和C的连接。
C工程很简单,直接创建CMainActivity,然后改一下textView中的文字即可。
B工程,创建BMainActivity,然后设置textView和button。再设置BMainActivity主文件:
~~~
public class BMainActivity extends Activity {
@Override
protected void onCreate(Bundle savedInstanceState) {
super.onCreate(savedInstanceState);
setContentView(R.layout.activity_b_main);
findViewById(R.id.buttonBC).setOnClickListener(new View.OnClickListener() {
@Override
public void onClick(View arg0) {
// TODO Auto-generated method stub
Intent cIntent=new Intent(BMainActivity.this,CMainActivity.class);
startActivity(cIntent);
}
});
}
........
~~~
参照上述网址[http://blog.csdn.net/songshimvp1/article/details/50015887](http://blog.csdn.net/songshimvp1/article/details/50015887)连通B和C。
接下来是A。仍然是直接创建AMainActivity,然后设置textView和button。再设置AMainActivity主文件:
~~~
public class AMainActivity extends Activity {
@Override
protected void onCreate(Bundle savedInstanceState) {
super.onCreate(savedInstanceState);
setContentView(R.layout.activity_amain);
findViewById(R.id.buttonAB).setOnClickListener(new View.OnClickListener() {
@Override
public void onClick(View arg0) {
// TODO Auto-generated method stub
Intent bIntent=new Intent(AMainActivity.this,BMainActivity.class);
startActivity(bIntent);
}
});
}
..........
~~~
设置依赖项时,是单层依赖,A中不去设置C,单层设置,单层依赖

设置清单文件时,A中要包含B和C中的所有清单文件:

在工程中如果出现错误,可能是资源id出现冲突,所以最好是每个项目的资源ID要个性化单独设置。还要记得clean这一招。总之,尝试一下吧,快速集成开源项目像上面这个demo一样,还是很让人愉快的。
Android 与 SQLite
最后更新于:2022-04-01 14:27:00
SQLite官网:sqlite.org。
### 一、SQLiteOpenHelper类 与 数据库创建、自动升级
该类是一个抽象类。为了数据库的升级需要以及使用方便,往往使用该类的子类进行创建、打开、操作数据库。子类必须实现以下两个方法。
~~~
public class UesrDB extends SQLiteOpenHelper {
public UesrDB(Context context, String name, CursorFactory factory, int version) {
super(context, name, factory, version);
// TODO Auto-generated constructor stub
}
/*
* 如果数据库不存在,SQLiteOpenHelper根据上述构造函数的name,
* 在自动创建数据库之后自动执行OnCreate方法(也仅是在第一次被创建时被调用)。
* 在该方法中一般创建数据库中的表、视图等组件。
*/
@Override
public void onCreate(SQLiteDatabase db) {
// TODO Auto-generated method stub
}
/*
* 如果数据库存在,在上述构造函数中的version表示:数据库的版本号。
* 如果当前传递的版本号比上次创建或升级的数据库版本号高,就调用onUpgrade方法。
* 在该方法中,首先要删除原来数据库的组件,然后创建数据库中的表、视图等组件。
*/
@Override
public void onUpgrade(SQLiteDatabase db, int oldVersion, int newVersion) {
// TODO Auto-generated method stub
}
}
~~~
### 二、SimpleCursorAdapter类 与 数据绑定
该类专门用于数据绑定,数据源是Cursor对象。在数据库的操作中进程会使用到Cursor对象,该对象封装了查询表和查询视图返回的结果集。
~~~
SimpleCursorAdapter(Context context, int layout, Cursor c, String[] from, int[] to)
~~~
特别注意(1):
在绑定数据时,Cursor对象返回的记录集中必须包含一个名为“_id”的字段,否则,将无法完成数据绑定。如果没有“_id”字段,可以将某个唯一索引字段或者主键的别名设为"_id"。
特别注意(2):
SQLiteOpenHelper.getReadableDatabase() 和 SQLiteOpenHelper.getWritableDatabase() 这两个方法获得的 SQLiteDatabase 对象,系统会在也只能在 手机内存 的/data/data/<package name>/database目录中创建或者查找数据库文件。
### 三、操作SD卡上的数据库
~~~
public SQLiteDatabase openOrCreateDatabase( String path, SQLiteDatabase.CursorFactory factory )
~~~
~~~
public void onClick_SDCard_Database(View view){
String filename=android.os.Environment.getExternalStorageDirectory()+"/sdcard_test.db"; //数据库文件的存储路径
String createTableSQL="create table testUser(" +
"_id autoinc PRIMERY KEY," +
"name varchar(20), " +
"sex TEXT)";
File file=new File(filename);
if(file.exists()){
file.delete();
}
SQLiteDatabase database=SQLiteDatabase.openOrCreateDatabase(filename, null); //打开数据库
database.execSQL(createTableSQL);
ContentValues values=new ContentValues();
values.put("name","LI");
values.put("sex", "male");
database.insert("testUser", null, values); //(1)SQLiteDatabase的相应方法来操作
String insertSQL="insert into testUser (name,sex) values(?,?)";
database.execSQL(insertSQL,new Object[]{"song","female"});
String selectSQL="select name,sex from testUser where name=?";
Cursor c=database.rawQuery(selectSQL, new String[]{"song"}); //(2)rawQuery直接执行SQL语句
c.moveToFirst();
Toast.makeText(this, c.getString(0)+" "+c.getString(1), Toast.LENGTH_LONG).show();
database.close();
}
~~~
### 四、将数据库随应用程序一起发布
### 五、手机ARM中的数据库
这是内存数据库。该数据库只存在于手机ARM中,当程序退出以后,数据库中的数据会自动释放。