JS中实现字符串和数组的相互转化
最后更新于:2022-04-01 11:30:08
早上起来看了一道JS的面试题,是这样描述的:利用var s1=prompt("请输入任意的字符串","")可以获取用户输入的字符串,试编程将用户输入的字符串“反转”,并且将字符串输出。
想了一下,字符串对象的方法中并没有实现反转的,但是数组中有,于是考虑了字符串和数组的相互转换问题。
JS中的内置对象中包括字符串对象(String)和数组对象(Array),这两个对象是可以通过它们对象的方法实现相互转化的。对于String对象,提供了对字符串进行操作的属性和方法;对于Array对象,提供了数组操作方面的属性和方法。因此我们实现上面的面试题就容易了。
### 一,首先来看字符串转化为数组
String对象中的split()方法
上述方法的功能是:将一个字符串切割成若干段,返回一个数组。也就是说,可以将一个字符串转成数值。如:strObj.split(分割号),参数是一个分割号的字符串,用指定的分割号将字符串切成若干段。
实例:
~~~
//要求输出今天是星期几
//定义一个星期字符串
var str="星期日,星期一,星期二,星期三,星期四,星期五,星期六";
//创建一个日期对象
var today=new Date();
//使用today对象的getDay()方法
var week=today.getDay();
//将星期字符串分割成一个数组
var arr=str.split(",");
document.write("类型是:"+typeof(arr)+",数组的第一个元素是:"+arr[0]+"<br />");
//输出结果
document.write("今天是:"+arr[week]);
~~~
输出的结果是:类型是:object,数组的第一个元素是:星期日
今天是:星期五
### 二,再来看数组转换为字符串和数组元素实现反转
Array对象的join()方法
上述方法的功能是:将一个数组转成字符串。如:arrObj.join(连接号),将一个数组用指定的连接号链接成一个字符串。
实例:
~~~
var arr=["a","b","c"];
var str=arr.join("-");
document.write("类型是:"+typeof(str)+",字符串是:"+str);
~~~
输出的结果是:类型是:string,字符串是:a-b-c
Array对象的reverse()方法
上述方法的功能是:将数组中各元素颠倒顺序。如:arrObj.reverse()。
实例:
~~~
var arr=["a","b","c"];
arr.reverse();
document.write(arr);
~~~
输出的结果是:c,b,a
最后我们来看面试题的实现代码:
~~~
/*
利用var s1=prompt("请输入任意的字符串","")可以获取用户输入
的字符串,试编程将用户输入的字符串“反转”,并且将字符串输出。
*/
//接受字符串
var s1=prompt("请输入任意的字符串","");
//字符串转换为数组
var arr=s1.split("");
//利用数组对象的reverse()方法实现反转
arr.reverse();
//利用数组的join()方法转换为字符串
var str=arr.join("");
document.write(str);
~~~
实现的结果:


DIV+CSS实操七:中文系内容模块控制文本不换行和超出指定宽度后用省略号代替
最后更新于:2022-04-01 11:30:06
在做经管系主网页的同时也在进行着中文系主网页的构建,果然是只有自己去实践了,才能遇到各种各样的问题,然后再去寻找解决这些问题的方法,最后进行修改和不断的调试,最后达到自己想要的效果。中文系主网页构建遇到的问题也很多,首先就是遇到了在排版链接文字时由于宽度是固定的文字过多造成折行显示,这种结果是不想要的,还有就是想要多出宽度的文字用省略号代替。
上面的两个问题都是CSS样式的应用,先来看不换行文字截断的CSS样式:
(1)white-space
属性设置如何处理元素内的空白。可能取值为:

(2)word-break(该属性是CSS3新增加的)
属性规定自动换行的处理方法。可能取值为:

再来看怎么隐藏多余的文字的CSS样式:
(1)overflow
属性规定当内容溢出元素框时发生的事情。可能取值为:

(2)text-overflow(CSS3新增属性)
属性规定当文本溢出包含元素时发生的事情。可能取值为:

这里要注意的是只有overflow和text-overflow两个属性同时使用才会达到多出宽度的文字用省略号代替。
要想达到上述的效果需要对其作用选择器做到如下属性设置:
~~~
选择器 {
display:block;/*行内元素需加*/
word-break:keep-all;/* 不换行,二选一*/
white-space:nowrap;/* 不换行 ,二选一*/
overflow:hidden;/* 内容超出宽度时隐藏超出部分的内容 */
text-overflow:ellipsis;/* 当对象内文本溢出时显示省略标记(...) ;需与overflow:hidden;一起使用。*/
}
~~~
下面就来看中文系主网页内容模块一小块实例:
HTML部分代码:
~~~
<div id="news_left_bottom">
<div class="news_left_title">【学科建设】</div>
<div class="news_left_content">
<ul>
<li><a href="#" title="我系郭万青博士获批2015年度教育部人文社会科学研究规划基金项目">我系郭万青博士获批2015年度教育部人文社会科学研究规划基金项目</a><span class="time">[2015-12-04]</span></li>
<li><a href="#" title="张学鹏教授应邀赴澳门讲学">张学鹏教授应邀赴澳门讲学</a><span class="time">[2015-12-04]</span></li>
<li><a href="#" title="中文系又一部“十二五”国家规划教材出版">中文系又一部“十二五”国家规划教材出版</a><span class="time">[2015-12-04]</span></li>
<li><a href="#" title="杨立元成为首批中国文艺评论家协会会员">杨立元成为首批中国文艺评论家协会会员</a><span class="time">[2015-12-04]</span></li>
<li><a href="#" title="《燕山作家论》出版">《燕山作家论》出版</a><span class="time">[2015-12-04]</span></li>
<li><a href="#" title="中文系微电影获唐山市廉政微电影大赛提名奖">中文系微电影获唐山市廉政微电影大赛提名奖</a><span class="time">[2015-12-04]</span></li>
<li><a href="#" title="我系“语言与文化研究中心”获批河北省高等学校人文社会科学重点研究培育基地">我系“语言与文化研究中心”获批河北省高等学校人文社会科学重点研究培育基地</a><span class="time">[2015-12-04]</span></li>
<li><a href="#" title="我系郭万青副教授获批2014年全国高校古籍整理研究计划项目">我系郭万青副教授获批2014年全国高校古籍整理研究计划项目</a><span class="time">[2015-12-04]</span></li>
</ul>
</div>
</div>
~~~
在给出这个作用样式的选择器的CSS代码:
~~~
.news_left_content li a {
white-space:nowrap;/* 不换行 */
overflow:hidden;/* 内容超出宽度时隐藏超出部分的内容 */
text-overflow:ellipsis;/* 当对象内文本溢出时显示省略标记(...) ;需与overflow:hidden;一起使用。*/
width:350px;
display:block;
float:left;
padding-left:10px;
}
~~~
那么效果是:

需要注意的是,这个CSS样式只对单行的文字的效,如果你想把它用在多行上,也只有第一行有作用的。
DIV+CSS实操六:经管系网页添加导航栏下拉菜单
最后更新于:2022-04-01 11:30:04
其实很久之前就想实现这个功能,一直没有去付诸行动,大早上的就开始看老师讲过的一些简单的JS下拉菜单的知识,可能是我们基础差,老师讲的也是非常基础的一些,但是我们还是没有听懂,仔细研究了一番,反反复复终于实现了下拉的效果,后来在网上找这方面的教程和代码实例看,发现和自己写的还是有很大的区别,最近一直在深入JS的学习,还没有学到这块,相信学到这块,自己可以写出更加简洁的下拉菜单的代码。由于JS懂的比较少,大部分还是用CSS实现的。
继续接着这个系列完成经管系网站的功能构建,这次是给导航栏添加下拉菜单。CSS代码很多,不过为了妥当,还是粘贴上来了,为了解决看的麻烦的问题,我给每次添加CSS代码的内容都分块了,前面的改动也会用注释标注出来。
HTML代码:
~~~
<!DOCTYPE html PUBLIC "-//W3C//DTD XHTML 1.0 Transitional//EN" "http://www.w3.org/TR/xhtml1/DTD/xhtml1-transitional.dtd">
<html xmlns="http://www.w3.org/1999/xhtml">
<head>
<meta http-equiv="Content-Type" content="text/html; charset=gb2312" />
<title>经管系</title>
<link rel="stylesheet" href="Style.css" type="text/css" />
<script type="text/javascript" src="myScript.js">
</script>
</head>
<body>
<!--经管系Logo板块-->
<div id="top">Dreamweaver8</div>
<!--经管系网页导航栏板块-->
<div id="nav">
<ul><!--无序列表-->
<li onmouseover="showmenu('bzsy')" onmouseout="hidemenu('bzsy')"><a href="#">本站首页</a>
<ul id="bzsy">
<li><a href="#">学校首页</a></li>
</ul>
</li>
<li onmouseover="showmenu('bxgk')" onmouseout="hidemenu('bxgk')"><a href="#">本系概况</a>
<ul id="bxgk">
<li><a href="#">系情概览</a></li>
<li><a href="#">机构设置</a></li>
<li><a href="#">领导班子</a></li>
<li><a href="#">师资力量</a></li>
</ul>
</li>
<li onmouseover="showmenu('jyjx')" onmouseout="hidemenu('jyjx')"><a href="#">教育教学</a>
<ul id="jyjx">
<li><a href="#">培养方案</a></li>
<li><a href="#">课程建设</a></li>
<li><a href="#">实践教学</a></li>
<li><a href="#">毕业论文</a></li>
<li><a href="#">各班课表</a></li>
<li><a href="#">管理制度</a></li>
</ul>
</li>
<li onmouseover="showmenu('kxyj')" onmouseout="hidemenu('kxyj')"><a href="#">科学研究</a>
<ul id="kxyj">
<li><a href="#">科研成果</a></li>
<li><a href="#">文献资料</a></li>
<li><a href="#">学术报告</a></li>
</ul>
</li>
<li onmouseover="showmenu('xsgz')" onmouseout="hidemenu('xsgz')"><a href="#">学生工作</a>
<ul id="xsgz">
<li><a href="#">工作动态</a></li>
<li><a href="#">新生导向</a></li>
<li><a href="#">学生社团</a></li>
<li><a href="#">学子风采</a></li>
<li><a href="#">管理制度</a></li>
</ul>
</li>
<li onmouseover="showmenu('zsjy')" onmouseout="hidemenu('zsjy')"><a href="#">招生就业</a>
<ul id="zsjy">
<li><a href="#">专业介绍</a></li>
<li><a href="#">招生计划</a></li>
<li><a href="#">就业工作</a></li>
<li><a href="#">招聘信息</a></li>
<li><a href="#">求职指导</a></li>
<li><a href="#">就业精英</a></li>
</ul>
</li>
<li onmouseover="showmenu('dtjs')" onmouseout="hidemenu('dtjs')"><a href="#">党团建设</a>
<ul id="dtjs">
<li><a href="#">组织机构</a></li>
<li><a href="#">入党指南</a></li>
<li><a href="#">创先争优</a></li>
</ul>
</li>
<li onmouseover="showmenu('kysb')" onmouseout="hidemenu('kysb')"><a href="#">考研升本</a>
<ul id="kysb">
<li><a href="#">考研专题</a></li>
<li><a href="#">专科接本</a></li>
</ul>
</li>
<li onmouseover="showmenu('sxjd')" onmouseout="hidemenu('sxjd')"><a href="#">实习基地</a>
<ul id="sxjd">
<li><a href="#">物流管理</a></li>
<li><a href="#">社会工作</a></li>
<li><a href="#">保险专业</a></li>
<li><a href="#">商务管理</a></li>
<li><a href="#">实习动态</a></li>
</ul>
</li>
<li><a href="#">经管动态</a></li>
<li><a href="#">通知公告</a></li>
</ul>
</div>
<!--经管系网页风采展示广告板块-->
<div id="adpic"></div>
<!--经管系内容板块-->
<div id="news">
<div id="news_left">
<div id="news_left_top">
<div class="news_left_titlebar"><img src="images/n_icon001.gif" />常用服务</div>
<div id="news_left_top_content">
<ul>
<li><a href="#">唐山师范学院校历查询</a></li>
<li><a href="#">课程表查询</a></li>
<li><a href="#">期末成绩录入与查询</a></li>
<li><a href="#">论文检索[CNKI,万方,读秀]</a></li>
<li><a href="#">毕业论文格式及相关表格</a></li>
<li><a href="#">常用下载</a></li>
<li><a href="#">电子资源</a></li>
</ul>
</div>
</div>
<div id="news_left_mid">
<div class="news_left_titlebar"><img src="images/n_icon001.gif" />站内导航</div>
<div id="news_left_mid_content">
<table>
<tr>
<td><a href="#">专业介绍</a></td>
<td><a href="#">新生向导</a></td>
</tr>
<tr>
<td><a href="#">教授风采</a></td>
<td><a href="#">学生社团</a></td>
</tr>
<tr>
<td><a href="#">课程建设</a></td>
<td><a href="#">学子风采</a></td>
</tr>
<tr>
<td><a href="#">实践教学</a></td>
<td><a href="#">招聘信息</a></td>
</tr>
<tr>
<td><a href="#">实习动态</a></td>
<td><a href="#">求职指导</td>
</tr>
<tr>
<td><a href="#">学术活动</a></td>
<td><a href="#">就业精英</td>
</tr>
<tr>
<td><a href="#">科研成果</a></td>
<td><a href="#">考研专题</a></td>
</tr>
</table>
</div>
</div>
<div id="news_left_bottom">
<div class="news_left_titlebar"><img src="images/n_icon001.gif" />扫一扫</div>
<div id="news_left_bottom_content">
<a href="#"><img src="images/ewm.png" width="233" height="200" border="0" /></a> <!--二维码图片-->
</div>
</div>
</div>
<div id="news_mid">
<div id="news_mid_top">
<div class="news_mid_titlebar">经管动态</div>
<div id="news_mid_top_content">
<div id="news_mid_top_content1">图片动态无缝滚动需要JS实现,我们后续加上</div>
<div id="news_mid_top_content2">
<ul>
<li><img src="images/arrow.gif" /><a href="#" title="博弈思维与竞争策略 --北京外国语大学">博弈思维与竞争策略 --北京外国语大学</a></li>
<li><img src="images/arrow.gif" /><a href="#" title="经济管理系“四进四信”主题团日活动">经济管理系“四进四信”主题团日活动</a></li>
<li><img src="images/arrow.gif" /><a href="#" title="经济管理系2015级专接本新生顺利开学">经济管理系2015级专接本新生顺利开学</a></li>
<li><img src="images/arrow.gif" /><a href="#" title="经济管理系与合作企业开展实习工作经验交流">经济管理系与合作企业开展实习工作经验交流</a></li>
<li><img src="images/arrow.gif" /><a href="#" title="荣盛集团举办“企业精英对话高校学子”高校巡讲活动">荣盛集团举办“企业精英对话高校学子”高校巡讲活动</a></li>
<li><img src="images/arrow.gif" /><a href="#" title="经济管理系第七届社工文化节开幕">经济管理系第七届社工文化节开幕</a></li>
<li><img src="images/arrow.gif" /><a href="#" title="唐山师院经管系学生开展服务高考志愿者活动">唐山师院经管系学生开展服务高考志愿者活动</a></li>
<li><img src="images/arrow.gif" /><a href="#" title="2011级2015届社会工作专业考研光荣榜">2011级2015届社会工作专业考研光荣榜</a></li>
</ul>
</div>
</div>
</div>
<div id="news_mid_bottom">
<div class="news_mid_titlebar">通知公告</div>
<div id="news_mid_bottom_content">
<ul>
<li><img src="images/arrow.gif" /><a href="#" title="经管系2016届论文最新文件(试用于2012级本科)">经管系2016届论文最新文件(试用于2012级本科)</a></li>
<li><img src="images/arrow.gif" /><a href="#" title="2011级2015届本科论文安排(修订)">2011级2015届本科论文安排(修订)</a></li>
<li><img src="images/arrow.gif" /><a href="#" title="我系生活部宿舍卫生检查通报">我系生活部宿舍卫生检查通报</a></li>
<li><img src="images/arrow.gif" /><a href="#" title="经管系2011级本科毕业论文教学工作安排">经管系2011级本科毕业论文教学工作安排</a></li>
<li><img src="images/arrow.gif" /><a href="#" title="经管系首问负责制">经管系首问负责制</a></li>
<li><img src="images/arrow.gif" /><a href="#" title="2014暑假社会实践先进个人">2014暑假社会实践先进个人</a></li>
<li><img src="images/arrow.gif" /><a href="#" title="社会工作专业历届考研人数统计(2011-2014)">社会工作专业历届考研人数统计(2011-2014)</a></li>
<li><img src="images/arrow.gif" /><a href="#" title="经济管理系2013年度系务公开">经济管理系2013年度系务公开</a></li>
</ul>
</div>
</div>
</div>
<div id="news_right">
<div id="news_right_top">
<div class="news_right_titlebar">招生就业</div>
<div id="news_right_top_content">
<ul>
<li><a href="#" title="2015年招生计划">2015年招生计划</a></li>
<li><a href="#" title="长城汽车招聘">长城汽车招聘</a></li>
<li><a href="#" title="河北港口集团">河北港口集团</a></li>
<li><a href="#" title="链家地产招聘会">链家地产招聘会</a></li>
<li><a href="#" title="北京瑞亚启明教育简章">北京瑞亚启明教育简章</a></li>
<li><a href="#" title="天津诺航佳运国际货运代理有限公司">天津诺航佳运国际货运代理有限公司</a></li>
<li><a href="#" title="春暖社工服务中心2015年4月急聘">春暖社工服务中心2015年4月急聘</a></li>
<li><a href="#" title="唐山君元科技有限责任公司招聘信息">唐山君元科技有限责任公司招聘信息</a></li>
<li><a href="#" title="国企招聘信息汇总">国企招聘信息汇总</a></li>
</ul>
</div>
</div>
<div id="news_right_mid">
<div class="news_right_titlebar">实习基地</div>
<div id="news_right_mid_content">
<div id="news_right_mid_content1">
<ul>
<li><a href="#" title="端正实习态度,明确实习目的">端正实习态度,明确实习目的</a></li>
<li><a href="#" title="我系10社工专业学生赴深圳毕业实习顺利进行">我系10社工专业学生赴深圳毕业实习顺利进行</a></li>
<li><a href="#" title="总结经验 巩固成果 扎实推进 实践教学工作">总结经验 巩固成果 扎实推进 实践教学工作</a></li>
<li><a href="#" title="11级物流专接本班上海全家实习总结">11级物流专接本班上海全家实习总结</a></li>
</ul>
</div>
</div>
</div>
<div id="news_right_bottom">
<div class="news_right_titlebar">学生工作</div>
<div id="news_right_bottom_content">
<ul>
<li><a href="#" title="唐山师院经管系学生开展服务高考志愿活动">唐山师院经管系学生开展服务高考志愿活动</a></li>
<li><a href="#" title="宿舍文化建设倡议">宿舍文化建设倡议</a></li>
<li><a href="#" title="热烈祝贺经管系取得佳绩">热烈祝贺经管系取得佳绩</a></li>
<li><a href="#" title="灰姑娘舞会">灰姑娘舞会</a></li>
<li><a href="#" title="经济管理系举行升旗仪式">经济管理系举行升旗仪式</a></li>
<li><a href="#" title="经管系考研交流大会">经管系考研交流大会</a></li>
<li><a href="#" title="书香浸润校园-好书推荐活动开始了">书香浸润校园-好书推荐活动开始了</a></li>
<li><a href="#" title="宿舍风采大赛">宿舍风采大赛</a></li>
</ul>
</div>
</div>
</div>
</div>
<!--经管系网站友情链接板块-->
<div id="link">
<div id="link_left">友情链接:</div>
<div id="link_right">
<table width="100%" border="0" cellspacing="0" cellpadding="0"><!--表格-->
<tr align="center" valign="middle">
<td><a href="#">教学资源网</a></td>
<td>|</td>
<td><a href="#">中国大学</a></td>
<td>|</td>
<td><a href="#">教育部</a></td>
<td>|</td>
<td><a href="#">河北省教育厅</a></td>
<td>|</td>
<td><a href="#">中国教育科研网</a></td>
<td>|</td>
<td><a href="#">教育网河北主节点</a></td>
<td>|</td>
<td><a href="#">慕课网</a></td>
<td>|</td>
<td><a href="#">爱课程</a></td>
<td>|</td>
<td><a href="#">南方周末</a></td>
<td>|</td>
<td><a href="#">经济观察</a></td>
<td>|</td>
<td><a href="#">中国企业家</a></td>
</tr>
</table>
</div>
</div>
<!--经管系网站制作版权信息板块-->
<div id="copyright">
<div id="copyright_top"><a href="#">版权所有:</a></div>
<div id="copyright_bottom"><a href="#">所在地址:</a></div>
</div>
</body>
</html>
~~~
CSS代码:
~~~
/*第一次添加网页总体布局的代码*/
* {
margin:0px;
padding:0px;
}
body {
padding:0px;
margin:0px;
font-size:12px;
}
#top {
background-image: url(images/head.jpg);
background-repeat: no-repeat;
height: 120px;
width: 998px;
margin-right: auto;
margin-left: auto;
}
#nav {
background-image: url(images/n_nav_bg.gif);
background-repeat: repeat-x;
height: 37px;
width: 998px;
margin-right: auto;
margin-left: auto;
}
#adpic {
background-image: url(images/h4.jpg);
background-repeat: no-repeat;
height: 218px;
width: 998px;
margin-right: auto;
margin-left: auto;
}
#news {
height: 720px;
width: 998px;
margin-right: auto;
margin-left: auto;
}
#link {
background-image: url(images/n_title_bg.gif);
background-repeat: repeat-x;
height: 40px;
width: 998px;
margin-right: auto;
margin-left: auto;
}
#copyright {
background-color: #E2E2E2;
height: 80px;
width: 998px;
margin-top: 0px;
margin-right: auto;
margin-left: auto;
border-top-width: 5px;/*设置5像素的上边框*/
border-top-style: solid;
border-top-color: #006042;
margin-bottom: 0px;
}
#news #news_left {
float: left;
height: 720px;
width: 233px;
margin-right: 5px;
}
#news #news_mid {
float: left;
height: 720px;
width: 455px;
margin-right: 5px;
}
#news #news_right {
height: 720px;
width: 300px;
float: left;
}
#news #news_left #news_left_top {
height: 248px;
width: 233px;
}
#news #news_left #news_left_mid {
height: 240px;
width: 233px;
}
#news #news_left #news_left_bottom {
height: 232px;
width: 233px;
}
#news #news_mid #news_mid_top {
height: 488px;
width: 455px;
}
#news #news_mid #news_mid_bottom {
height: 232px;
width: 455px;
}
#news #news_right #news_right_top {
height: 248px;
width: 300px;
}
#news #news_right #news_right_mid {
height: 240px;
width: 300px;
}
#news #news_right #news_right_bottom {
height: 232px;
width: 300px;
}
/*第二次添加导航栏和友情链接栏的代码,下拉菜单我们后面做*/
a:link { /*伪类选择页面中全部的超链接标签的未访问的链接状态*/
color:#000000;
text-decoration:none;
}
a:visited { /*伪类选择页面中全部的超链接标签的已访问的链接状态*/
color:#000000;
text-decoration:none;
}
a:hover{ /*伪类选择页面中全部的超链接标签的鼠标悬停的状态*/
color:#FF0000;
text-decoration:none;
font-weight: bold;
}
#nav li {/*后代选择器选择div中行内元素li的设置*/
float: left;
line-height: 37px;
list-style-type:none;
text-align:center;
position:relative;/*给下拉菜单的父元素设置为相对定位*/
}
#link #link_left {
font-family: "微软雅黑";
font-size: 14px;
line-height: 32px;
font-weight: bold;
color: #009966;
float: left;
height: 32px;
width: 80px;
padding-left: 10px;
}
#link #link_right {
line-height: 32px;
float: left;
height: 32px;
width: 908px;
}
#nav a:link{/*后代选择器选择div中行内选择a设置未访问的链接状态*/
color:#FFFFFF;
text-decoration:none;
font-family: "微软雅黑";
font-size: 14px;
font-weight: bold;
width:89px;
height:37px;
display:block;
}
#nav a:visited{/*后代选择器选择div中行内选择a设置已访问的链接状态*/
color:#FFFFFF;
text-decoration:none;
font-family: "微软雅黑";
font-size: 14px;
font-weight: bold;
width:89px;
height:37px;
display:block;
}
#nav a:hover{/*后代选择器选择div中行内选择a设置鼠标悬浮在链接的的状态*/
color:#FFFFFF;
text-decoration:none;
font-family: "微软雅黑";
font-size: 14px;
font-weight: bold;
background-color: #009966;
width:89px;
height:37px;
display:block;
}
/*第三次添加内容标题栏的代码*/
img { /*消除图片的默认格式*/
border:none;
}
.news_left_titlebar {
background-repeat: no-repeat;
height: 31px;
width: 233px;
border-bottom-width: 1px;
border-bottom-style: dashed;
border-bottom-color: #CCCCCC;
background-color: #FFFFFF;
font-size: 14px;
line-height: 32px;
font-weight: bold;
color: #009966;
}
.news_left_titlebar img {/*设置图片的格式*/
float: left;
height: 14px;
width: 14px;
margin-top: 9px;
margin-right:5px;
}
.news_mid_titlebar {
background-image: url(images/n_title_bg.gif);
background-repeat: repeat-x;
height: 32px;
width: 445px;
font-size: 14px;
line-height: 32px;
font-weight: bold;
color: #009966;
padding-left: 10px;
}
.news_right_titlebar {
background-image: url(images/n_title_bg.gif);
background-repeat: repeat-x;
height: 32px;
width: 290px;
font-size: 14px;
line-height: 32px;
font-weight: bold;
color: #009966;
padding-left: 10px;
}
#copyright #copyright_top {
height: 20px;
width: 998px;
text-align:center;
line-height:20px;
padding-top:20px;
}
#copyright #copyright_bottom {
height: 20px;
width: 998px;
text-align:center;
line-height:20px;
padding-bottom:20px;
}
/*第四次代码左半部分内容的添加*/
li {
list-style-type:none;
}
#news #news_left #news_left_top #news_left_top_content {
height: 210px;
width: 233px;
overflow: hidden;
padding-top:3px;
padding-bottom:3px;
}
#news #news_left #news_left_top #news_left_top_content li {
float: left;
height: 30px;
width: 233px;
display:block;
}
#news #news_left #news_left_top #news_left_top_content li a:link{
color:#999999;
font-family: "微软雅黑";
font-size: 14px;
font-weight: bold;
width:233px;
height:30px;
display:block;
text-align:left;
line-height:30px;
vertical-align:middle;
}
#news #news_left #news_left_top #news_left_top_content li a:visited{
color:#999999;
font-family: "微软雅黑";
font-size: 14px;
font-weight: bold;
width:233px;
height:30px;
display:block;
text-align:left;
line-height:30px;
vertical-align:middle;
}
#news #news_left #news_left_top #news_left_top_content li a:hover{
color:#FFFFFF;
font-family: "微软雅黑";
font-size: 14px;
font-weight: bold;
background-color: #009966;
width:233px;
height:30px;
display:block;
text-align:left;
line-height:30px;
vertical-align:middle;
}
#news #news_left #news_left_mid #news_left_mid_content {
height: 196px;
width: 200px;
overflow: hidden;
padding-top:6px;
padding-bottom:6px;
padding-left:13px;
padding-right:20px;
}
#news #news_left #news_left_mid #news_left_mid_content a:link{
color:#999999;
font-family: "微软雅黑";
font-size: 14px;
font-weight: bold;
width:100px;
height:27px;
display:block;
text-align:center;
line-height:27px;
vertical-align:middle;
}
#news #news_left #news_left_mid #news_left_mid_content a:visited{
color:#999999;
font-family: "微软雅黑";
font-size: 14px;
font-weight: bold;
width:100px;
height:27px;
display:block;
text-align:center;
line-height:27px;
vertical-align:middle;
}
#news #news_left #news_left_mid #news_left_mid_content a:hover{
color:#FFFFFF;
font-family: "微软雅黑";
font-size: 14px;
font-weight: bold;
background-color: #009966;
width:100px;
height:27px;
display:block;
text-align:center;
line-height:27px;
vertical-align:middle;
}
/*第五次代码中间内容一部分的添加*/
#news #news_mid #news_mid_top #news_mid_top_content #news_mid_top_content1 {
background-color:#CCCCCC;
height: 256px;
width: 455px;
}
#news #news_mid #news_mid_top #news_mid_top_content #news_mid_top_content2 {
height: 232px;
width: 455px;
}
#news #news_mid #news_mid_top #news_mid_top_content #news_mid_top_content2 li {
line-height: 24px;
border-bottom-width: 1px;
border-bottom-style: dashed;
border-bottom-color: #CCCCCC;
}
#news #news_mid #news_mid_top #news_mid_top_content #news_mid_top_content2 img {
float: left;
height: 16px;
width: 16px;
margin-top: 5px;
}
#news #news_mid #news_mid_bottom #news_mid_bottom_content li {
line-height: 24px;
border-bottom-width: 1px;
border-bottom-style: dashed;
border-bottom-color: #CCCCCC;
}
#news #news_mid #news_mid_bottom #news_mid_bottom_content img {
float: left;
height: 16px;
width: 16px;
margin-top: 5px;
}
/*第五次代码右半部分内容的添加*/
#news #news_right #news_right_top #news_right_top_content li {
line-height: 23px;
border-bottom-width: 1px;
border-bottom-style: dashed;
border-bottom-color: #CCCCCC;
}
#news #news_right #news_right_mid #news_right_mid_content #news_right_mid_content1 {
height: 100px;
width: 300px;
margin-top: 54px;
margin-bottom: 54px;
}
#news #news_right #news_right_mid #news_right_mid_content li {
line-height: 24px;
border-bottom-width: 1px;
border-bottom-style: dashed;
border-bottom-color: #CCCCCC;
}
#news #news_right #news_right_bottom #news_right_bottom_content li {
line-height: 24px;
border-bottom-width: 1px;
border-bottom-style: dashed;
border-bottom-color: #CCCCCC;
}
/*第六次添加导航栏下拉菜单的代码*/
#nav #bzsy {
background-color: #009900;
display: none;
height: 37px;
width: 89px;
overflow: hidden;
position: absolute;/*下拉列表设置为绝对定位*/
z-index: 99;/*设置元素的堆叠属性*/
left: 0px;
top: 37px;
}
#nav #bxgk {
background-color: #009900;
display: none;
height: 148px;
width: 89px;
overflow: hidden;
position: absolute;
z-index: 99;
left: 0px;
top: 37px;
}
#nav #jyjx {
background-color: #009900;
display: none;
height: 222px;
width: 89px;
overflow: hidden;
position: absolute;
z-index: 99;
left: 0px;
top: 37px;
}
#nav #kxyj {
background-color: #009900;
display: none;
height: 111px;
width: 89px;
overflow: hidden;
position: absolute;
z-index: 99;
left: 0px;
top: 37px;
}
#nav #xsgz {
background-color: #009900;
display: none;
height: 185px;
width: 89px;
overflow: hidden;
position: absolute;
z-index: 99;
left: 0px;
top: 37px;
}
#nav #zsjy {
background-color: #009900;
display: none;
height: 222px;
width: 89px;
overflow: hidden;
position: absolute;
z-index: 99;
left: 0px;
top: 37px;
}
#nav #dtjs {
background-color: #009900;
display: none;
height: 111px;
width: 89px;
overflow: hidden;
position: absolute;
z-index: 99;
left: 0px;
top: 37px;
}
#nav #kysb {
background-color: #009900;
display: none;
height: 74px;
width: 89px;
overflow: hidden;
position: absolute;
z-index: 99;
left: 0px;
top: 37px;
}
#nav #sxjd {
background-color: #009900;
display: none;
height: 185px;
width: 89px;
overflow: hidden;
position: absolute;
z-index: 99;
left: 0px;
top: 37px;
}
~~~
简单的JS代码:
~~~
function showmenu(str){
var subdiv=document.getElementById(str);
subdiv.style.display="block";
}
function hidemenu(str){
var subdiv=document.getElementById(str);
subdiv.style.display="none";
}
~~~
效果:


DIV+CSS实操五:经管系网页内容模块内容添加(二)
最后更新于:2022-04-01 11:30:02
继续接着DIV+CSS实操系列的博文添加代码:[DIV+CSS实操一:经管系网页总体模块布局](http://blog.csdn.net/erlian1992/article/details/49928091),[DIV+CSS实操二:](http://blog.csdn.net/erlian1992/article/details/49945823)[经](http://blog.csdn.net/erlian1992/article/details/49945823)[管系网页添加导航栏和友情链接栏](http://blog.csdn.net/erlian1992/article/details/49945823),[DIV+CSS实操三:经管系网页内容模块添加标题栏和版权信息模块](http://blog.csdn.net/erlian1992/article/details/49966797)和[DIV+CSS实](http://blog.csdn.net/erlian1992/article/details/49977351)[操四:经管系网页内容模块内容添加(一)](http://blog.csdn.net/erlian1992/article/details/49977351)。我们还是添加内容版块的内容,这一次是中间部分和右半部分。由于中间的图片无缝滚动需要JS实现,我们后续加上。
HTML代码:
~~~
<!DOCTYPE html PUBLIC "-//W3C//DTD XHTML 1.0 Transitional//EN" "http://www.w3.org/TR/xhtml1/DTD/xhtml1-transitional.dtd">
<html xmlns="http://www.w3.org/1999/xhtml">
<head>
<meta http-equiv="Content-Type" content="text/html; charset=gb2312" />
<title>经管系</title>
<link rel="stylesheet" href="Style.css" type="text/css" />
</head>
<body>
<!--经管系Logo板块-->
<div id="top">Dreamweaver8</div>
<!--经管系网页导航栏板块-->
<div id="nav">
<ul><!--无序列表-->
<li><a href="#">本站首页</a></li>
<li><a href="#">本系概况</a></li>
<li><a href="#">教育教学</a></li>
<li><a href="#">科学研究</a></li>
<li><a href="#">招生就业</a></li>
<li><a href="#">学生工作</a></li>
<li><a href="#">党团建设</a></li>
<li><a href="#">考研升本</a></li>
<li><a href="#">实习基地</a></li>
<li><a href="#">经管动态</a></li>
<li><a href="#">通知公告</a></li>
</ul>
</div>
<!--经管系网页风采展示广告板块-->
<div id="adpic"></div>
<!--经管系内容板块-->
<div id="news">
<div id="news_left">
<div id="news_left_top">
<div class="news_left_titlebar"><img src="images/n_icon001.gif" />常用服务</div>
<div id="news_left_top_content">
<ul>
<li><a href="#">唐山师范学院校历查询</a></li>
<li><a href="#">课程表查询</a></li>
<li><a href="#">期末成绩录入与查询</a></li>
<li><a href="#">论文检索[CNKI,万方,读秀]</a></li>
<li><a href="#">毕业论文格式及相关表格</a></li>
<li><a href="#">常用下载</a></li>
<li><a href="#">电子资源</a></li>
</ul>
</div>
</div>
<div id="news_left_mid">
<div class="news_left_titlebar"><img src="images/n_icon001.gif" />站内导航</div>
<div id="news_left_mid_content">
<table>
<tr>
<td><a href="#">专业介绍</a></td>
<td><a href="#">新生向导</a></td>
</tr>
<tr>
<td><a href="#">教授风采</a></td>
<td><a href="#">学生社团</a></td>
</tr>
<tr>
<td><a href="#">课程建设</a></td>
<td><a href="#">学子风采</a></td>
</tr>
<tr>
<td><a href="#">实践教学</a></td>
<td><a href="#">招聘信息</a></td>
</tr>
<tr>
<td><a href="#">实习动态</a></td>
<td><a href="#">求职指导</td>
</tr>
<tr>
<td><a href="#">学术活动</a></td>
<td><a href="#">就业精英</td>
</tr>
<tr>
<td><a href="#">科研成果</a></td>
<td><a href="#">考研专题</a></td>
</tr>
</table>
</div>
</div>
<div id="news_left_bottom">
<div class="news_left_titlebar"><img src="images/n_icon001.gif" />扫一扫</div>
<div id="news_left_bottom_content">
<a href="#"><img src="images/ewm.png" width="233" height="200" border="0" /></a> <!--二维码图片-->
</div>
</div>
</div>
<div id="news_mid">
<div id="news_mid_top">
<div class="news_mid_titlebar">经管动态</div>
<div id="news_mid_top_content">
<div id="news_mid_top_content1">图片动态无缝滚动需要JS实现,我们后续加上</div>
<div id="news_mid_top_content2">
<ul>
<li><img src="images/arrow.gif" /><a href="#" title="博弈思维与竞争策略 --北京外国语大学">博弈思维与竞争策略 --北京外国语大学</a></li>
<li><img src="images/arrow.gif" /><a href="#" title="经济管理系“四进四信”主题团日活动">经济管理系“四进四信”主题团日活动</a></li>
<li><img src="images/arrow.gif" /><a href="#" title="经济管理系2015级专接本新生顺利开学">经济管理系2015级专接本新生顺利开学</a></li>
<li><img src="images/arrow.gif" /><a href="#" title="经济管理系与合作企业开展实习工作经验交流">经济管理系与合作企业开展实习工作经验交流</a></li>
<li><img src="images/arrow.gif" /><a href="#" title="荣盛集团举办“企业精英对话高校学子”高校巡讲活动">荣盛集团举办“企业精英对话高校学子”高校巡讲活动</a></li>
<li><img src="images/arrow.gif" /><a href="#" title="经济管理系第七届社工文化节开幕">经济管理系第七届社工文化节开幕</a></li>
<li><img src="images/arrow.gif" /><a href="#" title="唐山师院经管系学生开展服务高考志愿者活动">唐山师院经管系学生开展服务高考志愿者活动</a></li>
<li><img src="images/arrow.gif" /><a href="#" title="2011级2015届社会工作专业考研光荣榜">2011级2015届社会工作专业考研光荣榜</a></li>
</ul>
</div>
</div>
</div>
<div id="news_mid_bottom">
<div class="news_mid_titlebar">通知公告</div>
<div id="news_mid_bottom_content">
<ul>
<li><img src="images/arrow.gif" /><a href="#" title="经管系2016届论文最新文件(试用于2012级本科)">经管系2016届论文最新文件(试用于2012级本科)</a></li>
<li><img src="images/arrow.gif" /><a href="#" title="2011级2015届本科论文安排(修订)">2011级2015届本科论文安排(修订)</a></li>
<li><img src="images/arrow.gif" /><a href="#" title="我系生活部宿舍卫生检查通报">我系生活部宿舍卫生检查通报</a></li>
<li><img src="images/arrow.gif" /><a href="#" title="经管系2011级本科毕业论文教学工作安排">经管系2011级本科毕业论文教学工作安排</a></li>
<li><img src="images/arrow.gif" /><a href="#" title="经管系首问负责制">经管系首问负责制</a></li>
<li><img src="images/arrow.gif" /><a href="#" title="2014暑假社会实践先进个人">2014暑假社会实践先进个人</a></li>
<li><img src="images/arrow.gif" /><a href="#" title="社会工作专业历届考研人数统计(2011-2014)">社会工作专业历届考研人数统计(2011-2014)</a></li>
<li><img src="images/arrow.gif" /><a href="#" title="经济管理系2013年度系务公开">经济管理系2013年度系务公开</a></li>
</ul>
</div>
</div>
</div>
<div id="news_right">
<div id="news_right_top">
<div class="news_right_titlebar">招生就业</div>
<div id="news_right_top_content">
<ul>
<li><a href="#" title="2015年招生计划">2015年招生计划</a></li>
<li><a href="#" title="长城汽车招聘">长城汽车招聘</a></li>
<li><a href="#" title="河北港口集团">河北港口集团</a></li>
<li><a href="#" title="链家地产招聘会">链家地产招聘会</a></li>
<li><a href="#" title="北京瑞亚启明教育简章">北京瑞亚启明教育简章</a></li>
<li><a href="#" title="天津诺航佳运国际货运代理有限公司">天津诺航佳运国际货运代理有限公司</a></li>
<li><a href="#" title="春暖社工服务中心2015年4月急聘">春暖社工服务中心2015年4月急聘</a></li>
<li><a href="#" title="唐山君元科技有限责任公司招聘信息">唐山君元科技有限责任公司招聘信息</a></li>
<li><a href="#" title="国企招聘信息汇总">国企招聘信息汇总</a></li>
</ul>
</div>
</div>
<div id="news_right_mid">
<div class="news_right_titlebar">实习基地</div>
<div id="news_right_mid_content">
<div id="news_right_mid_content1">
<ul>
<li><a href="#" title="端正实习态度,明确实习目的">端正实习态度,明确实习目的</a></li>
<li><a href="#" title="我系10社工专业学生赴深圳毕业实习顺利进行">我系10社工专业学生赴深圳毕业实习顺利进行</a></li>
<li><a href="#" title="总结经验 巩固成果 扎实推进 实践教学工作">总结经验 巩固成果 扎实推进 实践教学工作</a></li>
<li><a href="#" title="11级物流专接本班上海全家实习总结">11级物流专接本班上海全家实习总结</a></li>
</ul>
</div>
</div>
</div>
<div id="news_right_bottom">
<div class="news_right_titlebar">学生工作</div>
<div id="news_right_bottom_content">
<ul>
<li><a href="#" title="唐山师院经管系学生开展服务高考志愿活动">唐山师院经管系学生开展服务高考志愿活动</a></li>
<li><a href="#" title="宿舍文化建设倡议">宿舍文化建设倡议</a></li>
<li><a href="#" title="热烈祝贺经管系取得佳绩">热烈祝贺经管系取得佳绩</a></li>
<li><a href="#" title="灰姑娘舞会">灰姑娘舞会</a></li>
<li><a href="#" title="经济管理系举行升旗仪式">经济管理系举行升旗仪式</a></li>
<li><a href="#" title="经管系考研交流大会">经管系考研交流大会</a></li>
<li><a href="#" title="书香浸润校园-好书推荐活动开始了">书香浸润校园-好书推荐活动开始了</a></li>
<li><a href="#" title="宿舍风采大赛">宿舍风采大赛</a></li>
</ul>
</div>
</div>
</div>
</div>
<!--经管系网站友情链接板块-->
<div id="link">
<div id="link_left">友情链接:</div>
<div id="link_right">
<table width="100%" border="0" cellspacing="0" cellpadding="0"><!--表格-->
<tr align="center" valign="middle">
<td><a href="#">教学资源网</a></td>
<td>|</td>
<td><a href="#">中国大学</a></td>
<td>|</td>
<td><a href="#">教育部</a></td>
<td>|</td>
<td><a href="#">河北省教育厅</a></td>
<td>|</td>
<td><a href="#">中国教育科研网</a></td>
<td>|</td>
<td><a href="#">教育网河北主节点</a></td>
<td>|</td>
<td><a href="#">慕课网</a></td>
<td>|</td>
<td><a href="#">爱课程</a></td>
<td>|</td>
<td><a href="#">南方周末</a></td>
<td>|</td>
<td><a href="#">经济观察</a></td>
<td>|</td>
<td><a href="#">中国企业家</a></td>
</tr>
</table>
</div>
</div>
<!--经管系网站制作版权信息板块-->
<div id="copyright">
<div id="copyright_top"><a href="#">版权所有:</a></div>
<div id="copyright_bottom"><a href="#">所在地址:</a></div>
</div>
</body>
</html>
~~~
CSS样式表代码:
~~~
<span style="font-size:18px;">/*第一次添加网页总体布局的代码*/
* {
margin:0px;
padding:0px;
}
body {
padding:0px;
margin:0px;
font-size:12px;
}
#top {
background-image: url(images/head.jpg);
background-repeat: no-repeat;
height: 120px;
width: 998px;
margin-right: auto;
margin-left: auto;
}
#nav {
background-image: url(images/n_nav_bg.gif);
background-repeat: repeat-x;
height: 37px;
width: 998px;
margin-right: auto;
margin-left: auto;
}
#adpic {
background-image: url(images/h4.jpg);
background-repeat: no-repeat;
height: 218px;
width: 998px;
margin-right: auto;
margin-left: auto;
}
#news {
height: 720px;
width: 998px;
margin-right: auto;
margin-left: auto;
}
#link {
background-image: url(images/n_title_bg.gif);
background-repeat: repeat-x;
height: 40px;
width: 998px;
margin-right: auto;
margin-left: auto;
}
#copyright {
background-color: #E2E2E2;
height: 80px;
width: 998px;
margin-top: 0px;
margin-right: auto;
margin-left: auto;
border-top-width: 5px;/*设置5像素的上边框*/
border-top-style: solid;
border-top-color: #006042;
margin-bottom: 0px;
}
#news #news_left {
float: left;
height: 720px;
width: 233px;
margin-right: 5px;
}
#news #news_mid {
float: left;
height: 720px;
width: 455px;
margin-right: 5px;
}
#news #news_right {
height: 720px;
width: 300px;
float: left;
}
#news #news_left #news_left_top {
height: 248px;
width: 233px;
}
#news #news_left #news_left_mid {
height: 240px;
width: 233px;
}
#news #news_left #news_left_bottom {
height: 232px;
width: 233px;
}
#news #news_mid #news_mid_top {
height: 488px;
width: 455px;
}
#news #news_mid #news_mid_bottom {
height: 232px;
width: 455px;
}
#news #news_right #news_right_top {
height: 248px;
width: 300px;
}
#news #news_right #news_right_mid {
height: 240px;
width: 300px;
}
#news #news_right #news_right_bottom {
height: 232px;
width: 300px;
}
/*第二次添加导航栏和友情链接栏的代码,下拉菜单我们后面做*/
a:link { /*伪类选择页面中全部的超链接标签的未访问的链接状态*/
color:#000000;
text-decoration:none;
}
a:visited { /*伪类选择页面中全部的超链接标签的已访问的链接状态*/
color:#000000;
text-decoration:none;
}
a:hover{ /*伪类选择页面中全部的超链接标签的鼠标悬停的状态*/
color:#FF0000;
text-decoration:none;
font-weight: bold;
}
#nav li {/*后代选择器选择div中行内元素li的设置*/
float: left;
line-height: 37px;
list-style-type:none;
text-align:center;
}
#link #link_left {
font-family: "微软雅黑";
font-size: 14px;
line-height: 32px;
font-weight: bold;
color: #009966;
float: left;
height: 32px;
width: 80px;
padding-left: 10px;
}
#link #link_right {
line-height: 32px;
float: left;
height: 32px;
width: 908px;
}
#nav a:link{/*后代选择器选择div中行内选择a设置未访问的链接状态*/
color:#FFFFFF;
text-decoration:none;
font-family: "微软雅黑";
font-size: 14px;
font-weight: bold;
width:89px;
height:37px;
display:block;
}
#nav a:visited{/*后代选择器选择div中行内选择a设置已访问的链接状态*/
color:#FFFFFF;
text-decoration:none;
font-family: "微软雅黑";
font-size: 14px;
font-weight: bold;
width:89px;
height:37px;
display:block;
}
#nav a:hover{/*后代选择器选择div中行内选择a设置鼠标悬浮在链接的的状态*/
color:#FFFFFF;
text-decoration:none;
font-family: "微软雅黑";
font-size: 14px;
font-weight: bold;
background-color: #009966;
width:89px;
height:37px;
display:block;
}
/*第三次添加内容标题栏的代码*/
img { /*消除图片的默认格式*/
border:none;
}
.news_left_titlebar {
background-repeat: no-repeat;
height: 31px;
width: 233px;
border-bottom-width: 1px;
border-bottom-style: dashed;
border-bottom-color: #CCCCCC;
background-color: #FFFFFF;
font-size: 14px;
line-height: 32px;
font-weight: bold;
color: #009966;
}
.news_left_titlebar img {/*设置图片的格式*/
float: left;
height: 14px;
width: 14px;
margin-top: 9px;
margin-right:5px;
}
.news_mid_titlebar {
background-image: url(images/n_title_bg.gif);
background-repeat: repeat-x;
height: 32px;
width: 445px;
font-size: 14px;
line-height: 32px;
font-weight: bold;
color: #009966;
padding-left: 10px;
}
.news_right_titlebar {
background-image: url(images/n_title_bg.gif);
background-repeat: repeat-x;
height: 32px;
width: 290px;
font-size: 14px;
line-height: 32px;
font-weight: bold;
color: #009966;
padding-left: 10px;
}
#copyright #copyright_top {
height: 20px;
width: 998px;
text-align:center;
line-height:20px;
padding-top:20px;
}
#copyright #copyright_bottom {
height: 20px;
width: 998px;
text-align:center;
line-height:20px;
padding-bottom:20px;
}
/*第四次代码左半部分内容的添加*/
li {
list-style-type:none;
}
#news #news_left #news_left_top #news_left_top_content {
height: 210px;
width: 233px;
overflow: hidden;
padding-top:3px;
padding-bottom:3px;
}
#news #news_left #news_left_top #news_left_top_content li {
float: left;
height: 30px;
width: 233px;
display:block;
}
#news #news_left #news_left_top #news_left_top_content li a:link{
color:#999999;
font-family: "微软雅黑";
font-size: 14px;
font-weight: bold;
width:233px;
height:30px;
display:block;
text-align:left;
line-height:30px;
vertical-align:middle;
}
#news #news_left #news_left_top #news_left_top_content li a:visited{
color:#999999;
font-family: "微软雅黑";
font-size: 14px;
font-weight: bold;
width:233px;
height:30px;
display:block;
text-align:left;
line-height:30px;
vertical-align:middle;
}
#news #news_left #news_left_top #news_left_top_content li a:hover{
color:#FFFFFF;
font-family: "微软雅黑";
font-size: 14px;
font-weight: bold;
background-color: #009966;
width:233px;
height:30px;
display:block;
text-align:left;
line-height:30px;
vertical-align:middle;
}
#news #news_left #news_left_mid #news_left_mid_content {
height: 196px;
width: 200px;
overflow: hidden;
padding-top:6px;
padding-bottom:6px;
padding-left:13px;
padding-right:20px;
}
#news #news_left #news_left_mid #news_left_mid_content a:link{
color:#999999;
font-family: "微软雅黑";
font-size: 14px;
font-weight: bold;
width:100px;
height:27px;
display:block;
text-align:center;
line-height:27px;
vertical-align:middle;
}
#news #news_left #news_left_mid #news_left_mid_content a:visited{
color:#999999;
font-family: "微软雅黑";
font-size: 14px;
font-weight: bold;
width:100px;
height:27px;
display:block;
text-align:center;
line-height:27px;
vertical-align:middle;
}
#news #news_left #news_left_mid #news_left_mid_content a:hover{
color:#FFFFFF;
font-family: "微软雅黑";
font-size: 14px;
font-weight: bold;
background-color: #009966;
width:100px;
height:27px;
display:block;
text-align:center;
line-height:27px;
vertical-align:middle;
}
/*第五次代码中间内容一部分的添加*/
#news #news_mid #news_mid_top #news_mid_top_content #news_mid_top_content1 {
background-color:#CCCCCC;
height: 256px;
width: 455px;
}
#news #news_mid #news_mid_top #news_mid_top_content #news_mid_top_content2 {
height: 232px;
width: 455px;
}
#news #news_mid #news_mid_top #news_mid_top_content #news_mid_top_content2 li {
line-height: 24px;
border-bottom-width: 1px;
border-bottom-style: dashed;
border-bottom-color: #CCCCCC;
}
#news #news_mid #news_mid_top #news_mid_top_content #news_mid_top_content2 img {
float: left;
height: 16px;
width: 16px;
margin-top: 5px;
}
#news #news_mid #news_mid_bottom #news_mid_bottom_content li {
line-height: 24px;
border-bottom-width: 1px;
border-bottom-style: dashed;
border-bottom-color: #CCCCCC;
}
#news #news_mid #news_mid_bottom #news_mid_bottom_content img {
float: left;
height: 16px;
width: 16px;
margin-top: 5px;
}
/*第五次代码右半部分内容的添加*/
#news #news_right #news_right_top #news_right_top_content li {
line-height: 23px;
border-bottom-width: 1px;
border-bottom-style: dashed;
border-bottom-color: #CCCCCC;
}
#news #news_right #news_right_mid #news_right_mid_content #news_right_mid_content1 {
height: 100px;
width: 300px;
margin-top: 54px;
margin-bottom: 54px;
}
#news #news_right #news_right_mid #news_right_mid_content li {
line-height: 24px;
border-bottom-width: 1px;
border-bottom-style: dashed;
border-bottom-color: #CCCCCC;
}
#news #news_right #news_right_bottom #news_right_bottom_content li {
line-height: 24px;
border-bottom-width: 1px;
border-bottom-style: dashed;
border-bottom-color: #CCCCCC;
}</span>
~~~
运行的效果为:


点击链接的效果是出现和链接文字一样的title提示,这是HTML超链接标签的title属性实现的。我截图时并没有显
示出右下侧的链接文字。这是截图的原因,只要加上了title属性就可实现!!!

DIV+CSS实操四:经管系网页内容模块内容添加(一)
最后更新于:2022-04-01 11:29:59
我们继续接着DIV+CSS实操系列:[DIV+CSS实操一:经管系网页总体模块布局](http://blog.csdn.net/erlian1992/article/details/49928091),[DIV+CSS实操二:经管系网页](http://blog.csdn.net/erlian1992/article/details/49945823)[添](http://blog.csdn.net/erlian1992/article/details/49945823)[加导航栏和友情链接栏](http://blog.csdn.net/erlian1992/article/details/49945823)和[DIV+CSS实操三:经管系网页内容模块添加标题栏和版权信息模块](http://blog.csdn.net/erlian1992/article/details/49966797)。今天我们就来给内容模块添加内容,所有的内容都用超链接。
由于内容部分较多,我会分两次添加,先来左半部分内容的添加:
HTML代码:
~~~
<span style="font-size:18px;"><!DOCTYPE html PUBLIC "-//W3C//DTD XHTML 1.0 Transitional//EN" "http://www.w3.org/TR/xhtml1/DTD/xhtml1-
transitional.dtd">
<html xmlns="http://www.w3.org/1999/xhtml">
<head>
<meta http-equiv="Content-Type" content="text/html; charset=gb2312" />
<title>经管系</title>
<link rel="stylesheet" href="Style.css" type="text/css" />
</head>
<body>
<!--经管系Logo板块-->
<div id="top">Dreamweaver8</div>
<!--经管系网页导航栏板块-->
<div id="nav">
<ul><!--无序列表-->
<li><a href="#">本站首页</a></li>
<li><a href="#">本系概况</a></li>
<li><a href="#">教育教学</a></li>
<li><a href="#">科学研究</a></li>
<li><a href="#">招生就业</a></li>
<li><a href="#">学生工作</a></li>
<li><a href="#">党团建设</a></li>
<li><a href="#">考研升本</a></li>
<li><a href="#">实习基地</a></li>
<li><a href="#">经管动态</a></li>
<li><a href="#">通知公告</a></li>
</ul>
</div>
<!--经管系网页风采展示广告板块-->
<div id="adpic"></div>
<!--经管系内容板块-->
<div id="news">
<div id="news_left">
<div id="news_left_top">
<div class="news_left_titlebar"><img src="images/n_icon001.gif" />常用服务</div>
<div id="news_left_top_content">
<ul>
<li><a href="#">唐山师范学院校历查询</a></li>
<li><a href="#">课程表查询</a></li>
<li><a href="#">期末成绩录入与查询</a></li>
<li><a href="#">论文检索[CNKI,万方,读秀]</a></li>
<li><a href="#">毕业论文格式及相关表格</a></li>
<li><a href="#">常用下载</a></li>
<li><a href="#">电子资源</a></li>
</ul>
</div>
</div>
<div id="news_left_mid">
<div class="news_left_titlebar"><img src="images/n_icon001.gif" />站内导航</div>
<div id="news_left_mid_content">
<table>
<tr>
<td><a href="#">专业介绍</a></td>
<td><a href="#">新生向导</a></td>
</tr>
<tr>
<td><a href="#">教授风采</a></td>
<td><a href="#">学生社团</a></td>
</tr>
<tr>
<td><a href="#">课程建设</a></td>
<td><a href="#">学子风采</a></td>
</tr>
<tr>
<td><a href="#">实践教学</a></td>
<td><a href="#">招聘信息</a></td>
</tr>
<tr>
<td><a href="#">实习动态</a></td>
<td><a href="#">求职指导</td>
</tr>
<tr>
<td><a href="#">学术活动</a></td>
<td><a href="#">就业精英</td>
</tr>
<tr>
<td><a href="#">科研成果</a></td>
<td><a href="#">考研专题</a></td>
</tr>
</table>
</div>
</div>
<div id="news_left_bottom">
<div class="news_left_titlebar"><img src="images/n_icon001.gif" />扫一扫</div>
<div id="news_left_bottom_content">
<a href="#"><img src="images/ewm.png" width="233" height="200" border="0" /></a>
<!--二维码图片-->
</div>
</div>
</div>
<div id="news_mid">
<div id="news_mid_top">
<div class="news_mid_titlebar">经管动态</div>
<div id="news_mid_top_content"></div>
</div>
<div id="news_mid_bottom">
<div class="news_mid_titlebar">通知公告</div>
<div id="news_mid_bottom_content"></div>
</div>
</div>
<div id="news_right">
<div id="news_right_top">
<div class="news_right_titlebar">招生就业</div>
<div id="news_right_top_content"></div>
</div>
<div id="news_right_mid">
<div class="news_right_titlebar">实习基地</div>
<div id="news_right_mid_content"></div>
</div>
<div id="news_right_bottom">
<div class="news_right_titlebar">学生工作</div>
<div id="news_right_bottom_content"></div>
</div>
</div>
</div>
<!--经管系网站友情链接板块-->
<div id="link">
<div id="link_left">友情链接:</div>
<div id="link_right">
<table width="100%" border="0" cellspacing="0" cellpadding="0"><!--表格-->
<tr align="center" valign="middle">
<td><a href="#">教学资源网</a></td>
<td>|</td>
<td><a href="#">中国大学</a></td>
<td>|</td>
<td><a href="#">教育部</a></td>
<td>|</td>
<td><a href="#">河北省教育厅</a></td>
<td>|</td>
<td><a href="#">中国教育科研网</a></td>
<td>|</td>
<td><a href="#">教育网河北主节点</a></td>
<td>|</td>
<td><a href="#">慕课网</a></td>
<td>|</td>
<td><a href="#">爱课程</a></td>
<td>|</td>
<td><a href="#">南方周末</a></td>
<td>|</td>
<td><a href="#">经济观察</a></td>
<td>|</td>
<td><a href="#">中国企业家</a></td>
</tr>
</table>
</div>
</div>
<!--经管系网站制作版权信息板块-->
<div id="copyright">
<div id="copyright_top"><a href="#">版权所有:</a></div>
<div id="copyright_bottom"><a href="#">所在地址:</a></div>
</div>
</body>
</html></span>
~~~
CSS代码:
~~~
<span style="font-size:18px;">/*第一次添加网页总体布局的代码*/
* {
margin:0px;
padding:0px;
}
body {
padding:0px;
margin:0px;
font-size:12px;
}
#top {
background-image: url(images/head.jpg);
background-repeat: no-repeat;
height: 120px;
width: 998px;
margin-right: auto;
margin-left: auto;
}
#nav {
background-image: url(images/n_nav_bg.gif);
background-repeat: repeat-x;
height: 37px;
width: 998px;
margin-right: auto;
margin-left: auto;
}
#adpic {
background-image: url(images/h4.jpg);
background-repeat: no-repeat;
height: 218px;
width: 998px;
margin-right: auto;
margin-left: auto;
}
#news {
height: 720px;
width: 998px;
margin-right: auto;
margin-left: auto;
}
#link {
background-image: url(images/n_title_bg.gif);
background-repeat: repeat-x;
height: 40px;
width: 998px;
margin-right: auto;
margin-left: auto;
}
#copyright {
background-color: #E2E2E2;
height: 80px;
width: 998px;
margin-top: 0px;
margin-right: auto;
margin-left: auto;
border-top-width: 5px;/*设置5像素的上边框*/
border-top-style: solid;
border-top-color: #006042;
margin-bottom: 0px;
}
#news #news_left {
float: left;
height: 720px;
width: 233px;
margin-right: 5px;
}
#news #news_mid {
float: left;
height: 720px;
width: 455px;
margin-right: 5px;
}
#news #news_right {
height: 720px;
width: 300px;
float: left;
}
#news #news_left #news_left_top {
height: 248px;
width: 233px;
}
#news #news_left #news_left_mid {
height: 240px;
width: 233px;
}
#news #news_left #news_left_bottom {
height: 232px;
width: 233px;
}
#news #news_mid #news_mid_top {
height: 488px;
width: 455px;
}
#news #news_mid #news_mid_bottom {
height: 232px;
width: 455px;
}
#news #news_right #news_right_top {
height: 248px;
width: 300px;
background-color:#FFFF00;
}
#news #news_right #news_right_mid {
height: 240px;
width: 300px;
background-color:#00FFFF;
}
#news #news_right #news_right_bottom {
height: 232px;
width: 300px;
background-color:#FF00FF;
}
/*第二次添加导航栏和友情链接栏的代码,下拉菜单我们后面做*/
a:link { /*伪类选择页面中全部的超链接标签的未访问的链接状态*/
color:#000000;
text-decoration:none;
}
a:visited { /*伪类选择页面中全部的超链接标签的已访问的链接状态*/
color:#000000;
text-decoration:none;
}
a:hover{ /*伪类选择页面中全部的超链接标签的鼠标悬停的状态*/
color:#FF0000;
text-decoration:none;
font-weight: bold;
}
#nav li {/*后代选择器选择div中行内元素li的设置*/
float: left;
line-height: 37px;
list-style-type:none;
text-align:center;
}
#link #link_left {
font-family: "微软雅黑";
font-size: 14px;
line-height: 32px;
font-weight: bold;
color: #009966;
float: left;
height: 32px;
width: 80px;
padding-left: 10px;
}
#link #link_right {
line-height: 32px;
float: left;
height: 32px;
width: 908px;
}
#nav a:link{/*后代选择器选择div中行内选择a设置未访问的链接状态*/
color:#FFFFFF;
text-decoration:none;
font-family: "微软雅黑";
font-size: 14px;
font-weight: bold;
width:89px;
height:37px;
display:block;
}
#nav a:visited{/*后代选择器选择div中行内选择a设置已访问的链接状态*/
color:#FFFFFF;
text-decoration:none;
font-family: "微软雅黑";
font-size: 14px;
font-weight: bold;
width:89px;
height:37px;
display:block;
}
#nav a:hover{/*后代选择器选择div中行内选择a设置鼠标悬浮在链接的的状态*/
color:#FFFFFF;
text-decoration:none;
font-family: "微软雅黑";
font-size: 14px;
font-weight: bold;
background-color: #009966;
width:89px;
height:37px;
display:block;
}
/*第三次添加内容标题栏的代码*/
img { /*消除图片的默认格式*/
border:none;
}
.news_left_titlebar {
background-repeat: no-repeat;
height: 31px;
width: 233px;
border-bottom-width: 1px;
border-bottom-style: dashed;
border-bottom-color: #CCCCCC;
background-color: #FFFFFF;
font-size: 14px;
line-height: 32px;
font-weight: bold;
color: #009966;
}
.news_left_titlebar img {/*设置图片的格式*/
float: left;
height: 14px;
width: 14px;
margin-top: 9px;
margin-right:5px;
}
.news_mid_titlebar {
background-image: url(images/n_title_bg.gif);
background-repeat: repeat-x;
height: 32px;
width: 445px;
font-size: 14px;
line-height: 32px;
font-weight: bold;
color: #009966;
padding-left: 10px;
}
.news_right_titlebar {
background-image: url(images/n_title_bg.gif);
background-repeat: repeat-x;
height: 32px;
width: 290px;
font-size: 14px;
line-height: 32px;
font-weight: bold;
color: #009966;
padding-left: 10px;
}
#copyright #copyright_top {
height: 20px;
width: 998px;
text-align:center;
line-height:20px;
padding-top:20px;
}
#copyright #copyright_bottom {
height: 20px;
width: 998px;
text-align:center;
line-height:20px;
padding-bottom:20px;
}
/*第四次代码左半部分内容的添加*/
#news #news_left #news_left_top #news_left_top_content {
height: 210px;
width: 233px;
overflow: hidden;
padding-top:3px;
padding-bottom:3px;
}
#news #news_left #news_left_top #news_left_top_content li {
float: left;
height: 30px;
width: 233px;
display:block;
}
#news #news_left #news_left_top #news_left_top_content a:link{
color:#999999;
font-family: "微软雅黑";
font-size: 14px;
font-weight: bold;
width:233px;
height:30px;
display:block;
text-align:left;
vertical-align:middle;
}
#news #news_left #news_left_top #news_left_top_content a:visited{
color:#999999;
font-family: "微软雅黑";
font-size: 14px;
font-weight: bold;
width:233px;
height:30px;
display:block;
text-align:left;
vertical-align:middle;
}
#news #news_left #news_left_top #news_left_top_content a:hover{
color:#FFFFFF;
font-family: "微软雅黑";
font-size: 14px;
font-weight: bold;
background-color: #009966;
width:233px;
height:30px;
display:block;
text-align:left;
vertical-align:middle;
}
#news #news_left #news_left_mid #news_left_mid_content {
height: 196px;
width: 200px;
overflow: hidden;
padding-top:6px;
padding-bottom:6px;
padding-left:13px;
padding-right:20px;
}
#news #news_left #news_left_mid #news_left_mid_content a:link{
color:#999999;
font-family: "微软雅黑";
font-size: 14px;
font-weight: bold;
width:100px;
height:28px;
display:block;
text-align:center;
vertical-align:middle;
}
#news #news_left #news_left_mid #news_left_mid_content a:visited{
color:#999999;
font-family: "微软雅黑";
font-size: 14px;
font-weight: bold;
width:100px;
height:28px;
display:block;
text-align:center;
vertical-align:middle;
}
#news #news_left #news_left_mid #news_left_mid_content a:hover{
color:#FFFFFF;
font-family: "微软雅黑";
font-size: 14px;
font-weight: bold;
background-color: #009966;
width:100px;
height:28px;
display:block;
text-align:center;
vertical-align:middle;
}</span>
~~~
运行的效果为:

点击链接的效果:


DIV+CSS实操三:经管系网页内容模块添加标题栏和版权信息模块
最后更新于:2022-04-01 11:29:57
我们继续接着[DIV+CSS实操一:经管系网页总体模块布局](http://blog.csdn.net/erlian1992/article/details/49928091)和[DIV+CSS实操二:经管系网页添加导航栏和友情链接](http://blog.csdn.net/erlian1992/article/details/49945823)[栏](http://blog.csdn.net/erlian1992/article/details/49945823)这个系列的博文做经管系网页。这一次我们所要做的就是给内容版块添加标题栏,还有就是给制作信息版块添加链接。这一篇博文基本就是做这些了,记着和前两篇博文比较效果。
还是老套路,写HTML代码时,一定要注意闭合标签,一定要注意代码的整齐承担和完整性,先来HTML代码:
~~~
<!DOCTYPE html PUBLIC "-//W3C//DTD XHTML 1.0 Transitional//EN" "http://www.w3.org/TR/xhtml1/DTD/xhtml1-transitional.dtd">
<html xmlns="http://www.w3.org/1999/xhtml">
<head>
<meta http-equiv="Content-Type" content="text/html; charset=gb2312" />
<title>经管系</title>
<link rel="stylesheet" href="Style.css" type="text/css" />
</head>
<body>
<!--经管系Logo板块-->
<div id="top">Dreamweaver8</div>
<!--经管系网页导航栏板块-->
<div id="nav">
<ul><!--无序列表-->
<li><a href="#">本站首页</a></li>
<li><a href="#">本系概况</a></li>
<li><a href="#">教育教学</a></li>
<li><a href="#">科学研究</a></li>
<li><a href="#">招生就业</a></li>
<li><a href="#">学生工作</a></li>
<li><a href="#">党团建设</a></li>
<li><a href="#">考研升本</a></li>
<li><a href="#">实习基地</a></li>
<li><a href="#">经管动态</a></li>
<li><a href="#">通知公告</a></li>
</ul>
</div>
<!--经管系网页风采展示广告板块-->
<div id="adpic"></div>
<!--经管系内容板块-->
<div id="news">
<div id="news_left">
<div id="news_left_top">
<div class="news_left_titlebar"><img src="images/n_icon001.gif" />常用服务</div>
<div id="news_left_top_content"></div>
</div>
<div id="news_left_mid">
<div class="news_left_titlebar"><img src="images/n_icon001.gif" />站内导航</div>
<div id="news_left_top_content"></div>
</div>
<div id="news_left_bottom">
<div class="news_left_titlebar"><img src="images/n_icon001.gif" />扫一扫</div>
<div id="news_left_top_content"></div>
</div>
</div>
<div id="news_mid">
<div id="news_mid_top">
<div class="news_mid_titlebar">经管动态</div>
<div id="news_mid_top_content"></div>
</div>
<div id="news_mid_bottom">
<div class="news_mid_titlebar">通知公告</div>
<div id="news_mid_bottom_content"></div>
</div>
</div>
<div id="news_right">
<div id="news_right_top">
<div class="news_right_titlebar">招生就业</div>
<div id="news_right_top_content"></div>
</div>
<div id="news_right_mid">
<div class="news_right_titlebar">实习基地</div>
<div id="news_right_top_content"></div>
</div>
<div id="news_right_bottom">
<div class="news_right_titlebar">学生工作</div>
<div id="news_right_top_content"></div>
</div>
</div>
</div>
<!--经管系网站友情链接板块-->
<div id="link">
<div id="link_left">友情链接:</div>
<div id="link_right">
<table width="100%" border="0" cellspacing="0" cellpadding="0"><!--表格-->
<tr align="center" valign="middle">
<td><a href="#">教学资源网</a></td>
<td>|</td>
<td><a href="#">中国大学</a></td>
<td>|</td>
<td><a href="#">教育部</a></td>
<td>|</td>
<td><a href="#">河北省教育厅</a></td>
<td>|</td>
<td><a href="#">中国教育科研网</a></td>
<td>|</td>
<td><a href="#">教育网河北主节点</a></td>
<td>|</td>
<td><a href="#">慕课网</a></td>
<td>|</td>
<td><a href="#">爱课程</a></td>
<td>|</td>
<td><a href="#">南方周末</a></td>
<td>|</td>
<td><a href="#">经济观察</a></td>
<td>|</td>
<td><a href="#">中国企业家</a></td>
</tr>
</table>
</div>
</div>
<!--经管系网站制作版权信息板块-->
<div id="copyright">
<div id="copyright_top"><a href="#">版权所有:</a></div>
<div id="copyright_bottom"><a href="#">所在地址:</a></div>
</div>
</body>
</html>
~~~
CSS样式表代码:
~~~
/*第一次添加网页总体布局的代码*/
* {
margin:0px;
padding:0px;
}
body {
padding:0px;
margin:0px;
font-size:12px;
}
#top {
background-image: url(images/head.jpg);
background-repeat: no-repeat;
height: 120px;
width: 998px;
margin-right: auto;
margin-left: auto;
}
#nav {
background-image: url(images/n_nav_bg.gif);
background-repeat: repeat-x;
height: 37px;
width: 998px;
margin-right: auto;
margin-left: auto;
}
#adpic {
background-image: url(images/h4.jpg);
background-repeat: no-repeat;
height: 218px;
width: 998px;
margin-right: auto;
margin-left: auto;
}
#news {
height: 720px;
width: 998px;
margin-right: auto;
margin-left: auto;
}
#link {
background-image: url(images/n_title_bg.gif);
background-repeat: repeat-x;
height: 40px;
width: 998px;
margin-right: auto;
margin-left: auto;
}
#copyright {
background-color: #E2E2E2;
height: 80px;
width: 998px;
margin-top: 0px;
margin-right: auto;
margin-left: auto;
border-top-width: 5px;/*设置5像素的上边框*/
border-top-style: solid;
border-top-color: #006042;
margin-bottom: 0px;
}
#news #news_left {
float: left;
height: 720px;
width: 233px;
margin-right: 5px;
}
#news #news_mid {
float: left;
height: 720px;
width: 455px;
margin-right: 5px;
}
#news #news_right {
height: 720px;
width: 300px;
float: left;
}
#news #news_left #news_left_top {
height: 248px;
width: 233px;
background-color:#FF0000;
}
#news #news_left #news_left_mid {
height: 240px;
width: 233px;
background-color:#00FF00;
}
#news #news_left #news_left_bottom {
height: 232px;
width: 233px;
background-color:#0000FF;
}
#news #news_mid #news_mid_top {
height: 488px;
width: 455px;
background-color:#000000;
}
#news #news_mid #news_mid_bottom {
height: 232px;
width: 455px;
background-color:#999999;
}
#news #news_right #news_right_top {
height: 248px;
width: 300px;
background-color:#FFFF00;
}
#news #news_right #news_right_mid {
height: 240px;
width: 300px;
background-color:#00FFFF;
}
#news #news_right #news_right_bottom {
height: 232px;
width: 300px;
background-color:#FF00FF;
}
/*第二次添加导航栏和友情链接栏的代码,下拉菜单我们后面做*/
a:link { /*伪类选择页面中全部的超链接标签的未访问的链接状态*/
color:#000000;
text-decoration:none;
}
a:visited { /*伪类选择页面中全部的超链接标签的已访问的链接状态*/
color:#000000;
text-decoration:none;
}
a:hover{ /*伪类选择页面中全部的超链接标签的鼠标悬停的状态*/
color:#FF0000;
text-decoration:none;
font-weight: bold;
}
#nav li {/*后代选择器选择div中行内元素li的设置*/
float: left;
line-height: 37px;
list-style-type:none;
text-align:center;
}
#link #link_left {
font-family: "微软雅黑";
font-size: 14px;
line-height: 32px;
font-weight: bold;
color: #009966;
float: left;
height: 32px;
width: 80px;
padding-left: 10px;
}
#link #link_right {
line-height: 32px;
float: left;
height: 32px;
width: 908px;
}
#nav a:link{/*后代选择器选择div中行内选择a设置未访问的链接状态*/
color:#FFFFFF;
text-decoration:none;
font-family: "微软雅黑";
font-size: 14px;
font-weight: bold;
width:89px;
height:37px;
display:block;
}
#nav a:visited{/*后代选择器选择div中行内选择a设置已访问的链接状态*/
color:#FFFFFF;
text-decoration:none;
font-family: "微软雅黑";
font-size: 14px;
font-weight: bold;
width:89px;
height:37px;
display:block;
}
#nav a:hover{/*后代选择器选择div中行内选择a设置鼠标悬浮在链接的的状态*/
color:#FFFFFF;
text-decoration:none;
font-family: "微软雅黑";
font-size: 14px;
font-weight: bold;
background-color: #009966;
width:89px;
height:37px;
display:block;
}
/*第三次添加内容标题栏的代码*/
img { /*消除图片的默认格式*/
border:none;
}
.news_left_titlebar {
background-repeat: no-repeat;
height: 31px;
width: 233px;
border-bottom-width: 1px;
border-bottom-style: dashed;
border-bottom-color: #CCCCCC;
background-color: #FFFFFF;
font-size: 14px;
line-height: 32px;
font-weight: bold;
color: #009966;
}
.news_left_titlebar img {/*设置图片的格式*/
float: left;
height: 14px;
width: 14px;
margin-top: 9px;
margin-right:5px;
}
.news_mid_titlebar {
background-image: url(images/n_title_bg.gif);
background-repeat: repeat-x;
height: 32px;
width: 445px;
font-size: 14px;
line-height: 32px;
font-weight: bold;
color: #009966;
padding-left: 10px;
}
.news_right_titlebar {
background-image: url(images/n_title_bg.gif);
background-repeat: no-repeat;
height: 32px;
width: 290px;
font-size: 14px;
line-height: 32px;
font-weight: bold;
color: #009966;
padding-left: 10px;
}
#copyright #copyright_top {
height: 20px;
width: 998px;
text-align:center;
line-height:20px;
padding-top:20px;
}
#copyright #copyright_bottom {
height: 20px;
width: 998px;
text-align:center;
line-height:20px;
padding-bottom:20px;
}
~~~
运行的效果:
内容标题栏:

制作信息版块,点击链接会有不同的效果:

DIV+CSS实操二:经管系网页添加导航栏和友情链接栏
最后更新于:2022-04-01 11:29:55
接着[DIV+CSS实操一:经管系网页总体模块布局](http://blog.csdn.net/erlian1992/article/details/49928091)这篇博客继续,实现添加导航栏和友情链接栏,导航栏的下
拉菜单我们后续会加上。
先来HTML代码:
~~~
<!DOCTYPE html PUBLIC "-//W3C//DTD XHTML 1.0 Transitional//EN" "http://www.w3.org/TR/xhtml1/DTD/xhtml1-transitional.dtd">
<html xmlns="http://www.w3.org/1999/xhtml">
<head>
<meta http-equiv="Content-Type" content="text/html; charset=gb2312" />
<title>经管系</title>
<link rel="stylesheet" href="Style.css" type="text/css" />
</head>
<body>
<!--经管系Logo板块-->
<div id="top">Dreamweaver8</div>
<!--经管系网页导航栏板块-->
<div id="nav">
<ul><!--无序列表-->
<li><a href="#">本站首页</a></li>
<li><a href="#">本系概况</a></li>
<li><a href="#">教育教学</a></li>
<li><a href="#">科学研究</a></li>
<li><a href="#">招生就业</a></li>
<li><a href="#">学生工作</a></li>
<li><a href="#">党团建设</a></li>
<li><a href="#">考研升本</a></li>
<li><a href="#">实习基地</a></li>
<li><a href="#">经管动态</a></li>
<li><a href="#">通知公告</a></li>
</ul>
</div>
<!--经管系网页风采展示广告板块-->
<div id="adpic"></div>
<!--经管系内容板块-->
<div id="news">
<div id="news_left">
<div id="news_left_top">
<div class="news_left_titlebar"></div>
<div id="news_left_top_content"></div>
</div>
<div id="news_left_mid">
<div class="news_left_titlebar"></div>
<div id="news_left_top_content"></div>
</div>
<div id="news_left_bottom">
<div class="news_left_titlebar"></div>
<div id="news_left_top_content"></div>
</div>
</div>
<div id="news_mid">
<div id="news_mid_top">
<div class="news_mid_titlebar"></div>
<div id="news_mid_top_content"></div>
</div>
<div id="news_mid_bottom">
<div class="news_mid_titlebar">/div>
<div id="news_mid_bottom_content"></div>
</div>
</div>
<div id="news_right">
<div id="news_right_top">
<div class="news_right_titlebar"></div>
<div id="news_right_top_content"></div>
</div>
<div id="news_right_mid">
<div class="news_right_titlebar"></div>
<div id="news_right_top_content"></div>
</div>
<div id="news_right_bottom">
<div class="news_right_titlebar"></div>
<div id="news_right_top_content"></div>
</div>
</div>
</div>
<!--经管系网站友情链接板块-->
<div id="link">
<div id="link_left">友情链接:</div>
<div id="link_right">
<table width="100%" border="0" cellspacing="0" cellpadding="0"><!--表格-->
<tr align="center" valign="middle">
<td><a href="#">教学资源网</a></td>
<td>|</td>
<td><a href="#">中国大学</a></td>
<td>|</td>
<td><a href="#">教育部</a></td>
<td>|</td>
<td><a href="#">河北省教育厅</a></td>
<td>|</td>
<td><a href="#">中国教育科研网</a></td>
<td>|</td>
<td><a href="#">教育网河北主节点</a></td>
<td>|</td>
<td><a href="#">慕课网</a></td>
<td>|</td>
<td><a href="#">爱课程</a></td>
<td>|</td>
<td><a href="#">南方周末</a></td>
<td>|</td>
<td><a href="#">经济观察</a></td>
<td>|</td>
<td><a href="#">中国企业家</a></td>
</tr>
</table>
</div>
</div>
<!--经管系网站制作信息板块-->
<div id="copyright"></div>
</body>
</html>
~~~
再来CSS代码:
~~~
/*第一次添加网页总体布局的代码*/
* {
margin:0px;
padding:0px;
}
body {
padding:0px;
margin:0px;
font-size:12px;
}
#top {
background-image: url(images/head.jpg);
background-repeat: no-repeat;
height: 120px;
width: 998px;
margin-right: auto;
margin-left: auto;
}
#nav {
background-image: url(images/n_nav_bg.gif);
background-repeat: repeat-x;
height: 37px;
width: 998px;
margin-right: auto;
margin-left: auto;
}
#adpic {
background-image: url(images/h4.jpg);
background-repeat: no-repeat;
height: 218px;
width: 998px;
margin-right: auto;
margin-left: auto;
}
#news {
height: 720px;
width: 998px;
margin-right: auto;
margin-left: auto;
}
#link {
background-image: url(images/n_title_bg.gif);
background-repeat: repeat-x;
height: 40px;
width: 998px;
margin-right: auto;
margin-left: auto;
}
#copyright {
background-color: #E2E2E2;
height: 80px;
width: 998px;
margin-top: 0px;
margin-right: auto;
margin-left: auto;
border-top-width: 5px;/*设置5像素的上边框*/
border-top-style: solid;
border-top-color: #006042;
margin-bottom: 0px;
}
#news #news_left {
float: left;
height: 720px;
width: 233px;
margin-right: 5px;
}
#news #news_mid {
float: left;
height: 720px;
width: 455px;
margin-right: 5px;
}
#news #news_right {
height: 720px;
width: 300px;
float: left;
}
#news #news_left #news_left_top {
height: 248px;
width: 233px;
background-color:#FF0000;
}
#news #news_left #news_left_mid {
height: 240px;
width: 233px;
background-color:#00FF00;
}
#news #news_left #news_left_bottom {
height: 232px;
width: 233px;
}
#news #news_mid #news_mid_top {
height: 488px;
width: 455px;
background-color:#000000;
}
#news #news_mid #news_mid_bottom {
height: 232px;
width: 455px;
background-color:#999999;
}
#news #news_right #news_right_top {
height: 248px;
width: 300px;
background-color:#FFFF00;
}
#news #news_right #news_right_mid {
height: 240px;
width: 300px;
background-color:#00FFFF;
}
#news #news_right #news_right_bottom {
height: 232px;
width: 300px;
background-color:#FF00FF;
}
/*第二次添加导航栏和友情链接栏的代码,下拉菜单我们后面做*/
a:link { /*伪类选择页面中全部的超链接标签的未访问的链接状态*/
color:#000000;
text-decoration:none;
}
a:visited { /*伪类选择页面中全部的超链接标签的已访问的链接状态*/
color:#000000;
text-decoration:none;
}
a:hover{ /*伪类选择页面中全部的超链接标签的鼠标悬停的状态*/
color:#FF0000;
text-decoration:none;
font-weight: bold;
}
#nav li {/*后代选择器选择div中行内元素li的设置*/
float: left;
line-height: 37px;
list-style-type:none;
text-align:center;
}
#link #link_left {
font-family: "微软雅黑";
font-size: 14px;
line-height: 32px;
font-weight: bold;
color: #009966;
float: left;
height: 32px;
width: 80px;
padding-left: 10px;
}
#link #link_right {
line-height: 32px;
float: left;
height: 32px;
width: 908px;
}
#nav a:link{/*后代选择器选择div中行内选择a设置未访问的链接状态*/
color:#FFFFFF;
text-decoration:none;
font-family: "微软雅黑";
font-size: 14px;
font-weight: bold;
width:89px;
height:37px;
display:block;
}
#nav a:visited{/*后代选择器选择div中行内选择a设置已访问的链接状态*/
color:#FFFFFF;
text-decoration:none;
font-family: "微软雅黑";
font-size: 14px;
font-weight: bold;
width:89px;
height:37px;
display:block;
}
#nav a:hover{/*后代选择器选择div中行内选择a设置鼠标悬浮在链接的的状态*/
color:#FFFFFF;
text-decoration:none;
font-family: "微软雅黑";
font-size: 14px;
font-weight: bold;
background-color: #009966;
width:89px;
height:37px;
display:block;
}
~~~
浏览器运行的结果为:
导航栏:

点击导航栏效果:

未点击的友情链接栏:

鼠标悬浮在链接上的友情链接栏:

DIV+CSS实操一:经管系网页总体模块布局
最后更新于:2022-04-01 11:29:52
首先我们先来打开经管系网页,看看网页效果是怎么样的。通过所学Web前端开发的知识,我们一步一步模仿出标准的网页。我们知道DIV+CSS可以实现网页模块的总体布局,这基本取代了HTML中用table布局,DIV+CSS布局
更加灵活,改写代码方便。
经管系原网页截图:


我先开始做网页的整体模块布局草图:

下面开始编写代码:
第一次HTML代码:
~~~
<span style="font-size:18px;"><!DOCTYPE html PUBLIC "-//W3C//DTD XHTML 1.0 Transitional//EN" "http://www.w3.org/TR/xhtml1/DTD/xhtml1-transitional.dtd">
<html xmlns="http://www.w3.org/1999/xhtml">
<head>
<meta http-equiv="Content-Type" content="text/html; charset=gb2312" />
<title>经管系</title>
<link rel="stylesheet" href="Style.css" type="text/css" />
</head>
<body>
<!--经管系Logo板块-->
<div id="top">Dreamweaver8</div>
<!--经管系网页导航栏板块-->
<div id="nav"></div>
<!--经管系网页风采展示广告板块-->
<div id="adpic"></div>
<!--经管系内容板块-->
<div id="news">
<div id="news_left">
<div id="news_left_top"></div>
<div id="news_left_mid"></div>
<div id="news_left_bottom"></div>
</div>
<div id="news_mid">
<div id="news_mid_top"></div>
<div id="news_mid_bottom"></div>
</div>
<div id="news_right">
<div id="news_right_top"></div>
<div id="news_right_mid"></div>
<div id="news_right_bottom"></div>
</div>
</div>
<!--经管系网站友情链接板块-->
<div id="link"></div>
<!--经管系网站制作信息板块-->
<div id="copyright"></div>
</body>
</html></span>
~~~
CSS样式表Style.css代码:
~~~
<span style="font-size:18px;">/*第一次添加的代码*/
* {
margin:0px;
padding:0px;
}
body {
padding:0px;
margin:0px;
font-size:12px;
}
#top {
background-image: url(images/head.jpg);
background-repeat: no-repeat;
height: 120px;
width: 998px;
margin-right: auto;
margin-left: auto;
}
#nav {
background-image: url(images/n_nav_bg.gif);
background-repeat: repeat-x;
height: 37px;
width: 998px;
margin-right: auto;
margin-left: auto;
}
#adpic {
background-image: url(images/h4.jpg);
background-repeat: no-repeat;
height: 218px;
width: 998px;
margin-right: auto;
margin-left: auto;
}
#news {
height: 720px;
width: 998px;
margin-right: auto;
margin-left: auto;
}
#link {
background-image: url(images/n_title_bg.gif);
background-repeat: repeat-x;
height: 40px;
width: 998px;
margin-right: auto;
margin-left: auto;
}
#copyright {
background-color: #E2E2E2;
height: 80px;
width: 998px;
margin-top: 0px;
margin-right: auto;
margin-left: auto;
border-top-width: 5px;/*设置5像素的上边框*/
border-top-style: solid;
border-top-color: #006042;
margin-bottom: 0px;
}
#news #news_left {
float: left;
height: 720px;
width: 233px;
margin-right: 5px;
}
#news #news_mid {
float: left;
height: 720px;
width: 455px;
margin-right: 5px;
}
#news #news_right {
height: 720px;
width: 300px;
float: left;
}
#news #news_left #news_left_top {
height: 248px;
width: 233px;
background-color:#FF0000;
}
#news #news_left #news_left_mid {
height: 240px;
width: 233px;
background-color:#00FF00;
}
#news #news_left #news_left_bottom {
height: 232px;
width: 233px;
background-color:#0000FF;
}
#news #news_mid #news_mid_top {
height: 488px;
width: 455px;
background-color:#000000;
}
#news #news_mid #news_mid_bottom {
height: 232px;
width: 455px;
background-color:#999999;
}
#news #news_right #news_right_top {
height: 248px;
width: 300px;
background-color:#FFFF00;
}
#news #news_right #news_right_mid {
height: 240px;
width: 300px;
background-color:#00FFFF;
}
#news #news_right #news_right_bottom {
height: 232px;
width: 300px;
background-color:#FF00FF;
}</span>
~~~
浏览器运行的结果为:


CSS基础学习十九:CSS布局之图文混排,图像签名,多图拼接和图片特效
最后更新于:2022-04-01 11:29:50
学习了CSS布局的定位和浮动,我们可以简单地做出很多排版和内容拼接。今天就来做几个简单的实例展示现在流行的DIV+CSS布局的方便好用之处。顺便也说一下CSS3新增的样式属性box-shadow和属性transform。
### 一,图文混排
~~~
<!DOCTYPE html PUBLIC "-//W3C//DTD XHTML 1.0 Transitional//EN" "http://www.w3.org/TR/xhtml1/DTD/xhtml1-transitional.dtd">
<html xmlns="http://www.w3.org/1999/xhtml">
<head>
<meta http-equiv="Content-Type" content="text/html; charset=gb2312" />
<title>CSS布局之图文混排</title>
<style type="text/css">
#test {
border:#FF00FF solid 2px;
width:650px;
height:460px;
background-color:#CCCCCC;
margin:auto;
}
#img {
padding-top:3px;
float:left;
}
img {
width:300px;
height:350px;
}
#text {
color:#0000FF;
font-size:18px;
font-family:"微软雅黑";
}
</style>
</head>
<body>
<div id="test">
<div id="img">
<img src="6.jpg" />
</div>
<div id="text"> 高圆圆,中国女演员,1979年10月5日出生于北京市丰台区云岗一个普通的知识分子家庭。1996年高圆圆被广告公司发掘,随后拍摄了大量广告,成为了广告圈中的模特。1997年高圆圆出演了她的第一部电影《爱情麻辣烫》,从此开始了她的演员生涯。2001年高圆圆参演的电影《十七岁的单车》获得柏林国际电影节最佳影片银熊奖。2003年高圆圆首次尝试古装武侠剧,在《倚天屠龙记》电视剧中饰演峨眉派掌门周芷若。2005年主演的电影《青红》获得戛纳国际电影节评审团大奖,同年成为荷兰国际球根花卉中心中国首届百合小姐。2008年到2009年,拍摄电影《南京!南京!》,该片获圣塞斯蒂安国际电影节最佳电影金贝壳奖。2011年凭借电影《单身男女》获得香港电影金像奖最佳女主角提名。2012年主演陈凯歌导演的影片《搜索》。2013年高圆圆主演的视剧《咱们结婚吧》在央视、湖南卫视黄金档播出。2014年主演的爱情电影《一生一世》票房突破两亿。电影《君子道》已定档期2015年国庆档。
</div>
</div>
</body>
</html>
~~~
效果图:

### 二,图像签名
~~~
<!DOCTYPE html PUBLIC "-//W3C//DTD XHTML 1.0 Transitional//EN" "http://www.w3.org/TR/xhtml1/DTD/xhtml1-transitional.dtd">
<html xmlns="http://www.w3.org/1999/xhtml">
<head>
<meta http-equiv="Content-Type" content="text/html; charset=gb2312" />
<title>CSS布局之图像签名</title>
<style type="text/css">
#test {
border:#FF00FF solid 2px;
width:720px;
position:absolute;/*让文字不会脱离图片*/
top:50px;
}
img {
width:720px;
height:480px;
}
#text {
color:#0000FF;
font-size:24px;
font-family:"华文隶书";
position:absolute;
bottom:50px;
right:50px;
}
</style>
</head>
<body>
<div id="test">
<div id="img">
<img src="10.jpg" />
</div>
<div id="text">
国民女神————高圆圆
</div>
</div>
</body>
</html>
~~~
效果图:

### 三,多图拼接
~~~
<!DOCTYPE html PUBLIC "-//W3C//DTD XHTML 1.0 Transitional//EN" "http://www.w3.org/TR/xhtml1/DTD/xhtml1-transitional.dtd">
<html xmlns="http://www.w3.org/1999/xhtml">
<head>
<meta http-equiv="Content-Type" content="text/html; charset=gb2312" />
<title>CSS布局之图片拼接</title>
<style type="text/css">
#box {
margin:auto;
height:600px;
width:690px;
}
.test {
height:300px;
width:690px;
}
.img {
height:300px;
width:230px;
float:left;
}
img {
height:300px;
width:230px;
}
</style>
</head>
<body>
<div id="box">
<div class="test">
<div class="img"><img src="16.jpg" /></div>
<div class="img"><img src="17.jpg" /></div>
<div class="img"><img src="18.jpg" /></div>
</div>
<div class="test">
<div class="img"><img src="19.jpg" /></div>
<div class="img"><img src="20.jpg" /></div>
<div class="img"><img src="21.jpg" /></div>
</div>
</div>
</body>
</html>
~~~
效果图:

### 四,图片特效
我们在做这个实例之前先来简单的介绍CSS3新增的样式属性:box-shadow(边框阴影)和transform(旋转特效)。在学习CSS的时候学到了很多的盒子模型的样式属性,加以结合也会做出很好的效果。详细的看一看:[CSS3box-](http://www.w3school.com.cn/cssref/pr_box-shadow.asp)[shadow属性](http://www.w3school.com.cn/cssref/pr_box-shadow.asp)和[CSS3transform属性]()。
(1)边框阴影属性:box-shadow
设置元素的阴影,其实没有边框也可以添加阴影效果
语法规则:
box-shadow:apx bpx cpx #xxxxxx;
box-shadow:apx bpx cpx rgb(0,0,0,0.1);
apx表示水平方向的移动;bpx表示竖直方向的移动;cpx表示阴影的模糊距离;最后面的为颜色值。
(2)旋转特效属性:transform
设置元素的旋转,向元素应用2D或3D转换。该属性允许我们对元素进行旋转、缩放、移动或倾斜。
transform:rotate(angle单位为deg); 定义2D旋转在参数中规定角度,angle表示角度。
~~~
<!DOCTYPE html PUBLIC "-//W3C//DTD XHTML 1.0 Transitional//EN" "http://www.w3.org/TR/xhtml1/DTD/xhtml1-transitional.dtd">
<html xmlns="http://www.w3.org/1999/xhtml">
<head>
<meta http-equiv="Content-Type" content="text/html; charset=gb2312" />
<title>CSS布局之图片特效</title>
<style type="text/css">
body {
margin:30px;
background-color:#CCCCCC;
}
div.polaroid {
width:294px;
padding:10px;
margin:10px;
border:1px solid #BFBFBF;
background-color:#FFFFFF;
box-shadow:10px 10px 10px #999999;/*图片阴影的设置*/
}
div.rotate_left {
float:left;
transform:rotate(8deg);/*图片向右倾倒*/
}
div.rotate_right {
float:left;
transform:rotate(-8deg);/*图片向左倾倒*/
}
</style>
</head>
<body>
<div class="polaroid rotate_left">
<img src="http://www.w3school.com.cn//i/ballade_dream.jpg" alt="郁金香" width="284" height="213" />
<p class="caption">上海鲜花港的郁金香,花名:Ballade Dream。</p>
</div>
<div class="polaroid rotate_right">
<img src="http://www.w3school.com.cn//i/china_pavilion.jpg" alt="世博中国馆" width="284" height="213" />
<p class="caption">2010年上海世博会,中国馆。</p>
</div>
</body>
</html>
~~~
效果图:

CSS基础学习十八:CSS布局之浮动
最后更新于:2022-04-01 11:29:48
CSS布局中说到定位就不得不提浮动,浮动的框可以向左或向右移动,直到它的外边缘碰到包含框或另一个浮动框的边框为止。由于浮动框不在文档的普通流中,所以文档的普通流中的块框表现得就像浮动框不存在一样。
### 一,float属性的定义和用法
float属性:设置元素浮动
可能的值:
none 不浮动,在文档流内,默认
left 左浮动,脱离文档流
right 右浮动,脱离文档流
inherit规定应该从父元素继承 float属性的值。
float属性定义元素在哪个方向浮动。以往这个属性总应用于图像,使文本围绕在图像周围,不过在CSS中,任何元素都可以浮动。浮动元素会生成一个块级框,而不论它本身是何种元素。如果浮动非替换元素,则要指定一个明确的宽度;否则,它们会尽可能地窄。假如在一行之上只有极少的空间可供浮动元素,那么这个元素会跳至下一行,这个过程会持续到某一行拥有足够的空间为止。
我们用图示和实例来理解元素的浮动:
(1)三个不浮动元素的图示和效果:

~~~
<!DOCTYPE html PUBLIC "-//W3C//DTD XHTML 1.0 Transitional//EN"
"http://www.w3.org/TR/xhtml1/DTD/xhtml1-transitional.dtd">
<html xmlns="http://www.w3.org/1999/xhtml">
<head>
<meta http-equiv="Content-Type" content="text/html; charset=gb2312" />
<title>CSS布局之漂浮</title>
<style type="text/css">
#test {
border:#FF00FF solid 1px;
width:700px;
height:400px;
margin:auto;
}
#div_1 {
background-color:#00FF00;
width:200px;
height:100px;
}
#div_2 {
background-color:#FFFF00;
width:200px;
height:100px;
}
#div_3 {
background-color:#FF0000;
width:200px;
height:100px;
}
</style>
</head>
<body>
<div id="test">
<div id="div_1">区域1</div>
<div id="div_2">区域2</div>
<div id="div_3">区域3</div>
</div>
</body>
</html>
~~~

当没有设置元素浮动的时候,由于我们使用的是div元素是块级元素,我们看到三个元素依次排列到元素的下面,而不会是接着元素排列。
(2)第一个元素向左浮动的图示和效果:

改写第一个元素向左浮动的代码:
~~~
#div_1 {
background-color:#00FF00;
width:200px;
height:100px;
float:left;
}
~~~

当元素1向左浮动时,它脱离文档流并且向左移动,直到它的左边缘碰到包含框的左边缘。因为它不再处于文档流中,所以它不占据空间,实际上覆盖住了元素2,使元素2从视图中消失。
(3)第一个元素向右浮动的图示和效果:

改写第一个元素向右浮动的代码:
~~~
#div_1 {
background-color:#00FF00;
width:200px;
height:100px;
float:right;
}
~~~

当把元素1向右浮动时,它脱离文档流并且向右移动,直到它的右边缘碰到包含框的右边缘。
(4)设置三个元素均向左浮动的图示和效果:

改写三个元素都向左浮动的代码:
~~~
#div_1 {
background-color:#00FF00;
width:200px;
height:100px;
float:left;
}
#div_2 {
background-color:#FFFF00;
width:200px;
height:100px;
float:left;
}
#div_3 {
background-color:#FF0000;
width:200px;
height:100px;
float:left;
}
~~~

如果把所有三个框都向左移动,那么框 1 向左浮动直到碰到包含框,另外两个框向左浮动直碰到前一个浮动框。
(5)如果包含框太窄,无法容纳水平排列的三个浮动元素,那么其它浮动块向下移动,直到有足够的空间:

~~~
<!DOCTYPE html PUBLIC "-//W3C//DTD XHTML 1.0 Transitional//EN"
"http://www.w3.org/TR/xhtml1/DTD/xhtml1-transitional.dtd">
<html xmlns="http://www.w3.org/1999/xhtml">
<head>
<meta http-equiv="Content-Type" content="text/html; charset=gb2312" />
<title>CSS布局之漂浮</title>
<style type="text/css">
#test {
border:#FF00FF solid 1px;
width:500px;
height:400px;
margin:auto;
}
#div_1 {
background-color:#00FF00;
width:200px;
height:100px;
float:left;
}
#div_2 {
background-color:#FFFF00;
width:200px;
height:100px;
float:left;
}
#div_3 {
background-color:#FF0000;
width:200px;
height:100px;
float:left;
}
</style>
</head>
<body>
<div id="test">
<div id="div_1">区域1</div>
<div id="div_2">区域2</div>
<div id="div_3">区域3</div>
</div>
</body>
</html>
~~~

(6)如果浮动元素的高度不同,那么当它们向下移动时可能被其它浮动元素“卡住”:

改写第一个元素的高度的代码:
~~~
#div_1 {
background-color:#00FF00;
width:200px;
height:150px;
float:left;
}
~~~

那么我们会在第二个实例中看到浮动元素遮住了文档流的区域,那么我们怎么做,才能看到元素2的内容呢?下面我们就来解决这个问题:使用clear属性。
### 二,clear属性
浮动清除的定义和用法
clear属性规定元素的哪一侧不允许其他浮动元素。在CSS1和CSS2中,这是通过自动为清除元素(即设置了clear属性的元素)增加上外边距实现的。在CSS2.1中,会在元素上外边距之上增加清除空间,而外边距本身并不改
变。不论哪一种改变,最终结果都一样,如果声明为左边或右边清除,会使元素的上外边框边界刚好在该边上浮动元素的下外边距边界之下。
可能的值
left 在左侧不允许浮动元素。
right 在右侧不允许浮动元素。
both 在左右两侧均不允许浮动元素。
none 默认值。允许浮动元素出现在两侧。
inherit规定应该从父元素继承 clear 属性的值。
我们用图示和实例来理解元素的清除浮动:
实例:先回过头来看实例(2)的效果,我们设置第二个元素有清除浮动元素属性:
~~~
#div_2 {
background-color:#FFFF00;
width:200px;
height:100px;
clear:left;
}
~~~

### 三,浮动和清除浮动的结合
我们先来看个例子:
~~~
<!DOCTYPE html PUBLIC "-//W3C//DTD XHTML 1.0 Transitional//EN"
"http://www.w3.org/TR/xhtml1/DTD/xhtml1-transitional.dtd">
<html xmlns="http://www.w3.org/1999/xhtml">
<head>
<meta http-equiv="Content-Type" content="text/html; charset=gb2312" />
<title>CSS布局</title>
<style type="text/css">
#test {
margin:auto;
}
#div_1 {
background-color:#00FF00;
width:200px;
height:100px;
float:left;
}
#div_2 {
background-color:#FFFF00;
width:200px;
height:100px;
float:left;
}
#div_3 {
background-color:#FF0000;
width:200px;
height:100px;
float:left;
}
</style>
</head>
<body>
<div>欢迎访问某某网站</div>
<div id="test">
<div id="div_1">区域1</div>
<div id="div_2">区域2</div>
<div id="div_3">区域3</div>
</div>
<div>这是一些文本内容</div>
</body>
</html>
~~~

我们从结果中看出浮动的元素并没有融入到我们编辑的整个文档流中,从布局来看,文本内容应该紧接着区域块的内容向下另起一行排列,但是并没有达到预期的效果。
如何让浮动元素融入到整个文档流布局中?
结合实际我们找到了一个可行的方法,在浮动元素的区域块中再添加一个div,设置这个div为清除浮动属性,这样浮动元素就真实存在文档流中。
~~~
<!DOCTYPE html PUBLIC "-//W3C//DTD XHTML 1.0 Transitional//EN"
"http://www.w3.org/TR/xhtml1/DTD/xhtml1-transitional.dtd">
<html xmlns="http://www.w3.org/1999/xhtml">
<head>
<meta http-equiv="Content-Type" content="text/html; charset=gb2312" />
<title>CSS布局</title>
<style type="text/css">
#test {
margin:auto;
}
#div_1 {
background-color:#00FF00;
width:200px;
height:100px;
float:left;
}
#div_2 {
background-color:#FFFF00;
width:200px;
height:100px;
float:left;
}
#div_3 {
background-color:#FF0000;
width:200px;
height:100px;
float:left;
}
#clear {
clear:both;
}
</style>
</head>
<body>
<div>欢迎访问某某网站</div>
<div id="test">
<div id="div_1">区域1</div>
<div id="div_2">区域2</div>
<div id="div_3">区域3</div>
<div id="clear"></div>
</div>
<div>这是一些文本内容</div>
</body>
</html>
~~~
看一下效果:

CSS基础学习十七:CSS布局之定位
最后更新于:2022-04-01 11:29:46
在我们开始学习CSS布局之前,先来了解一下文档流的概念。文档流即是HTML的布局机制,块级元素占一行,
行内元素不占一行。将窗体自上而下分成一行行,并在每行中按从左往右的顺序排放元素。
### 一,CSS定位和浮动概述
CSS定位属性允许你对元素进行定位。CSS为定位和浮动提供了一些属性,利用这些属性,可以建立列式布局,将布局的一部分与另一部分重叠,还可以完成多年来通常需要使用多个表格才能完成的任务。定位的基本思想很简单,它允许你定义元素框相对于其正常位置应该出现的位置,或者相对于父元素、另一个元素甚至浏览器窗口本身的位置。显然,这个功能非常强大,也很让人吃惊。浮动不完全是定位,不过,它当然也不是正常流布局。
(1)一切皆为框
div、h1或 p元素常常被称为块级元素。这意味着这些元素显示为一块内容,即“块框”。与之相反,span和strong等元素称为“行内元素”,这是因为它们的内容显示在行中,即“行内框”。我们可以使用display属性改变生成的框的类型。这意味着,通过将display属性设置为block,可以让行内元素(比如< a>元素)表现得像块级元素一样。可以通过把display设置为none,让生成的元素根本没有框。这样的话,该框及其所有内容就不再显示,不占用文档中的空间。
但是在一种情况下,即使没有进行显式定义,也会创建块级元素。这种情况发生在把一些文本添加到一个块级元素(比如div)的开头。即使没有把这些文本定义为段落,它也会被当作段落对待:
~~~
<div>
some text
<p>Some more text.</p>
</div>
~~~
在这种情况下,这个框称为无名块框,因为它不与专门定义的元素相关联。
块级元素的文本行也会发生类似的情况。假设有一个包含三行文本的段落。每行文本形成一个无名框。无法直接对无名块或行框应用样式,因为没有可以应用样式的地方(注意,行框和行内框是两个概念)。但是,这有助于理解在屏幕上看到的所有东西都形成某种框。
(2)CSS 定位机制
CSS有三种基本的定位机制:普通流、浮动和绝对定位。除非专门指定,否则所有框都在普通流中定位。也就是说,普通流中的元素的位置由元素在(X)HTML中的位置决定。
1,块级框从上到下一个接一个地排列,框之间的垂直距离是由框的垂直外边距计算出来。
2,行内框在一行中水平布置。可以使用水平内边距、边框和外边距调整它们的间距。但是,垂直内边距、边框和外边距不影响行内框的高度。由一行形成的水平框称为行框(Line Box),行框的高度总是足以容纳它包含的所有行内框。不过,设置行高可以增加这个框的高度。
(3)CSS定位属性
通过使用position属性,我们可以选择4种不同类型的定位,这会影响元素框生成的方式。下面就是四种position属性值的含义:
1,static:正常显示(默认)
元素框正常生成。块级元素生成一个矩形框,作为文档流的一部分,行内元素则会创建一个或多个行框,置于其父元素中。
2,relative:相对定位
设置元素会基于自己的最初位置偏移某个距离,仍然保留定位前的形状,它原所占的空间仍然保留。没有脱离文档流。
元素框偏移某个距离。元素仍保持其未定位前的形状,它原本所占的空间仍保留。相对定位实际上被看作普通流定位模型的一部分,因为元素的位置相对于它在普通流中的位置。
3,absolute:绝对定位
元素会基于其外层且有定位属性的元素偏移某个距离,它原来所占的空间不保留,它对于其外层元素有定位属性的元素来说相当于不存在。脱离文档流。
元素框从文档流完全删除,并相对于其包含块定位。包含块可能是文档中的另一个元素或者是初始包含块。元素原先在正常文档流中所占的空间会关闭,就好像元素原来不存在一样。元素定位后生成一个块级框,而不论原来它在正常流中生成何种类型的框。
4,fixed:固定定位
元素会基于视窗(浏览器窗口)偏移某个距离,且固定不随着网页移动而移动。它原来所占的空间不保留。脱离文档流。元素框的表现类似于将position设置为absolute,不过其包含块是视窗本身。
(4)偏移距离
偏移距离:结合定位一起用。设置元素在水平方向(x)或竖直方向(y)的偏移距离。
常用属性有四个:top,bottom,left,right。同一个方向,使用一个即可。
我们就来拿一个top属性来简单了解一下:
top:设置元素基于最初位置的顶部在竖直方向的偏移距离
可能的值:
xpx 正值表示向下移动,负值表示向上移动
xem 同上
x% 基于外层元素的高度的百分
看了这些我们可能不是很明白,我们具体有了实例,就会觉得这很简单,下面讲述具体的定位时,会有这些属性值的出现,注意他们移动的方向和距离,加深自己对定位和偏移距离的理解。
(5)CSS定位属性允许对元素进行定位的属性:

### 二,相对定位
CSS相对定位:设置为相对定位的元素框会偏移某个距离。元素仍然保持其未定位前的形状,它原本所占的空间
仍保留。相对定位是一个非常容易掌握的概念。如果对一个元素进行相对定位,它将出现在它所在的位置上。然后,
可以通过设置垂直或水平位置,让这个元素“相对于”它的起点进行移动。
我们看一张图就能明白:

实例:如果将top设置为20px,那么框将在原位置顶部下面20像素的地方。如果left设置为30像素,那么会在元素
左边创建30像素的空间,也就是将元素向右移动。
~~~
<!DOCTYPE html PUBLIC "-//W3C//DTD XHTML 1.0 Transitional//EN" "http://www.w3.org/TR/xhtml1/DTD/xhtml1-transitional.dtd">
<html xmlns="http://www.w3.org/1999/xhtml">
<head>
<meta http-equiv="Content-Type" content="text/html; charset=gb2312" />
<title>CSS相对定位演示</title>
<style type="text/css">
body {
margin:0px;
}
div {
height:100px;
width:200px;
}
#test {
border:#FF00FF solid 1px;
width:700px;
height:400px;
}
#div_1 {
background-color:#0000FF;
}
#div_3 {
background-color:#FFFF00;
}
#box_relative {
background-color:#00FF00;
position: relative;
left: 30px;
top: 20px;
}
</style>
</head>
<body>
<div id="test">
<div id="div_1">区域1</div>
<div id="box_relative">区域2</div>
<div id="div_3">区域3</div>
</div>
</body>
</html>
~~~
运行的结果为:

注意:在使用相对定位时,无论是否进行移动,元素仍然占据原来的空间。因此,移动元素会导致它覆盖其它
框。
### 三,绝对定位
CSS绝对定位:设置为绝对定位的元素框从文档流完全删除,并相对于其包含块定位,包含块可能是文档中的另一个元素或者是初始包含块。元素原先在正常文档流中所占的空间会关闭,就好像该元素原来不存在一样。元素定位后生成一个块级框,而不论原来它在正常流中生成何种类型的框。绝对定位使元素的位置与文档流无关,因此不占据空间。这一点与相对定位不同,相对定位实际上被看作普通流定位模型的一部分,因为元素的位置相对于它在普通流中的位置。
普通流中其它元素的布局就像绝对定位的元素不存在一样,看下面的图:

绝对定位的元素的位置相对于最近的已定位祖先元素,如果元素没有已定位的祖先元素,那么它的位置相对于最初的包含块。
实例:
~~~
<!DOCTYPE html PUBLIC "-//W3C//DTD XHTML 1.0 Transitional//EN" "http://www.w3.org/TR/xhtml1/DTD/xhtml1-transitional.dtd">
<html xmlns="http://www.w3.org/1999/xhtml">
<head>
<meta http-equiv="Content-Type" content="text/html; charset=gb2312" />
<title>CSS绝对定位演示</title>
<style type="text/css">
body {
margin:0px;
}
div {
height:100px;
width:200px;
}
#test {
border:#FF00FF 1px solid;
width:700px;
height:400px;
}
#div_1 {
background-color:#0000FF;
}
#div_3 {
background-color:#FFFF00;
}
#box_relative {
background-color:#00FF00;
position:absolute;
left:30px;
top:20px;
}
</style>
</head>
<body>
<div id="test">
<div id="div_1">区域1</div>
<div id="box_relative">区域2</div>
<div id="div_3">区域3</div>
</div>
</body>
</html>
~~~
运行的结果为:

对于定位的主要问题是要记住每种定位的意义。相对定位是“相对于”元素在文档中的初始位置,而绝对定位是“相对于”最近的已定位祖先元素,如果不存在已定位的祖先元素,那么“相对于”最初的包含块。
根据用户代理的不同,最初的包含块可能是画布或HTML元素。因为绝对定位的框与文档流无关,所以它们可以覆盖页面上的其它元素。可以通过设置z-index属性来控制这些框的堆放次序。
### 三,固定定位
CSS固定定位:设置元素会基于视窗(浏览器窗口)偏移某个距离,且固定不随着网页移动而移动。它原来所占的空间不保留。脱离文档流。元素框的表现类似于将position设置为absolute,不过其包含块是视窗本身。
这个我们应该在浏览网页的时候经常见,比如一些广告并不会随着我们向下看内容而消失,它们一直处于基于视窗的某个位置不动。我们打开新浪首页可以看到:

实例:
~~~
<!DOCTYPE html PUBLIC "-//W3C//DTD XHTML 1.0 Transitional//EN" "http://www.w3.org/TR/xhtml1/DTD/xhtml1-transitional.dtd">
<html xmlns="http://www.w3.org/1999/xhtml">
<head>
<meta http-equiv="Content-Type" content="text/html; charset=gb2312" />
<title>CSS固定定位演示</title>
<style type="text/css">
body {
margin:0px;
}
#test {
height:1500px;
width:750px;
margin:auto;
background-color:#999999;
border:#FF00FF solid 1px;
}
#AD {
background-color:#FFFF00;
width:200px;
height:300px;
position:fixed;
right:0px;
top:100px;
}
</style>
</head>
<body>
<div id="test">
<div id="AD">这里我们可以放置一个广告</div>
</div>
</body>
</html>
~~~
运行的结果为:

总结一下:
1,相对定位不会失去文档流中的位置,而绝对定位和固定定位都会失去原来在文档流中的位置而被下面的替代;
2,无论是相对、绝对还是固定定位,当偏移量超出上面、左边浏览器窗体(或者说超出可视区域)的时候,超出的内容都会被隐藏;而超出下面和右边的时候,相对定位和固定定位会隐藏超出的部分内容,而绝对定位会出现滚动条。
3,相对、绝对和固定定位都会浮在正常文档流的上面,如果遮盖了正常显示的文档流,可以设置z-index来消除。
CSS基础学习十六:CSS盒子模型补充之border-radius属性
最后更新于:2022-04-01 11:29:43
CSS盒子模型有很多的内容和属性,CSS也一直在更新和新增属性,今天我们来说说CSS3新增的盒子模型中的边框中的内容,也就是border-radius属性。
border-radius属性设置元素的边框添加圆角,其实没有边框也可以添加圆角效果。但是要是显示出来,就必须增加背景色或者边框。
可能的值:xpx;圆角是xpx,半径为xpx的四分之一圆。
语法格式为:
border-radius:apx bpx cpx dpx; 顺时针。当a=b=c=d,写为:border-radius:apx;
这样看起来很抽象,还是拿例子来说明
实例一:没有边框,有背景色的div,给其增加边框圆角属性
~~~
<!DOCTYPE html PUBLIC "-//W3C//DTD XHTML 1.0 Transitional//EN" "http://www.w3.org/TR/xhtml1/DTD/xhtml1-transitional.dtd">
<html xmlns="http://www.w3.org/1999/xhtml">
<head>
<meta http-equiv="Content-Type" content="text/html; charset=gb2312" />
<title>CSS演示</title>
<style type="text/css">
#test {
width:300px;
height:200px;
background-color:#FFFF00;
border-radius:10px;
line-height:200px;/*设置行高相同,便于居中*/
text-align:center;
}
</style>
</head>
<body>
<div id="test">攻城课堂</div>
</body>
</html>
~~~
运行的结果为:

实例二:有绿色实线2像素的边框,有背景色的div,给其增加边框圆角属性
~~~
<!DOCTYPE html PUBLIC "-//W3C//DTD XHTML 1.0 Transitional//EN" "http://www.w3.org/TR/xhtml1/DTD/xhtml1-transitional.dtd">
<html xmlns="http://www.w3.org/1999/xhtml">
<head>
<meta http-equiv="Content-Type" content="text/html; charset=gb2312" />
<title>CSS演示</title>
<style type="text/css">
#test {
width:300px;
height:200px;
background-color:#FFFF00;
border:#00FF00 solid 2px;/*增加的边框*/
border-radius:10px;
line-height:200px;/*设置行高相同,便于居中*/
text-align:center;
}
</style>
</head>
<body>
<div id="test">攻城课堂</div>
</body>
</html>
~~~
运行的结果为:

我们在浏览的大多数网页中肯定会看到过许多各种各样的圆角的图片,有许多并不是经过PS处理过的,那么多的图片我们也不可能一张一张去切割和处理,因此我们可以利用盒子模型的border-radius属性进行样式设计,会达到意想不到的效果,而且还会很方便和简洁。那我们来看实例。
实例三:给下面两张图片其中的一张图片添加圆角属性,请区别两张效果的不同
~~~
<!DOCTYPE html PUBLIC "-//W3C//DTD XHTML 1.0 Transitional//EN" "http://www.w3.org/TR/xhtml1/DTD/xhtml1-transitional.dtd">
<html xmlns="http://www.w3.org/1999/xhtml">
<head>
<meta http-equiv="Content-Type" content="text/html; charset=gb2312" />
<title>CSS演示</title>
<style type="text/css">
img {
display:block;
margin-top:50px;
width:450px;
height:300px;
}
#img_1 {
border-radius:15px;
}
</style>
</head>
<body>
<img src="10.jpg" />
<hr/>
<img id="img_1" src="10.jpg" />
</body>
</html>
~~~
运行的结果为:

我们在浏览网页的时候还会看到一些圆形的图片,这个也很好实现,就将border-radius的属性的值设置为图片高度和宽度的一半即可。可以是正方形的,也可以是矩形的。
实例四:设置一张图片为圆形
~~~
<!DOCTYPE html PUBLIC "-//W3C//DTD XHTML 1.0 Transitional//EN" "http://www.w3.org/TR/xhtml1/DTD/xhtml1-transitional.dtd">
<html xmlns="http://www.w3.org/1999/xhtml">
<head>
<meta http-equiv="Content-Type" content="text/html; charset=gb2312" />
<title>CSS演示</title>
<style type="text/css">
img {
display:block;
width:300px;
height:300px;
}
#img_1 {
border-radius:150px;
}
</style>
</head>
<body>
<img src="6.jpg" />
<hr/>
<img id="img_1" src="6.jpg" />
</body>
</html>
~~~
运行的结果为:

当然,我们也可以进行单个圆角的设置,这个就不再过多的演示了,如果我们要求各个边角都不相同,可以使用下面的属性进行设置:

border-top-left-radius:表示左上角
border-top-right-radius:表示右上角
border-bottom-right-radius:表示左下角
border-bottom-left-radius:表示右下角
我们找个图来看看效果:同时也要设置各个边框的宽度和颜色的不同只给出CSS代码:
~~~
.demo {
border-color: red green blue orange;
border-width: 15px 30px 30px 80px;
border-radius: 50px;
}
~~~
效果图:

CSS基础学习十五:盒子模型补充之外边距合并
最后更新于:2022-04-01 11:29:41
今天继续接着CSS盒子模型补充,[CSS基础学习十三:盒子模型](http://blog.csdn.net/erlian1992/article/details/49932943)和[CSS基础学习十四:盒子模型补充之display属](http://blog.csdn.net/erlian1992/article/details/49950193)
[性设置](http://blog.csdn.net/erlian1992/article/details/49950193)都是介绍了盒子模型中的内容概括。开始今天的主题:外边距合并。
外边距合并指的是,当两个垂直外边距相遇时,它们将形成一个外边距。合并后的外边距的高度等于两个发生合并的外边距的高度中的较大者。
(1)外边距合并
外边距合并叠加是一个相当简单的概念。但是,在实践中对网页进行布局时,它会造成许多混淆。简单地说,外边距合并指的是,当两个垂直外边距相遇时,它们将形成一个外边距。合并后的外边距的高度等于两个发生合并的外边距的高度中的较大者。
当一个元素出现在另一个元素上面时,第一个元素的下外边距与第二个元素的上外边距会发生合并。请看下图:

如果看上面的图还不直观,我们来举一个实例:
~~~
<!DOCTYPE html PUBLIC "-//W3C//DTD XHTML 1.0 Transitional//EN" "http://www.w3.org/TR/xhtml1/DTD/xhtml1-transitional.dtd">
<html xmlns="http://www.w3.org/1999/xhtml">
<head>
<meta http-equiv="Content-Type" content="text/html; charset=gb2312" />
<title>CSS盒子模型外边距合并</title>
<style type="text/css">
* {/*去掉所有的缺省设置*/
margin:0;
padding:0;
border:0;
}
#div_1 {
width:100px;
height:100px;
margin-top:20px;/*第一个盒子的上外边距为20像素*/
margin-bottom:20px;/*第一个盒子的下外边距为20像素*/
background-color:#FF0000;
}
#div_2 {
width:100px;
height:100px;
margin-top:10px;/*第二个盒子的上外边距为10像素*/
background-color:#0000FF;
}
</style>
</head>
<body>
<div id="div_1"></div>
<div id="div_2"></div>
<p>请注意,两个div之间的外边距是20px,而不是30px(20px+10px)</p>
</body>
</html>
~~~
运行的结果为:

注意两个盒子之间的距离,也就是所谓的margin,确实实现了合并,并且合并后的外边距的高度等于两个发生合并的外边距的高度中的较大者。
当一个元素包含在另一个元素中时(假设没有内边距或边框把外边距分隔开),它们的上和/或下外边距也会发生合并。请看下图:

我们继续来个实例更直观看出外边距合并的结果:
~~~
<!DOCTYPE html PUBLIC "-//W3C//DTD XHTML 1.0 Transitional//EN" "http://www.w3.org/TR/xhtml1/DTD/xhtml1-transitional.dtd">
<html xmlns="http://www.w3.org/1999/xhtml">
<head>
<meta http-equiv="Content-Type" content="text/html; charset=gb2312" />
<title>CSS盒子模型外边距合并2</title>
<style type="text/css">
* {
margin:0;
padding:0;
border:0;
}
#outer {
width:300px;
height:300px;
background-color:#FF0000;
margin-top:20px;/*外部盒子的上外边距为20像素*/
}
#inner {
width:100px;
height:100px;
background-color:#0000FF;
margin-top:10px;/*内部盒子的上外边距为20像素*/
}
</style>
</head>
<body>
<div id="outer">
<div id="inner"></div>
</div>
<p><b>注释:</b>请注意,如果不设置div的内边距和边框,那么内部div的上外边距将与外部div的上外边距(合叠)</p>
</body>
</html>
~~~
运行的结果为:

注意两个盒子的上外边距的像素值,很清楚看出都是20像素,尽管看上去有些奇怪,但是外边距甚至可以与自身发生合并。
假设有一个空元素,它有外边距,但是没有边框或填充。在这种情况下,上外边距与下外边距就碰到了一起,它们会发生合并:

这个实例并不好演示,但是在下边的实例中可以出来,注意看第一个盒子的两个边距的合并。
如果这个外边距遇到另一个元素的外边距,它还会发生合并:

我们再来一个实例:
~~~
<!DOCTYPE html PUBLIC "-//W3C//DTD XHTML 1.0 Transitional//EN" "http://www.w3.org/TR/xhtml1/DTD/xhtml1-transitional.dtd">
<html xmlns="http://www.w3.org/1999/xhtml">
<head>
<meta http-equiv="Content-Type" content="text/html; charset=gb2312" />
<title>CSS盒子模型外边距合并3</title>
<style type="text/css">
* {
margin:0;
border:0;
padding:0;
}
#div_1 {
margin-top:20px;
margin-bottom:20px;
}
#div_2 {
width:200px;
height:200px;
background-color:#FFFF00;
margin-top:20px;
margin-bottom:20px;
}
</style>
</head>
<body>
<div id="div_1"></div>
<div id="div_2"></div>
</body>
</html>
~~~
运行的结果为:

这就是一系列的段落元素占用空间非常小的原因,因为它们的所有外边距都合并到一起,形成了一个小的外距。
外边距合并初看上去可能有点奇怪,但是实际上,它是有意义的。以由几个段落组成的典型文本页面为例。第一个段落上面的空间等于段落的上外边距。如果没有外边距合并,后续所有段落之间的外边距都将是相邻上外边距和下外边距的和。这意味着段落之间的空间是页面顶部的两倍。如果发生外边距合并,段落之间的上外边距和下外边距就合并在一起,这样各处的距离就一致了。

注释:只有普通文档流中块框的垂直外边距才会发生外边距合并。行内框、浮动框或绝对定位之间的外边距不会合并。
CSS基础学习十四:盒子模型补充之display属性设置
最后更新于:2022-04-01 11:29:39
我在[ CSS基础学习十三:盒子模型](http://blog.csdn.net/erlian1992/article/details/49932943)的i博文只是阐释了CSS盒子模型,并没有过多的使用实例来演示。这篇博文就来做一些盒子模型知识的补充。这一部分对于网页总体布局还是蛮重要的,过去大多数使用HTML中的table元素和框架标签来进行网页的整体布局,现在我们使用最多的是DIV+CSS网页布局。所以一定要掌握好盒子模型,记住content,border,padding和margin各自在盒子中的作用和使用方式。
先来看一个完整元素的盒子模型实例:
~~~
<span style="font-size:18px;"><!DOCTYPE html PUBLIC "-//W3C//DTD XHTML 1.0 Transitional//EN" "http://www.w3.org/TR/xhtml1/DTD/xhtml1-transitional.dtd">
<html xmlns="http://www.w3.org/1999/xhtml">
<head>
<meta http-equiv="Content-Type" content="text/html; charset=gb2312" />
<title>CSS盒子模型演示</title>
<style type="text/css">
/*去掉浏览器缺省设置*/
body {
padding:0px;
margin:0px;
}
/*设置盒子的宽度和高度以及边框*/
div {
border:#FF0000 solid 2px;
width:300px;
height:200px;
}
#div_1 {
background-color:#00FF00;
padding:20px 50px;
}
#div_2 {
background-color:#0000FF;
margin:20px;
}
#div_3 {
background-color:#FF00FF;
}
</style>
</head>
<body>
<div id="div_1">第一个盒子</div>
<div id="div_2">第二个盒子</div>
<div id="div_3">第三个盒子</div>
</body>
</html></span>
~~~
运行的结果为:

我们会好奇哪些元素可以作为盒子模型?其实任何一个HTML标签都可以盒子!但是盒子的类型是有区别的,我们重点讨论这个问题,这就涉及到了display属性。
display属性:
设置元素的盒模型的类型,也就是行内元素和块级元素的类型。
经常可用的值:
none 不显示,隐藏
inline 内联元素(行内元素)
block 块级元素
inline-block 行内块级元素
我们先来回忆哪些是块级元素,行内元素
HTML标签分为两大类:
1,块级标签(元素):一个完整的区块,区域。标签结束后都有换行。常用标签有:div p dl table ol ul title等。
2,行内标签(元素):用于块级元素内,不能表示一个完整的区块,一个区块或者只是一行内的某一部分。标签结束后没有换行。常用标签有:font span img input select a等。
下面我们举例子来说明怎么使用display属性:
实例一:给div元素和span元素设置相同的宽度和高度:
~~~
<span style="font-size:18px;"><!DOCTYPE html PUBLIC "-//W3C//DTD XHTML 1.0 Transitional//EN"
"http://www.w3.org/TR/xhtml1/DTD/xhtml1-transitional.dtd">
<html xmlns="http://www.w3.org/1999/xhtml">
<head>
<meta http-equiv="Content-Type" content="text/html; charset=gb2312" />
<title>CSS盒模型演示</title>
<style type="text/css">
div {
width:300px;
height:200px;
background-color:#0000FF;
}
span {
width:300px;
height:200px;
background-color:#FFFF00;
}
</style>
</head>
<body>
<div>div区域</div>
<hr/>
<span>span区域</span>
</body>
</html></span>
~~~
运行的结果为:

看上述的结果一目了然,div区域显示宽度和高度,与文本内容的多少无关;而span区域不显示设置宽度和高度,文本内容有多少它就有多少的宽度和高度,这就说明了div元素和span元素的盒子类型不一样。
实例二:再增加一个span元素,设置同样的高度和宽度,再把它的display属性设置为:block
~~~
<span style="font-size:18px;"><!DOCTYPE html PUBLIC "-//W3C//DTD XHTML 1.0 Transitional//EN"
"http://www.w3.org/TR/xhtml1/DTD/xhtml1-transitional.dtd">
<html xmlns="http://www.w3.org/1999/xhtml">
<head>
<meta http-equiv="Content-Type" content="text/html; charset=gb2312" />
<title>CSS盒模型演示</title>
<style type="text/css">
div {
width:300px;
height:200px;
background-color:#0000FF;
}
span {
width:300px;
height:200px;
background-color:#FFFF00;
}
#span_2 {
width:300px;
height:200px;
background-color:#FFFF00;
display:block;/*把span设置成块级元素*/
}
</style>
</head>
<body>
<div>div区域</div>
<hr/>
<span id="span_1">span区域1</span>
<hr/>
<span id="span_2">span区域2</span>
</body>
</html></span>
~~~
运行的结果为:

这一次我们看到了不一样的两个span元素,因为第二个span元素它通过display属性设置为了块级元素,所以高度和宽度都显示了出来。
实例三:区别行内块级元素和块级元素
~~~
<span style="font-size:18px;"><!DOCTYPE html PUBLIC "-//W3C//DTD XHTML 1.0 Transitional//EN" "http://www.w3.org/TR/xhtml1/DTD/xhtml1-transitional.dtd">
<html xmlns="http://www.w3.org/1999/xhtml">
<head>
<meta http-equiv="Content-Type" content="text/html; charset=gb2312" />
<title>CSS盒模型演示</title>
<style type="text/css">
div {
width:300px;
height:200px;
background-color:#0000FF;
}
span {
width:300px;
height:200px;
background-color:#FFFF00;
}
#span_2 {
width:300px;
height:200px;
background-color:#FFFF00;
display:block;/*把span设置成块级元素*/
}
#span_3 {
width:300px;
height:200px;
background-color:#FFFF00;
display:inline-block;/*把span设置成行内块级元素*/
}
</style>
</head>
<body>
<div>div区域</div>
<hr/>
<span id="span_1">span区域1</span>
<hr/>
<span id="span_2">span区域2</span>
<a>欢迎来到攻城课堂</a>
<hr/>
<span id="span_3">span区域3</span>
<a>欢迎来到攻城课堂</a>
</body>
</html></span>
~~~
运行的结果为:

行内块级元素还是处于一行,它的右侧还可以其他的元素;但是块级元素就不可以,第二个元素必须换行才能显示,这就是它们最直接的区别。
对于盒子模型的display属性暂时了解了这么多,如果有什么错误,会及时更正!!后续会学到更深层次的知识,回头来在进行补充。
CSS基础学习十三:盒子模型
最后更新于:2022-04-01 11:29:36
### 一,CSS盒子模型概述
CSS盒子模型规定了元素框处理元素内容、内边距、边框和外边距的方式。一个完整元素包括内容(content),内边距(填充)(padding),边框(border)和外边距(空白)(margin)。
盒子模型图:

元素框的最内部分是实际的内容,直接包围内容的是内边距。内边距呈现了元素的背景。内边距的边缘是边框。
边框以外是外边距,外边距默认是透明的,因此不会遮挡其后的任何元素。故背景应用于由内容和内边距组成的区
域。
内边距、边框和外边距都是可选的,默认值是零。但是,许多元素将由用户代理样式表设置外边距和内边距。可
以通过将元素的 margin 和 padding 设置为零来覆盖这些浏览器样式。这可以分别进行,也可以使用通用选择器对所
有元素进行设置:
~~~
* {
margin: 0;
padding: 0;
}
~~~
在CSS中,width和height指的是内容区域的宽度和高度。增加内边距、边框和外边距不会影响内容区域的尺寸,
但是会增加元素框的总尺寸。内边距、边框和外边距可以应用于一个元素的所有边,也可以应用于单独的边。外边距
可以是负值,而且在很多情况下都要使用负值的外边距。
假设框的每个边上有10个像素的外边距和5个像素的内边距。如果希望这个元素框达到 100 个像素,就需要将内
容的宽度设置为70像素,请看下图:

~~~
<span style="font-size:18px;">#box {
width: 70px;
margin: 10px;
padding: 5px;
}</span>
~~~
display属性设置元素的盒模型的类型
可能的值:
none 不显示,隐藏
inline 内联元素(行内元素)
block 块级元素
inline-block 行内块级元素
### 二,内边距padding
元素的内边距在边框和内容区之间。控制该区域最简单的属性是padding属性。CSSpadding属性定义元素边框与
元素内容之间的空白区域。
(1)padding属性
padding属性定义元素的内边距。padding属性接受长度值或百分比值,但不允许使用负值。
例如,如果您希望所有 h1 元素的各边都有 10 像素的内边距,只需要这样:
~~~
h1 {padding: 10px;}
~~~
您还可以按照上、右、下、左的顺序分别设置各边的内边距,各边均可以使用不同的单位或百分比值:
~~~
</pre><pre name="code" class="css">h1 {padding: 10px 0.25em 2ex 20%;}
~~~
(2)单边内边距属性
也通过使用下面四个单独的属性,分别设置上、右、下、左内边距:
padding-left 设置左内边距
padding-right 设置右内边距
padding-top 设置上内边距
padding-bottom 设置下内边距
您也许已经想到了,下面的规则实现的效果与上面的简写规则是完全相同的:
~~~
h1 {
padding-top: 10px;
padding-right: 0.25em;
padding-bottom: 2ex;
padding-left: 20%;
}
~~~
(3)内边距的百分比数值
前面提到过,可以为元素的内边距设置百分数值。百分数值是相对于其父元素的width计算的,这一点与外边距一
样。所以,如果父元素的width改变,它们也会改变。注意:上下内边距与左右内边距一致;即上下内边距的百分数会
相对于父元素宽度设置,而不是相对于高度。
下面这条规则把段落的内边距设置为父元素width的10%:
~~~
p {padding: 10%;}
~~~
例如:如果一个段落的父元素是div元素,那么它的内边距要根据div的width计算。
~~~
<div style="width: 200px;">
<p>This paragragh is contained within a DIV that has a width of 200 pixels.</p>
</div>
~~~
### 三,边框border
元素的边框是围绕元素内容和内边距的一条或多条线。border属性允许你规定元素边框的样式、宽度和颜色。
(1)边框
在HTML中,我们使用表格来创建文本周围的边框,但是通过使用CSS边框属性,我们可以创建出效果出色的边框,并且可以应用于任何元素。元素外边距内就是元素的的边框。元素的边框就是围绕元素内容和内边据的一条或多条线。每个边框有 3 个方面:宽度、样式,以及颜色。
(2)边框与背景
CSS规范指出,边框绘制在“元素的背景之上”。这很重要,因为有些边框是“间断的”(例如,点线边框或虚线框),元素的背景应当出现在边框的可见部分之间。CSS2 指出背景只延伸到内边距,而不是边框。后来 CSS2.1 进行了更正:元素的背景是内容、内边距和边框区的背景。
(3)边框的样式
样式是边框最重要的一个方面,这不是因为样式控制着边框的显示(当然,样式确实控制着边框的显示),而是因
为如果没有样式,将根本没有边框。CSS中border-style属性定义了10个不同的非inheri 样式,包括none。
例如,您可以为把一幅图片的边框定义为outset,使之看上去像是“凸起按钮”:
~~~
a:link img {border-style: outset;}
~~~
(4)定义多种样式
您可以为一个边框定义多个样式,例如:
~~~
p.aside {border-style: solid dotted dashed double;}
~~~
上面这条规则为类名为aside的段落定义了四种边框样式:实线上边框、点线右边框、虚线下边框和一个双线左边
框。
(5)定义单边样式
如果您希望为元素框的某一个边设置边框样式,而不是设置所有 4 个边的边框样式,可以使用下面的单边边框样
式属性:
border-top-style
border-right-style
border-bottom-style
border-left-style
(6)边框的宽度
您可以通过border-width属性为边框指定宽度。为边框指定宽度有两种方法:可以指定长度值,比如 2px或
0.1em;或者使用3个关键字之一,它们分别是 thin 、medium(默认值) 和 thick。
所以,我们可以这样设置边框的宽度:
~~~
p {border-style: solid; border-width: 5px;}
~~~
或者:
~~~
p {border-style: solid; border-width: thick;}
~~~
(7)定义单边宽度
您可以按照 top-right-bottom-left 的顺序设置元素的各边边框:
~~~
p {border-style: solid; border-width: 15px 5px 15px 5px;}
~~~
上面的例子也可以简写为(这样写法称为值复制):
~~~
p {border-style: solid; border-width: 15px 5px;}
~~~
您也可以通过下列属性分别设置边框各边的宽度:
border-top-width
border-right-width
border-bottom-width
border-left-width
因此,下面的规则与上面的例子是等价的:
~~~
p {
border-style: solid;
border-top-width: 15px;
border-right-width: 5px;
border-bottom-width: 15px;
border-left-width: 5px;
}
~~~
(8)没有边框
在前面的例子中,您已经看到,如果希望显示某种边框,就必须设置边框样式,比如solid 或 outset。那么如果把border-style设置为none,由于border-style的默认值是none,如果没有声明样式,就相当于 border-style: none。因
此,如果您希望边框出现,就必须声明一个边框样式。
(9)边框的颜色
设置边框颜色非常简单。CSS使用一个简单的border-color属性,它一次可以接受最多4个颜色值。可以使用任何
类型的颜色值,例如可以是命名颜色,也可以是十六进制和 RGB 值:
~~~
p {
border-style: solid;
border-color: blue rgb(25%,35%,45%) #909090 red;
}
~~~
如果颜色值小于 4 个,值复制就会起作用。例如下面的规则声明了段落的上下边框是蓝色,左右边框是红色:
~~~
p {
border-style: solid;
border-color: blue red;
}
~~~
注释:默认的边框颜色是元素本身的前景色。如果没有为边框声明颜色,它将与元素的文本颜色相同。另一方面,如果元素没有任何文本,假设它是一个表格,其中只包含图像,那么该表的边框颜色就是其父元素的文本颜色(因为color可以继承)。这个父元素很可能是body、div 或另一个table。
(10)定义单边颜色
还有一些单边边框颜色属性。它们的原理与单边样式和宽度属性相同:
border-top-color
border-right-color
border-bottom-color
border-left-color
要为 h1 元素指定实线黑色边框,而右边框为实线红色,可以这样指定:
~~~
h1 {
border-style: solid;
border-color: black;
border-right-color: red;
}
~~~
### 四,外边距margin
围绕在元素边框的空白区域是外边距。设置外边距会在元素外创建额外的“空白”。
(1)margin属性
设置外边距的最简单的方法就是使用margin属性,这个属性接受任何长度单位、百分数值甚至负值。margin可以设置为auto。更常见的做法是为外边距设置长度值。
下面的例子为h1元素的四个边分别定义了不同的外边距,所使用的长度单位是像素(px):
~~~
<span style="font-size:18px;">h1 {margin : 10px 0px 15px 5px;}</span>
~~~
另外,还可以为 margin 设置一个百分比数值:
~~~
p {margin : 10%;}
~~~
百分数是相对于父元素的 width 计算的。上面这个例子为p元素设置的外边距是其父元素的 width 的10%。
margin 的默认值是0,所以如果没有为margin 声明一个值,就不会出现外边距。但是,在实际中,浏览器对许多元素已经提供了预定的样式,外边距也不例外。例如,在支持 CSS的浏览器中,外边距会在每个段落元素的上面和下面生成“空行”。因此,如果没有为 p 元素声明外边距,浏览器可能会自己应用一个外边距。当然,只要你特别作了声明,就会覆盖默认样式。
(2)值复制
有时,我们会输入一些重复的值:
~~~
p {margin: 0.5em 1em 0.5em 1em;}
~~~
通过值复制,您可以不必重复地键入这对数字。上面的规则与下面的规则是等价的:
~~~
<span style="font-size:18px;">p {margin: 0.5em 1em;}</span>
~~~
这两个值可以取代前面4个值。CSS 定义了一些规则,允许为外边距指定少于4 个值。规则如下:
如果缺少左外边的值,则使用右外边距的值。
如果缺少下外边距的值,则使用上外边距的值。
如果缺少右外边距的值,则使用上外边距的值。
下图提供了更直观的方法来了解这一点:

(3)单边外边距属性
您可以使用单边外边距属性为元素单边上的外边距设置值。假设您希望把 p 元素的左外边距设置为 20px。
~~~
p {margin-left: 20px;}
~~~
您可以使用下列任何一个属性来只设置相应上的外边距,而不会直接影响所有其他外边距:
margin-top
margin-right
margin-bottom
margin-left
一个规则中可以使用多个这种单边属性,例如:
~~~
h2 {
margin-top: 20px;
margin-right: 30px;
margin-bottom: 30px;
margin-left: 20px;
}
~~~
当然,对于这种情况,使用 margin 可能更容易一些:
~~~
p {margin: 20px 30px 30px 20px;}
~~~
不论使用单边属性还是使用 margin,得到的结果都一样。一般来说,如果希望为多个边设置外边距,使用margin 会更容易一些。不过,从文档显示的角度看,实际上使用哪种方法都不重要,所以应该选择对自己来说更容易的一种方法。
CSS基础学习十二:CSS样式
最后更新于:2022-04-01 11:29:34
CSS样式包括:CSS背景,CSS文本,CSS字体,CSS列表,CSS表格,CSS轮廓等样式。我们就目前用到的
CSS样式简单地介绍一下。
下面只是总结性的一些东西,具体的可以参考:[CSS样式教程](http://www.phpstudy.net/e/css/css_background.html)
(1)背景色
background-color
设置背景颜色
可能的值:
颜色名称:如red,yellow,blue
十六进制颜色值:如#ffffff
rgb颜色值:如rgb(255,255,255(十六进制为ff))
transparent:默认的,背景颜色透明
inherit:继承父元素的背景色
(2)背景图片
background-image
设置背景图片
值:url(图片目录)
background-repeat
设置背景图片是否重复
值:
repeat 横向和纵向都重复(默认的)
repeat-x 横向重复
repeat-y 纵向重复
no-repeat 不重复
(3)background-position
设置背景图片的位置
值:
一些关键词 top,left,right,bottom,center
百分比:x% y%
像素值:xpx,ypx
注意:养成习惯,两个值,一个表示水平方向,一个表示垂直方向。
(4)字体颜色
color
设置字体颜色
可能的值:
颜色名称:如red,yellow,blue
十六进制颜色值:如#ffffff
rgb颜色值:如rgb(255,255,255(十六进制为ff))
inherit:继承父元素的背景颜色
(5)文字缩进
text-indent
设置文字的缩进,注意,多行内容只有第一行缩进
可能的值:像素
xpx 像素
x% 基于父元素宽度的百分比
inhertit 继承父元素的文字缩进属性
(6)文本对齐方式
text-align
设置文本的对齐方式,注意基于块级元素
可能的值:
left 把文本排列在左边,左对齐
right 把文本排列在右边,右对齐
center 文本居中
和center的区别:
对于文本的效果是一样的
对于非文本,center依然可以把内容居中
(7)字体大小
font-size
设置文本的字体大小
可能的值:
xpx 文本大小为xpx
xem 文本大小为xem
(8)px和em解释
px :像素,计算机上的一个点
em:相对大小,1em,1倍当前字体大小的尺寸,2em,2倍当前字体大小的尺寸。如字体大小是16px,那么1.75em就等于28像素。
设置字体大小的时候,xem是相对于父元素的字体大小的x倍来设置。
(9)字体
font-family
设置使用什么类型的字体
可能的值:
字体名称 如Times,Georgia,serif等
规则:
可以定义多种字体,逗号隔开,先使用前面的字体,当前面的字体没有,使用下一种,以此类推。
(10)字体风格
font-style
设置文本正常或斜体
可能的值:
normal 文本正常显示
italic 文本倾斜显示
oblique 文本倾斜显示设置
(11)字体加粗
font-weight
设置文本加粗
可能的值:
normal 正常字符,默认
bold 粗体字符
bolder 更粗的字符
lighter 更细的字符
100-900 整百值,400相当于normal,700相当于bold20
(12)字母间距
letter-spacing
设置字母之间的间距,默认为0
可能的值:
xpx 字母之间的间距是xpx
xem 字母之间的间距是xem
(13)字间距
word-spacing
设置字(单词)之间的间距
可能的值:
xpx 字之间的间距是xpx
xem 字之间的间距是xem
(14)字符转换
text-transform
设置字母大小写
可能的值:
none 不做任何处理
uppercase 全部大写显示
lowercase 全部小写显示
capitalize 单词首字母大写
(15)文本装饰
text-decoration
设置文本装饰效果
可能的值:
none 不作任何处理
underline 文本添加下划线
overline 文本添加上划线
line-through 文字中间添加一个贯穿线
bink 文本闪烁,不推荐使用
(16)字母间距和字间距在中文的区别
在中文中的应用
在中文中没有子母和单词的概念
在外国人看来,每个汉字相当于letter
所以,对于中文,我们一般使用letter-spacing
每个汉字在英文中相当于一个字母,因此使用letter-spacing效果起作用,word-spacing对汉字不起作用
(17)列表的标志的类型
list-style-type
设置列表项标志的类型
常用的值:
none 无标志
disc 实心圆标志
circle 空心圆标志
square 实心方块标志
decimal 数字标志,从1开始的自然数
lower-roman 小写罗马数字
upper-roman 大写罗马数字
lower-alpha 小写字母
upper-alpha 大写字母
(18)表格边框
boeder属性设置表格边框
border-collapse 属性设置表格边框折叠为单一边框:
width 和 height 属性定义表格的宽度和高度。
text-align 和 vertical-align 属性设置表格中文本的对齐方式。
text-align 属性设置水平对齐方式,比如左对齐、右对齐或者居中:
vertical-align 属性设置垂直对齐方式,比如顶部对齐、底部对齐或居中对齐:
padding 属性控制表格中内容与边框的距离
border-spacing设置分隔单元格边框的距离。
caption-side设置表格标题的位置。
empty-cells设置是否显示表格中的空单元格。
table-layout设置显示单元、行和列的算法。
(19)轮廓
outline是绘制于元素周围的一条线,位于边框边缘的外围,可起到突出元素的作用。
outline在一个声明中设置所有的轮廓属性
outline-color设置轮廓的颜色
outline-style设置轮廓的样式
outline-width设置轮廓的宽度
接下来我们就具体演示一下这些CSS样式的效果:
~~~
<span style="font-size:18px;"><!DOCTYPE html PUBLIC "-//W3C//DTD XHTML 1.0 Transitional//EN" "http://www.w3.org/TR/xhtml1/DTD/xhtml1-transitional.dtd">
<html xmlns="http://www.w3.org/1999/xhtml">
<head>
<meta http-equiv="Content-Type" content="text/html; charset=gb2312" />
<title>CSS样式样式</title></head>
<style type="text/css">
.test1{
background-color:#FF0000;
}
.test2{
height:400px;
border:1px solid #FF0000;
background-image:url('http://zx.kaitao.cn/UserFiles/Image/beijingtupian6.jpg');
background-repeat:no-repeat;
background-position:center;
}
.test3{
color:#0000FF;
}
.test4{
text-indent:30px;
}.test5{
text-align:center;
}
img{
display:block;
}
.test6{
font-size:40px;
}.test7{
font-family:"华文行楷", "华文仿宋", "黑体";
font-size:24px;
}
.test8{
font-style:oblique;
font-size:36px;
}
.test9{
font-weight:bold;
font-size:36px;
}
.test10{
letter-spacing:30px;
font-size:36px;
}
.test11{
word-spacing:30px;
font-size:36px;
}
.test12{
letter-spacing:20px;
word-spacing:30px;
font-size:36px;
}
.test13{
text-transform:uppercase;
font-size:36px;
}
.test14{
text-decoration:underline;
font-size:36px;
}
.test15{
list-style-type:square;
}
.test16{
list-style-position:inside;
}
.test17{
list-style-image:url("01.png");
}
table{
width:200px;
border-collapse:collapse;
}
table,tr,th,td{
border:1px solid #0000FF;
text-align:center;
vertical-align:middle;
}
th{
background-color:#00FF00;
height:50px;
}
td{
background-color:#999999;
}
.test18{
border:1px solid #00FF00;
outline-color:#FF0000;
outline-style:dotted;
outline-width:3px;
}
</style>
</head>
<body>
<p align="center">背景色演示</p>
<div class="test1">攻城课堂</div>
<hr/>
<p align="center">背景图片演示</p>
<div class="test2"></div>
<hr/>
<p align="center">字体颜色演示</p>
<div class="test3">攻城课堂</div>
<hr/>
<p align="center">文字缩进演示</p>
<div class="test4">攻城课堂(只作用于文本第一行)攻城课堂(只作用于文本第一行)攻城课堂(只作用于文本第一行)攻城课堂(只作用于文本第一行)
攻城课堂(只作用于文本第一行)攻城课堂(只作用于文本第一行)攻城课堂(只作用于文本第一行)攻城课堂(只作用于文本第一行)攻城课堂(只作用于文本第一行)攻城课堂(只作用于文本第一行)</div>
<div>攻城课堂</div>
<hr/>
<p align="center">文字对齐方式演示</p>
<div class="test5">攻城课堂</div>
<div>攻城课堂(浏览器默认的效果)</div>
<span class="test5">攻城课堂(span标签是行内元素,因此不会生效)</span>
<div class="test5"><span>攻城课堂(嵌套在块级元素内的可以生效)</span></div>
<hr/>
<p align="center">与center标签作比较</p>
<div class="test5">攻城课堂</div>
<center>攻城课堂(使用center标签的效果)</center>
<div class="test5"><img src="http://zx.kaitao.cn/UserFiles/Image/beijingtupian6.jpg" /></div>
<center><img src="http://zx.kaitao.cn/UserFiles/Image/beijingtupian6.jpg" />(使用center标签居中的效果)</center>
<hr/>
<p align="center">字体大小演示</p>
<div>攻城课堂(浏览器默认的字体大小)</div>
<div class="test6">攻城课堂(字体大小为40px)</div>
<hr/>
<p align="center">字体演示</p>
<div>攻城课堂(浏览器的默认效果)</div>
<div class="test7">攻城课堂(华文行楷)</div>
<hr/>
<p align="center">字体风格演示</p>
<div>攻城课堂(浏览器的默认效果)</div>
<div class="test8">攻城课堂</div>
<hr/>
<p align="center">字体加粗演示</p>
<div>攻城课堂(浏览器的默认效果)</div>
<div class="test9">攻城课堂</div>
<hr/>
<p align="center">字母间距演示</p>
<div style="font-size:36px">important(浏览器的默认效果)</div>
<div class="test10">important</div>
<hr/>
<p align="center">字间距演示</p>
<div style="font-size:36px">This is very impotant(浏览器的默认效果)</div>
<div class="test11">This is very impotant</div>
<hr/>
<p align="center">字母间距和字间距在中文中的应用演示</p>
<div style="font-size:36px">欢迎来到攻城课堂(浏览器的默认效果)</div>
<div class="test12">欢迎来到攻城课堂(每个汉字在英文中相当于一个字母,因此使用letter-spacing效果起作用,word-spacing对汉字不起作用)</div>
<hr/>
<p align="center">字符转换演示</p>
<div style="font-size:36px">This is very impotant(浏览器的默认效果)</div>
<div class="test13">This is very impotant(全部大写)</div>
<hr/>
<p align="center">文本装饰演示</p>
<div style="font-size:36px">攻城课堂(浏览器的默认效果)</div>
<div class="test14">攻城课堂</div>
<hr/>
<p align="center">列表项标志的类型演示</p>
<ol>
<li>足球</li>
<li>篮球</li>
<li>排球</li>
</ol>
<ul>
<li>权利的游戏第一季</li>
<li>权利的游戏第二季</li>
<li>权利的游戏第三季</li>
</ul>
<ol class="test15">
<li>足球</li>
<li>篮球</li>
<li>排球</li>
</ol>
<ul class="test15">
<li>权利的游戏第一季</li>
<li>权利的游戏第二季</li>
<li>权利的游戏第三季</li>
</ul>
<hr/>
<p align="center">列表项标志的位置演示</p>
<ul>
<li>权利的游戏第一季</li>
<li>权利的游戏第二季</li>
<li>权利的游戏第三季</li>
</ul>
<ul class="test16">
<li>权利的游戏第一季</li>
<li>权利的游戏第二季</li>
<li>权利的游戏第三季</li>
</ul>
<hr/>
<p align="center">图片型列表项标志演示</p>
<ul>
<li>权利的游戏第一季</li>
<li>权利的游戏第二季</li>
<li>权利的游戏第三季</li>
</ul>
<ul class="test17">
<li>权利的游戏第一季</li>
<li>权利的游戏第二季</li>
<li>权利的游戏第三季</li>
</ul>
<hr/>
<p align="center">表格演示</p>
<table align="center">
<tr>
<th>姓名</th>
<th>性别</th>
</tr>
<tr>
<td>张国庆</td>
<td>男</td>
</tr>
<tr>
<td>李思思</td>
<td>女</td>
</tr>
</table>
<hr/>
<p align="center">轮廓演示</p>
<p align="center">落霞与孤鹜齐飞,秋水共长天一色</p>
<p align="center" class="test18">落霞与孤鹜齐飞,秋水共长天一色</p>
<hr/>
</body>
</html>
</span>
~~~
火狐浏览器运行的结果为:


CSS基础学习十一:选择器的优先级
最后更新于:2022-04-01 11:29:32
在CSS基础学习的篇章中,从第四篇博客开始说选择器,到昨天基本已经说完了。今天我们总结一下,选择器作
用:告知浏览器需要设置哪个dom元素的样式。最后来说说选择器一个重要的问题,选择器的优先级。判断优先级的
方法就是尝试!!!
### 一,简单选择器的优先级
简单的选择器包括我们在第四篇,第五篇,第六篇博客的元素选择器(标签选择器),类选择器和id选择器。
我们来试验:
~~~
<!DOCTYPE html PUBLIC "-//W3C//DTD XHTML 1.0 Transitional//EN" "http://www.w3.org/TR/xhtml1/DTD/xhtml1-transitional.dtd">
<html xmlns="http://www.w3.org/1999/xhtml">
<head>
<meta http-equiv="Content-Type" content="text/html; charset=gb2312" />
<title>CSS选择器优先级</title>
<style type="text/css">
/*标签选择器的渲染红色*/
div{
background-color:#FF0000;
width:900px;
height:400px;
}
/*类选择器的渲染蓝色*/
.test{
background-color:#0000FF;
width:900px;
height:300px;
}
/*id选择器的渲染紫色*/
#test{
background-color:#FF00FF;
width:900px;
height:200px;
}
</style>
</head>
<body>
<div id="test" class="test"></div>
</body>
</html>
~~~
运行的结果为:id选择器的优先级最高。

注释掉id选择器后的结果为:类选择器的优先级居其次。

因此这三个简单选择器的优先级顺序为:HTML标签属性>id选择器>类选择器>元素选择器
### 二,同类型选择器的优先级
同类型:指的是相同类型的选择器,理论上优先级是一样的。比如:div和p。.btn和.button。#header和
#footer,它们的优先级是相同的。但是当同类型的选择器作用到相同的HTML标签上的时候优先级就不一样了。
我们继续试验:
~~~
<!DOCTYPE html PUBLIC "-//W3C//DTD XHTML 1.0 Transitional//EN" "http://www.w3.org/TR/xhtml1/DTD/xhtml1-transitional.dtd">
<html xmlns="http://www.w3.org/1999/xhtml">
<head>
<meta http-equiv="Content-Type" content="text/html; charset=gb2312" />
<title>CSS选择器优先级</title>
<style type="text/css">
/*test类选择器的渲染浅绿色*/
.test{
background-color:#00FF00;
width:900px;
height:200px;
}
/*test1类选择器的渲染浅蓝色*/
.test1{
background-color:#00FFFF;
width:900px;
height:200px;
}
</style>
</head>
<body>
<div class="test test1"></div>
</body>
</html>
~~~
运行的结果为:

我们尝试的结果为:CSS规则写在最后面的生效!!
如果这还不能信服我们再来尝试< div class="test1 test">< /div>有什么不一样的效果?
~~~
<!DOCTYPE html PUBLIC "-//W3C//DTD XHTML 1.0 Transitional//EN" "http://www.w3.org/TR/xhtml1/DTD/xhtml1-transitional.dtd">
<html xmlns="http://www.w3.org/1999/xhtml">
<head>
<meta http-equiv="Content-Type" content="text/html; charset=gb2312" />
<title>CSS选择器优先级</title>
<style type="text/css">
/*test类选择器的渲染浅绿色*/
.test{
background-color:#00FF00;
width:900px;
height:200px;
}
/*test1类选择器的渲染浅蓝色*/
.test1{
background-color:#00FFFF;
width:900px;
height:200px;
}
</style>
</head>
<body>
<div class="test test1"></div>
<hr/>
<div class="test1 test"></div>
</body>
</html>
~~~
运行的结果为:

最终我们得出的结论依然是:同类型的选择器,CSS规则写在最后面的生效!
### 三,选择器的优先级
CSS选择器组合出很多复杂的选择器规则,那么我们就不能像简单的选择器那样一个一个尝试。下面我们介绍一
个很实用的判断优先级的方法。
判断优先级:我们约定 id选择器的权重为100,类选择器权重为10,标签选择器权重为1。一个复杂的选择器的权
重等于所有选择器的权重之和。一般,选择器越特殊,优先级(权重)越高。
我们先来看两个复杂的选择器规则:
第一个选择器的权重为:1+10+10+1=22
div.test .item span{
background-color:#00FF00;
}
第二个选择器的权重为:100+1+1=102
#test div span{
background-color:#FF0000;
}
从我们约定的规则来看,显然是第二个生效!
~~~
<!DOCTYPE html PUBLIC "-//W3C//DTD XHTML 1.0 Transitional//EN" "http://www.w3.org/TR/xhtml1/DTD/xhtml1-transitional.dtd">
<html xmlns="http://www.w3.org/1999/xhtml">
<head>
<meta http-equiv="Content-Type" content="text/html; charset=gb2312" />
<title>CSS选择器优先级</title>
<style type="text/css">
/*第一个选择器渲染的是绿色*/
div.test .item span{
background-color:#00FF00;
}
/*第一个选择器渲染的是红色*/
#test div span{
background-color:#FF0000;
}
</style>
</head>
<body>
<div id="test" class="test">
<div class="item">
<span>12345</span>
</div>
</div>
</body>
</html>
~~~
运行的结果为与我们的理论是一致的!

那么我们可能会有一个疑问:同样的权重,那个选择器起作用呢?从一系列的理论和试验我们可以得出这与同类
型选择器的优先级问题相似,我们还是能轻易的得出结论:同样的权重要选择顺序最后的生效。
### 四,!important
样式最高优先级:无视优先级,在样式的一条声明的最后分号前加上,使该样式起作用。
我们还是来尝试:
~~~
<!DOCTYPE html PUBLIC "-//W3C//DTD XHTML 1.0 Transitional//EN" "http://www.w3.org/TR/xhtml1/DTD/xhtml1-transitional.dtd">
<html xmlns="http://www.w3.org/1999/xhtml">
<head>
<meta http-equiv="Content-Type" content="text/html; charset=gb2312" />
<title>CSS选择器优先级</title>
<style type="text/css">
/*元素选择器渲染的是红色*/
div{
color:#0000FF;
}
/*类选择器渲染的是蓝色*/
.test{
color:#FF0000;
}
</style>
</head>
<body>
<div class="test">攻城课堂</div>
</body>
</html>
~~~
首先运行的结果我们肯定知道是红色,那么我们在标签选择器后面!important,我们再来运行结果看看?
~~~
/*元素选择器渲染的是红色*/
div{
color:#0000FF!important;
}
~~~
运行的结果为:

关于选择器的优先级我也就了解了这些,CSS选择器就告一段落了!!
CSS基础学习十:伪元素
最后更新于:2022-04-01 11:29:29
上一篇博客说的是伪类,这次我们来说说伪元素。先来补充一下上篇博客漏掉的一个伪类::focus 伪类
(1)定义和用法
:focus伪类在元素获得焦点时向元素添加特殊的样式。注释IE浏览器不支持此属性。
(2)说明
这个伪类应用于有焦点的元素。
例如HTML中一个有文本输入焦点的输入框,其中出现了文本输入光标;也就是说,在用户开始键入时,文本会
输入到这个输入框。其他元素(如超链接)也可以有焦点,不过CSS没有定义哪些元素可以有焦点。
~~~
a:link {color: #FF0000} /* 未访问的链接 */
a:focus {color: #00FF00} /* 获得焦点的链接 */
~~~
再来一个结合其他选择器的例子:
~~~
<!DOCTYPE html PUBLIC "-//W3C//DTD XHTML 1.0 Transitional//EN" "http://www.w3.org/TR/xhtml1/DTD/xhtml1-transitional.dtd">
<html xmlns="http://www.w3.org/1999/xhtml">
<head>
<meta http-equiv="Content-Type" content="text/html; charset=gb2312" />
<title>无标题文档</title>
<style type="text/css">
a.red:visited {color: #FF0000;}
</style>
</head>
<body>
<a class="red" href="http://www.baidu.com">百度一下,你就知道</a>
</body>
</html>
~~~
如果上面这个例子中的链接已被访问过,那么它会显示为红色。那么运行的结果为也是这样子的。
(3)实例:规定获得焦点的输入字段的颜色的完整代码为:
~~~
<!DOCTYPE html PUBLIC "-//W3C//DTD XHTML 1.0 Transitional//EN" "http://www.w3.org/TR/xhtml1/DTD/xhtml1-transitional.dtd">
<html xmlns="http://www.w3.org/1999/xhtml">
<head>
<meta http-equiv="Content-Type" content="text/html; charset=gb2312" />
<title>CSS选择器演示</title>
<style type="text/css">
input:focus
{
background-color:yellow;
}
</style>
</head>
<body>
<form action="form_action.asp" method="get">
First name: <input type="text" name="fname" /><br />
Last name: <input type="text" name="lname" /><br />
<input type="submit" value="Submit" />
</form>
<p><b>注释:</b>如果已规定 !DOCTYPE,那么 Internet Explorer 8 (以及更高版本)支持 :focus 伪类。</p>
</body>
</html>
~~~
运行的结果为:
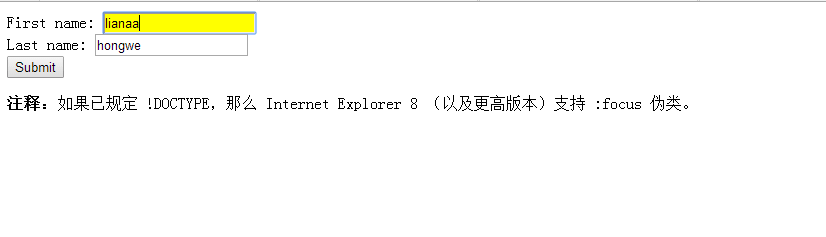
浏览器支持
所有主流浏览器都支持 :focus 伪类。注释:如果已规定 !DOCTYPE,那么 Internet Explorer 8 (以及更高版本)
支持 :focus 伪类。
下面我们来说伪元素
CSS伪元素用于向某些选择器设置特殊效果。
语法
伪元素的语法(和伪类是一样的):
selector:pseudo-element {property:value;}
CSS 类也可以与伪元素配合使用:
selector.class:pseudo-element {property:value;}
(1):first-line 伪元素
":first-line" 伪元素用于向文本的首行设置特殊样式。
在下面的例子中,浏览器会根据 "first-line" 伪元素中的样式对 p 元素的第一行文本进行格式化:
~~~
<!DOCTYPE html PUBLIC "-//W3C//DTD XHTML 1.0 Transitional//EN" "http://www.w3.org/TR/xhtml1/DTD/xhtml1-transitional.dtd">
<html xmlns="http://www.w3.org/1999/xhtml">
<head>
<meta http-equiv="Content-Type" content="text/html; charset=gb2312" />
<title>CSS选择器演示</title>
<style type="text/css">
p:first-line
{
color: #ff0000;
font-size:18px;
}
</style>
</head>
<body>
<p>出师未捷身先死,<br/>长使英雄泪满襟。</p>
</body>
</html>
~~~
运行的结果为:
注释:"first-line" 伪元素只能用于块级元素。
注释:下面的属性可应用于 "first-line" 伪元素:
font
color
background
word-spacing
letter-spacing
text-decoration
vertical-align
text-transform
line-height
clear
(2):first-letter 伪元素
":first-letter" 伪元素用于向文本的首字母设置特殊样式:
来看一个实例:
~~~
<!DOCTYPE html PUBLIC "-//W3C//DTD XHTML 1.0 Transitional//EN" "http://www.w3.org/TR/xhtml1/DTD/xhtml1-transitional.dtd">
<html xmlns="http://www.w3.org/1999/xhtml">
<head>
<meta http-equiv="Content-Type" content="text/html; charset=gb2312" />
<title>CSS选择器演示</title>
<style type="text/css">
p:first-letter
{
color: #ff0000;
font-size:18px;
}
</style>
</head>
<body>
<p>出师未捷身先死,<br/>长使英雄泪满襟。</p>
<hr/>
<p>两情若是久长时,又岂在朝朝暮暮</p>
</body>
</html>
~~~
运行的结果为:
注释:"first-letter" 伪元素只能用于块级元素。
注释:下面的属性可应用于 "first-letter" 伪元素:
font
color
background
margin
padding
border
text-decoration
vertical-align (仅当 float 为 none 时)
text-transform
line-height
float
clear
(3)伪元素和CSS类
伪元素可以与CSS类配合使用:
~~~
<!DOCTYPE html PUBLIC "-//W3C//DTD XHTML 1.0 Transitional//EN" "http://www.w3.org/TR/xhtml1/DTD/xhtml1-transitional.dtd">
<html xmlns="http://www.w3.org/1999/xhtml">
<head>
<meta http-equiv="Content-Type" content="text/html; charset=gb2312" />
<title>CSS选择器演示</title>
<style type="text/css">
p.article:first-letter
{
color: #FF0000;
}
</style>
</head>
<body>
<p class="one">出师未捷身先死,<br/>长使英雄泪满襟。</p>
<hr/>
<p class="article">两情若是久长时,又岂在朝朝暮暮</p>
</body>
</html>
~~~
上面的例子会使所有 class 为 article 的段落的首字母变为红色。
运行的结果为:
(4)多重伪元素
可以结合多个伪元素来使用。
在下面的例子中,段落的第一个字母将显示为红色,其字体大小为 xx-large。第一行中的其余文本将为蓝色,并
以小型大写字母显示。段落中的其余文本将以默认字体大小和颜色来显示:
~~~
<!DOCTYPE html PUBLIC "-//W3C//DTD XHTML 1.0 Transitional//EN" "http://www.w3.org/TR/xhtml1/DTD/xhtml1-transitional.dtd">
<html xmlns="http://www.w3.org/1999/xhtml">
<head>
<meta http-equiv="Content-Type" content="text/html; charset=gb2312" />
<title>CSS选择器演示</title>
<style type="text/css">
p:first-letter
{
color:#ff0000;
font-size:xx-large;
}
p:first-line
{
color:#0000ff;
font-variant:small-caps;
}
</style>
</head>
<body>
<p class="one">出师未捷身先死,<br/>长使英雄泪满襟。</p>
<hr/>
<p class="article">两情若是久长时,又岂在朝朝暮暮</p>
</body>
</html>
~~~
运行的结果为:
:before 伪元素
":before" 伪元素可以在元素的内容前面插入新内容。
下面的例子在每个 <p> 元素前面插入一幅图片:
~~~
<!DOCTYPE html PUBLIC "-//W3C//DTD XHTML 1.0 Transitional//EN" "http://www.w3.org/TR/xhtml1/DTD/xhtml1-transitional.dtd">
<html xmlns="http://www.w3.org/1999/xhtml">
<head>
<meta http-equiv="Content-Type" content="text/html; charset=gb2312" />
<title>CSS选择器演示</title>
<style type="text/css">
p:before {
content:url(01.jpg);
}
</style>
</head>
<body>
<p class="one">出师未捷身先死,<br/>长使英雄泪满襟。</p>
<hr/>
<p class="article">两情若是久长时,又岂在朝朝暮暮</p>
</body>
</html>
~~~
运行的结果为:
:after 伪元素
":after" 伪元素可以在元素的内容之后插入新内容。
下面的例子在每个 <p> 元素后面插入一幅图片:
~~~
<!DOCTYPE html PUBLIC "-//W3C//DTD XHTML 1.0 Transitional//EN" "http://www.w3.org/TR/xhtml1/DTD/xhtml1-transitional.dtd">
<html xmlns="http://www.w3.org/1999/xhtml">
<head>
<meta http-equiv="Content-Type" content="text/html; charset=gb2312" />
<title>CSS选择器演示</title>
<style type="text/css">
p:after {
content:url(01.jpg);
}
</style>
</head>
<body>
<p class="one">出师未捷身先死,<br/>长使英雄泪满襟。</p>
<hr/>
<p class="article">两情若是久长时,又岂在朝朝暮暮</p>
</body>
</html>
~~~
运行的结果为:
CSS基础学习九:伪类
最后更新于:2022-04-01 11:29:27
CSS伪类
CSS语法中伪类用于向某些选择器添加特殊的效果。常见的伪类有:

(1)语法
伪类的语法:
selector : pseudo-class {property: value}
CSS 类也可与伪类搭配使用。
selector.class : pseudo-class {property: value}
(2)锚伪类
在支持 CSS 的浏览器中,链接的不同状态都可以不同的方式显示,这些状态包括:活动状态,已被访问状态,未被访问状态,和鼠标悬停状态。
~~~
a:link {color: #FF0000} /* 未访问的链接 */
a:visited {color: #00FF00} /* 已访问的链接 */
a:hover {color: #FF00FF} /* 鼠标移动到链接上 */
a:active {color: #0000FF} /* 选定的链接 */
~~~
完整的代码为:
~~~
<!DOCTYPE html PUBLIC "-//W3C//DTD XHTML 1.0 Transitional//EN" "http://www.w3.org/TR/xhtml1/DTD/xhtml1-transitional.dtd">
<html xmlns="http://www.w3.org/1999/xhtml">
<head>
<meta http-equiv="Content-Type" content="text/html; charset=gb2312" />
<title>无标题文档</title>
<style type="text/css">
a:link {color: #FF0000}
a:visited {color: #00FF00}
a:hover {color: #FF00FF}
a:active {color: #0000FF}
</style>
</head>
<body>
<p><b><a href="../index.html" target="_blank">这是一个链接。</a></b></p>
<p><b>注释:</b>在CSS定义中,a:hover 必须位于 a:link 和 a:visited 之后,这样才能生效!</p>
<p><b>注释:</b>在CS 定义中,a:active 必须位于 a:hover 之后,这样才能生效!</p>
</body>
</html>
~~~
运行的结果为:
1,浏览器从未访问过的链接状态为:

2,浏览器已访问过的链接状态为:

3,鼠标置在链接上的状态为:

4,鼠标点击后的链接的状态为:

提示:
1,在 CSS 定义中,a:hover 必须被置于 a:link 和 a:visited 之后,才是有效的。
2,在 CSS 定义中,a:active 必须被置于 a:hover 之后,才是有效的。
3,伪类名称对大小写不敏感。
(3)伪类与 CSS 类
伪类可以与 CSS 类配合使用:
a.red : visited {color: #FF0000}
<a class="red" href="css_syntax.asp">CSS Syntax</a>
假如上面的例子中的链接被访问过,那么它将显示为红色。
(4):first-child 伪类
您可以使用:first-child 伪类来选择元素的第一个子元素。这个特定伪类很容易遭到误解,所以有必要举例来说明。考虑以下标记:
~~~
<div>
<p>These are the necessary steps:</p>
<ul>
<li>Intert Key</li>
<li>Turn key <strong>clockwise</strong></li>
<li>Push accelerator</li>
</ul>
<p>Do <em>not</em> push the brake at the same time as the accelerator.</p>
</div>
~~~
在上面的例子中,作为第一个元素的元素包括第一个 p、第一个 li 和 strong 和 em 元素。
给定以下规则:
~~~
p:first-child {color:red;}
li:first-child {color:blue;}
strong:first-child {color:green;}
em:first-child {color:yellow;}
~~~
第一个规则将作为某元素第一个子元素的所有 p 元素设置为红色。第二个规则将作为某个元素(在 HTML 中,
这肯定是 ol 或 ul 元素)第一个子元素的所有 li 元素变成蓝色。第三个规则将作为某元素第一个子元素的所有 strong
元素设置为绿色。第一个规则将作为某元素第一个子元素的所有em元素设置为黄色。
提示:最常见的错误是认为 p:first-child 之类的选择器会选择 p 元素的第一个子元素。
注释:必须声明 <!DOCTYPE>,这样 :first-child 才能在 IE 中生效。
浏览器运行的结果为:

下面我们再来三个例子详细说明:
例子 1 - 匹配第一个 < p> 元素
在下面的例子中,选择器匹配作为任何元素的第一个子元素的 p 元素:
~~~
<!DOCTYPE HTML PUBLIC "-//W3C//DTD HTML 4.01 Transitional//EN" "http://www.w3.org/TR/html4/loose.dtd">
<html>
<head>
<style type="text/css">
p:first-child {
color: red;
}
</style>
</head>
<body>
<p>some text</p>
<p>some text</p>
</body>
</html>
~~~
运行的结果为:

例子 2 - 匹配所有 < p> 元素中的第一个 < i> 元素
在下面的例子中,选择器匹配所有 < p> 元素中的第一个 < i> 元素:
~~~
<!DOCTYPE HTML PUBLIC "-//W3C//DTD HTML 4.01 Transitional//EN" "http://www.w3.org/TR/html4/loose.dtd">
<html>
<head>
<style type="text/css">
p > i:first-child {
font-weight:bold;
}
</style>
</head>
<body>
<p>some <i>text</i>. some <i>text</i>.</p>
<p>some <i>text</i>. some <i>text</i>.</p>
</body>
</html>
~~~
运行的结果为:

例子 3 - 匹配所有作为第一个子元素的 < p> 元素中的所有 < i> 元素
在下面的例子中,选择器匹配所有作为元素的第一个子元素的 < p> 元素中的所有 < i> 元素:
~~~
<!DOCTYPE HTML PUBLIC "-//W3C//DTD HTML 4.01 Transitional//EN" "http://www.w3.org/TR/html4/loose.dtd">
<html>
<head>
<style type="text/css">
p:first-child i {
color:blue;
}
</style>
</head>
<body>
<p>some <i>text</i>. some <i>text</i>.</p>
<p>some <i>text</i>. some <i>text</i>.</p>
</body>
</html>
~~~
运行的结果为:

(5):lang 伪类
:lang 伪类使你有能力为不同的语言定义特殊的规则。
在下面的例子中,:lang 类为属性值为 no 的 q 元素定义引号的类型:
~~~
<!DOCTYPE html PUBLIC "-//W3C//DTD XHTML 1.0 Transitional//EN" "http://www.w3.org/TR/xhtml1/DTD/xhtml1-transitional.dtd">
<html xmlns="http://www.w3.org/1999/xhtml">
<head>
<meta http-equiv="Content-Type" content="text/html; charset=gb2312" />
<title>无标题文档</title>
<style type="text/css">
q:lang(no)
{
quotes: "~" "~"
}
</style>
</head>
<body>
<p>文字<q lang="no" style="color:#FF0000">段落中的引用的文字</q>文字</p>
</body>
</html>
~~~
运行的结果为:

CSS基础学习八:派生选择器
最后更新于:2022-04-01 11:29:25
CSS语法中通过依据元素在其位置的上下文关系来定义样式,你可以使标记更加简洁。
在CSS1中,通过这种方式来应用规则的选择器被称为上下文选择器(contextual selectors),这是由于它们依赖于
上下文关系来应用或者避免某项规则。在CSS2中,它们称为派生选择器,但是无论你如何称呼它们,它们的作用都
是相同的。派生选择器允许你根据文档的上下文关系来确定某个标签的样式。通过合理地使用派生选择器,我们可以
使HTML代码变得更加整洁。
举一个例子来说,你希望列表中的 strong 元素变为斜体字,而不是通常的粗体字,可以这样定义一个派生选择
器:
~~~
<span style="font-size:18px;">li strong {
font-style: italic;
font-weight: normal;
}</span>
~~~
请注意标记为< strong>的代码的上下文关系:
~~~
<span style="font-size:18px;"><p><strong>我是粗体字,不是斜体字,因为我不在列表当中,所以这个规则对我不起作用</strong></p>
<ol>
<li><strong>我是斜体字。这是因为 strong 元素位于 li 元素内。</strong></li>
<li>我是正常的字体。</li>
</ol></span>
~~~
在上面的例子中,只有 li 元素中的 strong 元素的样式为斜体字,无需为 strong 元素定义特别的class或id,代码更加简洁。
我们可以看以运行的结果为:

接下来我们来看看常见的派生选择器。
### 一,后代(包含)选择器
后代选择器又称为包含选择器。后代选择器可以选择作为某元素后代的元素。选择某元素后代的元素,并设置一些样式。
(1)根据上下文选择元素
我们可以定义后代选择器来创建一些规则,使这些规则在某些文档结构中起作用,而在另外一些结构中不起作
用。上述的例子就是一个标准的后代选择器的演示。
(2)语法解释
在后代选择器中,规则左边的选择器一端包括两个或多个用空格分隔的选择器。选择器之间的空格是一种结合符。每个空格结合符可以解释为“... 在 ... 找到”、“... 作为 ... 的一部分”、“... 作为...的后代”,但是要求必须从右向左读选择器。语法:选择器 选择器 [选择器...] {}。有关后代选择器有一个易被忽视的方面,即两个元素之间的层次间隔可以是无限的。
比如:h1 span{ } span嵌套在h1中
~~~
<span style="font-size:18px;"><span style="font-size:18px;"><!DOCTYPE html PUBLIC "-//W3C//DTD XHTML 1.0 Transitional//EN" "http://www.w3.org/TR/xhtml1/DTD/xhtml1-transitional.dtd">
<html xmlns="http://www.w3.org/1999/xhtml">
<head>
<meta http-equiv="Content-Type" content="text/html; charset=gb2312" />
<title>无标题文档</title>
<style type="text/css">
h1 span { color:red;}
</style>
</head>
<body>
<h1>12345<span>12345</span></h1>
<span>12345</span>
<h1>12345<div><p><span>12345</div></p></span></h1>
</body>
</html></span></span>
~~~
运行的结果为:

(3)也有些复杂的选择器组合成的后代选择器: .test img{}和#header .btn{}等等。
### 二,子元素选择器
与后代选择器相比,子元素选择器(Child selectors)只能选择作为某元素子元素的元素。比后代选择器更严格,选择某元素子元素的元素,并设置一些样式。
(1)选择子元素
如果您不希望选择任意的后代元素,而是希望缩小范围,只选择某个元素的子元素,请使用子元素选择器。
例如,如果您希望选择只作为 h1 元素子元素的 strong 元素,可以这样写:
~~~
<span style="font-size:18px;">h1 > strong {color:red;}</span>
~~~
这个规则会把第一个 h1 下面的 strong 元素变为红色,但是第二个 strong 不受影响:
~~~
<span style="font-size:18px;"><h1>This is <strong>very</strong> important.</h1>
<h1>This is <em>really <strong>very</strong></em> important.</h1></span>
~~~
运行的结果为:

(2)语法解释
您应该已经注意到了,子选择器使用了大于号(子结合符)。子结合符两边可以有空白符,这是可选的。因此,以下写法都没有问题:
~~~
<span style="font-size:18px;">h1 > strong
h1> strong
h1 >strong
h1>strong</span>
~~~
如果从右向左读,选择器 h1 > strong 可以解释为“选择作为 h1 元素子元素的所有 strong 元素”。
(3)结合后代选择器和子选择器
请看下面这个选择器:
~~~
<span style="font-size:18px;">table.company td > p {}</span>
~~~
下面的选择器会选择作为 td 元素子元素的所有 p 元素,这个 td 元素本身从 table 元素继承,该 table 元素有一个
包含 company 的 class 属性。
### 三,CSS 相邻兄弟选择器
相邻兄弟选择器可选择紧接在另一元素后的元素,且二者有相同父元素。
(1)选择相邻兄弟
如果需要选择紧接在另一个元素后的元素,而且二者有相同的父元素,可以使用相邻兄弟选择器。
例如,如果要增加紧接在 h1 元素后出现的段落的上边距,可以这样写:
~~~
<span style="font-size:18px;">h1 + p { color:#FF0000;}</span>
~~~
这个选择器读作:“选择紧接在 h1 元素后出现的段落,h1 和 p 元素拥有共同的父元素”。
~~~
<span style="font-size:18px;"><!DOCTYPE html PUBLIC "-//W3C//DTD XHTML 1.0 Transitional//EN" "http://www.w3.org/TR/xhtml1/DTD/xhtml1-transitional.dtd">
<html xmlns="http://www.w3.org/1999/xhtml">
<head>
<meta http-equiv="Content-Type" content="text/html; charset=gb2312" />
<title>无标题文档</title>
<style type="text/css">
h1 + p { color:#FF0000;}
</style>
</head>
<body>
<h1>This is a heading.</h1>
<p>This is paragraph.</p>
<p>This is paragraph.</p>
<p>This is paragraph.</p>
<p>This is paragraph.</p>
<p>This is paragraph.</p>
</body>
</html></span>
~~~
运行的结果为:

(2)语法解释
相邻兄弟选择器使用了加号(+),即相邻兄弟结合符。注释:与子结合符一样,相邻兄弟结合符旁边可以有空白符。
请看下面这个文档树片段:
~~~
<span style="font-size:18px;"><div>
<ul>
<li>List item 1</li>
<li>List item 2</li>
<li>List item 3</li>
</ul>
<ol>
<li>List item 1</li>
<li>List item 2</li>
<li>List item 3</li>
</ol>
</div></span>
~~~
在上面的片段中,div 元素中包含两个列表:一个无序列表,一个有序列表,每个列表都包含三个列表项。这两
个列表是相邻兄弟,列表项本身也是相邻兄弟。不过,第一个列表中的列表项与第二个列表中的列表项不是相邻兄
弟,因为这两组列表项不属于同一父元素(最多只能算堂兄弟)。
请记住,用一个结合符只能选择两个相邻兄弟中的第二个元素。请看下面的选择器:
~~~
<span style="font-size:18px;">li + li {font-weight:bold;}</span>
~~~
上面这个选择器只会把列表中的第二个和第三个列表项变为粗体。第一个列表项不受影响。
运行的结果为:

(3)结合其他选择器
相邻兄弟结合符还可以结合其他结合符:
~~~
<span style="font-size:18px;">html > body table + ul {margin-top:20px;}</span>
~~~
这个选择器解释为:选择紧接在 table 元素后出现的所有兄弟 ul 元素,该 table 元素包含在一个 body 元素中,
body 元素本身是 html 元素的子元素。