License & Copyright
最后更新于:2022-04-01 04:48:44
*Mastering Django: Core* is a Modified Version of “The Django Book” by Adrian Holovaty and Jacob Kaplan-Moss. New content for this Modified Version copyright
Nigel George, the Django Software Foundation and individual contributors.
Original content Copyright Adrian Holovaty, Jacob Kaplan-Moss, and contributors.
Permission is granted to copy, distribute and/or modify this document under the terms of the GNU Free Documentation License, Version 1.3 or any later version
published by the Free Software Foundation; with no Invariant Sections, no Front-Cover Texts, and no Back-Cover Texts. A copy of the license is included in the section below entitled “GNU Free Documentation License”.
## GNU Free Documentation License
GNU Free Documentation License
Version 1.3, 3 November 2008
Copyright(c) 2000, 2001, 2002, 2007, 2008 Free Software Foundation, Inc.
Everyone is permitted to copy and distribute verbatim copies of this license
document, but changing it is not allowed.
1. PREAMBLE
The purpose of this License is to make a manual, textbook, or
other functional and useful document “free” in the sense of freedom: to
assure everyone the effective freedom to copy and redistribute it, with or
without modifying it, either commercially or noncommercially. Secondarily,
this License preserves for the author and publisher a way to get credit for
their work, while not being considered responsible for modifications made
by others.
This License is a kind of “copyleft”, which means that derivative works of the
document must themselves be free in the same sense. It complements the GNU
General Public License, which is a copyleft license designed for free
software.
We have designed this License in order to use it for manuals for free
software, because free software needs free documentation: a free program
should come with manuals providing the same freedoms that the software does.
But this License is not limited to software manuals; it can be used for any
textual work, regardless of subject matter or whether it is published as a
printed book. We recommend this License principally for works whose purpose is
instruction or reference.
1. APPLICABILITY AND DEFINITIONS
This License applies to any manual or other work, in any medium, that contains
a notice placed by the copyright holder saying it can be distributed under the
terms of this License. Such a notice grants a world-wide, royalty-free
license, unlimited in duration, to use that work under the conditions stated
herein. The “Document”, below, refers to any such manual or work. Any member
of the public is a licensee, and is addressed as “you”. You accept the license
if you copy, modify or distribute the work in a way requiring permission under
copyright law.
A “Modified Version” of the Document means any work containing the Document or
a portion of it, either copied verbatim, or with modifications and/or
translated into another language.
A “Secondary Section” is a named appendix or a front-matter section of the
Document that deals exclusively with the relationship of the publishers or
authors of the Document to the Document’s overall subject (or to related
matters) and contains nothing that could fall directly within that overall
subject. (Thus, if the Document is in part a textbook of mathematics, a
Secondary Section may not explain any mathematics.) The relationship could be
a matter of historical connection with the subject or with related matters, or
of legal, commercial, philosophical, ethical or political position regarding
them.
The “Invariant Sections” are certain Secondary Sections whose titles are
designated, as being those of Invariant Sections, in the notice that says that
the Document is released under this License. If a section does not fit the
above definition of Secondary then it is not allowed to be designated as
Invariant. The Document may contain zero Invariant Sections. If the Document
does not identify any Invariant Sections then there are none.
The “Cover Texts” are certain short passages of text that are listed, as
Front-Cover Texts or Back-Cover Texts, in the notice that says that the
Document is released under this License. A Front-Cover Text may be at most 5
words, and a Back-Cover Text may be at most 25 words.
A “Transparent” copy of the Document means a machine-readable copy,
represented in a format whose specification is available to the general
public, that is suitable for revising the document straightforwardly with
generic text editors or (for images composed of pixels) generic paint programs
or (for drawings) some widely available drawing editor, and that is suitable
for input to text formatters or for automatic translation to a variety of
formats suitable for input to text formatters. A copy made in an otherwise
Transparent file format whose markup, or absence of markup, has been arranged
to thwart or discourage subsequent modification by readers is not Transparent.
An image format is not Transparent if used for any substantial amount of text.
A copy that is not “Transparent” is called “Opaque”.
Examples of suitable formats for Transparent copies include plain ASCII
without markup, Texinfo input format, LaTeX input format, SGML or XML using a
publicly available DTD, and standard-conforming simple HTML, PostScript or PDF
designed for human modification. Examples of transparent image formats include
PNG, XCF and JPG. Opaque formats include proprietary formats that can be read
and edited only by proprietary word processors, SGML or XML for which the DTD
and/or processing tools are not generally available, and the machine-generated
HTML, PostScript or PDF produced by some word processors for output purposes
only.
The “Title Page” means, for a printed book, the title page itself, plus such
following pages as are needed to hold, legibly, the material this License
requires to appear in the title page. For works in formats which do not have
any title page as such, “Title Page” means the text near the most prominent
appearance of the work’s title, preceding the beginning of the body of the
text.
The “publisher” means any person or entity that distributes copies of the
Document to the public.
A section “Entitled XYZ” means a named subunit of the Document whose title
either is precisely XYZ or contains XYZ in parentheses following text that
translates XYZ in another language. (Here XYZ stands for a specific section
name mentioned below, such as “Acknowledgements”, “Dedications”,
“Endorsements”, or “History”.) To “Preserve the Title” of such a section when
you modify the Document means that it remains a section “Entitled XYZ”
according to this definition.
The Document may include Warranty Disclaimers next to the notice which states
that this License applies to the Document. These Warranty Disclaimers are
considered to be included by reference in this License, but only as regards
disclaiming warranties: any other implication that these Warranty Disclaimers
may have is void and has no effect on the meaning of this License.
1. VERBATIM COPYING
You may copy and distribute the Document in any medium, either commercially
or noncommercially, provided that this License, the copyright notices, and
the license notice saying this License applies to the Document are
reproduced in all copies, and that you add no other conditions whatsoever
to those of this License. You may not use technical measures to obstruct or
control the reading or further copying of the copies you make or
distribute. However, you may accept compensation in exchange for copies. If
you distribute a large enough number of copies you must also follow the
conditions in section 3.
You may also lend copies, under the same conditions stated above, and you may
publicly display copies.
1. COPYING IN QUANTITY
If you publish printed copies (or copies in media that
commonly have printed covers) of the Document, numbering more than 100, and
the Document’s license notice requires Cover Texts, you must enclose the
copies in covers that carry, clearly and legibly, all these Cover Texts:
Front-Cover Texts on the front cover, and Back-Cover Texts on the back
cover. Both covers must also clearly and legibly identify you as the
publisher of these copies. The front cover must present the full title with
all words of the title equally prominent and visible. You may add other
material on the covers in addition. Copying with changes limited to the
covers, as long as they preserve the title of the Document and satisfy
these conditions, can be treated as verbatim copying in other respects.
If the required texts for either cover are too voluminous to fit legibly, you
should put the first ones listed (as many as fit reasonably) on the actual
cover, and continue the rest onto adjacent pages.
If you publish or distribute Opaque copies of the Document numbering more than
100, you must either include a machine-readable Transparent copy along with
each Opaque copy, or state in or with each Opaque copy a computer-network
location from which the general network-using public has access to download
using public-standard network protocols a complete Transparent copy of the
Document, free of added material. If you use the latter option, you must take
reasonably prudent steps, when you begin distribution of Opaque copies in
quantity, to ensure that this Transparent copy will remain thus accessible at
the stated location until at least one year after the last time you distribute
an Opaque copy (directly or through your agents or retailers) of that edition
to the public.
It is requested, but not required, that you contact the authors of the
Document well before redistributing any large number of copies, to give them a
chance to provide you with an updated version of the Document.
1. MODIFICATIONS
You may copy and distribute a Modified Version of the
Document under the conditions of sections 2 and 3 above, provided that you
release the Modified Version under precisely this License, with the
Modified Version filling the role of the Document, thus licensing
distribution and modification of the Modified Version to whoever possesses
a copy of it. In addition, you must do these things in the Modified
Version:
A. Use in the Title Page (and on the covers, if any) a title distinct from
that of the Document, and from those of previous versions (which should, if
there were any, be listed in the History section of the Document). You may use
the same title as a previous version if the original publisher of that
version gives permission.
B. List on the Title Page, as authors, one or more persons or entities
responsible for authorship of the modifications in the Modified Version,
together with at least five of the principal authors of the Document (all of
its principal authors, if it has fewer than five), unless they release you
from this requirement.
C. State on the Title page the name of the publisher of the Modified Version,
as the publisher.
1. Preserve all the copyright notices of the Document.
E. Add an appropriate copyright notice for your modifications adjacent to the
other copyright notices.
F. Include, immediately after the copyright notices, a license notice giving
the public permission to use the Modified Version under the terms of this
License, in the form shown in the Addendum below.
G. Preserve in that license notice the full lists of Invariant Sections and
required Cover Texts given in the Document’s license notice.
1. Include an unaltered copy of this License.
I. Preserve the section Entitled “History”, Preserve its Title, and add to it
an item stating at least the title, year, new authors, and publisher of the
Modified Version as given on the Title Page. If there is no section Entitled
“History” in the Document, create one stating the title, year, authors, and
publisher of the Document as given on its Title Page, then add an item
describing the Modified Version as stated in the previous sentence.
J. Preserve the network location, if any, given in the Document for public
access to a Transparent copy of the Document, and likewise the network
locations given in the Document for previous versions it was based on. These
may be placed in the “History” section. You may omit a network location for a
work that was published at least four years before the Document itself, or if
the original publisher of the version it refers to gives permission.
K. For any section Entitled “Acknowledgements” or “Dedications”, Preserve the
Title of the section, and preserve in the section all the substance and tone
of each of the contributor acknowledgements and/or dedications given therein.
L. Preserve all the Invariant Sections of the Document, unaltered in their
text and in their titles. Section numbers or the equivalent are not considered
part of the section titles.
M. Delete any section Entitled “Endorsements”. Such a section may not be
included in the Modified Version.
N. Do not retitle any existing section to be Entitled “Endorsements” or to
conflict in title with any Invariant Section.
O. Preserve any Warranty Disclaimers. If the Modified Version includes new
front-matter sections or appendices that qualify as Secondary Sections and
contain no material copied from the Document, you may at your option designate
some or all of these sections as invariant. To do this, add their titles to
the list of Invariant Sections in the Modified Version’s license notice. These
titles must be distinct from any other section titles.
You may add a section Entitled “Endorsements”, provided it contains nothing
but endorsements of your Modified Version by various parties for example,
statements of peer review or that the text has been approved by an
organization as the authoritative definition of a standard.
You may add a passage of up to five words as a Front-Cover Text, and a passage
of up to 25 words as a Back-Cover Text, to the end of the list of Cover Texts
in the Modified Version. Only one passage of Front-Cover Text and one of
Back-Cover Text may be added by (or through arrangements made by) any one
entity. If the Document already includes a cover text for the same cover,
previously added by you or by arrangement made by the same entity you are
acting on behalf of, you may not add another; but you may replace the old one,
on explicit permission from the previous publisher that added the old one.
The author(s) and publisher(s) of the Document do not by this License give
permission to use their names for publicity for or to assert or imply
endorsement of any Modified Version.
1. COMBINING DOCUMENTS
You may combine the Document with other documents
released under this License, under the terms defined in section 4 above for
modified versions, provided that you include in the combination all of the
Invariant Sections of all of the original documents, unmodified, and list
them all as Invariant Sections of your combined work in its license notice,
and that you preserve all their Warranty Disclaimers.
The combined work need only contain one copy of this License, and multiple
identical Invariant Sections may be replaced with a single copy. If there are
multiple Invariant Sections with the same name but different contents, make
the title of each such section unique by adding at the end of it, in
parentheses, the name of the original author or publisher of that section if
known, or else a unique number. Make the same adjustment to the section titles
in the list of Invariant Sections in the license notice of the combined work.
In the combination, you must combine any sections Entitled “History” in the
various original documents, forming one section Entitled “History”; likewise
combine any sections Entitled “Acknowledgements”, and any sections Entitled
“Dedications”. You must delete all sections Entitled “Endorsements”.
1. COLLECTIONS OF DOCUMENTS
You may make a collection consisting of the
Document and other documents released under this License, and replace the
individual copies of this License in the various documents with a single
copy that is included in the collection, provided that you follow the rules
of this License for verbatim copying of each of the documents in all other
respects.
You may extract a single document from such a collection, and distribute it
individually under this License, provided you insert a copy of this License
into the extracted document, and follow this License in all other respects
regarding verbatim copying of that document.
1. AGGREGATION WITH INDEPENDENT WORKS
A compilation of the Document or its
derivatives with other separate and independent documents or works, in or
on a volume of a storage or distribution medium, is called an “aggregate”
if the copyright resulting from the compilation is not used to limit the
legal rights of the compilation’s users beyond what the individual works
permit. When the Document is included in an aggregate, this License does
not apply to the other works in the aggregate which are not themselves
derivative works of the Document.
If the Cover Text requirement of section 3 is applicable to these copies of
the Document, then if the Document is less than one half of the entire
aggregate, the Document’s Cover Texts may be placed on covers that bracket the
Document within the aggregate, or the electronic equivalent of covers if the
Document is in electronic form. Otherwise they must appear on printed covers
that bracket the whole aggregate.
1. TRANSLATION
Translation is considered a kind of modification, so you may
distribute translations of the Document under the terms of section 4.
Replacing Invariant Sections with translations requires special permission
from their copyright holders, but you may include translations of some or
all Invariant Sections in addition to the original versions of these
Invariant Sections. You may include a translation of this License, and all
the license notices in the Document, and any Warranty Disclaimers, provided
that you also include the original English version of this License and the
original versions of those notices and disclaimers. In case of a
disagreement between the translation and the original version of this
License or a notice or disclaimer, the original version will prevail.
If a section in the Document is Entitled “Acknowledgements”, “Dedications”, or
“History”, the requirement (section 4) to Preserve its Title (section 1) will
typically require changing the actual title.
1. TERMINATION
You may not copy, modify, sublicense, or distribute the
Document except as expressly provided under this License. Any attempt
otherwise to copy, modify, sublicense, or distribute it is void, and will
automatically terminate your rights under this License.
However, if you cease all violation of this License, then your license from a
particular copyright holder is reinstated (a) provisionally, unless and until
the copyright holder explicitly and finally terminates your license, and (b)
permanently, if the copyright holder fails to notify you of the violation by
some reasonable means prior to 60 days after the cessation.
Moreover, your license from a particular copyright holder is reinstated
permanently if the copyright holder notifies you of the violation by some
reasonable means, this is the first time you have received notice of violation
of this License (for any work) from that copyright holder, and you cure the
violation prior to 30 days after your receipt of the notice.
Termination of your rights under this section does not terminate the licenses
of parties who have received copies or rights from you under this License. If
your rights have been terminated and not permanently reinstated, receipt of a
copy of some or all of the same material does not give you any rights to use
it.
1. FUTURE REVISIONS OF THIS LICENSE
The Free Software Foundation may publish
new, revised versions of the GNU Free Documentation License from time to
time. Such new versions will be similar in spirit to the present version,
but may differ in detail to address new problems or concerns. See
[http://www.gnu.org/copyleft/](http://www.gnu.org/copyleft/).
Each version of the License is given a distinguishing version number. If the
Document specifies that a particular numbered version of this License “or any
later version” applies to it, you have the option of following the terms and
conditions either of that specified version or of any later version that has
been published (not as a draft) by the Free Software Foundation. If the
Document does not specify a version number of this License, you may choose any
version ever published (not as a draft) by the Free Software Foundation. If
the Document specifies that a proxy can decide which future versions of this
License can be used, that proxy’s public statement of acceptance of a version
permanently authorizes you to choose that version for the Document.
1. RELICENSING
“Massive Multiauthor Collaboration Site” (or “MMC Site”) means
any World Wide Web server that publishes copyrightable works and also
provides prominent facilities for anybody to edit those works. A public
wiki that anybody can edit is an example of such a server. A “Massive
Multiauthor Collaboration” (or “MMC”) contained in the site means any set
of copyrightable works thus published on the MMC site.
“CC-BY-SA” means the Creative Commons Attribution-Share Alike 3.0 license
published by Creative Commons Corporation, a not-for-profit corporation with a
principal place of business in San Francisco, California, as well as future
copyleft versions of that license published by that same organization.
“Incorporate” means to publish or republish a Document, in whole or in part,
as part of another Document.
An MMC is “eligible for relicensing” if it is licensed under this License, and
if all works that were first published under this License somewhere other than
this MMC, and subsequently incorporated in whole or in part into the MMC, (1)
had no cover texts or invariant sections, and (2) were thus incorporated prior
to November 1, 2008.
The operator of an MMC Site may republish an MMC contained in the site under
CC-BY-SA on the same site at any time before August 1, 2009, provided the MMC
is eligible for relicensing.
ADDENDUM: How to use this License for your documents
To use this License in a document you have written, include a copy of the
License in the document and put the following copyright and license notices
just after the title page:
>
>
> Copyright (C) YEAR YOUR NAME. Permission is granted to copy, distribute
> and/or modify this document under the terms of the GNU Free Documentation
> License, Version 1.3 or any later version published by the Free Software
> Foundation; with no Invariant Sections, no Front-Cover Texts, and no
> Back-Cover Texts. A copy of the license is included in the section
> entitled “GNU Free Documentation License”. If you have Invariant
> Sections, Front-Cover Texts and Back-Cover Texts, replace the “with
> Texts.” line with this:
>
> with the Invariant Sections being LIST THEIR TITLES, with the Front-Cover
> Texts being LIST, and with the Back-Cover Texts being LIST. If you have
> Invariant Sections without Cover Texts, or some other combination of the
> three, merge those two alternatives to suit the situation.
>
>
If your document contains nontrivial examples of program code, we recommend
releasing these examples in parallel under your choice of free software
license, such as the GNU General Public License, to permit their use in free
software.
Appendix G: Request and Response Objects
最后更新于:2022-04-01 04:48:42
Django uses request and response objects to pass state through the system.
When a page is requested, Django creates an [`HttpRequest`](http://masteringdjango.com/django-request-and-response-objects/#HttpRequest "HttpRequest") object that contains metadata about the request. Then Django loads the appropriate view, passing the [`HttpRequest`](http://masteringdjango.com/django-request-and-response-objects/#HttpRequest "HttpRequest") as the first argument to the view function. Each view is responsible for returning an [`HttpResponse`](http://masteringdjango.com/django-request-and-response-objects/#HttpResponse "HttpResponse") object.
This document explains the APIs for [`HttpRequest`](http://masteringdjango.com/django-request-and-response-objects/#HttpRequest "HttpRequest") and [`HttpResponse`](http://masteringdjango.com/django-request-and-response-objects/#HttpResponse "HttpResponse") objects, which are defined in the`django.http` module.
[TOC=3]
## HttpRequest objects
*class *`HttpRequest`
### Attributes
All attributes should be considered read-only, unless stated otherwise below. `session` is a notable exception.
`HttpRequest.``scheme`
A string representing the scheme of the request (`http` or `https` usually).
`HttpRequest.``body`
The raw HTTP request body as a byte string. This is useful for processing data in different ways than conventional HTML forms: binary images, XML payload etc. For processing conventional form data, use`HttpRequest.POST`.
You can also read from an HttpRequest using a file-like interface. See [`HttpRequest.read()`](http://masteringdjango.com/django-request-and-response-objects/#HttpRequest.read "HttpRequest.read").
`HttpRequest.``path`
A string representing the full path to the requested page, not including the domain.
Example: `"/music/bands/the_beatles/"`
`HttpRequest.``path_info`
Under some Web server configurations, the portion of the URL after the host name is split up into a script prefix portion and a path info portion. The `path_info` attribute always contains the path info portion of the path, no matter what Web server is being used. Using this instead of [`path`](http://masteringdjango.com/django-request-and-response-objects/#HttpRequest.path "HttpRequest.path") can make your code easier to move between test and deployment servers.
For example, if the `WSGIScriptAlias` for your application is set to `"/minfo"`, then `path` might be`"/minfo/music/bands/the_beatles/"` and `path_info` would be `"/music/bands/the_beatles/"`.
`HttpRequest.``method`
A string representing the HTTP method used in the request. This is guaranteed to be uppercase. Example:
~~~
if request.method == 'GET':
do_something()
elif request.method == 'POST':
do_something_else()
~~~
`HttpRequest.``encoding`
A string representing the current encoding used to decode form submission data (or `None`, which means the `DEFAULT_CHARSET` setting is used). You can write to this attribute to change the encoding used when accessing the form data. Any subsequent attribute accesses (such as reading from `GET` or `POST`) will use the new `encoding` value. Useful if you know the form data is not in the `DEFAULT_CHARSET` encoding.
`HttpRequest.``GET`
A dictionary-like object containing all given HTTP GET parameters. See the [`QueryDict`](http://masteringdjango.com/django-request-and-response-objects/#QueryDict "QueryDict") documentation below.
`HttpRequest.``POST`
A dictionary-like object containing all given HTTP POST parameters, providing that the request contains form data. See the [`QueryDict`](http://masteringdjango.com/django-request-and-response-objects/#QueryDict "QueryDict") documentation below. If you need to access raw or non-form data posted in the request, access this through the [`HttpRequest.body`](http://masteringdjango.com/django-request-and-response-objects/#HttpRequest.body "HttpRequest.body") attribute instead.
Its possible that a request can come in via POST with an empty `POST` dictionary if, say, a form is requested via the POST HTTP method but does not include form data. Therefore, you shouldnt use `if request.POST` to check for use of the POST method; instead, use `if request.method == "POST"` (see above).
Note: `POST` does *not* include file-upload information. See `FILES`.
`HttpRequest.``COOKIES`
A standard Python dictionary containing all cookies. Keys and values are strings.
`HttpRequest.``FILES`
A dictionary-like object containing all uploaded files. Each key in `FILES` is the `name` from the `<inputtype="file" name="" />`. Each value in `FILES` is an `UploadedFile`.
Note that `FILES` will only contain data if the request method was POST and the `<form>` that posted to the request had `enctype="multipart/form-data"`. Otherwise, `FILES` will be a blank dictionary-like object.
`HttpRequest.``META`
A standard Python dictionary containing all available HTTP headers. Available headers depend on the client and server, but here are some examples:
* `CONTENT_LENGTH` the length of the request body (as a string).
* `CONTENT_TYPE` the MIME type of the request body.
* `HTTP_ACCEPT_ENCODING` Acceptable encodings for the response.
* `HTTP_ACCEPT_LANGUAGE` Acceptable languages for the response.
* `HTTP_HOST` The HTTP Host header sent by the client.
* `HTTP_REFERER` The referring page, if any.
* `HTTP_USER_AGENT` The clients user-agent string.
* `QUERY_STRING` The query string, as a single (unparsed) string.
* `REMOTE_ADDR` The IP address of the client.
* `REMOTE_HOST` The hostname of the client.
* `REMOTE_USER` The user authenticated by the Web server, if any.
* `REQUEST_METHOD` A string such as `"GET"` or `"POST"`.
* `SERVER_NAME` The hostname of the server.
* `SERVER_PORT` The port of the server (as a string).
With the exception of `CONTENT_LENGTH` and `CONTENT_TYPE`, as given above, any HTTP headers in the request are converted to `META` keys by converting all characters to uppercase, replacing any hyphens with underscores and adding an `HTTP_` prefix to the name. So, for example, a header called `X-Bender` would be mapped to the`META` key `HTTP_X_BENDER`.
`HttpRequest.``user`
An object of type `AUTH_USER_MODEL` representing the currently logged-in user. If the user isnt currently logged in, `user` will be set to an instance of `django.contrib.auth.models.AnonymousUser`. You can tell them apart with `is_authenticated()`, like so:
~~~
if request.user.is_authenticated():
# Do something for logged-in users.
else:
# Do something for anonymous users.
~~~
`user` is only available if your Django installation has the [`AuthenticationMiddleware`](http://masteringdjango.com/django-request-and-response-objects/chapter_19.html#django.contrib.auth.middleware.AuthenticationMiddleware "django.contrib.auth.middleware.AuthenticationMiddleware") activated.
`HttpRequest.``session`
A readable-and-writable, dictionary-like object that represents the current session. This is only available if your Django installation has session support activated.
`HttpRequest.``urlconf`
Not defined by Django itself, but will be read if other code (e.g., a custom middleware class) sets it. When present, this will be used as the root URLconf for the current request, overriding the `ROOT_URLCONF` setting. See how-django-processes-a-request for details.
`HttpRequest.``resolver_match`
An instance of `ResolverMatch` representing the resolved url. This attribute is only set after url resolving took place, which means its available in all views but not in middleware methods which are executed before url resolving takes place (like `process_request`, you can use `process_view` instead).
### Methods
`HttpRequest.``get_host`()
Returns the originating host of the request using information from the `HTTP_X_FORWARDED_HOST` (if`USE_X_FORWARDED_HOST` is enabled) and `HTTP_HOST` headers, in that order. If they dont provide a value, the method uses a combination of `SERVER_NAME` and `SERVER_PORT` as detailed in [PEP 3333](https://www.python.org/dev/peps/pep-3333).
Example: `"127.0.0.1:8000"`
Note
The [`get_host()`](http://masteringdjango.com/django-request-and-response-objects/#HttpRequest.get_host "HttpRequest.get_host") method fails when the host is behind multiple proxies. One solution is to use middleware to rewrite the proxy headers, as in the following example:
~~~
class MultipleProxyMiddleware(object):
FORWARDED_FOR_FIELDS = [
'HTTP_X_FORWARDED_FOR',
'HTTP_X_FORWARDED_HOST',
'HTTP_X_FORWARDED_SERVER',
]
def process_request(self, request):
"""
Rewrites the proxy headers so that only the most
recent proxy is used.
"""
for field in self.FORWARDED_FOR_FIELDS:
if field in request.META:
if ',' in request.META[field]:
parts = request.META[field].split(',')
request.META[field] = parts[-1].strip()
~~~
This middleware should be positioned before any other middleware that relies on the value of [`get_host()`](http://masteringdjango.com/django-request-and-response-objects/#HttpRequest.get_host "HttpRequest.get_host") for instance, [`CommonMiddleware`](http://masteringdjango.com/django-request-and-response-objects/chapter_19.html#django.middleware.common.CommonMiddleware "django.middleware.common.CommonMiddleware") or [`CsrfViewMiddleware`](http://masteringdjango.com/django-request-and-response-objects/chapter_19.html#django.middleware.csrf.CsrfViewMiddleware "django.middleware.csrf.CsrfViewMiddleware").
`HttpRequest.``get_full_path`()
Returns the `path`, plus an appended query string, if applicable.
Example: `"/music/bands/the_beatles/?print=true"`
`HttpRequest.``build_absolute_uri`(*location*)
Returns the absolute URI form of `location`. If no location is provided, the location will be set to`request.get_full_path()`.
If the location is already an absolute URI, it will not be altered. Otherwise the absolute URI is built using the server variables available in this request.
Example: `"http://example.com/music/bands/the_beatles/?print=true"`
`HttpRequest.``get_signed_cookie`(*key*, *default=RAISE_ERROR*, *salt=”*, *max_age=None*)
Returns a cookie value for a signed cookie, or raises a `django.core.signing.BadSignature` exception if the signature is no longer valid. If you provide the `default` argument the exception will be suppressed and that default value will be returned instead.
The optional `salt` argument can be used to provide extra protection against brute force attacks on your secret key. If supplied, the `max_age` argument will be checked against the signed timestamp attached to the cookie value to ensure the cookie is not older than `max_age` seconds.
For example:
~~~
>>> request.get_signed_cookie('name')
'Tony'
>>> request.get_signed_cookie('name', salt='name-salt')
'Tony' # assuming cookie was set using the same salt
>>> request.get_signed_cookie('non-existing-cookie')
...
KeyError: 'non-existing-cookie'
>>> request.get_signed_cookie('non-existing-cookie', False)
False
>>> request.get_signed_cookie('cookie-that-was-tampered-with')
...
BadSignature: ...
>>> request.get_signed_cookie('name', max_age=60)
...
SignatureExpired: Signature age 1677.3839159 > 60 seconds
>>> request.get_signed_cookie('name', False, max_age=60)
False
~~~
See cryptographic signing for more information.
`HttpRequest.``is_secure`()
Returns `True` if the request is secure; that is, if it was made with HTTPS.
`HttpRequest.``is_ajax`()
Returns `True` if the request was made via an `XMLHttpRequest`, by checking the `HTTP_X_REQUESTED_WITH` header for the string `'XMLHttpRequest'`. Most modern JavaScript libraries send this header. If you write your own XMLHttpRequest call (on the browser side), youll have to set this header manually if you want `is_ajax()` to work.
If a response varies on whether or not its requested via AJAX and you are using some form of caching like Djangos [`cache middleware`](http://masteringdjango.com/django-request-and-response-objects/chapter_19.html#module-django.middleware.cache "django.middleware.cache: Middleware for the site-wide cache."), you should decorate the view with `vary_on_headers('HTTP_X_REQUESTED_WITH')` so that the responses are properly cached.
`HttpRequest.``read`(*size=None*)
`HttpRequest.``readline`()
`HttpRequest.``readlines`()
`HttpRequest.``xreadlines`()
`HttpRequest.``__iter__`()
Methods implementing a file-like interface for reading from an HttpRequest instance. This makes it possible to consume an incoming request in a streaming fashion. A common use-case would be to process a big XML payload with iterative parser without constructing a whole XML tree in memory.
Given this standard interface, an HttpRequest instance can be passed directly to an XML parser such as ElementTree:
~~~
import xml.etree.ElementTree as ET
for element in ET.iterparse(request):
process(element)
~~~
## QueryDict objects
*class *`QueryDict`
In an [`HttpRequest`](http://masteringdjango.com/django-request-and-response-objects/#HttpRequest "HttpRequest") object, the `GET` and `POST` attributes are instances of `django.http.QueryDict`, a dictionary-like class customized to deal with multiple values for the same key. This is necessary because some HTML form elements, notably `<select multiple>`, pass multiple values for the same key.
The `QueryDict`s at `request.POST` and `request.GET` will be immutable when accessed in a normal request/response cycle. To get a mutable version you need to use `.copy()`.
### Methods
[`QueryDict`](http://masteringdjango.com/django-request-and-response-objects/#QueryDict "QueryDict") implements all the standard dictionary methods because its a subclass of dictionary. Exceptions are outlined here:
`QueryDict.``__init__`(*query_string=None*, *mutable=False*, *encoding=None*)
Instantiates a `QueryDict` object based on `query_string`.
~~~
>>> QueryDict('a=1&a=2&c=3')
<QueryDict: {'a': ['1', '2'], 'c': ['3']}>
~~~
If `query_string` is not passed in, the resulting `QueryDict` will be empty (it will have no keys or values).
Most `QueryDict`s you encounter, and in particular those at `request.POST` and `request.GET`, will be immutable. If you are instantiating one yourself, you can make it mutable by passing `mutable=True` to its `__init__()`.
Strings for setting both keys and values will be converted from `encoding` to unicode. If encoding is not set, it defaults to `DEFAULT_CHARSET`.
Changed in version 1.8: In previous versions, `query_string` was a required positional argument.
`QueryDict.``__getitem__`(*key*)
Returns the value for the given key. If the key has more than one value, `__getitem__()` returns the last value. Raises `django.utils.datastructures.MultiValueDictKeyError` if the key does not exist. (This is a subclass of Pythons standard `KeyError`, so you can stick to catching `KeyError`.)
`QueryDict.``__setitem__`(*key*, *value*)
Sets the given key to `[value]` (a Python list whose single element is `value`). Note that this, as other dictionary functions that have side effects, can only be called on a mutable `QueryDict` (such as one that was created via `copy()`).
`QueryDict.``__contains__`(*key*)
Returns `True` if the given key is set. This lets you do, e.g., `if "foo" in request.GET`.
`QueryDict.``get`(*key*, *default*)
Uses the same logic as `__getitem__()` above, with a hook for returning a default value if the key doesnt exist.
`QueryDict.``setdefault`(*key*, *default*)
Just like the standard dictionary `setdefault()` method, except it uses `__setitem__()` internally.
`QueryDict.``update`(*other_dict*)
Takes either a `QueryDict` or standard dictionary. Just like the standard dictionary `update()` method, except it*appends* to the current dictionary items rather than replacing them. For example:
~~~
>>> q = QueryDict('a=1', mutable=True)
>>> q.update({'a': '2'})
>>> q.getlist('a')
['1', '2']
>>> q['a'] # returns the last
['2']
~~~
`QueryDict.``items`()
Just like the standard dictionary `items()` method, except this uses the same last-value logic as`__getitem__()`. For example:
~~~
>>> q = QueryDict('a=1&a=2&a=3')
>>> q.items()
[('a', '3')]
~~~
`QueryDict.``iteritems`()
Just like the standard dictionary `iteritems()` method. Like [`QueryDict.items()`](http://masteringdjango.com/django-request-and-response-objects/#QueryDict.items "QueryDict.items") this uses the same last-value logic as [`QueryDict.__getitem__()`](http://masteringdjango.com/django-request-and-response-objects/#QueryDict.__getitem__ "QueryDict.__getitem__").
`QueryDict.``iterlists`()
Like [`QueryDict.iteritems()`](http://masteringdjango.com/django-request-and-response-objects/#QueryDict.iteritems "QueryDict.iteritems") except it includes all values, as a list, for each member of the dictionary.
`QueryDict.``values`()
Just like the standard dictionary `values()` method, except this uses the same last-value logic as`__getitem__()`. For example:
~~~
>>> q = QueryDict('a=1&a=2&a=3')
>>> q.values()
['3']
~~~
`QueryDict.``itervalues`()
Just like [`QueryDict.values()`](http://masteringdjango.com/django-request-and-response-objects/#QueryDict.values "QueryDict.values"), except an iterator.
In addition, `QueryDict` has the following methods:
`QueryDict.``copy`()
Returns a copy of the object, using `copy.deepcopy()` from the Python standard library. This copy will be mutable even if the original was not.
`QueryDict.``getlist`(*key*, *default*)
Returns the data with the requested key, as a Python list. Returns an empty list if the key doesnt exist and no default value was provided. Its guaranteed to return a list of some sort unless the default value was no list.
`QueryDict.``setlist`(*key*, *list_*)
Sets the given key to `list_` (unlike `__setitem__()`).
`QueryDict.``appendlist`(*key*, *item*)
Appends an item to the internal list associated with key.
`QueryDict.``setlistdefault`(*key*, *default_list*)
Just like `setdefault`, except it takes a list of values instead of a single value.
`QueryDict.``lists`()
Like [`items()`](http://masteringdjango.com/django-request-and-response-objects/#QueryDict.items "QueryDict.items"), except it includes all values, as a list, for each member of the dictionary. For example:
~~~
>>> q = QueryDict('a=1&a=2&a=3')
>>> q.lists()
[('a', ['1', '2', '3'])]
~~~
`QueryDict.``pop`(*key*)
Returns a list of values for the given key and removes them from the dictionary. Raises `KeyError` if the key does not exist. For example:
~~~
>>> q = QueryDict('a=1&a=2&a=3', mutable=True)
>>> q.pop('a')
['1', '2', '3']
~~~
`QueryDict.``popitem`()
Removes an arbitrary member of the dictionary (since theres no concept of ordering), and returns a two value tuple containing the key and a list of all values for the key. Raises `KeyError` when called on an empty dictionary. For example:
~~~
>>> q = QueryDict('a=1&a=2&a=3', mutable=True)
>>> q.popitem()
('a', ['1', '2', '3'])
~~~
`QueryDict.``dict`()
Returns `dict` representation of `QueryDict`. For every (key, list) pair in `QueryDict`, `dict` will have (key, item), where item is one element of the list, using same logic as [`QueryDict.__getitem__()`](http://masteringdjango.com/django-request-and-response-objects/#QueryDict.__getitem__ "QueryDict.__getitem__"):
~~~
>>> q = QueryDict('a=1&a=3&a=5')
>>> q.dict()
{'a': '5'}
~~~
`QueryDict.``urlencode`([*safe*])
Returns a string of the data in query-string format. Example:
~~~
>>> q = QueryDict('a=2&b=3&b=5')
>>> q.urlencode()
'a=2&b=3&b=5'
~~~
Optionally, urlencode can be passed characters which do not require encoding. For example:
~~~
>>> q = QueryDict(mutable=True)
>>> q['next'] = '/a&b/'
>>> q.urlencode(safe='/')
'next=/a%26b/'
~~~
## HttpResponse objects
*class *`HttpResponse`
In contrast to [`HttpRequest`](http://masteringdjango.com/django-request-and-response-objects/#HttpRequest "HttpRequest") objects, which are created automatically by Django, [`HttpResponse`](http://masteringdjango.com/django-request-and-response-objects/#HttpResponse "HttpResponse") objects are your responsibility. Each view you write is responsible for instantiating, populating and returning an[`HttpResponse`](http://masteringdjango.com/django-request-and-response-objects/#HttpResponse "HttpResponse").
The [`HttpResponse`](http://masteringdjango.com/django-request-and-response-objects/#HttpResponse "HttpResponse") class lives in the `django.http` module.
### Usage
#### PASSING STRINGS
Typical usage is to pass the contents of the page, as a string, to the [`HttpResponse`](http://masteringdjango.com/django-request-and-response-objects/#HttpResponse "HttpResponse") constructor:
~~~
>>> from django.http import HttpResponse
>>> response = HttpResponse("Here's the text of the Web page.")
>>> response = HttpResponse("Text only, please.", content_type="text/plain")
~~~
But if you want to add content incrementally, you can use `response` as a file-like object:
~~~
>>> response = HttpResponse()
>>> response.write("<p>Here's the text of the Web page.</p>")
>>> response.write("<p>Here's another paragraph.</p>")
~~~
#### PASSING ITERATORS
Finally, you can pass `HttpResponse` an iterator rather than strings. `HttpResponse` will consume the iterator immediately, store its content as a string, and discard it.
If you need the response to be streamed from the iterator to the client, you must use the[`StreamingHttpResponse`](http://masteringdjango.com/django-request-and-response-objects/#StreamingHttpResponse "StreamingHttpResponse") class instead.
#### SETTING HEADER FIELDS
To set or remove a header field in your response, treat it like a dictionary:
~~~
>>> response = HttpResponse()
>>> response['Age'] = 120
>>> del response['Age']
~~~
Note that unlike a dictionary, `del` doesnt raise `KeyError` if the header field doesnt exist.
For setting the `Cache-Control` and `Vary` header fields, it is recommended to use the `patch_cache_control()` and`patch_vary_headers()` methods from `django.utils.cache`, since these fields can have multiple, comma-separated values. The patch methods ensure that other values, e.g. added by a middleware, are not removed.
HTTP header fields cannot contain newlines. An attempt to set a header field containing a newline character (CR or LF) will raise `BadHeaderError`
#### TELLING THE BROWSER TO TREAT THE RESPONSE AS A FILE ATTACHMENT
To tell the browser to treat the response as a file attachment, use the `content_type` argument and set the`Content-Disposition` header. For example, this is how you might return a Microsoft Excel spreadsheet:
~~~
>>> response = HttpResponse(my_data, content_type='application/vnd.ms-excel')
>>> response['Content-Disposition'] = 'attachment; filename="foo.xls"'
~~~
Theres nothing Django-specific about the `Content-Disposition` header, but its easy to forget the syntax, so weve included it here.
### Attributes
`HttpResponse.``content`
A bytestring representing the content, encoded from a Unicode object if necessary.
`HttpResponse.``charset`
A string denoting the charset in which the response will be encoded. If not given at `HttpResponse`instantiation time, it will be extracted from `content_type` and if that is unsuccessful, the `DEFAULT_CHARSET`setting will be used.
`HttpResponse.``status_code`
The [HTTP status code](http://www.w3.org/Protocols/rfc2616/rfc2616-sec10.html#sec10) for the response.
`HttpResponse.``reason_phrase`
The HTTP reason phrase for the response.
`HttpResponse.``streaming`
This is always `False`.
This attribute exists so middleware can treat streaming responses differently from regular responses.
`HttpResponse.``closed`
`True` if the response has been closed.
### Methods
`HttpResponse.``__init__`(*content=”*, *content_type=None*, *status=200*, *reason=None*, *charset=None*)
Instantiates an `HttpResponse` object with the given page content and content type.
`content` should be an iterator or a string. If its an iterator, it should return strings, and those strings will be joined together to form the content of the response. If it is not an iterator or a string, it will be converted to a string when accessed.
`content_type` is the MIME type optionally completed by a character set encoding and is used to fill the HTTP `Content-Type` header. If not specified, it is formed by the `DEFAULT_CONTENT_TYPE` and `DEFAULT_CHARSET`settings, by default: text/html; charset=utf-8.
`status` is the [HTTP status code](http://www.w3.org/Protocols/rfc2616/rfc2616-sec10.html#sec10) for the response.
`reason` is the HTTP response phrase. If not provided, a default phrase will be used.
`charset` is the charset in which the response will be encoded. If not given it will be extracted from`content_type`, and if that is unsuccessful, the `DEFAULT_CHARSET` setting will be used.
`HttpResponse.``__setitem__`(*header*, *value*)
Sets the given header name to the given value. Both `header` and `value` should be strings.
`HttpResponse.``__delitem__`(*header*)
Deletes the header with the given name. Fails silently if the header doesnt exist. Case-insensitive.
`HttpResponse.``__getitem__`(*header*)
Returns the value for the given header name. Case-insensitive.
`HttpResponse.``has_header`(*header*)
Returns `True` or `False` based on a case-insensitive check for a header with the given name.
`HttpResponse.``setdefault`(*header*, *value*)
Sets a header unless it has already been set.
`HttpResponse.``set_cookie`(*key*, *value=”*, *max_age=None*, *expires=None*, *path=’/’*, *domain=None*, *secure=None*,*httponly=False*)
Sets a cookie. The parameters are the same as in the `Morsel` cookie object in the Python standard library.
* `max_age` should be a number of seconds, or `None` (default) if the cookie should last only as long as the clients browser session. If `expires` is not specified, it will be calculated.
* `expires` should either be a string in the format `"Wdy, DD-Mon-YY HH:MM:SS GMT"` or a `datetime.datetime` object in UTC. If `expires` is a `datetime` object, the `max_age` will be calculated.
* Use `domain` if you want to set a cross-domain cookie. For example, `domain=".lawrence.com"` will set a cookie that is readable by the domains www.lawrence.com, blogs.lawrence.com and calendars.lawrence.com. Otherwise, a cookie will only be readable by the domain that set it.
* Use `httponly=True` if you want to prevent client-side JavaScript from having access to the cookie.
[HTTPOnly](https://www.owasp.org/index.php/HTTPOnly) is a flag included in a Set-Cookie HTTP response header. It is not part of the [RFC 2109](https://tools.ietf.org/html/rfc2109.html) standard for cookies, and it isnt honored consistently by all browsers. However, when it is honored, it can be a useful way to mitigate the risk of client side script accessing the protected cookie data.
Warning
Both [RFC 2109](https://tools.ietf.org/html/rfc2109.html) and [RFC 6265](https://tools.ietf.org/html/rfc6265.html) state that user agents should support cookies of at least 4096 bytes. For many browsers this is also the maximum size. Django will not raise an exception if theres an attempt to store a cookie of more than 4096 bytes, but many browsers will not set the cookie correctly.
`HttpResponse.``set_signed_cookie`(*key*, *value*, *salt=”*, *max_age=None*, *expires=None*, *path=’/’*, *domain=None*,*secure=None*, *httponly=True*)
Like [`set_cookie()`](http://masteringdjango.com/django-request-and-response-objects/#HttpResponse.set_cookie "HttpResponse.set_cookie"), but cryptographic signing the cookie before setting it. Use in conjunction with[`HttpRequest.get_signed_cookie()`](http://masteringdjango.com/django-request-and-response-objects/#HttpRequest.get_signed_cookie "HttpRequest.get_signed_cookie"). You can use the optional `salt` argument for added key strength, but you will need to remember to pass it to the corresponding [`HttpRequest.get_signed_cookie()`](http://masteringdjango.com/django-request-and-response-objects/#HttpRequest.get_signed_cookie "HttpRequest.get_signed_cookie") call.
`HttpResponse.``delete_cookie`(*key*, *path=’/’*, *domain=None*)
Deletes the cookie with the given key. Fails silently if the key doesnt exist.
Due to the way cookies work, `path` and `domain` should be the same values you used in `set_cookie()` otherwise the cookie may not be deleted.
`HttpResponse.``write`(*content*)
This method makes an [`HttpResponse`](http://masteringdjango.com/django-request-and-response-objects/#HttpResponse "HttpResponse") instance a file-like object.
`HttpResponse.``flush`()
This method makes an [`HttpResponse`](http://masteringdjango.com/django-request-and-response-objects/#HttpResponse "HttpResponse") instance a file-like object.
`HttpResponse.``tell`()
This method makes an [`HttpResponse`](http://masteringdjango.com/django-request-and-response-objects/#HttpResponse "HttpResponse") instance a file-like object.
`HttpResponse.``getvalue`()
Returns the value of [`HttpResponse.content`](http://masteringdjango.com/django-request-and-response-objects/#HttpResponse.content "HttpResponse.content"). This method makes an [`HttpResponse`](http://masteringdjango.com/django-request-and-response-objects/#HttpResponse "HttpResponse") instance a stream-like object.
`HttpResponse.``writable`()
Always `True`. This method makes an [`HttpResponse`](http://masteringdjango.com/django-request-and-response-objects/#HttpResponse "HttpResponse") instance a stream-like object.
`HttpResponse.``writelines`(*lines*)
Writes a list of lines to the response. Line separators are not added. This method makes an [`HttpResponse`](http://masteringdjango.com/django-request-and-response-objects/#HttpResponse "HttpResponse")instance a stream-like object.
### HttpResponse subclasses
Django includes a number of `HttpResponse` subclasses that handle different types of HTTP responses. Like`HttpResponse`, these subclasses live in `django.http`.
*class *`HttpResponseRedirect`
The first argument to the constructor is required the path to redirect to. This can be a fully qualified URL (e.g. `'http://www.yahoo.com/search/'`) or an absolute path with no domain (e.g. `'/search/'`). See [`HttpResponse`](http://masteringdjango.com/django-request-and-response-objects/#HttpResponse "HttpResponse")for other optional constructor arguments. Note that this returns an HTTP status code 302.
`url`
This read-only attribute represents the URL the response will redirect to (equivalent to the `Location`response header).
*class *`HttpResponsePermanentRedirect`
Like [`HttpResponseRedirect`](http://masteringdjango.com/django-request-and-response-objects/#HttpResponseRedirect "HttpResponseRedirect"), but it returns a permanent redirect (HTTP status code 301) instead of a found redirect (status code 302).
*class *`HttpResponseNotModified`
The constructor doesnt take any arguments and no content should be added to this response. Use this to designate that a page hasnt been modified since the users last request (status code 304).
*class *`HttpResponseBadRequest`
Acts just like [`HttpResponse`](http://masteringdjango.com/django-request-and-response-objects/#HttpResponse "HttpResponse") but uses a 400 status code.
*class *`HttpResponseNotFound`
Acts just like [`HttpResponse`](http://masteringdjango.com/django-request-and-response-objects/#HttpResponse "HttpResponse") but uses a 404 status code.
*class *`HttpResponseForbidden`
Acts just like [`HttpResponse`](http://masteringdjango.com/django-request-and-response-objects/#HttpResponse "HttpResponse") but uses a 403 status code.
*class *`HttpResponseNotAllowed`
Like [`HttpResponse`](http://masteringdjango.com/django-request-and-response-objects/#HttpResponse "HttpResponse"), but uses a 405 status code. The first argument to the constructor is required: a list of permitted methods (e.g. `['GET', 'POST']`).
*class *`HttpResponseGone`
Acts just like [`HttpResponse`](http://masteringdjango.com/django-request-and-response-objects/#HttpResponse "HttpResponse") but uses a 410 status code.
*class *`HttpResponseServerError`
Acts just like [`HttpResponse`](http://masteringdjango.com/django-request-and-response-objects/#HttpResponse "HttpResponse") but uses a 500 status code.
Note
If a custom subclass of [`HttpResponse`](http://masteringdjango.com/django-request-and-response-objects/#HttpResponse "HttpResponse") implements a `render` method, Django will treat it as emulating a`SimpleTemplateResponse`, and the `render` method must itself return a valid response object.
## JsonResponse objects
*class *`JsonResponse`
`JsonResponse.``__init__`(*data*, *encoder=DjangoJSONEncoder*, *safe=True*, ***kwargs*)
An [`HttpResponse`](http://masteringdjango.com/django-request-and-response-objects/#HttpResponse "HttpResponse") subclass that helps to create a JSON-encoded response. It inherits most behavior from its superclass with a couple differences:
Its default `Content-Type` header is set to `application/json`.
The first parameter, `data`, should be a `dict` instance. If the `safe` parameter is set to `False` (see below) it can be any JSON-serializable object.
The `encoder`, which defaults to `django.core.serializers.json.DjangoJSONEncoder`, will be used to serialize the data.
The `safe` boolean parameter defaults to `True`. If its set to `False`, any object can be passed for serialization (otherwise only `dict` instances are allowed). If `safe` is `True` and a non-`dict` object is passed as the first argument, a `TypeError` will be raised.
### Usage
Typical usage could look like:
~~~
>>> from django.http import JsonResponse
>>> response = JsonResponse({'foo': 'bar'})
>>> response.content
'{"foo": "bar"}'
~~~
#### SERIALIZING NON-DICTIONARY OBJECTS
In order to serialize objects other than `dict` you must set the `safe` parameter to `False`:
~~~
>>> response = JsonResponse([1, 2, 3], safe=False)
~~~
Without passing `safe=False`, a `TypeError` will be raised.
Warning
Before the [5th edition of EcmaScript](http://www.ecma-international.org/publications/standards/Ecma-262.htm) it was possible to poison the JavaScript `Array` constructor. For this reason, Django does not allow passing non-dict objects to the `JsonResponse` constructor by default. However, most modern browsers implement EcmaScript 5 which removes this attack vector. Therefore it is possible to disable this security precaution.
#### CHANGING THE DEFAULT JSON ENCODER
If you need to use a different JSON encoder class you can pass the `encoder` parameter to the constructor method:
~~~
>>> response = JsonResponse(data, encoder=MyJSONEncoder)
~~~
## StreamingHttpResponse objects
*class *`StreamingHttpResponse`
The [`StreamingHttpResponse`](http://masteringdjango.com/django-request-and-response-objects/#StreamingHttpResponse "StreamingHttpResponse") class is used to stream a response from Django to the browser. You might want to do this if generating the response takes too long or uses too much memory. For instance, its useful for generating large CSV files .
Performance considerations
Django is designed for short-lived requests. Streaming responses will tie a worker process for the entire duration of the response. This may result in poor performance.
Generally speaking, you should perform expensive tasks outside of the request-response cycle, rather than resorting to a streamed response.
The [`StreamingHttpResponse`](http://masteringdjango.com/django-request-and-response-objects/#StreamingHttpResponse "StreamingHttpResponse") is not a subclass of [`HttpResponse`](http://masteringdjango.com/django-request-and-response-objects/#HttpResponse "HttpResponse"), because it features a slightly different API. However, it is almost identical, with the following notable differences:
* It should be given an iterator that yields strings as content.
* You cannot access its content, except by iterating the response object itself. This should only occur when the response is returned to the client.
* It has no `content` attribute. Instead, it has a [`streaming_content`](http://masteringdjango.com/django-request-and-response-objects/#StreamingHttpResponse.streaming_content "StreamingHttpResponse.streaming_content") attribute.
* You cannot use the file-like object `tell()` or `write()` methods. Doing so will raise an exception.
[`StreamingHttpResponse`](http://masteringdjango.com/django-request-and-response-objects/#StreamingHttpResponse "StreamingHttpResponse") should only be used in situations where it is absolutely required that the whole content isnt iterated before transferring the data to the client. Because the content cant be accessed, many middlewares cant function normally. For example the `ETag` and `Content- Length` headers cant be generated for streaming responses.
### Attributes
`StreamingHttpResponse.``streaming_content`
An iterator of strings representing the content.
`StreamingHttpResponse.``status_code`
The [HTTP status code](http://www.w3.org/Protocols/rfc2616/rfc2616-sec10.html#sec10) for the response.
`StreamingHttpResponse.``reason_phrase`
The HTTP reason phrase for the response.
`StreamingHttpResponse.``streaming`
This is always `True`.
## FileResponse objects
*class *`FileResponse`
[`FileResponse`](http://masteringdjango.com/django-request-and-response-objects/#FileResponse "FileResponse") is a subclass of [`StreamingHttpResponse`](http://masteringdjango.com/django-request-and-response-objects/#StreamingHttpResponse "StreamingHttpResponse") optimized for binary files. It uses [wsgi.file_wrapper](https://www.python.org/dev/peps/pep-3333/#optional-platform-specific-file-handling) if provided by the wsgi server, otherwise it streams the file out in small chunks.
`FileResponse` expects a file open in binary mode like so:
~~~
>>> from django.http import FileResponse
>>> response = FileResponse(open('myfile.png', 'rb'))
~~~
## Error views
Django comes with a few views by default for handling HTTP errors. To override these with your own custom views, see customizing-error-views.
### The 404 (page not found) view
`defaults.``page_not_found`(*request*, *template_name=’404.html’*)
When you raise `Http404` from within a view, Django loads a special view devoted to handling 404 errors. By default, its the view `django.views.defaults.page_not_found()`, which either produces a very simple Not Found message or loads and renders the template `404.html` if you created it in your root template directory.
The default 404 view will pass one variable to the template: `request_path`, which is the URL that resulted in the error.
Three things to note about 404 views:
* The 404 view is also called if Django doesnt find a match after checking every regular expression in the URLconf.
* The 404 view is passed a `RequestContext` and will have access to variables supplied by your template context processors (e.g. `MEDIA_URL`).
* If `DEBUG` is set to `True` (in your settings module), then your 404 view will never be used, and your URLconf will be displayed instead, with some debug information.
### The 500 (server error) view
`defaults.``server_error`(*request*, *template_name=’500.html’*)
Similarly, Django executes special-case behavior in the case of runtime errors in view code. If a view results in an exception, Django will, by default, call the view `django.views.defaults.server_error`, which either produces a very simple Server Error message or loads and renders the template `500.html` if you created it in your root template directory.
The default 500 view passes no variables to the `500.html` template and is rendered with an empty `Context` to lessen the chance of additional errors.
If `DEBUG` is set to `True` (in your settings module), then your 500 view will never be used, and the traceback will be displayed instead, with some debug information.
### The 403 (HTTP Forbidden) view
`defaults.``permission_denied`(*request*, *template_name=’403.html’*)
In the same vein as the 404 and 500 views, Django has a view to handle 403 Forbidden errors. If a view results in a 403 exception then Django will, by default, call the view`django.views.defaults.permission_denied`.
This view loads and renders the template `403.html` in your root template directory, or if this file does not exist, instead serves the text 403 Forbidden, as per [RFC 2616](https://tools.ietf.org/html/rfc2616.html) (the HTTP 1.1 Specification).
`django.views.defaults.permission_denied` is triggered by a `PermissionDenied` exception. To deny access in a view you can use code like this:
~~~
from django.core.exceptions import PermissionDenied
def edit(request, pk):
if not request.user.is_staff:
raise PermissionDenied
# ...
~~~
### The 400 (bad request) view
`defaults.``bad_request`(*request*, *template_name=’400.html’*)
When a `SuspiciousOperation` is raised in Django, it may be handled by a component of Django (for example resetting the session data). If not specifically handled, Django will consider the current request a bad request instead of a server error.
`django.views.defaults.bad_request`, is otherwise very similar to the `server_error` view, but returns with the status code 400 indicating that the error condition was the result of a client operation.
`bad_request` views are also only used when `DEBUG` is `False`.
## Customizing error views
The default error views in Django should suffice for most Web applications, but can easily be overridden if you need any custom behavior. Simply specify the handlers as seen below in your URLconf (setting them anywhere else will have no effect).
The `page_not_found()` view is overridden by `handler404`:
~~~
handler404 = 'mysite.views.my_custom_page_not_found_view'
~~~
The `server_error()` view is overridden by `handler500`:
~~~
handler500 = 'mysite.views.my_custom_error_view'
~~~
The `permission_denied()` view is overridden by `handler403`:
~~~
handler403 = 'mysite.views.my_custom_permission_denied_view'
~~~
The `bad_request()` view is overridden by `handler400`:
~~~
handler400 = 'mysite.views.my_custom_bad_request_view'
~~~
Appendix F: The django-admin Utility
最后更新于:2022-04-01 04:48:40
`django-admin` is Djangos command-line utility for administrative tasks. This document outlines all it can do.
In addition, `manage.py` is automatically created in each Django project. `manage.py` is a thin wrapper around`django-admin` that takes care of several things for you before delegating to `django-admin`:
* It puts your projects package on `sys.path`.
* It sets the `DJANGO_SETTINGS_MODULE` environment variable so that it points to your projects `settings.py` file.
* It calls `django.setup()` to initialize various internals of Django.
The `django-admin` script should be on your system path if you installed Django via its `setup.py` utility. If its not on your path, you can find it in `site-packages/django/bin` within your Python installation. Consider symlinking it from some place on your path, such as `/usr/local/bin`.
For Windows users, who do not have symlinking functionality available, you can copy `django-admin.exe` to a location on your existing path or edit the `PATH` settings (under `Settings - Control Panel - System - Advanced- Environment...`) to point to its installed location.
Generally, when working on a single Django project, its easier to use `manage.py` than `django-admin`. If you need to switch between multiple Django settings files, use `django-admin` with `DJANGO_SETTINGS_MODULE` or the `--settings` command line option.
The command-line examples throughout this document use `django-admin` to be consistent, but any example can use `manage.py` just as well.
[TOC=3]
## Usage
~~~
$ django-admin <command> [options]
$ manage.py <command> [options]
~~~
`command` should be one of the commands listed in this document. `options`, which is optional, should be zero or more of the options available for the given command.
### Getting runtime help
Run `django-admin help` to display usage information and a list of the commands provided by each application.
Run `django-admin help --commands` to display a list of all available commands.
Run `django-admin help <command>` to display a description of the given command and a list of its available options.
### App names
Many commands take a list of app names. An app name is the basename of the package containing your models. For example, if your `INSTALLED_APPS` contains the string `'mysite.blog'`, the app name is `blog`.
### Determining the version
Run `django-admin version` to display the current Django version.
The output follows the schema described in [PEP 386](https://www.python.org/dev/peps/pep-0386):
~~~
1.4.dev17026
1.4a1
1.4
~~~
### Displaying debug output
Use `--verbosity` to specify the amount of notification and debug information that `django-admin` should print to the console. For more details, see the documentation for the `--verbosity` option.
## Available commands
### check
Uses the system check framework to inspect the entire Django project for common problems.
The system check framework will confirm that there arent any problems with your installed models or your admin registrations. It will also provide warnings of common compatibility problems introduced by upgrading Django to a new version. Custom checks may be introduced by other libraries and applications.
By default, all apps will be checked. You can check a subset of apps by providing a list of app labels as arguments:
~~~
python manage.py check auth admin myapp
~~~
If you do not specify any app, all apps will be checked.
`--tag <tagname>`
The system check framework performs many different types of checks. These check types are categorized with tags. You can use these tags to restrict the checks performed to just those in a particular category. For example, to perform only security and compatibility checks, you would run:
~~~
python manage.py check --tag security --tag compatibility
~~~
`--list-tags`
List all available tags.
`--deploy`
The `--deploy` option activates some additional checks that are only relevant in a deployment setting.
You can use this option in your local development environment, but since your local development settings module may not have many of your production settings, you will probably want to point the `check`command at a different settings module, either by setting the `DJANGO_SETTINGS_MODULE` environment variable, or by passing the `--settings` option:
~~~
python manage.py check --deploy --settings=production_settings
~~~
Or you could run it directly on a production or staging deployment to verify that the correct settings are in use (omitting `--settings`). You could even make it part of your integration test suite.
### compilemessages
Compiles .po files created by `makemessages` to .mo files for use with the builtin gettext support.
Use the `--locale` option (or its shorter version `-l`) to specify the locale(s) to process. If not provided, all locales are processed.
Use the `--exclude` option (or its shorter version `-x`) to specify the locale(s) to exclude from processing. If not provided, no locales are excluded.
You can pass `--use-fuzzy` option (or `-f`) to include fuzzy translations into compiled files.
Example usage:
~~~
django-admin compilemessages --locale=pt_BR
django-admin compilemessages --locale=pt_BR --locale=fr -f
django-admin compilemessages -l pt_BR
django-admin compilemessages -l pt_BR -l fr --use-fuzzy
django-admin compilemessages --exclude=pt_BR
django-admin compilemessages --exclude=pt_BR --exclude=fr
django-admin compilemessages -x pt_BR
django-admin compilemessages -x pt_BR -x fr
~~~
### createcachetable
Creates the cache tables for use with the database cache backend using the information from your settings file.
The `--database` option can be used to specify the database onto which the cache table will be installed, but since this information is pulled from your settings by default, its typically not needed.
### dbshell
Runs the command-line client for the database engine specified in your `ENGINE` setting, with the connection parameters specified in your `USER`, `PASSWORD`, etc., settings.
* For PostgreSQL, this runs the `psql` command-line client.
* For MySQL, this runs the `mysql` command-line client.
* For SQLite, this runs the `sqlite3` command-line client.
This command assumes the programs are on your `PATH` so that a simple call to the program name (`psql`,`mysql`, `sqlite3`) will find the program in the right place. Theres no way to specify the location of the program manually.
The `--database` option can be used to specify the database onto which to open a shell.
### diffsettings
Displays differences between the current settings file and Djangos default settings.
Settings that dont appear in the defaults are followed by `"###"`. For example, the default settings dont define `ROOT_URLCONF`, so `ROOT_URLCONF` is followed by `"###"` in the output of `diffsettings`.
The `--all` option may be provided to display all settings, even if they have Djangos default value. Such settings are prefixed by `"###"`.
### dumpdata
Outputs to standard output all data in the database associated with the named application(s).
If no application name is provided, all installed applications will be dumped.
The output of `dumpdata` can be used as input for `loaddata`.
Note that `dumpdata` uses the default manager on the model for selecting the records to dump. If youre using a custom manager as the default manager and it filters some of the available records, not all of the objects will be dumped.
The `--all` option may be provided to specify that `dumpdata` should use Djangos base manager, dumping records which might otherwise be filtered or modified by a custom manager.
`--format <fmt>`
By default, `dumpdata` will format its output in JSON, but you can use the `--format` option to specify another format. Currently supported formats are listed in serialization-formats.
`--indent <num>`
By default, `dumpdata` will output all data on a single line. This isnt easy for humans to read, so you can use the `--indent` option to pretty-print the output with a number of indentation spaces.
The `--exclude` option may be provided to prevent specific applications or models (specified as in the form of `app_label.ModelName`) from being dumped. If you specify a model name to `dumpdata`, the dumped output will be restricted to that model, rather than the entire application. You can also mix application names and model names.
The `--database` option can be used to specify the database from which data will be dumped.
`--natural-foreign`
When this option is specified, Django will use the `natural_key()` model method to serialize any foreign key and many-to-many relationship to objects of the type that defines the method. If you are dumping`contrib.auth` `Permission` objects or `contrib.contenttypes` `ContentType` objects, you should probably be using this flag.
`--natural-primary`
When this option is specified, Django will not provide the primary key in the serialized data of this object since it can be calculated during deserialization.
`--pks`
By default, `dumpdata` will output all the records of the model, but you can use the `--pks` option to specify a comma separated list of primary keys on which to filter. This is only available when dumping one model.
`--output`
By default `dumpdata` will output all the serialized data to standard output. This options allows to specify the file to which the data is to be written.
### flush
Removes all data from the database, re-executes any post-synchronization handlers, and reinstalls any initial data fixtures.
The `--noinput` option may be provided to suppress all user prompts.
The `--database` option may be used to specify the database to flush.
### inspectdb
Introspects the database tables and views in the database pointed-to by the `NAME` setting and outputs a Django model module (a `models.py` file) to standard output.
Use this if you have a legacy database with which youd like to use Django. The script will inspect the database and create a model for each table or view within it.
As you might expect, the created models will have an attribute for every field in the table or view. Note that `inspectdb` has a few special cases in its field-name output:
* If `inspectdb` cannot map a columns type to a model field type, itll use `TextField` and will insert the Python comment `'This field type is a guess.'` next to the field in the generated model.
* If the database column name is a Python reserved word (such as `'pass'`, `'class'` or `'for'`), `inspectdb` will append `'_field'` to the attribute name. For example, if a table has a column `'for'`, the generated model will have a field `'for_field'`, with the `db_column` attribute set to `'for'`. `inspectdb` will insert the Python comment `'Field renamed because it was a Python reserved word.'` next to the field.
This feature is meant as a shortcut, not as definitive model generation. After you run it, youll want to look over the generated models yourself to make customizations. In particular, youll need to rearrange models order, so that models that refer to other models are ordered properly.
Primary keys are automatically introspected for PostgreSQL, MySQL and SQLite, in which case Django puts in the `primary_key=True` where needed.
`inspectdb` works with PostgreSQL, MySQL and SQLite. Foreign-key detection only works in PostgreSQL and with certain types of MySQL tables.
Django doesnt create database defaults when a [`default`](http://masteringdjango.com/the-django-admin-utility/appendix_A.html#django.db.models.Field.default "django.db.models.Field.default") is specified on a model field. Similarly, database defaults arent translated to model field defaults or detected in any fashion by `inspectdb`.
By default, `inspectdb` creates unmanaged models. That is, `managed = False` in the models `Meta` class tells Django not to manage each tables creation, modification, and deletion. If you do want to allow Django to manage the tables lifecycle, youll need to change the [`managed`](http://masteringdjango.com/the-django-admin-utility/appendix_A.html#django.db.models.Options.managed "django.db.models.Options.managed") option to `True` (or simply remove it because`True` is its default value).
The `--database` option may be used to specify the database to introspect.
### loaddata
Searches for and loads the contents of the named fixture into the database.
The `--database` option can be used to specify the database onto which the data will be loaded.
`--ignorenonexistent`
The `--ignorenonexistent` option can be used to ignore fields and models that may have been removed since the fixture was originally generated. I will also ingore non-existent models.
`--app`
The `--app` option can be used to specify a single app to look for fixtures in rather than looking through all apps.
#### WHATS A FIXTURE?
A *fixture* is a collection of files that contain the serialized contents of the database. Each fixture has a unique name, and the files that comprise the fixture can be distributed over multiple directories, in multiple applications.
Django will search in three locations for fixtures:
1. In the `fixtures` directory of every installed application
2. In any directory named in the `FIXTURE_DIRS` setting
3. In the literal path named by the fixture
Django will load any and all fixtures it finds in these locations that match the provided fixture names.
If the named fixture has a file extension, only fixtures of that type will be loaded. For example:
~~~
django-admin loaddata mydata.json
~~~
would only load JSON fixtures called `mydata`. The fixture extension must correspond to the registered name of a serializer (e.g., `json` or `xml`).
If you omit the extensions, Django will search all available fixture types for a matching fixture. For example:
~~~
django-admin loaddata mydata
~~~
would look for any fixture of any fixture type called `mydata`. If a fixture directory contained `mydata.json`, that fixture would be loaded as a JSON fixture.
The fixtures that are named can include directory components. These directories will be included in the search path. For example:
~~~
django-admin loaddata foo/bar/mydata.json
~~~
would search `<app_label>/fixtures/foo/bar/mydata.json` for each installed application,`<dirname>/foo/bar/mydata.json` for each directory in `FIXTURE_DIRS`, and the literal path `foo/bar/mydata.json`.
When fixture files are processed, the data is saved to the database as is. Model defined `save()` methods are not called, and any `pre_save` or `post_save` signals will be called with `raw=True` since the instance only contains attributes that are local to the model. You may, for example, want to disable handlers that access related fields that arent present during fixture loading and would otherwise raise an exception:
~~~
from django.db.models.signals import post_save
from .models import MyModel
def my_handler(**kwargs):
# disable the handler during fixture loading
if kwargs['raw']:
return
...
post_save.connect(my_handler, sender=MyModel)
~~~
You could also write a simple decorator to encapsulate this logic:
~~~
from functools import wraps
def disable_for_loaddata(signal_handler):
"""
Decorator that turns off signal handlers when loading fixture data.
"""
@wraps(signal_handler)
def wrapper(*args, **kwargs):
if kwargs['raw']:
return
signal_handler(*args, **kwargs)
return wrapper
@disable_for_loaddata
def my_handler(**kwargs):
...
~~~
Just be aware that this logic will disable the signals whenever fixtures are deserialized, not just during`loaddata`.
Note that the order in which fixture files are processed is undefined. However, all fixture data is installed as a single transaction, so data in one fixture can reference data in another fixture. If the database backend supports row-level constraints, these constraints will be checked at the end of the transaction.
The `dumpdata` command can be used to generate input for `loaddata`.
#### COMPRESSED FIXTURES
Fixtures may be compressed in `zip`, `gz`, or `bz2` format. For example:
~~~
django-admin loaddata mydata.json
~~~
would look for any of `mydata.json`, `mydata.json.zip`, `mydata.json.gz`, or `mydata.json.bz2`. The first file contained within a zip-compressed archive is used.
Note that if two fixtures with the same name but different fixture type are discovered (for example, if`mydata.json` and `mydata.xml.gz` were found in the same fixture directory), fixture installation will be aborted, and any data installed in the call to `loaddata` will be removed from the database.
MySQL with MyISAM and fixtures
The MyISAM storage engine of MySQL doesnt support transactions or constraints, so if you use MyISAM, you wont get validation of fixture data, or a rollback if multiple transaction files are found.
#### DATABASE-SPECIFIC FIXTURES
If youre in a multi-database setup, you might have fixture data that you want to load onto one database, but not onto another. In this situation, you can add database identifier into the names of your fixtures.
For example, if your `DATABASES` setting has a master database defined, name the fixture `mydata.master.json`or `mydata.master.json.gz` and the fixture will only be loaded when you specify you want to load data into the `master` database.
### makemessages
Runs over the entire source tree of the current directory and pulls out all strings marked for translation. It creates (or updates) a message file in the conf/locale (in the Django tree) or locale (for project and application) directory. After making changes to the messages files you need to compile them with`compilemessages` for use with the builtin gettext support. See the i18n documentation for details.
`--all`
Use the `--all` or `-a` option to update the message files for all available languages.
Example usage:
~~~
django-admin makemessages --all
~~~
`--extension`
Use the `--extension` or `-e` option to specify a list of file extensions to examine (default: .html, .txt).
Example usage:
~~~
django-admin makemessages --locale=de --extension xhtml
~~~
Separate multiple extensions with commas or use -e or extension multiple times:
~~~
django-admin makemessages --locale=de --extension=html,txt --extension xml
~~~
Use the `--locale` option (or its shorter version `-l`) to specify the locale(s) to process.
Use the `--exclude` option (or its shorter version `-x`) to specify the locale(s) to exclude from processing. If not provided, no locales are excluded.
Example usage:
~~~
django-admin makemessages --locale=pt_BR
django-admin makemessages --locale=pt_BR --locale=fr
django-admin makemessages -l pt_BR
django-admin makemessages -l pt_BR -l fr
django-admin makemessages --exclude=pt_BR
django-admin makemessages --exclude=pt_BR --exclude=fr
django-admin makemessages -x pt_BR
django-admin makemessages -x pt_BR -x fr
~~~
`--domain`
Use the `--domain` or `-d` option to change the domain of the messages files. Currently supported:
* `django` for all `*.py`, `*.html` and `*.txt` files (default)
* `djangojs` for `*.js` files
`--symlinks`
Use the `--symlinks` or `-s` option to follow symlinks to directories when looking for new translation strings.
Example usage:
~~~
django-admin makemessages --locale=de --symlinks
~~~
`--ignore`
Use the `--ignore` or `-i` option to ignore files or directories matching the given `glob`-style pattern. Use multiple times to ignore more.
These patterns are used by default: `'CVS'`, `'.*'`, `'*~'`, `'*.pyc'`
Example usage:
~~~
django-admin makemessages --locale=en_US --ignore=apps/* --ignore=secret/*.html
~~~
`--no-default-ignore`
Use the `--no-default-ignore` option to disable the default values of `--ignore`.
`--no-wrap`
Use the `--no-wrap` option to disable breaking long message lines into several lines in language files.
`--no-location`
Use the `--no-location` option to not write `#: filename:line` comment lines in language files. Note that using this option makes it harder for technically skilled translators to understand each messages context.
`--keep-pot`
Use the `--keep-pot` option to prevent Django from deleting the temporary .pot files it generates before creating the .po file. This is useful for debugging errors which may prevent the final language files from being created.
See also
See customizing-makemessages for instructions on how to customize the keywords that `makemessages`passes to `xgettext`.
### makemigrations []
Creates new migrations based on the changes detected to your models. Migrations, their relationship with apps and more are covered in depth in the migrations documentation.
Providing one or more app names as arguments will limit the migrations created to the app(s) specified and any dependencies needed (the table at the other end of a `ForeignKey`, for example).
`--empty`
The `--empty` option will cause `makemigrations` to output an empty migration for the specified apps, for manual editing. This option is only for advanced users and should not be used unless you are familiar with the migration format, migration operations, and the dependencies between your migrations.
`--dry-run`
The `--dry-run` option shows what migrations would be made without actually writing any migrations files to disk. Using this option along with `--verbosity 3` will also show the complete migrations files that would be written.
`--merge`
The `--merge` option enables fixing of migration conflicts. The `--noinput` option may be provided to suppress user prompts during a merge.
`--name, -n`
The `--name` option allows you to give the migration(s) a custom name instead of a generated one.
`--exit, -e`
The `--exit` option will cause `makemigrations` to exit with error code 1 when no migration are created (or would have been created, if combined with `--dry-run`).
### migrate [ []]
Synchronizes the database state with the current set of models and migrations. Migrations, their relationship with apps and more are covered in depth in the migrations documentation.
The behavior of this command changes depending on the arguments provided:
* No arguments: All apps have all of their migrations run.
* `<app_label>`: The specified app has its migrations run, up to the most recent migration. This may involve running other apps migrations too, due to dependencies.
* `<app_label> <migrationname>`: Brings the database schema to a state where the named migration is applied, but no later migrations in the same app are applied. This may involve unapplying migrations if you have previously migrated past the named migration. Use the name `zero` to unapply all migrations for an app.
The `--database` option can be used to specify the database to migrate.
`--fake`
The `--fake` option tells Django to mark the migrations as having been applied or unapplied, but without actually running the SQL to change your database schema.
This is intended for advanced users to manipulate the current migration state directly if theyre manually applying changes; be warned that using `--fake` runs the risk of putting the migration state table into a state where manual recovery will be needed to make migrations run correctly.
`--fake-initial`
The `--fake-initial` option can be used to allow Django to skip an apps initial migration if all database tables with the names of all models created by all `CreateModel` operations in that migration already exist. This option is intended for use when first running migrations against a database that preexisted the use of migrations. This option does not, however, check for matching database schema beyond matching table names and so is only safe to use if you are confident that your existing schema matches what is recorded in your initial migration.
Deprecated since version 1.8: The `--list` option has been moved to the `showmigrations` command.
### runserver [port or address:port]
Starts a lightweight development Web server on the local machine. By default, the server runs on port 8000 on the IP address `127.0.0.1`. You can pass in an IP address and port number explicitly.
If you run this script as a user with normal privileges (recommended), you might not have access to start a port on a low port number. Low port numbers are reserved for the superuser (root).
This server uses the WSGI application object specified by the `WSGI_APPLICATION` setting.
DO NOT USE THIS SERVER IN A PRODUCTION SETTING. It has not gone through security audits or performance tests. (And thats how its gonna stay. Were in the business of making Web frameworks, not Web servers, so improving this server to be able to handle a production environment is outside the scope of Django.)
The development server automatically reloads Python code for each request, as needed. You dont need to restart the server for code changes to take effect. However, some actions like adding files dont trigger a restart, so youll have to restart the server in these cases.
If you are using Linux and install [pyinotify](https://pypi.python.org/pypi/pyinotify/), kernel signals will be used to autoreload the server (rather than polling file modification timestamps each second). This offers better scaling to large projects, reduction in response time to code modification, more robust change detection, and battery usage reduction.
When you start the server, and each time you change Python code while the server is running, the server will check your entire Django project for errors (see the `check` command). If any errors are found, they will be printed to standard output, but it wont stop the server.
You can run as many servers as you want, as long as theyre on separate ports. Just execute `django-adminrunserver` more than once.
Note that the default IP address, `127.0.0.1`, is not accessible from other machines on your network. To make your development server viewable to other machines on the network, use its own IP address (e.g.`192.168.2.1`) or `0.0.0.0` or `::` (with IPv6 enabled).
You can provide an IPv6 address surrounded by brackets (e.g. `[200a::1]:8000`). This will automatically enable IPv6 support.
A hostname containing ASCII-only characters can also be used.
If the staticfiles contrib app is enabled (default in new projects) the `runserver` command will be overridden with its own runserver command.
If `migrate` was not previously executed, the table that stores the history of migrations is created at first run of `runserver`.
`--noreload`
Use the `--noreload` option to disable the use of the auto-reloader. This means any Python code changes you make while the server is running will *not* take effect if the particular Python modules have already been loaded into memory.
Example usage:
~~~
django-admin runserver --noreload
~~~
`--nothreading`
The development server is multithreaded by default. Use the `--nothreading` option to disable the use of threading in the development server.
`--ipv6, -6`
Use the `--ipv6` (or shorter `-6`) option to tell Django to use IPv6 for the development server. This changes the default IP address from `127.0.0.1` to `::1`.
Example usage:
~~~
django-admin runserver --ipv6
~~~
#### EXAMPLES OF USING DIFFERENT PORTS AND ADDRESSES
Port 8000 on IP address `127.0.0.1`:
~~~
django-admin runserver
~~~
Port 8000 on IP address `1.2.3.4`:
~~~
django-admin runserver 1.2.3.4:8000
~~~
Port 7000 on IP address `127.0.0.1`:
~~~
django-admin runserver 7000
~~~
Port 7000 on IP address `1.2.3.4`:
~~~
django-admin runserver 1.2.3.4:7000
~~~
Port 8000 on IPv6 address `::1`:
~~~
django-admin runserver -6
~~~
Port 7000 on IPv6 address `::1`:
~~~
django-admin runserver -6 7000
~~~
Port 7000 on IPv6 address `2001:0db8:1234:5678::9`:
~~~
django-admin runserver [2001:0db8:1234:5678::9]:7000
~~~
Port 8000 on IPv4 address of host `localhost`:
~~~
django-admin runserver localhost:8000
~~~
Port 8000 on IPv6 address of host `localhost`:
~~~
django-admin runserver -6 localhost:8000
~~~
#### SERVING STATIC FILES WITH THE DEVELOPMENT SERVER
By default, the development server doesnt serve any static files for your site (such as CSS files, images, things under `MEDIA_URL` and so forth). If you want to configure Django to serve static media, read Chapter 13\. shell
Starts the Python interactive interpreter.
Django will use [IPython](http://ipython.scipy.org/) or [bpython](http://bpython-interpreter.org/) if either is installed. If you have a rich shell installed but want to force use of the plain Python interpreter, use the `--plain` option, like so:
~~~
django-admin shell --plain
~~~
If you would like to specify either IPython or bpython as your interpreter if you have both installed you can specify an alternative interpreter interface with the `-i` or `--interface` options like so:
IPython:
~~~
django-admin shell -i ipython
django-admin shell --interface ipython
~~~
bpython:
~~~
django-admin shell -i bpython
django-admin shell --interface bpython
~~~
When the plain Python interactive interpreter starts (be it because `--plain` was specified or because no other interactive interface is available) it reads the script pointed to by the `PYTHONSTARTUP` environment variable and the `~/.pythonrc.py` script. If you dont wish this behavior you can use the `--no-startup` option. e.g.:
~~~
django-admin shell --plain --no-startup
~~~
### showmigrations [ []]
Shows all migrations in a project.
`--list, -l`
The `--list` option lists all of the apps Django knows about, the migrations available for each app, and whether or not each migrations is applied (marked by an `[X]` next to the migration name).
Apps without migrations are also listed, but have `(no migrations)` printed under them.
`--plan, -p`
The `--plan` option shows the migration plan Django will follow to apply migrations. Any supplied app labels are ignored because the plan might go beyond those apps. Same as `--list`, applied migrations are marked by an `[X]`. For a verbosity of 2 and above, all dependencies of a migration will also be shown.
### sqlflush
Prints the SQL statements that would be executed for the `flush` command.
The `--database` option can be used to specify the database for which to print the SQL.
### sqlmigrate
Prints the SQL for the named migration. This requires an active database connection, which it will use to resolve constraint names; this means you must generate the SQL against a copy of the database you wish to later apply it on.
Note that `sqlmigrate` doesnt colorize its output.
The `--database` option can be used to specify the database for which to generate the SQL.
`--backwards`
By default, the SQL created is for running the migration in the forwards direction. Pass `--backwards` to generate the SQL for unapplying the migration instead.
### sqlsequencereset
Prints the SQL statements for resetting sequences for the given app name(s).
Sequences are indexes used by some database engines to track the next available number for automatically incremented fields.
Use this command to generate SQL which will fix cases where a sequence is out of sync with its automatically incremented field data.
The `--database` option can be used to specify the database for which to print the SQL.
### squashmigrations
Squashes the migrations for `app_label` up to and including `migration_name` down into fewer migrations, if possible. The resulting squashed migrations can live alongside the unsquashed ones safely. For more information, please read migration-squashing.
`--no-optimize`
By default, Django will try to optimize the operations in your migrations to reduce the size of the resulting file. Pass `--no-optimize` if this process is failing for you or creating incorrect migrations, though please also file a Django bug report about the behavior, as optimization is meant to be safe.
### startapp [destination]
Creates a Django app directory structure for the given app name in the current directory or the given destination.
By default the directory created contains a `models.py` file and other app template files. (See the [source](https://github.com/django/django/tree/master/django/conf/app_template/) for more details.) If only the app name is given, the app directory will be created in the current working directory.
If the optional destination is provided, Django will use that existing directory rather than creating a new one. You can use . to denote the current working directory.
For example:
~~~
django-admin startapp myapp /Users/jezdez/Code/myapp
~~~
`--template`
With the `--template` option, you can use a custom app template by providing either the path to a directory with the app template file, or a path to a compressed file (`.tar.gz`, `.tar.bz2`, `.tgz`, `.tbz`, `.zip`) containing the app template files.
For example, this would look for an app template in the given directory when creating the `myapp` app:
~~~
django-admin startapp --template=/Users/jezdez/Code/my_app_template myapp
~~~
Django will also accept URLs (`http`, `https`, `ftp`) to compressed archives with the app template files, downloading and extracting them on the fly.
For example, taking advantage of Githubs feature to expose repositories as zip files, you can use a URL like:
~~~
django-admin startapp --template=https://github.com/githubuser/django-app-template/archive/master.zip myapp
~~~
When Django copies the app template files, it also renders certain files through the template engine: the files whose extensions match the `--extension` option (`py` by default) and the files whose names are passed with the `--name` option. The `template context` used is:
* Any option passed to the `startapp` command (among the commands supported options)
* `app_name` the app name as passed to the command
* `app_directory` the full path of the newly created app
* `docs_version` the version of the documentation: `'dev'` or `'1.x'`
Warning
When the app template files are rendered with the Django template engine (by default all `*.py` files), Django will also replace all stray template variables contained. For example, if one of the Python files contains a docstring explaining a particular feature related to template rendering, it might result in an incorrect example.
To work around this problem, you can use the `templatetag` templatetag to escape the various parts of the template syntax.
### startproject [destination]
Creates a Django project directory structure for the given project name in the current directory or the given destination.
By default, the new directory contains `manage.py` and a project package (containing a `settings.py` and other files). See the [template source](https://github.com/django/django/tree/master/django/conf/project_template/) for details.
If only the project name is given, both the project directory and project package will be named`<projectname>` and the project directory will be created in the current working directory.
If the optional destination is provided, Django will use that existing directory as the project directory, and create `manage.py` and the project package within it. Use . to denote the current working directory.
For example:
~~~
django-admin startproject myproject /Users/jezdez/Code/myproject_repo
~~~
As with the `startapp` command, the `--template` option lets you specify a directory, file path or URL of a custom project template. See the `startapp` documentation for details of supported project template formats.
For example, this would look for a project template in the given directory when creating the `myproject`project:
~~~
django-admin startproject --template=/Users/jezdez/Code/my_project_template myproject
~~~
Django will also accept URLs (`http`, `https`, `ftp`) to compressed archives with the project template files, downloading and extracting them on the fly.
For example, taking advantage of Githubs feature to expose repositories as zip files, you can use a URL like:
~~~
django-admin startproject --template=https://github.com/githubuser/django-project-template/archive/master.zip myproject
~~~
When Django copies the project template files, it also renders certain files through the template engine: the files whose extensions match the `--extension` option (`py` by default) and the files whose names are passed with the `--name` option. The `template context` used is:
* Any option passed to the `startproject` command (among the commands supported options)
* `project_name` the project name as passed to the command
* `project_directory` the full path of the newly created project
* `secret_key` a random key for the `SECRET_KEY` setting
* `docs_version` the version of the documentation: `'dev'` or `'1.x'`
Please also see the rendering warning as mentioned for `startapp`.
### test
Runs tests for all installed models.
`--failfast`
The `--failfast` option can be used to stop running tests and report the failure immediately after a test fails.
`--testrunner`
The `--testrunner` option can be used to control the test runner class that is used to execute tests. If this value is provided, it overrides the value provided by the `TEST_RUNNER` setting.
`--liveserver`
The `--liveserver` option can be used to override the default address where the live server (used with`LiveServerTestCase`) is expected to run from. The default value is `localhost:8081`.
`--keepdb`
The `--keepdb` option can be used to preserve the test database between test runs. This has the advantage of skipping both the create and destroy actions which greatly decreases the time to run tests, especially those in a large test suite. If the test database does not exist, it will be created on the first run and then preserved for each subsequent run. Any unapplied migrations will also be applied to the test database before running the test suite.
`--reverse`
The `--reverse` option can be used to sort test cases in the opposite order. This may help in debugging tests that arent properly isolated and have side effects. Grouping by test class is preserved when using this option.
`--debug-sql`
The `--debug-sql` option can be used to enable SQL logging for failing tests. If `--verbosity` is `2`, then queries in passing tests are also output.
### testserver
Runs a Django development server (as in `runserver`) using data from the given fixture(s).
For example, this command:
~~~
django-admin testserver mydata.json
~~~
…would perform the following steps:
1. Create a test database, as described in the-test-database.
2. Populate the test database with fixture data from the given fixtures. (For more on fixtures, see the documentation for `loaddata` above.)
3. Runs the Django development server (as in `runserver`), pointed at this newly created test database instead of your production database.
This is useful in a number of ways:
* When youre writing unit tests of how your views act with certain fixture data, you can use `testserver` to interact with the views in a Web browser, manually.
* Lets say youre developing your Django application and have a pristine copy of a database that youd like to interact with. You can dump your database to a fixture (using the `dumpdata` command, explained above), then use `testserver` to run your Web application with that data. With this arrangement, you have the flexibility of messing up your data in any way, knowing that whatever data changes youre making are only being made to a test database.
Note that this server does *not* automatically detect changes to your Python source code (as `runserver` does). It does, however, detect changes to templates.
`--addrport [port number or ipaddr:port]`
Use `--addrport` to specify a different port, or IP address and port, from the default of `127.0.0.1:8000`. This value follows exactly the same format and serves exactly the same function as the argument to the`runserver` command.
Examples:
To run the test server on port 7000 with `fixture1` and `fixture2`:
~~~
django-admin testserver --addrport 7000 fixture1 fixture2
django-admin testserver fixture1 fixture2 --addrport 7000
~~~
(The above statements are equivalent. We include both of them to demonstrate that it doesnt matter whether the options come before or after the fixture arguments.)
To run on 1.2.3.4:7000 with a `test` fixture:
~~~
django-admin testserver --addrport 1.2.3.4:7000 test
~~~
The `--noinput` option may be provided to suppress all user prompts.
## Commands provided by applications
Some commands are only available when the `django.contrib` application that implements them has been`enabled <INSTALLED_APPS>`. This section describes them grouped by their application.
### `django.contrib.auth`
#### CHANGEPASSWORD
This command is only available if Djangos authentication system (`django.contrib.auth`) is installed.
Allows changing a users password. It prompts you to enter twice the password of the user given as parameter. If they both match, the new password will be changed immediately. If you do not supply a user, the command will attempt to change the password whose username matches the current user.
Use the `--database` option to specify the database to query for the user. If its not supplied, Django will use the `default` database.
Example usage:
~~~
django-admin changepassword ringo
~~~
#### CREATESUPERUSER
This command is only available if Djangos authentication system (`django.contrib.auth`) is installed.
Creates a superuser account (a user who has all permissions). This is useful if you need to create an initial superuser account or if you need to programmatically generate superuser accounts for your site(s).
When run interactively, this command will prompt for a password for the new superuser account. When run non-interactively, no password will be set, and the superuser account will not be able to log in until a password has been manually set for it.
`--username` `--email`
The username and email address for the new account can be supplied by using the `--username` and `--email`arguments on the command line. If either of those is not supplied, `createsuperuser` will prompt for it when running interactively.
Use the `--database` option to specify the database into which the superuser object will be saved.
You can subclass the management command and override `get_input_data()` if you want to customize data input and validation. Consult the source code for details on the existing implementation and the methods parameters. For example, it could be useful if you have a `ForeignKey` in [`REQUIRED_FIELDS`](http://masteringdjango.com/the-django-admin-utility/chapter_11.html#django.contrib.auth.models.CustomUser.REQUIRED_FIELDS "django.contrib.auth.models.CustomUser.REQUIRED_FIELDS") and want to allow creating an instance instead of entering the primary key of an existing instance.
### `django.contrib.gis`
#### OGRINSPECT
This command is only available if GeoDjango (`django.contrib.gis`) is installed.
Please refer to its `description <ogrinspect>` in the GeoDjango documentation.
### `django.contrib.sessions`
#### CLEARSESSIONS
Can be run as a cron job or directly to clean out expired sessions.
### `django.contrib.sitemaps`
#### PING_GOOGLE
This command is only available if the Sitemaps framework (`django.contrib.sitemaps`) is installed.
Please refer to its `description <ping_google>` in the Sitemaps documentation.
### `django.contrib.staticfiles`
#### COLLECTSTATIC
This command is only available if the static files application (`django.contrib.staticfiles`) is installed.
Please refer to its `description <collectstatic>` in the staticfiles documentation.
#### FINDSTATIC
This command is only available if the static files application (`django.contrib.staticfiles`) is installed.
Please refer to its `description <findstatic>` in the staticfiles documentation.
## Default options
Although some commands may allow their own custom options, every command allows for the following options:
`--pythonpath`
Example usage:
~~~
django-admin migrate --pythonpath='/home/djangoprojects/myproject'
~~~
Adds the given filesystem path to the Python [import search path](http://www.diveintopython.net/getting_to_know_python/everything_is_an_object.html). If this isnt provided, `django-admin` will use the `PYTHONPATH` environment variable.
Note that this option is unnecessary in `manage.py`, because it takes care of setting the Python path for you.
`--settings`
Example usage:
~~~
django-admin migrate --settings=mysite.settings
~~~
Explicitly specifies the settings module to use. The settings module should be in Python package syntax, e.g. `mysite.settings`. If this isnt provided, `django-admin` will use the `DJANGO_SETTINGS_MODULE` environment variable.
Note that this option is unnecessary in `manage.py`, because it uses `settings.py` from the current project by default.
`--traceback`
Example usage:
~~~
django-admin migrate --traceback
~~~
By default, `django-admin` will show a simple error message whenever an [`CommandError`](http://masteringdjango.com/the-django-admin-utility/#django.core.management.CommandError "django.core.management.CommandError") occurs, but a full stack trace for any other exception. If you specify `--traceback`, `django-admin` will also output a full stack trace when a `CommandError` is raised.
`--verbosity`
Example usage:
~~~
django-admin migrate --verbosity 2
~~~
Use `--verbosity` to specify the amount of notification and debug information that `django-admin` should print to the console.
* `0` means no output.
* `1` means normal output (default).
* `2` means verbose output.
* `3` means *very* verbose output.
`--no-color`
Example usage:
~~~
django-admin sqlall --no-color
~~~
By default, `django-admin` will format the output to be colorized. For example, errors will be printed to the console in red and SQL statements will be syntax highlighted. To prevent this and have a plain text output, pass the `--no-color` option when running your command.
## Common options
The following options are not available on every command, but they are common to a number of commands.
`--database`
Used to specify the database on which a command will operate. If not specified, this option will default to an alias of `default`.
For example, to dump data from the database with the alias `master`:
~~~
django-admin dumpdata --database=master
~~~
`--exclude`
Exclude a specific application from the applications whose contents is output. For example, to specifically exclude the `auth` application from the output of dumpdata, you would call:
~~~
django-admin dumpdata --exclude=auth
~~~
If you want to exclude multiple applications, use multiple `--exclude` directives:
~~~
django-admin dumpdata --exclude=auth --exclude=contenttypes
~~~
`--locale`
Use the `--locale` or `-l` option to specify the locale to process. If not provided all locales are processed.
`--noinput`
Use the `--noinput` option to suppress all user prompting, such as Are you sure? confirmation messages. This is useful if `django-admin` is being executed as an unattended, automated script.
## Extra niceties
### Syntax coloring
The `django-admin` / `manage.py` commands will use pretty color-coded output if your terminal supports ANSI-colored output. It wont use the color codes if youre piping the commands output to another program.
Under Windows, the native console doesnt support ANSI escape sequences so by default there is no color output. But you can install the [ANSICON](http://adoxa.altervista.org/ansicon/) third-party tool, the Django commands will detect its presence and will make use of its services to color output just like on Unix-based platforms.
The colors used for syntax highlighting can be customized. Django ships with three color palettes:
* `dark`, suited to terminals that show white text on a black background. This is the default palette.
* `light`, suited to terminals that show black text on a white background.
* `nocolor`, which disables syntax highlighting.
You select a palette by setting a `DJANGO_COLORS` environment variable to specify the palette you want to use. For example, to specify the `light` palette under a Unix or OS/X BASH shell, you would run the following at a command prompt:
~~~
export DJANGO_COLORS="light"
~~~
You can also customize the colors that are used. Django specifies a number of roles in which color is used:
* `error` – A major error.
* `notice` – A minor error.
* `sql_field` – The name of a model field in SQL.
* `sql_coltype` – The type of a model field in SQL.
* `sql_keyword` – An SQL keyword.
* `sql_table` – The name of a model in SQL.
* `http_info` – A 1XX HTTP Informational server response.
* `http_success` – A 2XX HTTP Success server response.
* `http_not_modified` – A 304 HTTP Not Modified server response.
* `http_redirect` – A 3XX HTTP Redirect server response other than 304.
* `http_not_found` – A 404 HTTP Not Found server response.
* `http_bad_request` – A 4XX HTTP Bad Request server response other than 404.
* `http_server_error` – A 5XX HTTP Server Error response.
Each of these roles can be assigned a specific foreground and background color, from the following list:
* `black`
* `red`
* `green`
* `yellow`
* `blue`
* `magenta`
* `cyan`
* `white`
Each of these colors can then be modified by using the following display options:
* `bold`
* `underscore`
* `blink`
* `reverse`
* `conceal`
A color specification follows one of the following patterns:
* `role=fg`
* `role=fg/bg`
* `role=fg,option,option`
* `role=fg/bg,option,option`
where `role` is the name of a valid color role, `fg` is the foreground color, `bg` is the background color and each`option` is one of the color modifying options. Multiple color specifications are then separated by semicolon. For example:
~~~
export DJANGO_COLORS="error=yellow/blue,blink;notice=magenta"
~~~
would specify that errors be displayed using blinking yellow on blue, and notices displayed using magenta. All other color roles would be left uncolored.
Colors can also be specified by extending a base palette. If you put a palette name in a color specification, all the colors implied by that palette will be loaded. So:
~~~
export DJANGO_COLORS="light;error=yellow/blue,blink;notice=magenta"
~~~
would specify the use of all the colors in the light color palette, *except* for the colors for errors and notices which would be overridden as specified.
### Bash completion
If you use the Bash shell, consider installing the Django bash completion script, which lives in`extras/django_bash_completion` in the Django distribution. It enables tab-completion of `django-admin` and`manage.py` commands, so you can, for instance…
* Type `django-admin`.
* Press [TAB] to see all available options.
* Type `sql`, then [TAB], to see all available options whose names start with `sql`.
## Running management commands from your code
`django.core.management.``call_command`(*name*, **args*, ***options*)
To call a management command from code use `call_command`.
`name`
the name of the command to call.
`*args`
a list of arguments accepted by the command.
`**options`
named options accepted on the command-line.
Examples:
~~~
from django.core import management
management.call_command('flush', verbosity=0, interactive=False)
management.call_command('loaddata', 'test_data', verbosity=0)
~~~
Note that command options that take no arguments are passed as keywords with `True` or `False`, as you can see with the `interactive` option above.
Named arguments can be passed by using either one of the following syntaxes:
~~~
# Similar to the command line
management.call_command('dumpdata', '--natural-foreign')
# Named argument similar to the command line minus the initial dashes and
# with internal dashes replaced by underscores
management.call_command('dumpdata', natural_foreign=True)
# `use_natural_foreign_keys` is the option destination variable
management.call_command('dumpdata', use_natural_foreign_keys=True)
~~~
The first syntax is now supported thanks to management commands using the `argparse` module. For the second syntax, Django previously passed the option name as-is to the command, now it is always using the `dest` variable name (which may or may not be the same as the option name).
Command options which take multiple options are passed a list:
~~~
management.call_command('dumpdata', exclude=['contenttypes', 'auth'])
~~~
## Output redirection
Note that you can redirect standard output and error streams as all commands support the `stdout` and`stderr` options. For example, you could write:
~~~
with open('/tmp/command_output') as f:
management.call_command('dumpdata', stdout=f)
~~~
## Writing custom django-admin commands
Applications can register their own actions with `manage.py`. For example, you might want to add a `manage.py`action for a Django app that youre distributing. In this document, we will be building a custom `closepoll`command for the `polls` application from the tutorial.
To do this, just add a `management/commands` directory to the application. Django will register a `manage.py`command for each Python module in that directory whose name doesnt begin with an underscore. For example:
~~~
polls/
__init__.py
models.py
management/
__init__.py
commands/
__init__.py
_private.py
closepoll.py
tests.py
views.py
~~~
On Python 2, be sure to include `__init__.py` files in both the `management` and `management/commands` directories as done above or your command will not be detected.
In this example, the `closepoll` command will be made available to any project that includes the `polls`application in `INSTALLED_APPS`.
The `_private.py` module will not be available as a management command.
The `closepoll.py` module has only one requirement it must define a class `Command` that extends [`BaseCommand`](http://masteringdjango.com/the-django-admin-utility/#django.core.management.BaseCommand "django.core.management.BaseCommand")or one of its subclasses.
Standalone scripts
Custom management commands are especially useful for running standalone scripts or for scripts that are periodically executed from the UNIX crontab or from Windows scheduled tasks control panel.
To implement the command, edit `polls/management/commands/closepoll.py` to look like this:
~~~
from django.core.management.base import BaseCommand, CommandError
from polls.models import Poll
class Command(BaseCommand):
help = 'Closes the specified poll for voting'
def add_arguments(self, parser):
parser.add_argument('poll_id', nargs='+', type=int)
def handle(self, *args, **options):
for poll_id in options['poll_id']:
try:
poll = Poll.objects.get(pk=poll_id)
except Poll.DoesNotExist:
raise CommandError('Poll "%s" does not exist' % poll_id)
poll.opened = False
poll.save()
self.stdout.write('Successfully closed poll "%s"' % poll_id)
~~~
Before Django 1.8, management commands were based on the `optparse` module, and positional arguments were passed in `*args` while optional arguments were passed in `**options`. Now that management commands use `argparse` for argument parsing, all arguments are passed in `**options` by default, unless you name your positional arguments to `args` (compatibility mode). You are encouraged to exclusively use`**options` for new commands.
Note
When you are using management commands and wish to provide console output, you should write to`self.stdout` and `self.stderr`, instead of printing to `stdout` and `stderr` directly. By using these proxies, it becomes much easier to test your custom command. Note also that you dont need to end messages with a newline character, it will be added automatically, unless you specify the `ending` parameter:
~~~
self.stdout.write("Unterminated line", ending='')
~~~
The new custom command can be called using `python manage.py closepoll <poll_id>`.
The `handle()` method takes one or more `poll_ids` and sets `poll.opened` to `False` for each one. If the user referenced any nonexistent polls, a [`CommandError`](http://masteringdjango.com/the-django-admin-utility/#django.core.management.CommandError "django.core.management.CommandError") is raised. The `poll.opened` attribute does not exist in the tutorial and was added to `polls.models.Poll` for this example.
## Accepting optional arguments
The same `closepoll` could be easily modified to delete a given poll instead of closing it by accepting additional command line options. These custom options can be added in the [`add_arguments()`](http://masteringdjango.com/the-django-admin-utility/#django.core.management.BaseCommand.add_arguments "django.core.management.BaseCommand.add_arguments") method like this:
~~~
class Command(BaseCommand):
def add_arguments(self, parser):
# Positional arguments
parser.add_argument('poll_id', nargs='+', type=int)
# Named (optional) arguments
parser.add_argument('--delete',
action='store_true',
dest='delete',
default=False,
help='Delete poll instead of closing it')
def handle(self, *args, **options):
# ...
if options['delete']:
poll.delete()
# ...
~~~
The option (`delete` in our example) is available in the options dict parameter of the handle method. See the `argparse` Python documentation for more about `add_argument` usage.
In addition to being able to add custom command line options, all management commands can accept some default options such as `--verbosity` and `--traceback`.
## Management commands and locales
By default, the [`BaseCommand.execute()`](http://masteringdjango.com/the-django-admin-utility/#django.core.management.BaseCommand.execute "django.core.management.BaseCommand.execute") method deactivates translations because some commands shipped with Django perform several tasks (for example, user-facing content rendering and database population) that require a project-neutral string language.
If, for some reason, your custom management command needs to use a fixed locale, you should manually activate and deactivate it in your [`handle()`](http://masteringdjango.com/the-django-admin-utility/#django.core.management.BaseCommand.handle "django.core.management.BaseCommand.handle") method using the functions provided by the I18N support code:
~~~
from django.core.management.base import BaseCommand, CommandError
from django.utils import translation
class Command(BaseCommand):
...
can_import_settings = True
def handle(self, *args, **options):
# Activate a fixed locale, e.g. Russian
translation.activate('ru')
# Or you can activate the LANGUAGE_CODE # chosen in the settings:
from django.conf import settings
translation.activate(settings.LANGUAGE_CODE)
# Your command logic here
...
translation.deactivate()
~~~
Another need might be that your command simply should use the locale set in settings and Django should be kept from deactivating it. You can achieve it by using the [`BaseCommand.leave_locale_alone`](http://masteringdjango.com/the-django-admin-utility/#django.core.management.BaseCommand.leave_locale_alone "django.core.management.BaseCommand.leave_locale_alone") option.
When working on the scenarios described above though, take into account that system management commands typically have to be very careful about running in non-uniform locales, so you might need to:
* Make sure the `USE_I18N` setting is always `True` when running the command (this is a good example of the potential problems stemming from a dynamic runtime environment that Django commands avoid offhand by deactivating translations).
* Review the code of your command and the code it calls for behavioral differences when locales are changed and evaluate its impact on predictable behavior of your command.
## Testing
Information on how to test custom management commands can be found in the testing docs .
## Command objects
*class *`django.core.management.``BaseCommand`
The base class from which all management commands ultimately derive.
Use this class if you want access to all of the mechanisms which parse the command-line arguments and work out what code to call in response; if you dont need to change any of that behavior, consider using one of its subclasses.
Subclassing the [`BaseCommand`](http://masteringdjango.com/the-django-admin-utility/#django.core.management.BaseCommand "django.core.management.BaseCommand") class requires that you implement the [`handle()`](http://masteringdjango.com/the-django-admin-utility/#django.core.management.BaseCommand.handle "django.core.management.BaseCommand.handle") method.
### Attributes
All attributes can be set in your derived class and can be used in [`BaseCommand`](http://masteringdjango.com/the-django-admin-utility/#django.core.management.BaseCommand "django.core.management.BaseCommand")s subclasses.
`BaseCommand.``can_import_settings`
A boolean indicating whether the command needs to be able to import Django settings; if `True`, `execute()`will verify that this is possible before proceeding. Default value is `True`.
`BaseCommand.``help`
A short description of the command, which will be printed in the help message when the user runs the command `python manage.py help <command>`.
`BaseCommand.``missing_args_message`
If your command defines mandatory positional arguments, you can customize the message error returned in the case of missing arguments. The default is output by `argparse` (too few arguments).
`BaseCommand.``output_transaction`
A boolean indicating whether the command outputs SQL statements; if `True`, the output will automatically be wrapped with `BEGIN;` and `COMMIT;`. Default value is `False`.
`BaseCommand.``requires_system_checks`
A boolean; if `True`, the entire Django project will be checked for potential problems prior to executing the command. Default value is `True`.
`BaseCommand.``leave_locale_alone`
A boolean indicating whether the locale set in settings should be preserved during the execution of the command instead of being forcibly set to en-us.
Default value is `False`.
Make sure you know what you are doing if you decide to change the value of this option in your custom command if it creates database content that is locale-sensitive and such content shouldnt contain any translations (like it happens e.g. with django.contrib.auth permissions) as making the locale differ from the de facto default en-us might cause unintended effects. Seethe [Management commands and locales](http://masteringdjango.com/the-django-admin-utility/#id2)section above for further details.
This option cant be `False` when the [`can_import_settings`](http://masteringdjango.com/the-django-admin-utility/#django.core.management.BaseCommand.can_import_settings "django.core.management.BaseCommand.can_import_settings") option is set to `False` too because attempting to set the locale needs access to settings. This condition will generate a [`CommandError`](http://masteringdjango.com/the-django-admin-utility/#django.core.management.CommandError "django.core.management.CommandError").
### Methods
[`BaseCommand`](http://masteringdjango.com/the-django-admin-utility/#django.core.management.BaseCommand "django.core.management.BaseCommand") has a few methods that can be overridden but only the [`handle()`](http://masteringdjango.com/the-django-admin-utility/#django.core.management.BaseCommand.handle "django.core.management.BaseCommand.handle") method must be implemented.
Implementing a constructor in a subclass
If you implement `__init__` in your subclass of [`BaseCommand`](http://masteringdjango.com/the-django-admin-utility/#django.core.management.BaseCommand "django.core.management.BaseCommand"), you must call [`BaseCommand`](http://masteringdjango.com/the-django-admin-utility/#django.core.management.BaseCommand "django.core.management.BaseCommand")s `__init__`:
~~~
class Command(BaseCommand):
def __init__(self, \*args, \*\*kwargs):
super(Command, self).__init__(\*args, \*\*kwargs)
# ...
~~~
`BaseCommand.``add_arguments`(*parser*)
Entry point to add parser arguments to handle command line arguments passed to the command. Custom commands should override this method to add both positional and optional arguments accepted by the command. Calling `super()` is not needed when directly subclassing `BaseCommand`.
`BaseCommand.``get_version`()
Returns the Django version, which should be correct for all built-in Django commands. User-supplied commands can override this method to return their own version.
`BaseCommand.``execute`(**args*, ***options*)
Tries to execute this command, performing system checks if needed (as controlled by the[`requires_system_checks`](http://masteringdjango.com/the-django-admin-utility/#django.core.management.BaseCommand.requires_system_checks "django.core.management.BaseCommand.requires_system_checks") attribute). If the command raises a [`CommandError`](http://masteringdjango.com/the-django-admin-utility/#django.core.management.CommandError "django.core.management.CommandError"), its intercepted and printed to stderr.
Calling a management command in your code
`execute()` should not be called directly from your code to execute a command. Use call_command instead.
`BaseCommand.``handle`(**args*, ***options*)
The actual logic of the command. Subclasses must implement this method.
`BaseCommand.``check`(*app_configs=None*, *tags=None*, *display_num_errors=False*)
Uses the system check framework to inspect the entire Django project for potential problems. Serious problems are raised as a [`CommandError`](http://masteringdjango.com/the-django-admin-utility/#django.core.management.CommandError "django.core.management.CommandError"); warnings are output to stderr; minor notifications are output to stdout.
If `app_configs` and `tags` are both `None`, all system checks are performed. `tags` can be a list of check tags, like`compatibility` or `models`.
### BaseCommand subclasses
*class *`django.core.management.``AppCommand`
A management command which takes one or more installed application labels as arguments, and does something with each of them.
Rather than implementing [`handle()`](http://masteringdjango.com/the-django-admin-utility/#django.core.management.BaseCommand.handle "django.core.management.BaseCommand.handle"), subclasses must implement [`handle_app_config()`](http://masteringdjango.com/the-django-admin-utility/#django.core.management.AppCommand.handle_app_config "django.core.management.AppCommand.handle_app_config"), which will be called once for each application.
`AppCommand.``handle_app_config`(*app_config*, ***options*)
Perform the commands actions for `app_config`, which will be an `AppConfig` instance corresponding to an application label given on the command line.
*class *`django.core.management.``LabelCommand`
A management command which takes one or more arbitrary arguments (labels) on the command line, and does something with each of them.
Rather than implementing [`handle()`](http://masteringdjango.com/the-django-admin-utility/#django.core.management.BaseCommand.handle "django.core.management.BaseCommand.handle"), subclasses must implement [`handle_label()`](http://masteringdjango.com/the-django-admin-utility/#django.core.management.LabelCommand.handle_label "django.core.management.LabelCommand.handle_label"), which will be called once for each label.
`LabelCommand.``handle_label`(*label*, ***options*)
Perform the commands actions for `label`, which will be the string as given on the command line.
A command which takes no arguments on the command line.
Rather than implementing [`handle()`](http://masteringdjango.com/the-django-admin-utility/#django.core.management.BaseCommand.handle "django.core.management.BaseCommand.handle"), subclasses must implement [`handle_noargs()`](http://masteringdjango.com/the-django-admin-utility/#django.core.management.NoArgsCommand.handle_noargs "django.core.management.NoArgsCommand.handle_noargs"); [`handle()`](http://masteringdjango.com/the-django-admin-utility/#django.core.management.BaseCommand.handle "django.core.management.BaseCommand.handle") itself is overridden to ensure no arguments are passed to the command.
`NoArgsCommand.``handle_noargs`(***options*)
Perform this commands actions
### Command exceptions
*class *`django.core.management.``CommandError`
Exception class indicating a problem while executing a management command.
If this exception is raised during the execution of a management command from a command line console, it will be caught and turned into a nicely-printed error message to the appropriate output stream (i.e., stderr); as a result, raising this exception (with a sensible description of the error) is the preferred way to indicate that something has gone wrong in the execution of a command.
If a management command is called from code through call_command , its up to you to catch the exception when needed.
Appendix E: Built-in Template Tags and Filters
最后更新于:2022-04-01 04:48:37
Chapter 4 lists a number of the most useful built-in template tags and filters. However, Django ships with many more built-in tags and filters. This appendix covers them.
[TOC=3]
## Built-in Tag Reference
### autoescape
Controls the current auto-escaping behavior. This tag takes either `on` or `off` as an argument and that determines whether auto-escaping is in effect inside the block. The block is closed with an `endautoescape`ending tag.
When auto-escaping is in effect, all variable content has HTML escaping applied to it before placing the result into the output (but after any filters have been applied). This is equivalent to manually applying the `escape` filter to each variable.
The only exceptions are variables that are already marked as safe from escaping, either by the code that populated the variable, or because it has had the `safe` or `escape` filters applied.
Sample usage:
~~~
{% autoescape on %}
{{ body }}
{% endautoescape %}
~~~
### block
Defines a block that can be overridden by child templates. See Template inheritance for more information.
### comment
Ignores everything between `{% comment %}` and `{% endcomment %}`. An optional note may be inserted in the first tag. For example, this is useful when commenting out code for documenting why the code was disabled.
Sample usage:
~~~
<p>Rendered text with {{ pub_date|date:"c" }}</p>
{% comment "Optional note" %}
<p>Commented out text with {{ create_date|date:"c" }}</p>
{% endcomment %}
~~~
`comment` tags cannot be nested.
### csrf_token
This tag is used for CSRF protection, as described in the documentation for Cross Site Request Forgeries .
### cycle
Produces one of its arguments each time this tag is encountered. The first argument is produced on the first encounter, the second argument on the second encounter, and so forth. Once all arguments are exhausted, the tag cycles to the first argument and produces it again.
This tag is particularly useful in a loop:
~~~
{% for o in some_list %}
<tr class="{% cycle 'row1' 'row2' %}">
...
</tr>
{% endfor %}
~~~
The first iteration produces HTML that refers to class `row1`, the second to `row2`, the third to `row1` again, and so on for each iteration of the loop.
You can use variables, too. For example, if you have two template variables, `rowvalue1` and `rowvalue2`, you can alternate between their values like this:
~~~
{% for o in some_list %}
<tr class="{% cycle rowvalue1 rowvalue2 %}">
...
</tr>
{% endfor %}
~~~
Variables included in the cycle will be escaped. You can disable auto-escaping with:
~~~
{% for o in some_list %}
<tr class="{% autoescape off %}{% cycle rowvalue1 rowvalue2 %}{% endautoescape %}">
...
</tr>
{% endfor %}
~~~
You can mix variables and strings:
~~~
{% for o in some_list %}
<tr class="{% cycle 'row1' rowvalue2 'row3' %}">
...
</tr>
{% endfor %}
~~~
In some cases you might want to refer to the current value of a cycle without advancing to the next value. To do this, just give the `{% cycle %}` tag a name, using as, like this:
~~~
{% cycle 'row1' 'row2' as rowcolors %}
~~~
From then on, you can insert the current value of the cycle wherever youd like in your template by referencing the cycle name as a context variable. If you want to move the cycle to the next value independently of the original `cycle` tag, you can use another `cycle` tag and specify the name of the variable. So, the following template:
~~~
<tr>
<td class="{% cycle 'row1' 'row2' as rowcolors %}">...</td>
<td class="{{ rowcolors }}">...</td>
</tr>
<tr>
<td class="{% cycle rowcolors %}">...</td>
<td class="{{ rowcolors }}">...</td>
</tr>
~~~
would output:
~~~
<tr>
<td class="row1">...</td>
<td class="row1">...</td>
</tr>
<tr>
<td class="row2">...</td>
<td class="row2">...</td>
</tr>
~~~
You can use any number of values in a `cycle` tag, separated by spaces. Values enclosed in single quotes (`'`) or double quotes (`"`) are treated as string literals, while values without quotes are treated as template variables.
By default, when you use the `as` keyword with the cycle tag, the usage of `{% cycle %}` that initiates the cycle will itself produce the first value in the cycle. This could be a problem if you want to use the value in a nested loop or an included template. If you only want to declare the cycle but not produce the first value, you can add a `silent` keyword as the last keyword in the tag. For example:
~~~
{% for obj in some_list %}
{% cycle 'row1' 'row2' as rowcolors silent %}
<tr class="{{ rowcolors }}">{% include "subtemplate.html" %}</tr>
{% endfor %}
~~~
This will output a list of `<tr>` elements with `class` alternating between `row1` and `row2`. The subtemplate will have access to `rowcolors` in its context and the value will match the class of the `<tr>` that encloses it. If the`silent` keyword were to be omitted, `row1` and `row2` would be emitted as normal text, outside the `<tr>`element.
When the silent keyword is used on a cycle definition, the silence automatically applies to all subsequent uses of that specific cycle tag. The following template would output *nothing*, even though the second call to `{% cycle %}` doesnt specify `silent`:
~~~
{% cycle 'row1' 'row2' as rowcolors silent %}
{% cycle rowcolors %}
~~~
For backward compatibility, the `{% cycle %}` tag supports the much inferior old syntax from previous Django versions. You shouldnt use this in any new projects, but for the sake of the people who are still using it, heres what it looks like:
~~~
{% cycle row1,row2,row3 %}
~~~
In this syntax, each value gets interpreted as a literal string, and theres no way to specify variable values. Or literal commas. Or spaces. Did we mention you shouldnt use this syntax in any new projects?
### debug
Outputs a whole load of debugging information, including the current context and imported modules.
### extends
Signals that this template extends a parent template.
This tag can be used in two ways:
* `{% extends "base.html" %}` (with quotes) uses the literal value `"base.html"` as the name of the parent template to extend.
* `{% extends variable %}` uses the value of `variable`. If the variable evaluates to a string, Django will use that string as the name of the parent template. If the variable evaluates to a `Template` object, Django will use that object as the parent template.
See template-inheritance for more information.
### filter
Filters the contents of the block through one or more filters. Multiple filters can be specified with pipes and filters can have arguments, just as in variable syntax.
Note that the block includes *all* the text between the `filter` and `endfilter` tags.
Sample usage:
~~~
{% filter force_escape|lower %}
This text will be HTML-escaped, and will appear in all lowercase.
{% endfilter %}
~~~
Note
The `escape` and `safe` filters are not acceptable arguments. Instead, use the `autoescape` tag to manage autoescaping for blocks of template code.
### firstof
Outputs the first argument variable that is not `False`. Outputs nothing if all the passed variables are `False`.
Sample usage:
~~~
{% firstof var1 var2 var3 %}
~~~
This is equivalent to:
~~~
{% if var1 %}
{{ var1 }}
{% elif var2 %}
{{ var2 }}
{% elif var3 %}
{{ var3 }}
{% endif %}
~~~
You can also use a literal string as a fallback value in case all passed variables are False:
~~~
{% firstof var1 var2 var3 "fallback value" %}
~~~
This tag auto-escapes variable values. You can disable auto-escaping with:
~~~
{% autoescape off %}
{% firstof var1 var2 var3 "<strong>fallback value</strong>" %}
{% endautoescape %}
~~~
Or if only some variables should be escaped, you can use:
~~~
{% firstof var1 var2|safe var3 "<strong>fallback value</strong>"|safe %}
~~~
### for
Loops over each item in an array, making the item available in a context variable. For example, to display a list of athletes provided in `athlete_list`:
~~~
<ul>
{% for athlete in athlete_list %}
<li>{{ athlete.name }}</li>
{% endfor %}
</ul>
~~~
You can loop over a list in reverse by using `{% for obj in list reversed %}`.
If you need to loop over a list of lists, you can unpack the values in each sublist into individual variables. For example, if your context contains a list of (x,y) coordinates called `points`, you could use the following to output the list of points:
~~~
{% for x, y in points %}
There is a point at {{ x }},{{ y }}
{% endfor %}
~~~
This can also be useful if you need to access the items in a dictionary. For example, if your context contained a dictionary `data`, the following would display the keys and values of the dictionary:
~~~
{% for key, value in data.items %}
{{ key }}: {{ value }}
{% endfor %}
~~~
The for loop sets a number of variables available within the loop:
| Variable | Description |
| --- | --- |
| `forloop.counter` | The current iteration of the loop (1-indexed) |
| `forloop.counter0` | The current iteration of the loop (0-indexed) |
| `forloop.revcounter` | The number of iterations from the end of the loop (1-indexed) |
| `forloop.revcounter0` | The number of iterations from the end of the loop (0-indexed) |
| `forloop.first` | True if this is the first time through the loop |
| `forloop.last` | True if this is the last time through the loop |
| `forloop.parentloop` | For nested loops, this is the loop surrounding the current one |
### for … empty
The `for` tag can take an optional `{% empty %}` clause whose text is displayed if the given array is empty or could not be found:
~~~
<ul>
{% for athlete in athlete_list %}
<li>{{ athlete.name }}</li>
{% empty %}
<li>Sorry, no athletes in this list.</li>
{% endfor %}
</ul>
~~~
The above is equivalent to but shorter, cleaner, and possibly faster than the following:
~~~
<ul>
{% if athlete_list %}
{% for athlete in athlete_list %}
<li>{{ athlete.name }}</li>
{% endfor %}
{% else %}
<li>Sorry, no athletes in this list.</li>
{% endif %}
</ul>
~~~
### if
The `{% if %}` tag evaluates a variable, and if that variable is true (i.e. exists, is not empty, and is not a false boolean value) the contents of the block are output:
~~~
{% if athlete_list %}
Number of athletes: {{ athlete_list|length }}
{% elif athlete_in_locker_room_list %}
Athletes should be out of the locker room soon!
{% else %}
No athletes.
{% endif %}
~~~
In the above, if `athlete_list` is not empty, the number of athletes will be displayed by the `{{athlete_list|length }}` variable.
As you can see, the `if` tag may take one or several `{% elif %}` clauses, as well as an `{% else %}` clause that will be displayed if all previous conditions fail. These clauses are optional.
### Boolean operators
`if` tags may use `and`, `or` or `not` to test a number of variables or to negate a given variable:
~~~
{% if athlete_list and coach_list %}
Both athletes and coaches are available.
{% endif %}
{% if not athlete_list %}
There are no athletes.
{% endif %}
{% if athlete_list or coach_list %}
There are some athletes or some coaches.
{% endif %}
{% if not athlete_list or coach_list %}
There are no athletes or there are some coaches.
{% endif %}
{% if athlete_list and not coach_list %}
There are some athletes and absolutely no coaches.
{% endif %}
~~~
Use of both `and` and `or` clauses within the same tag is allowed, with `and` having higher precedence than `or`e.g.:
~~~
{% if athlete_list and coach_list or cheerleader_list %}
~~~
will be interpreted like:
~~~
if (athlete_list and coach_list) or cheerleader_list
~~~
Use of actual parentheses in the `if` tag is invalid syntax. If you need them to indicate precedence, you should use nested `if` tags.
`if` tags may also use the operators `==`, `!=`, `<`, `>`, `<=`, `>=` and `in` which work as follows:
### `==` operator
Equality. Example:
~~~
{% if somevar == "x" %}
This appears if variable somevar equals the string "x"
{% endif %}
~~~
### `!=` operator
Inequality. Example:
~~~
{% if somevar != "x" %}
This appears if variable somevar does not equal the string "x",
or if somevar is not found in the context
{% endif %}
~~~
### `<` operator
Less than. Example:
~~~
{% if somevar < 100 %}
This appears if variable somevar is less than 100.
{% endif %}
~~~
### `>` operator
Greater than. Example:
~~~
{% if somevar > 0 %}
This appears if variable somevar is greater than 0.
{% endif %}
~~~
### `<=` operator
Less than or equal to. Example:
~~~
{% if somevar <= 100 %}
This appears if variable somevar is less than 100 or equal to 100.
{% endif %}
~~~
### `>=` operator
Greater than or equal to. Example:
~~~
{% if somevar >= 1 %}
This appears if variable somevar is greater than 1 or equal to 1.
{% endif %}
~~~
### `in` operator
Contained within. This operator is supported by many Python containers to test whether the given value is in the container. The following are some examples of how `x in y` will be interpreted:
~~~
{% if "bc" in "abcdef" %}
This appears since "bc" is a substring of "abcdef"
{% endif %}
{% if "hello" in greetings %}
If greetings is a list or set, one element of which is the string
"hello", this will appear.
{% endif %}
{% if user in users %}
If users is a QuerySet, this will appear if user is an
instance that belongs to the QuerySet.
{% endif %}
~~~
### `not in` operator
Not contained within. This is the negation of the `in` operator.
The comparison operators cannot be chained like in Python or in mathematical notation. For example, instead of using:
~~~
{% if a > b > c %} (WRONG)
~~~
you should use:
~~~
{% if a > b and b > c %}
~~~
### Filters
You can also use filters in the `if` expression. For example:
~~~
{% if messages|length >= 100 %}
You have lots of messages today!
{% endif %}
~~~
### Complex expressions
All of the above can be combined to form complex expressions. For such expressions, it can be important to know how the operators are grouped when the expression is evaluated – that is, the precedence rules. The precedence of the operators, from lowest to highest, is as follows:
* `or`
* `and`
* `not`
* `in`
* `==`, `!=`, `<`, `>`, `<=`, `>=`
(This follows Python exactly). So, for example, the following complex `if` tag:
~~~
{% if a == b or c == d and e %}
~~~
…will be interpreted as:
~~~
(a == b) or ((c == d) and e)
~~~
If you need different precedence, you will need to use nested `if` tags. Sometimes that is better for clarity anyway, for the sake of those who do not know the precedence rules.
### ifchanged
Check if a value has changed from the last iteration of a loop.
The `{% ifchanged %}` block tag is used within a loop. It has two possible uses.
1. Checks its own rendered contents against its previous state and only displays the content if it has changed. For example, this displays a list of days, only displaying the month if it changes:
~~~
<h1>Archive for {{ year }}</h1>
{% for date in days %}
{% ifchanged %}<h3>{{ date|date:"F" }}</h3>{% endifchanged %}
<a href="{{ date|date:"M/d"|lower }}/">{{ date|date:"j" }}</a>
{% endfor %}
~~~
2. If given one or more variables, check whether any variable has changed. For example, the following shows the date every time it changes, while showing the hour if either the hour or the date has changed:
~~~
{% for date in days %}
{% ifchanged date.date %} {{ date.date }} {% endifchanged %}
{% ifchanged date.hour date.date %}
{{ date.hour }}
{% endifchanged %}
{% endfor %}
~~~
The `ifchanged` tag can also take an optional `{% else %}` clause that will be displayed if the value has not changed:
~~~
{% for match in matches %}
<div style="background-color:
{% ifchanged match.ballot_id %}
{% cycle "red" "blue" %}
{% else %}
gray
{% endifchanged %}
">{{ match }}</div>
{% endfor %}
~~~
### ifequal
Output the contents of the block if the two arguments equal each other.
Example:
~~~
{% ifequal user.pk comment.user_id %}
...
{% endifequal %}
~~~
As in the `if` tag, an `{% else %}` clause is optional.
The arguments can be hard-coded strings, so the following is valid:
~~~
{% ifequal user.username "adrian" %}
...
{% endifequal %}
~~~
An alternative to the `ifequal` tag is to use the `if` tag and the `==` operator.
### ifnotequal
Just like `ifequal`, except it tests that the two arguments are not equal.
An alternative to the `ifnotequal` tag is to use the `if` tag and the `!=` operator.
### include
Loads a template and renders it with the current context. This is a way of including other templates within a template.
The template name can either be a variable or a hard-coded (quoted) string, in either single or double quotes.
This example includes the contents of the template `"foo/bar.html"`:
~~~
{% include "foo/bar.html" %}
~~~
This example includes the contents of the template whose name is contained in the variable`template_name`:
~~~
{% include template_name %}
~~~
The variable may also be any object with a `render()` method that accepts a context. This allows you to reference a compiled `Template` in your context.
An included template is rendered within the context of the template that includes it. This example produces the output `"Hello, John"`:
* Context: variable `person` is set to `"john"`.
* Template:
~~~
{% include "name_snippet.html" %}
~~~
* The `name_snippet.html` template:
~~~
{{ greeting }}, {{ person|default:"friend" }}!
~~~
You can pass additional context to the template using keyword arguments:
~~~
{% include "name_snippet.html" with person="Jane" greeting="Hello" %}
~~~
If you want to render the context only with the variables provided (or even no variables at all), use the`only` option. No other variables are available to the included template:
~~~
{% include "name_snippet.html" with greeting="Hi" only %}
~~~
Note
The `include` tag should be considered as an implementation of render this subtemplate and include the HTML, not as parse this subtemplate and include its contents as if it were part of the parent. This means that there is no shared state between included templates each include is a completely independent rendering process.
Blocks are evaluated *before* they are included. This means that a template that includes blocks from another will contain blocks that have *already been evaluated and rendered* – not blocks that can be overridden by, for example, an extending template.
### load
Loads a custom template tag set.
For example, the following template would load all the tags and filters registered in `somelibrary` and`otherlibrary` located in package `package`:
~~~
{% load somelibrary package.otherlibrary %}
~~~
You can also selectively load individual filters or tags from a library, using the `from` argument. In this example, the template tags/filters named `foo` and `bar` will be loaded from `somelibrary`:
~~~
{% load foo bar from somelibrary %}
~~~
See Custom tag and filter libraries for more information.
### lorem
Displays random lorem ipsum Latin text. This is useful for providing sample data in templates.
Usage:
~~~
{% lorem [count] [method] [random] %}
~~~
The `{% lorem %}` tag can be used with zero, one, two or three arguments. The arguments are:
| Argument | Description |
| --- | --- |
| `count` | A number (or variable) containing the number of paragraphs or words to generate (default is 1). |
| `method` | Either `w` for words, `p` for HTML paragraphs or `b` for plain-text paragraph blocks (default is`b`). |
| `random` | The word `random`, which if given, does not use the common paragraph (Lorem ipsum dolor sit amet…) when generating text. |
Examples:
* `{% lorem %}` will output the common lorem ipsum paragraph.
* `{% lorem 3 p %}` will output the common lorem ipsum paragraph and two random paragraphs each wrapped in HTML `<p>` tags.
* `{% lorem 2 w random %}` will output two random Latin words.
### now
Displays the current date and/or time, using a format according to the given string. Such string can contain format specifiers characters as described in the `date` filter section.
Example:
~~~
It is {% now "jS F Y H:i" %}
~~~
Note that you can backslash-escape a format string if you want to use the raw value. In this example, both o and f are backslash-escaped, because otherwise each is a format string that displays the year and the time, respectively:
~~~
It is the {% now "jS \o\f F" %}
~~~
This would display as It is the 4th of September.
Note
The format passed can also be one of the predefined ones `DATE_FORMAT`, `DATETIME_FORMAT`, `SHORT_DATE_FORMAT` or`SHORT_DATETIME_FORMAT`. The predefined formats may vary depending on the current locale and if format-localization is enabled, e.g.:
~~~
It is {% now "SHORT_DATETIME_FORMAT" %}
~~~
You can also use the syntax `{% now "Y" as current_year %}` to store the output inside a variable. This is useful if you want to use `{% now %}` inside a template tag like `blocktrans` for example:
~~~
{% now "Y" as current_year %}
{% blocktrans %}Copyright {{ current_year }}{% endblocktrans %}
~~~
### regroup
Regroups a list of alike objects by a common attribute.
This complex tag is best illustrated by way of an example: say that places is a list of cities represented by dictionaries containing `"name"`, `"population"`, and `"country"` keys:
~~~
cities = [
{'name': 'Mumbai', 'population': '19,000,000', 'country': 'India'},
{'name': 'Calcutta', 'population': '15,000,000', 'country': 'India'},
{'name': 'New York', 'population': '20,000,000', 'country': 'USA'},
{'name': 'Chicago', 'population': '7,000,000', 'country': 'USA'},
{'name': 'Tokyo', 'population': '33,000,000', 'country': 'Japan'},
]
~~~
…and youd like to display a hierarchical list that is ordered by country, like this:
* India
* Mumbai: 19,000,000
* Calcutta: 15,000,000
* USA
* New York: 20,000,000
* Chicago: 7,000,000
* Japan
* Tokyo: 33,000,000
You can use the `{% regroup %}` tag to group the list of cities by country. The following snippet of template code would accomplish this:
~~~
{% regroup cities by country as country_list %}
<ul>
{% for country in country_list %}
<li>{{ country.grouper }}
<ul>
{% for item in country.list %}
<li>{{ item.name }}: {{ item.population }}</li>
{% endfor %}
</ul>
</li>
{% endfor %}
</ul>
~~~
Lets walk through this example. `{% regroup %}` takes three arguments: the list you want to regroup, the attribute to group by, and the name of the resulting list. Here, were regrouping the `cities` list by the`country` attribute and calling the result `country_list`.
`{% regroup %}` produces a list (in this case, `country_list`) of group objects. Each group object has two attributes:
* `grouper` the item that was grouped by (e.g., the string India or Japan).
* `list` a list of all items in this group (e.g., a list of all cities with country=India).
Note that `{% regroup %}` does not order its input! Our example relies on the fact that the `cities` list was ordered by `country` in the first place. If the `cities` list did *not* order its members by `country`, the regrouping would naively display more than one group for a single country. For example, say the `cities` list was set to this (note that the countries are not grouped together):
~~~
cities = [
{'name': 'Mumbai', 'population': '19,000,000', 'country': 'India'},
{'name': 'New York', 'population': '20,000,000', 'country': 'USA'},
{'name': 'Calcutta', 'population': '15,000,000', 'country': 'India'},
{'name': 'Chicago', 'population': '7,000,000', 'country': 'USA'},
{'name': 'Tokyo', 'population': '33,000,000', 'country': 'Japan'},
]
~~~
With this input for `cities`, the example `{% regroup %}` template code above would result in the following output:
* India
* Mumbai: 19,000,000
* USA
* New York: 20,000,000
* India
* Calcutta: 15,000,000
* USA
* Chicago: 7,000,000
* Japan
* Tokyo: 33,000,000
The easiest solution to this gotcha is to make sure in your view code that the data is ordered according to how you want to display it.
Another solution is to sort the data in the template using the `dictsort` filter, if your data is in a list of dictionaries:
~~~
{% regroup cities|dictsort:"country" by country as country_list %}
~~~
### Grouping on other properties
Any valid template lookup is a legal grouping attribute for the regroup tag, including methods, attributes, dictionary keys and list items. For example, if the country field is a foreign key to a class with an attribute description, you could use:
~~~
{% regroup cities by country.description as country_list %}
~~~
Or, if `country` is a field with `choices`, it will have a `get_FOO_display()` method available as an attribute, allowing you to group on the display string rather than the `choices` key:
~~~
{% regroup cities by get_country_display as country_list %}
~~~
`{{ country.grouper }}` will now display the value fields from the `choices` set rather than the keys.
### spaceless
Removes whitespace between HTML tags. This includes tab characters and newlines.
Example usage:
~~~
{% spaceless %}
<p>
<a href="foo/">Foo</a>
</p>
{% endspaceless %}
~~~
This example would return this HTML:
~~~
<p><a href="foo/">Foo</a></p>
~~~
Only space between *tags* is removed not space between tags and text. In this example, the space around`Hello` wont be stripped:
~~~
{% spaceless %}
<strong>
Hello
</strong>
{% endspaceless %}
~~~
### templatetag
Outputs one of the syntax characters used to compose template tags.
Since the template system has no concept of escaping, to display one of the bits used in template tags, you must use the `{% templatetag %}` tag.
The argument tells which template bit to output:
| Argument | Outputs |
| --- | --- |
| `openblock` | `{%` |
| `closeblock` | `%}` |
| `openvariable` | `{{` |
| `closevariable` | `}}` |
| `openbrace` | `{` |
| `closebrace` | `}` |
| `opencomment` | `{#` |
| `closecomment` | `#}` |
Sample usage:
~~~
{% templatetag openblock %} url 'entry_list' {% templatetag closeblock %}
~~~
### url
Returns an absolute path reference (a URL without the domain name) matching a given view function and optional parameters. Any special characters in the resulting path will be encoded using `iri_to_uri()`.
This is a way to output links without violating the DRY principle by having to hard-code URLs in your templates:
~~~
{% url 'some-url-name' v1 v2 %}
~~~
The first argument is a path to a view function in the format `package.package.module.function`. It can be a quoted literal or any other context variable. Additional arguments are optional and should be space-separated values that will be used as arguments in the URL. The example above shows passing positional arguments. Alternatively you may use keyword syntax:
~~~
{% url 'some-url-name' arg1=v1 arg2=v2 %}
~~~
Do not mix both positional and keyword syntax in a single call. All arguments required by the URLconf should be present.
For example, suppose you have a view, `app_views.client`, whose URLconf takes a client ID (here, `client()` is a method inside the views file `app_views.py`). The URLconf line might look like this:
~~~
('^client/([0-9]+)/$', 'app_views.client', name='app-views-client')
~~~
If this apps URLconf is included into the projects URLconf under a path such as this:
~~~
('^clients/', include('project_name.app_name.urls'))
~~~
…then, in a template, you can create a link to this view like this:
~~~
{% url 'app-views-client' client.id %}
~~~
The template tag will output the string `/clients/client/123/`.
If youre using named URL patterns , you can refer to the name of the pattern in the `url` tag instead of using the path to the view.
Note that if the URL youre reversing doesnt exist, youll get an `NoReverseMatch` exception raised, which will cause your site to display an error page.
If youd like to retrieve a URL without displaying it, you can use a slightly different call:
~~~
{% url 'some-url-name' arg arg2 as the_url %}
<a href="{{ the_url }}">I'm linking to {{ the_url }}</a>
~~~
The scope of the variable created by the `as var` syntax is the `{% block %}` in which the `{% url %}` tag appears.
This `{% url ... as var %}` syntax will *not* cause an error if the view is missing. In practice youll use this to link to views that are optional:
~~~
{% url 'some-url-name' as the_url %}
{% if the_url %}
<a href="{{ the_url }}">Link to optional stuff</a>
{% endif %}
~~~
If youd like to retrieve a namespaced URL, specify the fully qualified name:
~~~
{% url 'myapp:view-name' %}
~~~
This will follow the normal namespaced URL resolution strategy , including using any hints provided by the context as to the current application.
Deprecated since version 1.8: The dotted Python path syntax is deprecated and will be removed in Django 2.0:
~~~
{% url 'path.to.some_view' v1 v2 %}
~~~
Warning
Dont forget to put quotes around the function path or pattern name, otherwise the value will be interpreted as a context variable!
### verbatim
Stops the template engine from rendering the contents of this block tag.
A common use is to allow a Javascript template layer that collides with Djangos syntax. For example:
~~~
{% verbatim %}
{{if dying}}Still alive.{{/if}}
{% endverbatim %}
~~~
You can also designate a specific closing tag, allowing the use of `{% endverbatim %}` as part of the unrendered contents:
~~~
{% verbatim myblock %}
Avoid template rendering via the {% verbatim %}{% endverbatim %} block.
{% endverbatim myblock %}
~~~
### widthratio
For creating bar charts and such, this tag calculates the ratio of a given value to a maximum value, and then applies that ratio to a constant.
For example:
~~~
<img src="bar.png" alt="Bar"
height="10" width="{% widthratio this_value max_value max_width %}" />
~~~
If `this_value` is 175, `max_value` is 200, and `max_width` is 100, the image in the above example will be 88 pixels wide (because 175/200 = .875; .875 * 100 = 87.5 which is rounded up to 88).
In some cases you might want to capture the result of `widthratio` in a variable. It can be useful, for instance, in a `blocktrans` like this:
~~~
{% widthratio this_value max_value max_width as width %}
{% blocktrans %}The width is: {{ width }}{% endblocktrans %}
~~~
### with
Caches a complex variable under a simpler name. This is useful when accessing an expensive method (e.g., one that hits the database) multiple times.
For example:
~~~
{% with total=business.employees.count %}
{{ total }} employee{{ total|pluralize }}
{% endwith %}
~~~
The populated variable (in the example above, `total`) is only available between the `{% with %}` and `{%endwith %}` tags.
You can assign more than one context variable:
~~~
{% with alpha=1 beta=2 %}
...
{% endwith %}
~~~
Note
The previous more verbose format is still supported: `{% with business.employees.count as total %}`
### Built-in filter reference
### add
Adds the argument to the value.
For example:
~~~
{{ value|add:"2" }}
~~~
If `value` is `4`, then the output will be `6`.
This filter will first try to coerce both values to integers. If this fails, itll attempt to add the values together anyway. This will work on some data types (strings, list, etc.) and fail on others. If it fails, the result will be an empty string.
For example, if we have:
~~~
{{ first|add:second }}
~~~
and `first` is `[1, 2, 3]` and `second` is `[4, 5, 6]`, then the output will be `[1, 2, 3, 4, 5, 6]`.
Warning
Strings that can be coerced to integers will be summed, not concatenated, as in the first example above.
### addslashes
Adds slashes before quotes. Useful for escaping strings in CSV, for example.
For example:
~~~
{{ value|addslashes }}
~~~
If `value` is `"I'm using Django"`, the output will be `"I\'m using Django"`.
### capfirst
Capitalizes the first character of the value. If the first character is not a letter, this filter has no effect.
For example:
~~~
{{ value|capfirst }}
~~~
If `value` is `"django"`, the output will be `"Django"`.
### center
Centers the value in a field of a given width.
For example:
~~~
"{{ value|center:"15" }}"
~~~
If `value` is `"Django"`, the output will be `" Django "`.
### cut
Removes all values of arg from the given string.
For example:
~~~
{{ value|cut:" " }}
~~~
If `value` is `"String with spaces"`, the output will be `"Stringwithspaces"`.
### date
Formats a date according to the given format.
Uses a similar format as PHPs `date()` function ([http://php.net/date](http://php.net/date)) with some differences.
Note
These format characters are not used in Django outside of templates. They were designed to be compatible with PHP to ease transitioning for designers.
Available format strings:
| Format character | Description | Example output |
| --- | --- | --- |
| a | `'a.m.'` or `'p.m.'` (Note that this is slightly different than PHPs output, because this includes periods to match Associated Press style.) | `'a.m.'` |
| A | `'AM'` or `'PM'`. | `'AM'` |
| b | Month, textual, 3 letters, lowercase. | `'jan'` |
| B | Not implemented. | |
| c | ISO 8601 format. (Note: unlike others formatters, such as Z, O or r, the c formatter will not add timezone offset if value is a naive datetime (see`datetime.tzinfo`). | `2008-01-02T10:30:00.000123+02:00`, or `2008-01-02T10:30:00.000123` if the datetime is naive |
| d | Day of the month, 2 digits with leading zeros. | `'01'` to `'31'` |
| D | Day of the week, textual, 3 letters. | `'Fri'` |
| e | Timezone name. Could be in any format, or might return an empty string, depending on the datetime. | `''`, `'GMT'`, `'-500'`, `'US/Eastern'`, etc. |
| E | Month, locale specific alternative representation usually used for long date representation. | `'listopada'` (for Polish locale, as opposed to `'Listopad'`) |
| f | Time, in 12-hour hours and minutes, with minutes left off if theyre zero. Proprietary extension. | `'1'`, `'1:30'` |
| F | Month, textual, long. | `'January'` |
| g | Hour, 12-hour format without leading zeros. | `'1'` to `'12'` |
| G | Hour, 24-hour format without leading zeros. | `'0'` to `'23'` |
| h | Hour, 12-hour format. | `'01'` to `'12'` |
| H | Hour, 24-hour format. | `'00'` to `'23'` |
| i | Minutes. | `'00'` to `'59'` |
| I | Daylight Savings Time, whether its in effect or not. | `'1'` or `'0'` |
| j | Day of the month without leading zeros. | `'1'` to `'31'` |
| l | Day of the week, textual, long. | `'Friday'` |
| L | Boolean for whether its a leap year. | `True` or `False` |
| m | Month, 2 digits with leading zeros. | `'01'` to `'12'` |
| M | Month, textual, 3 letters. | `'Jan'` |
| n | Month without leading zeros. | `'1'` to `'12'` |
| N | Month abbreviation in Associated Press style. Proprietary extension. | `'Jan.'`, `'Feb.'`, `'March'`, `'May'` |
| o | ISO-8601 week-numbering year, corresponding to the ISO-8601 week number (W) | `'1999'` |
| O | Difference to Greenwich time in hours. | `'+0200'` |
| P | Time, in 12-hour hours, minutes and a.m./p.m., with minutes left off if theyre zero and the special-case strings midnight and noon if appropriate. Proprietary extension. | `'1 a.m.'`, `'1:30 p.m.'`, `'midnight'`, `'noon'`, `'12:30 p.m.'` |
| r | [RFC 2822](https://tools.ietf.org/html/rfc2822.html) formatted date. | `'Thu, 21 Dec 2000 16:01:07 +0200'` |
| s | Seconds, 2 digits with leading zeros. | `'00'` to `'59'` |
| S | English ordinal suffix for day of the month, 2 characters. | `'st'`, `'nd'`, `'rd'` or `'th'` |
| t | Number of days in the given month. | `28` to `31` |
| T | Time zone of this machine. | `'EST'`, `'MDT'` |
| u | Microseconds. | `000000` to `999999` |
| U | Seconds since the Unix Epoch (January 1 1970 00:00:00 UTC). | |
| w | Day of the week, digits without leading zeros. | `'0'` (Sunday) to `'6'` (Saturday) |
| W | ISO-8601 week number of year, with weeks starting on Monday. | `1`, `53` |
| y | Year, 2 digits. | `'99'` |
| Y | Year, 4 digits. | `'1999'` |
| z | Day of the year. | `0` to `365` |
| Z | Time zone offset in seconds. The offset for timezones west of UTC is always negative, and for those east of UTC is always positive. | `-43200` to `43200` |
For example:
~~~
{{ value|date:"D d M Y" }}
~~~
If `value` is a `datetime` object (e.g., the result of `datetime.datetime.now()`), the output will be the string `'Wed 09Jan 2008'`.
The format passed can be one of the predefined ones `DATE_FORMAT`, `DATETIME_FORMAT`, `SHORT_DATE_FORMAT` or`SHORT_DATETIME_FORMAT`, or a custom format that uses the format specifiers shown in the table above. Note that predefined formats may vary depending on the current locale.
Assuming that `USE_L10N` is `True` and `LANGUAGE_CODE` is, for example, `"es"`, then for:
~~~
{{ value|date:"SHORT_DATE_FORMAT" }}
~~~
the output would be the string `"09/01/2008"` (the `"SHORT_DATE_FORMAT"` format specifier for the `es` locale as shipped with Django is `"d/m/Y"`).
When used without a format string:
~~~
{{ value|date }}
~~~
…the formatting string defined in the `DATE_FORMAT` setting will be used, without applying any localization.
You can combine `date` with the `time` filter to render a full representation of a `datetime` value. E.g.:
~~~
{{ value|date:"D d M Y" }} {{ value|time:"H:i" }}
~~~
### default
If value evaluates to `False`, uses the given default. Otherwise, uses the value.
For example:
~~~
{{ value|default:"nothing" }}
~~~
If `value` is `""` (the empty string), the output will be `nothing`.
### default_if_none
If (and only if) value is `None`, uses the given default. Otherwise, uses the value.
Note that if an empty string is given, the default value will *not* be used. Use the `default` filter if you want to fallback for empty strings.
For example:
~~~
{{ value|default_if_none:"nothing" }}
~~~
If `value` is `None`, the output will be the string `"nothing"`.
### dictsort
Takes a list of dictionaries and returns that list sorted by the key given in the argument.
For example:
~~~
{{ value|dictsort:"name" }}
~~~
If `value` is:
~~~
[
{'name': 'zed', 'age': 19},
{'name': 'amy', 'age': 22},
{'name': 'joe', 'age': 31},
]
~~~
then the output would be:
~~~
[
{'name': 'amy', 'age': 22},
{'name': 'joe', 'age': 31},
{'name': 'zed', 'age': 19},
]
~~~
You can also do more complicated things like:
~~~
{% for book in books|dictsort:"author.age" %}
* {{ book.title }} ({{ book.author.name }})
{% endfor %}
~~~
If `books` is:
~~~
[
{'title': '1984', 'author': {'name': 'George', 'age': 45}},
{'title': 'Timequake', 'author': {'name': 'Kurt', 'age': 75}},
{'title': 'Alice', 'author': {'name': 'Lewis', 'age': 33}},
]
~~~
then the output would be:
~~~
* Alice (Lewis)
* 1984 (George)
* Timequake (Kurt)
~~~
### dictsortreversed
Takes a list of dictionaries and returns that list sorted in reverse order by the key given in the argument. This works exactly the same as the above filter, but the returned value will be in reverse order.
### divisibleby
Returns `True` if the value is divisible by the argument.
For example:
~~~
{{ value|divisibleby:"3" }}
~~~
If `value` is `21`, the output would be `True`.
### escape
Escapes a strings HTML. Specifically, it makes these replacements:
* `<` is converted to `<`
* `>` is converted to `>`
* `'` (single quote) is converted to `'`
* `"` (double quote) is converted to `"`
* `&` is converted to `&`
The escaping is only applied when the string is output, so it does not matter where in a chained sequence of filters you put `escape`: it will always be applied as though it were the last filter. If you want escaping to be applied immediately, use the `force_escape` filter.
Applying `escape` to a variable that would normally have auto-escaping applied to the result will only result in one round of escaping being done. So it is safe to use this function even in auto-escaping environments. If you want multiple escaping passes to be applied, use the `force_escape` filter.
For example, you can apply `escape` to fields when `autoescape` is off:
~~~
{% autoescape off %}
{{ title|escape }}
{% endautoescape %}
~~~
### escapejs
Escapes characters for use in JavaScript strings. This does *not* make the string safe for use in HTML, but does protect you from syntax errors when using templates to generate JavaScript/JSON.
For example:
~~~
{{ value|escapejs }}
~~~
If `value` is `"testing\r\njavascript \'string" <b>escaping</b>"`, the output will be`"testing\\u000D\\u000Ajavascript \\u0027string\\u0022 \\u003Cb\\u003Eescaping\\u003C/b\\u003E"`.
### filesizeformat
Formats the value like a human-readable file size (i.e. `'13 KB'`, `'4.1 MB'`, `'102 bytes'`, etc).
For example:
~~~
{{ value|filesizeformat }}
~~~
If `value` is 123456789, the output would be `117.7 MB`.
File sizes and SI units
Strictly speaking, `filesizeformat` does not conform to the International System of Units which recommends using KiB, MiB, GiB, etc. when byte sizes are calculated in powers of 1024 (which is the case here). Instead, Django uses traditional unit names (KB, MB, GB, etc.) corresponding to names that are more commonly used.
### first
Returns the first item in a list.
For example:
~~~
{{ value|first }}
~~~
If `value` is the list `['a', 'b', 'c']`, the output will be `'a'`.
### floatformat
When used without an argument, rounds a floating-point number to one decimal place but only if theres a decimal part to be displayed. For example:
| `value` | Template | Output |
| --- | --- | --- |
| `34.23234` | `{{ value|floatformat }}` | `34.2` |
| `34.00000` | `{{ value|floatformat }}` | `34` |
| `34.26000` | `{{ value|floatformat }}` | `34.3` |
If used with a numeric integer argument, `floatformat` rounds a number to that many decimal places. For example:
| `value` | Template | Output |
| --- | --- | --- |
| `34.23234` | `{{ value|floatformat:3 }}` | `34.232` |
| `34.00000` | `{{ value|floatformat:3 }}` | `34.000` |
| `34.26000` | `{{ value|floatformat:3 }}` | `34.260` |
Particularly useful is passing 0 (zero) as the argument which will round the float to the nearest integer.
| `value` | Template | Output |
| --- | --- | --- |
| `34.23234` | `{{ value|floatformat:"0" }}` | `34` |
| `34.00000` | `{{ value|floatformat:"0" }}` | `34` |
| `39.56000` | `{{ value|floatformat:"0" }}` | `40` |
If the argument passed to `floatformat` is negative, it will round a number to that many decimal places but only if theres a decimal part to be displayed. For example:
| `value` | Template | Output |
| --- | --- | --- |
| `34.23234` | `{{ value|floatformat:"-3" }}` | `34.232` |
| `34.00000` | `{{ value|floatformat:"-3" }}` | `34` |
| `34.26000` | `{{ value|floatformat:"-3" }}` | `34.260` |
Using `floatformat` with no argument is equivalent to using `floatformat` with an argument of `-1`.
### force_escape
Applies HTML escaping to a string (see the `escape` filter for details). This filter is applied *immediately* and returns a new, escaped string. This is useful in the rare cases where you need multiple escaping or want to apply other filters to the escaped results. Normally, you want to use the `escape` filter.
For example, if you want to catch the `<p>` HTML elements created by the `linebreaks` filter:
~~~
{% autoescape off %}
{{ body|linebreaks|force_escape }}
{% endautoescape %}
~~~
### get_digit
Given a whole number, returns the requested digit, where 1 is the right-most digit, 2 is the second-right-most digit, etc. Returns the original value for invalid input (if input or argument is not an integer, or if argument is less than 1). Otherwise, output is always an integer.
For example:
~~~
{{ value|get_digit:"2" }}
~~~
If `value` is `123456789`, the output will be `8`.
### iriencode
Converts an IRI (Internationalized Resource Identifier) to a string that is suitable for including in a URL. This is necessary if youre trying to use strings containing non-ASCII characters in a URL.
Its safe to use this filter on a string that has already gone through the `urlencode` filter.
For example:
~~~
{{ value|iriencode }}
~~~
If `value` is `"?test=1&me=2"`, the output will be `"?test=1&me=2"`.
### join
Joins a list with a string, like Pythons `str.join(list)`
For example:
~~~
{{ value|join:" // " }}
~~~
If `value` is the list `['a', 'b', 'c']`, the output will be the string `"a // b // c"`.
### last
Returns the last item in a list.
For example:
~~~
{{ value|last }}
~~~
If `value` is the list `['a', 'b', 'c', 'd']`, the output will be the string `"d"`.
### length
Returns the length of the value. This works for both strings and lists.
For example:
~~~
{{ value|length }}
~~~
If `value` is `['a', 'b', 'c', 'd']` or `"abcd"`, the output will be `4`.
Changed in version 1.8: The filter returns `0` for an undefined variable. Previously, it returned an empty string.
### length_is
Returns `True` if the values length is the argument, or `False` otherwise.
For example:
~~~
{{ value|length_is:"4" }}
~~~
If `value` is `['a', 'b', 'c', 'd']` or `"abcd"`, the output will be `True`.
### linebreaks
Replaces line breaks in plain text with appropriate HTML; a single newline becomes an HTML line break (`<br />`) and a new line followed by a blank line becomes a paragraph break (`</p>`).
For example:
~~~
{{ value|linebreaks }}
~~~
If `value` is `Joel\nis a slug`, the output will be `<p>Joel<br />is a slug</p>`.
### linebreaksbr
Converts all newlines in a piece of plain text to HTML line breaks (`<br />`).
For example:
~~~
{{ value|linebreaksbr }}
~~~
If `value` is `Joel\nis a slug`, the output will be `Joel<br />is a slug`.
### linenumbers
Displays text with line numbers.
For example:
~~~
{{ value|linenumbers }}
~~~
If `value` is:
~~~
one
two
three
~~~
the output will be:
~~~
1\. one
2\. two
3\. three
~~~
### ljust
Left-aligns the value in a field of a given width.
Argument: field size
For example:
~~~
"{{ value|ljust:"10" }}"
~~~
If `value` is `Django`, the output will be `"Django "`.
### lower
Converts a string into all lowercase.
For example:
~~~
{{ value|lower }}
~~~
If `value` is `Still MAD At Yoko`, the output will be `still mad at yoko`.
### make_list
Returns the value turned into a list. For a string, its a list of characters. For an integer, the argument is cast into an unicode string before creating a list.
For example:
~~~
{{ value|make_list }}
~~~
If `value` is the string `"Joel"`, the output would be the list `['J', 'o', 'e', 'l']`. If `value` is `123`, the output will be the list `['1', '2', '3']`.
### phone2numeric
Converts a phone number (possibly containing letters) to its numerical equivalent.
The input doesnt have to be a valid phone number. This will happily convert any string.
For example:
~~~
{{ value|phone2numeric }}
~~~
If `value` is `800-COLLECT`, the output will be `800-2655328`.
### pluralize
Returns a plural suffix if the value is not 1\. By default, this suffix is `'s'`.
Example:
~~~
You have {{ num_messages }} message{{ num_messages|pluralize }}.
~~~
If `num_messages` is `1`, the output will be `You have 1 message.` If `num_messages` is `2` the output will be `You have 2messages.`
For words that require a suffix other than `'s'`, you can provide an alternate suffix as a parameter to the filter.
Example:
~~~
You have {{ num_walruses }} walrus{{ num_walruses|pluralize:"es" }}.
~~~
For words that dont pluralize by simple suffix, you can specify both a singular and plural suffix, separated by a comma.
Example:
~~~
You have {{ num_cherries }} cherr{{ num_cherries|pluralize:"y,ies" }}.
~~~
Note
Use `blocktrans` to pluralize translated strings.
### pprint
A wrapper around `pprint.pprint()` for debugging, really.
### random
Returns a random item from the given list.
For example:
~~~
{{ value|random }}
~~~
If `value` is the list `['a', 'b', 'c', 'd']`, the output could be `"b"`.
### removetags
Deprecated since version 1.8: `removetags` cannot guarantee HTML safe output and has been deprecated due to security concerns. Consider using [bleach](http://bleach.readthedocs.org/en/latest/) instead.
Removes a space-separated list of [X]HTML tags from the output.
For example:
~~~
{{ value|removetags:"b span" }}
~~~
If `value` is `"<b>Joel</b> <button>is</button> a <span>slug"` the unescaped output will be `"Joel<button>is</button> a slug"`.
Note that this filter is case-sensitive.
If `value` is `"<B>Joel</B> <button>is</button> a <span>slug"` the unescaped output will be `"<B>Joel</B><button>is</button> a slug"`.
No safety guarantee
Note that `removetags` doesnt give any guarantee about its output being HTML safe. In particular, it doesnt work recursively, so an input like `"<sc<script>ript>alert('XSS')</sc</script>ript>"` wont be safe even if you apply `|removetags:"script"`. So if the input is user provided, NEVER apply the `safe` filter to a `removetags`output. If you are looking for something more robust, you can use the `bleach` Python library, notably its[clean](http://bleach.readthedocs.org/en/latest/clean.html) method.
### rjust
Right-aligns the value in a field of a given width.
Argument: field size
For example:
~~~
"{{ value|rjust:"10" }}"
~~~
If `value` is `Django`, the output will be `" Django"`.
### safe
Marks a string as not requiring further HTML escaping prior to output. When autoescaping is off, this filter has no effect.
Note
If you are chaining filters, a filter applied after `safe` can make the contents unsafe again. For example, the following code prints the variable as is, unescaped:
~~~
{{ var|safe|escape }}
~~~
### safeseq
Applies the `safe` filter to each element of a sequence. Useful in conjunction with other filters that operate on sequences, such as `join`. For example:
~~~
{{ some_list|safeseq|join:", " }}
~~~
You couldnt use the `safe` filter directly in this case, as it would first convert the variable into a string, rather than working with the individual elements of the sequence.
### slice
Returns a slice of the list.
Uses the same syntax as Pythons list slicing. See [http://www.diveintopython3.net/native-datatypes.html#slicinglists](http://www.diveintopython3.net/native-datatypes.html#slicinglists) for an introduction.
Example:
~~~
{{ some_list|slice:":2" }}
~~~
If `some_list` is `['a', 'b', 'c']`, the output will be `['a', 'b']`.
### slugify
Converts to ASCII. Converts spaces to hyphens. Removes characters that arent alphanumerics, underscores, or hyphens. Converts to lowercase. Also strips leading and trailing whitespace.
For example:
~~~
{{ value|slugify }}
~~~
If `value` is `"Joel is a slug"`, the output will be `"joel-is-a-slug"`.
### stringformat
Formats the variable according to the argument, a string formatting specifier. This specifier uses Python string formatting syntax, with the exception that the leading % is dropped.
See [https://docs.python.org/library/stdtypes.html#string-formatting-operations](https://docs.python.org/library/stdtypes.html#string-formatting-operations) for documentation of Python string formatting
For example:
~~~
{{ value|stringformat:"E" }}
~~~
If `value` is `10`, the output will be `1.000000E+01`.
### striptags
Makes all possible efforts to strip all [X]HTML tags.
For example:
~~~
{{ value|striptags }}
~~~
If `value` is `"<b>Joel</b> <button>is</button> a <span>slug"`, the output will be `"Joel is a slug"`.
No safety guarantee
Note that `striptags` doesnt give any guarantee about its output being HTML safe, particularly with non valid HTML input. So NEVER apply the `safe` filter to a `striptags` output. If you are looking for something more robust, you can use the `bleach` Python library, notably its [clean](http://bleach.readthedocs.org/en/latest/clean.html) method.
### time
Formats a time according to the given format.
Given format can be the predefined one `TIME_FORMAT`, or a custom format, same as the `date` filter. Note that the predefined format is locale-dependent.
For example:
~~~
{{ value|time:"H:i" }}
~~~
If `value` is equivalent to `datetime.datetime.now()`, the output will be the string `"01:23"`.
Another example:
Assuming that `USE_L10N` is `True` and `LANGUAGE_CODE` is, for example, `"de"`, then for:
~~~
{{ value|time:"TIME_FORMAT" }}
~~~
the output will be the string `"01:23:00"` (The `"TIME_FORMAT"` format specifier for the `de` locale as shipped with Django is `"H:i:s"`).
The `time` filter will only accept parameters in the format string that relate to the time of day, not the date (for obvious reasons). If you need to format a `date` value, use the `date` filter instead (or along `time` if you need to render a full `datetime` value).
There is one exception the above rule: When passed a `datetime` value with attached timezone information (a timezone-aware `datetime` instance) the `time` filter will accept the timezone-related format specifiers `'e'`,`'O'` , `'T'` and `'Z'`.
When used without a format string:
~~~
{{ value|time }}
~~~
…the formatting string defined in the `TIME_FORMAT` setting will be used, without applying any localization.
### timesince
Formats a date as the time since that date (e.g., 4 days, 6 hours).
Takes an optional argument that is a variable containing the date to use as the comparison point (without the argument, the comparison point is *now*). For example, if `blog_date` is a date instance representing midnight on 1 June 2006, and `comment_date` is a date instance for 08:00 on 1 June 2006, then the following would return 8 hours:
~~~
{{ blog_date|timesince:comment_date }}
~~~
Comparing offset-naive and offset-aware datetimes will return an empty string.
Minutes is the smallest unit used, and 0 minutes will be returned for any date that is in the future relative to the comparison point.
### timeuntil
Similar to `timesince`, except that it measures the time from now until the given date or datetime. For example, if today is 1 June 2006 and `conference_date` is a date instance holding 29 June 2006, then `{{conference_date|timeuntil }}` will return 4 weeks.
Takes an optional argument that is a variable containing the date to use as the comparison point (instead of *now*). If `from_date` contains 22 June 2006, then the following will return 1 week:
~~~
{{ conference_date|timeuntil:from_date }}
~~~
Comparing offset-naive and offset-aware datetimes will return an empty string.
Minutes is the smallest unit used, and 0 minutes will be returned for any date that is in the past relative to the comparison point.
### title
Converts a string into titlecase by making words start with an uppercase character and the remaining characters lowercase. This tag makes no effort to keep trivial words in lowercase.
For example:
~~~
{{ value|title }}
~~~
If `value` is `"my FIRST post"`, the output will be `"My First Post"`.
### truncatechars
Truncates a string if it is longer than the specified number of characters. Truncated strings will end with a translatable ellipsis sequence (…).
Argument: Number of characters to truncate to
For example:
~~~
{{ value|truncatechars:9 }}
~~~
If `value` is `"Joel is a slug"`, the output will be `"Joel i..."`.
### truncatechars_html
Similar to `truncatechars`, except that it is aware of HTML tags. Any tags that are opened in the string and not closed before the truncation point are closed immediately after the truncation.
For example:
~~~
{{ value|truncatechars_html:9 }}
~~~
If `value` is `"<p>Joel is a slug</p>"`, the output will be `"<p>Joel i...</p>"`.
Newlines in the HTML content will be preserved.
### truncatewords
Truncates a string after a certain number of words.
Argument: Number of words to truncate after
For example:
~~~
{{ value|truncatewords:2 }}
~~~
If `value` is `"Joel is a slug"`, the output will be `"Joel is ..."`.
Newlines within the string will be removed.
### truncatewords_html
Similar to `truncatewords`, except that it is aware of HTML tags. Any tags that are opened in the string and not closed before the truncation point, are closed immediately after the truncation.
This is less efficient than `truncatewords`, so should only be used when it is being passed HTML text.
For example:
~~~
{{ value|truncatewords_html:2 }}
~~~
If `value` is `"<p>Joel is a slug</p>"`, the output will be `"<p>Joel is ...</p>"`.
Newlines in the HTML content will be preserved.
### unordered_list
Recursively takes a self-nested list and returns an HTML unordered list WITHOUT opening and closing tags.
The list is assumed to be in the proper format. For example, if `var` contains `['States', ['Kansas',['Lawrence', 'Topeka'], 'Illinois']]`, then `{{ var|unordered_list }}` would return:
~~~
<li>States
<ul>
<li>Kansas
<ul>
<li>Lawrence</li>
<li>Topeka</li>
</ul>
</li>
<li>Illinois</li>
</ul>
</li>
~~~
### upper
Converts a string into all uppercase.
For example:
~~~
{{ value|upper }}
~~~
If `value` is `"Joel is a slug"`, the output will be `"JOEL IS A SLUG"`.
### urlencode
Escapes a value for use in a URL.
For example:
~~~
{{ value|urlencode }}
~~~
If `value` is `"http://www.example.org/foo?a=b&c=d"`, the output will be`"http%3A//www.example.org/foo%3Fa%3Db%26c%3Dd"`.
An optional argument containing the characters which should not be escaped can be provided.
If not provided, the / character is assumed safe. An empty string can be provided when *all* characters should be escaped. For example:
~~~
{{ value|urlencode:"" }}
~~~
If `value` is `"http://www.example.org/"`, the output will be `"http%3A%2F%2Fwww.example.org%2F"`.
### urlize
Converts URLs and email addresses in text into clickable links.
This template tag works on links prefixed with `http://`, `https://`, or `www.`. For example, `http://goo.gl/aia1t`will get converted but `goo.gl/aia1t` wont.
It also supports domain-only links ending in one of the original top level domains (`.com`, `.edu`, `.gov`, `.int`,`.mil`, `.net`, and `.org`). For example, `djangoproject.com` gets converted.
Changed in version 1.8: Support for domain-only links that include characters after the top-level domain (e.g. `djangoproject.com/` and `djangoproject.com/download/`) was added.
Links can have trailing punctuation (periods, commas, close-parens) and leading punctuation (opening parens), and `urlize` will still do the right thing.
Links generated by `urlize` have a `rel="nofollow"` attribute added to them.
For example:
~~~
{{ value|urlize }}
~~~
If `value` is `"Check out www.djangoproject.com"`, the output will be `"Check out <ahref="http://www.djangoproject.com" rel="nofollow">www.djangoproject.com</a>"`.
In addition to web links, `urlize` also converts email addresses into `mailto:` links. If `value` is `"Send questionsto foo@example.com"`, the output will be `"Send questions to <a href="mailto:foo@example.com">foo@example</a>"`.
The `urlize` filter also takes an optional parameter `autoescape`. If `autoescape` is `True`, the link text and URLs will be escaped using Djangos built-in `escape` filter. The default value for `autoescape` is `True`.
Note
If `urlize` is applied to text that already contains HTML markup, things wont work as expected. Apply this filter only to plain text.
### urlizetrunc
Converts URLs and email addresses into clickable links just like [urlize](http://masteringdjango.com/django-built-in-template-tags-and-filters/#urlize), but truncates URLs longer than the given character limit.
Argument: Number of characters that link text should be truncated to, including the ellipsis thats added if truncation is necessary.
For example:
~~~
{{ value|urlizetrunc:15 }}
~~~
If `value` is `"Check out www.djangoproject.com"`, the output would be `'Check out <ahref="http://www.djangoproject.com" rel="nofollow">www.djangopr...</a>'`.
As with [urlize](http://masteringdjango.com/django-built-in-template-tags-and-filters/#urlize), this filter should only be applied to plain text.
### wordcount
Returns the number of words.
For example:
~~~
{{ value|wordcount }}
~~~
If `value` is `"Joel is a slug"`, the output will be `4`.
### wordwrap
Wraps words at specified line length.
Argument: number of characters at which to wrap the text
For example:
~~~
{{ value|wordwrap:5 }}
~~~
If `value` is `Joel is a slug`, the output would be:
~~~
Joel
is a
slug
~~~
### yesno
Maps values for true, false and (optionally) None, to the strings yes, no, maybe, or a custom mapping passed as a comma-separated list, and returns one of those strings according to the value:
For example:
~~~
{{ value|yesno:"yeah,no,maybe" }}
~~~
| Value | Argument | Outputs |
| --- | --- | --- |
| `True` | | `yes` |
| `True` | `"yeah,no,maybe"` | `yeah` |
| `False` | `"yeah,no,maybe"` | `no` |
| `None` | `"yeah,no,maybe"` | `maybe` |
| `None` | `"yeah,no"` | `"no"` (converts None to False if no mapping for None is given) |
### Internationalization tags and filters
Django provides template tags and filters to control each aspect of internationalization in templates. They allow for granular control of translations, formatting, and time zone conversions.
#### I18N
This library allows specifying translatable text in templates. To enable it, set `USE_I18N` to `True`, then load it with `{% load i18n %}`.
See specifying-translation-strings-in-template-code.
#### L10N
This library provides control over the localization of values in templates. You only need to load the library using `{% load l10n %}`, but youll often set `USE_L10N` to `True` so that localization is active by default.
See topic-l10n-templates.
#### TZ
This library provides control over time zone conversions in templates. Like `l10n`, you only need to load the library using `{% load tz %}`, but youll usually also set `USE_TZ` to `True` so that conversion to local time happens by default.
See time-zones-in-templates.
### Other tags and filters libraries
Django comes with a couple of other template-tag libraries that you have to enable explicitly in your`INSTALLED_APPS` setting and enable in your template with the `{% load %}<load>` tag.
#### DJANGO.CONTRIB.HUMANIZE
A set of Django template filters useful for adding a human touch to data.
#### DJANGO.CONTRIB.WEBDESIGN
A collection of template tags that can be useful while designing a Web site, such as a generator of Lorem Ipsum text.
#### STATIC
##### static
To link to static files that are saved in `STATIC_ROOT` Django ships with a `static` template tag. You can use this regardless if youre using `RequestContext` or not.
~~~
{% load static %}
<img src="{% static "images/hi.jpg" %}" alt="Hi!" />
~~~
It is also able to consume standard context variables, e.g. assuming a `user_stylesheet` variable is passed to the template:
~~~
{% load static %}
<link rel="stylesheet" href="{% static user_stylesheet %}" type="text/css" media="screen" />
~~~
If youd like to retrieve a static URL without displaying it, you can use a slightly different call:
~~~
{% load static %}
{% static "images/hi.jpg" as myphoto %}
<img src="{{ myphoto }}"></img>
~~~
Note
The `staticfiles` contrib app also ships with a `static template tag<staticfiles-static>` which uses`staticfiles'` `STATICFILES_STORAGE` to build the URL of the given path (rather than simply using`urllib.parse.urljoin()` with the `STATIC_URL` setting and the given path). Use that instead if you have an advanced use case such as using a cloud service to serve static files:
~~~
{% load static from staticfiles %}
<img src="{% static "images/hi.jpg" %}" alt="Hi!" />
~~~
##### get_static_prefix
You should prefer the `static` template tag, but if you need more control over exactly where and how`STATIC_URL` is injected into the template, you can use the `get_static_prefix` template tag:
~~~
{% load static %}
<img src="{% get_static_prefix %}images/hi.jpg" alt="Hi!" />
~~~
Theres also a second form you can use to avoid extra processing if you need the value multiple times:
~~~
{% load static %}
{% get_static_prefix as STATIC_PREFIX %}
<img src="{{ STATIC_PREFIX }}images/hi.jpg" alt="Hi!" />
<img src="{{ STATIC_PREFIX }}images/hi2.jpg" alt="Hello!" />
~~~
##### get_media_prefix
Similar to the `get_static_prefix`, `get_media_prefix` populates a template variable with the media prefix`MEDIA_URL`, e.g.:
~~~
<script type="text/javascript" charset="utf-8">
var media_path = '{% get_media_prefix %}';
</script>
~~~
Appendix D: Settings
最后更新于:2022-04-01 04:48:35
Your Django settings file contains all the configuration of your Django installation. This appendix explains how settings work and which settings are available.
[TOC=3]
## Whats a Settings File?
A settings file is just a Python module with module-level variables.
Here are a couple of example settings:
~~~
ALLOWED_HOSTS = ['www.example.com']
DEBUG = False
DEFAULT_FROM_EMAIL = 'webmaster@example.com'
~~~
Note
If you set `DEBUG` to `False`, you also need to properly set the `ALLOWED_HOSTS` setting.
Because a settings file is a Python module, the following apply:
* It doesnt allow for Python syntax errors.
* It can assign settings dynamically using normal Python syntax. For example:
~~~
MY_SETTING = [str(i) for i in range(30)]
~~~
* It can import values from other settings files.
### Default Settings
A Django settings file doesnt have to define any settings if it doesnt need to. Each setting has a sensible default value. These defaults live in the module `django/conf/global_settings.py`.
Heres the algorithm Django uses in compiling settings:
* Load settings from `global_settings.py`.
* Load settings from the specified settings file, overriding the global settings as necessary.
Note that a settings file should *not* import from `global_settings`, because thats redundant.
### Seeing which settings youve changed
Theres an easy way to view which of your settings deviate from the default settings. The command `pythonmanage.py diffsettings` displays differences between the current settings file and Djangos default settings.
For more, see the `diffsettings` documentation.
## Using settings in Python code
In your Django apps, use settings by importing the object `django.conf.settings`. Example:
~~~
from django.conf import settings
if settings.DEBUG:
# Do something
~~~
Note that `django.conf.settings` isnt a module its an object. So importing individual settings is not possible:
~~~
from django.conf.settings import DEBUG # This won't work.
~~~
Also note that your code should *not* import from either `global_settings` or your own settings file.`django.conf.settings` abstracts the concepts of default settings and site-specific settings; it presents a single interface. It also decouples the code that uses settings from the location of your settings.
## Altering settings at runtime
You shouldnt alter settings in your applications at runtime. For example, dont do this in a view:
~~~
from django.conf import settings
settings.DEBUG = True # Don't do this!
~~~
The only place you should assign to settings is in a settings file.
## Security
Because a settings file contains sensitive information, such as the database password, you should make every attempt to limit access to it. For example, change its file permissions so that only you and your Web servers user can read it. This is especially important in a shared-hosting environment.
## Creating your own settings
Theres nothing stopping you from creating your own settings, for your own Django apps. Just follow these conventions:
* Setting names are in all uppercase.
* Dont reinvent an already-existing setting.
For settings that are sequences, Django itself uses tuples, rather than lists, but this is only a convention.
## Designating the Settings: DJANGO_SETTINGS_MODULE
When you use Django, you have to tell it which settings youre using. Do this by using an environment variable, `DJANGO_SETTINGS_MODULE`.
The value of `DJANGO_SETTINGS_MODULE` should be in Python path syntax, e.g. `mysite.settings`.
### The django-admin utility
When using django-admin, you can either set the environment variable once, or explicitly pass in the settings module each time you run the utility.
Example (Unix Bash shell):
~~~
export DJANGO_SETTINGS_MODULE=mysite.settings
django-admin runserver
~~~
Example (Windows shell):
~~~
set DJANGO_SETTINGS_MODULE=mysite.settings
django-admin runserver
~~~
Use the `--settings` command-line argument to specify the settings manually:
~~~
django-admin runserver --settings=mysite.settings
~~~
### On the server (mod_wsgi)
In your live server environment, youll need to tell your WSGI application what settings file to use. Do that with `os.environ`:
~~~
import os
os.environ['DJANGO_SETTINGS_MODULE'] = 'mysite.settings'
~~~
Read Chapter 22 for more information and other common elements to a Django WSGI application.
## Using Settings Without Setting DJANGO_SETTINGS_MODULE
In some cases, you might want to bypass the `DJANGO_SETTINGS_MODULE` environment variable. For example, if youre using the template system by itself, you likely dont want to have to set up an environment variable pointing to a settings module.
In these cases, you can configure Djangos settings manually. Do this by calling:
`django.conf.settings.``configure`(*default_settings*, ***settings*)
Example:
~~~
from django.conf import settings
settings.configure(DEBUG=True, TEMPLATE_DEBUG=True)
~~~
Pass `configure()` as many keyword arguments as youd like, with each keyword argument representing a setting and its value. Each argument name should be all uppercase, with the same name as the settings described above. If a particular setting is not passed to `configure()` and is needed at some later point, Django will use the default setting value.
Configuring Django in this fashion is mostly necessary and, indeed, recommended when youre using a piece of the framework inside a larger application.
Consequently, when configured via `settings.configure()`, Django will not make any modifications to the process environment variables (see the documentation of `TIME_ZONE` for why this would normally occur). Its assumed that youre already in full control of your environment in these cases.
### Custom default settings
If youd like default values to come from somewhere other than `django.conf.global_settings`, you can pass in a module or class that provides the default settings as the `default_settings` argument (or as the first positional argument) in the call to `configure()`.
In this example, default settings are taken from `myapp_defaults`, and the `DEBUG` setting is set to `True`, regardless of its value in `myapp_defaults`:
~~~
from django.conf import settings
from myapp import myapp_defaults
settings.configure(default_settings=myapp_defaults, DEBUG=True)
~~~
The following example, which uses `myapp_defaults` as a positional argument, is equivalent:
~~~
settings.configure(myapp_defaults, DEBUG=True)
~~~
Normally, you will not need to override the defaults in this fashion. The Django defaults are sufficiently tame that you can safely use them. Be aware that if you do pass in a new default module, it entirely*replaces* the Django defaults, so you must specify a value for every possible setting that might be used in that code you are importing. Check in `django.conf.settings.global_settings` for the full list.
### Either configure() or DJANGO_SETTINGS_MODULE is required
If youre not setting the `DJANGO_SETTINGS_MODULE` environment variable, you *must* call `configure()` at some point before using any code that reads settings.
If you dont set `DJANGO_SETTINGS_MODULE` and dont call `configure()`, Django will raise an `ImportError` exception the first time a setting is accessed.
If you set `DJANGO_SETTINGS_MODULE`, access settings values somehow, *then* call `configure()`, Django will raise a`RuntimeError` indicating that settings have already been configured. There is a property just for this purpose:
`django.conf.settings.``configured`
For example:
~~~
from django.conf import settings
if not settings.configured:
settings.configure(myapp_defaults, DEBUG=True)
~~~
Also, its an error to call `configure()` more than once, or to call `configure()` after any setting has been accessed.
It boils down to this: Use exactly one of either `configure()` or `DJANGO_SETTINGS_MODULE`. Not both, and not neither.
## Available Settings
Warning
Be careful when you override settings, especially when the default value is a non-empty list or dictionary, such as `MIDDLEWARE_CLASSES` and `STATICFILES_FINDERS`. Make sure you keep the components required by the features of Django you wish to use.
## Core settings
Heres a list of settings available in Django core and their default values. Settings provided by contrib apps are listed below, followed by a topical index of the core settings.
### ABSOLUTE_URL_OVERRIDES
Default: `{}` (Empty dictionary)
A dictionary mapping `"app_label.model_name"` strings to functions that take a model object and return its URL. This is a way of inserting or overriding `get_absolute_url()` methods on a per-installation basis. Example:
~~~
ABSOLUTE_URL_OVERRIDES = {
'blogs.weblog': lambda o: "/blogs/%s/" % o.slug,
'news.story': lambda o: "/stories/%s/%s/" % (o.pub_year, o.slug),
}
~~~
Note that the model name used in this setting should be all lower-case, regardless of the case of the actual model class name.
### ADMINS
Default: `[]` (Empty list)
A list of all the people who get code error notifications. When `DEBUG=False` and a view raises an exception, Django will email these people with the full exception information. Each item in the list should be a tuple of (Full name, email address). Example:
~~~
[('John', 'john@example.com'), ('Mary', 'mary@example.com')]
~~~
Note that Django will email *all* of these people whenever an error happens.
### ALLOWED_HOSTS
Default: `[]` (Empty list)
A list of strings representing the host/domain names that this Django site can serve. This is a security measure to prevent an attacker from poisoning caches and password reset emails with links to malicious hosts by submitting requests with a fake HTTP `Host` header, which is possible even under many seemingly-safe web server configurations.
Values in this list can be fully qualified names (e.g. `'www.example.com'`), in which case they will be matched against the requests `Host` header exactly (case-insensitive, not including port). A value beginning with a period can be used as a subdomain wildcard: `'.example.com'` will match `example.com`, `www.example.com`, and any other subdomain of `example.com`. A value of `'*'` will match anything; in this case you are responsible to provide your own validation of the `Host` header (perhaps in a middleware; if so this middleware must be listed first in `MIDDLEWARE_CLASSES`).
Django also allows the [fully qualified domain name (FQDN)](http://en.wikipedia.org/wiki/Fully_qualified_domain_name) of any entries. Some browsers include a trailing dot in the `Host` header which Django strips when performing host validation.
If the `Host` header (or `X-Forwarded-Host` if `USE_X_FORWARDED_HOST` is enabled) does not match any value in this list, the `django.http.HttpRequest.get_host()` method will raise `SuspiciousOperation`.
When `DEBUG` is `True` or when running tests, host validation is disabled; any host will be accepted. Thus its usually only necessary to set it in production.
This validation only applies via `get_host()`; if your code accesses the `Host` header directly from `request.META`you are bypassing this security protection.
### APPEND_SLASH
Default: `True`
When set to `True`, if the request URL does not match any of the patterns in the URLconf and it doesnt end in a slash, an HTTP redirect is issued to the same URL with a slash appended. Note that the redirect may cause any data submitted in a POST request to be lost.
The `APPEND_SLASH` setting is only used if CommonMiddleware is installed . See also `PREPEND_WWW`.
### CACHES
Default:
~~~
{
'default': {
'BACKEND': 'django.core.cache.backends.locmem.LocMemCache',
}
}
~~~
A dictionary containing the settings for all caches to be used with Django. It is a nested dictionary whose contents maps cache aliases to a dictionary containing the options for an individual cache.
The `CACHES` setting must configure a `default` cache; any number of additional caches may also be specified. If you are using a cache backend other than the local memory cache, or you need to define multiple caches, other options will be required. The following cache options are available.
#### BACKEND
Default: `''` (Empty string)
The cache backend to use. The built-in cache backends are:
* `'django.core.cache.backends.db.DatabaseCache'`
* `'django.core.cache.backends.dummy.DummyCache'`
* `'django.core.cache.backends.filebased.FileBasedCache'`
* `'django.core.cache.backends.locmem.LocMemCache'`
* `'django.core.cache.backends.memcached.MemcachedCache'`
* `'django.core.cache.backends.memcached.PyLibMCCache'`
You can use a cache backend that doesnt ship with Django by setting `BACKEND <CACHES-BACKEND>` to a fully-qualified path of a cache backend class (i.e. `mypackage.backends.whatever.WhateverCache`).
#### KEY_FUNCTION
A string containing a dotted path to a function (or any callable) that defines how to compose a prefix, version and key into a final cache key. The default implementation is equivalent to the function:
~~~
def make_key(key, key_prefix, version):
return ':'.join([key_prefix, str(version), key])
~~~
You may use any key function you want, as long as it has the same argument signature.
#### KEY_PREFIX
Default: `''` (Empty string)
A string that will be automatically included (prepended by default) to all cache keys used by the Django server.
#### LOCATION
Default: `''` (Empty string)
The location of the cache to use. This might be the directory for a file system cache, a host and port for a memcache server, or simply an identifying name for a local memory cache. e.g.:
~~~
CACHES = {
'default': {
'BACKEND': 'django.core.cache.backends.filebased.FileBasedCache',
'LOCATION': '/var/tmp/django_cache',
}
}
~~~
#### OPTIONS
Default: None
Extra parameters to pass to the cache backend. Available parameters vary depending on your cache backend.
Some information on available parameters can be found in the Cache Backends documentation. For more information, consult your backend modules own documentation.
#### TIMEOUT
Default: 300
The number of seconds before a cache entry is considered stale. If the value of this settings is `None`, cache entries will not expire.
#### VERSION
Default: `1`
The default version number for cache keys generated by the Django server.
### CACHE_MIDDLEWARE_ALIAS
Default: `default`
The cache connection to use for the cache middleware.
### CACHE_MIDDLEWARE_KEY_PREFIX
Default: `''` (Empty string)
A string which will be prefixed to the cache keys generated by the cache middleware. This prefix is combined with the `KEY_PREFIX <CACHES-KEY_PREFIX>` setting; it does not replace it.
See Chapter 17 for more information on caching in Django.
### CACHE_MIDDLEWARE_SECONDS
Default: `600`
The default number of seconds to cache a page for the cache middleware.
See Chapter 17 for more information on caching in Django.
### CSRF_COOKIE_AGE
Default: `31449600` (1 year, in seconds)
The age of CSRF cookies, in seconds.
The reason for setting a long-lived expiration time is to avoid problems in the case of a user closing a browser or bookmarking a page and then loading that page from a browser cache. Without persistent cookies, the form submission would fail in this case.
Some browsers (specifically Internet Explorer) can disallow the use of persistent cookies or can have the indexes to the cookie jar corrupted on disk, thereby causing CSRF protection checks to fail (and sometimes intermittently). Change this setting to `None` to use session-based CSRF cookies, which keep the cookies in-memory instead of on persistent storage.
### CSRF_COOKIE_DOMAIN
Default: `None`
The domain to be used when setting the CSRF cookie. This can be useful for easily allowing cross-subdomain requests to be excluded from the normal cross site request forgery protection. It should be set to a string such as `".example.com"` to allow a POST request from a form on one subdomain to be accepted by a view served from another subdomain.
Please note that the presence of this setting does not imply that Djangos CSRF protection is safe from cross-subdomain attacks by default – please see the CSRF limitations section.
### CSRF_COOKIE_HTTPONLY
Default: `False`
Whether to use `HttpOnly` flag on the CSRF cookie. If this is set to `True`, client-side JavaScript will not to be able to access the CSRF cookie.
This can help prevent malicious JavaScript from bypassing CSRF protection. If you enable this and need to send the value of the CSRF token with Ajax requests, your JavaScript will need to pull the value from a hidden CSRF token form input on the page instead of from the cookie.
See `SESSION_COOKIE_HTTPONLY` for details on `HttpOnly`.
### CSRF_COOKIE_NAME
Default: `'csrftoken'`
The name of the cookie to use for the CSRF authentication token. This can be whatever you want.
### CSRF_COOKIE_PATH
Default: `'/'`
The path set on the CSRF cookie. This should either match the URL path of your Django installation or be a parent of that path.
This is useful if you have multiple Django instances running under the same hostname. They can use different cookie paths, and each instance will only see its own CSRF cookie.
### CSRF_COOKIE_SECURE
Default: `False`
Whether to use a secure cookie for the CSRF cookie. If this is set to `True`, the cookie will be marked as secure, which means browsers may ensure that the cookie is only sent under an HTTPS connection.
### CSRF_FAILURE_VIEW
Default: `'django.views.csrf.csrf_failure'`
A dotted path to the view function to be used when an incoming request is rejected by the CSRF protection. The function should have this signature:
~~~
def csrf_failure(request, reason="")
~~~
where `reason` is a short message (intended for developers or logging, not for end users) indicating the reason the request was rejected.
### DATABASES
Default: `{}` (Empty dictionary)
A dictionary containing the settings for all databases to be used with Django. It is a nested dictionary whose contents maps database aliases to a dictionary containing the options for an individual database.
The `DATABASES` setting must configure a `default` database; any number of additional databases may also be specified.
The simplest possible settings file is for a single-database setup using SQLite. This can be configured using the following:
~~~
DATABASES = {
'default': {
'ENGINE': 'django.db.backends.sqlite3',
'NAME': 'mydatabase',
}
}
~~~
When connecting to other database backends, such as MySQL, Oracle, or PostgreSQL, additional connection parameters will be required. See the `ENGINE <DATABASE-ENGINE>` setting below on how to specify other database types. This example is for PostgreSQL:
~~~
DATABASES = {
'default': {
'ENGINE': 'django.db.backends.postgresql_psycopg2',
'NAME': 'mydatabase',
'USER': 'mydatabaseuser',
'PASSWORD': 'mypassword',
'HOST': '127.0.0.1',
'PORT': '5432',
}
}
~~~
The following inner options that may be required for more complex configurations are available:
#### ATOMIC_REQUESTS
Default: `False`
Set this to `True` to wrap each HTTP request in a transaction on this database.
#### AUTOCOMMIT
Default: `True`
Set this to `False` if you want to disable Djangos transaction management and implement your own.
#### ENGINE
Default: `''` (Empty string)
The database backend to use. The built-in database backends are:
* `'django.db.backends.postgresql_psycopg2'`
* `'django.db.backends.mysql'`
* `'django.db.backends.sqlite3'`
* `'django.db.backends.oracle'`
You can use a database backend that doesnt ship with Django by setting `ENGINE` to a fully-qualified path (i.e. `mypackage.backends.whatever`).
#### HOST
Default: `''` (Empty string)
Which host to use when connecting to the database. An empty string means localhost. Not used with SQLite.
If this value starts with a forward slash (`'/'`) and youre using MySQL, MySQL will connect via a Unix socket to the specified socket. For example:
~~~
"HOST": '/var/run/mysql'
~~~
If youre using MySQL and this value *doesnt* start with a forward slash, then this value is assumed to be the host.
If youre using PostgreSQL, by default (empty `HOST`), the connection to the database is done through UNIX domain sockets (local lines in `pg_hba.conf`). If your UNIX domain socket is not in the standard location, use the same value of `unix_socket_directory` from `postgresql.conf`. If you want to connect through TCP sockets, set `HOST` to localhost or 127.0.0.1 (host lines in `pg_hba.conf`). On Windows, you should always define `HOST`, as UNIX domain sockets are not available.
#### NAME
Default: `''` (Empty string)
The name of the database to use. For SQLite, its the full path to the database file. When specifying the path, always use forward slashes, even on Windows (e.g. `C:/homes/user/mysite/sqlite3.db`).
#### CONN_MAX_AGE
Default: `0`
The lifetime of a database connection, in seconds. Use `0` to close database connections at the end of each request Djangos historical behavior and `None` for unlimited persistent connections.
#### OPTIONS
Default: `{}` (Empty dictionary)
Extra parameters to use when connecting to the database. Available parameters vary depending on your database backend.
Some information on available parameters can be found in the Database Backends documentation. For more information, consult your backend modules own documentation.
#### PASSWORD
Default: `''` (Empty string)
The password to use when connecting to the database. Not used with SQLite.
#### PORT
Default: `''` (Empty string)
The port to use when connecting to the database. An empty string means the default port. Not used with SQLite.
#### USER
Default: `''` (Empty string)
The username to use when connecting to the database. Not used with SQLite.
#### TEST
Default: `{}`
A dictionary of settings for test databases. The following entries are available:
##### CHARSET
Default: `None`
The character set encoding used to create the test database. The value of this string is passed directly through to the database, so its format is backend-specific.
Supported for the [PostgreSQL](http://www.postgresql.org/docs/current/static/multibyte.html) (`postgresql_psycopg2`) and [MySQL](http://dev.mysql.com/doc/refman/5.6/en/charset-database.html) (`mysql`) backends.
##### COLLATION
Default: `None`
The collation order to use when creating the test database. This value is passed directly to the backend, so its format is backend-specific.
Only supported for the `mysql` backend (see the [MySQL manual](http://dev.mysql.com/doc/refman/5.6/en/charset-database.html) for details).
##### DEPENDENCIES
Default: `['default']`, for all databases other than `default`, which has no dependencies.
The creation-order dependencies of the database. MIRROR ^^^^^^
Default: `None`
The alias of the database that this database should mirror during testing.
This setting exists to allow for testing of primary/replica (referred to as master/slave by some databases) configurations of multiple databases.
##### NAME
Default: `None`
The name of database to use when running the test suite.
If the default value (`None`) is used with the SQLite database engine, the tests will use a memory resident database. For all other database engines the test database will use the name `'test_' + DATABASE_NAME`.
##### SERIALIZE
Boolean value to control whether or not the default test runner serializes the database into an in-memory JSON string before running tests (used to restore the database state between tests if you dont have transactions). You can set this to `False` to speed up creation time if you dont have any test classes with serialized_rollback=True.
##### CREATE_DB
Default: `True`
This is an Oracle-specific setting.
If it is set to `False`, the test tablespaces wont be automatically created at the beginning of the tests and dropped at the end.
##### CREATE_USER
Default: `True`
This is an Oracle-specific setting.
If it is set to `False`, the test user wont be automatically created at the beginning of the tests and dropped at the end.
##### USER
Default: `None`
This is an Oracle-specific setting.
The username to use when connecting to the Oracle database that will be used when running tests. If not provided, Django will use `'test_' + USER`.
##### PASSWORD
Default: `None`
This is an Oracle-specific setting.
The password to use when connecting to the Oracle database that will be used when running tests. If not provided, Django will use a hardcoded default value.
##### TBLSPACE
Default: `None`
This is an Oracle-specific setting.
The name of the tablespace that will be used when running tests. If not provided, Django will use `'test_'+ USER`.
Changed in version 1.8: Previously Django used `'test_' + NAME` if not provided.
##### TBLSPACE_TMP
Default: `None`
This is an Oracle-specific setting.
The name of the temporary tablespace that will be used when running tests. If not provided, Django will use `'test_' + USER + '_temp'`.
Changed in version 1.8: Previously Django used `'test_' + NAME + '_temp'` if not provided.
##### DATAFILE
Default: `None`
This is an Oracle-specific setting.
The name of the datafile to use for the TBLSPACE. If not provided, Django will use `TBLSPACE + '.dbf'`.
##### DATAFILE_TMP
Default: `None`
This is an Oracle-specific setting.
The name of the datafile to use for the TBLSPACE_TMP. If not provided, Django will use `TBLSPACE_TMP +'.dbf'`.
##### DATAFILE_MAXSIZE
Default: `'500M'`
This is an Oracle-specific setting.
The maximum size that the DATAFILE is allowed to grow to.
##### DATAFILE_TMP_MAXSIZE
Default: `'500M'`
This is an Oracle-specific setting.
The maximum size that the DATAFILE_TMP is allowed to grow to.
### DATABASE_ROUTERS
Default: `[]` (Empty list)
The list of routers that will be used to determine which database to use when performing a database queries.
### DATE_FORMAT
Default: `'N j, Y'` (e.g. `Feb. 4, 2003`)
The default formatting to use for displaying date fields in any part of the system. Note that if `USE_L10N` is set to `True`, then the locale-dictated format has higher precedence and will be applied instead.
See also `DATETIME_FORMAT`, `TIME_FORMAT` and `SHORT_DATE_FORMAT`.
### DATE_INPUT_FORMATS
Default:
~~~
[
'%Y-%m-%d', '%m/%d/%Y', '%m/%d/%y', # '2006-10-25', '10/25/2006', '10/25/06'
'%b %d %Y', '%b %d, %Y', # 'Oct 25 2006', 'Oct 25, 2006'
'%d %b %Y', '%d %b, %Y', # '25 Oct 2006', '25 Oct, 2006'
'%B %d %Y', '%B %d, %Y', # 'October 25 2006', 'October 25, 2006'
'%d %B %Y', '%d %B, %Y', # '25 October 2006', '25 October, 2006'
]
~~~
A list of formats that will be accepted when inputting data on a date field. Formats will be tried in order, using the first valid one. Note that these format strings use Pythons [datetime](https://docs.python.org/library/datetime.html#strftime-strptime-behavior) module syntax, not the format strings from the `date` Django template tag.
When `USE_L10N` is `True`, the locale-dictated format has higher precedence and will be applied instead.
See also `DATETIME_INPUT_FORMATS` and `TIME_INPUT_FORMATS`.
### DATETIME_FORMAT
Default: `'N j, Y, P'` (e.g. `Feb. 4, 2003, 4 p.m.`)
The default formatting to use for displaying datetime fields in any part of the system. Note that if `USE_L10N`is set to `True`, then the locale-dictated format has higher precedence and will be applied instead.
See also `DATE_FORMAT`, `TIME_FORMAT` and `SHORT_DATETIME_FORMAT`.
### DATETIME_INPUT_FORMATS
Default:
~~~
[
'%Y-%m-%d %H:%M:%S', # '2006-10-25 14:30:59'
'%Y-%m-%d %H:%M:%S.%f', # '2006-10-25 14:30:59.000200'
'%Y-%m-%d %H:%M', # '2006-10-25 14:30'
'%Y-%m-%d', # '2006-10-25'
'%m/%d/%Y %H:%M:%S', # '10/25/2006 14:30:59'
'%m/%d/%Y %H:%M:%S.%f', # '10/25/2006 14:30:59.000200'
'%m/%d/%Y %H:%M', # '10/25/2006 14:30'
'%m/%d/%Y', # '10/25/2006'
'%m/%d/%y %H:%M:%S', # '10/25/06 14:30:59'
'%m/%d/%y %H:%M:%S.%f', # '10/25/06 14:30:59.000200'
'%m/%d/%y %H:%M', # '10/25/06 14:30'
'%m/%d/%y', # '10/25/06'
]
~~~
A list of formats that will be accepted when inputting data on a datetime field. Formats will be tried in order, using the first valid one. Note that these format strings use Pythons [datetime](https://docs.python.org/library/datetime.html#strftime-strptime-behavior) module syntax, not the format strings from the `date` Django template tag.
When `USE_L10N` is `True`, the locale-dictated format has higher precedence and will be applied instead.
See also `DATE_INPUT_FORMATS` and `TIME_INPUT_FORMATS`.
### DEBUG
Default: `False`
A boolean that turns on/off debug mode.
Never deploy a site into production with `DEBUG` turned on.
Did you catch that? NEVER deploy a site into production with `DEBUG` turned on.
One of the main features of debug mode is the display of detailed error pages. If your app raises an exception when `DEBUG` is `True`, Django will display a detailed traceback, including a lot of metadata about your environment, such as all the currently defined Django settings (from `settings.py`).
As a security measure, Django will *not* include settings that might be sensitive (or offensive), such as`SECRET_KEY`. Specifically, it will exclude any setting whose name includes any of the following:
* `'API'`
* `'KEY'`
* `'PASS'`
* `'SECRET'`
* `'SIGNATURE'`
* `'TOKEN'`
Note that these are *partial* matches. `'PASS'` will also match PASSWORD, just as `'TOKEN'` will also match TOKENIZED and so on.
Still, note that there are always going to be sections of your debug output that are inappropriate for public consumption. File paths, configuration options and the like all give attackers extra information about your server.
It is also important to remember that when running with `DEBUG` turned on, Django will remember every SQL query it executes. This is useful when youre debugging, but itll rapidly consume memory on a production server.
Finally, if `DEBUG` is `False`, you also need to properly set the `ALLOWED_HOSTS` setting. Failing to do so will result in all requests being returned as Bad Request (400).
### DEBUG_PROPAGATE_EXCEPTIONS
Default: `False`
If set to True, Djangos normal exception handling of view functions will be suppressed, and exceptions will propagate upwards. This can be useful for some test setups, and should never be used on a live site.
### DECIMAL_SEPARATOR
Default: `'.'` (Dot)
Default decimal separator used when formatting decimal numbers.
Note that if `USE_L10N` is set to `True`, then the locale-dictated format has higher precedence and will be applied instead.
See also `NUMBER_GROUPING`, `THOUSAND_SEPARATOR` and `USE_THOUSAND_SEPARATOR`.
### DEFAULT_CHARSET
Default: `'utf-8'`
Default charset to use for all `HttpResponse` objects, if a MIME type isnt manually specified. Used with`DEFAULT_CONTENT_TYPE` to construct the `Content-Type` header.
### DEFAULT_CONTENT_TYPE
Default: `'text/html'`
Default content type to use for all `HttpResponse` objects, if a MIME type isnt manually specified. Used with`DEFAULT_CHARSET` to construct the `Content-Type` header.
### DEFAULT_EXCEPTION_REPORTER_FILTER
Default: `django.views.debug.SafeExceptionReporterFilter`
Default exception reporter filter class to be used if none has been assigned to the `HttpRequest` instance yet.
### DEFAULT_FILE_STORAGE
Default: `django.core.files.storage.FileSystemStorage`
Default file storage class to be used for any file-related operations that dont specify a particular storage system.
### DEFAULT_FROM_EMAIL
Default: `'webmaster@localhost'`
Default email address to use for various automated correspondence from the site manager(s). This doesnt include error messages sent to `ADMINS` and `MANAGERS`; for that, see `SERVER_EMAIL`.
### DEFAULT_INDEX_TABLESPACE
Default: `''` (Empty string)
Default tablespace to use for indexes on fields that dont specify one, if the backend supports it.
### DEFAULT_TABLESPACE
Default: `''` (Empty string)
Default tablespace to use for models that dont specify one, if the backend supports it.
### DISALLOWED_USER_AGENTS
Default: `[]` (Empty list)
List of compiled regular expression objects representing User-Agent strings that are not allowed to visit any page, systemwide. Use this for bad robots/crawlers. This is only used if `CommonMiddleware` is installed.
### EMAIL_BACKEND
Default: `'django.core.mail.backends.smtp.EmailBackend'`
The backend to use for sending emails. For the list of available backends see Appendix H. EMAIL_FILE_PATH
Default: Not defined
The directory used by the `file` email backend to store output files.
### EMAIL_HOST
Default: `'localhost'`
The host to use for sending email.
See also `EMAIL_PORT`.
### EMAIL_HOST_PASSWORD
Default: `''` (Empty string)
Password to use for the SMTP server defined in `EMAIL_HOST`. This setting is used in conjunction with`EMAIL_HOST_USER` when authenticating to the SMTP server. If either of these settings is empty, Django wont attempt authentication.
See also `EMAIL_HOST_USER`.
### EMAIL_HOST_USER
Default: `''` (Empty string)
Username to use for the SMTP server defined in `EMAIL_HOST`. If empty, Django wont attempt authentication.
See also `EMAIL_HOST_PASSWORD`.
### EMAIL_PORT
Default: `25`
Port to use for the SMTP server defined in `EMAIL_HOST`.
### EMAIL_SUBJECT_PREFIX
Default: `'[Django] '`
Subject-line prefix for email messages sent with `django.core.mail.mail_admins` or`django.core.mail.mail_managers`. Youll probably want to include the trailing space.
### EMAIL_USE_TLS
Default: `False`
Whether to use a TLS (secure) connection when talking to the SMTP server. This is used for explicit TLS connections, generally on port 587\. If you are experiencing hanging connections, see the implicit TLS setting `EMAIL_USE_SSL`.
### EMAIL_USE_SSL
Default: `False`
Whether to use an implicit TLS (secure) connection when talking to the SMTP server. In most email documentation this type of TLS connection is referred to as SSL. It is generally used on port 465\. If you are experiencing problems, see the explicit TLS setting `EMAIL_USE_TLS`.
Note that `EMAIL_USE_TLS`/`EMAIL_USE_SSL` are mutually exclusive, so only set one of those settings to `True`.
### EMAIL_SSL_CERTFILE
Default: `None`
If `EMAIL_USE_SSL` or `EMAIL_USE_TLS` is `True`, you can optionally specify the path to a PEM-formatted certificate chain file to use for the SSL connection.
### EMAIL_SSL_KEYFILE
Default: `None`
If `EMAIL_USE_SSL` or `EMAIL_USE_TLS` is `True`, you can optionally specify the path to a PEM-formatted private key file to use for the SSL connection.
Note that setting `EMAIL_SSL_CERTFILE` and `EMAIL_SSL_KEYFILE` doesnt result in any certificate checking. Theyre passed to the underlying SSL connection. Please refer to the documentation of Pythons`python:ssl.wrap_socket()` function for details on how the certificate chain file and private key file are handled.
### EMAIL_TIMEOUT
Default: `None`
Specifies a timeout in seconds for blocking operations like the connection attempt.
### FILE_CHARSET
Default: `'utf-8'`
The character encoding used to decode any files read from disk. This includes template files and initial SQL data files.
### FILE_UPLOAD_HANDLERS
Default:
~~~
["django.core.files.uploadhandler.MemoryFileUploadHandler",
"django.core.files.uploadhandler.TemporaryFileUploadHandler"]
~~~
A list of handlers to use for uploading. Changing this setting allows complete customization even replacement of Djangos upload process.
### FILE_UPLOAD_MAX_MEMORY_SIZE
Default: `2621440` (i.e. 2.5 MB).
The maximum size (in bytes) that an upload will be before it gets streamed to the file system.
### FILE_UPLOAD_DIRECTORY_PERMISSIONS
Default: `None`
The numeric mode to apply to directories created in the process of uploading files.
This setting also determines the default permissions for collected static directories when using the`collectstatic` management command. See `collectstatic` for details on overriding it.
This value mirrors the functionality and caveats of the `FILE_UPLOAD_PERMISSIONS` setting.
### FILE_UPLOAD_PERMISSIONS
Default: `None`
The numeric mode (i.e. `0o644`) to set newly uploaded files to. For more information about what these modes mean, see the documentation for `os.chmod()`.
If this isnt given or is `None`, youll get operating-system dependent behavior. On most platforms, temporary files will have a mode of `0o600`, and files saved from memory will be saved using the systems standard umask.
For security reasons, these permissions arent applied to the temporary files that are stored in`FILE_UPLOAD_TEMP_DIR`.
This setting also determines the default permissions for collected static files when using the `collectstatic`management command. See `collectstatic` for details on overriding it.
Warning
Always prefix the mode with a 0.
If youre not familiar with file modes, please note that the leading `0` is very important: it indicates an octal number, which is the way that modes must be specified. If you try to use `644`, youll get totally incorrect behavior.
### FILE_UPLOAD_TEMP_DIR
Default: `None`
The directory to store data (typically files larger than `FILE_UPLOAD_MAX_MEMORY_SIZE`) temporarily while uploading files. If `None`, Django will use the standard temporary directory for the operating system. For example, this will default to `/tmp` on *nix-style operating systems.
### FIRST_DAY_OF_WEEK
Default: `0` (Sunday)
Number representing the first day of the week. This is especially useful when displaying a calendar. This value is only used when not using format internationalization, or when a format cannot be found for the current locale.
The value must be an integer from 0 to 6, where 0 means Sunday, 1 means Monday and so on.
### FIXTURE_DIRS
Default: `[]` (Empty list)
List of directories searched for fixture files, in addition to the `fixtures` directory of each application, in search order.
Note that these paths should use Unix-style forward slashes, even on Windows.
### FORCE_SCRIPT_NAME
Default: `None`
If not `None`, this will be used as the value of the `SCRIPT_NAME` environment variable in any HTTP request. This setting can be used to override the server-provided value of `SCRIPT_NAME`, which may be a rewritten version of the preferred value or not supplied at all.
### FORMAT_MODULE_PATH
Default: `None`
A full Python path to a Python package that contains format definitions for project locales. If not `None`, Django will check for a `formats.py` file, under the directory named as the current locale, and will use the formats defined on this file.
For example, if `FORMAT_MODULE_PATH` is set to `mysite.formats`, and current language is `en` (English), Django will expect a directory tree like:
~~~
mysite/
formats/
__init__.py
en/
__init__.py
formats.py
~~~
You can also set this setting to a list of Python paths, for example:
~~~
FORMAT_MODULE_PATH = [
'mysite.formats',
'some_app.formats',
]
~~~
When Django searches for a certain format, it will go through all given Python paths until it finds a module that actually defines the given format. This means that formats defined in packages farther up in the list will take precedence over the same formats in packages farther down.
Available formats are `DATE_FORMAT`, `TIME_FORMAT`, `DATETIME_FORMAT`, `YEAR_MONTH_FORMAT`, `MONTH_DAY_FORMAT`,`SHORT_DATE_FORMAT`, `SHORT_DATETIME_FORMAT`, `FIRST_DAY_OF_WEEK`, `DECIMAL_SEPARATOR`, `THOUSAND_SEPARATOR` and`NUMBER_GROUPING`.
### IGNORABLE_404_URLS
Default: `[]` (Empty list)
List of compiled regular expression objects describing URLs that should be ignored when reporting HTTP 404 errors via email. Regular expressions are matched against `request's full paths` (including query string, if any). Use this if your site does not provide a commonly requested file such as `favicon.ico` or `robots.txt`, or if it gets hammered by script kiddies.
This is only used if `BrokenLinkEmailsMiddleware` is enabled.
### INSTALLED_APPS
Default: `[]` (Empty list)
A list of strings designating all applications that are enabled in this Django installation. Each string should be a dotted Python path to:
* an application configuration class, or
* a package containing a application.
Learn more about application configurations .
Use the application registry for introspection
Your code should never access `INSTALLED_APPS` directly. Use `django.apps.apps` instead.
Application names and labels must be unique in `INSTALLED_APPS`
Application `names` the dotted Python path to the application package must be unique. There is no way to include the same application twice, short of duplicating its code under another name.
Application `labels` by default the final part of the name must be unique too. For example, you cant include both `django.contrib.auth` and `myproject.auth`. However, you can relabel an application with a custom configuration that defines a different `label`.
These rules apply regardless of whether `INSTALLED_APPS` references application configuration classes on application packages.
When several applications provide different versions of the same resource (template, static file, management command, translation), the application listed first in `INSTALLED_APPS` has precedence.
### INTERNAL_IPS
Default: `[]` (Empty list)
A list of IP addresses, as strings, that:
* See debug comments, when `DEBUG` is `True`
* Receive X headers in admindocs if the `XViewMiddleware` is installed.
### LANGUAGE_CODE
Default: `'en-us'`
A string representing the language code for this installation. This should be in standard language ID format. For example, U.S. English is `"en-us"`.
`USE_I18N` must be active for this setting to have any effect.
It serves two purposes:
* If the locale middleware isnt in use, it decides which translation is served to all users.
* If the locale middleware is active, it provides the fallback translation when no translation exist for a given literal to the users preferred language.
### LANGUAGE_COOKIE_AGE
Default: `None` (expires at browser close)
The age of the language cookie, in seconds.
### LANGUAGE_COOKIE_DOMAIN
Default: `None`
The domain to use for the language cookie. Set this to a string such as `".example.com"` (note the leading dot!) for cross-domain cookies, or use `None` for a standard domain cookie.
Be cautious when updating this setting on a production site. If you update this setting to enable cross-domain cookies on a site that previously used standard domain cookies, existing user cookies that have the old domain will not be updated. This will result in site users being unable to switch the language as long as these cookies persist. The only safe and reliable option to perform the switch is to change the language cookie name permanently (via the `LANGUAGE_COOKIE_NAME` setting) and to add a middleware that copies the value from the old cookie to a new one and then deletes the old one.
### LANGUAGE_COOKIE_NAME
Default: `'django_language'`
The name of the cookie to use for the language cookie. This can be whatever you want (but should be different from `SESSION_COOKIE_NAME`). LANGUAGE_COOKIE_PATH
Default: `/`
The path set on the language cookie. This should either match the URL path of your Django installation or be a parent of that path.
This is useful if you have multiple Django instances running under the same hostname. They can use different cookie paths and each instance will only see its own language cookie.
Be cautious when updating this setting on a production site. If you update this setting to use a deeper path than it previously used, existing user cookies that have the old path will not be updated. This will result in site users being unable to switch the language as long as these cookies persist. The only safe and reliable option to perform the switch is to change the language cookie name permanently (via the`LANGUAGE_COOKIE_NAME` setting), and to add a middleware that copies the value from the old cookie to a new one and then deletes the one.
### LANGUAGES
Default: A list of all available languages. This list is continually growing and including a copy here would inevitably become rapidly out of date. You can see the current list of translated languages by looking in`django/conf/global_settings.py` (or view the [online source](https://github.com/django/django/blob/master/django/conf/global_settings.py)).
The list is a list of two-tuples in the format (`language code`, `language name`) for example, `('ja', 'Japanese')`. This specifies which languages are available for language selection. Generally, the default value should suffice. Only set this setting if you want to restrict language selection to a subset of the Django-provided languages.
If you define a custom `LANGUAGES` setting, you can mark the language names as translation strings using the`ugettext_lazy()` function.
Heres a sample settings file:
~~~
from django.utils.translation import ugettext_lazy as _
LANGUAGES = [
('de', _('German')),
('en', _('English')),
]
~~~
### LOCALE_PATHS
Default: `[]` (Empty list)
A list of directories where Django looks for translation files.
Example:
~~~
LOCALE_PATHS = [
'/home/www/project/common_files/locale',
'/var/local/translations/locale',
]
~~~
Django will look within each of these paths for the `<locale_code>/LC_MESSAGES` directories containing the actual translation files.
### LOGGING
Default: A logging configuration dictionary.
A data structure containing configuration information. The contents of this data structure will be passed as the argument to the configuration method described in `LOGGING_CONFIG`.
Among other things, the default logging configuration passes HTTP 500 server errors to an email log handler when `DEBUG` is `False`. You can see the default logging configuration by looking in`django/utils/log.py` (or view the [online source](https://github.com/django/django/blob/master/django/utils/log.py)).
### LOGGING_CONFIG
Default: `'logging.config.dictConfig'`
A path to a callable that will be used to configure logging in the Django project. Points at a instance of Pythons [dictConfig](https://docs.python.org/library/logging.config.html#configuration-dictionary-schema) configuration method by default.
If you set `LOGGING_CONFIG` to `None`, the logging configuration process will be skipped.
### MANAGERS
Default: `[]` (Empty list)
A list in the same format as `ADMINS` that specifies who should get broken link notifications when`BrokenLinkEmailsMiddleware` is enabled.
### MEDIA_ROOT
Default: `''` (Empty string)
Absolute filesystem path to the directory that will hold user-uploaded files.
Example: `"/var/www/example.com/media/"`
See also `MEDIA_URL`.
Warning
`MEDIA_ROOT` and `STATIC_ROOT` must have different values. Before `STATIC_ROOT` was introduced, it was common to rely or fallback on `MEDIA_ROOT` to also serve static files; however, since this can have serious security implications, there is a validation check to prevent it.
### MEDIA_URL
Default: `''` (Empty string)
URL that handles the media served from `MEDIA_ROOT`, used for managing stored files . It must end in a slash if set to a non-empty value. You will need to configure these files to be served in both development and production.
If you want to use `{{ MEDIA_URL }}` in your templates, add `'django.template.context_processors.media'` in the`'context_processors'` option of `TEMPLATES`.
Example: `"http://media.example.com/"`
Warning
There are security risks if you are accepting uploaded content from untrusted users! See Chapter 21 for mitigation details.
Warning
`MEDIA_URL` and `STATIC_URL` must have different values. See `MEDIA_ROOT` for more details.
### MIDDLEWARE_CLASSES
Default:
~~~
['django.middleware.common.CommonMiddleware',
'django.middleware.csrf.CsrfViewMiddleware']
~~~
A list of middleware classes to use. See Chapter 19.
### MIGRATION_MODULES
Default:
~~~
{} # empty dictionary
~~~
A dictionary specifying the package where migration modules can be found on a per-app basis. The default value of this setting is an empty dictionary, but the default package name for migration modules is `migrations`.
Example:
~~~
{'blog': 'blog.db_migrations'}
~~~
In this case, migrations pertaining to the `blog` app will be contained in the `blog.db_migrations` package.
If you provide the `app_label` argument, `makemigrations` will automatically create the package if it doesnt already exist.
### MONTH_DAY_FORMAT
Default: `'F j'`
The default formatting to use for date fields on Django admin change-list pages and, possibly, by other parts of the system in cases when only the month and day are displayed.
For example, when a Django admin change-list page is being filtered by a date drilldown, the header for a given day displays the day and month. Different locales have different formats. For example, U.S. English would say January 1, whereas Spanish might say 1 Enero.
Note that if `USE_L10N` is set to `True`, then the corresponding locale-dictated format has higher precedence and will be applied.
See also `DATE_FORMAT`, `DATETIME_FORMAT`, `TIME_FORMAT` and `YEAR_MONTH_FORMAT`.
### NUMBER_GROUPING
Default: `0`
Number of digits grouped together on the integer part of a number.
Common use is to display a thousand separator. If this setting is `0`, then no grouping will be applied to the number. If this setting is greater than `0`, then `THOUSAND_SEPARATOR` will be used as the separator between those groups.
Note that if `USE_L10N` is set to `True`, then the locale-dictated format has higher precedence and will be applied instead.
See also `DECIMAL_SEPARATOR`, `THOUSAND_SEPARATOR` and `USE_THOUSAND_SEPARATOR`.
### PREPEND_WWW
Default: `False`
Whether to prepend the www. subdomain to URLs that dont have it. This is only used if `CommonMiddleware`is installed. See also `APPEND_SLASH`.
### ROOT_URLCONF
Default: Not defined
A string representing the full Python import path to your root URLconf. For example: `"mydjangoapps.urls"`. Can be overridden on a per-request basis by setting the attribute `urlconf` on the incoming `HttpRequest`object.
### SECRET_KEY
Default: `''` (Empty string)
A secret key for a particular Django installation. This is used to provide cryptographic signing , and should be set to a unique, unpredictable value.
django-admin startproject automatically adds a randomly-generated `SECRET_KEY` to each new project.
Django will refuse to start if `SECRET_KEY` is not set.
Warning
Keep this value secret.
Running Django with a known `SECRET_KEY` defeats many of Djangos security protections, and can lead to privilege escalation and remote code execution vulnerabilities.
The secret key is used for:
* All sessions if you are using any other session backend than `django.contrib.sessions.backends.cache`, or if you use `SessionAuthenticationMiddleware` and are using the default `get_session_auth_hash()`.
* All messages if you are using `CookieStorage` or `FallbackStorage`.
* `Form wizard` progress when using cookie storage with `formtools.wizard.views.CookieWizardView`.
* All `password_reset()` tokens.
* All in progress `form previews`.
* Any usage of cryptographic signing , unless a different key is provided.
If you rotate your secret key, all of the above will be invalidated. Secret keys are not used for passwords of users and key rotation will not affect them.
### SECURE_BROWSER_XSS_FILTER
Default: `False`
If `True`, the `SecurityMiddleware` sets the xss protection header on all responses that do not already have it.
### SECURE_CONTENT_TYPE_NOSNIFF
Default: `False`
If `True`, the `SecurityMiddleware` sets the x content type options header on all responses that do not already have it.
### SECURE_HSTS_INCLUDE_SUBDOMAINS
Default: `False`
If `True`, the `SecurityMiddleware` adds the `includeSubDomains` tag to the http-strict-transport-security header. It has no effect unless `SECURE_HSTS_SECONDS` is set to a non-zero value.
Warning
Setting this incorrectly can irreversibly (for some time) break your site. Read the http-strict-transport-security documentation first.
### SECURE_HSTS_SECONDS
Default: `0`
If set to a non-zero integer value, the `SecurityMiddleware` sets the http-strict-transport-security header on all responses that do not already have it.
Warning
Setting this incorrectly can irreversibly (for some time) break your site. Read the http-strict-transport-security documentation first.
### SECURE_PROXY_SSL_HEADER
Default: `None`
A tuple representing a HTTP header/value combination that signifies a request is secure. This controls the behavior of the request objects `is_secure()` method.
This takes some explanation. By default, `is_secure()` is able to determine whether a request is secure by looking at whether the requested URL uses https://. This is important for Djangos CSRF protection, and may be used by your own code or third-party apps.
If your Django app is behind a proxy, though, the proxy may be swallowing the fact that a request is HTTPS, using a non-HTTPS connection between the proxy and Django. In this case, `is_secure()` would always return `False` even for requests that were made via HTTPS by the end user.
In this situation, youll want to configure your proxy to set a custom HTTP header that tells Django whether the request came in via HTTPS, and youll want to set `SECURE_PROXY_SSL_HEADER` so that Django knows what header to look for.
Youll need to set a tuple with two elements the name of the header to look for and the required value. For example:
~~~
SECURE_PROXY_SSL_HEADER = ('HTTP_X_FORWARDED_PROTO', 'https')
~~~
Here, were telling Django that we trust the `X-Forwarded-Proto` header that comes from our proxy, and any time its value is `'https'`, then the request is guaranteed to be secure (i.e., it originally came in via HTTPS). Obviously, you should *only* set this setting if you control your proxy or have some other guarantee that it sets/strips this header appropriately.
Note that the header needs to be in the format as used by `request.META` all caps and likely starting with`HTTP_`. (Remember, Django automatically adds `'HTTP_'` to the start of x-header names before making the header available in `request.META`.)
Warning
You will probably open security holes in your site if you set this without knowing what youre doing. And if you fail to set it when you should. Seriously.
Make sure ALL of the following are true before setting this (assuming the values from the example above):
* Your Django app is behind a proxy.
* Your proxy strips the `X-Forwarded-Proto` header from all incoming requests. In other words, if end users include that header in their requests, the proxy will discard it.
* Your proxy sets the `X-Forwarded-Proto` header and sends it to Django, but only for requests that originally come in via HTTPS.
If any of those are not true, you should keep this setting set to `None` and find another way of determining HTTPS, perhaps via custom middleware.
### SECURE_REDIRECT_EXEMPT
Default: `[]`
If a URL path matches a regular expression in this list, the request will not be redirected to HTTPS. If`SECURE_SSL_REDIRECT` is `False`, this setting has no effect.
### SECURE_SSL_HOST
Default: `None`
If a string (e.g. `secure.example.com`), all SSL redirects will be directed to this host rather than the originally-requested host (e.g. `www.example.com`). If `SECURE_SSL_REDIRECT` is `False`, this setting has no effect.
### SECURE_SSL_REDIRECT
Default: `False`.
If `True`, the `SecurityMiddleware` redirects all non-HTTPS requests to HTTPS (except for those URLs matching a regular expression listed in `SECURE_REDIRECT_EXEMPT`).
Note
If turning this to `True` causes infinite redirects, it probably means your site is running behind a proxy and cant tell which requests are secure and which are not. Your proxy likely sets a header to indicate secure requests; you can correct the problem by finding out what that header is and configuring the`SECURE_PROXY_SSL_HEADER` setting accordingly.
### SERIALIZATION_MODULES
Default: Not defined.
A dictionary of modules containing serializer definitions (provided as strings), keyed by a string identifier for that serialization type. For example, to define a YAML serializer, use:
~~~
SERIALIZATION_MODULES = {'yaml': 'path.to.yaml_serializer'}
~~~
### SERVER_EMAIL
Default: `'root@localhost'`
The email address that error messages come from, such as those sent to `ADMINS` and `MANAGERS`.
Why are my emails sent from a different address?
This address is used only for error messages. It is *not* the address that regular email messages sent with`send_mail()` come from; for that, see `DEFAULT_FROM_EMAIL`.
### SHORT_DATE_FORMAT
Default: `m/d/Y` (e.g. `12/31/2003`)
An available formatting that can be used for displaying date fields on templates. Note that if `USE_L10N` is set to `True`, then the corresponding locale-dictated format has higher precedence and will be applied.
See also `DATE_FORMAT` and `SHORT_DATETIME_FORMAT`.
### SHORT_DATETIME_FORMAT
Default: `m/d/Y P` (e.g. `12/31/2003 4 p.m.`)
An available formatting that can be used for displaying datetime fields on templates. Note that if `USE_L10N`is set to `True`, then the corresponding locale-dictated format has higher precedence and will be applied.
See also `DATE_FORMAT` and `SHORT_DATE_FORMAT`.
### SIGNING_BACKEND
Default: `'django.core.signing.TimestampSigner'`
The backend used for signing cookies and other data.
### SILENCED_SYSTEM_CHECKS
Default: `[]`
A list of identifiers of messages generated by the system check framework (i.e. `["models.W001"]`) that you wish to permanently acknowledge and ignore. Silenced warnings will no longer be output to the console; silenced errors will still be printed, but will not prevent management commands from running.
### TEMPLATES
Default:: `[]` (Empty list)
A list containing the settings for all template engines to be used with Django. Each item of the list is a dictionary containing the options for an individual engine.
Heres a simple setup that tells the Django template engine to load templates from the `templates`subdirectories inside installed applications:
~~~
TEMPLATES = [
{
'BACKEND': 'django.template.backends.django.DjangoTemplates',
'APP_DIRS': True,
},
]
~~~
The following options are available for all backends.
#### BACKEND
Default: not defined
The template backend to use. The built-in template backends are:
* `'django.template.backends.django.DjangoTemplates'`
* `'django.template.backends.jinja2.Jinja2'`
You can use a template backend that doesnt ship with Django by setting `BACKEND` to a fully-qualified path (i.e. `'mypackage.whatever.Backend'`).
#### NAME
Default: see below
The alias for this particular template engine. Its an identifier that allows selecting an engine for rendering. Aliases must be unique across all configured template engines.
It defaults to the name of the module defining the engine class, i.e. the next to last piece of `BACKEND<TEMPLATES-BACKEND>`, when it isnt provided. For example if the backend is `'mypackage.whatever.Backend'` then its default name is `'whatever'`.
#### DIRS
Default:: `[]` (Empty list)
Directories where the engine should look for template source files, in search order.
#### APP_DIRS
Default:: `False`
Whether the engine should look for template source files inside installed applications.
#### OPTIONS
Default:: `{}` (Empty dict)
Extra parameters to pass to the template backend. Available parameters vary depending on the template backend.
### TEMPLATE_DEBUG
Default: `False`
A boolean that turns on/off template debug mode. If this is `True`, the fancy error page will display a detailed report for any exception raised during template rendering. This report contains the relevant snippet of the template, with the appropriate line highlighted.
Note that Django only displays fancy error pages if `DEBUG` is `True`, so youll want to set that to take advantage of this setting.
See also `DEBUG`.
### TEST_RUNNER
Default: `'django.test.runner.DiscoverRunner'`
The name of the class to use for starting the test suite.
### TEST_NON_SERIALIZED_APPS
Default: `[]`
In order to restore the database state between tests for `TransactionTestCase`s and database backends without transactions, Django will serialize the contents of all apps when it starts the test run so it can then reload from that copy before tests that need it.
This slows down the startup time of the test runner; if you have apps that you know dont need this feature, you can add their full names in here (e.g. `'django.contrib.contenttypes'`) to exclude them from this serialization process.
### THOUSAND_SEPARATOR
Default: `,` (Comma)
Default thousand separator used when formatting numbers. This setting is used only when`USE_THOUSAND_SEPARATOR` is `True` and `NUMBER_GROUPING` is greater than `0`.
Note that if `USE_L10N` is set to `True`, then the locale-dictated format has higher precedence and will be applied instead.
See also `NUMBER_GROUPING`, `DECIMAL_SEPARATOR` and `USE_THOUSAND_SEPARATOR`.
### TIME_FORMAT
Default: `'P'` (e.g. `4 p.m.`)
The default formatting to use for displaying time fields in any part of the system. Note that if `USE_L10N` is set to `True`, then the locale-dictated format has higher precedence and will be applied instead.
See also `DATE_FORMAT` and `DATETIME_FORMAT`.
### TIME_INPUT_FORMATS
Default:
~~~
[
'%H:%M:%S', # '14:30:59'
'%H:%M:%S.%f', # '14:30:59.000200'
'%H:%M', # '14:30'
]
~~~
A list of formats that will be accepted when inputting data on a time field. Formats will be tried in order, using the first valid one. Note that these format strings use Pythons [datetime](https://docs.python.org/library/datetime.html#strftime-strptime-behavior) module syntax, not the format strings from the `date` Django template tag.
When `USE_L10N` is `True`, the locale-dictated format has higher precedence and will be applied instead.
See also `DATE_INPUT_FORMATS` and `DATETIME_INPUT_FORMATS`.
### TIME_ZONE
Default: `'America/Chicago'`
A string representing the time zone for this installation, or `None`. See the [list of time zones](http://en.wikipedia.org/wiki/List_of_tz_database_time_zones).
Note
Since Django was first released with the `TIME_ZONE` set to `'America/Chicago'`, the global setting (used if nothing is defined in your projects `settings.py`) remains `'America/Chicago'` for backwards compatibility. New project templates default to `'UTC'`.
Note that this isnt necessarily the time zone of the server. For example, one server may serve multiple Django-powered sites, each with a separate time zone setting.
When `USE_TZ` is `False`, this is the time zone in which Django will store all datetimes. When `USE_TZ` is `True`, this is the default time zone that Django will use to display datetimes in templates and to interpret datetimes entered in forms.
Django sets the `os.environ['TZ']` variable to the time zone you specify in the `TIME_ZONE` setting. Thus, all your views and models will automatically operate in this time zone. However, Django wont set the `TZ`environment variable under the following conditions:
* If youre using the manual configuration option as described in manually configuring settings,or
* If you specify `TIME_ZONE = None`. This will cause Django to fall back to using the system timezone. However, this is discouraged when `USE_TZ = True`, because it makes conversions between local time and UTC less reliable.
If Django doesnt set the `TZ` environment variable, its up to you to ensure your processes are running in the correct environment.
Note
Django cannot reliably use alternate time zones in a Windows environment. If youre running Django on Windows, `TIME_ZONE` must be set to match the system time zone.
### USE_ETAGS
Default: `False`
A boolean that specifies whether to output the Etag header. This saves bandwidth but slows down performance. This is used by the `CommonMiddleware` and in the“Cache Framework“.
### USE_I18N
Default: `True`
A boolean that specifies whether Djangos translation system should be enabled. This provides an easy way to turn it off, for performance. If this is set to `False`, Django will make some optimizations so as not to load the translation machinery.
See also `LANGUAGE_CODE`, `USE_L10N` and `USE_TZ`.
### USE_L10N
Default: `False`
A boolean that specifies if localized formatting of data will be enabled by default or not. If this is set to`True`, e.g. Django will display numbers and dates using the format of the current locale.
See also `LANGUAGE_CODE`, `USE_I18N` and `USE_TZ`.
Note
The default `settings.py` file created by `django-admin startproject` includes `USE_L10N = True` for convenience.
### USE_THOUSAND_SEPARATOR
Default: `False`
A boolean that specifies whether to display numbers using a thousand separator. When `USE_L10N` is set to`True` and if this is also set to `True`, Django will use the values of `THOUSAND_SEPARATOR` and `NUMBER_GROUPING` to format numbers.
See also `DECIMAL_SEPARATOR`, `NUMBER_GROUPING` and `THOUSAND_SEPARATOR`.
### USE_TZ
Default: `False`
A boolean that specifies if datetimes will be timezone-aware by default or not. If this is set to `True`, Django will use timezone-aware datetimes internally. Otherwise, Django will use naive datetimes in local time.
See also `TIME_ZONE`, `USE_I18N` and `USE_L10N`.
Note
The default `settings.py` file created by django-admin startproject includes `USE_TZ = True` for convenience.
### USE_X_FORWARDED_HOST
Default: `False`
A boolean that specifies whether to use the X-Forwarded-Host header in preference to the Host header. This should only be enabled if a proxy which sets this header is in use.
### WSGI_APPLICATION
Default: `None`
The full Python path of the WSGI application object that Djangos built-in servers (e.g. `runserver`) will use. The `django-admin startproject` management command will create a simple `wsgi.py` file with an `application`callable in it, and point this setting to that `application`.
If not set, the return value of `django.core.wsgi.get_wsgi_application()` will be used. In this case, the behavior of `runserver` will be identical to previous Django versions.
### YEAR_MONTH_FORMAT
Default: `'F Y'`
The default formatting to use for date fields on Django admin change-list pages and, possibly, by other parts of the system in cases when only the year and month are displayed.
For example, when a Django admin change-list page is being filtered by a date drilldown, the header for a given month displays the month and the year. Different locales have different formats. For example, U.S. English would say January 2006, whereas another locale might say 2006/January.
Note that if `USE_L10N` is set to `True`, then the corresponding locale-dictated format has higher precedence and will be applied.
See also `DATE_FORMAT`, `DATETIME_FORMAT`, `TIME_FORMAT` and `MONTH_DAY_FORMAT`.
### X_FRAME_OPTIONS
Default: `'SAMEORIGIN'`
The default value for the X-Frame-Options header used by `XFrameOptionsMiddleware`. See the clickjacking protection documentation.
## Auth
Settings for `django.contrib.auth`.
### AUTHENTICATION_BACKENDS
Default: `['django.contrib.auth.backends.ModelBackend']`
A list of authentication backend classes (as strings) to use when attempting to authenticate a user. See the authentication backends documentation for details.
### AUTH_USER_MODEL
Default: auth.User
The model to use to represent a User.
Warning
You cannot change the AUTH_USER_MODEL setting during the lifetime of a project (i.e. once you have made and migrated models that depend on it) without serious effort. It is intended to be set at the project start, and the model it refers to must be available in the first migration of the app that it lives in.
### LOGIN_REDIRECT_URL
Default: `'/accounts/profile/'`
The URL where requests are redirected after login when the `contrib.auth.login` view gets no `next`parameter.
This is used by the `login_required()` decorator, for example.
This setting also accepts view function names and named URL patterns which can be used to reduce configuration duplication since you dont have to define the URL in two places (`settings` and URLconf).
### LOGIN_URL
Default: `'/accounts/login/'`
The URL where requests are redirected for login, especially when using the `login_required()` decorator.
This setting also accepts view function names and named URL patterns which can be used to reduce configuration duplication since you dont have to define the URL in two places (`settings` and URLconf).
### LOGOUT_URL
Default: `'/accounts/logout/'`
LOGIN_URL counterpart.
### PASSWORD_RESET_TIMEOUT_DAYS
Default: `3`
The number of days a password reset link is valid for. Used by the `django.contrib.auth` password reset mechanism.
### PASSWORD_HASHERS
Default:
~~~
['django.contrib.auth.hashers.PBKDF2PasswordHasher',
'django.contrib.auth.hashers.PBKDF2SHA1PasswordHasher',
'django.contrib.auth.hashers.BCryptPasswordHasher',
'django.contrib.auth.hashers.SHA1PasswordHasher',
'django.contrib.auth.hashers.MD5PasswordHasher',
'django.contrib.auth.hashers.UnsaltedMD5PasswordHasher',
'django.contrib.auth.hashers.CryptPasswordHasher']
~~~
## Messages
Settings for `django.contrib.messages`.
### MESSAGE_LEVEL
Default: `messages.INFO`
Sets the minimum message level that will be recorded by the messages framework.
Important
If you override `MESSAGE_LEVEL` in your settings file and rely on any of the built-in constants, you must import the constants module directly to avoid the potential for circular imports, e.g.:
~~~
from django.contrib.messages import constants as message_constants
MESSAGE_LEVEL = message_constants.DEBUG
~~~
If desired, you may specify the numeric values for the constants directly according to the values in the above constants table.
### MESSAGE_STORAGE
Default: `'django.contrib.messages.storage.fallback.FallbackStorage'`
Controls where Django stores message data. Valid values are:
* `'django.contrib.messages.storage.fallback.FallbackStorage'`
* `'django.contrib.messages.storage.session.SessionStorage'`
* `'django.contrib.messages.storage.cookie.CookieStorage'`
The backends that use cookies `CookieStorage` and `FallbackStorage` use the value of `SESSION_COOKIE_DOMAIN`,`SESSION_COOKIE_SECURE` and `SESSION_COOKIE_HTTPONLY` when setting their cookies.
### MESSAGE_TAGS
Default:
~~~
{messages.DEBUG: 'debug',
messages.INFO: 'info',
messages.SUCCESS: 'success',
messages.WARNING: 'warning',
messages.ERROR: 'error'}
~~~
This sets the mapping of message level to message tag, which is typically rendered as a CSS class in HTML. If you specify a value, it will extend the default. This means you only have to specify those values which you need to override.
Important
If you override `MESSAGE_TAGS` in your settings file and rely on any of the built-in constants, you must import the `constants` module directly to avoid the potential for circular imports, e.g.:
~~~
from django.contrib.messages import constants as message_constants
MESSAGE_TAGS = {message_constants.INFO: ''}
~~~
If desired, you may specify the numeric values for the constants directly according to the values in the above constants table.
## Sessions
Settings for `django.contrib.sessions`.
### SESSION_CACHE_ALIAS
Default: `default`
If youre using cache-based session storage, this selects the cache to use.
### SESSION_COOKIE_AGE
Default: `1209600` (2 weeks, in seconds)
The age of session cookies, in seconds.
### SESSION_COOKIE_DOMAIN
Default: `None`
The domain to use for session cookies. Set this to a string such as `".example.com"` (note the leading dot!) for cross-domain cookies, or use `None` for a standard domain cookie.
Be cautious when updating this setting on a production site. If you update this setting to enable cross-domain cookies on a site that previously used standard domain cookies, existing user cookies will be set to the old domain. This may result in them being unable to log in as long as these cookies persist.
This setting also affects cookies set by `django.contrib.messages`.
### SESSION_COOKIE_HTTPONLY
Default: `True`
Whether to use `HTTPOnly` flag on the session cookie. If this is set to `True`, client-side JavaScript will not to be able to access the session cookie.
[HTTPOnly](https://www.owasp.org/index.php/HTTPOnly) is a flag included in a Set-Cookie HTTP response header. It is not part of the [RFC 2109](https://tools.ietf.org/html/rfc2109.html) standard for cookies, and it isnt honored consistently by all browsers. However, when it is honored, it can be a useful way to mitigate the risk of client side script accessing the protected cookie data.
Turning it on makes it less trivial for an attacker to escalate a cross-site scripting vulnerability into full hijacking of a users session. Theres not much excuse for leaving this off, either: if your code depends on reading session cookies from Javascript, youre probably doing it wrong.
### SESSION_COOKIE_NAME
Default: `'sessionid'`
The name of the cookie to use for sessions. This can be whatever you want (but should be different from`LANGUAGE_COOKIE_NAME`).
### SESSION_COOKIE_PATH
Default: `'/'`
The path set on the session cookie. This should either match the URL path of your Django installation or be parent of that path.
This is useful if you have multiple Django instances running under the same hostname. They can use different cookie paths, and each instance will only see its own session cookie.
### SESSION_COOKIE_SECURE
Default: `False`
Whether to use a secure cookie for the session cookie. If this is set to `True`, the cookie will be marked as secure, which means browsers may ensure that the cookie is only sent under an HTTPS connection.
Since its trivial for a packet sniffer (e.g. [Firesheep](http://codebutler.com/firesheep)) to hijack a users session if the session cookie is sent unencrypted, theres really no good excuse to leave this off. It will prevent you from using sessions on insecure requests and thats a good thing.
### SESSION_ENGINE
Default: `django.contrib.sessions.backends.db`
Controls where Django stores session data. Included engines are:
* `'django.contrib.sessions.backends.db'`
* `'django.contrib.sessions.backends.file'`
* `'django.contrib.sessions.backends.cache'`
* `'django.contrib.sessions.backends.cached_db'`
* `'django.contrib.sessions.backends.signed_cookies'`
### SESSION_EXPIRE_AT_BROWSER_CLOSE
Default: `False`
Whether to expire the session when the user closes their browser.
### SESSION_FILE_PATH
Default: `None`
If youre using file-based session storage, this sets the directory in which Django will store session data. When the default value (`None`) is used, Django will use the standard temporary directory for the system.
### SESSION_SAVE_EVERY_REQUEST
Default: `False`
Whether to save the session data on every request. If this is `False` (default), then the session data will only be saved if it has been modified that is, if any of its dictionary values have been assigned or deleted.
### SESSION_SERIALIZER
Default: `'django.contrib.sessions.serializers.JSONSerializer'`
Full import path of a serializer class to use for serializing session data. Included serializers are:
* `'django.contrib.sessions.serializers.PickleSerializer'`
* `'django.contrib.sessions.serializers.JSONSerializer'`
## Sites
Settings for `django.contrib.sites`.
### SITE_ID
Default: Not defined
The ID, as an integer, of the current site in the `django_site` database table. This is used so that application data can hook into specific sites and a single database can manage content for multiple sites.
## Static files
Settings for `django.contrib.staticfiles`.
### STATIC_ROOT
Default: `None`
The absolute path to the directory where `collectstatic` will collect static files for deployment.
Example: `"/var/www/example.com/static/"`
If the staticfiles contrib app is enabled (default) the `collectstatic` management command will collect static files into this directory. See the howto on managing static files for more details about usage.
Warning
This should be an (initially empty) destination directory for collecting your static files from their permanent locations into one directory for ease of deployment; it is not a place to store your static files permanently. You should do that in directories that will be found by staticfiles`finders<STATICFILES_FINDERS>`, which by default, are `'static/'` app sub-directories and any directories you include in `STATICFILES_DIRS`).
### STATIC_URL
Default: `None`
URL to use when referring to static files located in `STATIC_ROOT`.
Example: `"/static/"` or `"http://static.example.com/"`
If not `None`, this will be used as the base path for asset definitions (the `Media` class) and the staticfiles app.
It must end in a slash if set to a non-empty value.
You may need to configure these files to be served in development and will definitely need to do so in production .
### STATICFILES_DIRS
Default: `[]` (Empty list)
This setting defines the additional locations the staticfiles app will traverse if the `FileSystemFinder` finder is enabled, e.g. if you use the `collectstatic` or `findstatic` management command or use the static file serving view.
This should be set to a list of strings that contain full paths to your additional files directory(ies) e.g.:
~~~
STATICFILES_DIRS = [
"/home/special.polls.com/polls/static",
"/home/polls.com/polls/static",
"/opt/webfiles/common",
]
~~~
Note that these paths should use Unix-style forward slashes, even on Windows (e.g.`"C:/Users/user/mysite/extra_static_content"`).
#### PREFIXES (OPTIONAL)
In case you want to refer to files in one of the locations with an additional namespace, you can optionallyprovide a prefix as `(prefix, path)` tuples, e.g.:
~~~
STATICFILES_DIRS = [
# ...
("downloads", "/opt/webfiles/stats"),
]
~~~
For example, assuming you have `STATIC_URL` set to `'/static/'`, the `collectstatic` management command would collect the stats files in a `'downloads'` subdirectory of `STATIC_ROOT`.
This would allow you to refer to the local file `'/opt/webfiles/stats/polls_20101022.tar.gz'` with`'/static/downloads/polls_20101022.tar.gz'` in your templates, e.g.:
~~~
<a href="{% static "downloads/polls_20101022.tar.gz" %}">
~~~
### STATICFILES_STORAGE
Default: `'django.contrib.staticfiles.storage.StaticFilesStorage'`
The file storage engine to use when collecting static files with the `collectstatic` management command.
A ready-to-use instance of the storage backend defined in this setting can be found at`django.contrib.staticfiles.storage.staticfiles_storage`.
### STATICFILES_FINDERS
Default:
~~~
["django.contrib.staticfiles.finders.FileSystemFinder",
"django.contrib.staticfiles.finders.AppDirectoriesFinder"]
~~~
The list of finder backends that know how to find static files in various locations.
The default will find files stored in the `STATICFILES_DIRS` setting (using`django.contrib.staticfiles.finders.FileSystemFinder`) and in a `static` subdirectory of each app (using`django.contrib.staticfiles.finders.AppDirectoriesFinder`). If multiple files with the same name are present, the first file that is found will be used.
One finder is disabled by default: `django.contrib.staticfiles.finders.DefaultStorageFinder`. If added to your`STATICFILES_FINDERS` setting, it will look for static files in the default file storage as defined by the`DEFAULT_FILE_STORAGE` setting.
Note
When using the `AppDirectoriesFinder` finder, make sure your apps can be found by staticfiles. Simply add the app to the `INSTALLED_APPS` setting of your site.
Static file finders are currently considered a private interface, and this interface is thus undocumented.
Appendix C: Generic View Reference
最后更新于:2022-04-01 04:48:32
Chapter 10 introduced generic views but leaves out some of the gory details. This appendix describes each generic view along with all the options each view can take. Be sure to read Chapter 10 before trying to understand the reference material that follows. You might want to refer back to the `Book`, `Publisher`, and`Author` objects defined in that chapter; the examples that follow use these models.
[TOC=3]
## Common Arguments to Generic Views
Most of these views take a large number of arguments that can change the generic views behavior. Many of these arguments work the same across a large number of views. Table C-1 describes each of these common arguments; anytime you see one of these arguments in a generic views argument list, it will work as described in the table.
Table C-1\. Common Arguments to Generic Views
| Argument | Description |
| --- | --- |
| `allow_empty` | A Boolean specifying whether to display the page if no objects are available. If this is `False` and no objects are available, the view will raise a 404 error instead of displaying an empty page. By default, this is `True`. |
| `context_processors` | A list of additional template-context processors (besides the defaults) to apply to the views template. See Chapter 9 for information on template context processors. |
| `extra_context` | A dictionary of values to add to the template context. By default, this is an empty dictionary. If a value in the dictionary is callable, the generic view will call it just before rendering the template. |
| `mimetype` | The MIME type to use for the resulting document. It defaults to the value of the `DEFAULT_MIME_TYPE` setting, which is `text/html` if you havent changed it. |
| `queryset` | A `QuerySet` (i.e., something like `Author.objects.all()`) to read objects from. See Appendix B for more information about `QuerySet` objects. Most generic views require this argument. |
| `template_loader` | The template loader to use when loading the template. By default, its `django.template.loader`. See Chapter 9 for information on template loaders. |
| `template_name` | The full name of a template to use in rendering the page. This lets you override the default template name derived from the `QuerySet`. |
| `template_object_name` | The name of the template variable to use in the template context. By default, this is `'object'`. Views that list more than one object (i.e., `object_list` views and various objects-for-date views) will append `'_list'` to the value of this parameter. |
## Simple Generic Views
The module“django.views.generic.base“ contains simple views that handle a couple of common cases: rendering a template when no view logic is needed and issuing a redirect.
### Rendering a Template
*View function*: `django.views.generic.base.TemplateView`
This view renders a given template, passing it a context with keyword arguments captured in the URL.
#### EXAMPLE
Given the following URLconf:
~~~
from django.conf.urls import url
from myapp.views import HomePageView
urlpatterns = [
url(r'^$', HomePageView.as_view(), name='home'),
]
~~~
An a sample views.py:
~~~
from django.views.generic.base import TemplateView
from articles.models import Article
class HomePageView(TemplateView):
template_name = "home.html"
def get_context_data(self, **kwargs):
context = super(HomePageView, self).get_context_data(**kwargs)
context['latest_articles'] = Article.objects.all()[:5]
return context
~~~
a request to `/` would render the template `home.html`, returning a context containing a list of the top 5 articles.
### Redirecting to Another URL
*View function*: `django.views.generic.base.RedirectView`
Redirects to a given URL.
The given URL may contain dictionary-style string formatting, which will be interpolated against the parameters captured in the URL. Because keyword interpolation is *always* done (even if no arguments are passed in), any `"%"` characters in the URL must be written as `"%%"` so that Python will convert them to a single percent sign on output.
If the given URL is `None`, Django will return an `HttpResponseGone` (410).
Example views.py:
~~~
from django.shortcuts import get_object_or_404
from django.views.generic.base import RedirectView
from articles.models import Article
class ArticleCounterRedirectView(RedirectView):
permanent = False
query_string = True
pattern_name = 'article-detail'
def get_redirect_url(self, *args, **kwargs):
article = get_object_or_404(Article, pk=kwargs['pk'])
article.update_counter()
return super(ArticleCounterRedirectView, self).get_redirect_url(*args, **kwargs)
~~~
Example urls.py:
~~~
from django.conf.urls import url
from django.views.generic.base import RedirectView
from article.views import ArticleCounterRedirectView, ArticleDetail
urlpatterns = [
url(r'^counter/(?P<pk>[0-9]+)/$', ArticleCounterRedirectView.as_view(), name='article-counter'),
url(r'^details/(?P<pk>[0-9]+)/$', ArticleDetail.as_view(), name='article-detail'),
url(r'^go-to-django/$', RedirectView.as_view(url='http://djangoproject.com'), name='go-to-django'),
]
~~~
Attributes
`url`
The URL to redirect to, as a string. Or `None` to raise a 410 (Gone) HTTP error.
`pattern_name`
The name of the URL pattern to redirect to. Reversing will be done using the same args and kwargs as are passed in for this view.
`permanent`
Whether the redirect should be permanent. The only difference here is the HTTP status code returned. If`True`, then the redirect will use status code 301\. If `False`, then the redirect will use status code 302\. By default, `permanent` is `True`.
`query_string`
Whether to pass along the GET query string to the new location. If `True`, then the query string is appended to the URL. If `False`, then the query string is discarded. By default, `query_string` is `False`.
Methods
`get_redirect_url`(**args*, ***kwargs*)
Constructs the target URL for redirection.
The default implementation uses [`url`](http://masteringdjango.com/django-generic-view-reference/#url "url") as a starting string and performs expansion of `%` named parameters in that string using the named groups captured in the URL.
If [`url`](http://masteringdjango.com/django-generic-view-reference/#url "url") is not set, `get_redirect_url()` tries to reverse the [`pattern_name`](http://masteringdjango.com/django-generic-view-reference/#pattern_name "pattern_name") using what was captured in the URL (both named and unnamed groups are used).
If requested by [`query_string`](http://masteringdjango.com/django-generic-view-reference/#query_string "query_string"), it will also append the query string to the generated URL. Subclasses may implement any behavior they wish, as long as the method returns a redirect-ready URL string.
## List/Detail Generic Views
The list/detail generic views handle the common case of displaying a list of items at one view and individual detail views of those items at another.
### Lists of Objects
*View function*: `django.views.generic.list.ListView`
Use this view to display a page representing a list of objects.
#### EXAMPLE
Example views.py:
~~~
from django.views.generic.list import ListView
from django.utils import timezone
from articles.models import Article
class ArticleListView(ListView):
model = Article
def get_context_data(self, **kwargs):
context = super(ArticleListView, self).get_context_data(**kwargs)
context['now'] = timezone.now()
return context
~~~
Example myapp/urls.py:
~~~
from django.conf.urls import url
from article.views import ArticleListView
urlpatterns = [
url(r'^$', ArticleListView.as_view(), name='article-list'),
]
~~~
Example myapp/article_list.html:
~~~
<h1>Articles</h1>
<ul>
{% for article in object_list %}
<li>{{ article.pub_date|date }} - {{ article.headline }}</li>
{% empty %}
<li>No articles yet.</li>
{% endfor %}
</ul>
~~~
### Detail Views
*View function*: `django.views.generic.detail.DetailView`
This view provides a detail view of a single object.
#### EXAMPLE
Example myapp/views.py:
~~~
from django.views.generic.detail import DetailView
from django.utils import timezone
from articles.models import Article
class ArticleDetailView(DetailView):
model = Article
def get_context_data(self, **kwargs):
context = super(ArticleDetailView, self).get_context_data(**kwargs)
context['now'] = timezone.now()
return context
~~~
Example myapp/urls.py:
~~~
from django.conf.urls import url
from article.views import ArticleDetailView
urlpatterns = [
url(r'^(?P<slug>[-_\w]+)/$', ArticleDetailView.as_view(), name='article-detail'),
]
~~~
Example myapp/article_detail.html:
~~~
<h1>{{ object.headline }}</h1>
<p>{{ object.content }}</p>
<p>Reporter: {{ object.reporter }}</p>
<p>Published: {{ object.pub_date|date }}</p>
<p>Date: {{ now|date }}</p>
~~~
## Date-Based Generic Views
Date-based generic views, provided in [`django.views.generic.dates`](http://masteringdjango.com/django-generic-view-reference/#module-django.views.generic.dates "django.views.generic.dates"), are views for displaying drilldown pages for date-based data.
Note
Some of the examples on this page assume that an `Article` model has been defined as follows in`myapp/models.py`:
~~~
from django.db import models
from django.core.urlresolvers import reverse
class Article(models.Model):
title = models.CharField(max_length=200)
pub_date = models.DateField()
def get_absolute_url(self):
return reverse('article-detail', kwargs={'pk': self.pk})
~~~
### ArchiveIndexView
*class *`django.views.generic.dates.``ArchiveIndexView`
A top-level index page showing the latest objects, by date. Objects with a date in the *future* are not included unless you set `allow_future` to `True`.
Context
In addition to the context provided by `django.views.generic.list.MultipleObjectMixin` (via`django.views.generic.dates.BaseDateListView`), the templates context will be:
* `date_list`: A `DateQuerySet` object containing all years that have objects available according to `queryset`, represented as `datetime.datetime` objects, in descending order.
Notes
* Uses a default `context_object_name` of `latest`.
* Uses a default `template_name_suffix` of `_archive`.
* Defaults to providing `date_list` by year, but this can be altered to month or day using the attribute`date_list_period`. This also applies to all subclass views.
Example myapp/urls.py:
~~~
from django.conf.urls import url
from django.views.generic.dates import ArchiveIndexView
from myapp.models import Article
urlpatterns = [
url(r'^archive/$',
ArchiveIndexView.as_view(model=Article, date_field="pub_date"),
name="article_archive"),
]
~~~
Example myapp/article_archive.html:
~~~
<ul>
{% for article in latest %}
<li>{{ article.pub_date }}: {{ article.title }}</li>
{% endfor %}
</ul>
~~~
This will output all articles.
### YearArchiveView
*class *`django.views.generic.dates.``YearArchiveView`
A yearly archive page showing all available months in a given year. Objects with a date in the *future* are not displayed unless you set `allow_future` to `True`.
`make_object_list`
A boolean specifying whether to retrieve the full list of objects for this year and pass those to the template. If `True`, the list of objects will be made available to the context. If `False`, the `None` queryset will be used as the object list. By default, this is `False`.
`get_make_object_list`()
Determine if an object list will be returned as part of the context. Returns [`make_object_list`](http://masteringdjango.com/django-generic-view-reference/#django.views.generic.dates.YearArchiveView.make_object_list "django.views.generic.dates.YearArchiveView.make_object_list") by default.
Context
In addition to the context provided by `django.views.generic.list.MultipleObjectMixin` (via`django.views.generic.dates.BaseDateListView`), the templates context will be:
* `date_list`: A `DateQuerySet` object containing all months that have objects available according to `queryset`, represented as `datetime.datetime` objects, in ascending order.
* `year`: A `date` object representing the given year.
* `next_year`: A `date` object representing the first day of the next year, according to `allow_empty` and`allow_future`.
* `previous_year`: A `date` object representing the first day of the previous year, according to `allow_empty` and`allow_future`.
Notes
* Uses a default `template_name_suffix` of `_archive_year`.
Example myapp/views.py:
~~~
from django.views.generic.dates import YearArchiveView
from myapp.models import Article
class ArticleYearArchiveView(YearArchiveView):
queryset = Article.objects.all()
date_field = "pub_date"
make_object_list = True
allow_future = True
~~~
Example myapp/urls.py:
~~~
from django.conf.urls import url
from myapp.views import ArticleYearArchiveView
urlpatterns = [
url(r'^(?P<year>[0-9]{4})/$',
ArticleYearArchiveView.as_view(),
name="article_year_archive"),
]
~~~
Example myapp/article_archive_year.html:
~~~
<ul>
{% for date in date_list %}
<li>{{ date|date }}</li>
{% endfor %}
</ul>
<div>
<h1>All Articles for {{ year|date:"Y" }}</h1>
{% for obj in object_list %}
<p>
{{ obj.title }} - {{ obj.pub_date|date:"F j, Y" }}
</p>
{% endfor %}
</div>
~~~
### MonthArchiveView
*class *`django.views.generic.dates.``MonthArchiveView`
A monthly archive page showing all objects in a given month. Objects with a date in the *future* are not displayed unless you set `allow_future` to `True`.
Context
In addition to the context provided by `MultipleObjectMixin` (via `BaseDateListView`), the templates context will be:
* `date_list`: A `DateQuerySet` object containing all days that have objects available in the given month, according to `queryset`, represented as `datetime.datetime` objects, in ascending order.
* `month`: A `date` object representing the given month.
* `next_month`: A `date` object representing the first day of the next month, according to `allow_empty` and`allow_future`.
* `previous_month`: A `date` object representing the first day of the previous month, according to `allow_empty` and`allow_future`.
Notes
* Uses a default `template_name_suffix` of `_archive_month`.
Example myapp/views.py:
~~~
from django.views.generic.dates import MonthArchiveView
from myapp.models import Article
class ArticleMonthArchiveView(MonthArchiveView):
queryset = Article.objects.all()
date_field = "pub_date"
make_object_list = True
allow_future = True
~~~
Example myapp/urls.py:
~~~
from django.conf.urls import url
from myapp.views import ArticleMonthArchiveView
urlpatterns = [
# Example: /2012/aug/
url(r'^(?P<year>[0-9]{4})/(?P<month>[-\w]+)/$',
ArticleMonthArchiveView.as_view(),
name="archive_month"),
# Example: /2012/08/
url(r'^(?P<year>[0-9]{4})/(?P<month>[0-9]+)/$',
ArticleMonthArchiveView.as_view(month_format='%m'),
name="archive_month_numeric"),
]
~~~
Example myapp/article_archive_month.html:
~~~
<ul>
{% for article in object_list %}
<li>{{ article.pub_date|date:"F j, Y" }}: {{ article.title }}</li>
{% endfor %}
</ul>
<p>
{% if previous_month %}
Previous Month: {{ previous_month|date:"F Y" }}
{% endif %}
{% if next_month %}
Next Month: {{ next_month|date:"F Y" }}
{% endif %}
</p>
~~~
### WeekArchiveView
*class *`django.views.generic.dates.``WeekArchiveView`
A weekly archive page showing all objects in a given week. Objects with a date in the *future* are not displayed unless you set `allow_future` to `True`.
Context
In addition to the context provided by `MultipleObjectMixin` (via `BaseDateListView`), the templates context will be:
* `week`: A `date` object representing the first day of the given week.
* `next_week`: A `date` object representing the first day of the next week, according to `allow_empty` and`allow_future`.
* `previous_week`: A `date` object representing the first day of the previous week, according to `allow_empty` and`allow_future`.
Notes
* Uses a default `template_name_suffix` of `_archive_week`.
Example myapp/views.py:
~~~
from django.views.generic.dates import WeekArchiveView
from myapp.models import Article
class ArticleWeekArchiveView(WeekArchiveView):
queryset = Article.objects.all()
date_field = "pub_date"
make_object_list = True
week_format = "%W"
allow_future = True
~~~
Example myapp/urls.py:
~~~
from django.conf.urls import url
from myapp.views import ArticleWeekArchiveView
urlpatterns = [
# Example: /2012/week/23/
url(r'^(?P<year>[0-9]{4})/week/(?P<week>[0-9]+)/$',
ArticleWeekArchiveView.as_view(),
name="archive_week"),
]
~~~
Example myapp/article_archive_week.html:
~~~
<h1>Week {{ week|date:'W' }}</h1>
<ul>
{% for article in object_list %}
<li>{{ article.pub_date|date:"F j, Y" }}: {{ article.title }}</li>
{% endfor %}
</ul>
<p>
{% if previous_week %}
Previous Week: {{ previous_week|date:"F Y" }}
{% endif %}
{% if previous_week and next_week %}--{% endif %}
{% if next_week %}
Next week: {{ next_week|date:"F Y" }}
{% endif %}
</p>
~~~
In this example, you are outputting the week number. The default `week_format` in the `WeekArchiveView` uses week format `'%U'` which is based on the United States week system where the week begins on a Sunday. The `'%W'` format uses the ISO week format and its week begins on a Monday. The `'%W'` format is the same in both the `strftime()` and the `date`.
However, the `date` template filter does not have an equivalent output format that supports the US based week system. The `date` filter `'%U'` outputs the number of seconds since the Unix epoch.
### DayArchiveView
*class *`django.views.generic.dates.``DayArchiveView`
A day archive page showing all objects in a given day. Days in the future throw a 404 error, regardless of whether any objects exist for future days, unless you set `allow_future` to `True`.
Context
In addition to the context provided by `MultipleObjectMixin` (via `BaseDateListView`), the templates context will be:
* `day`: A `date` object representing the given day.
* `next_day`: A `date` object representing the next day, according to `allow_empty` and `allow_future`.
* `previous_day`: A `date` object representing the previous day, according to `allow_empty` and `allow_future`.
* `next_month`: A `date` object representing the first day of the next month, according to `allow_empty` and`allow_future`.
* `previous_month`: A `date` object representing the first day of the previous month, according to `allow_empty` and`allow_future`.
Notes
* Uses a default `template_name_suffix` of `_archive_day`.
Example myapp/views.py:
~~~
from django.views.generic.dates import DayArchiveView
from myapp.models import Article
class ArticleDayArchiveView(DayArchiveView):
queryset = Article.objects.all()
date_field = "pub_date"
make_object_list = True
allow_future = True
~~~
Example myapp/urls.py:
~~~
from django.conf.urls import url
from myapp.views import ArticleDayArchiveView
urlpatterns = [
# Example: /2012/nov/10/
url(r'^(?P<year>[0-9]{4})/(?P<month>[-\w]+)/(?P<day>[0-9]+)/$',
ArticleDayArchiveView.as_view(),
name="archive_day"),
]
~~~
Example myapp/article_archive_day.html:
~~~
<h1>{{ day }}</h1>
<ul>
{% for article in object_list %}
<li>{{ article.pub_date|date:"F j, Y" }}: {{ article.title }}</li>
{% endfor %}
</ul>
<p>
{% if previous_day %}
Previous Day: {{ previous_day }}
{% endif %}
{% if previous_day and next_day %}--{% endif %}
{% if next_day %}
Next Day: {{ next_day }}
{% endif %}
</p>
~~~
### TodayArchiveView
*class *`django.views.generic.dates.``TodayArchiveView`
A day archive page showing all objects for *today*. This is exactly the same as[`django.views.generic.dates.DayArchiveView`](http://masteringdjango.com/django-generic-view-reference/#django.views.generic.dates.DayArchiveView "django.views.generic.dates.DayArchiveView"), except todays date is used instead of the `year`/`month`/`day`arguments.
Notes
* Uses a default `template_name_suffix` of `_archive_today`.
Example myapp/views.py:
~~~
from django.views.generic.dates import TodayArchiveView
from myapp.models import Article
class ArticleTodayArchiveView(TodayArchiveView):
queryset = Article.objects.all()
date_field = "pub_date"
make_object_list = True
allow_future = True
~~~
Example myapp/urls.py:
~~~
from django.conf.urls import url
from myapp.views import ArticleTodayArchiveView
urlpatterns = [
url(r'^today/$',
ArticleTodayArchiveView.as_view(),
name="archive_today"),
]
~~~
Where is the example template for `TodayArchiveView`?
This view uses by default the same template as the [`DayArchiveView`](http://masteringdjango.com/django-generic-view-reference/#django.views.generic.dates.DayArchiveView "django.views.generic.dates.DayArchiveView"), which is in the previous example. If you need a different template, set the `template_name` attribute to be the name of the new template.
### DateDetailView
*class *`django.views.generic.dates.``DateDetailView`
A page representing an individual object. If the object has a date value in the future, the view will throw a 404 error by default, unless you set `allow_future` to `True`.
Context
* Includes the single object associated with the `model` specified in the `DateDetailView`.
Notes
* Uses a default `template_name_suffix` of `_detail`.
Example myapp/urls.py:
~~~
from django.conf.urls import url
from django.views.generic.dates import DateDetailView
urlpatterns = [
url(r'^(?P<year>[0-9]+)/(?P<month>[-\w]+)/(?P<day>[0-9]+)/(?P<pk>[0-9]+)/$',
DateDetailView.as_view(model=Article, date_field="pub_date"),
name="archive_date_detail"),
]
~~~
Example myapp/article_detail.html:
~~~
<h1>{{ object.title }}</h1>
~~~
## Form handling with class-based views
Form processing generally has 3 paths:
* Initial GET (blank or prepopulated form)
* POST with invalid data (typically redisplay form with errors)
* POST with valid data (process the data and typically redirect)
Implementing this yourself often results in a lot of repeated boilerplate code (see Using a form in a view). To help avoid this, Django provides a collection of generic class-based views for form processing.
### Basic Forms
Given a simple contact form:
~~~
# forms.py
from django import forms
class ContactForm(forms.Form):
name = forms.CharField()
message = forms.CharField(widget=forms.Textarea)
def send_email(self):
# send email using the self.cleaned_data dictionary
pass
~~~
The view can be constructed using a `FormView`:
~~~
# views.py
from myapp.forms import ContactForm
from django.views.generic.edit import FormView
class ContactView(FormView):
template_name = 'contact.html'
form_class = ContactForm
success_url = '/thanks/'
def form_valid(self, form):
# This method is called when valid form data has been POSTed.
# It should return an HttpResponse.
form.send_email()
return super(ContactView, self).form_valid(form)
~~~
Notes:
* FormView inherits `TemplateResponseMixin` so `template_name` can be used here.
* The default implementation for `form_valid()` simply redirects to the `success_url`.
### Model Forms
Generic views really shine when working with models. These generic views will automatically create a`ModelForm`, so long as they can work out which model class to use:
* If the `model` attribute is given, that model class will be used.
* If `get_object()` returns an object, the class of that object will be used.
* If a `queryset` is given, the model for that queryset will be used.
Model form views provide a `form_valid()` implementation that saves the model automatically. You can override this if you have any special requirements; see below for examples.
You dont even need to provide a `success_url` for `CreateView` or `UpdateView` – they will use `get_absolute_url()`on the model object if available.
If you want to use a custom `ModelForm` (for instance to add extra validation) simply set `form_class` on your view.
Note
When specifying a custom form class, you must still specify the model, even though the `form_class` may be a `ModelForm`.
First we need to add `get_absolute_url()` to our `Author` class:
~~~
# models.py
from django.core.urlresolvers import reverse
from django.db import models
class Author(models.Model):
name = models.CharField(max_length=200)
def get_absolute_url(self):
return reverse('author-detail', kwargs={'pk': self.pk})
~~~
Then we can use `CreateView` and friends to do the actual work. Notice how were just configuring the generic class-based views here; we dont have to write any logic ourselves:
~~~
# views.py
from django.views.generic.edit import CreateView, UpdateView, DeleteView
from django.core.urlresolvers import reverse_lazy
from myapp.models import Author
class AuthorCreate(CreateView):
model = Author
fields = ['name']
class AuthorUpdate(UpdateView):
model = Author
fields = ['name']
class AuthorDelete(DeleteView):
model = Author
success_url = reverse_lazy('author-list')
~~~
Note
We have to use `reverse_lazy()` here, not just `reverse` as the urls are not loaded when the file is imported.
The `fields` attribute works the same way as the `fields` attribute on the inner `Meta` class on `ModelForm`. Unless you define the form class in another way, the attribute is required and the view will raise an`ImproperlyConfigured` exception if its not.
If you specify both the `fields` and `form_class` attributes, an `ImproperlyConfigured` exception will be raised.
Changed in version 1.8: Omitting the `fields` attribute was previously allowed and resulted in a form with all of the models fields.
Changed in version 1.8: Previously if both `fields` and `form_class` were specified, `fields` was silently ignored.
Finally, we hook these new views into the URLconf:
~~~
# urls.py
from django.conf.urls import url
from myapp.views import AuthorCreate, AuthorUpdate, AuthorDelete
urlpatterns = [
# ...
url(r'author/add/$', AuthorCreate.as_view(), name='author_add'),
url(r'author/(?P<pk>[0-9]+)/$', AuthorUpdate.as_view(), name='author_update'),
url(r'author/(?P<pk>[0-9]+)/delete/$', AuthorDelete.as_view(), name='author_delete'),
]
~~~
Note
These views inherit `SingleObjectTemplateResponseMixin` which uses `template_name_suffix` to construct the`template_name` based on the model.
In this example:
* `CreateView` and `UpdateView` use `myapp/author_form.html`
* `DeleteView` uses `myapp/author_confirm_delete.html`
If you wish to have separate templates for `CreateView` and `UpdateView`, you can set either `template_name` or`template_name_suffix` on your view class.
### Models and request.user
To track the user that created an object using a `CreateView`, you can use a custom `ModelForm` to do this. First, add the foreign key relation to the model:
~~~
# models.py
from django.contrib.auth.models import User
from django.db import models
class Author(models.Model):
name = models.CharField(max_length=200)
created_by = models.ForeignKey(User)
# ...
~~~
In the view, ensure that you dont include `created_by` in the list of fields to edit, and override `form_valid()`to add the user:
~~~
# views.py
from django.views.generic.edit import CreateView
from myapp.models import Author
class AuthorCreate(CreateView):
model = Author
fields = ['name']
def form_valid(self, form):
form.instance.created_by = self.request.user
return super(AuthorCreate, self).form_valid(form)
~~~
Note that youll need to decorate this view using [`login_required()`](http://masteringdjango.com/django-generic-view-reference/chapter_11.html#django.contrib.auth.decorators.login_required "django.contrib.auth.decorators.login_required"), or alternatively handle unauthorized users in the `form_valid()`.
### AJAX example
Here is a simple example showing how you might go about implementing a form that works for AJAX requests as well as normal form POSTs:
~~~
from django.http import JsonResponse
from django.views.generic.edit import CreateView
from myapp.models import Author
class AjaxableResponseMixin(object):
"""
Mixin to add AJAX support to a form.
Must be used with an object-based FormView (e.g. CreateView)
"""
def form_invalid(self, form):
response = super(AjaxableResponseMixin, self).form_invalid(form)
if self.request.is_ajax():
return JsonResponse(form.errors, status=400)
else:
return response
def form_valid(self, form):
# We make sure to call the parent's form_valid() method because
# it might do some processing (in the case of CreateView, it will
# call form.save() for example).
response = super(AjaxableResponseMixin, self).form_valid(form)
if self.request.is_ajax():
data = {
'pk': self.object.pk,
}
return JsonResponse(data)
else:
return response
class AuthorCreate(AjaxableResponseMixin, CreateView):
model = Author
fields = ['name']
~~~
## Using mixins with class-based views
Caution
This is an advanced topic. A working knowledge of Djangos class-based views is advised before exploring these techniques.
Djangos built-in class-based views provide a lot of functionality, but some of it you may want to use separately. For instance, you may want to write a view that renders a template to make the HTTP response, but you cant use `TemplateView`; perhaps you need to render a template only on `POST`, with `GET`doing something else entirely. While you could use `TemplateResponse` directly, this will likely result in duplicate code.
For this reason, Django also provides a number of mixins that provide more discrete functionality. Template rendering, for instance, is encapsulated in the `TemplateResponseMixin`. The Django reference documentation contains full documentation of all the mixins.
## Context and template responses
Two central mixins are provided that help in providing a consistent interface to working with templates in class-based views.
`TemplateResponseMixin`
Every built in view which returns a `TemplateResponse` will call the `render_to_response()` method that`TemplateResponseMixin` provides. Most of the time this will be called for you (for instance, it is called by the`get()` method implemented by both `TemplateView` and `DetailView`); similarly, its unlikely that youll need to override it, although if you want your response to return something not rendered via a Django template then youll want to do it. For an example of this, see the JSONResponseMixin example .
`render_to_response()` itself calls `get_template_names()`, which by default will just look up `template_name` on the class-based view; two other mixins (`SingleObjectTemplateResponseMixin` and`MultipleObjectTemplateResponseMixin`) override this to provide more flexible defaults when dealing with actual objects.
`ContextMixin`
Every built in view which needs context data, such as for rendering a template (including`TemplateResponseMixin` above), should call `get_context_data()` passing any data they want to ensure is in there as keyword arguments. `get_context_data()` returns a dictionary; in `ContextMixin` it simply returns its keyword arguments, but it is common to override this to add more members to the dictionary.
## Building up Djangos generic class-based views
Lets look at how two of Djangos generic class-based views are built out of mixins providing discrete functionality. Well consider `DetailView`, which renders a detail view of an object, and `ListView`, which will render a list of objects, typically from a queryset, and optionally paginate them. This will introduce us to four mixins which between them provide useful functionality when working with either a single Django object, or multiple objects.
There are also mixins involved in the generic edit views (`FormView`, and the model-specific views`CreateView`, `UpdateView` and `DeleteView`), and in the date-based generic views. These are covered in the mixin reference documentation.
### DetailView: working with a single Django object
To show the detail of an object, we basically need to do two things: we need to look up the object and then we need to make a `TemplateResponse` with a suitable template, and that object as context.
To get the object, `DetailView` relies on `SingleObjectMixin`, which provides a `get_object()` method that figures out the object based on the URL of the request (it looks for `pk` and `slug` keyword arguments as declared in the URLConf, and looks the object up either from the `model` attribute on the view, or the `queryset` attribute if thats provided). `SingleObjectMixin` also overrides `get_context_data()`, which is used across all Djangos built in class-based views to supply context data for template renders.
To then make a `TemplateResponse`, `DetailView` uses `SingleObjectTemplateResponseMixin`, which extends`TemplateResponseMixin`, overriding `get_template_names()` as discussed above. It actually provides a fairly sophisticated set of options, but the main one that most people are going to use is`<app_label>/<model_name>_detail.html`. The `_detail` part can be changed by setting `template_name_suffix` on a subclass to something else. (For instance, the generic edit views use `_form` for create and update views, and `_confirm_delete` for delete views.)
### ListView: working with many Django objects
Lists of objects follow roughly the same pattern: we need a (possibly paginated) list of objects, typically a`QuerySet`, and then we need to make a `TemplateResponse` with a suitable template using that list of objects.
To get the objects, `ListView` uses `MultipleObjectMixin`, which provides both `get_queryset()` and`paginate_queryset()`. Unlike with `SingleObjectMixin`, theres no need to key off parts of the URL to figure out the queryset to work with, so the default just uses the `queryset` or `model` attribute on the view class. A common reason to override `get_queryset()` here would be to dynamically vary the objects, such as depending on the current user or to exclude posts in the future for a blog.
`MultipleObjectMixin` also overrides `get_context_data()` to include appropriate context variables for pagination (providing dummies if pagination is disabled). It relies on `object_list` being passed in as a keyword argument, which `ListView` arranges for it.
To make a `TemplateResponse`, `ListView` then uses `MultipleObjectTemplateResponseMixin`; as with`SingleObjectTemplateResponseMixin` above, this overrides `get_template_names()` to provide `a range of options`, with the most commonly-used being `<app_label>/<model_name>_list.html`, with the `_list` part again being taken from the `template_name_suffix` attribute. (The date based generic views use suffixes such as `_archive`,`_archive_year` and so on to use different templates for the various specialized date-based list views.)
## Using Djangos class-based view mixins
Now weve seen how Djangos generic class-based views use the provided mixins, lets look at other ways we can combine them. Of course were still going to be combining them with either built-in class-based views, or other generic class-based views, but there are a range of rarer problems you can solve than are provided for by Django out of the box.
Warning
Not all mixins can be used together, and not all generic class based views can be used with all other mixins. Here we present a few examples that do work; if you want to bring together other functionality then youll have to consider interactions between attributes and methods that overlap between the different classes youre using, and how [method resolution order](https://www.python.org/download/releases/2.3/mro/) will affect which versions of the methods will be called in what order.
The reference documentation for Djangos class-based views and class-based view mixins will help you in understanding which attributes and methods are likely to cause conflict between different classes and mixins.
If in doubt, its often better to back off and base your work on `View` or `TemplateView`, perhaps with`SingleObjectMixin` and `MultipleObjectMixin`. Although you will probably end up writing more code, it is more likely to be clearly understandable to someone else coming to it later, and with fewer interactions to worry about you will save yourself some thinking. (Of course, you can always dip into Djangos implementation of the generic class based views for inspiration on how to tackle problems.)
### Using SingleObjectMixin with View
If we want to write a simple class-based view that responds only to `POST`, well subclass `View` and write a`post()` method in the subclass. However if we want our processing to work on a particular object, identified from the URL, well want the functionality provided by `SingleObjectMixin`.
Well demonstrate this with the `Author` model we used in the generic class-based views introduction.
~~~
# views.py
from django.http import HttpResponseForbidden, HttpResponseRedirect
from django.core.urlresolvers import reverse
from django.views.generic import View
from django.views.generic.detail import SingleObjectMixin
from books.models import Author
class RecordInterest(SingleObjectMixin, View):
"""Records the current user's interest in an author."""
model = Author
def post(self, request, \*args, \*\*kwargs):
if not request.user.is_authenticated():
return HttpResponseForbidden()
# Look up the author we're interested in.
self.object = self.get_object()
# Actually record interest somehow here!
return HttpResponseRedirect(reverse('author-detail', kwargs={'pk': self.object.pk}))
~~~
In practice youd probably want to record the interest in a key-value store rather than in a relational database, so weve left that bit out. The only bit of the view that needs to worry about using`SingleObjectMixin` is where we want to look up the author were interested in, which it just does with a simple call to `self.get_object()`. Everything else is taken care of for us by the mixin.
We can hook this into our URLs easily enough:
~~~
# urls.py
from django.conf.urls import url
from books.views import RecordInterest
urlpatterns = [
#...
url(r'^author/(?P<pk>[0-9]+)/interest/$', RecordInterest.as_view(), name='author-interest'),
]
~~~
Note the `pk` named group, which `get_object()` uses to look up the `Author` instance. You could also use a slug, or any of the other features of `SingleObjectMixin`.
### Using SingleObjectMixin with ListView
`ListView` provides built-in pagination, but you might want to paginate a list of objects that are all linked (by a foreign key) to another object. In our publishing example, you might want to paginate through all the books by a particular publisher.
One way to do this is to combine `ListView` with `SingleObjectMixin`, so that the queryset for the paginated list of books can hang off the publisher found as the single object. In order to do this, we need to have two different querysets:
`Book` queryset for use by `ListView`
Since we have access to the `Publisher` whose books we want to list, we simply override `get_queryset()` and use the `Publisher`s reverse foreign key manager.
`Publisher` queryset for use in `get_object()`
Well rely on the default implementation of `get_object()` to fetch the correct `Publisher` object. However, we need to explicitly pass a `queryset` argument because otherwise the default implementation of `get_object()`would call `get_queryset()` which we have overridden to return `Book` objects instead of `Publisher` ones.
Note
We have to think carefully about `get_context_data()`. Since both `SingleObjectMixin` and `ListView` will put things in the context data under the value of `context_object_name` if its set, well instead explicitly ensure the `Publisher` is in the context data. `ListView` will add in the suitable `page_obj` and `paginator` for us providing we remember to call `super()`.
Now we can write a new `PublisherDetail`:
~~~
from django.views.generic import ListView
from django.views.generic.detail import SingleObjectMixin
from books.models import Publisher
class PublisherDetail(SingleObjectMixin, ListView):
paginate_by = 2
template_name = "books/publisher_detail.html"
def get(self, request, *args, **kwargs):
self.object = self.get_object(queryset=Publisher.objects.all())
return super(PublisherDetail, self).get(request, *args, **kwargs)
def get_context_data(self, **kwargs):
context = super(PublisherDetail, self).get_context_data(**kwargs)
context['publisher'] = self.object
return context
def get_queryset(self):
return self.object.book_set.all()
~~~
Notice how we set `self.object` within `get()` so we can use it again later in `get_context_data()` and`get_queryset()`. If you dont set `template_name`, the template will default to the normal `ListView` choice, which in this case would be `"books/book_list.html"` because its a list of books; `ListView` knows nothing about`SingleObjectMixin`, so it doesnt have any clue this view is anything to do with a `Publisher`.
The `paginate_by` is deliberately small in the example so you dont have to create lots of books to see the pagination working! Heres the template youd want to use:
~~~
{% extends "base.html" %}
{% block content %}
<h2>Publisher {{ publisher.name }}</h2>
<ol>
{% for book in page_obj %}
<li>{{ book.title }}</li>
{% endfor %}
</ol>
<div class="pagination">
<span class="step-links">
{% if page_obj.has_previous %}
<a href="?page={{ page_obj.previous_page_number }}">previous</a>
{% endif %}
<span class="current">
Page {{ page_obj.number }} of {{ paginator.num_pages }}.
{% if page_obj.has_next %}
<a href="?page={{ page_obj.next_page_number }}">next</a>
{% endif %}
</div>
{% endblock %}
~~~
## Avoid anything more complex
Generally you can use `TemplateResponseMixin` and `SingleObjectMixin` when you need their functionality. As shown above, with a bit of care you can even combine `SingleObjectMixin` with `ListView`. However things get increasingly complex as you try to do so, and a good rule of thumb is:
Hint
Each of your views should use only mixins or views from one of the groups of generic class-based views: detail, list editing and date. For example its fine to combine `TemplateView` (built in view) with`MultipleObjectMixin` (generic list), but youre likely to have problems combining `SingleObjectMixin` (generic detail) with `MultipleObjectMixin` (generic list).
To show what happens when you try to get more sophisticated, we show an example that sacrifices readability and maintainability when there is a simpler solution. First, lets look at a naive attempt to combine `DetailView` with `FormMixin` to enable use to `POST` a Django `Form` to the same URL as were displaying an object using `DetailView`.
### Using FormMixin with DetailView
Think back to our earlier example of using `View` and `SingleObjectMixin` together. We were recording a users interest in a particular author; say now that we want to let them leave a message saying why they like them. Again, lets assume were not going to store this in a relational database but instead in something more esoteric that we wont worry about here.
At this point its natural to reach for a `Form` to encapsulate the information sent from the users browser to Django. Say also that were heavily invested in [REST](http://en.wikipedia.org/wiki/Representational_state_transfer), so we want to use the same URL for displaying the author as for capturing the message from the user. Lets rewrite our `AuthorDetailView` to do that.
Well keep the `GET` handling from `DetailView`, although well have to add a `Form` into the context data so we can render it in the template. Well also want to pull in form processing from `FormMixin`, and write a bit of code so that on `POST` the form gets called appropriately.
Note
We use `FormMixin` and implement `post()` ourselves rather than try to mix `DetailView` with `FormView` (which provides a suitable `post()` already) because both of the views implement `get()`, and things would get much more confusing.
Our new `AuthorDetail` looks like this:
~~~
# CAUTION: you almost certainly do not want to do this.
# It is provided as part of a discussion of problems you can
# run into when combining different generic class-based view
# functionality that is not designed to be used together.
from django import forms
from django.http import HttpResponseForbidden
from django.core.urlresolvers import reverse
from django.views.generic import DetailView
from django.views.generic.edit import FormMixin
from books.models import Author
class AuthorInterestForm(forms.Form):
message = forms.CharField()
class AuthorDetail(FormMixin, DetailView):
model = Author
form_class = AuthorInterestForm
def get_success_url(self):
return reverse('author-detail', kwargs={'pk': self.object.pk})
def get_context_data(self, **kwargs):
context = super(AuthorDetail, self).get_context_data(**kwargs)
context['form'] = self.get_form()
return context
def post(self, request, *args, **kwargs):
if not request.user.is_authenticated():
return HttpResponseForbidden()
self.object = self.get_object()
form = self.get_form()
if form.is_valid():
return self.form_valid(form)
else:
return self.form_invalid(form)
def form_valid(self, form):
# Here, we would record the user's interest using the message
# passed in form.cleaned_data['message']
return super(AuthorDetail, self).form_valid(form)
~~~
`get_success_url()` is just providing somewhere to redirect to, which gets used in the default implementation of `form_valid()`. We have to provide our own `post()` as noted earlier, and override`get_context_data()` to make the `Form` available in the context data.
### A better solution
It should be obvious that the number of subtle interactions between `FormMixin` and `DetailView` is already testing our ability to manage things. Its unlikely youd want to write this kind of class yourself.
In this case, it would be fairly easy to just write the `post()` method yourself, keeping `DetailView` as the only generic functionality, although writing `Form` handling code involves a lot of duplication.
Alternatively, it would still be easier than the above approach to have a separate view for processing the form, which could use `FormView` distinct from `DetailView` without concerns.
### An alternative better solution
What were really trying to do here is to use two different class based views from the same URL. So why not do just that? We have a very clear division here: `GET` requests should get the `DetailView` (with the `Form`added to the context data), and `POST` requests should get the `FormView`. Lets set up those views first.
The `AuthorDisplay` view is almost the same as when we first introduced AuthorDetail`; we have to write our own `get_context_data()` to make the `AuthorInterestForm` available to the template. Well skip the `get_object()` override from before for clarity:
~~~
from django.views.generic import DetailView
from django import forms
from books.models import Author
class AuthorInterestForm(forms.Form):
message = forms.CharField()
class AuthorDisplay(DetailView):
model = Author
def get_context_data(self, **kwargs):
context = super(AuthorDisplay, self).get_context_data(**kwargs)
context['form'] = AuthorInterestForm()
return context
~~~
Then the `AuthorInterest` is a simple `FormView`, but we have to bring in `SingleObjectMixin` so we can find the author were talking about, and we have to remember to set `template_name` to ensure that form errors will render the same template as `AuthorDisplay` is using on `GET`:
~~~
from django.core.urlresolvers import reverse
from django.http import HttpResponseForbidden
from django.views.generic import FormView
from django.views.generic.detail import SingleObjectMixin
class AuthorInterest(SingleObjectMixin, FormView):
template_name = 'books/author_detail.html'
form_class = AuthorInterestForm
model = Author
def post(self, request, *args, **kwargs):
if not request.user.is_authenticated():
return HttpResponseForbidden()
self.object = self.get_object()
return super(AuthorInterest, self).post(request, *args, **kwargs)
def get_success_url(self):
return reverse('author-detail', kwargs={'pk': self.object.pk})
~~~
Finally we bring this together in a new `AuthorDetail` view. We already know that calling `as_view()` on a class-based view gives us something that behaves exactly like a function based view, so we can do that at the point we choose between the two subviews.
You can of course pass through keyword arguments to `as_view()` in the same way you would in your URLconf, such as if you wanted the `AuthorInterest` behavior to also appear at another URL but using a different template:
~~~
from django.views.generic import View
class AuthorDetail(View):
def get(self, request, *args, **kwargs):
view = AuthorDisplay.as_view()
return view(request, *args, **kwargs)
def post(self, request, *args, **kwargs):
view = AuthorInterest.as_view()
return view(request, *args, **kwargs)
~~~
This approach can also be used with any other generic class-based views or your own class-based views inheriting directly from `View` or `TemplateView`, as it keeps the different views as separate as possible.
## More than just HTML
Where class based views shine is when you want to do the same thing many times. Suppose youre writing an API, and every view should return JSON instead of rendered HTML.
We can create a mixin class to use in all of our views, handling the conversion to JSON once.
For example, a simple JSON mixin might look something like this:
~~~
from django.http import JsonResponse
class JSONResponseMixin(object):
"""
A mixin that can be used to render a JSON response.
"""
def render_to_json_response(self, context, **response_kwargs):
"""
Returns a JSON response, transforming 'context' to make the payload.
"""
return JsonResponse(
self.get_data(context),
**response_kwargs
)
def get_data(self, context):
"""
Returns an object that will be serialized as JSON by json.dumps().
"""
# Note: This is *EXTREMELY* naive; in reality, you'll need
# to do much more complex handling to ensure that arbitrary
# objects -- such as Django model instances or querysets
# -- can be serialized as JSON.
return context
~~~
Note
Check out the serialization documentation for more information on how to correctly transform Django models and querysets into JSON.
This mixin provides a `render_to_json_response()` method with the same signature as `render_to_response()`. To use it, we simply need to mix it into a `TemplateView` for example, and override `render_to_response()` to call`render_to_json_response()` instead:
~~~
from django.views.generic import TemplateView
class JSONView(JSONResponseMixin, TemplateView):
def render_to_response(self, context, **response_kwargs):
return self.render_to_json_response(context, **response_kwargs)
~~~
Equally we could use our mixin with one of the generic views. We can make our own version of `DetailView`by mixing `JSONResponseMixin` with the `django.views.generic.detail.BaseDetailView` (the `DetailView` before template rendering behavior has been mixed in):
~~~
from django.views.generic.detail import BaseDetailView
class JSONDetailView(JSONResponseMixin, BaseDetailView):
def render_to_response(self, context, **response_kwargs):
return self.render_to_json_response(context, **response_kwargs)
~~~
This view can then be deployed in the same way as any other `DetailView`, with exactly the same behavior except for the format of the response.
If you want to be really adventurous, you could even mix a `DetailView` subclass that is able to return *both*HTML and JSON content, depending on some property of the HTTP request, such as a query argument or a HTTP header. Just mix in both the `JSONResponseMixin` and a `SingleObjectTemplateResponseMixin`, and override the implementation of `render_to_response()` to defer to the appropriate rendering method depending on the type of response that the user requested:
~~~
from django.views.generic.detail import SingleObjectTemplateResponseMixin
class HybridDetailView(JSONResponseMixin, SingleObjectTemplateResponseMixin, BaseDetailView):
def render_to_response(self, context):
# Look for a 'format=json' GET argument
if self.request.GET.get('format') == 'json':
return self.render_to_json_response(context)
else:
return super(HybridDetailView, self).render_to_response(context)
~~~
Because of the way that Python resolves method overloading, the call to `super(HybridDetailView,self).render_to_response(context)` ends up calling the `render_to_response()` implementation of`TemplateResponseMixin`.
Appendix B: Database API Reference
最后更新于:2022-04-01 04:48:30
Django’s database API is the other half of the model API discussed in Appendix A. Once youve defined a model, youll use this API any time you need to access the database. Youve seen examples of this API in use throughout the book; this appendix explains all the various options in detail.
Like the model APIs discussed in Appendix A, though these APIs are considered very stable, the Django developers consistently add new shortcuts and conveniences. Its a good idea to always check the latest documentation online, available at [http://docs.djangoproject.com/](http://docs.djangoproject.com/).
Throughout this guide (and in the reference), well refer to the following models, which comprise a Weblog application:
~~~
from django.db import models
class Blog(models.Model):
name = models.CharField(max_length=100)
tagline = models.TextField()
def __str__(self):
return self.name
class Author(models.Model):
name = models.CharField(max_length=50)
email = models.EmailField()
def __str__(self):
return self.name
class Entry(models.Model):
blog = models.ForeignKey(Blog)
headline = models.CharField(max_length=255)
body_text = models.TextField()
pub_date = models.DateField()
mod_date = models.DateField()
authors = models.ManyToManyField(Author)
n_comments = models.IntegerField()
n_pingbacks = models.IntegerField()
rating = models.IntegerField()
def __str__(self): # __unicode__ on Python 2
return self.headline
~~~
[TOC=3]
## Creating objects
To represent database-table data in Python objects, Django uses an intuitive system: A model class represents a database table, and an instance of that class represents a particular record in the database table.
To create an object, instantiate it using keyword arguments to the model class, then call `save()` to save it to the database.
Assuming models live in a file `mysite/blog/models.py`, heres an example:
~~~
>>> from blog.models import Blog
>>> b = Blog(name='Beatles Blog', tagline='All the latest Beatles news.')
>>> b.save()
~~~
This performs an `INSERT` SQL statement behind the scenes. Django doesnt hit the database until you explicitly call `save()`.
The `save()` method has no return value.
See also
`save()` takes a number of advanced options not described here. See the documentation for `save()` for complete details.
To create and save an object in a single step, use the `create()` method.
## Saving changes to objects
To save changes to an object thats already in the database, use `save()`.
Given a `Blog` instance `b5` that has already been saved to the database, this example changes its name and updates its record in the database:
~~~
>>> b5.name = 'New name'
>>> b5.save()
~~~
This performs an `UPDATE` SQL statement behind the scenes. Django doesnt hit the database until you explicitly call `save()`.
### Saving `ForeignKey` and `ManyToManyField` fields
Updating a [`ForeignKey`](http://masteringdjango.com/django-database-api-reference/appendix_A.html#django.db.models.ForeignKey "django.db.models.ForeignKey") field works exactly the same way as saving a normal field simply assign an object of the right type to the field in question. This example updates the `blog` attribute of an `Entry` instance `entry`, assuming appropriate instances of `Entry` and `Blog` are already saved to the database (so we can retrieve them below):
~~~
>>> from blog.models import Entry
>>> entry = Entry.objects.get(pk=1)
>>> cheese_blog = Blog.objects.get(name="Cheddar Talk")
>>> entry.blog = cheese_blog
>>> entry.save()
~~~
Updating a [`ManyToManyField`](http://masteringdjango.com/django-database-api-reference/appendix_A.html#django.db.models.ManyToManyField "django.db.models.ManyToManyField") works a little differently use the `add()` method on the field to add a record to the relation. This example adds the `Author` instance `joe` to the `entry` object:
~~~
>>> from blog.models import Author
>>> joe = Author.objects.create(name="Joe")
>>> entry.authors.add(joe)
~~~
To add multiple records to a [`ManyToManyField`](http://masteringdjango.com/django-database-api-reference/appendix_A.html#django.db.models.ManyToManyField "django.db.models.ManyToManyField") in one go, include multiple arguments in the call to `add()`, like this:
~~~
>>> john = Author.objects.create(name="John")
>>> paul = Author.objects.create(name="Paul")
>>> george = Author.objects.create(name="George")
>>> ringo = Author.objects.create(name="Ringo")
>>> entry.authors.add(john, paul, george, ringo)
~~~
Django will complain if you try to assign or add an object of the wrong type.
## Retrieving objects
To retrieve objects from your database, construct a `QuerySet` via a `Manager` on your model class.
A `QuerySet` represents a collection of objects from your database. It can have zero, one or many *filters*. Filters narrow down the query results based on the given parameters. In SQL terms, a `QuerySet` equates to a`SELECT` statement, and a filter is a limiting clause such as `WHERE` or `LIMIT`.
You get a `QuerySet` by using your models `Manager`. Each model has at least one `Manager`, and its called `objects`by default. Access it directly via the model class, like so:
~~~
>>> Blog.objects
<django.db.models.manager.Manager object at ...>
>>> b = Blog(name='Foo', tagline='Bar')
>>> b.objects
Traceback:
...
AttributeError: "Manager isn't accessible via Blog instances."
~~~
Note
`Managers` are accessible only via model classes, rather than from model instances, to enforce a separation between table-level operations and record-level operations.
The `Manager` is the main source of `QuerySets` for a model. For example, `Blog.objects.all()` returns a `QuerySet`that contains all `Blog` objects in the database.
### Retrieving all objects
The simplest way to retrieve objects from a table is to get all of them. To do this, use the `all()` method on a `Manager`:
~~~
>>> all_entries = Entry.objects.all()
~~~
The `all()` method returns a `QuerySet` of all the objects in the database.
### Retrieving specific objects with filters
The `QuerySet` returned by `all()` describes all objects in the database table. Usually, though, youll need to select only a subset of the complete set of objects.
To create such a subset, you refine the initial `QuerySet`, adding filter conditions. The two most common ways to refine a `QuerySet` are:
`filter(**kwargs)`
Returns a new `QuerySet` containing objects that match the given lookup parameters.
`exclude(**kwargs)`
Returns a new `QuerySet` containing objects that do *not* match the given lookup parameters.
The lookup parameters (`**kwargs` in the above function definitions) should be in the format described in[Field lookups](http://masteringdjango.com/django-database-api-reference/#field-lookups) below.
For example, to get a `QuerySet` of blog entries from the year 2006, use `filter()` like so:
~~~
Entry.objects.filter(pub_date__year=2006)
~~~
With the default manager class, it is the same as:
~~~
Entry.objects.all().filter(pub_date__year=2006)
~~~
#### CHAINING FILTERS
The result of refining a `QuerySet` is itself a `QuerySet`, so its possible to chain refinements together. For example:
~~~
>>> Entry.objects.filter(
... headline__startswith='What'
... ).exclude(
... pub_date__gte=datetime.date.today()
... ).filter(
... pub_date__gte=datetime(2005, 1, 30)
... )
~~~
This takes the initial `QuerySet` of all entries in the database, adds a filter, then an exclusion, then another filter. The final result is a `QuerySet` containing all entries with a headline that starts with What, that were published between January 30, 2005, and the current day.
#### FILTERED QUERYSETS ARE UNIQUE
Each time you refine a `QuerySet`, you get a brand-new `QuerySet` that is in no way bound to the previous`QuerySet`. Each refinement creates a separate and distinct `QuerySet` that can be stored, used and reused.
Example:
~~~
>>> q1 = Entry.objects.filter(headline__startswith="What")
>>> q2 = q1.exclude(pub_date__gte=datetime.date.today())
>>> q3 = q1.filter(pub_date__gte=datetime.date.today())
~~~
These three `QuerySets` are separate. The first is a base `QuerySet` containing all entries that contain a headline starting with What. The second is a subset of the first, with an additional criteria that excludes records whose `pub_date` is today or in the future. The third is a subset of the first, with an additional criteria that selects only the records whose `pub_date` is today or in the future. The initial `QuerySet` (`q1`) is unaffected by the refinement process.
#### QUERYSETS ARE LAZY
`QuerySets` are lazy the act of creating a `QuerySet` doesnt involve any database activity. You can stack filters together all day long, and Django wont actually run the query until the `QuerySet` is *evaluated*. Take a look at this example:
~~~
>>> q = Entry.objects.filter(headline__startswith="What")
>>> q = q.filter(pub_date__lte=datetime.date.today())
>>> q = q.exclude(body_text__icontains="food")
>>> print(q)
~~~
Though this looks like three database hits, in fact it hits the database only once, at the last line (`print(q)`). In general, the results of a `QuerySet` arent fetched from the database until you ask for them. When you do, the `QuerySet` is *evaluated* by accessing the database. For more details on exactly when evaluation takes place, see when querysets are evaluated.
### Retrieving a single object with get
`filter()` will always give you a `QuerySet`, even if only a single object matches the query – in this case, it will be a `QuerySet` containing a single element.
If you know there is only one object that matches your query, you can use the `get()` method on a `Manager`which returns the object directly:
~~~
>>> one_entry = Entry.objects.get(pk=1)
~~~
You can use any query expression with `get()`, just like with `filter()` – again, see [Field lookups](http://masteringdjango.com/django-database-api-reference/#field-lookups) below.
Note that there is a difference between using `get()`, and using `filter()` with a slice of `[0]`. If there are no results that match the query, `get()` will raise a `DoesNotExist` exception. This exception is an attribute of the model class that the query is being performed on – so in the code above, if there is no `Entry` object with a primary key of 1, Django will raise `Entry.DoesNotExist`.
Similarly, Django will complain if more than one item matches the `get()` query. In this case, it will raise`MultipleObjectsReturned`, which again is an attribute of the model class itself.
### Other QuerySet methods
Most of the time youll use `all()`, `get()`, `filter()` and `exclude()` when you need to look up objects from the database. However, thats far from all there is; see the QuerySet API Reference for a complete list of all the various `QuerySet` methods.
### Limiting QuerySets
Use a subset of Pythons array-slicing syntax to limit your `QuerySet` to a certain number of results. This is the equivalent of SQLs `LIMIT` and `OFFSET` clauses.
For example, this returns the first 5 objects (`LIMIT 5`):
~~~
>>> Entry.objects.all()[:5]
~~~
This returns the sixth through tenth objects (`OFFSET 5 LIMIT 5`):
~~~
>>> Entry.objects.all()[5:10]
~~~
Negative indexing (i.e. `Entry.objects.all()[-1]`) is not supported.
Generally, slicing a `QuerySet` returns a new `QuerySet` it doesnt evaluate the query. An exception is if you use the step parameter of Python slice syntax. For example, this would actually execute the query in order to return a list of every *second* object of the first 10:
~~~
>>> Entry.objects.all()[:10:2]
~~~
To retrieve a *single* object rather than a list (e.g. `SELECT foo FROM bar LIMIT 1`), use a simple index instead of a slice. For example, this returns the first `Entry` in the database, after ordering entries alphabetically by headline:
~~~
>>> Entry.objects.order_by('headline')[0]
~~~
This is roughly equivalent to:
~~~
>>> Entry.objects.order_by('headline')[0:1].get()
~~~
Note, however, that the first of these will raise `IndexError` while the second will raise `DoesNotExist` if no objects match the given criteria. See `get()` for more details.
### Field lookups
Field lookups are how you specify the meat of an SQL `WHERE` clause. Theyre specified as keyword arguments to the `QuerySet` methods `filter()`, `exclude()` and `get()`.
Basic lookups keyword arguments take the form `field__lookuptype=value`. (Thats a double-underscore). For example:
~~~
>>> Entry.objects.filter(pub_date__lte='2006-01-01')
~~~
translates (roughly) into the following SQL:
~~~
SELECT * FROM blog_entry WHERE pub_date <= '2006-01-01';
~~~
How this is possible
Python has the ability to define functions that accept arbitrary name-value arguments whose names and values are evaluated at runtime. For more information, see [Keyword Arguments](https://docs.python.org/tutorial/controlflow.html#keyword-arguments) in the official Python tutorial.
The field specified in a lookup has to be the name of a model field. Theres one exception though, in case of a [`ForeignKey`](http://masteringdjango.com/django-database-api-reference/appendix_A.html#django.db.models.ForeignKey "django.db.models.ForeignKey") you can specify the field name suffixed with `_id`. In this case, the value parameter is expected to contain the raw value of the foreign models primary key. For example:
~~~
>>> Entry.objects.filter(blog_id=4)
~~~
If you pass an invalid keyword argument, a lookup function will raise `TypeError`.
The database API supports about two dozen lookup types; a complete reference can be found in the field lookup reference . To give you a taste of whats available, heres some of the more common lookups youll probably use:
`exact`
An exact match. For example:
~~~
>>> Entry.objects.get(headline__exact="Man bites dog")
~~~
Would generate SQL along these lines:
~~~
SELECT ... WHERE headline = 'Man bites dog';
~~~
If you dont provide a lookup type that is, if your keyword argument doesnt contain a double underscore the lookup type is assumed to be `exact`.
For example, the following two statements are equivalent:
~~~
>>> Blog.objects.get(id__exact=14) # Explicit form
>>> Blog.objects.get(id=14) # __exact is implied
~~~
This is for convenience, because `exact` lookups are the common case.
`iexact`
A case-insensitive match. So, the query:
~~~
>>> Blog.objects.get(name__iexact="beatles blog")
~~~
Would match a `Blog` titled `"Beatles Blog"`, `"beatles blog"`, or even `"BeAtlES blOG"`.
`contains`
Case-sensitive containment test. For example:
~~~
Entry.objects.get(headline__contains='Lennon')
~~~
Roughly translates to this SQL:
~~~
SELECT ... WHERE headline LIKE '%Lennon%';
~~~
Note this will match the headline `'Today Lennon honored'` but not `'today lennon honored'`.
Theres also a case-insensitive version, `icontains`.
`startswith`, `endswith`
Starts-with and ends-with search, respectively. There are also case-insensitive versions called `istartswith`and `iendswith`.
Again, this only scratches the surface. A complete reference can be found in the field lookup reference .
### Lookups that span relationships
Django offers a powerful and intuitive way to follow relationships in lookups, taking care of the SQL `JOIN`s for you automatically, behind the scenes. To span a relationship, just use the field name of related fields across models, separated by double underscores, until you get to the field you want.
This example retrieves all `Entry` objects with a `Blog` whose `name` is `'Beatles Blog'`:
~~~
>>> Entry.objects.filter(blog__name='Beatles Blog')
~~~
This spanning can be as deep as youd like.
It works backwards, too. To refer to a reverse relationship, just use the lowercase name of the model.
This example retrieves all `Blog` objects which have at least one `Entry` whose `headline` contains `'Lennon'`:
~~~
>>> Blog.objects.filter(entry__headline__contains='Lennon')
~~~
If you are filtering across multiple relationships and one of the intermediate models doesnt have a value that meets the filter condition, Django will treat it as if there is an empty (all values are `NULL`), but valid, object there. All this means is that no error will be raised. For example, in this filter:
~~~
Blog.objects.filter(entry__authors__name='Lennon')
~~~
(if there was a related `Author` model), if there was no `author` associated with an entry, it would be treated as if there was also no `name` attached, rather than raising an error because of the missing `author`. Usually this is exactly what you want to have happen. The only case where it might be confusing is if you are using `isnull`. Thus:
~~~
Blog.objects.filter(entry__authors__name__isnull=True)
~~~
will return `Blog` objects that have an empty `name` on the `author` and also those which have an empty `author`on the `entry`. If you dont want those latter objects, you could write:
~~~
Blog.objects.filter(entry__authors__isnull=False,
entry__authors__name__isnull=True)
~~~
#### SPANNING MULTI-VALUED RELATIONSHIPS
When you are filtering an object based on a [`ManyToManyField`](http://masteringdjango.com/django-database-api-reference/appendix_A.html#django.db.models.ManyToManyField "django.db.models.ManyToManyField") or a reverse [`ForeignKey`](http://masteringdjango.com/django-database-api-reference/appendix_A.html#django.db.models.ForeignKey "django.db.models.ForeignKey"), there are two different sorts of filter you may be interested in. Consider the `Blog`/`Entry` relationship (`Blog` to `Entry` is a one-to-many relation). We might be interested in finding blogs that have an entry which has both *Lennon* in the headline and was published in 2008\. Or we might want to find blogs that have an entry with *Lennon* in the headline as well as an entry that was published in 2008\. Since there are multiple entries associated with a single `Blog`, both of these queries are possible and make sense in some situations.
The same type of situation arises with a [`ManyToManyField`](http://masteringdjango.com/django-database-api-reference/appendix_A.html#django.db.models.ManyToManyField "django.db.models.ManyToManyField"). For example, if an `Entry` has a [`ManyToManyField`](http://masteringdjango.com/django-database-api-reference/appendix_A.html#django.db.models.ManyToManyField "django.db.models.ManyToManyField")called `tags`, we might want to find entries linked to tags called *music* and *bands* or we might want an entry that contains a tag with a name of *music* and a status of *public*.
To handle both of these situations, Django has a consistent way of processing `filter()` and `exclude()` calls. Everything inside a single `filter()` call is applied simultaneously to filter out items matching all those requirements. Successive `filter()` calls further restrict the set of objects, but for multi-valued relations, they apply to any object linked to the primary model, not necessarily those objects that were selected by an earlier `filter()` call.
That may sound a bit confusing, so hopefully an example will clarify. To select all blogs that contain entries with both *Lennon* in the headline and that were published in 2008 (the same entry satisfying both conditions), we would write:
~~~
Blog.objects.filter(entry__headline__contains='Lennon',
entry__pub_date__year=2008)
~~~
To select all blogs that contain an entry with *Lennon* in the headline as well as an entry that was published in 2008, we would write:
~~~
Blog.objects.filter(entry__headline__contains='Lennon').filter(
entry__pub_date__year=2008)
~~~
Suppose there is only one blog that had both entries containing *Lennon* and entries from 2008, but that none of the entries from 2008 contained *Lennon*. The first query would not return any blogs, but the second query would return that one blog.
In the second example, the first filter restricts the queryset to all those blogs linked to entries with*Lennon* in the headline. The second filter restricts the set of blogs *further* to those that are also linked to entries that were published in 2008\. The entries selected by the second filter may or may not be the same as the entries in the first filter. We are filtering the `Blog` items with each filter statement, not the `Entry`items.
All of this behavior also applies to `exclude()`: all the conditions in a single `exclude()` statement apply to a single instance (if those conditions are talking about the same multi-valued relation). Conditions in subsequent `filter()` or `exclude()` calls that refer to the same relation may end up filtering on different linked objects.
### Filters can reference fields on the model
In the examples given so far, we have constructed filters that compare the value of a model field with a constant. But what if you want to compare the value of a model field with another field on the same model?
Django provides `F expressions` to allow such comparisons. Instances of `F()` act as a reference to a model field within a query. These references can then be used in query filters to compare the values of two different fields on the same model instance.
For example, to find a list of all blog entries that have had more comments than pingbacks, we construct an `F()` object to reference the pingback count, and use that `F()` object in the query:
~~~
>>> from django.db.models import F
>>> Entry.objects.filter(n_comments__gt=F('n_pingbacks'))
~~~
Django supports the use of addition, subtraction, multiplication, division, modulo, and power arithmetic with `F()` objects, both with constants and with other `F()` objects. To find all the blog entries with more than *twice* as many comments as pingbacks, we modify the query:
~~~
>>> Entry.objects.filter(n_comments__gt=F('n_pingbacks') * 2)
~~~
To find all the entries where the rating of the entry is less than the sum of the pingback count and comment count, we would issue the query:
~~~
>>> Entry.objects.filter(rating__lt=F('n_comments') + F('n_pingbacks'))
~~~
You can also use the double underscore notation to span relationships in an `F()` object. An `F()` object with a double underscore will introduce any joins needed to access the related object. For example, to retrieve all the entries where the authors name is the same as the blog name, we could issue the query:
~~~
>>> Entry.objects.filter(authors__name=F('blog__name'))
~~~
For date and date/time fields, you can add or subtract a `timedelta` object. The following would return all entries that were modified more than 3 days after they were published:
~~~
>>> from datetime import timedelta
>>> Entry.objects.filter(mod_date__gt=F('pub_date') + timedelta(days=3))
~~~
The `F()` objects support bitwise operations by `.bitand()` and `.bitor()`, for example:
~~~
>>> F('somefield').bitand(16)
~~~
### The pk lookup shortcut
For convenience, Django provides a `pk` lookup shortcut, which stands for primary key.
In the example `Blog` model, the primary key is the `id` field, so these three statements are equivalent:
~~~
>>> Blog.objects.get(id__exact=14) # Explicit form
>>> Blog.objects.get(id=14) # __exact is implied
>>> Blog.objects.get(pk=14) # pk implies id__exact
~~~
The use of `pk` isnt limited to `__exact` queries any query term can be combined with `pk` to perform a query on the primary key of a model:
~~~
# Get blogs entries with id 1, 4 and 7
>>> Blog.objects.filter(pk__in=[1,4,7])
# Get all blog entries with id > 14
>>> Blog.objects.filter(pk__gt=14)
~~~
`pk` lookups also work across joins. For example, these three statements are equivalent:
~~~
>>> Entry.objects.filter(blog__id__exact=3) # Explicit form
>>> Entry.objects.filter(blog__id=3) # __exact is implied
>>> Entry.objects.filter(blog__pk=3) # __pk implies __id__exact
~~~
### Escaping percent signs and underscores in LIKE statements
The field lookups that equate to `LIKE` SQL statements (`iexact`, `contains`, `icontains`, `startswith`, `istartswith`,`endswith` and `iendswith`) will automatically escape the two special characters used in `LIKE` statements the percent sign and the underscore. (In a `LIKE` statement, the percent sign signifies a multiple-character wildcard and the underscore signifies a single-character wildcard.)
This means things should work intuitively, so the abstraction doesnt leak. For example, to retrieve all the entries that contain a percent sign, just use the percent sign as any other character:
~~~
>>> Entry.objects.filter(headline__contains='%')
~~~
Django takes care of the quoting for you; the resulting SQL will look something like this:
~~~
SELECT ... WHERE headline LIKE '%\%%';
~~~
Same goes for underscores. Both percentage signs and underscores are handled for you transparently.
### Caching and QuerySets
Each `QuerySet` contains a cache to minimize database access. Understanding how it works will allow you to write the most efficient code.
In a newly created `QuerySet`, the cache is empty. The first time a `QuerySet` is evaluated and, hence, a database query happens Django saves the query results in the `QuerySet`s cache and returns the results that have been explicitly requested (e.g., the next element, if the `QuerySet` is being iterated over). Subsequent evaluations of the `QuerySet` reuse the cached results.
Keep this caching behavior in mind, because it may bite you if you dont use your `QuerySet`s correctly. For example, the following will create two `QuerySet`s, evaluate them, and throw them away:
~~~
>>> print([e.headline for e in Entry.objects.all()])
>>> print([e.pub_date for e in Entry.objects.all()])
~~~
That means the same database query will be executed twice, effectively doubling your database load. Also, theres a possibility the two lists may not include the same database records, because an `Entry` may have been added or deleted in the split second between the two requests.
To avoid this problem, simply save the `QuerySet` and reuse it:
~~~
>>> queryset = Entry.objects.all()
>>> print([p.headline for p in queryset]) # Evaluate the query set.
>>> print([p.pub_date for p in queryset]) # Re-use the cache from the evaluation.
~~~
#### WHEN QUERYSETS ARE NOT CACHED
Querysets do not always cache their results. When evaluating only *part* of the queryset, the cache is checked, but if it is not populated then the items returned by the subsequent query are not cached. Specifically, this means that limiting the queryset using an array slice or an index will not populate the cache.
For example, repeatedly getting a certain index in a queryset object will query the database each time:
~~~
>>> queryset = Entry.objects.all()
>>> print queryset[5] # Queries the database
>>> print queryset[5] # Queries the database again
~~~
However, if the entire queryset has already been evaluated, the cache will be checked instead:
~~~
>>> queryset = Entry.objects.all()
>>> [entry for entry in queryset] # Queries the database
>>> print queryset[5] # Uses cache
>>> print queryset[5] # Uses cache
~~~
Here are some examples of other actions that will result in the entire queryset being evaluated and therefore populate the cache:
~~~
>>> [entry for entry in queryset]
>>> bool(queryset)
>>> entry in queryset
>>> list(queryset)
~~~
Note
Simply printing the queryset will not populate the cache. This is because the call to `__repr__()` only returns a slice of the entire queryset.
## Complex lookups with Q objects
Keyword argument queries in `filter()`, etc. are ANDed together. If you need to execute more complex queries (for example, queries with `OR` statements), you can use `Q objects`.
A `Q object` (`django.db.models.Q`) is an object used to encapsulate a collection of keyword arguments. These keyword arguments are specified as in Field lookups above.
For example, this `Q` object encapsulates a single `LIKE` query:
~~~
from django.db.models import Q
Q(question__startswith='What')
~~~
`Q` objects can be combined using the `&` and `|` operators. When an operator is used on two `Q` objects, it yields a new `Q` object.
For example, this statement yields a single `Q` object that represents the OR of two `"question__startswith"`queries:
~~~
Q(question__startswith='Who') | Q(question__startswith='What')
~~~
This is equivalent to the following SQL `WHERE` clause:
~~~
WHERE question LIKE 'Who%' OR question LIKE 'What%'
~~~
You can compose statements of arbitrary complexity by combining `Q` objects with the `&` and `|` operators and use parenthetical grouping. Also, `Q` objects can be negated using the `~` operator, allowing for combined lookups that combine both a normal query and a negated (`NOT`) query:
~~~
Q(question__startswith='Who') | ~Q(pub_date__year=2005)
~~~
Each lookup function that takes keyword-arguments (e.g. `filter()`, `exclude()`, `get()`) can also be passed one or more `Q` objects as positional (not-named) arguments. If you provide multiple `Q` object arguments to a lookup function, the arguments will be ANDed together. For example:
~~~
Poll.objects.get(
Q(question__startswith='Who'),
Q(pub_date=date(2005, 5, 2)) | Q(pub_date=date(2005, 5, 6))
)
~~~
… roughly translates into the SQL:
~~~
SELECT * from polls WHERE question LIKE 'Who%'
AND (pub_date = '2005-05-02' OR pub_date = '2005-05-06')
~~~
Lookup functions can mix the use of `Q` objects and keyword arguments. All arguments provided to a lookup function (be they keyword arguments or `Q` objects) are ANDed together. However, if a `Q` object is provided, it must precede the definition of any keyword arguments. For example:
~~~
Poll.objects.get(
Q(pub_date=date(2005, 5, 2)) | Q(pub_date=date(2005, 5, 6)),
question__startswith='Who')
~~~
… would be a valid query, equivalent to the previous example; but:
~~~
# INVALID QUERY
Poll.objects.get(
question__startswith='Who',
Q(pub_date=date(2005, 5, 2)) | Q(pub_date=date(2005, 5, 6)))
~~~
… would not be valid.
See also
The [OR lookups examples](https://github.com/django/django/blob/master/tests/or_lookups/tests.py) in the Django unit tests show some possible uses of `Q`.
## Comparing objects
To compare two model instances, just use the standard Python comparison operator, the double equals sign: `==`. Behind the scenes, that compares the primary key values of two models.
Using the `Entry` example above, the following two statements are equivalent:
~~~
>>> some_entry == other_entry
>>> some_entry.id == other_entry.id
~~~
If a models primary key isnt called `id`, no problem. Comparisons will always use the primary key, whatever its called. For example, if a models primary key field is called `name`, these two statements are equivalent:
~~~
>>> some_obj == other_obj
>>> some_obj.name == other_obj.name
~~~
## Deleting objects
The delete method, conveniently, is named `delete()`. This method immediately deletes the object and has no return value. Example:
~~~
e.delete()
~~~
You can also delete objects in bulk. Every `QuerySet` has a `delete()` method, which deletes all members of that `QuerySet`.
For example, this deletes all `Entry` objects with a `pub_date` year of 2005:
~~~
Entry.objects.filter(pub_date__year=2005).delete()
~~~
Keep in mind that this will, whenever possible, be executed purely in SQL, and so the `delete()` methods of individual object instances will not necessarily be called during the process. If youve provided a custom`delete()` method on a model class and want to ensure that it is called, you will need to manually delete instances of that model (e.g., by iterating over a `QuerySet` and calling `delete()` on each object individually) rather than using the bulk `delete()` method of a `QuerySet`.
When Django deletes an object, by default it emulates the behavior of the SQL constraint `ON DELETE CASCADE` in other words, any objects which had foreign keys pointing at the object to be deleted will be deleted along with it. For example:
~~~
b = Blog.objects.get(pk=1)
# This will delete the Blog and all of its Entry objects.
b.delete()
~~~
This cascade behavior is customizable via the [`on_delete`](http://masteringdjango.com/django-database-api-reference/appendix_A.html#django.db.models.ForeignKey.on_delete "django.db.models.ForeignKey.on_delete") argument to the [`ForeignKey`](http://masteringdjango.com/django-database-api-reference/appendix_A.html#django.db.models.ForeignKey "django.db.models.ForeignKey").
Note that `delete()` is the only `QuerySet` method that is not exposed on a `Manager` itself. This is a safety mechanism to prevent you from accidentally requesting `Entry.objects.delete()`, and deleting *all* the entries. If you *do* want to delete all the objects, then you have to explicitly request a complete query set:
~~~
Entry.objects.all().delete()
~~~
## Copying model instances
Although there is no built-in method for copying model instances, it is possible to easily create new instance with all fields values copied. In the simplest case, you can just set `pk` to `None`. Using our blog example:
~~~
blog = Blog(name='My blog', tagline='Blogging is easy')
blog.save() # blog.pk == 1
blog.pk = None
blog.save() # blog.pk == 2
~~~
Things get more complicated if you use inheritance. Consider a subclass of `Blog`:
~~~
class ThemeBlog(Blog):
theme = models.CharField(max_length=200)
django_blog = ThemeBlog(name='Django', tagline='Django is easy', theme='python')
django_blog.save() # django_blog.pk == 3
~~~
Due to how inheritance works, you have to set both `pk` and `id` to None:
~~~
django_blog.pk = None
django_blog.id = None
django_blog.save() # django_blog.pk == 4
~~~
This process does not copy related objects. If you want to copy relations, you have to write a little bit more code. In our example, `Entry` has a many to many field to `Author`:
~~~
entry = Entry.objects.all()[0] # some previous entry
old_authors = entry.authors.all()
entry.pk = None
entry.save()
entry.authors = old_authors # saves new many2many relations
~~~
## Updating multiple objects at once
Sometimes you want to set a field to a particular value for all the objects in a `QuerySet`. You can do this with the `update()` method. For example:
~~~
# Update all the headlines with pub_date in 2007.
Entry.objects.filter(pub_date__year=2007).update(headline='Everything is the same')
~~~
You can only set non-relation fields and [`ForeignKey`](http://masteringdjango.com/django-database-api-reference/appendix_A.html#django.db.models.ForeignKey "django.db.models.ForeignKey") fields using this method. To update a non-relation field, provide the new value as a constant. To update [`ForeignKey`](http://masteringdjango.com/django-database-api-reference/appendix_A.html#django.db.models.ForeignKey "django.db.models.ForeignKey") fields, set the new value to be the new model instance you want to point to. For example:
~~~
>>> b = Blog.objects.get(pk=1)
# Change every Entry so that it belongs to this Blog.
>>> Entry.objects.all().update(blog=b)
~~~
The `update()` method is applied instantly and returns the number of rows matched by the query (which may not be equal to the number of rows updated if some rows already have the new value). The only restriction on the `QuerySet` that is updated is that it can only access one database table, the models main table. You can filter based on related fields, but you can only update columns in the models main table. Example:
~~~
>>> b = Blog.objects.get(pk=1)
# Update all the headlines belonging to this Blog.
>>> Entry.objects.select_related().filter(blog=b).update(headline='Everything is the same')
~~~
Be aware that the `update()` method is converted directly to an SQL statement. It is a bulk operation for direct updates. It doesnt run any `save()` methods on your models, or emit the `pre_save` or `post_save` signals (which are a consequence of calling `save()`), or honor the `auto_now` field option. If you want to save every item in a `QuerySet` and make sure that the `save()` method is called on each instance, you dont need any special function to handle that. Just loop over them and call `save()`:
~~~
for item in my_queryset:
item.save()
~~~
Calls to update can also use `F expressions` to update one field based on the value of another field in the model. This is especially useful for incrementing counters based upon their current value. For example, to increment the pingback count for every entry in the blog:
~~~
>>> Entry.objects.all().update(n_pingbacks=F('n_pingbacks') + 1)
~~~
However, unlike `F()` objects in filter and exclude clauses, you cant introduce joins when you use `F()` objects in an update you can only reference fields local to the model being updated. If you attempt to introduce a join with an `F()` object, a `FieldError` will be raised:
~~~
# THIS WILL RAISE A FieldError
>>> Entry.objects.update(headline=F('blog__name'))
~~~
## Related objects
When you define a relationship in a model (i.e., a [`ForeignKey`](http://masteringdjango.com/django-database-api-reference/appendix_A.html#django.db.models.ForeignKey "django.db.models.ForeignKey"), [`OneToOneField`](http://masteringdjango.com/django-database-api-reference/appendix_A.html#django.db.models.OneToOneField "django.db.models.OneToOneField"), or [`ManyToManyField`](http://masteringdjango.com/django-database-api-reference/appendix_A.html#django.db.models.ManyToManyField "django.db.models.ManyToManyField")), instances of that model will have a convenient API to access the related object(s).
Using the models at the top of this page, for example, an `Entry` object `e` can get its associated `Blog` object by accessing the `blog` attribute: `e.blog`.
(Behind the scenes, this functionality is implemented by Python [descriptors](http://users.rcn.com/python/download/Descriptor.htm). This shouldnt really matter to you, but we point it out here for the curious.)
Django also creates API accessors for the other side of the relationship the link from the related model to the model that defines the relationship. For example, a `Blog` object `b` has access to a list of all related `Entry`objects via the `entry_set` attribute: `b.entry_set.all()`.
All examples in this section use the sample `Blog`, `Author` and `Entry` models defined at the top of this page.
### One-to-many relationships
#### FORWARD
If a model has a [`ForeignKey`](http://masteringdjango.com/django-database-api-reference/appendix_A.html#django.db.models.ForeignKey "django.db.models.ForeignKey"), instances of that model will have access to the related (foreign) object via a simple attribute of the model.
Example:
~~~
>>> e = Entry.objects.get(id=2)
>>> e.blog # Returns the related Blog object.
~~~
You can get and set via a foreign-key attribute. As you may expect, changes to the foreign key arent saved to the database until you call `save()`. Example:
~~~
>>> e = Entry.objects.get(id=2)
>>> e.blog = some_blog
>>> e.save()
~~~
If a [`ForeignKey`](http://masteringdjango.com/django-database-api-reference/appendix_A.html#django.db.models.ForeignKey "django.db.models.ForeignKey") field has `null=True` set (i.e., it allows `NULL` values), you can assign `None` to remove the relation. Example:
~~~
>>> e = Entry.objects.get(id=2)
>>> e.blog = None
>>> e.save() # "UPDATE blog_entry SET blog_id = NULL ...;"
~~~
Forward access to one-to-many relationships is cached the first time the related object is accessed. Subsequent accesses to the foreign key on the same object instance are cached. Example:
~~~
>>> e = Entry.objects.get(id=2)
>>> print(e.blog) # Hits the database to retrieve the associated Blog.
>>> print(e.blog) # Doesn't hit the database; uses cached version.
~~~
Note that the `select_related()` `QuerySet` method recursively prepopulates the cache of all one-to-many relationships ahead of time. Example:
~~~
>>> e = Entry.objects.select_related().get(id=2)
>>> print(e.blog) # Doesn't hit the database; uses cached version.
>>> print(e.blog) # Doesn't hit the database; uses cached version.
~~~
#### FOLLOWING RELATIONSHIPS BACKWARD
If a model has a [`ForeignKey`](http://masteringdjango.com/django-database-api-reference/appendix_A.html#django.db.models.ForeignKey "django.db.models.ForeignKey"), instances of the foreign-key model will have access to a `Manager` that returns all instances of the first model. By default, this `Manager` is named `FOO_set`, where `FOO` is the source model name, lowercased. This `Manager` returns `QuerySets`, which can be filtered and manipulated as described in the Retrieving objects section above.
Example:
~~~
>>> b = Blog.objects.get(id=1)
>>> b.entry_set.all() # Returns all Entry objects related to Blog.
# b.entry_set is a Manager that returns QuerySets.
>>> b.entry_set.filter(headline__contains='Lennon')
>>> b.entry_set.count()
~~~
You can override the `FOO_set` name by setting the [`related_name`](http://masteringdjango.com/django-database-api-reference/appendix_A.html#django.db.models.ForeignKey.related_name "django.db.models.ForeignKey.related_name") parameter in the [`ForeignKey`](http://masteringdjango.com/django-database-api-reference/appendix_A.html#django.db.models.ForeignKey "django.db.models.ForeignKey") definition. For example, if the `Entry` model was altered to `blog = ForeignKey(Blog, related_name='entries')`, the above example code would look like this:
~~~
>>> b = Blog.objects.get(id=1)
>>> b.entries.all() # Returns all Entry objects related to Blog.
# b.entries is a Manager that returns QuerySets.
>>> b.entries.filter(headline__contains='Lennon')
>>> b.entries.count()
~~~
#### USING A CUSTOM REVERSE MANAGER
By default the `RelatedManager` used for reverse relations is a subclass of the default manager for that model. If you would like to specify a different manager for a given query you can use the following syntax:
~~~
from django.db import models
class Entry(models.Model):
#...
objects = models.Manager() # Default Manager
entries = EntryManager() # Custom Manager
b = Blog.objects.get(id=1)
b.entry_set(manager='entries').all()
~~~
If `EntryManager` performed default filtering in its `get_queryset()` method, that filtering would apply to the`all()` call.
Of course, specifying a custom reverse manager also enables you to call its custom methods:
~~~
b.entry_set(manager='entries').is_published()
~~~
#### ADDITIONAL METHODS TO HANDLE RELATED OBJECTS
In addition to the `QuerySet` methods defined in Retrieving objects above, the [`ForeignKey`](http://masteringdjango.com/django-database-api-reference/appendix_A.html#django.db.models.ForeignKey "django.db.models.ForeignKey") `Manager` has additional methods used to handle the set of related objects. A synopsis of each is below, and complete details can be found in the related objects reference .
`add(obj1, obj2, ...)`
Adds the specified model objects to the related object set.
`create(**kwargs)`
Creates a new object, saves it and puts it in the related object set. Returns the newly created object.
`remove(obj1, obj2, ...)`
Removes the specified model objects from the related object set.
`clear()`
Removes all objects from the related object set.
`set(objs)`
Replace the set of related objects.
To assign the members of a related set in one fell swoop, just assign to it from any iterable object. The iterable can contain object instances, or just a list of primary key values. For example:
~~~
b = Blog.objects.get(id=1)
b.entry_set = [e1, e2]
~~~
In this example, `e1` and `e2` can be full Entry instances, or integer primary key values.
If the `clear()` method is available, any pre-existing objects will be removed from the `entry_set` before all objects in the iterable (in this case, a list) are added to the set. If the `clear()` method is *not* available, all objects in the iterable will be added without removing any existing elements.
Each reverse operation described in this section has an immediate effect on the database. Every addition, creation and deletion is immediately and automatically saved to the database.
### Many-to-many relationships
Both ends of a many-to-many relationship get automatic API access to the other end. The API works just as a backward one-to-many relationship, above.
The only difference is in the attribute naming: The model that defines the [`ManyToManyField`](http://masteringdjango.com/django-database-api-reference/appendix_A.html#django.db.models.ManyToManyField "django.db.models.ManyToManyField") uses the attribute name of that field itself, whereas the reverse model uses the lowercased model name of the original model, plus `'_set'` (just like reverse one-to-many relationships).
An example makes this easier to understand:
~~~
e = Entry.objects.get(id=3)
e.authors.all() # Returns all Author objects for this Entry.
e.authors.count()
e.authors.filter(name__contains='John')
a = Author.objects.get(id=5)
a.entry_set.all() # Returns all Entry objects for this Author.
~~~
Like [`ForeignKey`](http://masteringdjango.com/django-database-api-reference/appendix_A.html#django.db.models.ForeignKey "django.db.models.ForeignKey"), [`ManyToManyField`](http://masteringdjango.com/django-database-api-reference/appendix_A.html#django.db.models.ManyToManyField "django.db.models.ManyToManyField") can specify [`related_name`](http://masteringdjango.com/django-database-api-reference/appendix_A.html#django.db.models.ManyToManyField.related_name "django.db.models.ManyToManyField.related_name"). In the above example, if the [`ManyToManyField`](http://masteringdjango.com/django-database-api-reference/appendix_A.html#django.db.models.ManyToManyField "django.db.models.ManyToManyField") in`Entry` had specified `related_name='entries'`, then each `Author` instance would have an `entries` attribute instead of `entry_set`.
### One-to-one relationships
One-to-one relationships are very similar to many-to-one relationships. If you define a [`OneToOneField`](http://masteringdjango.com/django-database-api-reference/appendix_A.html#django.db.models.OneToOneField "django.db.models.OneToOneField") on your model, instances of that model will have access to the related object via a simple attribute of the model.
For example:
~~~
class EntryDetail(models.Model):
entry = models.OneToOneField(Entry)
details = models.TextField()
ed = EntryDetail.objects.get(id=2)
ed.entry # Returns the related Entry object.
~~~
The difference comes in reverse queries. The related model in a one-to-one relationship also has access to a `Manager` object, but that `Manager` represents a single object, rather than a collection of objects:
~~~
e = Entry.objects.get(id=2)
e.entrydetail # returns the related EntryDetail object
~~~
If no object has been assigned to this relationship, Django will raise a `DoesNotExist` exception.
Instances can be assigned to the reverse relationship in the same way as you would assign the forward relationship:
~~~
e.entrydetail = ed
~~~
### How are the backward relationships possible?
Other object-relational mappers require you to define relationships on both sides. The Django developers believe this is a violation of the DRY (Dont Repeat Yourself) principle, so Django only requires you to define the relationship on one end.
But how is this possible, given that a model class doesnt know which other model classes are related to it until those other model classes are loaded?
The answer lies in the `app registry`. When Django starts, it imports each application listed in`INSTALLED_APPS`, and then the `models` module inside each application. Whenever a new model class is created, Django adds backward-relationships to any related models. If the related models havent been imported yet, Django keeps tracks of the relationships and adds them when the related models eventually are imported.
For this reason, its particularly important that all the models youre using be defined in applications listed in `INSTALLED_APPS`. Otherwise, backwards relations may not work properly.
### Queries over related objects
Queries involving related objects follow the same rules as queries involving normal value fields. When specifying the value for a query to match, you may use either an object instance itself, or the primary key value for the object.
For example, if you have a Blog object `b` with `id=5`, the following three queries would be identical:
~~~
Entry.objects.filter(blog=b) # Query using object instance
Entry.objects.filter(blog=b.id) # Query using id from instance
Entry.objects.filter(blog=5) # Query using id directly
~~~
## Falling back to raw SQL
If you find yourself needing to write an SQL query that is too complex for Djangos database-mapper to handle, you can fall back on writing SQL by hand.
Finally, its important to note that the Django database layer is merely an interface to your database. You can access your database via other tools, programming languages or database frameworks; theres nothing Django-specific about your database.
Appendix A: Model Definition Reference
最后更新于:2022-04-01 04:48:28
Chapter 4 explains the basics of defining models, and we use them throughout the rest of the book. There is, however, a *huge* range of model options available not covered elsewhere. This appendix explains each possible model definition option.
Note that although these APIs are considered stable, the Django developers consistently add new shortcuts and conveniences to the model definition. Its a good idea to always check the latest documentation online at [http://docs.djangoproject.com/](http://docs.djangoproject.com/).
[TOC=3]
## Fields
The most important part of a model and the only required part of a model is the list of database fields it defines.
Field Name Restrictions
Django places only two restrictions on model field names:
1. A field name cannot be a Python reserved word, because that would result in a Python syntax error. For example:
~~~
class Example(models.Model):
pass = models.IntegerField() # 'pass' is a reserved word!
~~~
2. A field name cannot contain more than one underscore in a row, due to the way Djangos query lookup syntax works. For example:
~~~
class Example(models.Model):
foo__bar = models.IntegerField() # 'foo__bar' has two underscores!
~~~
Each field in your model should be an instance of the appropriate `Field` class. Django uses the field class types to determine a few things:
* The database column type (e.g., `INTEGER`, `VARCHAR`).
* The widget to use in Djangos forms and admin site, if you care to use it (e.g., `<input type="text">`,`<select>`).
* The minimal validation requirements, which are used in Djangos admin interface and by forms.
A complete list of field classes follows, sorted alphabetically. Note that relationship fields (`ForeignKey`, etc.) are handled in the next section.
Note
Technically, these models are defined in `django.db.models.fields`, but for convenience theyre imported into`django.db.models`; the standard convention is to use `from django.db import models` and refer to fields as`models.<Foo>Field`.
### `AutoField`
*class *`AutoField`(***options*)
An `IntegerField` that automatically increments according to available IDs. You usually wont need to use this directly; a primary key field will automatically be added to your model if you dont specify otherwise.
### `BigIntegerField`
*class *`BigIntegerField`([***options*])
A 64 bit integer, much like an `IntegerField` except that it is guaranteed to fit numbers from`-9223372036854775808` to `9223372036854775807`. The default form widget for this field is a `TextInput`.
### `BinaryField`
*class *`BinaryField`([***options*])
A field to store raw binary data. It only supports `bytes` assignment. Be aware that this field has limited functionality. For example, it is not possible to filter a queryset on a `BinaryField` value.
Abusing `BinaryField`
Although you might think about storing files in the database, consider that it is bad design in 99% of the cases. This field is *not* a replacement for proper static files handling.
### `BooleanField`
*class *`BooleanField`(***options*)
A true/false field.
The default form widget for this field is a `CheckboxInput`.
If you need to accept `null` values then use `NullBooleanField` instead.
The default value of `BooleanField` is `None` when `Field.default` isnt defined.
### `CharField`
*class *`CharField`(*max_length=None*[, ***options*])
A string field, for small- to large-sized strings.
For large amounts of text, use [`TextField`](http://masteringdjango.com/django-model-definition-reference/#django.db.models.TextField "django.db.models.TextField").
The default form widget for this field is a `TextInput`.
[`CharField`](http://masteringdjango.com/django-model-definition-reference/#CharField "CharField") has one extra required argument:
`CharField.``max_length`
The maximum length (in characters) of the field. The max_length is enforced at the database level and in Djangos validation.
Note
If you are writing an application that must be portable to multiple database backends, you should be aware that there are restrictions on `max_length` for some backends.
MySQL users
If you are using this field with MySQLdb 1.2.2 and the `utf8_bin` collation (which is *not* the default), there are some issues to be aware of. Refer to Chapter 23 for details.
### `CommaSeparatedIntegerField`
*class *`CommaSeparatedIntegerField`(*max_length=None*[, ***options*])
A field of integers separated by commas. As in [`CharField`](http://masteringdjango.com/django-model-definition-reference/#CharField "CharField"), the [`max_length`](http://masteringdjango.com/django-model-definition-reference/#CharField.max_length "CharField.max_length") argument is required and the note about database portability mentioned there should be heeded.
### `DateField`
*class *`DateField`([*auto_now=False*, *auto_now_add=False*, ***options*])
A date, represented in Python by a `datetime.date` instance. Has a few extra, optional arguments:
`DateField.``auto_now`
Automatically set the field to now every time the object is saved. Useful for last-modified timestamps. Note that the current date is *always* used; its not just a default value that you can override.
`DateField.``auto_now_add`
Automatically set the field to now when the object is first created. Useful for creation of timestamps. Note that the current date is *always* used; its not just a default value that you can override.
The default form widget for this field is a `TextInput`. The admin adds a JavaScript calendar, and a shortcut for Today. Includes an additional `invalid_date` error message key.
The options `auto_now_add`, `auto_now`, and `default` are mutually exclusive. Any combination of these options will result in an error.
Note
As currently implemented, setting `auto_now` or `auto_now_add` to `True` will cause the field to have`editable=False` and `blank=True` set.
### `DateTimeField`
*class *`DateTimeField`([*auto_now=False*, *auto_now_add=False*, ***options*])
A date and time, represented in Python by a `datetime.datetime` instance. Takes the same extra arguments as [`DateField`](http://masteringdjango.com/django-model-definition-reference/#DateField "DateField").
The default form widget for this field is a single `TextInput`. The admin uses two separate `TextInput` widgets with JavaScript shortcuts.
### `DecimalField`
*class *`DecimalField`(*max_digits=None*, *decimal_places=None*[, ***options*])
A fixed-precision decimal number, represented in Python by a `Decimal` instance. Has two requiredarguments:
`DecimalField.``max_digits`
The maximum number of digits allowed in the number. Note that this number must be greater than or equal to `decimal_places`.
`DecimalField.``decimal_places`
The number of decimal places to store with the number.
For example, to store numbers up to `999` with a resolution of 2 decimal places, youd use:
~~~
models.DecimalField(..., max_digits=5, decimal_places=2)
~~~
And to store numbers up to approximately one billion with a resolution of 10 decimal places:
~~~
models.DecimalField(..., max_digits=19, decimal_places=10)
~~~
The default form widget for this field is a `TextInput`.
Note
For more information about the differences between the `FloatField` and [`DecimalField`](http://masteringdjango.com/django-model-definition-reference/#DecimalField "DecimalField") classes, please see FloatField vs. DecimalField.
### `DurationField`
*class *`DurationField`([***options*])
A field for storing periods of time – modeled in Python by `timedelta`. When used on PostgreSQL, the data type used is an `interval` and on Oracle the data type is `INTERVAL DAY(9) TO SECOND(6)`. Otherwise a `bigint` of microseconds is used.
Note
Arithmetic with `DurationField` works in most cases. However on all databases other than PostgreSQL, comparing the value of a `DurationField` to arithmetic on `DateTimeField` instances will not work as expected.
### `EmailField`
*class *`EmailField`([*max_length=254*, ***options*])
A [`CharField`](http://masteringdjango.com/django-model-definition-reference/#CharField "CharField") that checks that the value is a valid email address. It uses `EmailValidator` to validate the input.
### `FileField`
*class *`FileField`([*upload_to=None*, *max_length=100*, ***options*])
A file-upload field.
Note
The `primary_key` and `unique` arguments are not supported, and will raise a `TypeError` if used.
Has two optional arguments:
`FileField.``upload_to`
A local filesystem path that will be appended to your `MEDIA_ROOT` setting to determine the value of the [`url`](http://masteringdjango.com/django-model-definition-reference/#django.db.models.fields.files.FieldFile.url "django.db.models.fields.files.FieldFile.url")attribute.
This path may contain `strftime()` formatting, which will be replaced by the date/time of the file upload (so that uploaded files dont fill up the given directory).
This may also be a callable, such as a function, which will be called to obtain the upload path, including the filename. This callable must be able to accept two arguments, and return a Unix-style path (with forward slashes) to be passed along to the storage system. The two arguments that will be passed are:
| Argument | Description |
| --- | --- |
| `instance` |
An instance of the model where the `FileField` is defined. More specifically, this is the particular instance where the current file is being attached.
In most cases, this object will not have been saved to the database yet, so if it uses the default `AutoField`, *it might not yet have a value for its primary key field*.
|
| `filename` | The filename that was originally given to the file. This may or may not be taken into account when determining the final destination path. |
`FileField.``storage`
A storage object, which handles the storage and retrieval of your files.
The default form widget for this field is a `ClearableFileInput`.
Using a [`FileField`](http://masteringdjango.com/django-model-definition-reference/#FileField "FileField") or an `ImageField` (see below) in a model takes a few steps:
1. In your settings file, youll need to define `MEDIA_ROOT` as the full path to a directory where youd like Django to store uploaded files. (For performance, these files are not stored in the database.) Define `MEDIA_URL` as the base public URL of that directory. Make sure that this directory is writable by the Web servers user account.
2. Add the [`FileField`](http://masteringdjango.com/django-model-definition-reference/#FileField "FileField") or `ImageField` to your model, defining the [`upload_to`](http://masteringdjango.com/django-model-definition-reference/#FileField.upload_to "FileField.upload_to") option to specify a subdirectory of`MEDIA_ROOT` to use for uploaded files.
3. All that will be stored in your database is a path to the file (relative to `MEDIA_ROOT`). Youll most likely want to use the convenience [`url`](http://masteringdjango.com/django-model-definition-reference/#django.db.models.fields.files.FieldFile.url "django.db.models.fields.files.FieldFile.url") attribute provided by Django. For example, if your `ImageField` is called `mug_shot`, you can get the absolute path to your image in a template with `{{ object.mug_shot.url }}`.
For example, say your `MEDIA_ROOT` is set to `'/home/media'`, and [`upload_to`](http://masteringdjango.com/django-model-definition-reference/#FileField.upload_to "FileField.upload_to") is set to `'photos/%Y/%m/%d'`. The`'%Y/%m/%d'` part of [`upload_to`](http://masteringdjango.com/django-model-definition-reference/#FileField.upload_to "FileField.upload_to") is `strftime()` formatting; `'%Y'` is the four-digit year, `'%m'` is the two-digit month and `'%d'` is the two-digit day. If you upload a file on Jan. 15, 2007, it will be saved in the directory`/home/media/photos/2007/01/15`.
If you wanted to retrieve the uploaded files on-disk filename, or the files size, you could use the `name` and`size` attributes respectively; for more information on the available attributes and methods, see the `File`class reference and the Files topic guide.
Note
The file is saved as part of saving the model in the database, so the actual file name used on disk cannot be relied on until after the model has been saved.
The uploaded files relative URL can be obtained using the [`url`](http://masteringdjango.com/django-model-definition-reference/#django.db.models.fields.files.FieldFile.url "django.db.models.fields.files.FieldFile.url") attribute. Internally, this calls the `url()`method of the underlying `Storage` class.
Note that whenever you deal with uploaded files, you should pay close attention to where youre uploading them and what type of files they are, to avoid security holes. *Validate all uploaded files* so that youre sure the files are what you think they are. For example, if you blindly let somebody upload files, without validation, to a directory thats within your Web servers document root, then somebody could upload a CGI or PHP script and execute that script by visiting its URL on your site. Dont allow that.
Also note that even an uploaded HTML file, since it can be executed by the browser (though not by the server), can pose security threats that are equivalent to XSS or CSRF attacks.
[`FileField`](http://masteringdjango.com/django-model-definition-reference/#FileField "FileField") instances are created in your database as `varchar` columns with a default max length of 100 characters. As with other fields, you can change the maximum length using the [`max_length`](http://masteringdjango.com/django-model-definition-reference/#CharField.max_length "CharField.max_length") argument.
#### FILEFIELD AND FIELDFILE
*class *`django.db.models.fields.files.``FieldFile`
When you access a `FileField` on a model, you are given an instance of [`FieldFile`](http://masteringdjango.com/django-model-definition-reference/#django.db.models.fields.files.FieldFile "django.db.models.fields.files.FieldFile") as a proxy for accessing the underlying file. In addition to the functionality inherited from `django.core.files.File`, this class has several attributes and methods that can be used to interact with file data:
`FieldFile.``url`
A read-only property to access the files relative URL by calling the `url()` method of the underlying `Storage`class.
`FieldFile.``open`(*mode=’rb’*)
Behaves like the standard Python `open()` method and opens the file associated with this instance in the mode specified by `mode`.
`FieldFile.``close`()
Behaves like the standard Python `file.close()` method and closes the file associated with this instance.
`FieldFile.``save`(*name*, *content*, *save=True*)
This method takes a filename and file contents and passes them to the storage class for the field, then associates the stored file with the model field. If you want to manually associate file data with `FileField`instances on your model, the `save()` method is used to persist that file data.
Takes two required arguments: `name` which is the name of the file, and `content` which is an object containing the files contents. The optional `save` argument controls whether or not the model instance is saved after the file associated with this field has been altered. Defaults to `True`.
Note that the `content` argument should be an instance of `django.core.files.File`, not Pythons built-in file object. You can construct a `File` from an existing Python file object like this:
~~~
from django.core.files import File
# Open an existing file using Python's built-in open()
f = open('/tmp/hello.world')
myfile = File(f)
~~~
Or you can construct one from a Python string like this:
~~~
from django.core.files.base import ContentFile
myfile = ContentFile("hello world")
~~~
`FieldFile.``delete`(*save=True*)
Deletes the file associated with this instance and clears all attributes on the field. Note: This method will close the file if it happens to be open when `delete()` is called.
The optional `save` argument controls whether or not the model instance is saved after the file associated with this field has been deleted. Defaults to `True`.
Note that when a model is deleted, related files are not deleted. If you need to cleanup orphaned files, youll need to handle it yourself (for instance, with a custom management command that can be run manually or scheduled to run periodically via e.g. cron).
### `FilePathField`
*class *`django.db.models.``FilePathField`(*path=None*[, *match=None*, *recursive=False*, *max_length=100*,***options*])
A [`CharField`](http://masteringdjango.com/django-model-definition-reference/#CharField "CharField") whose choices are limited to the filenames in a certain directory on the filesystem. Has three special arguments, of which the first is required:
`FilePathField.``path`
Required. The absolute filesystem path to a directory from which this [`FilePathField`](http://masteringdjango.com/django-model-definition-reference/#django.db.models.FilePathField "django.db.models.FilePathField") should get its choices. Example: `"/home/images"`.
`FilePathField.``match`
Optional. A regular expression, as a string, that [`FilePathField`](http://masteringdjango.com/django-model-definition-reference/#django.db.models.FilePathField "django.db.models.FilePathField") will use to filter filenames. Note that the regex will be applied to the base filename, not the full path. Example: `"foo.*\.txt$"`, which will match a file called `foo23.txt` but not `bar.txt` or `foo23.png`.
`FilePathField.``recursive`
Optional. Either `True` or `False`. Default is `False`. Specifies whether all subdirectories of [`path`](http://masteringdjango.com/django-model-definition-reference/#django.db.models.FilePathField.path "django.db.models.FilePathField.path") should be included
`FilePathField.``allow_files`
Optional. Either `True` or `False`. Default is `True`. Specifies whether files in the specified location should be included. Either this or [`allow_folders`](http://masteringdjango.com/django-model-definition-reference/#django.db.models.FilePathField.allow_folders "django.db.models.FilePathField.allow_folders") must be `True`.
`FilePathField.``allow_folders`
Optional. Either `True` or `False`. Default is `False`. Specifies whether folders in the specified location should be included. Either this or [`allow_files`](http://masteringdjango.com/django-model-definition-reference/#django.db.models.FilePathField.allow_files "django.db.models.FilePathField.allow_files") must be `True`.
Of course, these arguments can be used together.
The one potential gotcha is that [`match`](http://masteringdjango.com/django-model-definition-reference/#django.db.models.FilePathField.match "django.db.models.FilePathField.match") applies to the base filename, not the full path. So, this example:
~~~
FilePathField(path="/home/images", match="foo.*", recursive=True)
~~~
…will match `/home/images/foo.png` but not `/home/images/foo/bar.png` because the [`match`](http://masteringdjango.com/django-model-definition-reference/#django.db.models.FilePathField.match "django.db.models.FilePathField.match") applies to the base filename (`foo.png` and `bar.png`).
[`FilePathField`](http://masteringdjango.com/django-model-definition-reference/#django.db.models.FilePathField "django.db.models.FilePathField") instances are created in your database as `varchar` columns with a default max length of 100 characters. As with other fields, you can change the maximum length using the [`max_length`](http://masteringdjango.com/django-model-definition-reference/#CharField.max_length "CharField.max_length") argument.
### `FloatField`
*class *`django.db.models.``FloatField`([***options*])
A floating-point number represented in Python by a `float` instance.
The default form widget for this field is a `TextInput`.
`FloatField` vs. `DecimalField`
The [`FloatField`](http://masteringdjango.com/django-model-definition-reference/#django.db.models.FloatField "django.db.models.FloatField") class is sometimes mixed up with the [`DecimalField`](http://masteringdjango.com/django-model-definition-reference/#DecimalField "DecimalField") class. Although they both represent real numbers, they represent those numbers differently. `FloatField` uses Pythons `float` type internally, while`DecimalField` uses Pythons `Decimal` type. For information on the difference between the two, see Pythons documentation for the `decimal` module.
### `ImageField`
*class *`django.db.models.``ImageField`([*upload_to=None*, *height_field=None*, *width_field=None*, *max_length=100*,***options*])
Inherits all attributes and methods from [`FileField`](http://masteringdjango.com/django-model-definition-reference/#FileField "FileField"), but also validates that the uploaded object is a valid image.
In addition to the special attributes that are available for [`FileField`](http://masteringdjango.com/django-model-definition-reference/#FileField "FileField"), an [`ImageField`](http://masteringdjango.com/django-model-definition-reference/#django.db.models.ImageField "django.db.models.ImageField") also has `height` and `width`attributes.
To facilitate querying on those attributes, [`ImageField`](http://masteringdjango.com/django-model-definition-reference/#django.db.models.ImageField "django.db.models.ImageField") has two extra optional arguments:
`ImageField.``height_field`
Name of a model field which will be auto-populated with the height of the image each time the model instance is saved.
`ImageField.``width_field`
Name of a model field which will be auto-populated with the width of the image each time the model instance is saved.
Requires the [Pillow](http://pillow.readthedocs.org/en/latest/) library.
[`ImageField`](http://masteringdjango.com/django-model-definition-reference/#django.db.models.ImageField "django.db.models.ImageField") instances are created in your database as `varchar` columns with a default max length of 100 characters. As with other fields, you can change the maximum length using the [`max_length`](http://masteringdjango.com/django-model-definition-reference/#CharField.max_length "CharField.max_length") argument.
The default form widget for this field is a `ClearableFileInput`.
### `IntegerField`
*class *`django.db.models.``IntegerField`([***options*])
An integer. Values from `-2147483648` to `2147483647` are safe in all databases supported by Django. The default form widget for this field is a `TextInput`.
### `GenericIPAddressField`
*class *`django.db.models.``GenericIPAddressField`([*protocol=both*, *unpack_ipv4=False*, ***options*])
An IPv4 or IPv6 address, in string format (e.g. `192.0.2.30` or `2a02:42fe::4`). The default form widget for this field is a `TextInput`.
The IPv6 address normalization follows [RFC 4291#section-2.2](https://tools.ietf.org/html/rfc4291.html#section-2.2) section 2.2, including using the IPv4 format suggested in paragraph 3 of that section, like `::ffff:192.0.2.0`. For example, `2001:0::0:01` would be normalized to `2001::1`, and `::ffff:0a0a:0a0a` to `::ffff:10.10.10.10`. All characters are converted to lowercase.
`GenericIPAddressField.``protocol`
Limits valid inputs to the specified protocol. Accepted values are `'both'` (default), `'IPv4'` or `'IPv6'`. Matching is case insensitive.
`GenericIPAddressField.``unpack_ipv4`
Unpacks IPv4 mapped addresses like `::ffff:192.0.2.1`. If this option is enabled that address would be unpacked to `192.0.2.1`. Default is disabled. Can only be used when `protocol` is set to `'both'`.
If you allow for blank values, you have to allow for null values since blank values are stored as null.
### `NullBooleanField`
*class *`django.db.models.``NullBooleanField`([***options*])
Like a [`BooleanField`](http://masteringdjango.com/django-model-definition-reference/#BooleanField "BooleanField"), but allows `NULL` as one of the options. Use this instead of a [`BooleanField`](http://masteringdjango.com/django-model-definition-reference/#BooleanField "BooleanField") with `null=True`. The default form widget for this field is a `NullBooleanSelect`.
### `PositiveIntegerField`
*class *`django.db.models.``PositiveIntegerField`([***options*])
Like an [`IntegerField`](http://masteringdjango.com/django-model-definition-reference/#django.db.models.IntegerField "django.db.models.IntegerField"), but must be either positive or zero (`0`). Values from `0` to `2147483647` are safe in all databases supported by Django. The value `0` is accepted for backward compatibility reasons.
### `PositiveSmallIntegerField`
*class *`django.db.models.``PositiveSmallIntegerField`([***options*])
Like a [`PositiveIntegerField`](http://masteringdjango.com/django-model-definition-reference/#django.db.models.PositiveIntegerField "django.db.models.PositiveIntegerField"), but only allows values under a certain (database-dependent) point. Values from `0` to `32767` are safe in all databases supported by Django.
### `SlugField`
*class *`django.db.models.``SlugField`([*max_length=50*, ***options*])
Slug is a newspaper term. A slug is a short label for something, containing only letters, numbers, underscores or hyphens. Theyre generally used in URLs.
Like a CharField, you can specify [`max_length`](http://masteringdjango.com/django-model-definition-reference/#CharField.max_length "CharField.max_length") (read the note about database portability and [`max_length`](http://masteringdjango.com/django-model-definition-reference/#CharField.max_length "CharField.max_length") in that section, too). If [`max_length`](http://masteringdjango.com/django-model-definition-reference/#CharField.max_length "CharField.max_length") is not specified, Django will use a default length of 50.
Implies setting [`Field.db_index`](http://masteringdjango.com/django-model-definition-reference/#django.db.models.Field.db_index "django.db.models.Field.db_index") to `True`.
It is often useful to automatically prepopulate a SlugField based on the value of some other value. You can do this automatically in the admin using `prepopulated_fields`.
### `SmallIntegerField`
*class *`django.db.models.``SmallIntegerField`([***options*])
Like an [`IntegerField`](http://masteringdjango.com/django-model-definition-reference/#django.db.models.IntegerField "django.db.models.IntegerField"), but only allows values under a certain (database-dependent) point. Values from`-32768` to `32767` are safe in all databases supported by Django.
### `TextField`
*class *`django.db.models.``TextField`([***options*])
A large text field. The default form widget for this field is a `Textarea`.
If you specify a `max_length` attribute, it will be reflected in the `Textarea` widget of the auto-generated form field. However it is not enforced at the model or database level. Use a [`CharField`](http://masteringdjango.com/django-model-definition-reference/#CharField "CharField") for that.
MySQL users
If you are using this field with MySQLdb 1.2.1p2 and the `utf8_bin` collation (which is *not* the default), there are some issues to be aware of. Refer to Chapter 23 for details.
### `TimeField`
*class *`django.db.models.``TimeField`([*auto_now=False*, *auto_now_add=False*, ***options*])
A time, represented in Python by a `datetime.time` instance. Accepts the same auto-population options as[`DateField`](http://masteringdjango.com/django-model-definition-reference/#DateField "DateField").
The default form widget for this field is a `TextInput`. The admin adds some JavaScript shortcuts.
### `URLField`
*class *`django.db.models.``URLField`([*max_length=200*, ***options*])
A [`CharField`](http://masteringdjango.com/django-model-definition-reference/#CharField "CharField") for a URL.
The default form widget for this field is a `TextInput`.
Like all [`CharField`](http://masteringdjango.com/django-model-definition-reference/#CharField "CharField") subclasses, [`URLField`](http://masteringdjango.com/django-model-definition-reference/#django.db.models.URLField "django.db.models.URLField") takes the optional [`max_length`](http://masteringdjango.com/django-model-definition-reference/#CharField.max_length "CharField.max_length") argument. If you dont specify[`max_length`](http://masteringdjango.com/django-model-definition-reference/#CharField.max_length "CharField.max_length"), a default of 200 is used.
### `UUIDField`
*class *`django.db.models.``UUIDField`([***options*])
A field for storing universally unique identifiers. Uses Pythons `UUID` class. When used on PostgreSQL, this stores in a `uuid` datatype, otherwise in a `char(32)`.
Universally unique identifiers are a good alternative to [`AutoField`](http://masteringdjango.com/django-model-definition-reference/#AutoField "AutoField") for [`primary_key`](http://masteringdjango.com/django-model-definition-reference/#django.db.models.Field.primary_key "django.db.models.Field.primary_key"). The database will not generate the UUID for you, so it is recommended to use [`default`](http://masteringdjango.com/django-model-definition-reference/#django.db.models.Field.default "django.db.models.Field.default"):
~~~
import uuid
from django.db import models
class MyUUIDModel(models.Model):
id = models.UUIDField(primary_key=True, default=uuid.uuid4, editable=False)
# other fields
~~~
Note that a callable (with the parentheses omitted) is passed to `default`, not an instance of `UUID`.
## Universal Field Options
The following arguments are available to all field types. All are optional.
### `null`
`Field.``null`
If `True`, Django will store empty values as `NULL` in the database. Default is `False`.
Avoid using [`null`](http://masteringdjango.com/django-model-definition-reference/#django.db.models.Field.null "django.db.models.Field.null") on string-based fields such as [`CharField`](http://masteringdjango.com/django-model-definition-reference/#CharField "CharField") and [`TextField`](http://masteringdjango.com/django-model-definition-reference/#django.db.models.TextField "django.db.models.TextField") because empty string values will always be stored as empty strings, not as `NULL`. If a string-based field has `null=True`, that means it has two possible values for no data: `NULL`, and the empty string. In most cases, its redundant to have two possible values for no data; the Django convention is to use the empty string, not `NULL`.
For both string-based and non-string-based fields, you will also need to set `blank=True` if you wish to permit empty values in forms, as the [`null`](http://masteringdjango.com/django-model-definition-reference/#django.db.models.Field.null "django.db.models.Field.null") parameter only affects database storage (see [`blank`](http://masteringdjango.com/django-model-definition-reference/#django.db.models.Field.blank "django.db.models.Field.blank")).
Note
When using the Oracle database backend, the value `NULL` will be stored to denote the empty string regardless of this attribute.
If you want to accept [`null`](http://masteringdjango.com/django-model-definition-reference/#django.db.models.Field.null "django.db.models.Field.null") values with [`BooleanField`](http://masteringdjango.com/django-model-definition-reference/#BooleanField "BooleanField"), use [`NullBooleanField`](http://masteringdjango.com/django-model-definition-reference/#django.db.models.NullBooleanField "django.db.models.NullBooleanField") instead.
### `blank`
`Field.``blank`
If `True`, the field is allowed to be blank. Default is `False`.
Note that this is different than [`null`](http://masteringdjango.com/django-model-definition-reference/#django.db.models.Field.null "django.db.models.Field.null"). [`null`](http://masteringdjango.com/django-model-definition-reference/#django.db.models.Field.null "django.db.models.Field.null") is purely database-related, whereas [`blank`](http://masteringdjango.com/django-model-definition-reference/#django.db.models.Field.blank "django.db.models.Field.blank") is validation-related. If a field has `blank=True`, form validation will allow entry of an empty value. If a field has `blank=False`, the field will be required.
### `choices`
`Field.``choices`
An iterable (e.g., a list or tuple) consisting itself of iterables of exactly two items (e.g. `[(A, B), (A, B)...]`) to use as choices for this field. If this is given, the default form widget will be a select box with these choices instead of the standard text field.
The first element in each tuple is the actual value to be set on the model, and the second element is the human-readable name. For example:
~~~
YEAR_IN_SCHOOL_CHOICES = (
('FR', 'Freshman'),
('SO', 'Sophomore'),
('JR', 'Junior'),
('SR', 'Senior'),
)
~~~
Generally, its best to define choices inside a model class, and to define a suitably-named constant for each value:
~~~
from django.db import models
class Student(models.Model):
FRESHMAN = 'FR'
SOPHOMORE = 'SO'
JUNIOR = 'JR'
SENIOR = 'SR'
YEAR_IN_SCHOOL_CHOICES = (
(FRESHMAN, 'Freshman'),
(SOPHOMORE, 'Sophomore'),
(JUNIOR, 'Junior'),
(SENIOR, 'Senior'),
)
year_in_school = models.CharField(max_length=2,
choices=YEAR_IN_SCHOOL_CHOICES,
default=FRESHMAN)
def is_upperclass(self):
return self.year_in_school in (self.JUNIOR, self.SENIOR)
~~~
Though you can define a choices list outside of a model class and then refer to it, defining the choices and names for each choice inside the model class keeps all of that information with the class that uses it, and makes the choices easy to reference (e.g, `Student.SOPHOMORE` will work anywhere that the `Student` model has been imported).
You can also collect your available choices into named groups that can be used for organizational purposes:
~~~
MEDIA_CHOICES = (
('Audio', (
('vinyl', 'Vinyl'),
('cd', 'CD'),
)
),
('Video', (
('vhs', 'VHS Tape'),
('dvd', 'DVD'),
)
),
('unknown', 'Unknown'),
)
~~~
The first element in each tuple is the name to apply to the group. The second element is an iterable of 2-tuples, with each 2-tuple containing a value and a human-readable name for an option. Grouped options may be combined with ungrouped options within a single list (such as the unknown option in this example).
For each model field that has [`choices`](http://masteringdjango.com/django-model-definition-reference/#django.db.models.Field.choices "django.db.models.Field.choices") set, Django will add a method to retrieve the human-readable name for the fields current value. See `get_FOO_display()` in the database API documentation.
Note that choices can be any iterable object not necessarily a list or tuple. This lets you construct choices dynamically. But if you find yourself hacking [`choices`](http://masteringdjango.com/django-model-definition-reference/#django.db.models.Field.choices "django.db.models.Field.choices") to be dynamic, youre probably better off using a proper database table with a [`ForeignKey`](http://masteringdjango.com/django-model-definition-reference/#django.db.models.ForeignKey "django.db.models.ForeignKey"). [`choices`](http://masteringdjango.com/django-model-definition-reference/#django.db.models.Field.choices "django.db.models.Field.choices") is meant for static data that doesnt change much, if ever.
Unless [`blank=False`](http://masteringdjango.com/django-model-definition-reference/#django.db.models.Field.blank "django.db.models.Field.blank") is set on the field along with a [`default`](http://masteringdjango.com/django-model-definition-reference/#django.db.models.Field.default "django.db.models.Field.default") then a label containing `"---------"` will be rendered with the select box. To override this behavior, add a tuple to `choices` containing `None`; e.g. `(None,'Your String For Display')`. Alternatively, you can use an empty string instead of `None` where this makes sense – such as on a `CharField`.
### `db_column`
`Field.``db_column`
The name of the database column to use for this field. If this isnt given, Django will use the fields name.
If your database column name is an SQL reserved word, or contains characters that arent allowed in Python variable names notably, the hyphen thats OK. Django quotes column and table names behind the scenes.
### `db_index`
`Field.``db_index`
If `True`, a database index will be created for this field.
### `db_tablespace`
`Field.``db_tablespace`
The name of the database tablespace to use for this fields index, if this field is indexed. The default is the projects `DEFAULT_INDEX_TABLESPACE` setting, if set, or the [`db_tablespace`](http://masteringdjango.com/django-model-definition-reference/#django.db.models.Options.db_tablespace "django.db.models.Options.db_tablespace") of the model, if any. If the backend doesnt support tablespaces for indexes, this option is ignored.
### `default`
`Field.``default`
The default value for the field. This can be a value or a callable object. If callable it will be called every time a new object is created.
The default cannot be a mutable object (model instance, list, set, etc.), as a reference to the same instance of that object would be used as the default value in all new model instances. Instead, wrap the desired default in a callable. For example, if you had a custom `JSONField` and wanted to specify a dictionary as the default, use a function as follows:
~~~
def contact_default():
return {"email": "to1@example.com"}
contact_info = JSONField("ContactInfo", default=contact_default)
~~~
Note that `lambda`s cannot be used for field options like `default` because they cannot be serialized by migrations. See the Django documentation for other caveats.
The default value is used when new model instances are created and a value isnt provided for the field. When the field is a primary key, the default is also used when the field is set to `None`.
### `editable`
`Field.``editable`
If `False`, the field will not be displayed in the admin or any other `ModelForm`. They are also skipped during model validation. Default is `True`.
### `error_messages`
`Field.``error_messages`
The `error_messages` argument lets you override the default messages that the field will raise. Pass in a dictionary with keys matching the error messages you want to override.
Error message keys include `null`, `blank`, `invalid`, `invalid_choice`, `unique`, and `unique_for_date`. Additional error message keys are specified for each field in the Field types section below.
### `help_text`
`Field.``help_text`
Extra help text to be displayed with the form widget. Its useful for documentation even if your field isnt used on a form.
Note that this value is *not* HTML-escaped in automatically-generated forms. This lets you include HTML in [`help_text`](http://masteringdjango.com/django-model-definition-reference/#django.db.models.Field.help_text "django.db.models.Field.help_text") if you so desire. For example:
~~~
help_text="Please use the following format: <em>YYYY-MM-DD</em>."
~~~
Alternatively you can use plain text and `django.utils.html.escape()` to escape any HTML special characters. Ensure that you escape any help text that may come from untrusted users to avoid a cross-site scripting attack.
### `primary_key`
`Field.``primary_key`
If `True`, this field is the primary key for the model.
If you dont specify `primary_key=True` for any field in your model, Django will automatically add an [`AutoField`](http://masteringdjango.com/django-model-definition-reference/#AutoField "AutoField")to hold the primary key, so you dont need to set `primary_key=True` on any of your fields unless you want to override the default primary-key behavior.
`primary_key=True` implies [`null=False`](http://masteringdjango.com/django-model-definition-reference/#django.db.models.Field.null "django.db.models.Field.null") and [`unique=True`](http://masteringdjango.com/django-model-definition-reference/#django.db.models.Field.unique "django.db.models.Field.unique"). Only one primary key is allowed on an object.
The primary key field is read-only. If you change the value of the primary key on an existing object and then save it, a new object will be created alongside the old one.
### `unique`
`Field.``unique`
If `True`, this field must be unique throughout the table.
This is enforced at the database level and by model validation. If you try to save a model with a duplicate value in a [`unique`](http://masteringdjango.com/django-model-definition-reference/#django.db.models.Field.unique "django.db.models.Field.unique") field, a `django.db.IntegrityError` will be raised by the models `save()` method.
This option is valid on all field types except [`ManyToManyField`](http://masteringdjango.com/django-model-definition-reference/#django.db.models.ManyToManyField "django.db.models.ManyToManyField"), [`OneToOneField`](http://masteringdjango.com/django-model-definition-reference/#django.db.models.OneToOneField "django.db.models.OneToOneField"), and [`FileField`](http://masteringdjango.com/django-model-definition-reference/#FileField "FileField").
Note that when `unique` is `True`, you dont need to specify [`db_index`](http://masteringdjango.com/django-model-definition-reference/#django.db.models.Field.db_index "django.db.models.Field.db_index"), because `unique` implies the creation of an index.
### `unique_for_date`
`Field.``unique_for_date`
Set this to the name of a [`DateField`](http://masteringdjango.com/django-model-definition-reference/#DateField "DateField") or [`DateTimeField`](http://masteringdjango.com/django-model-definition-reference/#DateTimeField "DateTimeField") to require that this field be unique for the value of the date field.
For example, if you have a field `title` that has `unique_for_date="pub_date"`, then Django wouldnt allow the entry of two records with the same `title` and `pub_date`.
Note that if you set this to point to a [`DateTimeField`](http://masteringdjango.com/django-model-definition-reference/#DateTimeField "DateTimeField"), only the date portion of the field will be considered. Besides, when `USE_TZ` is `True`, the check will be performed in the current time zone at the time the object gets saved.
This is enforced by `Model.validate_unique()` during model validation but not at the database level. If any[`unique_for_date`](http://masteringdjango.com/django-model-definition-reference/#django.db.models.Field.unique_for_date "django.db.models.Field.unique_for_date") constraint involves fields that are not part of a `ModelForm` (for example, if one of the fields is listed in `exclude` or has [`editable=False`](http://masteringdjango.com/django-model-definition-reference/#django.db.models.Field.editable "django.db.models.Field.editable")), `Model.validate_unique()` will skip validation for that particular constraint.
### `unique_for_month`
`Field.``unique_for_month`
Like [`unique_for_date`](http://masteringdjango.com/django-model-definition-reference/#django.db.models.Field.unique_for_date "django.db.models.Field.unique_for_date"), but requires the field to be unique with respect to the month.
### `unique_for_year`
`Field.``unique_for_year`
Like [`unique_for_date`](http://masteringdjango.com/django-model-definition-reference/#django.db.models.Field.unique_for_date "django.db.models.Field.unique_for_date") and [`unique_for_month`](http://masteringdjango.com/django-model-definition-reference/#django.db.models.Field.unique_for_month "django.db.models.Field.unique_for_month").
### `verbose_name`
`Field.``verbose_name`
A human-readable name for the field. If the verbose name isnt given, Django will automatically create it using the fields attribute name, converting underscores to spaces. See Verbose field names.
### `validators`
`Field.``validators`
A list of validators to run for this field.
## Field attribute reference
Every `Field` instance contains several attributes that allow introspecting its behavior. Use these attributes instead of `isinstance` checks when you need to write code that depends on a fields functionality. These attributes can be used together with the Model._meta API to narrow down a search for specific field types. Custom model fields should implement these flags.
## Attributes for fields
`Field.``auto_created`
Boolean flag that indicates if the field was automatically created, such as the `OneToOneField` used by model inheritance.
`Field.``concrete`
Boolean flag that indicates if the field has a database column associated with it.
`Field.``hidden`
Boolean flag that indicates if a field is used to back another non-hidden fields functionality (e.g. the`content_type` and `object_id` fields that make up a `GenericForeignKey`). The `hidden` flag is used to distinguish what constitutes the public subset of fields on the model from all the fields on the model.
Note
`Options.get_fields()` excludes hidden fields by default. Pass in `include_hidden=True` to return hidden fields in the results.
`Field.``is_relation`
Boolean flag that indicates if a field contains references to one or more other models for its functionality (e.g. `ForeignKey`, `ManyToManyField`, `OneToOneField`, etc.).
`Field.``model`
Returns the model on which the field is defined. If a field is defined on a superclass of a model, `model` will refer to the superclass, not the class of the instance.
## Attributes for fields with relations
These attributes are used to query for the cardinality and other details of a relation. These attribute are present on all fields; however, they will only have meaningful values if the field is a relation type ([`Field.is_relation=True`](http://masteringdjango.com/django-model-definition-reference/#django.db.models.Field.is_relation "django.db.models.Field.is_relation")).
`Field.``many_to_many`
Boolean flag that is `True` if the field has a many-to-many relation; `False` otherwise. The only field included with Django where this is `True` is `ManyToManyField`.
`Field.``many_to_one`
Boolean flag that is `True` if the field has a many-to-one relation, such as a `ForeignKey`; `False` otherwise.
`Field.``one_to_many`
Boolean flag that is `True` if the field has a one-to-many relation, such as a `GenericRelation` or the reverse of a `ForeignKey`; `False` otherwise.
`Field.``one_to_one`
Boolean flag that is `True` if the field has a one-to-one relation, such as a `OneToOneField`; `False` otherwise.
`Field.``related_model`
Points to the model the field relates to. For example, `Author` in `ForeignKey(Author)`. If a field has a generic relation (such as a `GenericForeignKey` or a `GenericRelation`) then `related_model` will be `None`.
## Relationships
### `ForeignKey`
*class *`django.db.models.``ForeignKey`(*othermodel*[, ***options*])
A many-to-one relationship. Requires a positional argument: the class to which the model is related.
To create a recursive relationship an object that has a many-to-one relationship with itself use`models.ForeignKey('self')`.
If you need to create a relationship on a model that has not yet been defined, you can use the name of the model, rather than the model object itself:
~~~
from django.db import models
class Car(models.Model):
manufacturer = models.ForeignKey('Manufacturer')
# ...
class Manufacturer(models.Model):
# ...
pass
~~~
To refer to models defined in another application, you can explicitly specify a model with the full application label. For example, if the `Manufacturer` model above is defined in another application called`production`, youd need to use:
~~~
class Car(models.Model):
manufacturer = models.ForeignKey('production.Manufacturer')
~~~
This sort of reference can be useful when resolving circular import dependencies between two applications.
A database index is automatically created on the `ForeignKey`. You can disable this by setting [`db_index`](http://masteringdjango.com/django-model-definition-reference/#django.db.models.Field.db_index "django.db.models.Field.db_index") to`False`. You may want to avoid the overhead of an index if you are creating a foreign key for consistency rather than joins, or if you will be creating an alternative index like a partial or multiple column index.
#### DATABASE REPRESENTATION
Behind the scenes, Django appends `"_id"` to the field name to create its database column name. In the above example, the database table for the `Car` model will have a `manufacturer_id` column. (You can change this explicitly by specifying [`db_column`](http://masteringdjango.com/django-model-definition-reference/#django.db.models.Field.db_column "django.db.models.Field.db_column")) However, your code should never have to deal with the database column name, unless you write custom SQL. Youll always deal with the field names of your model object.
#### ARGUMENTS
[`ForeignKey`](http://masteringdjango.com/django-model-definition-reference/#django.db.models.ForeignKey "django.db.models.ForeignKey") accepts an extra set of arguments all optional that define the details of how the relation works.
`ForeignKey.``limit_choices_to`
Sets a limit to the available choices for this field when this field is rendered using a `ModelForm` or the admin (by default, all objects in the queryset are available to choose). Either a dictionary, a `Q` object, or a callable returning a dictionary or `Q` object can be used.
For example:
~~~
staff_member = models.ForeignKey(User, limit_choices_to={'is_staff': True})
~~~
causes the corresponding field on the `ModelForm` to list only `Users` that have `is_staff=True`. This may be helpful in the Django admin.
The callable form can be helpful, for instance, when used in conjunction with the Python `datetime` module to limit selections by date range. For example:
~~~
def limit_pub_date_choices():
return {'pub_date__lte': datetime.date.utcnow()}
limit_choices_to = limit_pub_date_choices
~~~
If `limit_choices_to` is or returns a `Q object`, which is useful for complex queries , then it will only have an effect on the choices available in the admin when the field is not listed in `raw_id_fields` in the `ModelAdmin`for the model.
Note
If a callable is used for `limit_choices_to`, it will be invoked every time a new form is instantiated. It may also be invoked when a model is validated, for example by management commands or the admin. The admin constructs querysets to validate its form inputs in various edge cases multiple times, so there is a possibility your callable may be invoked several times.
`ForeignKey.``related_name`
The name to use for the relation from the related object back to this one. Its also the default value for[`related_query_name`](http://masteringdjango.com/django-model-definition-reference/#django.db.models.ForeignKey.related_query_name "django.db.models.ForeignKey.related_query_name") (the name to use for the reverse filter name from the target model). See the related objects documentation for a full explanation and example. Note that you must set this value when defining relations on abstract models; and when you do so some special syntax is available.
If youd prefer Django not to create a backwards relation, set `related_name` to `'+'` or end it with `'+'`. For example, this will ensure that the `User` model wont have a backwards relation to this model:
~~~
user = models.ForeignKey(User, related_name='+')
~~~
`ForeignKey.``related_query_name`
The name to use for the reverse filter name from the target model. Defaults to the value of [`related_name`](http://masteringdjango.com/django-model-definition-reference/#django.db.models.ForeignKey.related_name "django.db.models.ForeignKey.related_name") if it is set, otherwise it defaults to the name of the model:
~~~
# Declare the ForeignKey with related_query_name
class Tag(models.Model):
article = models.ForeignKey(Article, related_name="tags", related_query_name="tag")
name = models.CharField(max_length=255)
# That's now the name of the reverse filter
Article.objects.filter(tag__name="important")
~~~
`ForeignKey.``to_field`
The field on the related object that the relation is to. By default, Django uses the primary key of the related object.
`ForeignKey.``db_constraint`
Controls whether or not a constraint should be created in the database for this foreign key. The default is`True`, and thats almost certainly what you want; setting this to `False` can be very bad for data integrity. That said, here are some scenarios where you might want to do this:
* You have legacy data that is not valid.
* Youre sharding your database.
If this is set to `False`, accessing a related object that doesnt exist will raise its `DoesNotExist` exception.
`ForeignKey.``on_delete`
When an object referenced by a [`ForeignKey`](http://masteringdjango.com/django-model-definition-reference/#django.db.models.ForeignKey "django.db.models.ForeignKey") is deleted, Django by default emulates the behavior of the SQL constraint `ON DELETE CASCADE` and also deletes the object containing the `ForeignKey`. This behavior can be overridden by specifying the [`on_delete`](http://masteringdjango.com/django-model-definition-reference/#django.db.models.ForeignKey.on_delete "django.db.models.ForeignKey.on_delete") argument. For example, if you have a nullable [`ForeignKey`](http://masteringdjango.com/django-model-definition-reference/#django.db.models.ForeignKey "django.db.models.ForeignKey") and you want it to be set null when the referenced object is deleted:
~~~
user = models.ForeignKey(User, blank=True, null=True, on_delete=models.SET_NULL)
~~~
The possible values for [`on_delete`](http://masteringdjango.com/django-model-definition-reference/#django.db.models.ForeignKey.on_delete "django.db.models.ForeignKey.on_delete") are found in `django.db.models`:
*
`django.db.models.``CASCADE`
Cascade deletes; the default.
*
`django.db.models.``PROTECT`
Prevent deletion of the referenced object by raising `ProtectedError`, a subclass of `django.db.IntegrityError`.
*
`django.db.models.``SET_NULL`
Set the [`ForeignKey`](http://masteringdjango.com/django-model-definition-reference/#django.db.models.ForeignKey "django.db.models.ForeignKey") null; this is only possible if [`null`](http://masteringdjango.com/django-model-definition-reference/#django.db.models.Field.null "django.db.models.Field.null") is `True`.
*
`django.db.models.``SET_DEFAULT`
Set the [`ForeignKey`](http://masteringdjango.com/django-model-definition-reference/#django.db.models.ForeignKey "django.db.models.ForeignKey") to its default value; a default for the [`ForeignKey`](http://masteringdjango.com/django-model-definition-reference/#django.db.models.ForeignKey "django.db.models.ForeignKey") must be set.
*
`django.db.models.``SET`()
Set the [`ForeignKey`](http://masteringdjango.com/django-model-definition-reference/#django.db.models.ForeignKey "django.db.models.ForeignKey") to the value passed to [`SET()`](http://masteringdjango.com/django-model-definition-reference/#django.db.models.SET "django.db.models.SET"), or if a callable is passed in, the result of calling it. In most cases, passing a callable will be necessary to avoid executing queries at the time your models.py is imported:
~~~
from django.conf import settings
from django.contrib.auth import get_user_model
from django.db import models
def get_sentinel_user():
return get_user_model().objects.get_or_create(username='deleted')[0]
class MyModel(models.Model):
user = models.ForeignKey(settings.AUTH_USER_MODEL,
on_delete=models.SET(get_sentinel_user))
~~~
*
`django.db.models.``DO_NOTHING`
Take no action. If your database backend enforces referential integrity, this will cause an `IntegrityError`unless you manually add an SQL `ON DELETE` constraint to the database field.
`ForeignKey.``swappable`
Controls the migration frameworks reaction if this [`ForeignKey`](http://masteringdjango.com/django-model-definition-reference/#django.db.models.ForeignKey "django.db.models.ForeignKey") is pointing at a swappable model. If it is `True`– the default – then if the [`ForeignKey`](http://masteringdjango.com/django-model-definition-reference/#django.db.models.ForeignKey "django.db.models.ForeignKey") is pointing at a model which matches the current value of`settings.AUTH_USER_MODEL` (or another swappable model setting) the relationship will be stored in the migration using a reference to the setting, not to the model directly.
You only want to override this to be `False` if you are sure your model should always point towards the swapped-in model – for example, if it is a profile model designed specifically for your custom user model.
Setting it to `False` does not mean you can reference a swappable model even if it is swapped out – `False`just means that the migrations made with this ForeignKey will always reference the exact model you specify (so it will fail hard if the user tries to run with a User model you dont support, for example).
If in doubt, leave it to its default of `True`.
### `ManyToManyField`
*class *`django.db.models.``ManyToManyField`(*othermodel*[, ***options*])
A many-to-many relationship. Requires a positional argument: the class to which the model is related, which works exactly the same as it does for [`ForeignKey`](http://masteringdjango.com/django-model-definition-reference/#django.db.models.ForeignKey "django.db.models.ForeignKey"), including recursive and lazy relationships.
Related objects can be added, removed, or created with the fields `RelatedManager`.
#### DATABASE REPRESENTATION
Behind the scenes, Django creates an intermediary join table to represent the many-to-many relationship. By default, this table name is generated using the name of the many-to-many field and the name of the table for the model that contains it. Since some databases dont support table names above a certain length, these table names will be automatically truncated to 64 characters and a uniqueness hash will be used. This means you might see table names like `author_books_9cdf4`; this is perfectly normal. You can manually provide the name of the join table using the [`db_table`](http://masteringdjango.com/django-model-definition-reference/#django.db.models.ManyToManyField.db_table "django.db.models.ManyToManyField.db_table") option.
#### ARGUMENTS
[`ManyToManyField`](http://masteringdjango.com/django-model-definition-reference/#django.db.models.ManyToManyField "django.db.models.ManyToManyField") accepts an extra set of arguments all optional that control how the relationship functions.
`ManyToManyField.``related_name`
Same as [`ForeignKey.related_name`](http://masteringdjango.com/django-model-definition-reference/#django.db.models.ForeignKey.related_name "django.db.models.ForeignKey.related_name").
`ManyToManyField.``related_query_name`
Same as [`ForeignKey.related_query_name`](http://masteringdjango.com/django-model-definition-reference/#django.db.models.ForeignKey.related_query_name "django.db.models.ForeignKey.related_query_name").
`ManyToManyField.``limit_choices_to`
Same as [`ForeignKey.limit_choices_to`](http://masteringdjango.com/django-model-definition-reference/#django.db.models.ForeignKey.limit_choices_to "django.db.models.ForeignKey.limit_choices_to").
`limit_choices_to` has no effect when used on a `ManyToManyField` with a custom intermediate table specified using the [`through`](http://masteringdjango.com/django-model-definition-reference/#django.db.models.ManyToManyField.through "django.db.models.ManyToManyField.through") parameter.
`ManyToManyField.``symmetrical`
Only used in the definition of ManyToManyFields on self. Consider the following model:
~~~
from django.db import models
class Person(models.Model):
friends = models.ManyToManyField("self")
~~~
When Django processes this model, it identifies that it has a [`ManyToManyField`](http://masteringdjango.com/django-model-definition-reference/#django.db.models.ManyToManyField "django.db.models.ManyToManyField") on itself, and as a result, it doesnt add a `person_set` attribute to the `Person` class. Instead, the [`ManyToManyField`](http://masteringdjango.com/django-model-definition-reference/#django.db.models.ManyToManyField "django.db.models.ManyToManyField") is assumed to be symmetrical that is, if I am your friend, then you are my friend.
If you do not want symmetry in many-to-many relationships with `self`, set [`symmetrical`](http://masteringdjango.com/django-model-definition-reference/#django.db.models.ManyToManyField.symmetrical "django.db.models.ManyToManyField.symmetrical") to `False`. This will force Django to add the descriptor for the reverse relationship, allowing [`ManyToManyField`](http://masteringdjango.com/django-model-definition-reference/#django.db.models.ManyToManyField "django.db.models.ManyToManyField") relationships to be non-symmetrical.
`ManyToManyField.``through`
Django will automatically generate a table to manage many-to-many relationships. However, if you want to manually specify the intermediary table, you can use the [`through`](http://masteringdjango.com/django-model-definition-reference/#django.db.models.ManyToManyField.through "django.db.models.ManyToManyField.through") option to specify the Django model that represents the intermediate table that you want to use.
The most common use for this option is when you want to associate extra data with a many-to-many relationship.
If you dont specify an explicit `through` model, there is still an implicit `through` model class you can use to directly access the table created to hold the association. It has three fields:
* `id`: the primary key of the relation.
* `<containing_model>_id`: the `id` of the model that declares the `ManyToManyField`.
* `<other_model>_id`: the `id` of the model that the `ManyToManyField` points to.
This class can be used to query associated records for a given model instance like a normal model.
`ManyToManyField.``through_fields`
Only used when a custom intermediary model is specified. Django will normally determine which fields of the intermediary model to use in order to establish a many-to-many relationship automatically. However, consider the following models:
~~~
from django.db import models
class Person(models.Model):
name = models.CharField(max_length=50)
class Group(models.Model):
name = models.CharField(max_length=128)
members = models.ManyToManyField(Person, through='Membership', through_fields=('group', 'person'))
class Membership(models.Model):
group = models.ForeignKey(Group)
person = models.ForeignKey(Person)
inviter = models.ForeignKey(Person, related_name="membership_invites")
invite_reason = models.CharField(max_length=64)
~~~
`Membership` has *two* foreign keys to `Person` (`person` and `inviter`), which makes the relationship ambiguous and Django cant know which one to use. In this case, you must explicitly specify which foreign keys Django should use using `through_fields`, as in the example above.
`through_fields` accepts a 2-tuple `('field1', 'field2')`, where `field1` is the name of the foreign key to the model the [`ManyToManyField`](http://masteringdjango.com/django-model-definition-reference/#django.db.models.ManyToManyField "django.db.models.ManyToManyField") is defined on (`group` in this case), and `field2` the name of the foreign key to the target model (`person` in this case).
When you have more than one foreign key on an intermediary model to any (or even both) of the models participating in a many-to-many relationship, you *must* specify `through_fields`. This also applies to recursive relationships when an intermediary model is used and there are more than two foreign keys to the model, or you want to explicitly specify which two Django should use.
Recursive relationships using an intermediary model are always defined as non-symmetrical that is, with[`symmetrical=False`](http://masteringdjango.com/django-model-definition-reference/#django.db.models.ManyToManyField.symmetrical "django.db.models.ManyToManyField.symmetrical") therefore, there is the concept of a source and a target. In that case `'field1'` will be treated as the source of the relationship and `'field2'` as the target.
`ManyToManyField.``db_table`
The name of the table to create for storing the many-to-many data. If this is not provided, Django will assume a default name based upon the names of: the table for the model defining the relationship and the name of the field itself.
`ManyToManyField.``db_constraint`
Controls whether or not constraints should be created in the database for the foreign keys in the intermediary table. The default is `True`, and thats almost certainly what you want; setting this to `False` can be very bad for data integrity. That said, here are some scenarios where you might want to do this:
* You have legacy data that is not valid.
* Youre sharding your database.
It is an error to pass both `db_constraint` and `through`.
`ManyToManyField.``swappable`
Controls the migration frameworks reaction if this [`ManyToManyField`](http://masteringdjango.com/django-model-definition-reference/#django.db.models.ManyToManyField "django.db.models.ManyToManyField") is pointing at a swappable model. If it is `True` – the default – then if the [`ManyToManyField`](http://masteringdjango.com/django-model-definition-reference/#django.db.models.ManyToManyField "django.db.models.ManyToManyField") is pointing at a model which matches the current value of `settings.AUTH_USER_MODEL` (or another swappable model setting) the relationship will be stored in the migration using a reference to the setting, not to the model directly.
You only want to override this to be `False` if you are sure your model should always point towards the swapped-in model – for example, if it is a profile model designed specifically for your custom user model.
If in doubt, leave it to its default of `True`.
[`ManyToManyField`](http://masteringdjango.com/django-model-definition-reference/#django.db.models.ManyToManyField "django.db.models.ManyToManyField") does not support [`validators`](http://masteringdjango.com/django-model-definition-reference/#django.db.models.Field.validators "django.db.models.Field.validators").
[`null`](http://masteringdjango.com/django-model-definition-reference/#django.db.models.Field.null "django.db.models.Field.null") has no effect since there is no way to require a relationship at the database level.
### `OneToOneField`
*class *`django.db.models.``OneToOneField`(*othermodel*[, *parent_link=False*, ***options*])
A one-to-one relationship. Conceptually, this is similar to a [`ForeignKey`](http://masteringdjango.com/django-model-definition-reference/#django.db.models.ForeignKey "django.db.models.ForeignKey") with [`unique=True`](http://masteringdjango.com/django-model-definition-reference/#django.db.models.Field.unique "django.db.models.Field.unique"), but the reverse side of the relation will directly return a single object.
This is most useful as the primary key of a model which extends another model in some way; multi table inheritance is implemented by adding an implicit one-to-one relation from the child model to the parent model, for example.
One positional argument is required: the class to which the model will be related. This works exactly the same as it does for [`ForeignKey`](http://masteringdjango.com/django-model-definition-reference/#django.db.models.ForeignKey "django.db.models.ForeignKey"), including all the options regarding recursive and lazy relationships.
If you do not specify the [`related_name`](http://masteringdjango.com/django-model-definition-reference/#django.db.models.ForeignKey.related_name "django.db.models.ForeignKey.related_name") argument for the `OneToOneField`, Django will use the lower-case name of the current model as default value.
With the following example:
~~~
from django.conf import settings
from django.db import models
class MySpecialUser(models.Model):
user = models.OneToOneField(settings.AUTH_USER_MODEL)
supervisor = models.OneToOneField(settings.AUTH_USER_MODEL, related_name='supervisor_of')
~~~
your resulting `User` model will have the following attributes:
~~~
>>> user = User.objects.get(pk=1)
>>> hasattr(user, 'myspecialuser')
True
>>> hasattr(user, 'supervisor_of')
True
~~~
A `DoesNotExist` exception is raised when accessing the reverse relationship if an entry in the related table doesnt exist. For example, if a user doesnt have a supervisor designated by `MySpecialUser`:
~~~
>>> user.supervisor_of
Traceback (most recent call last):
...
DoesNotExist: User matching query does not exist.
~~~
Additionally, `OneToOneField` accepts all of the extra arguments accepted by [`ForeignKey`](http://masteringdjango.com/django-model-definition-reference/#django.db.models.ForeignKey "django.db.models.ForeignKey"), plus one extra argument:
`OneToOneField.``parent_link`
When `True` and used in a model which inherits from another concrete model, indicates that this field should be used as the link back to the parent class, rather than the extra `OneToOneField` which would normally be implicitly created by subclassing.
See One-to-one relationships for usage examples of `OneToOneField`.
## Model Metadata Options
### `abstract`
`Options.``abstract`
If `abstract = True`, this model will be an abstract base class.
### `app_label`
`Options.``app_label`
If a model is defined outside of an application in `INSTALLED_APPS`, it must declare which app it belongs to:
~~~
app_label = 'myapp'
~~~
### `db_table`
`Options.``db_table`
The name of the database table to use for the model:
~~~
db_table = 'music_album'
~~~
#### TABLE NAMES
To save you time, Django automatically derives the name of the database table from the name of your model class and the app that contains it. A models database table name is constructed by joining the models app label the name you used in `manage.py startapp` to the models class name, with an underscore between them.
For example, if you have an app `bookstore` (as created by `manage.py startapp bookstore`), a model defined as`class Book` will have a database table named `bookstore_book`.
To override the database table name, use the `db_table` parameter in `class Meta`.
If your database table name is an SQL reserved word, or contains characters that arent allowed in Python variable names notably, the hyphen thats OK. Django quotes column and table names behind the scenes.
Use lowercase table names for MySQL
It is strongly advised that you use lowercase table names when you override the table name via `db_table`, particularly if you are using the MySQL backend. See Chapter 23 for more details.
Table name quoting for Oracle
In order to meet the 30-char limitation Oracle has on table names, and match the usual conventions for Oracle databases, Django may shorten table names and turn them all-uppercase. To prevent such transformations, use a quoted name as the value for `db_table`:
~~~
db_table = '"name_left_in_lowercase"'
~~~
Such quoted names can also be used with Djangos other supported database backends; except for Oracle, however, the quotes have no effect. See Chapter 23 for more details.
### `db_tablespace`
`Options.``db_tablespace`
The name of the database tablespace to use for this model. The default is the projects `DEFAULT_TABLESPACE`setting, if set. If the backend doesnt support tablespaces, this option is ignored.
### `default_related_name`
`Options.``default_related_name`
The name that will be used by default for the relation from a related object back to this one. The default is`<model_name>_set`.
As the reverse name for a field should be unique, be careful if you intend to subclass your model. To work around name collisions, part of the name should contain `'%(app_label)s'` and `'%(model_name)s'`, which are replaced respectively by the name of the application the model is in, and the name of the model, both lowercased. See the paragraph on related names for abstract models.
### `get_latest_by`
`Options.``get_latest_by`
The name of an orderable field in the model, typically a [`DateField`](http://masteringdjango.com/django-model-definition-reference/#DateField "DateField"), [`DateTimeField`](http://masteringdjango.com/django-model-definition-reference/#DateTimeField "DateTimeField"), or [`IntegerField`](http://masteringdjango.com/django-model-definition-reference/#django.db.models.IntegerField "django.db.models.IntegerField"). This specifies the default field to use in your model `Manager`s `latest()` and `earliest()` methods.
Example:
~~~
get_latest_by = "order_date"
~~~
See the `latest()` docs for more.
### `managed`
`Options.``managed`
Defaults to `True`, meaning Django will create the appropriate database tables in `migrate` or as part of migrations and remove them as part of a `flush` management command. That is, Django *manages* the database tables lifecycles.
If `False`, no database table creation or deletion operations will be performed for this model. This is useful if the model represents an existing table or a database view that has been created by some other means. This is the *only* difference when `managed=False`. All other aspects of model handling are exactly the same as normal. This includes
1. Adding an automatic primary key field to the model if you dont declare it. To avoid confusion for later code readers, its recommended to specify all the columns from the database table you are modeling when using unmanaged models.
2. If a model with `managed=False` contains a [`ManyToManyField`](http://masteringdjango.com/django-model-definition-reference/#django.db.models.ManyToManyField "django.db.models.ManyToManyField") that points to another unmanaged model, then the intermediate table for the many-to-many join will also not be created. However, the intermediary table between one managed and one unmanaged model *will* be created.
If you need to change this default behavior, create the intermediary table as an explicit model (with`managed` set as needed) and use the [`ManyToManyField.through`](http://masteringdjango.com/django-model-definition-reference/#django.db.models.ManyToManyField.through "django.db.models.ManyToManyField.through") attribute to make the relation use your custom model.
For tests involving models with `managed=False`, its up to you to ensure the correct tables are created as part of the test setup.
If youre interested in changing the Python-level behavior of a model class, you *could* use `managed=False` and create a copy of an existing model. However, theres a better approach for that situation: proxy models.
### `order_with_respect_to`
`Options.``order_with_respect_to`
Marks this object as orderable with respect to the given field. This is almost always used with related objects to allow them to be ordered with respect to a parent object. For example, if an `Answer` relates to a`Question` object, and a question has more than one answer, and the order of answers matters, youd do this:
~~~
from django.db import models
class Question(models.Model):
text = models.TextField()
# ...
class Answer(models.Model):
question = models.ForeignKey(Question)
# ...
class Meta:
order_with_respect_to = 'question'
~~~
When `order_with_respect_to` is set, two additional methods are provided to retrieve and to set the order of the related objects: `get_RELATED_order()` and `set_RELATED_order()`, where `RELATED` is the lowercased model name. For example, assuming that a `Question` object has multiple related `Answer` objects, the list returned contains the primary keys of the related `Answer` objects:
~~~
>>> question = Question.objects.get(id=1)
>>> question.get_answer_order()
[1, 2, 3]
~~~
The order of a `Question` objects related `Answer` objects can be set by passing in a list of `Answer` primary keys:
~~~
>>> question.set_answer_order([3, 1, 2])
~~~
The related objects also get two methods, `get_next_in_order()` and `get_previous_in_order()`, which can be used to access those objects in their proper order. Assuming the `Answer` objects are ordered by `id`:
~~~
>>> answer = Answer.objects.get(id=2)
>>> answer.get_next_in_order()
<Answer: 3>
>>> answer.get_previous_in_order()
<Answer: 1>
~~~
Changing order_with_respect_to
`order_with_respect_to` adds an additional field/database column named `_order`, so be sure to make and apply the appropriate migrations if you add or change `order_with_respect_to` after your initial `migrate`.
### `ordering`
`Options.``ordering`
The default ordering for the object, for use when obtaining lists of objects:
~~~
ordering = ['-order_date']
~~~
This is a tuple or list of strings. Each string is a field name with an optional - prefix, which indicates descending order. Fields without a leading - will be ordered ascending. Use the string ? to order randomly.
For example, to order by a `pub_date` field ascending, use this:
~~~
ordering = ['pub_date']
~~~
To order by `pub_date` descending, use this:
~~~
ordering = ['-pub_date']
~~~
To order by `pub_date` descending, then by `author` ascending, use this:
~~~
ordering = ['-pub_date', 'author']
~~~
Warning
Ordering is not a free operation. Each field you add to the ordering incurs a cost to your database. Each foreign key you add will implicitly include all of its default orderings as well.
### `permissions`
`Options.``permissions`
Extra permissions to enter into the permissions table when creating this object. Add, delete and change permissions are automatically created for each model. This example specifies an extra permission,`can_deliver_pizzas`:
~~~
permissions = (("can_deliver_pizzas", "Can deliver pizzas"),)
~~~
This is a list or tuple of 2-tuples in the format `(permission_code, human_readable_permission_name)`.
### `default_permissions`
`Options.``default_permissions`
Defaults to `('add', 'change', 'delete')`. You may customize this list, for example, by setting this to an empty list if your app doesnt require any of the default permissions. It must be specified on the model before the model is created by `migrate` in order to prevent any omitted permissions from being created.
### `proxy`
`Options.``proxy`
If `proxy = True`, a model which subclasses another model will be treated as a proxy model.
### `select_on_save`
`Options.``select_on_save`
Determines if Django will use the pre-1.6 `django.db.models.Model.save()` algorithm. The old algorithm uses`SELECT` to determine if there is an existing row to be updated. The new algorithm tries an `UPDATE` directly. In some rare cases the `UPDATE` of an existing row isnt visible to Django. An example is the PostgreSQL `ONUPDATE` trigger which returns `NULL`. In such cases the new algorithm will end up doing an `INSERT` even when a row exists in the database.
Usually there is no need to set this attribute. The default is `False`.
See `django.db.models.Model.save()` for more about the old and new saving algorithm.
### `unique_together`
`Options.``unique_together`
Sets of field names that, taken together, must be unique:
~~~
unique_together = (("driver", "restaurant"),)
~~~
This is a tuple of tuples that must be unique when considered together. Its used in the Django admin and is enforced at the database level (i.e., the appropriate `UNIQUE` statements are included in the `CREATE TABLE`statement).
For convenience, unique_together can be a single tuple when dealing with a single set of fields:
~~~
unique_together = ("driver", "restaurant")
~~~
A [`ManyToManyField`](http://masteringdjango.com/django-model-definition-reference/#django.db.models.ManyToManyField "django.db.models.ManyToManyField") cannot be included in unique_together. (Its not clear what that would even mean!) If you need to validate uniqueness related to a [`ManyToManyField`](http://masteringdjango.com/django-model-definition-reference/#django.db.models.ManyToManyField "django.db.models.ManyToManyField"), try using a signal or an explicit [`through`](http://masteringdjango.com/django-model-definition-reference/#django.db.models.ManyToManyField.through "django.db.models.ManyToManyField.through") model.
The `ValidationError` raised during model validation when the constraint is violated has the `unique_together`error code.
### `index_together`
`Options.``index_together`
Sets of field names that, taken together, are indexed:
~~~
index_together = [
["pub_date", "deadline"],
]
~~~
This list of fields will be indexed together (i.e. the appropriate `CREATE INDEX` statement will be issued.)
For convenience, `index_together` can be a single list when dealing with a single set of fields:
~~~
index_together = ["pub_date", "deadline"]
~~~
### `verbose_name`
`Options.``verbose_name`
A human-readable name for the object, singular:
~~~
verbose_name = "pizza"
~~~
If this isnt given, Django will use a munged version of the class name: `CamelCase` becomes `camel case`.
### `verbose_name_plural`
`Options.``verbose_name_plural`
The plural name for the object:
~~~
verbose_name_plural = "stories"
~~~
If this isnt given, Django will use [`verbose_name`](http://masteringdjango.com/django-model-definition-reference/#django.db.models.Options.verbose_name "django.db.models.Options.verbose_name") + `"s"`.
Chapter 23: Advanced database management
最后更新于:2022-04-01 04:48:25
This chapter provides additional information on each of the supported relational databases in Django, as well as notes and tips and tricks for connecting to legacy databases.
[TOC=3]
## General notes
Django attempts to support as many features as possible on all database backends. However, not all database backends are alike, and the Django developers had to make design decisions on which features to support and which assumptions could be made safely.
This file describes some of the features that might be relevant to Django usage. Of course, it is not intended as a replacement for server-specific documentation or reference manuals.
### Persistent connections
Persistent connections avoid the overhead of re-establishing a connection to the database in each request. Theyre controlled by the `CONN_MAX_AGE` parameter which defines the maximum lifetime of a connection. It can be set independently for each database.
The default value is `0`, preserving the historical behavior of closing the database connection at the end of each request. To enable persistent connections, set `CONN_MAX_AGE` to a positive number of seconds. For unlimited persistent connections, set it to `None`.
#### CONNECTION MANAGEMENT
Django opens a connection to the database when it first makes a database query. It keeps this connection open and reuses it in subsequent requests. Django closes the connection once it exceeds the maximum age defined by `CONN_MAX_AGE` or when it isnt usable any longer.
In detail, Django automatically opens a connection to the database whenever it needs one and doesnt have one already either because this is the first connection, or because the previous connection was closed.
At the beginning of each request, Django closes the connection if it has reached its maximum age. If your database terminates idle connections after some time, you should set `CONN_MAX_AGE` to a lower value, so that Django doesnt attempt to use a connection that has been terminated by the database server. (This problem may only affect very low traffic sites.)
At the end of each request, Django closes the connection if it has reached its maximum age or if it is in an unrecoverable error state. If any database errors have occurred while processing the requests, Django checks whether the connection still works, and closes it if it doesnt. Thus, database errors affect at most one request; if the connection becomes unusable, the next request gets a fresh connection.
#### CAVEATS
Since each thread maintains its own connection, your database must support at least as many simultaneous connections as you have worker threads.
Sometimes a database wont be accessed by the majority of your views, for example because its the database of an external system, or thanks to caching. In such cases, you should set `CONN_MAX_AGE` to a low value or even `0`, because it doesnt make sense to maintain a connection thats unlikely to be reused. This will help keep the number of simultaneous connections to this database small.
The development server creates a new thread for each request it handles, negating the effect of persistent connections. Dont enable them during development.
When Django establishes a connection to the database, it sets up appropriate parameters, depending on the backend being used. If you enable persistent connections, this setup is no longer repeated every request. If you modify parameters such as the connections isolation level or time zone, you should either restore Djangos defaults at the end of each request, force an appropriate value at the beginning of each request, or disable persistent connections.
### Encoding
Django assumes that all databases use UTF-8 encoding. Using other encodings may result in unexpected behavior such as value too long errors from your database for data that is valid in Django. See the database specific notes below for information on how to set up your database correctly.
## PostgreSQL notes
Django supports PostgreSQL 9.0 and higher. It requires the use of Psycopg2 2.0.9 or higher.
### PostgreSQL connection settings
See `HOST` for details.
### Optimizing PostgreSQLs configuration
Django needs the following parameters for its database connections:
* `client_encoding`: `'UTF8'`,
* `default_transaction_isolation`: `'read committed'` by default, or the value set in the connection options (see below),
* `timezone`: `'UTC'` when `USE_TZ` is `True`, value of `TIME_ZONE` otherwise.
If these parameters already have the correct values, Django wont set them for every new connection, which improves performance slightly. You can configure them directly in `postgresql.conf` or more conveniently per database user with [ALTER ROLE](http://www.postgresql.org/docs/current/interactive/sql-alterrole.html).
Django will work just fine without this optimization, but each new connection will do some additional queries to set these parameters.
### Isolation level
Like PostgreSQL itself, Django defaults to the `READ COMMITTED` [isolation level](http://www.postgresql.org/docs/current/static/transaction-iso.html). If you need a higher isolation level such as `REPEATABLE READ` or `SERIALIZABLE`, set it in the `OPTIONS` part of your database configuration in`DATABASES`:
~~~
import psycopg2.extensions
DATABASES = {
# ...
'OPTIONS': {
'isolation_level': psycopg2.extensions.ISOLATION_LEVEL_SERIALIZABLE,
},
}
~~~
Note
Under higher isolation levels, your application should be prepared to handle exceptions raised on serialization failures. This option is designed for advanced uses.
### Indexes for `varchar` and `text` columns
When specifying `db_index=True` on your model fields, Django typically outputs a single `CREATE INDEX`statement. However, if the database type for the field is either `varchar` or `text` (e.g., used by `CharField`,`FileField`, and `TextField`), then Django will create an additional index that uses an appropriate [PostgreSQL operator class](http://www.postgresql.org/docs/current/static/indexes-opclass.html) for the column. The extra index is necessary to correctly perform lookups that use the `LIKE`operator in their SQL, as is done with the `contains` and `startswith` lookup types.
## MySQL notes
### Version support
Django supports MySQL 5.5 and higher.
Djangos `inspectdb` feature uses the `information_schema` database, which contains detailed data on all database schemas.
Django expects the database to support Unicode (UTF-8 encoding) and delegates to it the task of enforcing transactions and referential integrity. It is important to be aware of the fact that the two latter ones arent actually enforced by MySQL when using the MyISAM storage engine, see the next section.
### Storage engines
MySQL has several [storage engines](http://dev.mysql.com/doc/refman/5.6/en/storage-engines.html). You can change the default storage engine in the server configuration.
Until MySQL 5.5.4, the default engine was [MyISAM](http://dev.mysql.com/doc/refman/5.6/en/myisam-storage-engine.html) [[1]](http://masteringdjango.com/advanced-database-management/#id6). The main drawbacks of MyISAM are that it doesnt support transactions or enforce foreign-key constraints. On the plus side, it was the only engine that supported full-text indexing and searching until MySQL 5.6.4.
Since MySQL 5.5.5, the default storage engine is [InnoDB](http://dev.mysql.com/doc/refman/5.6/en/innodb-storage-engine.html). This engine is fully transactional and supports foreign key references. Its probably the best choice at this point. However, note that the InnoDB autoincrement counter is lost on a MySQL restart because it does not remember the `AUTO_INCREMENT` value, instead recreating it as max(id)+1. This may result in an inadvertent reuse of `AutoField` values.
If you upgrade an existing project to MySQL 5.5.5 and subsequently add some tables, ensure that your tables are using the same storage engine (i.e. MyISAM vs. InnoDB). Specifically, if tables that have a`ForeignKey` between them use different storage engines, you may see an error like the following when running `migrate`:
~~~
_mysql_exceptions.OperationalError: (
1005, "Can't create table '\\db_name\\.#sql-4a8_ab' (errno: 150)"
)
~~~
| [[1]](http://masteringdjango.com/advanced-database-management/#id4) | Unless this was changed by the packager of your MySQL package. Weve had reports that the Windows Community Server installer sets up InnoDB as the default storage engine, for example. |
### MySQL DB API Drivers
The Python Database API is described in [PEP 249](https://www.python.org/dev/peps/pep-0249). MySQL has three prominent drivers that implement this API:
* [MySQLdb](https://pypi.python.org/pypi/MySQL-python/1.2.4) is a native driver that has been developed and supported for over a decade by Andy Dustman.
* [mysqlclient](https://pypi.python.org/pypi/mysqlclient) is a fork of `MySQLdb` which notably supports Python 3 and can be used as a drop-in replacement for MySQLdb. At the time of this writing, this is the recommended choice for using MySQL with Django.
* [MySQL Connector/Python](http://dev.mysql.com/downloads/connector/python) is a pure Python driver from Oracle that does not require the MySQL client library or any Python modules outside the standard library.
All these drivers are thread-safe and provide connection pooling. `MySQLdb` is the only one not supporting Python 3 currently.
In addition to a DB API driver, Django needs an adapter to access the database drivers from its ORM. Django provides an adapter for MySQLdb/mysqlclient while MySQL Connector/Python includes [its own](http://dev.mysql.com/doc/refman/5.6/en/connector-python-info.html).
#### MYSQLDB
Django requires MySQLdb version 1.2.1p2 or later.
Note
If you see `ImportError: cannot import name ImmutableSet` when trying to use Django, your MySQLdb installation may contain an outdated `sets.py` file that conflicts with the built-in module of the same name from Python 2.4 and later. To fix this, verify that you have installed MySQLdb version 1.2.1p2 or newer, then delete the `sets.py` file in the MySQLdb directory that was left by an earlier version.
Note
There are known issues with the way MySQLdb converts date strings into datetime objects. Specifically, date strings with value 0000-00-00 are valid for MySQL but will be converted into None by MySQLdb.
This means you should be careful while using loaddata/dumpdata with rows that may have 0000-00-00 values, as they will be converted to None.
Note
At the time of writing, the latest release of MySQLdb (1.2.4) doesnt support Python 3\. In order to use MySQLdb under Python 3, youll have to install `mysqlclient`.
#### MYSQLCLIENT
Django requires [mysqlclient](https://pypi.python.org/pypi/mysqlclient) 1.3.3 or later. Note that Python 3.2 is not supported. Except for the Python 3.3+ support, mysqlclient should mostly behave the same as MySQLDB.
#### MYSQL CONNECTOR/PYTHON
MySQL Connector/Python is available from the [download page](http://dev.mysql.com/downloads/connector/python/). The Django adapter is available in versions 1.1.X and later. It may not support the most recent releases of Django.
### Time zone definitions
If you plan on using Djangos timezone support , use [mysql_tzinfo_to_sql](http://dev.mysql.com/doc/refman/5.6/en/mysql-tzinfo-to-sql.html) to load time zone tables into the MySQL database. This needs to be done just once for your MySQL server, not per database.
### Creating your database
You can [create your database](http://dev.mysql.com/doc/refman/5.6/en/create-database.html) using the command-line tools and this SQL:
~~~
CREATE DATABASE <dbname> CHARACTER SET utf8;
~~~
This ensures all tables and columns will use UTF-8 by default.
#### COLLATION SETTINGS
The collation setting for a column controls the order in which data is sorted as well as what strings compare as equal. It can be set on a database-wide level and also per-table and per-column. This is[documented thoroughly](http://dev.mysql.com/doc/refman/5.6/en/charset.html) in the MySQL documentation. In all cases, you set the collation by directly manipulating the database tables; Django doesnt provide a way to set this on the model definition.
By default, with a UTF-8 database, MySQL will use the `utf8_general_ci` collation. This results in all string equality comparisons being done in a *case-insensitive* manner. That is, `"Fred"` and `"freD"` are considered equal at the database level. If you have a unique constraint on a field, it would be illegal to try to insert both `"aa"` and `"AA"` into the same column, since they compare as equal (and, hence, non-unique) with the default collation.
In many cases, this default will not be a problem. However, if you really want case-sensitive comparisons on a particular column or table, you would change the column or table to use the `utf8_bin` collation. The main thing to be aware of in this case is that if you are using MySQLdb 1.2.2, the database backend in Django will then return bytestrings (instead of unicode strings) for any character fields it receive from the database. This is a strong variation from Djangos normal practice of *always* returning unicode strings. It is up to you, the developer, to handle the fact that you will receive bytestrings if you configure your table(s) to use `utf8_bin` collation. Django itself should mostly work smoothly with such columns (except for the`contrib.sessions` `Session` and `contrib.admin` `LogEntry` tables described below), but your code must be prepared to call `django.utils.encoding.smart_text()` at times if it really wants to work with consistent data Django will not do this for you (the database backend layer and the model population layer are separated internally so the database layer doesnt know it needs to make this conversion in this one particular case).
If youre using MySQLdb 1.2.1p2, Djangos standard `CharField` class will return unicode strings even with`utf8_bin` collation. However, [`TextField`](http://masteringdjango.com/advanced-database-management/appendix_A.html#django.db.models.TextField "django.db.models.TextField") fields will be returned as an `array.array` instance (from Pythons standard `array` module). There isnt a lot Django can do about that, since, again, the information needed to make the necessary conversions isnt available when the data is read in from the database. This problem was [fixed in MySQLdb 1.2.2](http://sourceforge.net/tracker/index.php?func=detail&aid=1495765&group_id=22307&atid=374932), so if you want to use [`TextField`](http://masteringdjango.com/advanced-database-management/appendix_A.html#django.db.models.TextField "django.db.models.TextField") with `utf8_bin` collation, upgrading to version 1.2.2 and then dealing with the bytestrings (which shouldnt be too difficult) as described above is the recommended solution.
Should you decide to use `utf8_bin` collation for some of your tables with MySQLdb 1.2.1p2 or 1.2.2, you should still use `utf8_general_ci` (the default) collation for the `django.contrib.sessions.models.Session` table (usually called `django_session`) and the `django.contrib.admin.models.LogEntry` table (usually called`django_admin_log`). Those are the two standard tables that use [`TextField`](http://masteringdjango.com/advanced-database-management/appendix_A.html#django.db.models.TextField "django.db.models.TextField") internally.
Please note that according to [MySQL Unicode Character Sets](http://dev.mysql.com/doc/refman/5.7/en/charset-unicode-sets.html), comparisons for the `utf8_general_ci` collation are faster, but slightly less correct, than comparisons for `utf8_unicode_ci`. If this is acceptable for your application, you should use `utf8_general_ci` because it is faster. If this is not acceptable (for example, if you require German dictionary order), use `utf8_unicode_ci` because it is more accurate.
Warning
Model formsets validate unique fields in a case-sensitive manner. Thus when using a case-insensitive collation, a formset with unique field values that differ only by case will pass validation, but upon calling`save()`, an `IntegrityError` will be raised.
### Connecting to the database
Refer to the settings documentation .
Connection settings are used in this order:
1. `OPTIONS`.
2. `NAME`, `USER`, `PASSWORD`, `HOST`, `PORT`
3. MySQL option files.
In other words, if you set the name of the database in `OPTIONS`, this will take precedence over `NAME`, which would override anything in a [MySQL option file](http://dev.mysql.com/doc/refman/5.6/en/option-files.html).
Heres a sample configuration which uses a MySQL option file:
~~~
# settings.py
DATABASES = {
'default': {
'ENGINE': 'django.db.backends.mysql',
'OPTIONS': {
'read_default_file': '/path/to/my.cnf',
},
}
}
# my.cnf
[client]
database = NAME
user = USER
password = PASSWORD
default-character-set = utf8
~~~
Several other MySQLdb connection options may be useful, such as `ssl`, `init_command`, and `sql_mode`. Consult the [MySQLdb documentation](http://mysql-python.sourceforge.net/) for more details.
### Creating your tables
When Django generates the schema, it doesnt specify a storage engine, so tables will be created with whatever default storage engine your database server is configured for. The easiest solution is to set your database servers default storage engine to the desired engine.
If youre using a hosting service and cant change your servers default storage engine, you have a couple of options.
* After the tables are created, execute an `ALTER TABLE` statement to convert a table to a new storage engine (such as InnoDB):
~~~
ALTER TABLE <tablename> ENGINE=INNODB;
~~~
This can be tedious if you have a lot of tables.
* Another option is to use the `init_command` option for MySQLdb prior to creating your tables:
~~~
'OPTIONS': {
'init_command': 'SET storage_engine=INNODB',
}
~~~
This sets the default storage engine upon connecting to the database. After your tables have been created, you should remove this option as it adds a query that is only needed during table creation to each database connection.
### Table names
There are [known issues](http://bugs.mysql.com/bug.php?id=48875) in even the latest versions of MySQL that can cause the case of a table name to be altered when certain SQL statements are executed under certain conditions. It is recommended that you use lowercase table names, if possible, to avoid any problems that might arise from this behavior. Django uses lowercase table names when it auto-generates table names from models, so this is mainly a consideration if you are overriding the table name via the [`db_table`](http://masteringdjango.com/advanced-database-management/appendix_A.html#django.db.models.Options.db_table "django.db.models.Options.db_table") parameter.
### Savepoints
Both the Django ORM and MySQL (when using the InnoDB storage engine) support database savepoints.
If you use the MyISAM storage engine please be aware of the fact that you will receive database-generated errors if you try to use the savepoint-related methods of the transactions API. The reason for this is that detecting the storage engine of a MySQL database/table is an expensive operation so it was decided it isnt worth to dynamically convert these methods in no-ops based in the results of such detection.
### Notes on specific fields
#### CHARACTER FIELDS
Any fields that are stored with `VARCHAR` column types have their `max_length` restricted to 255 characters if you are using `unique=True` for the field. This affects `CharField`, [`SlugField`](http://masteringdjango.com/advanced-database-management/appendix_A.html#django.db.models.SlugField "django.db.models.SlugField") and `CommaSeparatedIntegerField`.
#### FRACTIONAL SECONDS SUPPORT FOR TIME AND DATETIME FIELDS
MySQL 5.6.4 and later can store fractional seconds, provided that the column definition includes a fractional indication (e.g. `DATETIME(6)`). Earlier versions do not support them at all. In addition, versions of MySQLdb older than 1.2.5 have [a bug](https://github.com/farcepest/MySQLdb1/issues/24) that also prevents the use of fractional seconds with MySQL.
Django will not upgrade existing columns to include fractional seconds if the database server supports it. If you want to enable them on an existing database, its up to you to either manually update the column on the target database, by executing a command like:
~~~
ALTER TABLE `your_table` MODIFY `your_datetime_column` DATETIME(6)
~~~
or using a `RunSQL` operation in a `data migration <data-migrations>`.
By default, new `DateTimeField` or `TimeField` columns are now created with fractional seconds support on MySQL 5.6.4 or later with either mysqlclient or MySQLdb 1.2.5 or later.
#### `TIMESTAMP` COLUMNS
If you are using a legacy database that contains `TIMESTAMP` columns, you must set `USE_TZ = False <USE_TZ>` to avoid data corruption. `inspectdb` maps these columns to `DateTimeField` and if you enable timezone support, both MySQL and Django will attempt to convert the values from UTC to local time.
### Row locking with `QuerySet.select_for_update()`
MySQL does not support the `NOWAIT` option to the `SELECT ... FOR UPDATE` statement. If `select_for_update()` is used with `nowait=True` then a `DatabaseError` will be raised.
### Automatic typecasting can cause unexpected results
When performing a query on a string type, but with an integer value, MySQL will coerce the types of all values in the table to an integer before performing the comparison. If your table contains the values `'abc'`,`'def'` and you query for `WHERE mycolumn=0`, both rows will match. Similarly, `WHERE mycolumn=1` will match the value `'abc1'`. Therefore, string type fields included in Django will always cast the value to a string before using it in a query.
If you implement custom model fields that inherit from `Field` directly, are overriding `get_prep_value()`, or use `extra()` or `raw()`, you should ensure that you perform the appropriate typecasting.
## SQLite notes
[SQLite](http://www.sqlite.org/) provides an excellent development alternative for applications that are predominantly read-only or require a smaller installation footprint. As with all database servers, though, there are some differences that are specific to SQLite that you should be aware of.
### Substring matching and case sensitivity
For all SQLite versions, there is some slightly counter-intuitive behavior when attempting to match some types of strings. These are triggered when using the `iexact` or `contains` filters in Querysets. The behavior splits into two cases:
1\. For substring matching, all matches are done case-insensitively. That is a filter such as`filter(name__contains="aa")` will match a name of `"Aabb"`.
2\. For strings containing characters outside the ASCII range, all exact string matches are performed case-sensitively, even when the case-insensitive options are passed into the query. So the `iexact` filter will behave exactly the same as the `exact` filter in these cases.
Some possible workarounds for this are [documented at sqlite.org](http://www.sqlite.org/faq.html#q18), but they arent utilized by the default SQLite backend in Django, as incorporating them would be fairly difficult to do robustly. Thus, Django exposes the default SQLite behavior and you should be aware of this when doing case-insensitive or substring filtering.
### Old SQLite and `CASE` expressions
SQLite 3.6.23.1 and older contains a bug when [handling query parameters](https://code.djangoproject.com/ticket/24148) in a `CASE` expression that contains an `ELSE` and arithmetic.
SQLite 3.6.23.1 was released in March 2010, and most current binary distributions for different platforms include a newer version of SQLite, with the notable exception of the Python 2.7 installers for Windows.
As of this writing, the latest release for Windows – Python 2.7.9 – includes SQLite 3.6.21\. You can install`pysqlite2` or replace `sqlite3.dll` (by default installed in `C:\Python27\DLLs`) with a newer version from[http://www.sqlite.org/](http://www.sqlite.org/) to remedy this issue.
### Using newer versions of the SQLite DB-API 2.0 driver
Django will use a `pysqlite2` module in preference to `sqlite3` as shipped with the Python standard library if it finds one is available.
This provides the ability to upgrade both the DB-API 2.0 interface or SQLite 3 itself to versions newer than the ones included with your particular Python binary distribution, if needed.
### Database is locked errors
SQLite is meant to be a lightweight database, and thus cant support a high level of concurrency.`OperationalError: database is locked` errors indicate that your application is experiencing more concurrency than `sqlite` can handle in default configuration. This error means that one thread or process has an exclusive lock on the database connection and another thread timed out waiting for the lock the be released.
Pythons SQLite wrapper has a default timeout value that determines how long the second thread is allowed to wait on the lock before it times out and raises the `OperationalError: database is locked` error.
If youre getting this error, you can solve it by:
* Switching to another database backend. At a certain point SQLite becomes too lite for real-world applications, and these sorts of concurrency errors indicate youve reached that point.
* Rewriting your code to reduce concurrency and ensure that database transactions are short-lived.
* Increase the default timeout value by setting the `timeout` database option option:
~~~
'OPTIONS': {
# ...
'timeout': 20,
# ...
}
~~~
This will simply make SQLite wait a bit longer before throwing database is locked errors; it wont really do anything to solve them.
### `QuerySet.select_for_update()` not supported
SQLite does not support the `SELECT ... FOR UPDATE` syntax. Calling it will have no effect.
### pyformat parameter style in raw queries not supported
For most backends, raw queries (`Manager.raw()` or `cursor.execute()`) can use the pyformat parameter style, where placeholders in the query are given as `'%(name)s'` and the parameters are passed as a dictionary rather than a list. SQLite does not support this.
### Parameters not quoted in `connection.queries`
`sqlite3` does not provide a way to retrieve the SQL after quoting and substituting the parameters. Instead, the SQL in `connection.queries` is rebuilt with a simple string interpolation. It may be incorrect. Make sure you add quotes where necessary before copying a query into an SQLite shell.
## Oracle notes
Django supports [Oracle Database Server](http://www.oracle.com/) versions 11.1 and higher. Version 4.3.1 or higher of the [cx_Oracle](http://cx-oracle.sourceforge.net/)Python driver is required, although we recommend version 5.1.3 or later as these versions support Python 3.
Note that due to a Unicode-corruption bug in `cx_Oracle` 5.0, that version of the driver should not be used with Django; `cx_Oracle` 5.0.1 resolved this issue, so if youd like to use a more recent `cx_Oracle`, use version 5.0.1.
`cx_Oracle` 5.0.1 or greater can optionally be compiled with the `WITH_UNICODE` environment variable. This is recommended but not required.
In order for the `python manage.py migrate` command to work, your Oracle database user must have privileges to run the following commands:
* CREATE TABLE
* CREATE SEQUENCE
* CREATE PROCEDURE
* CREATE TRIGGER
To run a projects test suite, the user usually needs these *additional* privileges:
* CREATE USER
* DROP USER
* CREATE TABLESPACE
* DROP TABLESPACE
* CREATE SESSION WITH ADMIN OPTION
* CREATE TABLE WITH ADMIN OPTION
* CREATE SEQUENCE WITH ADMIN OPTION
* CREATE PROCEDURE WITH ADMIN OPTION
* CREATE TRIGGER WITH ADMIN OPTION
Note that, while the RESOURCE role has the required CREATE TABLE, CREATE SEQUENCE, CREATE PROCEDURE and CREATE TRIGGER privileges, and a user granted RESOURCE WITH ADMIN OPTION can grant RESOURCE, such a user cannot grant the individual privileges (e.g. CREATE TABLE), and thus RESOURCE WITH ADMIN OPTION is not usually sufficient for running tests.
Some test suites also create views; to run these, the user also needs the CREATE VIEW WITH ADMIN OPTION privilege. In particular, this is needed for Djangos own test suite.
All of these privileges are included in the DBA role, which is appropriate for use on a private developers database.
The Oracle database backend uses the `SYS.DBMS_LOB` package, so your user will require execute permissions on it. Its normally accessible to all users by default, but in case it is not, youll need to grant permissions like so:
~~~
GRANT EXECUTE ON SYS.DBMS_LOB TO user;
~~~
### Connecting to the database
To connect using the service name of your Oracle database, your `settings.py` file should look something like this:
~~~
DATABASES = {
'default': {
'ENGINE': 'django.db.backends.oracle',
'NAME': 'xe',
'USER': 'a_user',
'PASSWORD': 'a_password',
'HOST': '',
'PORT': '',
}
}
~~~
In this case, you should leave both `HOST` and `PORT` empty. However, if you dont use a `tnsnames.ora` file or a similar naming method and want to connect using the SID (xe in this example), then fill in both `HOST` and`PORT` like so:
~~~
DATABASES = {
'default': {
'ENGINE': 'django.db.backends.oracle',
'NAME': 'xe',
'USER': 'a_user',
'PASSWORD': 'a_password',
'HOST': 'dbprod01ned.mycompany.com',
'PORT': '1540',
}
}
~~~
You should either supply both `HOST` and `PORT`, or leave both as empty strings. Django will use a different connect descriptor depending on that choice.
### Threaded option
If you plan to run Django in a multithreaded environment (e.g. Apache using the default MPM module on any modern operating system), then you must set the `threaded` option of your Oracle database configuration to True:
~~~
'OPTIONS': {
'threaded': True,
},
~~~
Failure to do this may result in crashes and other odd behavior.
### INSERT … RETURNING INTO
By default, the Oracle backend uses a `RETURNING INTO` clause to efficiently retrieve the value of an `AutoField`when inserting new rows. This behavior may result in a `DatabaseError` in certain unusual setups, such as when inserting into a remote table, or into a view with an `INSTEAD OF` trigger. The `RETURNING INTO` clause can be disabled by setting the `use_returning_into` option of the database configuration to False:
~~~
'OPTIONS': {
'use_returning_into': False,
},
~~~
In this case, the Oracle backend will use a separate `SELECT` query to retrieve AutoField values.
### Naming issues
Oracle imposes a name length limit of 30 characters. To accommodate this, the backend truncates database identifiers to fit, replacing the final four characters of the truncated name with a repeatable MD5 hash value. Additionally, the backend turns database identifiers to all-uppercase.
To prevent these transformations (this is usually required only when dealing with legacy databases or accessing tables which belong to other users), use a quoted name as the value for `db_table`:
~~~
class LegacyModel(models.Model):
class Meta:
db_table = '"name_left_in_lowercase"'
class ForeignModel(models.Model):
class Meta:
db_table = '"OTHER_USER"."NAME_ONLY_SEEMS_OVER_30"'
~~~
Quoted names can also be used with Djangos other supported database backends; except for Oracle, however, the quotes have no effect.
When running `migrate`, an `ORA-06552` error may be encountered if certain Oracle keywords are used as the name of a model field or the value of a `db_column` option. Django quotes all identifiers used in queries to prevent most such problems, but this error can still occur when an Oracle datatype is used as a column name. In particular, take care to avoid using the names `date`, `timestamp`, `number` or `float` as a field name.
### NULL and empty strings
Django generally prefers to use the empty string () rather than NULL, but Oracle treats both identically. To get around this, the Oracle backend ignores an explicit `null` option on fields that have the empty string as a possible value and generates DDL as if `null=True`. When fetching from the database, it is assumed that a `NULL` value in one of these fields really means the empty string, and the data is silently converted to reflect this assumption.
### `TextField` limitations
The Oracle backend stores `TextFields` as `NCLOB` columns. Oracle imposes some limitations on the usage of such LOB columns in general:
* LOB columns may not be used as primary keys.
* LOB columns may not be used in indexes.
* LOB columns may not be used in a `SELECT DISTINCT` list. This means that attempting to use the`QuerySet.distinct` method on a model that includes `TextField` columns will result in an error when run against Oracle. As a workaround, use the `QuerySet.defer` method in conjunction with `distinct()` to prevent`TextField` columns from being included in the `SELECT DISTINCT` list.
## Using a 3rd-party database backend
In addition to the officially supported databases, there are backends provided by 3rd parties that allow you to use other databases with Django:
* [SAP SQL Anywhere](https://github.com/sqlanywhere/sqlany-django)
* [IBM DB2](http://code.google.com/p/ibm-db/)
* [Microsoft SQL Server](http://django-mssql.readthedocs.org/en/latest/)
* [Firebird](https://github.com/maxirobaina/django-firebird)
* [ODBC](https://github.com/lionheart/django-pyodbc/)
* [ADSDB](http://code.google.com/p/adsdb-django/)
The Django versions and ORM features supported by these unofficial backends vary considerably. Queries regarding the specific capabilities of these unofficial backends, along with any support queries, should be directed to the support channels provided by each 3rd party project.
## Integrating Django with a legacy database
While Django is best suited for developing new applications, its quite possible to integrate it into legacy databases. Django includes a couple of utilities to automate as much of this process as possible.
Once youve got Django set up, youll follow this general process to integrate with an existing database.
### Give Django your database parameters
Youll need to tell Django what your database connection parameters are, and what the name of the database is. Do that by editing the `DATABASES` setting and assigning values to the following keys for the`'default'` connection:
* `NAME`
* `ENGINE <DATABASE-ENGINE>`
* `USER`
* `PASSWORD`
* `HOST`
* `PORT`
### Auto-generate the models
Django comes with a utility called `inspectdb` that can create models by introspecting an existing database. You can view the output by running this command:
~~~
$ python manage.py inspectdb
~~~
Save this as a file by using standard Unix output redirection:
~~~
$ python manage.py inspectdb > models.py
~~~
This feature is meant as a shortcut, not as definitive model generation. See the `documentation of inspectdb<inspectdb>` for more information.
Once youve cleaned up your models, name the file `models.py` and put it in the Python package that holds your app. Then add the app to your `INSTALLED_APPS` setting.
By default, `inspectdb` creates unmanaged models. That is, `managed = False` in the models `Meta` class tells Django not to manage each tables creation, modification, and deletion:
~~~
class Person(models.Model):
id = models.IntegerField(primary_key=True)
first_name = models.CharField(max_length=70)
class Meta:
managed = False
db_table = 'CENSUS_PERSONS'
~~~
If you do want to allow Django to manage the tables lifecycle, youll need to change the [`managed`](http://masteringdjango.com/advanced-database-management/appendix_A.html#django.db.models.Options.managed "django.db.models.Options.managed") option above to `True` (or simply remove it because `True` is its default value).
### Install the core Django tables
Next, run the `migrate` command to install any extra needed database records such as admin permissions and content types:
~~~
$ python manage.py migrate
~~~
### Cleaning Up Generated Models
As you might expect, the database introspection isnt perfect, and youll need to do some light cleanup of the resulting model code. Here are a few pointers for dealing with the generated models:
1. Each database table is converted to a model class (i.e., there is a one-to-one mapping between database tables and model classes). This means that youll need to refactor the models for any many-to-many join tables into `ManyToManyField` objects.
2. Each generated model has an attribute for every field, including `id` primary key fields. However, recall that Django automatically adds an `id` primary key field if a model doesnt have a primary key. Thus, youll want to remove any lines that look like this:
~~~
id = models.IntegerField(primary_key=True)
~~~
Not only are these lines redundant, but also they can cause problems if your application will be adding*new* records to these tables.
3. Each fields type (e.g., `CharField`, `DateField`) is determined by looking at the database column type (e.g.,`VARCHAR`, `DATE`). If `inspectdb` cannot map a columns type to a model field type, it will use `TextField` and will insert the Python comment `'This field type is a guess.'` next to the field in the generated model. Keep an eye out for that, and change the field type accordingly if needed.
If a field in your database has no good Django equivalent, you can safely leave it off. The Django model layer is not required to include every field in your table(s).
4. If a database column name is a Python reserved word (such as `pass`, `class`, or `for`), `inspectdb` will append`'_field'` to the attribute name and set the `db_column` attribute to the real field name (e.g., `pass`, `class`, or`for`).
For example, if a table has an `INT` column called `for`, the generated model will have a field like this:
~~~
for_field = models.IntegerField(db_column='for')
~~~
`inspectdb` will insert the Python comment `'Field renamed because it was a Python reserved word.'` next to the field.
5. If your database contains tables that refer to other tables (as most databases do), you might need to rearrange the order of the generated models so that models that refer to other models are ordered properly. For example, if model `Book` has a `ForeignKey` to model `Author`, model `Author` should be defined before model `Book`. If you need to create a relationship on a model that has not yet been defined, you can use a string containing the name of the model, rather than the model object itself.
6. `inspectdb` detects primary keys for PostgreSQL, MySQL, and SQLite. That is, it inserts `primary_key=True`where appropriate. For other databases, youll need to insert `primary_key=True` for at least one field in each model, because Django models are required to have a `primary_key=True` field.
7. Foreign-key detection only works with PostgreSQL and with certain types of MySQL tables. In other cases, foreign-key fields will be generated as ```IntegerField``s, assuming the foreign-key column was an ``INT```column.
### Test and tweak
Those are the basic steps from here youll want to tweak the models Django generated until they work the way youd like. Try accessing your data via the Django database API, and try editing objects via Djangos admin site, and edit the models file accordingly.
Chapter 22: How to install Django
最后更新于:2022-04-01 04:48:23
This chapter provides more detailed instructions on installing Django than our simple setup in Chapter 1\. It covers the general setup, as well as additional instructions for getting Django up and running on Jython and Windows.
[TOC=3]
## Install Python
Being a Python Web framework, Django requires Python. It works with Python 2.7 or 3.3+.
Get the latest version of Python at [https://www.python.org/download/](https://www.python.org/download/) or with your operating systems package manager.
Django on Jython
If you use [Jython](http://www.jython.org/) (a Python implementation for the Java platform), youll need to follow a few additional steps which we will cover a bit later in this chapter.
Python on Windows
If you are just starting with Django and using Windows,the next section will be useful.
## Install Apache and mod_wsgi
If you want to use Django on a production site, use [Apache](http://httpd.apache.org/) with [mod_wsgi](http://code.google.com/p/modwsgi/). mod_wsgi can operate in one of two modes: an embedded mode and a daemon mode. In embedded mode, mod_wsgi is similar to mod_perl it embeds Python within Apache and loads Python code into memory when the server starts. Code stays in memory throughout the life of an Apache process, which leads to significant performance gains over other server arrangements. In daemon mode, mod_wsgi spawns an independent daemon process that handles requests. The daemon process can run as a different user than the Web server, possibly leading to improved security, and the daemon process can be restarted without restarting the entire Apache Web server, possibly making refreshing your codebase more seamless.
Chapter 13 has all the necessary information you need to configure mod_wsgi once you have it installed.
If you cant use mod_wsgi for some reason, fear not: Django supports many other deployment options. One is uWSGI ; it works very well with [nginx](http://nginx.org/). Additionally, Django follows the WSGI spec ([PEP 3333](https://www.python.org/dev/peps/pep-3333)), which allows it to run on a variety of server platforms.
## Get your database running
If you plan to use Djangos database API functionality, youll need to make sure a database server is running. Django supports many different database servers and is officially supported with [PostgreSQL](http://www.postgresql.org/),[MySQL](http://www.mysql.com/), [Oracle](http://www.oracle.com/) and [SQLite](http://www.sqlite.org/).
If you are developing a simple project or something you dont plan to deploy in a production environment, SQLite is generally the simplest option as it doesnt require running a separate server. However, SQLite has many differences from other databases, so if you are working on something substantial, its recommended to develop with the same database as you plan on using in production.
In addition to the officially supported databases, there are backends provided by 3rd parties that allow you to use other databases with Django.
In addition to a database backend, youll need to make sure your Python database bindings are installed.
* If youre using PostgreSQL, youll need the [postgresql_psycopg2](http://initd.org/psycopg/) package. You might want to refer to our PostgreSQL notes for further technical details specific to this database.
If youre on Windows, check out the unofficial [compiled Windows version](http://stickpeople.com/projects/python/win-psycopg/).
* If youre using MySQL, youll need the `MySQL-python` package, version 1.2.1p2 or higher. You will also want to read the database-specific notes for the MySQL backend .
* If youre using SQLite you might want to read the SQLite backend notes.
* If youre using Oracle, youll need a copy of [cx_Oracle](http://cx-oracle.sourceforge.net/), but please read the database-specific notes for the Oracle backend for important information regarding supported versions of both Oracle and `cx_Oracle`.
* If youre using an unofficial 3rd party backend, please consult the documentation provided for any additional requirements.
If you plan to use Djangos `manage.py migrate` command to automatically create database tables for your models (after first installing Django and creating a project), youll need to ensure that Django has permission to create and alter tables in the database youre using; if you plan to manually create the tables, you can simply grant Django `SELECT`, `INSERT`, `UPDATE` and `DELETE` permissions. After creating a database user with these permissions, youll specify the details in your projects settings file, see `DATABASES` for details.
If youre using Djangos testing framework to test database queries, Django will need permission to create a test database.
## Remove any old versions of Django
If you are upgrading your installation of Django from a previous version, you will need to uninstall the old Django version before installing the new version.
If you installed Django using [pip](http://www.pip-installer.org/) or `easy_install` previously, installing with [pip](http://www.pip-installer.org/) or `easy_install` again will automatically take care of the old version, so you dont need to do it yourself.
If you previously installed Django using `python setup.py install`, uninstalling is as simple as deleting the`django` directory from your Python `site-packages`. To find the directory you need to remove, you can run the following at your shell prompt (not the interactive Python prompt):
~~~
python -c "import sys; sys.path = sys.path[1:]; import django; print(django.__path__)"
~~~
## Install the Django code
Installation instructions are slightly different depending on whether youre installing a distribution-specific package, downloading the latest official release, or fetching the latest development version.
Its easy, no matter which way you choose.
### Installing an official release with `pip`
This is the recommended way to install Django.
1. Install [pip](http://www.pip-installer.org/). The easiest is to use the [standalone pip installer](http://www.pip-installer.org/en/latest/installing.html#install-pip). If your distribution already has `pip` installed, you might need to update it if its outdated. (If its outdated, youll know because installation wont work.)
2. (optional) Take a look at [virtualenv](http://www.virtualenv.org/) and [virtualenvwrapper](http://virtualenvwrapper.readthedocs.org/en/latest/). These tools provide isolated Python environments, which are more practical than installing packages systemwide. They also allow installing packages without administrator privileges. Its up to you to decide if you want to learn and use them.
3. If youre using Linux, Mac OS X or some other flavor of Unix, enter the command `sudo pip install Django` at the shell prompt. If youre using Windows, start a command shell with administrator privileges and run the command `pip install Django`. This will install Django in your Python installations `site-packages`directory.
If youre using a virtualenv, you dont need `sudo` or administrator privileges, and this will install Django in the virtualenvs `site-packages` directory.
### Installing an official release manually
1. Download the latest release from our [download page](https://www.djangoproject.com/download/).
2. Untar the downloaded file (e.g. `tar xzvf Django-X.Y.tar.gz`, where `X.Y` is the version number of the latest release). If youre using Windows, you can download the command-line tool [bsdtar](http://gnuwin32.sourceforge.net/packages/bsdtar.htm) to do this, or you can use a GUI-based tool such as [7-zip](http://www.7-zip.org/).
3. Change into the directory created in step 2 (e.g. `cd Django-X.Y`).
4. If youre using Linux, Mac OS X or some other flavor of Unix, enter the command `sudo python setup.pyinstall` at the shell prompt. If youre using Windows, start a command shell with administrator privileges and run the command `python setup.py install`. This will install Django in your Python installations `site-packages` directory.
Removing an old version
If you use this installation technique, it is particularly important that you remove any existing installations of Django first. Otherwise, you can end up with a broken installation that includes files from previous versions that have since been removed from Django.
### Installing a distribution-specific package
Check the distribution specific notes to see if your platform/distribution provides official Django packages/installers. Distribution-provided packages will typically allow for automatic installation of dependencies and easy upgrade paths; however, these packages will rarely contain the latest release of Django.
### Installing the development version
Tracking Django development
If you decide to use the latest development version of Django, youll want to pay close attention to [the development timeline](https://code.djangoproject.com/timeline), and youll want to keep an eye on the release notes for the upcoming release. This will help you stay on top of any new features you might want to use, as well as any changes youll need to make to your code when updating your copy of Django. (For stable releases, any necessary changes are documented in the release notes.)
If youd like to be able to update your Django code occasionally with the latest bug fixes and improvements, follow these instructions:
1. Make sure that you have [Git](http://git-scm.com/) installed and that you can run its commands from a shell. (Enter `git help` at a shell prompt to test this.)
2. Check out Djangos main development branch (the trunk or master) like so:
~~~
git clone git://github.com/django/django.git django-trunk
~~~
This will create a directory `django-trunk` in your current directory.
3. Make sure that the Python interpreter can load Djangos code. The most convenient way to do this is via[pip](http://www.pip-installer.org/). Run the following command:
~~~
sudo pip install -e django-trunk/
~~~
(If using a [virtualenv](http://www.virtualenv.org/) you can omit `sudo`.)
This will make Djangos code importable, and will also make the `django-admin` utility command available. In other words, youre all set!
If you dont have [pip](http://www.pip-installer.org/) available, see the alternative instructions for [installing the development version without pip](http://masteringdjango.com/how-to-install-django/#id1).
Warning
Dont run `sudo python setup.py install`, because youve already carried out the equivalent actions in step 3.
When you want to update your copy of the Django source code, just run the command `git pull` from within the `django-trunk` directory. When you do this, Git will automatically download any changes.
### Installing the development version without pip
If you dont have [pip](http://www.pip-installer.org/), you can instead manually [modify Pythons search path](https://docs.python.org/install/index.html#modifying-python-s-search-path).
First follow steps 1 and 2 above, so that you have a `django-trunk` directory with a checkout of Djangos latest code in it. Then add a `.pth` file containing the full path to the `django-trunk` directory to your systems `site-packages` directory. For example, on a Unix-like system:
~~~
echo WORKING-DIR/django-trunk > SITE-PACKAGES-DIR/django.pth
~~~
In the above line, change `WORKING-DIR/django-trunk` to match the full path to your new `django-trunk`directory, and change `SITE-PACKAGES-DIR` to match the location of your systems `site-packages` directory.
The location of the `site-packages` directory depends on the operating system, and the location in which Python was installed. To find your systems `site-packages` location, execute the following:
~~~
python -c "from distutils.sysconfig import get_python_lib; print(get_python_lib())"
~~~
(Note that this should be run from a shell prompt, not a Python interactive prompt.)
Some Debian-based Linux distributions have separate `site-packages` directories for user-installed packages, such as when installing Django from a downloaded tarball. The command listed above will give you the systems `site-packages`, the users directory can be found in `/usr/local/lib/` instead of `/usr/lib/`.
Next you need to make the `django-admin.py` utility available in your shell PATH.
On Unix-like systems, create a symbolic link to the file `django-trunk/django/bin/django-admin` in a directory on your system path, such as `/usr/local/bin`. For example:
~~~
ln -s WORKING-DIR/django-trunk/django/bin/django-admin.py /usr/local/bin/
~~~
(In the above line, change WORKING-DIR to match the full path to your new `django-trunk` directory.)
This simply lets you type `django-admin.py` from within any directory, rather than having to qualify the command with the full path to the file.
On Windows systems, the same result can be achieved by copying the file `django-trunk/django/bin/django-admin.py` to somewhere on your system path, for example `C:\Python27\Scripts`.
Note that the rest of the documentation assumes this utility is installed as `django-admin`. Youll have to substitute `django-admin.py` if you use this method.
## How to install Django on Windows
This document will guide you through installing Python and Django for basic usage on Windows.
The steps in this guide have been tested with Windows 7, 8.1 and 10\. In other versions, the steps would be similar.
### Install Python
Django is a Python web framework, thus requiring Python to be installed on your machine.
To install Python on your machine go to [https://python.org/download/](https://python.org/download/), and download a Windows MSI installer for Python. Once downloaded, run the MSI installer and follow the on-screen instructions.
After installation, open the command prompt and check the Python version by executing `python --version`. If you encounter a problem, make sure you have set the `PATH` variable correctly. You might need to adjust your `PATH` environment variable to include paths to the Python executable and additional scripts. For example, if your Python is installed in `C:\Python34\`, the following paths need to be added to `PATH`:
~~~
C:\Python34\;C:\Python34\Scripts;
~~~
### Install Setuptools
To install Python packages on your computer, Setuptools is needed. Download the latest version of[Setuptools](https://pypi.python.org/pypi/setuptools) for your Python version and follow the installation instructions given there.
### Install PIP
[PIP](http://www.pip-installer.org/) is a package manager for Python that uses the [Python Package Index](https://pypi.python.org/) to install Python packages. PIP will later be used to install Django from PyPI. If youve installed Python 3.4, `pip` is included so you may skip this section.
Open a command prompt and execute `easy_install pip`. This will install `pip` on your system. This command will work if you have successfully installed Setuptools.
Alternatively, go to [http://www.pip-installer.org/en/latest/installing.html](http://www.pip-installer.org/en/latest/installing.html) for installing/upgrading instructions.
### Install Django
Django can be installed easily using `pip`.
In the command prompt, execute the following command: `pip install django`. This will download and install Django.
After the installation has completed, you can verify your Django installation by executing `django-admin --version` in the command prompt.
See `database-installation` for information on database installation with Django.
### Common pitfalls
* If `django-admin` only displays the help text no matter what arguments it is given, there is probably a problem with the file association in Windows. Check if there is more than one environment variable set for running Python scripts in `PATH`. This usually occurs when there is more than one Python version installed.
* If you are connecting to the internet behind a proxy, there might be problem in running the commands`easy_install pip` and `pip install django`. Set the environment variables for proxy configuration in the command prompt as follows:
~~~
set http_proxy=http://username:password@proxyserver:proxyport
set https_proxy=https://username:password@proxyserver:proxyport
~~~
## Running Django on Jython
[Jython](http://www.jython.org/) is an implementation of Python that runs on the Java platform (JVM). This document will get you up and running with Django on top of Jython.
### Installing Jython
Django works with Jython versions 2.7b2 and higher. See the [Jython](http://www.jython.org/) Web site for download and installation instructions.
### Creating a servlet container
If you just want to experiment with Django, skip ahead to the next section; Django includes a lightweight Web server you can use for testing, so you wont need to set up anything else until youre ready to deploy Django in production.
If you want to use Django on a production site, use a Java servlet container, such as [Apache Tomcat](http://tomcat.apache.org/). Full JavaEE applications servers such as [GlassFish](https://glassfish.java.net/) or [JBoss](http://www.jboss.org/) are also OK, if you need the extra features they include.
### Installing Django
The next step is to install Django itself. This is exactly the same as installing Django on standard Python, so see `removing-old-versions-of-django` and `install-django-code` for instructions.
### Installing Jython platform support libraries
The [django-jython](http://code.google.com/p/django-jython/) project contains database backends and management commands for Django/Jython development. Note that the builtin Django backends wont work on top of Jython.
To install it, follow the [installation instructions](https://pythonhosted.org/django-jython/quickstart.html#install) detailed on the project Web site. Also, read the [database backends](https://pythonhosted.org/django-jython/database-backends.html) documentation there.
### Differences with Django on Jython
At this point, Django on Jython should behave nearly identically to Django running on standard Python. However, are a few differences to keep in mind:
* Remember to use the `jython` command instead of `python`. The documentation uses `python` for consistency, but if youre using Jython youll want to mentally replace `python` with `jython` every time it occurs.
* Similarly, youll need to use the `JYTHONPATH` environment variable instead of `PYTHONPATH`.
* Any part of Django that requires [Pillow](http://pillow.readthedocs.org/en/latest/) will not work.
Chapter 21: Security in Django
最后更新于:2022-04-01 04:48:21
Chapter Still in Draft!!
This chapter is still a work in progress. You are welcome to browse and offer suggestions, but it is likely full of errors, jumbled and not recommended for use yet. You have been warned…
[TODO This is from the Django docs. Need to tidy up the flow and simplify]
This document is an overview of Djangos security features. It includes advice on securing a Django-powered site.
[TOC=3]
## Cross site scripting (XSS) protection
XSS attacks allow a user to inject client side scripts into the browsers of other users. This is usually achieved by storing the malicious scripts in the database where it will be retrieved and displayed to other users, or by getting users to click a link which will cause the attackers JavaScript to be executed by the users browser. However, XSS attacks can originate from any untrusted source of data, such as cookies or Web services, whenever the data is not sufficiently sanitized before including in a page.
Using Django templates protects you against the majority of XSS attacks. However, it is important to understand what protections it provides and its limitations.
Django templates escape specific characters which are particularly dangerous to HTML. While this protects users from most malicious input, it is not entirely foolproof. For example, it will not protect the following:
~~~
<style class={{ var }}>...</style>
~~~
If `var` is set to `'class1 onmouseover=javascript:func()'`, this can result in unauthorized JavaScript execution, depending on how the browser renders imperfect HTML. (Quoting the attribute value would fix this case.)
It is also important to be particularly careful when using `is_safe` with custom template tags, the `safe`template tag, `mark_safe`, and when autoescape is turned off.
In addition, if you are using the template system to output something other than HTML, there may be entirely separate characters and words which require escaping.
You should also be very careful when storing HTML in the database, especially when that HTML is retrieved and displayed.
## Cross site request forgery (CSRF) protection
CSRF attacks allow a malicious user to execute actions using the credentials of another user without that users knowledge or consent.
Django has built-in protection against most types of CSRF attacks, providing you have enabled and used it where appropriate. However, as with any mitigation technique, there are limitations. For example, it is possible to disable the CSRF module globally or for particular views. You should only do this if you know what you are doing. There are other limitations if your site has subdomains that are outside of your control.
CSRF protection works by checking for a nonce in each POST request. This ensures that a malicious user cannot simply replay a form POST to your Web site and have another logged in user unwittingly submit that form. The malicious user would have to know the nonce, which is user specific (using a cookie).
When deployed with HTTPS , `CsrfViewMiddleware` will check that the HTTP referer header is set to a URL on the same origin (including subdomain and port). Because HTTPS provides additional security, it is imperative to ensure connections use HTTPS where it is available by forwarding insecure connection requests and using HSTS for supported browsers.
Be very careful with marking views with the `csrf_exempt` decorator unless it is absolutely necessary.
## SQL injection protection
SQL injection is a type of attack where a malicious user is able to execute arbitrary SQL code on a database. This can result in records being deleted or data leakage.
By using Djangos querysets, the resulting SQL will be properly escaped by the underlying database driver. However, Django also gives developers power to write raw queries or execute custom sql . These capabilities should be used sparingly and you should always be careful to properly escape any parameters that the user can control. In addition, you should exercise caution when using `extra()`.
## Clickjacking protection
Clickjacking is a type of attack where a malicious site wraps another site in a frame. This attack can result in an unsuspecting user being tricked into performing unintended actions on the target site.
Django contains clickjacking protection in the form of the [`X-Frame-Options middleware`](http://masteringdjango.com/security-in-django/chapter_19.html#django.middleware.clickjacking.XFrameOptionsMiddleware "django.middleware.clickjacking.XFrameOptionsMiddleware") which in a supporting browser can prevent a site from being rendered inside a frame. It is possible to disable the protection on a per view basis or to configure the exact header value sent.
The middleware is strongly recommended for any site that does not need to have its pages wrapped in a frame by third party sites, or only needs to allow that for a small section of the site.
## SSL/HTTPS
It is always better for security, though not always practical in all cases, to deploy your site behind HTTPS. Without this, it is possible for malicious network users to sniff authentication credentials or any other information transferred between client and server, and in some cases active network attackers to alter data that is sent in either direction.
If you want the protection that HTTPS provides, and have enabled it on your server, there are some additional steps you may need:
* If necessary, set `SECURE_PROXY_SSL_HEADER`, ensuring that you have understood the warnings there thoroughly. Failure to do this can result in CSRF vulnerabilities, and failure to do it correctly can also be dangerous!
* Set up redirection so that requests over HTTP are redirected to HTTPS.
This could be done using a custom middleware. Please note the caveats under `SECURE_PROXY_SSL_HEADER`. For the case of a reverse proxy, it may be easier or more secure to configure the main Web server to do the redirect to HTTPS.
* Use secure cookies.
If a browser connects initially via HTTP, which is the default for most browsers, it is possible for existing cookies to be leaked. For this reason, you should set your `SESSION_COOKIE_SECURE` and `CSRF_COOKIE_SECURE`settings to `True`. This instructs the browser to only send these cookies over HTTPS connections. Note that this will mean that sessions will not work over HTTP, and the CSRF protection will prevent any POST data being accepted over HTTP (which will be fine if you are redirecting all HTTP traffic to HTTPS).
* Use HTTP Strict Transport Security (HSTS)
HSTS is an HTTP header that informs a browser that all future connections to a particular site should always use HTTPS. Combined with redirecting requests over HTTP to HTTPS, this will ensure that connections always enjoy the added security of SSL provided one successful connection has occurred. HSTS is usually configured on the web server.
## Host header validation
Django uses the `Host` header provided by the client to construct URLs in certain cases. While these values are sanitized to prevent Cross Site Scripting attacks, a fake `Host` value can be used for Cross-Site Request Forgery, cache poisoning attacks, and poisoning links in emails.
Because even seemingly-secure web server configurations are susceptible to fake `Host` headers, Django validates `Host` headers against the `ALLOWED_HOSTS` setting in the `django.http.HttpRequest.get_host()` method.
This validation only applies via `get_host()`; if your code accesses the `Host` header directly from `request.META`you are bypassing this security protection.
For more details see the full `ALLOWED_HOSTS` documentation.
Warning
Previous versions of this document recommended configuring your web server to ensure it validates incoming HTTP `Host` headers. While this is still recommended, in many common web servers a configuration that seems to validate the `Host` header may not in fact do so. For instance, even if Apache is configured such that your Django site is served from a non-default virtual host with the `ServerName` set, it is still possible for an HTTP request to match this virtual host and supply a fake `Host` header. Thus, Django now requires that you set `ALLOWED_HOSTS` explicitly rather than relying on web server configuration.
Additionally, as of 1.3.1, Django requires you to explicitly enable support for the `X-Forwarded-Host` header (via the `USE_X_FORWARDED_HOST` setting) if your configuration requires it.
## Session security
Similar to the CSRF limitations requiring a site to be deployed such that untrusted users dont have access to any subdomains, `django.contrib.sessions` also has limitations. See the session topic guide section on security for details.
## User-uploaded content
Note
Consider serving static files from a cloud service or CDN to avoid some of these issues.
* If your site accepts file uploads, it is strongly advised that you limit these uploads in your Web server configuration to a reasonable size in order to prevent denial of service (DOS) attacks. In Apache, this can be easily set using the [LimitRequestBody](http://httpd.apache.org/docs/2.2/mod/core.html#limitrequestbody) directive.
* If you are serving your own static files, be sure that handlers like Apaches `mod_php`, which would execute static files as code, are disabled. You dont want users to be able to execute arbitrary code by uploading and requesting a specially crafted file.
* Djangos media upload handling poses some vulnerabilities when that media is served in ways that do not follow security best practices. Specifically, an HTML file can be uploaded as an image if that file contains a valid PNG header followed by malicious HTML. This file will pass verification of the library that Django uses for [`ImageField`](http://masteringdjango.com/security-in-django/appendix_A.html#django.db.models.ImageField "django.db.models.ImageField") image processing (Pillow). When this file is subsequently displayed to a user, it may be displayed as HTML depending on the type and configuration of your web server.
No bulletproof technical solution exists at the framework level to safely validate all user uploaded file content, however, there are some other steps you can take to mitigate these attacks:
1. One class of attacks can be prevented by always serving user uploaded content from a distinct top-level or second-level domain. This prevents any exploit blocked by [same-origin policy](http://en.wikipedia.org/wiki/Same-origin_policy) protections such as cross site scripting. For example, if your site runs on `example.com`, you would want to serve uploaded content (the `MEDIA_URL` setting) from something like `usercontent-example.com`. Its *not* sufficient to serve content from a subdomain like `usercontent.example.com`.
2. Beyond this, applications may choose to define a whitelist of allowable file extensions for user uploaded files and configure the web server to only serve such files.
## Additional security topics
While Django provides good security protection out of the box, it is still important to properly deploy your application and take advantage of the security protection of the Web server, operating system and other components.
* Make sure that your Python code is outside of the Web servers root. This will ensure that your Python code is not accidentally served as plain text (or accidentally executed).
* Take care with any user uploaded files .
* Django does not throttle requests to authenticate users. To protect against brute-force attacks against the authentication system, you may consider deploying a Django plugin or Web server module to throttle these requests.
* Keep your `SECRET_KEY` a secret.
* It is a good idea to limit the accessibility of your caching system and database using a firewall.
## Archive of security issues
Djangos development team is strongly committed to responsible reporting and disclosure of security-related issues, as outlined in Djangos security policies.
As part of that commitment, they maintain an historical list of issues which have been fixed and disclosed. For the up to date list, see [https://docs.djangoproject.com/en/1.8/releases/security/](https://docs.djangoproject.com/en/1.8/releases/security/)
## Clickjacking Protection
The clickjacking middleware and decorators provide easy-to-use protection against [clickjacking](http://en.wikipedia.org/wiki/Clickjacking). This type of attack occurs when a malicious site tricks a user into clicking on a concealed element of another site which they have loaded in a hidden frame or iframe.
### An example of clickjacking
Suppose an online store has a page where a logged in user can click Buy Now to purchase an item. A user has chosen to stay logged into the store all the time for convenience. An attacker site might create an I Like Ponies button on one of their own pages, and load the stores page in a transparent iframe such that the Buy Now button is invisibly overlaid on the I Like Ponies button. If the user visits the attackers site, clicking I Like Ponies will cause an inadvertent click on the Buy Now button and an unknowing purchase of the item.
### Preventing clickjacking
Modern browsers honor the [X-Frame-Options](https://developer.mozilla.org/en/The_X-FRAME-OPTIONS_response_header) HTTP header that indicates whether or not a resource is allowed to load within a frame or iframe. If the response contains the header with a value of `SAMEORIGIN`then the browser will only load the resource in a frame if the request originated from the same site. If the header is set to `DENY` then the browser will block the resource from loading in a frame no matter which site made the request.
Django provides a few simple ways to include this header in responses from your site:
1. A simple middleware that sets the header in all responses.
2. A set of view decorators that can be used to override the middleware or to only set the header for certain views.
### How to use it
#### SETTING X-FRAME-OPTIONS FOR ALL RESPONSES
To set the same `X-Frame-Options` value for all responses in your site, put`'django.middleware.clickjacking.XFrameOptionsMiddleware'` to `MIDDLEWARE_CLASSES`:
~~~
MIDDLEWARE_CLASSES = [
...
'django.middleware.clickjacking.XFrameOptionsMiddleware',
...
]
~~~
This middleware is enabled in the settings file generated by `startproject`.
By default, the middleware will set the `X-Frame-Options` header to `SAMEORIGIN` for every outgoing`HttpResponse`. If you want `DENY` instead, set the `X_FRAME_OPTIONS` setting:
~~~
X_FRAME_OPTIONS = 'DENY'
~~~
When using the middleware there may be some views where you do not want the `X-Frame-Options` header set. For those cases, you can use a view decorator that tells the middleware not to set the header:
~~~
from django.http import HttpResponse
from django.views.decorators.clickjacking import xframe_options_exempt
@xframe_options_exempt
def ok_to_load_in_a_frame(request):
return HttpResponse("This page is safe to load in a frame on any site.")
~~~
#### SETTING X-FRAME-OPTIONS PER VIEW
To set the `X-Frame-Options` header on a per view basis, Django provides these decorators:
~~~
from django.http import HttpResponse
from django.views.decorators.clickjacking import xframe_options_deny
from django.views.decorators.clickjacking import xframe_options_sameorigin
@xframe_options_deny
def view_one(request):
return HttpResponse("I won't display in any frame!")
@xframe_options_sameorigin
def view_two(request):
return HttpResponse("Display in a frame if it's from the same origin as me.")
~~~
Note that you can use the decorators in conjunction with the middleware. Use of a decorator overrides the middleware.
### Limitations
The `X-Frame-Options` header will only protect against clickjacking in a modern browser. Older browsers will quietly ignore the header and need [other clickjacking prevention techniques](http://en.wikipedia.org/wiki/Clickjacking#Prevention).
#### BROWSERS THAT SUPPORT X-FRAME-OPTIONS
* Internet Explorer 8+
* Firefox 3.6.9+
* Opera 10.5+
* Safari 4+
* Chrome 4.1+
#### SEE ALSO
A [complete list](https://developer.mozilla.org/en/The_X-FRAME-OPTIONS_response_header#Browser_compatibility) of browsers supporting `X-Frame-Options`.
## Cross Site Request Forgery protection
The CSRF middleware and template tag provides easy-to-use protection against [Cross Site Request Forgeries](http://www.squarefree.com/securitytips/web-developers.html#CSRF). This type of attack occurs when a malicious Web site contains a link, a form button or some javascript that is intended to perform some action on your Web site, using the credentials of a logged-in user who visits the malicious site in their browser. A related type of attack, login CSRF, where an attacking site tricks a users browser into logging into a site with someone elses credentials, is also covered.
The first defense against CSRF attacks is to ensure that GET requests (and other safe methods, as defined by 9.1.1 Safe Methods, HTTP 1.1, [RFC 2616#section-9.1.1](https://tools.ietf.org/html/rfc2616.html#section-9.1.1)) are side-effect free. Requests via unsafe methods, such as POST, PUT and DELETE, can then be protected by following the steps below.
### How to use it
To take advantage of CSRF protection in your views, follow these steps:
1. The CSRF middleware is activated by default in the `MIDDLEWARE_CLASSES` setting. If you override that setting, remember that `'django.middleware.csrf.CsrfViewMiddleware'` should come before any view middleware that assume that CSRF attacks have been dealt with.
If you disabled it, which is not recommended, you can use [`csrf_protect()`](http://masteringdjango.com/security-in-django/#django.views.decorators.csrf.csrf_protect "django.views.decorators.csrf.csrf_protect") on particular views you want to protect (see below).
2. In any template that uses a POST form, use the `csrf_token` tag inside the `<form>` element if the form is for an internal URL, e.g.:
~~~
<form action="." method="post">{% csrf_token %}
~~~
This should not be done for POST forms that target external URLs, since that would cause the CSRF token to be leaked, leading to a vulnerability.
3. In the corresponding view functions, ensure that the `'django.template.context_processors.csrf'` context processor is being used. Usually, this can be done in one of two ways:
1. Use RequestContext, which always uses `'django.template.context_processors.csrf'` (no matter what template context processors are configured in the `TEMPLATES` setting). If you are using generic views or contrib apps, you are covered already, since these apps use RequestContext throughout.
2. Manually import and use the processor to generate the CSRF token and add it to the template context. e.g.:
~~~
from django.shortcuts import render_to_response
from django.template.context_processors import csrf
def my_view(request):
c = {}
c.update(csrf(request))
# ... view code here
return render_to_response("a_template.html", c)
~~~
You may want to write your own `render_to_response()` wrapper that takes care of this step for you.
### AJAX
While the above method can be used for AJAX POST requests, it has some inconveniences: you have to remember to pass the CSRF token in as POST data with every POST request. For this reason, there is an alternative method: on each XMLHttpRequest, set a custom `X-CSRFToken` header to the value of the CSRF token. This is often easier, because many javascript frameworks provide hooks that allow headers to be set on every request.
As a first step, you must get the CSRF token itself. The recommended source for the token is the `csrftoken`cookie, which will be set if youve enabled CSRF protection for your views as outlined above.
Note
The CSRF token cookie is named `csrftoken` by default, but you can control the cookie name via the`CSRF_COOKIE_NAME` setting.
Acquiring the token is straightforward:
~~~
// using jQuery
function getCookie(name) {
var cookieValue = null;
if (document.cookie && document.cookie != '') {
var cookies = document.cookie.split(';');
for (var i = 0; i < cookies.length; i++) {
var cookie = jQuery.trim(cookies[i]);
// Does this cookie string begin with the name we want?
if (cookie.substring(0, name.length + 1) == (name + '=')) {
cookieValue = decodeURIComponent(cookie.substring(name.length + 1));
break;
}
}
}
return cookieValue;
}
var csrftoken = getCookie('csrftoken');
~~~
The above code could be simplified by using the [jQuery cookie plugin](http://plugins.jquery.com/cookie/) to replace `getCookie`:
~~~
var csrftoken = $.cookie('csrftoken');
~~~
Note
The CSRF token is also present in the DOM, but only if explicitly included using `csrf_token` in a template. The cookie contains the canonical token; the `CsrfViewMiddleware` will prefer the cookie to the token in the DOM. Regardless, youre guaranteed to have the cookie if the token is present in the DOM, so you should use the cookie!
Warning
If your view is not rendering a template containing the `csrf_token` template tag, Django might not set the CSRF token cookie. This is common in cases where forms are dynamically added to the page. To address this case, Django provides a view decorator which forces setting of the cookie: [`ensure_csrf_cookie()`](http://masteringdjango.com/security-in-django/#django.views.decorators.csrf.ensure_csrf_cookie "django.views.decorators.csrf.ensure_csrf_cookie").
Finally, youll have to actually set the header on your AJAX request, while protecting the CSRF token from being sent to other domains using [settings.crossDomain](http://api.jquery.com/jQuery.ajax) in jQuery 1.5.1 and newer:
~~~
function csrfSafeMethod(method) {
// these HTTP methods do not require CSRF protection
return (/^(GET|HEAD|OPTIONS|TRACE)$/.test(method));
}
$.ajaxSetup({
beforeSend: function(xhr, settings) {
if (!csrfSafeMethod(settings.type) && !this.crossDomain) {
xhr.setRequestHeader("X-CSRFToken", csrftoken);
}
}
});
~~~
### Other template engines
When using a different template engine than Djangos built-in engine, you can set the token in your forms manually after making sure its available in the template context.
For example, in the Jinja2 template language, your form could contain the following:
~~~
<div style="display:none">
<input type="hidden" name="csrfmiddlewaretoken" value="{{ csrf_token }}">
</div>
~~~
You can use JavaScript similar to the AJAX code above to get the value of the CSRF token.
### The decorator method
Rather than adding `CsrfViewMiddleware` as a blanket protection, you can use the `csrf_protect` decorator, which has exactly the same functionality, on particular views that need the protection. It must be usedboth on views that insert the CSRF token in the output, and on those that accept the POST form data. (These are often the same view function, but not always).
Use of the decorator by itself is not recommended, since if you forget to use it, you will have a security hole. The belt and braces strategy of using both is fine, and will incur minimal overhead.
`django.views.decorators.csrf.``csrf_protect`(*view*)
Decorator that provides the protection of `CsrfViewMiddleware` to a view.
Usage:
~~~
from django.views.decorators.csrf import csrf_protect
from django.shortcuts import render
@csrf_protect
def my_view(request):
c = {}
# ...
return render(request, "a_template.html", c)
~~~
If you are using class-based views, you can refer to Decorating class-based views.
## Rejected requests
By default, a 403 Forbidden response is sent to the user if an incoming request fails the checks performed by `CsrfViewMiddleware`. This should usually only be seen when there is a genuine Cross Site Request Forgery, or when, due to a programming error, the CSRF token has not been included with a POST form.
The error page, however, is not very friendly, so you may want to provide your own view for handling this condition. To do this, simply set the `CSRF_FAILURE_VIEW` setting.
### How it works
The CSRF protection is based on the following things:
1. A CSRF cookie that is set to a random value (a session independent nonce, as it is called), which other sites will not have access to.
This cookie is set by `CsrfViewMiddleware`. It is meant to be permanent, but since there is no way to set a cookie that never expires, it is sent with every response that has called `django.middleware.csrf.get_token()`(the function used internally to retrieve the CSRF token).
2. A hidden form field with the name csrfmiddlewaretoken present in all outgoing POST forms. The value of this field is the value of the CSRF cookie.
This part is done by the template tag.
3. For all incoming requests that are not using HTTP GET, HEAD, OPTIONS or TRACE, a CSRF cookie must be present, and the csrfmiddlewaretoken field must be present and correct. If it isnt, the user will get a 403 error.
This check is done by `CsrfViewMiddleware`.
4. In addition, for HTTPS requests, strict referer checking is done by `CsrfViewMiddleware`. This is necessary to address a Man-In-The-Middle attack that is possible under HTTPS when using a session independent nonce, due to the fact that HTTP Set-Cookie headers are (unfortunately) accepted by clients that are talking to a site under HTTPS. (Referer checking is not done for HTTP requests because the presence of the Referer header is not reliable enough under HTTP.)
This ensures that only forms that have originated from your Web site can be used to POST data back.
It deliberately ignores GET requests (and other requests that are defined as safe by [RFC 2616](https://tools.ietf.org/html/rfc2616.html)). These requests ought never to have any potentially dangerous side effects , and so a CSRF attack with a GET request ought to be harmless. [RFC 2616](https://tools.ietf.org/html/rfc2616.html) defines POST, PUT and DELETE as unsafe, and all other methods are assumed to be unsafe, for maximum protection.
## Caching
If the `csrf_token` template tag is used by a template (or the `get_token` function is called some other way),`CsrfViewMiddleware` will add a cookie and a `Vary: Cookie` header to the response. This means that the middleware will play well with the cache middleware if it is used as instructed (`UpdateCacheMiddleware` goes before all other middleware).
However, if you use cache decorators on individual views, the CSRF middleware will not yet have been able to set the Vary header or the CSRF cookie, and the response will be cached without either one. In this case, on any views that will require a CSRF token to be inserted you should use the[`django.views.decorators.csrf.csrf_protect()`](http://masteringdjango.com/security-in-django/#django.views.decorators.csrf.csrf_protect "django.views.decorators.csrf.csrf_protect") decorator first:
~~~
from django.views.decorators.cache import cache_page
from django.views.decorators.csrf import csrf_protect
@cache_page(60 * 15)
@csrf_protect
def my_view(request):
...
~~~
If you are using class-based views, you can refer to Decorating class-based views.
## Testing
The `CsrfViewMiddleware` will usually be a big hindrance to testing view functions, due to the need for the CSRF token which must be sent with every POST request. For this reason, Djangos HTTP client for tests has been modified to set a flag on requests which relaxes the middleware and the `csrf_protect` decorator so that they no longer rejects requests. In every other respect (e.g. sending cookies etc.), they behave the same.
If, for some reason, you *want* the test client to perform CSRF checks, you can create an instance of the test client that enforces CSRF checks:
~~~
>>> from django.test import Client
>>> csrf_client = Client(enforce_csrf_checks=True)
~~~
## Limitations
Subdomains within a site will be able to set cookies on the client for the whole domain. By setting the cookie and using a corresponding token, subdomains will be able to circumvent the CSRF protection. The only way to avoid this is to ensure that subdomains are controlled by trusted users (or, are at least unable to set cookies). Note that even without CSRF, there are other vulnerabilities, such as session fixation, that make giving subdomains to untrusted parties a bad idea, and these vulnerabilities cannot easily be fixed with current browsers.
## Edge cases
Certain views can have unusual requirements that mean they dont fit the normal pattern envisaged here. A number of utilities can be useful in these situations. The scenarios they might be needed in are described in the following section.
### Utilities
The examples below assume you are using function-based views. If you are working with class-based views, you can refer to Decorating class-based views.
`django.views.decorators.csrf.``csrf_exempt`(*view*)
This decorator marks a view as being exempt from the protection ensured by the middleware. Example:
~~~
from django.views.decorators.csrf import csrf_exempt
from django.http import HttpResponse
@csrf_exempt
def my_view(request):
return HttpResponse('Hello world')
~~~
`django.views.decorators.csrf.``requires_csrf_token`(*view*)
Normally the `csrf_token` template tag will not work if `CsrfViewMiddleware.process_view` or an equivalent like`csrf_protect` has not run. The view decorator `requires_csrf_token` can be used to ensure the template tag does work. This decorator works similarly to `csrf_protect`, but never rejects an incoming request.
Example:
~~~
from django.views.decorators.csrf import requires_csrf_token
from django.shortcuts import render
@requires_csrf_token
def my_view(request):
c = {}
# ...
return render(request, "a_template.html", c)
~~~
`django.views.decorators.csrf.``ensure_csrf_cookie`(*view*)
This decorator forces a view to send the CSRF cookie.
### Scenarios
#### CSRF PROTECTION SHOULD BE DISABLED FOR JUST A FEW VIEWS
Most views requires CSRF protection, but a few do not.
Solution: rather than disabling the middleware and applying `csrf_protect` to all the views that need it, enable the middleware and use [`csrf_exempt()`](http://masteringdjango.com/security-in-django/#django.views.decorators.csrf.csrf_exempt "django.views.decorators.csrf.csrf_exempt").
#### CSRFVIEWMIDDLEWARE.PROCESS_VIEW NOT USED
There are cases when `CsrfViewMiddleware.process_view` may not have run before your view is run – 404 and 500 handlers, for example – but you still need the CSRF token in a form.
Solution: use [`requires_csrf_token()`](http://masteringdjango.com/security-in-django/#django.views.decorators.csrf.requires_csrf_token "django.views.decorators.csrf.requires_csrf_token")
#### UNPROTECTED VIEW NEEDS THE CSRF TOKEN
There may be some views that are unprotected and have been exempted by `csrf_exempt`, but still need to include the CSRF token.
Solution: use [`csrf_exempt()`](http://masteringdjango.com/security-in-django/#django.views.decorators.csrf.csrf_exempt "django.views.decorators.csrf.csrf_exempt") followed by [`requires_csrf_token()`](http://masteringdjango.com/security-in-django/#django.views.decorators.csrf.requires_csrf_token "django.views.decorators.csrf.requires_csrf_token"). (i.e. `requires_csrf_token` should be the innermost decorator).
#### VIEW NEEDS PROTECTION FOR ONE PATH
A view needs CSRF protection under one set of conditions only, and mustnt have it for the rest of the time.
Solution: use [`csrf_exempt()`](http://masteringdjango.com/security-in-django/#django.views.decorators.csrf.csrf_exempt "django.views.decorators.csrf.csrf_exempt") for the whole view function, and [`csrf_protect()`](http://masteringdjango.com/security-in-django/#django.views.decorators.csrf.csrf_protect "django.views.decorators.csrf.csrf_protect") for the path within it that needs protection. Example:
~~~
from django.views.decorators.csrf import csrf_exempt, csrf_protect
@csrf_exempt
def my_view(request):
@csrf_protect
def protected_path(request):
do_something()
if some_condition():
return protected_path(request)
else:
do_something_else()
~~~
#### PAGE USES AJAX WITHOUT ANY HTML FORM
A page makes a POST request via AJAX, and the page does not have an HTML form with a `csrf_token` that would cause the required CSRF cookie to be sent.
Solution: use [`ensure_csrf_cookie()`](http://masteringdjango.com/security-in-django/#django.views.decorators.csrf.ensure_csrf_cookie "django.views.decorators.csrf.ensure_csrf_cookie") on the view that sends the page.
## Contrib and reusable apps
Because it is possible for the developer to turn off the `CsrfViewMiddleware`, all relevant views in contrib apps use the `csrf_protect` decorator to ensure the security of these applications against CSRF. It is recommended that the developers of other reusable apps that want the same guarantees also use the`csrf_protect` decorator on their views.
## Settings
A number of settings can be used to control Djangos CSRF behavior:
* `CSRF_COOKIE_AGE`
* `CSRF_COOKIE_DOMAIN`
* `CSRF_COOKIE_HTTPONLY`
* `CSRF_COOKIE_NAME`
* `CSRF_COOKIE_PATH`
* `CSRF_COOKIE_SECURE`
* `CSRF_FAILURE_VIEW`
## Cryptographic signing
The golden rule of Web application security is to never trust data from untrusted sources. Sometimes it can be useful to pass data through an untrusted medium. Cryptographically signed values can be passed through an untrusted channel safe in the knowledge that any tampering will be detected.
Django provides both a low-level API for signing values and a high-level API for setting and reading signed cookies, one of the most common uses of signing in Web applications.
You may also find signing useful for the following:
* Generating recover my account URLs for sending to users who have lost their password.
* Ensuring data stored in hidden form fields has not been tampered with.
* Generating one-time secret URLs for allowing temporary access to a protected resource, for example a downloadable file that a user has paid for.
## Protecting the SECRET_KEY
When you create a new Django project using `startproject`, the `settings.py` file is generated automatically and gets a random `SECRET_KEY` value. This value is the key to securing signed data it is vital you keep this secure, or attackers could use it to generate their own signed values.
## Using the low-level API
Djangos signing methods live in the `django.core.signing` module. To sign a value, first instantiate a `Signer`instance:
~~~
>>> from django.core.signing import Signer
>>> signer = Signer()
>>> value = signer.sign('My string')
>>> value
'My string:GdMGD6HNQ_qdgxYP8yBZAdAIV1w'
~~~
The signature is appended to the end of the string, following the colon. You can retrieve the original value using the `unsign` method:
~~~
>>> original = signer.unsign(value)
>>> original
'My string'
~~~
If the signature or value have been altered in any way, a `django.core.signing.BadSignature` exception will be raised:
~~~
>>> from django.core import signing
>>> value += 'm'
>>> try:
... original = signer.unsign(value)
... except signing.BadSignature:
... print("Tampering detected!")
~~~
By default, the `Signer` class uses the `SECRET_KEY` setting to generate signatures. You can use a different secret by passing it to the `Signer` constructor:
~~~
>>> signer = Signer('my-other-secret')
>>> value = signer.sign('My string')
>>> value
'My string:EkfQJafvGyiofrdGnuthdxImIJw'
~~~
*class *`django.core.signing.``Signer`(*key=None*, *sep=’:’*, *salt=None*)
Returns a signer which uses `key` to generate signatures and `sep` to separate values. `sep` cannot be in the[URL safe base64 alphabet](http://tools.ietf.org/html/rfc4648#section-5). This alphabet contains alphanumeric characters, hyphens, and underscores.
### Using the salt argument
If you do not wish for every occurrence of a particular string to have the same signature hash, you can use the optional `salt` argument to the `Signer` class. Using a salt will seed the signing hash function with both the salt and your `SECRET_KEY`:
~~~
>>> signer = Signer()
>>> signer.sign('My string')
'My string:GdMGD6HNQ_qdgxYP8yBZAdAIV1w'
>>> signer = Signer(salt='extra')
>>> signer.sign('My string')
'My string:Ee7vGi-ING6n02gkcJ-QLHg6vFw'
>>> signer.unsign('My string:Ee7vGi-ING6n02gkcJ-QLHg6vFw')
'My string'
~~~
Using salt in this way puts the different signatures into different namespaces. A signature that comes from one namespace (a particular salt value) cannot be used to validate the same plaintext string in a different namespace that is using a different salt setting. The result is to prevent an attacker from using a signed string generated in one place in the code as input to another piece of code that is generating (and verifying) signatures using a different salt.
Unlike your `SECRET_KEY`, your salt argument does not need to stay secret.
### Verifying timestamped values
`TimestampSigner` is a subclass of [`Signer`](http://masteringdjango.com/security-in-django/#django.core.signing.Signer "django.core.signing.Signer") that appends a signed timestamp to the value. This allows you to confirm that a signed value was created within a specified period of time:
~~~
>>> from datetime import timedelta
>>> from django.core.signing import TimestampSigner
>>> signer = TimestampSigner()
>>> value = signer.sign('hello')
>>> value
'hello:1NMg5H:oPVuCqlJWmChm1rA2lyTUtelC-c'
>>> signer.unsign(value)
'hello'
>>> signer.unsign(value, max_age=10)
...
SignatureExpired: Signature age 15.5289158821 > 10 seconds
>>> signer.unsign(value, max_age=20)
'hello'
>>> signer.unsign(value, max_age=timedelta(seconds=20))
'hello'
~~~
*class *`django.core.signing.``TimestampSigner`(*key=None*, *sep=’:’*, *salt=None*)
`sign`(*value*)
Sign `value` and append current timestamp to it.
`unsign`(*value*, *max_age=None*)
Checks if `value` was signed less than `max_age` seconds ago, otherwise raises `SignatureExpired`. The `max_age`parameter can accept an integer or a `datetime.timedelta` object.
### Protecting complex data structures
If you wish to protect a list, tuple or dictionary you can do so using the signing modules `dumps` and `loads`functions. These imitate Pythons pickle module, but use JSON serialization under the hood. JSON ensures that even if your `SECRET_KEY` is stolen an attacker will not be able to execute arbitrary commands by exploiting the pickle format:
~~~
>>> from django.core import signing
>>> value = signing.dumps({"foo": "bar"})
>>> value
'eyJmb28iOiJiYXIifQ:1NMg1b:zGcDE4-TCkaeGzLeW9UQwZesciI'
>>> signing.loads(value)
{'foo': 'bar'}
~~~
Because of the nature of JSON (there is no native distinction between lists and tuples) if you pass in a tuple, you will get a list from `signing.loads(object)`:
~~~
>>> from django.core import signing
>>> value = signing.dumps(('a','b','c'))
>>> signing.loads(value)
['a', 'b', 'c']
~~~
`django.core.signing.``dumps`(*obj*, *key=None*, *salt=’django.core.signing’*, *compress=False*)
Returns URL-safe, sha1 signed base64 compressed JSON string. Serialized object is signed using[`TimestampSigner`](http://masteringdjango.com/security-in-django/#django.core.signing.TimestampSigner "django.core.signing.TimestampSigner").
`django.core.signing.``loads`(*string*, *key=None*, *salt=’django.core.signing’*, *max_age=None*)
Reverse of `dumps()`, raises `BadSignature` if signature fails. Checks `max_age` (in seconds) if given.
### Security middleware
Warning
If your deployment situation allows, its usually a good idea to have your front-end Web server perform the functionality provided by the `SecurityMiddleware`. That way, if there are requests that arent served by Django (such as static media or user-uploaded files), they will have the same protections as requests to your Django application.
The `django.middleware.security.SecurityMiddleware` provides several security enhancements to the request/response cycle. Each one can be independently enabled or disabled with a setting.
* `SECURE_BROWSER_XSS_FILTER`
* `SECURE_CONTENT_TYPE_NOSNIFF`
* `SECURE_HSTS_INCLUDE_SUBDOMAINS`
* `SECURE_HSTS_SECONDS`
* `SECURE_REDIRECT_EXEMPT`
* `SECURE_SSL_HOST`
* `SECURE_SSL_REDIRECT`
#### HTTP STRICT TRANSPORT SECURITY
For sites that should only be accessed over HTTPS, you can instruct modern browsers to refuse to connect to your domain name via an insecure connection (for a given period of time) by setting the [Strict-Transport-Security header](http://en.wikipedia.org/wiki/Strict_Transport_Security). This reduces your exposure to some SSL-stripping man-in-the-middle (MITM) attacks.
`SecurityMiddleware` will set this header for you on all HTTPS responses if you set the `SECURE_HSTS_SECONDS`setting to a non-zero integer value.
When enabling HSTS, its a good idea to first use a small value for testing, for example, `SECURE_HSTS_SECONDS= 3600<SECURE_HSTS_SECONDS>` for one hour. Each time a Web browser sees the HSTS header from your site, it will refuse to communicate non-securely (using HTTP) with your domain for the given period of time. Once you confirm that all assets are served securely on your site (i.e. HSTS didnt break anything), its a good idea to increase this value so that infrequent visitors will be protected (31536000 seconds, i.e. 1 year, is common).
Additionally, if you set the `SECURE_HSTS_INCLUDE_SUBDOMAINS` setting to `True`, `SecurityMiddleware` will add the`includeSubDomains` tag to the `Strict-Transport-Security` header. This is recommended (assuming all subdomains are served exclusively using HTTPS), otherwise your site may still be vulnerable via an insecure connection to a subdomain.
Warning
The HSTS policy applies to your entire domain, not just the URL of the response that you set the header on. Therefore, you should only use it if your entire domain is served via HTTPS only.
Browsers properly respecting the HSTS header will refuse to allow users to bypass warnings and connect to a site with an expired, self-signed, or otherwise invalid SSL certificate. If you use HSTS, make sure your certificates are in good shape and stay that way!
Note
If you are deployed behind a load-balancer or reverse-proxy server, and the `Strict-Transport-Security`header is not being added to your responses, it may be because Django doesnt realize that its on a secure connection; you may need to set the `SECURE_PROXY_SSL_HEADER` setting.
#### `X-CONTENT-TYPE-OPTIONS: NOSNIFF`
Some browsers will try to guess the content types of the assets that they fetch, overriding the `Content-Type`header. While this can help display sites with improperly configured servers, it can also pose a security risk.
If your site serves user-uploaded files, a malicious user could upload a specially-crafted file that would be interpreted as HTML or Javascript by the browser when you expected it to be something harmless.
To learn more about this header and how the browser treats it, you can read about it on the [IE Security Blog](http://blogs.msdn.com/b/ie/archive/2008/09/02/ie8-security-part-vi-beta-2-update.aspx).
To prevent the browser from guessing the content type and force it to always use the type provided in the`Content-Type` header, you can pass the `X-Content-Type-Options: nosniff` header. `SecurityMiddleware` will do this for all responses if the `SECURE_CONTENT_TYPE_NOSNIFF` setting is `True`.
Note that in most deployment situations where Django isnt involved in serving user-uploaded files, this setting wont help you. For example, if your `MEDIA_URL` is served directly by your front-end Web server (nginx, Apache, etc.) then youd want to set this header there. On the other hand, if you are using Django to do something like require authorization in order to download files and you cannot set the header using your Web server, this setting will be useful.
#### `X-XSS-PROTECTION: 1; MODE=BLOCK`
Some browsers have the ability to block content that appears to be an [XSS attack](http://en.wikipedia.org/wiki/Cross-site_scripting). They work by looking for Javascript content in the GET or POST parameters of a page. If the Javascript is replayed in the servers response, the page is blocked from rendering and an error page is shown instead.
The [X-XSS-Protection header](http://blogs.msdn.com/b/ie/archive/2008/07/02/ie8-security-part-iv-the-xss-filter.aspx) is used to control the operation of the XSS filter.
To enable the XSS filter in the browser, and force it to always block suspected XSS attacks, you can pass the `X-XSS-Protection: 1; mode=block` header. `SecurityMiddleware` will do this for all responses if the`SECURE_BROWSER_XSS_FILTER` setting is `True`.
Warning
The browser XSS filter is a useful defense measure, but must not be relied upon exclusively. It cannot detect all XSS attacks and not all browsers support the header. Ensure you are still validating and sanitizing all input to prevent XSS attacks.
#### SSL REDIRECT
If your site offers both HTTP and HTTPS connections, most users will end up with an unsecured connection by default. For best security, you should redirect all HTTP connections to HTTPS.
If you set the `SECURE_SSL_REDIRECT` setting to True, `SecurityMiddleware` will permanently (HTTP 301) redirect all HTTP connections to HTTPS.
Note
For performance reasons, its preferable to do these redirects outside of Django, in a front-end load balancer or reverse-proxy server such as [nginx](http://nginx.org/). `SECURE_SSL_REDIRECT` is intended for the deployment situations where this isnt an option.
If the `SECURE_SSL_HOST` setting has a value, all redirects will be sent to that host instead of the originally-requested host.
If there are a few pages on your site that should be available over HTTP, and not redirected to HTTPS, you can list regular expressions to match those URLs in the `SECURE_REDIRECT_EXEMPT` setting.
Note
If you are deployed behind a load-balancer or reverse-proxy server and Django cant seem to tell when a request actually is already secure, you may need to set the `SECURE_PROXY_SSL_HEADER` setting.
Chapter 20: Internationalization
最后更新于:2022-04-01 04:48:18
Django was originally developed right in the middle of the United States quite literally, as Lawrence, Kansas, is less than 40 miles from the geographic center of the continental United States. Like most open source projects, though, Djangos community grew to include people from all over the globe. As Djangos community became increasingly diverse, *internationalization* and *localization* became increasingly important.
Django itself is fully internationalized; all strings are marked for translation, and settings control the display of locale-dependent values like dates and times. Django also ships with more than 50 different localization files. If youre not a native English speaker, theres a good chance that Django is already translated into your primary language.
The same internationalization framework used for these localizations is available for you to use in your own code and templates.
Because many developers have at best a fuzzy understanding of what internationalization and localization actually mean, we will begin with a few definitions.
[TOC=3]
## Definitions
internationalization
Refers to the process of designing programs for the potential use of any locale. This process is usually done by software developers. Internationalization includes marking text (such as UI elements and error messages) for future translation, abstracting the display of dates and times so that different local standards may be observed, providing support for differing time zones, and generally making sure that the code contains no assumptions about the location of its users. Youll often see internationalization abbreviated *I18N*. (The 18 refers to the number of letters omitted between the initial I and the terminal N.)
localization
Refers to the process of actually translating an internationalized program for use in a particular locale. This work is usually done by translators. Youll sometimes see localization abbreviated as *L10N*.
More details can be found in the [W3C Web Internationalization FAQ](http://www.w3.org/International/questions/qa-i18n), the [Wikipedia article](http://en.wikipedia.org/wiki/Internationalization_and_localization) or the [GNU gettext documentation](http://www.gnu.org/software/gettext/manual/gettext.html#Concepts).
Here are some other terms that will help us to handle a common language:
locale name
A locale name, either a language specification of the form `ll` or a combined language and country specification of the form `ll_CC`. Examples: `it`, `de_AT`, `es`, `pt_BR`. The language part is always in lower case and the country part in upper case. The separator is an underscore.
language code
Represents the name of a language. Browsers send the names of the languages they accept in the `Accept-Language` HTTP header using this format. Examples: `it`, `de-at`, `es`, `pt-br`. Language codes are generally represented in lower-case, but the HTTP `Accept-Language` header is case-insensitive. The separator is a dash.
message file
A message file is a plain-text file, representing a single language, that contains all available [translation strings](http://masteringdjango.com/django-internationalization/#term-translation-string) and how they should be represented in the given language. Message files have a `.po` file extension.
translation string
A literal that can be translated.
format file
A format file is a Python module that defines the data formats for a given locale.
## Translation
In order to make a Django project translatable, you have to add a minimal number of hooks to your Python code and templates. These hooks are called [translation strings](http://masteringdjango.com/django-internationalization/#term-translation-string). They tell Django: This text should be translated into the end users language, if a translation for this text is available in that language. Its your responsibility to mark translatable strings; the system can only translate strings it knows about.
Django then provides utilities to extract the translation strings into a [message file](http://masteringdjango.com/django-internationalization/#term-message-file). This file is a convenient way for translators to provide the equivalent of the translation strings in the target language. Once the translators have filled in the message file, it must be compiled. This process relies on the GNU gettext toolset.
Once this is done, Django takes care of translating Web apps on the fly in each available language, according to users language preferences.
Essentially, Django does two things:
* It lets developers and template authors specify which parts of their applications should be translatable.
* It uses that information to translate Web applications for particular users according to their language preferences.
Djangos internationalization hooks are on by default, and that means theres a bit of i18n-related overhead in certain places of the framework. If you dont use internationalization, you should take the two seconds to set `USE_I18N = False <USE_I18N>` in your settings file. Then Django will make some optimizations so as not to load the internationalization machinery.
Note
There is also an independent but related `USE_L10N` setting that controls if Django should implement format localization.
Note
Make sure youve activated translation for your project (the fastest way is to check if `MIDDLEWARE_CLASSES`includes [`django.middleware.locale.LocaleMiddleware`](http://masteringdjango.com/django-internationalization/chapter_19.html#django.middleware.locale.LocaleMiddleware "django.middleware.locale.LocaleMiddleware")). If you havent yet, see how-django-discovers-language-preference.
If You Dont Need Internationalization:
Djangos internationalization hooks are enabled by default, which incurs a small bit of overhead. If you dont use internationalization, you should set `USE_I18N = False` in your settings file. If `USE_I18N` is set to`False`, then Django will make some optimizations so as not to load the internationalization machinery.
## Internationalization: in Python code
### Standard translation
Specify a translation string by using the function `ugettext()`. Its convention to import this as a shorter alias, `_`, to save typing.
Note
Pythons standard library `gettext` module installs `_()` into the global namespace, as an alias for `gettext()`. In Django, we have chosen not to follow this practice, for a couple of reasons:
1. For international character set (Unicode) support, `ugettext()` is more useful than `gettext()`. Sometimes, you should be using `ugettext_lazy()` as the default translation method for a particular file. Without `_()` in the global namespace, the developer has to think about which is the most appropriate translation function.
2. The underscore character (`_`) is used to represent the previous result in Pythons interactive shell and doctest tests. Installing a global `_()` function causes interference. Explicitly importing `ugettext()` as `_()`avoids this problem.
In this example, the text `"Welcome to my site."` is marked as a translation string:
~~~
from django.utils.translation import ugettext as _
from django.http import HttpResponse
def my_view(request):
output = _("Welcome to my site.")
return HttpResponse(output)
~~~
Obviously, you could code this without using the alias. This example is identical to the previous one:
~~~
from django.utils.translation import ugettext
from django.http import HttpResponse
def my_view(request):
output = ugettext("Welcome to my site.")
return HttpResponse(output)
~~~
Translation works on computed values. This example is identical to the previous two:
~~~
def my_view(request):
words = ['Welcome', 'to', 'my', 'site.']
output = _(' '.join(words))
return HttpResponse(output)
~~~
Translation works on variables. Again, heres an identical example:
~~~
def my_view(request):
sentence = 'Welcome to my site.'
output = _(sentence)
return HttpResponse(output)
~~~
(The caveat with using variables or computed values, as in the previous two examples, is that Djangos translation-string-detecting utility, django-admin makemessages , wont be able to find these strings. More on `makemessages` later.)
The strings you pass to `_()` or `ugettext()` can take placeholders, specified with Pythons standard named-string interpolation syntax. Example:
~~~
def my_view(request, m, d):
output = _('Today is %(month)s %(day)s.') % {'month': m, 'day': d}
return HttpResponse(output)
~~~
This technique lets language-specific translations reorder the placeholder text. For example, an English translation may be `"Today is November 26."`, while a Spanish translation may be `"Hoy es 26 de Noviembre."` with the month and the day placeholders swapped.
For this reason, you should use named-string interpolation (e.g., `%(day)s`) instead of positional interpolation (e.g., `%s` or `%d`) whenever you have more than a single parameter. If you used positional interpolation, translations wouldnt be able to reorder placeholder text.
### Comments for translators
If you would like to give translators hints about a translatable string, you can add a comment prefixed with the `Translators` keyword on the line preceding the string, e.g.:
~~~
def my_view(request):
# Translators: This message appears on the home page only
output = ugettext("Welcome to my site.")
~~~
The comment will then appear in the resulting `.po` file associated with the translatable construct located below it and should also be displayed by most translation tools.
Note
Just for completeness, this is the corresponding fragment of the resulting `.po` file:
~~~
#. Translators: This message appears on the home page only
# path/to/python/file.py:123
msgid "Welcome to my site."
msgstr ""
~~~
This also works in templates. See translator-comments-in-templates for more details.
### Marking strings as no-op
Use the function `django.utils.translation.ugettext_noop()` to mark a string as a translation string without translating it. The string is later translated from a variable.
Use this if you have constant strings that should be stored in the source language because they are exchanged over systems or users such as strings in a database but should be translated at the last possible point in time, such as when the string is presented to the user.
### Pluralization
Use the function `django.utils.translation.ungettext()` to specify pluralized messages.
`ungettext` takes three arguments: the singular translation string, the plural translation string and the number of objects.
This function is useful when you need your Django application to be localizable to languages where the number and complexity of [plural forms](http://www.gnu.org/software/gettext/manual/gettext.html#Plural-forms) is greater than the two forms used in English (object for the singular and objects for all the cases where `count` is different from one, irrespective of its value.)
For example:
~~~
from django.utils.translation import ungettext
from django.http import HttpResponse
def hello_world(request, count):
page = ungettext(
'there is %(count)d object',
'there are %(count)d objects',
count) % {
'count': count,
}
return HttpResponse(page)
~~~
In this example the number of objects is passed to the translation languages as the `count` variable.
Note that pluralization is complicated and works differently in each language. Comparing `count` to 1 isnt always the correct rule. This code looks sophisticated, but will produce incorrect results for some languages:
~~~
from django.utils.translation import ungettext
from myapp.models import Report
count = Report.objects.count()
if count == 1:
name = Report._meta.verbose_name
else:
name = Report._meta.verbose_name_plural
text = ungettext(
'There is %(count)d %(name)s available.',
'There are %(count)d %(name)s available.',
count
) % {
'count': count,
'name': name
}
~~~
Dont try to implement your own singular-or-plural logic, it wont be correct. In a case like this, consider something like the following:
~~~
text = ungettext(
'There is %(count)d %(name)s object available.',
'There are %(count)d %(name)s objects available.',
count
) % {
'count': count,
'name': Report._meta.verbose_name,
}
~~~
Note
When using `ungettext()`, make sure you use a single name for every extrapolated variable included in the literal. In the examples above, note how we used the `name` Python variable in both translation strings. This example, besides being incorrect in some languages as noted above, would fail:
~~~
text = ungettext(
'There is %(count)d %(name)s available.',
'There are %(count)d %(plural_name)s available.',
count
) % {
'count': Report.objects.count(),
'name': Report._meta.verbose_name,
'plural_name': Report._meta.verbose_name_plural
}
~~~
You would get an error when running django-admin compilemessages:
~~~
a format specification for argument 'name', as in 'msgstr[0]', doesn't exist in 'msgid'
~~~
### Contextual markers
Sometimes words have several meanings, such as `"May"` in English, which refers to a month name and to a verb. To enable translators to translate these words correctly in different contexts, you can use the`django.utils.translation.pgettext()` function, or the `django.utils.translation.npgettext()` function if the string needs pluralization. Both take a context string as the first variable.
In the resulting `.po` file, the string will then appear as often as there are different contextual markers for the same string (the context will appear on the `msgctxt` line), allowing the translator to give a different translation for each of them.
For example:
~~~
from django.utils.translation import pgettext
month = pgettext("month name", "May")
~~~
or:
~~~
from django.db import models
from django.utils.translation import pgettext_lazy
class MyThing(models.Model):
name = models.CharField(help_text=pgettext_lazy(
'help text for MyThing model', 'This is the help text'))
~~~
will appear in the `.po` file as:
~~~
msgctxt "month name"
msgid "May"
msgstr ""
~~~
Contextual markers are also supported by the `trans` and `blocktrans` template tags.
### Lazy translation
Use the lazy versions of translation functions in `django.utils.translation` (easily recognizable by the `lazy`suffix in their names) to translate strings lazily when the value is accessed rather than when theyre called.
These functions store a lazy reference to the string not the actual translation. The translation itself will be done when the string is used in a string context, such as in template rendering.
This is essential when calls to these functions are located in code paths that are executed at module load time.
This is something that can easily happen when defining models, forms and model forms, because Django implements these such that their fields are actually class-level attributes. For that reason, make sure to use lazy translations in the following cases:
#### MODEL FIELDS AND RELATIONSHIPS `VERBOSE_NAME` AND `HELP_TEXT` OPTION VALUES
For example, to translate the help text of the *name* field in the following model, do the following:
~~~
from django.db import models
from django.utils.translation import ugettext_lazy as _
class MyThing(models.Model):
name = models.CharField(help_text=_('This is the help text'))
~~~
You can mark names of [`ForeignKey`](http://masteringdjango.com/django-internationalization/appendix_A.html#django.db.models.ForeignKey "django.db.models.ForeignKey"), [`ManyToManyField`](http://masteringdjango.com/django-internationalization/appendix_A.html#django.db.models.ManyToManyField "django.db.models.ManyToManyField") or [`OneToOneField`](http://masteringdjango.com/django-internationalization/appendix_A.html#django.db.models.OneToOneField "django.db.models.OneToOneField") relationship as translatable by using their [`verbose_name`](http://masteringdjango.com/django-internationalization/appendix_A.html#django.db.models.Options.verbose_name "django.db.models.Options.verbose_name") options:
~~~
class MyThing(models.Model):
kind = models.ForeignKey(ThingKind, related_name='kinds',
verbose_name=_('kind'))
~~~
Just like you would do in [`verbose_name`](http://masteringdjango.com/django-internationalization/appendix_A.html#django.db.models.Options.verbose_name "django.db.models.Options.verbose_name") you should provide a lowercase verbose name text for the relation as Django will automatically titlecase it when required.
#### MODEL VERBOSE NAMES VALUES
It is recommended to always provide explicit [`verbose_name`](http://masteringdjango.com/django-internationalization/appendix_A.html#django.db.models.Options.verbose_name "django.db.models.Options.verbose_name") and [`verbose_name_plural`](http://masteringdjango.com/django-internationalization/appendix_A.html#django.db.models.Options.verbose_name_plural "django.db.models.Options.verbose_name_plural") options rather than relying on the fallback English-centric and somewhat naïve determination of verbose names Django performs by looking at the models class name:
~~~
from django.db import models
from django.utils.translation import ugettext_lazy as _
class MyThing(models.Model):
name = models.CharField(_('name'), help_text=_('This is the help text'))
class Meta:
verbose_name = _('my thing')
verbose_name_plural = _('my things')
~~~
#### MODEL METHODS `SHORT_DESCRIPTION` ATTRIBUTE VALUES
For model methods, you can provide translations to Django and the admin site with the `short_description`attribute:
~~~
from django.db import models
from django.utils.translation import ugettext_lazy as _
class MyThing(models.Model):
kind = models.ForeignKey(ThingKind, related_name='kinds',
verbose_name=_('kind'))
def is_mouse(self):
return self.kind.type == MOUSE_TYPE
is_mouse.short_description = _('Is it a mouse?')
~~~
### Working with lazy translation objects
The result of a `ugettext_lazy()` call can be used wherever you would use a unicode string (an object with type `unicode`) in Python. If you try to use it where a bytestring (a `str` object) is expected, things will not work as expected, since a `ugettext_lazy()` object doesnt know how to convert itself to a bytestring. You cant use a unicode string inside a bytestring, either, so this is consistent with normal Python behavior. For example:
~~~
# This is fine: putting a unicode proxy into a unicode string.
"Hello %s" % ugettext_lazy("people")
# This will not work, since you cannot insert a unicode object
# into a bytestring (nor can you insert our unicode proxy there)
b"Hello %s" % ugettext_lazy("people")
~~~
If you ever see output that looks like `"hello <django.utils.functional...>"`, you have tried to insert the result of `ugettext_lazy()` into a bytestring. Thats a bug in your code.
If you dont like the long `ugettext_lazy` name, you can just alias it as `_` (underscore), like so:
~~~
from django.db import models
from django.utils.translation import ugettext_lazy as _
class MyThing(models.Model):
name = models.CharField(help_text=_('This is the help text'))
~~~
Using `ugettext_lazy()` and `ungettext_lazy()` to mark strings in models and utility functions is a common operation. When youre working with these objects elsewhere in your code, you should ensure that you dont accidentally convert them to strings, because they should be converted as late as possible (so that the correct locale is in effect). This necessitates the use of the helper function described next.
#### LAZY TRANSLATIONS AND PLURAL
When using lazy translation for a plural string (`[u]n[p]gettext_lazy`), you generally dont know the `number`argument at the time of the string definition. Therefore, you are authorized to pass a key name instead of an integer as the `number` argument. Then `number` will be looked up in the dictionary under that key during string interpolation. Heres example:
~~~
from django import forms
from django.utils.translation import ugettext_lazy
class MyForm(forms.Form):
error_message = ungettext_lazy("You only provided %(num)d argument",
"You only provided %(num)d arguments", 'num')
def clean(self):
# ...
if error:
raise forms.ValidationError(self.error_message % {'num': number})
~~~
If the string contains exactly one unnamed placeholder, you can interpolate directly with the `number`argument:
~~~
class MyForm(forms.Form):
error_message = ungettext_lazy("You provided %d argument",
"You provided %d arguments")
def clean(self):
# ...
if error:
raise forms.ValidationError(self.error_message % number)
~~~
#### JOINING STRINGS: STRING_CONCAT()
Standard Python string joins (`''.join([...])`) will not work on lists containing lazy translation objects. Instead, you can use `django.utils.translation.string_concat()`, which creates a lazy object that concatenates its contents *and* converts them to strings only when the result is included in a string. For example:
~~~
from django.utils.translation import string_concat
from django.utils.translation import ugettext_lazy
...
name = ugettext_lazy('John Lennon')
instrument = ugettext_lazy('guitar')
result = string_concat(name, ': ', instrument)
~~~
In this case, the lazy translations in `result` will only be converted to strings when `result` itself is used in a string (usually at template rendering time).
#### OTHER USES OF LAZY IN DELAYED TRANSLATIONS
For any other case where you would like to delay the translation, but have to pass the translatable string as argument to another function, you can wrap this function inside a lazy call yourself. For example:
~~~
from django.utils import six # Python 3 compatibility
from django.utils.functional import lazy
from django.utils.safestring import mark_safe
from django.utils.translation import ugettext_lazy as _
mark_safe_lazy = lazy(mark_safe, six.text_type)
~~~
And then later:
~~~
lazy_string = mark_safe_lazy(_("<p>My <strong>string!</strong></p>"))
~~~
### Localized names of languages
`get_language_info`()
The `get_language_info()` function provides detailed information about languages:
~~~
>>> from django.utils.translation import get_language_info
>>> li = get_language_info('de')
>>> print(li['name'], li['name_local'], li['bidi'])
German Deutsch False
~~~
The `name` and `name_local` attributes of the dictionary contain the name of the language in English and in the language itself, respectively. The `bidi` attribute is True only for bi-directional languages.
The source of the language information is the `django.conf.locale` module. Similar access to this information is available for template code. See below.
## Internationalization: in template code
Translations in Django templates uses two template tags and a slightly different syntax than in Python code. To give your template access to these tags, put `{% load i18n %}` toward the top of your template. As with all template tags, this tag needs to be loaded in all templates which use translations, even those templates that extend from other templates which have already loaded the `i18n` tag.
### `trans` template tag
The `{% trans %}` template tag translates either a constant string (enclosed in single or double quotes) or variable content:
~~~
<title>{% trans "This is the title." %}</title>
<title>{% trans myvar %}</title>
~~~
If the `noop` option is present, variable lookup still takes place but the translation is skipped. This is useful when stubbing out content that will require translation in the future:
~~~
<title>{% trans "myvar" noop %}</title>
~~~
Internally, inline translations use an `ugettext()` call.
In case a template var (`myvar` above) is passed to the tag, the tag will first resolve such variable to a string at run-time and then look up that string in the message catalogs.
Its not possible to mix a template variable inside a string within `{% trans %}`. If your translations require strings with variables (placeholders), use `{% blocktrans %}<blocktrans>` instead.
If youd like to retrieve a translated string without displaying it, you can use the following syntax:
~~~
{% trans "This is the title" as the_title %}
<title>{{ the_title }}</title>
<meta name="description" content="{{ the_title }}">
~~~
In practice youll use this to get strings that are used in multiple places or should be used as arguments for other template tags or filters:
~~~
{% trans "starting point" as start %}
{% trans "end point" as end %}
{% trans "La Grande Boucle" as race %}
<h1>
<a href="/" title="{% blocktrans %}Back to '{{ race }}' homepage{% endblocktrans %}">{{ race }}</a>
</h1>
<p>
{% for stage in tour_stages %}
{% cycle start end %}: {{ stage }}{% if forloop.counter|divisibleby:2 %}<br />{% else %}, {% endif %}
{% endfor %}
</p>
~~~
`{% trans %}` also supports contextual markers using the `context` keyword:
~~~
{% trans "May" context "month name" %}
~~~
### `blocktrans` template tag
Contrarily to the `trans` tag, the `blocktrans` tag allows you to mark complex sentences consisting of literals and variable content for translation by making use of placeholders:
~~~
{% blocktrans %}This string will have {{ value }} inside.{% endblocktrans %}
~~~
To translate a template expression say, accessing object attributes or using template filters you need to bind the expression to a local variable for use within the translation block. Examples:
~~~
{% blocktrans with amount=article.price %}
That will cost $ {{ amount }}.
{% endblocktrans %}
{% blocktrans with myvar=value|filter %}
This will have {{ myvar }} inside.
{% endblocktrans %}
~~~
You can use multiple expressions inside a single `blocktrans` tag:
~~~
{% blocktrans with book_t=book|title author_t=author|title %}
This is {{ book_t }} by {{ author_t }}
{% endblocktrans %}
~~~
Note
The previous more verbose format is still supported: `{% blocktrans with book|title as book_t andauthor|title as author_t %}`
Other block tags (for example `{% for %}` or `{% if %}`) are not allowed inside a `blocktrans` tag.
If resolving one of the block arguments fails, blocktrans will fall back to the default language by deactivating the currently active language temporarily with the `deactivate_all()` function.
This tag also provides for pluralization. To use it:
* Designate and bind a counter value with the name `count`. This value will be the one used to select the right plural form.
* Specify both the singular and plural forms separating them with the `{% plural %}` tag within the `{%blocktrans %}` and `{% endblocktrans %}` tags.
An example:
~~~
{% blocktrans count counter=list|length %}
There is only one {{ name }} object.
{% plural %}
There are {{ counter }} {{ name }} objects.
{% endblocktrans %}
~~~
A more complex example:
~~~
{% blocktrans with amount=article.price count years=i.length %}
That will cost $ {{ amount }} per year.
{% plural %}
That will cost $ {{ amount }} per {{ years }} years.
{% endblocktrans %}
~~~
When you use both the pluralization feature and bind values to local variables in addition to the counter value, keep in mind that the `blocktrans` construct is internally converted to an `ungettext` call. This means the same notes regarding ungettext variables apply.
Reverse URL lookups cannot be carried out within the `blocktrans` and should be retrieved (and stored) beforehand:
~~~
{% url 'path.to.view' arg arg2 as the_url %}
{% blocktrans %}
This is a URL: {{ the_url }}
{% endblocktrans %}
~~~
`{% blocktrans %}` also supports contextual
using the `context` keyword:
~~~
{% blocktrans with name=user.username context "greeting" %}Hi {{ name }}{% endblocktrans %}
~~~
Another feature `{% blocktrans %}` supports is the `trimmed` option. This option will remove newline characters from the beginning and the end of the content of the `{% blocktrans %}` tag, replace any whitespace at the beginning and end of a line and merge all lines into one using a space character to separate them. This is quite useful for indenting the content of a `{% blocktrans %}` tag without having the indentation characters end up in the corresponding entry in the PO file, which makes the translation process easier.
For instance, the following `{% blocktrans %}` tag:
~~~
{% blocktrans trimmed %}
First sentence.
Second paragraph.
{% endblocktrans %}
~~~
will result in the entry `"First sentence. Second paragraph."` in the PO file, compared to `"\n First sentence.\nSecond sentence.\n"`, if the `trimmed` option had not been specified.
### String literals passed to tags and filters
You can translate string literals passed as arguments to tags and filters by using the familiar `_()` syntax:
~~~
{% some_tag _("Page not found") value|yesno:_("yes,no") %}
~~~
In this case, both the tag and the filter will see the translated string, so they dont need to be aware of translations.
Note
In this example, the translation infrastructure will be passed the string `"yes,no"`, not the individual strings `"yes"` and `"no"`. The translated string will need to contain the comma so that the filter parsing code knows how to split up the arguments. For example, a German translator might translate the string`"yes,no"` as `"ja,nein"` (keeping the comma intact).
### Comments for translators in templates
Just like with Python code , these notes for translators can be specified using comments, either with the`comment` tag:
~~~
{% comment %}Translators: View verb{% endcomment %}
{% trans "View" %}
{% comment %}Translators: Short intro blurb{% endcomment %}
<p>{% blocktrans %}A multiline translatable
literal.{% endblocktrans %}</p>
~~~
or with the `{#` … `#}` one-line comment constructs :
~~~
{# Translators: Label of a button that triggers search #}
<button type="submit">{% trans "Go" %}</button>
{# Translators: This is a text of the base template #}
{% blocktrans %}Ambiguous translatable block of text{% endblocktrans %}
~~~
Note
Just for completeness, these are the corresponding fragments of the resulting `.po` file:
~~~
#. Translators: View verb
# path/to/template/file.html:10
msgid "View"
msgstr ""
#. Translators: Short intro blurb
# path/to/template/file.html:13
msgid ""
"A multiline translatable"
"literal."
msgstr ""
# ...
#. Translators: Label of a button that triggers search
# path/to/template/file.html:100
msgid "Go"
msgstr ""
#. Translators: This is a text of the base template
# path/to/template/file.html:103
msgid "Ambiguous translatable block of text"
msgstr ""
~~~
### Switching language in templates
If you want to select a language within a template, you can use the `language` template tag:
~~~
{% load i18n %}
{% get_current_language as LANGUAGE_CODE %}
<!-- Current language: {{ LANGUAGE_CODE }} -->
<p>{% trans "Welcome to our page" %}</p>
{% language 'en' %}
{% get_current_language as LANGUAGE_CODE %}
<!-- Current language: {{ LANGUAGE_CODE }} -->
<p>{% trans "Welcome to our page" %}</p>
{% endlanguage %}
~~~
While the first occurrence of Welcome to our page uses the current language, the second will always be in English.
### Other tags
These tags also require a `{% load i18n %}`.
* `{% get_available_languages as LANGUAGES %}` returns a list of tuples in which the first element is the[language code](http://masteringdjango.com/django-internationalization/#term-language-code) and the second is the language name (translated into the currently active locale).
* `{% get_current_language as LANGUAGE_CODE %}` returns the current users preferred language, as a string. Example: `en-us`. (See how-django-discovers-language-preference.)
* `{% get_current_language_bidi as LANGUAGE_BIDI %}` returns the current locales direction. If True, its a right-to-left language, e.g.: Hebrew, Arabic. If False its a left-to-right language, e.g.: English, French, German etc.
If you enable the `django.template.context_processors.i18n` context processor then each `RequestContext` will have access to `LANGUAGES`, `LANGUAGE_CODE`, and `LANGUAGE_BIDI` as defined above.
The `i18n` context processor is not enabled by default for new projects.
You can also retrieve information about any of the available languages using provided template tags and filters. To get information about a single language, use the `{% get_language_info %}` tag:
~~~
{% get_language_info for LANGUAGE_CODE as lang %}
{% get_language_info for "pl" as lang %}
~~~
You can then access the information:
~~~
Language code: {{ lang.code }}<br />
Name of language: {{ lang.name_local }}<br />
Name in English: {{ lang.name }}<br />
Bi-directional: {{ lang.bidi }}
~~~
You can also use the `{% get_language_info_list %}` template tag to retrieve information for a list of languages (e.g. active languages as specified in `LANGUAGES`). See the section about the set_language redirect view for an example of how to display a language selector using `{% get_language_info_list %}`.
In addition to `LANGUAGES` style list of tuples, `{% get_language_info_list %}` supports simple lists of language codes. If you do this in your view:
~~~
context = {'available_languages': ['en', 'es', 'fr']}
return render(request, 'mytemplate.html', context)
~~~
you can iterate over those languages in the template:
~~~
{% get_language_info_list for available_languages as langs %}
{% for lang in langs %} ... {% endfor %}
~~~
There are also simple filters available for convenience:
* `{{ LANGUAGE_CODE|language_name }}` (German)
* `{{ LANGUAGE_CODE|language_name_local }}` (Deutsch)
* `{{ LANGUAGE_CODE|language_bidi }}` (False)
## Internationalization: in JavaScript code
Adding translations to JavaScript poses some problems:
* JavaScript code doesnt have access to a `gettext` implementation.
* JavaScript code doesnt have access to `.po` or `.mo` files; they need to be delivered by the server.
* The translation catalogs for JavaScript should be kept as small as possible.
Django provides an integrated solution for these problems: It passes the translations into JavaScript, so you can call `gettext`, etc., from within JavaScript.
### The `javascript_catalog` view
`django.views.i18n.``javascript_catalog`(*request*, *domain=’djangojs’*, *packages=None*)
The main solution to these problems is the [`django.views.i18n.javascript_catalog()`](http://masteringdjango.com/django-internationalization/#django.views.i18n.javascript_catalog "django.views.i18n.javascript_catalog") view, which sends out a JavaScript code library with functions that mimic the `gettext` interface, plus an array of translation strings. Those translation strings are taken from applications or Django core, according to what you specify in either the `info_dict` or the URL. Paths listed in `LOCALE_PATHS` are also included.
You hook it up like this:
~~~
from django.views.i18n import javascript_catalog
js_info_dict = {
'packages': ('your.app.package',),
}
urlpatterns = [
url(r'^jsi18n/$', javascript_catalog, js_info_dict),
]
~~~
Each string in `packages` should be in Python dotted-package syntax (the same format as the strings in`INSTALLED_APPS`) and should refer to a package that contains a `locale` directory. If you specify multiple packages, all those catalogs are merged into one catalog. This is useful if you have JavaScript that uses strings from different applications.
The precedence of translations is such that the packages appearing later in the `packages` argument have higher precedence than the ones appearing at the beginning, this is important in the case of clashing translations for the same literal.
By default, the view uses the `djangojs` gettext domain. This can be changed by altering the `domain`argument.
You can make the view dynamic by putting the packages into the URL pattern:
~~~
urlpatterns = [
url(r'^jsi18n/(?P<packages>\S+?)/$', javascript_catalog),
]
~~~
With this, you specify the packages as a list of package names delimited by + signs in the URL. This is especially useful if your pages use code from different apps and this changes often and you dont want to pull in one big catalog file. As a security measure, these values can only be either `django.conf` or any package from the `INSTALLED_APPS` setting.
The JavaScript translations found in the paths listed in the `LOCALE_PATHS` setting are also always included. To keep consistency with the translations lookup order algorithm used for Python and templates, the directories listed in `LOCALE_PATHS` have the highest precedence with the ones appearing first having higher precedence than the ones appearing later.
### Using the JavaScript translation catalog
To use the catalog, just pull in the dynamically generated script like this:
~~~
<script type="text/javascript" src="{% url 'django.views.i18n.javascript_catalog' %}"></script>
~~~
This uses reverse URL lookup to find the URL of the JavaScript catalog view. When the catalog is loaded, your JavaScript code can use the standard `gettext` interface to access it:
~~~
document.write(gettext('this is to be translated'));
~~~
There is also an `ngettext` interface:
~~~
var object_cnt = 1 // or 0, or 2, or 3, ...
s = ngettext('literal for the singular case',
'literal for the plural case', object_cnt);
~~~
and even a string interpolation function:
~~~
function interpolate(fmt, obj, named);
~~~
The interpolation syntax is borrowed from Python, so the `interpolate` function supports both positional and named interpolation:
* Positional interpolation: `obj` contains a JavaScript Array object whose elements values are then sequentially interpolated in their corresponding `fmt` placeholders in the same order they appear. For example:
~~~
fmts = ngettext('There is %s object. Remaining: %s',
'There are %s objects. Remaining: %s', 11);
s = interpolate(fmts, [11, 20]);
// s is 'There are 11 objects. Remaining: 20'
~~~
* Named interpolation: This mode is selected by passing the optional boolean `named` parameter as true. `obj`contains a JavaScript object or associative array. For example:
~~~
d = {
count: 10,
total: 50
};
fmts = ngettext('Total: %(total)s, there is %(count)s object',
'there are %(count)s of a total of %(total)s objects', d.count);
s = interpolate(fmts, d, true);
~~~
You shouldnt go over the top with string interpolation, though: this is still JavaScript, so the code has to make repeated regular-expression substitutions. This isnt as fast as string interpolation in Python, so keep it to those cases where you really need it (for example, in conjunction with `ngettext` to produce proper pluralizations).
### Note on performance
The [`javascript_catalog()`](http://masteringdjango.com/django-internationalization/#django.views.i18n.javascript_catalog "django.views.i18n.javascript_catalog") view generates the catalog from `.mo` files on every request. Since its output is constant at least for a given version of a site its a good candidate for caching.
Server-side caching will reduce CPU load. Its easily implemented with the [`cache_page()`](http://masteringdjango.com/django-internationalization/chapter_17.html#django.views.decorators.cache.cache_page "django.views.decorators.cache.cache_page") decorator. To trigger cache invalidation when your translations change, provide a version-dependent key prefix, as shown in the example below, or map the view at a version-dependent URL.
~~~
from django.views.decorators.cache import cache_page
from django.views.i18n import javascript_catalog
# The value returned by get_version() must change when translations change.
@cache_page(86400, key_prefix='js18n-%s' % get_version())
def cached_javascript_catalog(request, domain='djangojs', packages=None):
return javascript_catalog(request, domain, packages)
~~~
Client-side caching will save bandwidth and make your site load faster. If youre using ETags (`USE_ETAGS =True <USE_ETAGS>`), youre already covered. Otherwise, you can apply conditional decorators . In the following example, the cache is invalidated whenever you restart your application server.
~~~
from django.utils import timezone
from django.views.decorators.http import last_modified
from django.views.i18n import javascript_catalog
last_modified_date = timezone.now()
@last_modified(lambda req, **kw: last_modified_date)
def cached_javascript_catalog(request, domain='djangojs', packages=None):
return javascript_catalog(request, domain, packages)
~~~
You can even pre-generate the javascript catalog as part of your deployment procedure and serve it as a static file. This radical technique is implemented in [django-statici18n](http://django-statici18n.readthedocs.org/en/latest/).
## Internationalization: in URL patterns
Django provides two mechanisms to internationalize URL patterns:
* Adding the language prefix to the root of the URL patterns to make it possible for [`LocaleMiddleware`](http://masteringdjango.com/django-internationalization/chapter_19.html#django.middleware.locale.LocaleMiddleware "django.middleware.locale.LocaleMiddleware") to detect the language to activate from the requested URL.
* Making URL patterns themselves translatable via the `django.utils.translation.ugettext_lazy()` function.
Warning
Using either one of these features requires that an active language be set for each request; in other words, you need to have [`django.middleware.locale.LocaleMiddleware`](http://masteringdjango.com/django-internationalization/chapter_19.html#django.middleware.locale.LocaleMiddleware "django.middleware.locale.LocaleMiddleware") in your `MIDDLEWARE_CLASSES` setting.
### Language prefix in URL patterns
`django.conf.urls.i18n.``i18n_patterns`(*prefix*, *pattern_description*, *…*)
Deprecated since version 1.8: The `prefix` argument to `i18n_patterns()` has been deprecated and will not be supported in Django 2.0\. Simply pass a list of `django.conf.urls.url()` instances instead.
This function can be used in your root URLconf and Django will automatically prepend the current active language code to all url patterns defined within [`i18n_patterns()`](http://masteringdjango.com/django-internationalization/#django.conf.urls.i18n.i18n_patterns "django.conf.urls.i18n.i18n_patterns"). Example URL patterns:
~~~
from django.conf.urls import include, url
from django.conf.urls.i18n import i18n_patterns
from about import views as about_views
from news import views as news_views
from sitemap.views import sitemap
urlpatterns = [
url(r'^sitemap\.xml$', sitemap, name='sitemap_xml'),
]
news_patterns = [
url(r'^$', news_views.index, name='index'),
url(r'^category/(?P<slug>[\w-]+)/$', news_views.category, name='category'),
url(r'^(?P<slug>[\w-]+)/$', news_views.details, name='detail'),
]
urlpatterns += i18n_patterns(
url(r'^about/$', about_views.main, name='about'),
url(r'^news/', include(news_patterns, namespace='news')),
)
~~~
After defining these URL patterns, Django will automatically add the language prefix to the URL patterns that were added by the `i18n_patterns` function. Example:
~~~
from django.core.urlresolvers import reverse
from django.utils.translation import activate
>>> activate('en')
>>> reverse('sitemap_xml')
'/sitemap.xml'
>>> reverse('news:index')
'/en/news/'
>>> activate('nl')
>>> reverse('news:detail', kwargs={'slug': 'news-slug'})
'/nl/news/news-slug/'
~~~
Warning
[`i18n_patterns()`](http://masteringdjango.com/django-internationalization/#django.conf.urls.i18n.i18n_patterns "django.conf.urls.i18n.i18n_patterns") is only allowed in your root URLconf. Using it within an included URLconf will throw an`ImproperlyConfigured` exception.
Warning
Ensure that you dont have non-prefixed URL patterns that might collide with an automatically-added language prefix.
### Translating URL patterns
URL patterns can also be marked translatable using the `ugettext_lazy()` function. Example:
~~~
from django.conf.urls import include, url
from django.conf.urls.i18n import i18n_patterns
from django.utils.translation import ugettext_lazy as _
from about import views as about_views
from news import views as news_views
from sitemaps.views import sitemap
urlpatterns = [
url(r'^sitemap\.xml$', sitemap, name='sitemap_xml'),
]
news_patterns = [
url(r'^$', news_views.index, name='index'),
url(_(r'^category/(?P<slug>[\w-]+)/$'), news_views.category, name='category'),
url(r'^(?P<slug>[\w-]+)/$', news_views.details, name='detail'),
]
urlpatterns += i18n_patterns(
url(_(r'^about/$'), about_views.main, name='about'),
url(_(r'^news/'), include(news_patterns, namespace='news')),
)
~~~
After youve created the translations, the `reverse()` function will return the URL in the active language. Example:
~~~
from django.core.urlresolvers import reverse
from django.utils.translation import activate
>>> activate('en')
>>> reverse('news:category', kwargs={'slug': 'recent'})
'/en/news/category/recent/'
>>> activate('nl')
>>> reverse('news:category', kwargs={'slug': 'recent'})
'/nl/nieuws/categorie/recent/'
~~~
Warning
In most cases, its best to use translated URLs only within a language-code-prefixed block of patterns (using [`i18n_patterns()`](http://masteringdjango.com/django-internationalization/#django.conf.urls.i18n.i18n_patterns "django.conf.urls.i18n.i18n_patterns")), to avoid the possibility that a carelessly translated URL causes a collision with a non-translated URL pattern.
### Reversing in templates
If localized URLs get reversed in templates they always use the current language. To link to a URL in another language use the `language` template tag. It enables the given language in the enclosed template section:
~~~
{% load i18n %}
{% get_available_languages as languages %}
{% trans "View this category in:" %}
{% for lang_code, lang_name in languages %}
{% language lang_code %}
<a href="{% url 'category' slug=category.slug %}">{{ lang_name }}</a>
{% endlanguage %}
{% endfor %}
~~~
The `language` tag expects the language code as the only argument.
## Localization: how to create language files
Once the string literals of an application have been tagged for later translation, the translation themselves need to be written (or obtained). Heres how that works.
### Message files
The first step is to create a [message file](http://masteringdjango.com/django-internationalization/#term-message-file) for a new language. A message file is a plain-text file, representing a single language, that contains all available translation strings and how they should be represented in the given language. Message files have a `.po` file extension.
Django comes with a tool, django-admin makemessages , that automates the creation and upkeep of these files.
Gettext utilities
The `makemessages` command (and `compilemessages` discussed later) use commands from the GNU gettext toolset: `xgettext`, `msgfmt`, `msgmerge` and `msguniq`.
The minimum version of the `gettext` utilities supported is 0.15.
To create or update a message file, run this command:
~~~
django-admin makemessages -l de
~~~
…where `de` is the [locale name](http://masteringdjango.com/django-internationalization/#term-locale-name) for the message file you want to create. For example, `pt_BR` for Brazilian Portuguese, `de_AT` for Austrian German or `id` for Indonesian.
The script should be run from one of two places:
* The root directory of your Django project (the one that contains `manage.py`).
* The root directory of one of your Django apps.
The script runs over your project source tree or your application source tree and pulls out all strings marked for translation (see how-django-discovers-translations and be sure `LOCALE_PATHS` is configured correctly). It creates (or updates) a message file in the directory `locale/LANG/LC_MESSAGES`. In the `de` example, the file will be `locale/de/LC_MESSAGES/django.po`.
When you run `makemessages` from the root directory of your project, the extracted strings will be automatically distributed to the proper message files. That is, a string extracted from a file of an app containing a `locale` directory will go in a message file under that directory. A string extracted from a file of an app without any `locale` directory will either go in a message file under the directory listed first in`LOCALE_PATHS` or will generate an error if `LOCALE_PATHS` is empty.
By default django-admin makemessages examines every file that has the `.html` or `.txt` file extension. In case you want to override that default, use the `--extension` or `-e` option to specify the file extensions to examine:
~~~
django-admin makemessages -l de -e txt
~~~
Separate multiple extensions with commas and/or use `-e` or `--extension` multiple times:
~~~
django-admin makemessages -l de -e html,txt -e xml
~~~
Warning
When creating message files from JavaScript source code you need to use the special djangojs domain, not`-e js`.
No gettext?
If you dont have the `gettext` utilities installed, `makemessages` will create empty files. If thats the case, either install the `gettext` utilities or just copy the English message file (`locale/en/LC_MESSAGES/django.po`) if available and use it as a starting point; its just an empty translation file.
Working on Windows?
If youre using Windows and need to install the GNU gettext utilities so `makemessages` works, see gettext_on_windows for more information.
The format of `.po` files is straightforward. Each `.po` file contains a small bit of metadata, such as the translation maintainers contact information, but the bulk of the file is a list of messages simple mappings between translation strings and the actual translated text for the particular language.
For example, if your Django app contained a translation string for the text `"Welcome to my site."`, like so:
~~~
_("Welcome to my site.")
~~~
…then django-admin makemessages will have created a `.po` file containing the following snippet a message:
~~~
#: path/to/python/module.py:23
msgid "Welcome to my site."
msgstr ""
~~~
A quick explanation:
* `msgid` is the translation string, which appears in the source. Dont change it.
* `msgstr` is where you put the language-specific translation. It starts out empty, so its your responsibility to change it. Make sure you keep the quotes around your translation.
* As a convenience, each message includes, in the form of a comment line prefixed with `#` and located above the `msgid` line, the filename and line number from which the translation string was gleaned.
Long messages are a special case. There, the first string directly after the `msgstr` (or `msgid`) is an empty string. Then the content itself will be written over the next few lines as one string per line. Those strings are directly concatenated. Dont forget trailing spaces within the strings; otherwise, theyll be tacked together without whitespace!
Mind your charset
Due to the way the `gettext` tools work internally and because we want to allow non-ASCII source strings in Djangos core and your applications, you must use UTF-8 as the encoding for your PO files (the default when PO files are created). This means that everybody will be using the same encoding, which is important when Django processes the PO files.
To reexamine all source code and templates for new translation strings and update all message files for alllanguages, run this:
~~~
django-admin makemessages -a
~~~
### Compiling message files
After you create your message file and each time you make changes to it youll need to compile it into a more efficient form, for use by `gettext`. Do this with the django-admin compilemessages utility.
This tool runs over all available `.po` files and creates `.mo` files, which are binary files optimized for use by`gettext`. In the same directory from which you ran django-admin makemessages , run django-admin compilemessages like this:
~~~
django-admin compilemessages
~~~
Thats it. Your translations are ready for use.
Working on Windows?
If youre using Windows and need to install the GNU gettext utilities so django-admin compilemessages works see gettext_on_windows for more information.
.po files: Encoding and BOM usage.
Django only supports `.po` files encoded in UTF-8 and without any BOM (Byte Order Mark) so if your text editor adds such marks to the beginning of files by default then you will need to reconfigure it.
### Creating message files from JavaScript source code
You create and update the message files the same way as the other Django message files with the django-admin makemessages tool. The only difference is you need to explicitly specify what in gettext parlance is known as a domain in this case the `djangojs` domain, by providing a `-d djangojs` parameter, like this:
~~~
django-admin makemessages -d djangojs -l de
~~~
This would create or update the message file for JavaScript for German. After updating message files, just run django-admin compilemessages the same way as you do with normal Django message files.
### `gettext` on Windows
This is only needed for people who either want to extract message IDs or compile message files (`.po`). Translation work itself just involves editing existing files of this type, but if you want to create your own message files, or want to test or compile a changed message file, you will need the `gettext` utilities:
* Download the following zip files from the GNOME servers[https://download.gnome.org/binaries/win32/dependencies/](https://download.gnome.org/binaries/win32/dependencies/)
* `gettext-runtime-X.zip`
* `gettext-tools-X.zip`
`X` is the version number, we are requiring `0.15` or higher.
* Extract the contents of the `bin\` directories in both files to the same folder on your system (i.e. `C:\ProgramFiles\gettext-utils`)
* Update the system PATH:
* `Control Panel > System > Advanced > Environment Variables`.
* In the `System variables` list, click `Path`, click `Edit`.
* Add `;C:\Program Files\gettext-utils\bin` at the end of the `Variable value` field.
You may also use `gettext` binaries you have obtained elsewhere, so long as the `xgettext --version` command works properly. Do not attempt to use Django translation utilities with a `gettext` package if the command`xgettext --version` entered at a Windows command prompt causes a popup window saying xgettext.exe has generated errors and will be closed by Windows.
### Customizing the `makemessages` command
If you want to pass additional parameters to `xgettext`, you need to create a custom `makemessages` command and override its `xgettext_options` attribute:
~~~
from django.core.management.commands import makemessages
class Command(makemessages.Command):
xgettext_options = makemessages.Command.xgettext_options + ['--keyword=mytrans']
~~~
If you need more flexibility, you could also add a new argument to your custom `makemessages` command:
~~~
from django.core.management.commands import makemessages
class Command(makemessages.Command):
def add_arguments(self, parser):
super(Command, self).add_arguments(parser)
parser.add_argument('--extra-keyword', dest='xgettext_keywords',
action='append')
def handle(self, *args, **options):
xgettext_keywords = options.pop('xgettext_keywords')
if xgettext_keywords:
self.xgettext_options = (
makemessages.Command.xgettext_options[:] +
['--keyword=%s' % kwd for kwd in xgettext_keywords]
)
super(Command, self).handle(*args, **options)
~~~
## Miscellaneous
### The `set_language` redirect view
`django.views.i18n.``set_language`(*request*)
As a convenience, Django comes with a view, [`django.views.i18n.set_language()`](http://masteringdjango.com/django-internationalization/#django.views.i18n.set_language "django.views.i18n.set_language"), that sets a users language preference and redirects to a given URL or, by default, back to the previous page.
Activate this view by adding the following line to your URLconf:
~~~
url(r'^i18n/', include('django.conf.urls.i18n')),
~~~
(Note that this example makes the view available at `/i18n/setlang/`.)
Warning
Make sure that you dont include the above URL within [`i18n_patterns()`](http://masteringdjango.com/django-internationalization/#django.conf.urls.i18n.i18n_patterns "django.conf.urls.i18n.i18n_patterns") – it needs to be language-independent itself to work correctly.
The view expects to be called via the `POST` method, with a `language` parameter set in request. If session support is enabled, the view saves the language choice in the users session. Otherwise, it saves the language choice in a cookie that is by default named `django_language`. (The name can be changed through the `LANGUAGE_COOKIE_NAME` setting.)
After setting the language choice, Django redirects the user, following this algorithm:
* Django looks for a `next` parameter in the `POST` data.
* If that doesnt exist, or is empty, Django tries the URL in the `Referrer` header.
* If thats empty say, if a users browser suppresses that header then the user will be redirected to `/` (the site root) as a fallback.
Heres example HTML template code:
~~~
{% load i18n %}
<form action="{% url 'set_language' %}" method="post">
{% csrf_token %}
<input name="next" type="hidden" value="{{ redirect_to }}" />
<select name="language">
{% get_current_language as LANGUAGE_CODE %}
{% get_available_languages as LANGUAGES %}
{% get_language_info_list for LANGUAGES as languages %}
{% for language in languages %}
<option value="{{ language.code }}"{% if language.code == LANGUAGE_CODE %} selected="selected"{% endif %}>
{{ language.name_local }} ({{ language.code }})
</option>
{% endfor %}
</select>
<input type="submit" value="Go" />
</form>
~~~
In this example, Django looks up the URL of the page to which the user will be redirected in the`redirect_to` context variable.
### Explicitly setting the active language
You may want to set the active language for the current session explicitly. Perhaps a users language preference is retrieved from another system, for example. Youve already been introduced to`django.utils.translation.activate()`. That applies to the current thread only. To persist the language for the entire session, also modify `LANGUAGE_SESSION_KEY` in the session:
~~~
from django.utils import translation
user_language = 'fr'
translation.activate(user_language)
request.session[translation.LANGUAGE_SESSION_KEY] = user_language
~~~
You would typically want to use both: `django.utils.translation.activate()` will change the language for this thread, and modifying the session makes this preference persist in future requests.
If you are not using sessions, the language will persist in a cookie, whose name is configured in`LANGUAGE_COOKIE_NAME`. For example:
~~~
from django.utils import translation
from django import http
from django.conf import settings
user_language = 'fr'
translation.activate(user_language)
response = http.HttpResponse(...)
response.set_cookie(settings.LANGUAGE_COOKIE_NAME, user_language)
~~~
### Using translations outside views and templates
While Django provides a rich set of i18n tools for use in views and templates, it does not restrict the usage to Django-specific code. The Django translation mechanisms can be used to translate arbitrary texts to any language that is supported by Django (as long as an appropriate translation catalog exists, of course). You can load a translation catalog, activate it and translate text to language of your choice, but remember to switch back to original language, as activating a translation catalog is done on per-thread basis and such change will affect code running in the same thread.
For example:
~~~
from django.utils import translation
def welcome_translated(language):
cur_language = translation.get_language()
try:
translation.activate(language)
text = translation.ugettext('welcome')
finally:
translation.activate(cur_language)
return text
~~~
Calling this function with the value de will give you `"Willkommen"`, regardless of `LANGUAGE_CODE` and language set by middleware.
Functions of particular interest are `django.utils.translation.get_language()` which returns the language used in the current thread, `django.utils.translation.activate()` which activates a translation catalog for the current thread, and `django.utils.translation.check_for_language()` which checks if the given language is supported by Django.
### Language cookie
A number of settings can be used to adjust language cookie options:
* `LANGUAGE_COOKIE_NAME`
* `LANGUAGE_COOKIE_AGE`
* `LANGUAGE_COOKIE_DOMAIN`
* `LANGUAGE_COOKIE_PATH`
## Implementation notes
### Specialties of Django translation
Djangos translation machinery uses the standard `gettext` module that comes with Python. If you know`gettext`, you might note these specialties in the way Django does translation:
* The string domain is `django` or `djangojs`. This string domain is used to differentiate between different programs that store their data in a common message-file library (usually `/usr/share/locale/`). The `django`domain is used for python and template translation strings and is loaded into the global translation catalogs. The `djangojs` domain is only used for JavaScript translation catalogs to make sure that those are as small as possible.
* Django doesnt use `xgettext` alone. It uses Python wrappers around `xgettext` and `msgfmt`. This is mostly for convenience.
### How Django discovers language preference
Once youve prepared your translations or, if you just want to use the translations that come with Django youll just need to activate translation for your app.
Behind the scenes, Django has a very flexible model of deciding which language should be used installation-wide, for a particular user, or both.
To set an installation-wide language preference, set `LANGUAGE_CODE`. Django uses this language as the default translation the final attempt if no better matching translation is found through one of the methods employed by the locale middleware (see below).
If all you want is to run Django with your native language all you need to do is set `LANGUAGE_CODE` and make sure the corresponding [message files](http://masteringdjango.com/django-internationalization/#term-message-file) and their compiled versions (`.mo`) exist.
If you want to let each individual user specify which language they prefer, then you also need to use the`LocaleMiddleware`. `LocaleMiddleware` enables language selection based on data from the request. It customizes content for each user.
To use `LocaleMiddleware`, add `'django.middleware.locale.LocaleMiddleware'` to your `MIDDLEWARE_CLASSES` setting. Because middleware order matters, you should follow these guidelines:
* Make sure its one of the first middlewares installed.
* It should come after `SessionMiddleware`, because `LocaleMiddleware` makes use of session data. And it should come before `CommonMiddleware` because `CommonMiddleware` needs an activated language in order to resolve the requested URL.
* If you use `CacheMiddleware`, put `LocaleMiddleware` after it.
For example, your `MIDDLEWARE_CLASSES` might look like this:
~~~
MIDDLEWARE_CLASSES = [
'django.contrib.sessions.middleware.SessionMiddleware',
'django.middleware.locale.LocaleMiddleware',
'django.middleware.common.CommonMiddleware',
]
~~~
(For more on middleware, see the middleware documentation.
`LocaleMiddleware` tries to determine the users language preference by following this algorithm:
* First, it looks for the language prefix in the requested URL. This is only performed when you are using the`i18n_patterns` function in your root URLconf. See url-internationalization for more information about the language prefix and how to internationalize URL patterns.
* Failing that, it looks for the `LANGUAGE_SESSION_KEY` key in the current users session.
* Failing that, it looks for a cookie.
The name of the cookie used is set by the `LANGUAGE_COOKIE_NAME` setting. (The default name is`django_language`.)
* Failing that, it looks at the `Accept-Language` HTTP header. This header is sent by your browser and tells the server which language(s) you prefer, in order by priority. Django tries each language in the header until it finds one with available translations.
* Failing that, it uses the global `LANGUAGE_CODE` setting.
Notes:
* In each of these places, the language preference is expected to be in the standard [language format](http://masteringdjango.com/django-internationalization/#term-language-code), as a string. For example, Brazilian Portuguese is `pt-br`.
* If a base language is available but the sublanguage specified is not, Django uses the base language. For example, if a user specifies `de-at` (Austrian German) but Django only has `de` available, Django uses `de`.
* Only languages listed in the `LANGUAGES` setting can be selected. If you want to restrict the language selection to a subset of provided languages (because your application doesnt provide all those languages), set `LANGUAGES` to a list of languages. For example:
~~~
LANGUAGES = [
('de', _('German')),
('en', _('English')),
]
~~~
This example restricts languages that are available for automatic selection to German and English (and any sublanguage, like de-ch or en-us).
* If you define a custom `LANGUAGES` setting, as explained in the previous bullet, you can mark the language names as translation strings but use `ugettext_lazy()` instead of `ugettext()` to avoid a circular import.
Heres a sample settings file:
~~~
from django.utils.translation import ugettext_lazy as _
LANGUAGES = [
('de', _('German')),
('en', _('English')),
]
~~~
Once `LocaleMiddleware` determines the users preference, it makes this preference available as`request.LANGUAGE_CODE` for each `HttpRequest`. Feel free to read this value in your view code. Heres a simple example:
~~~
from django.http import HttpResponse
def hello_world(request, count):
if request.LANGUAGE_CODE == 'de-at':
return HttpResponse("You prefer to read Austrian German.")
else:
return HttpResponse("You prefer to read another language.")
~~~
Note that, with static (middleware-less) translation, the language is in `settings.LANGUAGE_CODE`, while with dynamic (middleware) translation, its in `request.LANGUAGE_CODE`.
### How Django discovers translations
At runtime, Django builds an in-memory unified catalog of literals-translations. To achieve this it looks for translations by following this algorithm regarding the order in which it examines the different file paths to load the compiled [message files](http://masteringdjango.com/django-internationalization/#term-message-file) (`.mo`) and the precedence of multiple translations for the same literal:
1. The directories listed in `LOCALE_PATHS` have the highest precedence, with the ones appearing first having higher precedence than the ones appearing later.
2. Then, it looks for and uses if it exists a `locale` directory in each of the installed apps listed in`INSTALLED_APPS`. The ones appearing first have higher precedence than the ones appearing later.
3. Finally, the Django-provided base translation in `django/conf/locale` is used as a fallback.
See also
The translations for literals included in JavaScript assets are looked up following a similar but not identical algorithm. See the javascript_catalog view documentation for more details.
In all cases the name of the directory containing the translation is expected to be named using [locale name](http://masteringdjango.com/django-internationalization/#term-locale-name) notation. E.g. `de`, `pt_BR`, `es_AR`, etc.
This way, you can write applications that include their own translations, and you can override base translations in your project. Or, you can just build a big project out of several apps and put all translations into one big common message file specific to the project you are composing. The choice is yours.
All message file repositories are structured the same way. They are:
* All paths listed in `LOCALE_PATHS` in your settings file are searched for `<language>/LC_MESSAGES/django.(po|mo)`
* `$APPPATH/locale/<language>/LC_MESSAGES/django.(po|mo)`
* `$PYTHONPATH/django/conf/locale/<language>/LC_MESSAGES/django.(po|mo)`
To create message files, you use the django-admin makemessages tool. And you use django-admin compilemessages to produce the binary `.mo` files that are used by `gettext`.
You can also run django-admin compilemessages to make the compiler process all the directories in your`LOCALE_PATHS` setting.
Chapter 19 – Django Middleware
最后更新于:2022-04-01 04:48:16
Middleware is a framework of hooks into Djangos request/response processing. Its a light, low-level plugin system for globally altering Djangos input or output.
Each middleware component is responsible for doing some specific function. For example, Django includes a middleware component, [`AuthenticationMiddleware`](http://masteringdjango.com/django-middleware/#django.contrib.auth.middleware.AuthenticationMiddleware "django.contrib.auth.middleware.AuthenticationMiddleware"), that associates users with requests using sessions.
This document explains how middleware works, how you activate middleware, and how to write your own middleware. Django ships with some built-in middleware you can use right out of the box. See Available Middleware later in this chapter.
[TOC=3]
## Activating middleware
To activate a middleware component, add it to the `MIDDLEWARE_CLASSES` list in your Django settings.
In `MIDDLEWARE_CLASSES`, each middleware component is represented by a string: the full Python path to the middlewares class name. For example, heres the default value created by `django-admin startproject`:
~~~
MIDDLEWARE_CLASSES = [
'django.contrib.sessions.middleware.SessionMiddleware',
'django.middleware.common.CommonMiddleware',
'django.middleware.csrf.CsrfViewMiddleware',
'django.contrib.auth.middleware.AuthenticationMiddleware',
'django.contrib.messages.middleware.MessageMiddleware',
'django.middleware.clickjacking.XFrameOptionsMiddleware',
]
~~~
A Django installation doesnt require any middleware `MIDDLEWARE_CLASSES` can be empty, if youd like but its strongly suggested that you at least use [`CommonMiddleware`](http://masteringdjango.com/django-middleware/#django.middleware.common.CommonMiddleware "django.middleware.common.CommonMiddleware").
The order in `MIDDLEWARE_CLASSES` matters because a middleware can depend on other middleware. For instance, [`AuthenticationMiddleware`](http://masteringdjango.com/django-middleware/#django.contrib.auth.middleware.AuthenticationMiddleware "django.contrib.auth.middleware.AuthenticationMiddleware") stores the authenticated user in the session; therefore, it must run after[`SessionMiddleware`](http://masteringdjango.com/django-middleware/#django.contrib.sessions.middleware.SessionMiddleware "django.contrib.sessions.middleware.SessionMiddleware"). See middleware-ordering for some common hints about ordering of Django middleware classes.
## Hooks and application order
During the request phase, before calling the view, Django applies middleware in the order its defined in`MIDDLEWARE_CLASSES`, top-down. Two hooks are available:
* [`process_request()`](http://masteringdjango.com/django-middleware/#process_request "process_request")
* [`process_view()`](http://masteringdjango.com/django-middleware/#process_view "process_view")
During the response phase, after calling the view, middleware are applied in reverse order, from the bottom up. Three hooks are available:
* [`process_exception()`](http://masteringdjango.com/django-middleware/#process_exception "process_exception") (only if the view raised an exception)
* [`process_template_response()`](http://masteringdjango.com/django-middleware/#process_template_response "process_template_response") (only for template responses)
* [`process_response()`](http://masteringdjango.com/django-middleware/#process_response "process_response")
If you prefer, you can also think of it like an onion: each middleware class is a layer that wraps the view.
The behavior of each hook is described below.
## Writing your own middleware
Writing your own middleware is easy. Each middleware component is a single Python class that defines one or more of the following methods:
### `process_request`
`process_request`(*request*)
`request` is an `HttpRequest` object.
`process_request()` is called on each request, before Django decides which view to execute.
It should return either `None` or an `HttpResponse` object. If it returns `None`, Django will continue processing this request, executing any other `process_request()` middleware, then, `process_view()` middleware, and finally, the appropriate view. If it returns an `HttpResponse` object, Django wont bother calling any other request, view or exception middleware, or the appropriate view; itll apply response middleware to that`HttpResponse`, and return the result.
### `process_view`
`process_view`(*request*, *view_func*, *view_args*, *view_kwargs*)
`request` is an `HttpRequest` object. `view_func` is the Python function that Django is about to use. (Its the actual function object, not the name of the function as a string.) `view_args` is a list of positional arguments that will be passed to the view, and `view_kwargs` is a dictionary of keyword arguments that will be passed to the view. Neither `view_args` nor `view_kwargs` include the first view argument (`request`).
`process_view()` is called just before Django calls the view.
It should return either `None` or an `HttpResponse` object. If it returns `None`, Django will continue processing this request, executing any other `process_view()` middleware and, then, the appropriate view. If it returns an`HttpResponse` object, Django wont bother calling any other view or exception middleware, or the appropriate view; itll apply response middleware to that `HttpResponse`, and return the result.
Note
Accessing `request.POST` inside middleware from `process_request` or `process_view` will prevent any view running after the middleware from being able to modify the upload handlers for the request, and should normally be avoided.
The [`CsrfViewMiddleware`](http://masteringdjango.com/django-middleware/#django.middleware.csrf.CsrfViewMiddleware "django.middleware.csrf.CsrfViewMiddleware") class can be considered an exception, as it provides the [`csrf_exempt()`](http://masteringdjango.com/django-middleware/chapter_21.html#django.views.decorators.csrf.csrf_exempt "django.views.decorators.csrf.csrf_exempt") and[`csrf_protect()`](http://masteringdjango.com/django-middleware/chapter_21.html#django.views.decorators.csrf.csrf_protect "django.views.decorators.csrf.csrf_protect") decorators which allow views to explicitly control at what point the CSRF validation should occur.
### `process_template_response`
`process_template_response`(*request*, *response*)
`request` is an `HttpRequest` object. `response` is the `TemplateResponse` object (or equivalent) returned by a Django view or by a middleware.
`process_template_response()` is called just after the view has finished executing, if the response instance has a `render()` method, indicating that it is a `TemplateResponse` or equivalent.
It must return a response object that implements a `render` method. It could alter the given `response` by changing `response.template_name` and `response.context_data`, or it could create and return a brand-new`TemplateResponse` or equivalent.
You dont need to explicitly render responses responses will be automatically rendered once all template response middleware has been called.
Middleware are run in reverse order during the response phase, which includes`process_template_response()`.
### `process_response`
`process_response`(*request*, *response*)
`request` is an `HttpRequest` object. `response` is the `HttpResponse` or `StreamingHttpResponse` object returned by a Django view or by a middleware.
`process_response()` is called on all responses before theyre returned to the browser.
It must return an `HttpResponse` or `StreamingHttpResponse` object. It could alter the given `response`, or it could create and return a brand-new `HttpResponse` or `StreamingHttpResponse`.
Unlike the `process_request()` and `process_view()` methods, the `process_response()` method is always called, even if the `process_request()` and `process_view()` methods of the same middleware class were skipped (because an earlier middleware method returned an `HttpResponse`). In particular, this means that your`process_response()` method cannot rely on setup done in `process_request()`.
Finally, remember that during the response phase, middleware are applied in reverse order, from the bottom up. This means classes defined at the end of `MIDDLEWARE_CLASSES` will be run first.
#### DEALING WITH STREAMING RESPONSES
Unlike `HttpResponse`, `StreamingHttpResponse` does not have a `content` attribute. As a result, middleware can no longer assume that all responses will have a `content` attribute. If they need access to the content, they must test for streaming responses and adjust their behavior accordingly:
~~~
if response.streaming:
response.streaming_content = wrap_streaming_content(response.streaming_content)
else:
response.content = alter_content(response.content)
~~~
Note
`streaming_content` should be assumed to be too large to hold in memory. Response middleware may wrap it in a new generator, but must not consume it. Wrapping is typically implemented as follows:
~~~
def wrap_streaming_content(content):
for chunk in content:
yield alter_content(chunk)
~~~
### `process_exception`
`process_exception`(*request*, *exception*)
`request` is an `HttpRequest` object. `exception` is an `Exception` object raised by the view function.
Django calls `process_exception()` when a view raises an exception. `process_exception()` should return either`None` or an `HttpResponse` object. If it returns an `HttpResponse` object, the template response and response middleware will be applied, and the resulting response returned to the browser. Otherwise, default exception handling kicks in.
Again, middleware are run in reverse order during the response phase, which includes `process_exception`. If an exception middleware returns a response, the middleware classes above that middleware will not be called at all.
### `__init__`
Most middleware classes wont need an initializer since middleware classes are essentially placeholders for the `process_*` methods. If you do need some global state you may use `__init__` to set up. However, keep in mind a couple of caveats:
* Django initializes your middleware without any arguments, so you cant define `__init__` as requiring any arguments.
* Unlike the `process_*` methods which get called once per request, `__init__` gets called only *once*, when the Web server responds to the first request.
#### MARKING MIDDLEWARE AS UNUSED
Its sometimes useful to determine at run-time whether a piece of middleware should be used. In these cases, your middlewares `__init__` method may raise `django.core.exceptions.MiddlewareNotUsed`. Django will then remove that piece of middleware from the middleware process and a debug message will be logged to the `django.request` logger when `DEBUG` is set to `True`.
### Guidelines
* Middleware classes dont have to subclass anything.
* The middleware class can live anywhere on your Python path. All Django cares about is that the`MIDDLEWARE_CLASSES` setting includes the path to it.
* Feel free to look at Djangos available middleware for examples.
* If you write a middleware component that you think would be useful to other people, contribute to the community! Let us know and well consider adding it to Django.
## Available middleware
### Cache middleware
*class *`django.middleware.cache.``UpdateCacheMiddleware`
*class *`django.middleware.cache.``FetchFromCacheMiddleware`
Enable the site-wide cache. If these are enabled, each Django-powered page will be cached for as long as the `CACHE_MIDDLEWARE_SECONDS` setting defines. See the cache documentation .
### Common middleware
*class *`django.middleware.common.``CommonMiddleware`
Adds a few conveniences for perfectionists:
* Forbids access to user agents in the `DISALLOWED_USER_AGENTS` setting, which should be a list of compiled regular expression objects.
* Performs URL rewriting based on the `APPEND_SLASH` and `PREPEND_WWW` settings.
If `APPEND_SLASH` is `True` and the initial URL doesnt end with a slash, and it is not found in the URLconf, then a new URL is formed by appending a slash at the end. If this new URL is found in the URLconf, then Django redirects the request to this new URL. Otherwise, the initial URL is processed as usual.
For example, `foo.com/bar` will be redirected to `foo.com/bar/` if you dont have a valid URL pattern for`foo.com/bar` but *do* have a valid pattern for `foo.com/bar/`.
If `PREPEND_WWW` is `True`, URLs that lack a leading www. will be redirected to the same URL with a leading www.
Both of these options are meant to normalize URLs. The philosophy is that each URL should exist in one, and only one, place. Technically a URL `foo.com/bar` is distinct from `foo.com/bar/` a search-engine indexer would treat them as separate URLs so its best practice to normalize URLs.
* Handles ETags based on the `USE_ETAGS` setting. If `USE_ETAGS` is set to `True`, Django will calculate an ETag for each request by MD5-hashing the page content, and itll take care of sending `Not Modified` responses, if appropriate.
`CommonMiddleware.``response_redirect_class`
Defaults to `HttpResponsePermanentRedirect`. Subclass `CommonMiddleware` and override the attribute to customize the redirects issued by the middleware.
*class *`django.middleware.common.``BrokenLinkEmailsMiddleware`
* Sends broken link notification emails to `MANAGERS`
### GZip middleware
*class *`django.middleware.gzip.``GZipMiddleware`
Warning
Security researchers recently revealed that when compression techniques (including `GZipMiddleware`) are used on a website, the site becomes exposed to a number of possible attacks. These approaches can be used to compromise, among other things, Djangos CSRF protection. Before using `GZipMiddleware` on your site, you should consider very carefully whether you are subject to these attacks. If youre in *any* doubt about whether youre affected, you should avoid using `GZipMiddleware`. For more details, see the [the BREACH paper (PDF)](http://breachattack.com/resources/BREACH%20-%20SSL,%20gone%20in%2030%20seconds.pdf) and [breachattack.com](http://breachattack.com/).
Compresses content for browsers that understand GZip compression (all modern browsers).
This middleware should be placed before any other middleware that need to read or write the response body so that compression happens afterward.
It will NOT compress content if any of the following are true:
* The content body is less than 200 bytes long.
* The response has already set the `Content-Encoding` header.
* The request (the browser) hasnt sent an `Accept-Encoding` header containing `gzip`.
You can apply GZip compression to individual views using the `gzip_page()` decorator.
### Conditional GET middleware
*class *`django.middleware.http.``ConditionalGetMiddleware`
Handles conditional GET operations. If the response has a `ETag` or `Last-Modified` header, and the request has `If-None-Match` or `If-Modified-Since`, the response is replaced by an `HttpResponseNotModified`.
Also sets the `Date` and `Content-Length` response-headers.
### Locale middleware
*class *`django.middleware.locale.``LocaleMiddleware`
Enables language selection based on data from the request. It customizes content for each user. See the internationalization documentation.
`LocaleMiddleware.``response_redirect_class`
Defaults to `HttpResponseRedirect`. Subclass `LocaleMiddleware` and override the attribute to customize the redirects issued by the middleware.
### Message middleware
*class *`django.contrib.messages.middleware.``MessageMiddleware`
Enables cookie- and session-based message support. See the messages documentation .
### Security middleware
Warning
If your deployment situation allows, its usually a good idea to have your front-end Web server perform the functionality provided by the `SecurityMiddleware`. That way, if there are requests that arent served by Django (such as static media or user-uploaded files), they will have the same protections as requests to your Django application.
*class *`django.middleware.security.``SecurityMiddleware`
The `django.middleware.security.SecurityMiddleware` provides several security enhancements to the request/response cycle. Each one can be independently enabled or disabled with a setting.
* `SECURE_BROWSER_XSS_FILTER`
* `SECURE_CONTENT_TYPE_NOSNIFF`
* `SECURE_HSTS_INCLUDE_SUBDOMAINS`
* `SECURE_HSTS_SECONDS`
* `SECURE_REDIRECT_EXEMPT`
* `SECURE_SSL_HOST`
* `SECURE_SSL_REDIRECT`
#### HTTP STRICT TRANSPORT SECURITY
For sites that should only be accessed over HTTPS, you can instruct modern browsers to refuse to connect to your domain name via an insecure connection (for a given period of time) by setting the [Strict-Transport-Security header](http://en.wikipedia.org/wiki/Strict_Transport_Security). This reduces your exposure to some SSL-stripping man-in-the-middle (MITM) attacks.
`SecurityMiddleware` will set this header for you on all HTTPS responses if you set the `SECURE_HSTS_SECONDS`setting to a non-zero integer value.
When enabling HSTS, its a good idea to first use a small value for testing, for example, `SECURE_HSTS_SECONDS= 3600<SECURE_HSTS_SECONDS>` for one hour. Each time a Web browser sees the HSTS header from your site, it will refuse to communicate non-securely (using HTTP) with your domain for the given period of time. Once you confirm that all assets are served securely on your site (i.e. HSTS didnt break anything), its a good idea to increase this value so that infrequent visitors will be protected (31536000 seconds, i.e. 1 year, is common).
Additionally, if you set the `SECURE_HSTS_INCLUDE_SUBDOMAINS` setting to `True`, `SecurityMiddleware` will add the`includeSubDomains` tag to the `Strict-Transport-Security` header. This is recommended (assuming all subdomains are served exclusively using HTTPS), otherwise your site may still be vulnerable via an insecure connection to a subdomain.
Warning
The HSTS policy applies to your entire domain, not just the URL of the response that you set the header on. Therefore, you should only use it if your entire domain is served via HTTPS only.
Browsers properly respecting the HSTS header will refuse to allow users to bypass warnings and connect to a site with an expired, self-signed, or otherwise invalid SSL certificate. If you use HSTS, make sure your certificates are in good shape and stay that way!
Note
If you are deployed behind a load-balancer or reverse-proxy server, and the `Strict-Transport-Security`header is not being added to your responses, it may be because Django doesnt realize that its on a secure connection; you may need to set the `SECURE_PROXY_SSL_HEADER` setting.
#### `X-CONTENT-TYPE-OPTIONS: NOSNIFF`
Some browsers will try to guess the content types of the assets that they fetch, overriding the `Content-Type`header. While this can help display sites with improperly configured servers, it can also pose a security risk.
If your site serves user-uploaded files, a malicious user could upload a specially-crafted file that would be interpreted as HTML or Javascript by the browser when you expected it to be something harmless.
To learn more about this header and how the browser treats it, you can read about it on the [IE Security Blog](http://blogs.msdn.com/b/ie/archive/2008/09/02/ie8-security-part-vi-beta-2-update.aspx).
To prevent the browser from guessing the content type and force it to always use the type provided in the`Content-Type` header, you can pass the `X-Content-Type-Options: nosniff` header. `SecurityMiddleware` will do this for all responses if the `SECURE_CONTENT_TYPE_NOSNIFF` setting is `True`.
Note that in most deployment situations where Django isnt involved in serving user-uploaded files, this setting wont help you. For example, if your `MEDIA_URL` is served directly by your front-end Web server (nginx, Apache, etc.) then youd want to set this header there. On the other hand, if you are using Django to do something like require authorization in order to download files and you cannot set the header using your Web server, this setting will be useful.
#### `X-XSS-PROTECTION: 1; MODE=BLOCK`
Some browsers have the ability to block content that appears to be an [XSS attack](http://en.wikipedia.org/wiki/Cross-site_scripting). They work by looking for Javascript content in the GET or POST parameters of a page. If the Javascript is replayed in the servers response, the page is blocked from rendering and an error page is shown instead.
The [X-XSS-Protection header](http://blogs.msdn.com/b/ie/archive/2008/07/02/ie8-security-part-iv-the-xss-filter.aspx) is used to control the operation of the XSS filter.
To enable the XSS filter in the browser, and force it to always block suspected XSS attacks, you can pass the `X-XSS-Protection: 1; mode=block` header. `SecurityMiddleware` will do this for all responses if the`SECURE_BROWSER_XSS_FILTER` setting is `True`.
Warning
The browser XSS filter is a useful defense measure, but must not be relied upon exclusively. It cannot detect all XSS attacks and not all browsers support the header. Ensure you are still validating and all input to prevent XSS attacks.
#### SSL REDIRECT
If your site offers both HTTP and HTTPS connections, most users will end up with an unsecured connection by default. For best security, you should redirect all HTTP connections to HTTPS.
If you set the `SECURE_SSL_REDIRECT` setting to True, `SecurityMiddleware` will permanently (HTTP 301) redirect all HTTP connections to HTTPS.
Note
For performance reasons, its preferable to do these redirects outside of Django, in a front-end load balancer or reverse-proxy server such as [nginx](http://nginx.org/). `SECURE_SSL_REDIRECT` is intended for the deployment situations where this isnt an option.
If the `SECURE_SSL_HOST` setting has a value, all redirects will be sent to that host instead of the originally-requested host.
If there are a few pages on your site that should be available over HTTP, and not redirected to HTTPS, you can list regular expressions to match those URLs in the `SECURE_REDIRECT_EXEMPT` setting.
Note
If you are deployed behind a load-balancer or reverse-proxy server and Django cant seem to tell when a request actually is already secure, you may need to set the `SECURE_PROXY_SSL_HEADER` setting.
### Session middleware
*class *`django.contrib.sessions.middleware.``SessionMiddleware`
Enables session support. See the session documentation.
### Site middleware
*class *`django.contrib.sites.middleware.``CurrentSiteMiddleware`
Adds the `site` attribute representing the current site to every incoming `HttpRequest` object. See the sites documentation.
### Authentication middleware
*class *`django.contrib.auth.middleware.``AuthenticationMiddleware`
Adds the `user` attribute, representing the currently-logged-in user, to every incoming `HttpRequest` object. See Authentication in Web requests.
*class *`django.contrib.auth.middleware.``RemoteUserMiddleware`
Middleware for utilizing Web server provided authentication. See auth-remote-user for usage details.
*class *`django.contrib.auth.middleware.``SessionAuthenticationMiddleware`
Allows a users sessions to be invalidated when their password changes. See session-invalidation-on-password-change for details. This middleware must appear after[`django.contrib.auth.middleware.AuthenticationMiddleware`](http://masteringdjango.com/django-middleware/#django.contrib.auth.middleware.AuthenticationMiddleware "django.contrib.auth.middleware.AuthenticationMiddleware") in `MIDDLEWARE_CLASSES`.
### CSRF protection middleware
*class *`django.middleware.csrf.``CsrfViewMiddleware`
Adds protection against Cross Site Request Forgeries by adding hidden form fields to POST forms and checking requests for the correct value. See the Cross Site Request Forgery protection documentation .
### X-Frame-Options middleware
*class *`django.middleware.clickjacking.``XFrameOptionsMiddleware`
Simple clickjacking protection via the X-Frame-Options header .
## Middleware ordering
Here are some hints about the ordering of various Django middleware classes:
1. [`UpdateCacheMiddleware`](http://masteringdjango.com/django-middleware/#django.middleware.cache.UpdateCacheMiddleware "django.middleware.cache.UpdateCacheMiddleware")
Before those that modify the `Vary` header (`SessionMiddleware`, `GZipMiddleware`, `LocaleMiddleware`).
2. [`GZipMiddleware`](http://masteringdjango.com/django-middleware/#django.middleware.gzip.GZipMiddleware "django.middleware.gzip.GZipMiddleware")
Before any middleware that may change or use the response body.
After `UpdateCacheMiddleware`: Modifies `Vary` header.
3. [`ConditionalGetMiddleware`](http://masteringdjango.com/django-middleware/#django.middleware.http.ConditionalGetMiddleware "django.middleware.http.ConditionalGetMiddleware")
Before `CommonMiddleware`: uses its `Etag` header when `USE_ETAGS` = `True`.
4. [`SessionMiddleware`](http://masteringdjango.com/django-middleware/#django.contrib.sessions.middleware.SessionMiddleware "django.contrib.sessions.middleware.SessionMiddleware")
After `UpdateCacheMiddleware`: Modifies `Vary` header.
5. [`LocaleMiddleware`](http://masteringdjango.com/django-middleware/#django.middleware.locale.LocaleMiddleware "django.middleware.locale.LocaleMiddleware")
One of the topmost, after `SessionMiddleware` (uses session data) and `CacheMiddleware` (modifies `Vary` header).
6. [`CommonMiddleware`](http://masteringdjango.com/django-middleware/#django.middleware.common.CommonMiddleware "django.middleware.common.CommonMiddleware")
Before any middleware that may change the response (it calculates `ETags`).
After `GZipMiddleware` so it wont calculate an `ETag` header on gzipped contents.
Close to the top: it redirects when `APPEND_SLASH` or `PREPEND_WWW` are set to `True`.
7. [`CsrfViewMiddleware`](http://masteringdjango.com/django-middleware/#django.middleware.csrf.CsrfViewMiddleware "django.middleware.csrf.CsrfViewMiddleware")
Before any view middleware that assumes that CSRF attacks have been dealt with.
8. [`AuthenticationMiddleware`](http://masteringdjango.com/django-middleware/#django.contrib.auth.middleware.AuthenticationMiddleware "django.contrib.auth.middleware.AuthenticationMiddleware")
After `SessionMiddleware`: uses session storage.
9. [`MessageMiddleware`](http://masteringdjango.com/django-middleware/#django.contrib.messages.middleware.MessageMiddleware "django.contrib.messages.middleware.MessageMiddleware")
After `SessionMiddleware`: can use session-based storage.
10. [`FetchFromCacheMiddleware`](http://masteringdjango.com/django-middleware/#django.middleware.cache.FetchFromCacheMiddleware "django.middleware.cache.FetchFromCacheMiddleware")
After any middleware that modifies the `Vary` header: that header is used to pick a value for the cache hash-key.
11. `FlatpageFallbackMiddleware`
Should be near the bottom as its a last-resort type of middleware.
12. `RedirectFallbackMiddleware`
Should be near the bottom as its a last-resort type of middleware.
Chapter 18 – Other core Django functionalities
最后更新于:2022-04-01 04:48:14
Chapter Still in Draft!!
This chapter is still a work in progress. You are welcome to browse and offer suggestions, but it is likely full of errors, jumbled and not recommended for use yet. You have been warned…
[TODO – this was originally the Django.contrib chapter. This is now grouped under *Django core functionalities* in the documentation. Much of this is now included in the main text. Finalise this chapter when I know what bits have been missed.]
Chapter 17 – Django’s cache framework
最后更新于:2022-04-01 04:48:11
A fundamental trade-off in dynamic Web sites is, well, they’re dynamic. Each time a user requests a page, the Web server makes all sorts of calculations from database queries to template rendering to business logic to creating the page that your site visitors see. This is a lot more expensive, from a processing-overhead perspective, than your standard read-a-file-off-the-filesystem server arrangement.
For most Web applications, this overhead isn’t a big deal. Most Web applications aren’t`washingtonpost.com` or `slashdot.org`; they’re simply small- to medium-sized sites with so-so traffic. But for medium- to high-traffic sites, its essential to cut as much overhead as possible.
Thats where caching comes in.
To cache something is to save the result of an expensive calculation so that you don’t have to perform the calculation next time. Heres some pseudocode explaining how this would work for a dynamically generated Web page:
~~~
given a URL, try finding that page in the cache
if the page is in the cache:
return the cached page
else:
generate the page
save the generated page in the cache (for next time)
return the generated page
~~~
Django comes with a robust cache system that lets you save dynamic pages so they don’t have to be calculated for each request. For convenience, Django offers different levels of cache granularity: You can cache the output of specific views, you can cache only the pieces that are difficult to produce, or you can cache your entire site.
Django also works well with downstream caches, such as [Squid](http://www.squid-cache.org/) and browser-based caches. These are the types of caches that you don’t directly control, but to which you can provide hints (via HTTP headers) about which parts of your site should be cached, and how.
[TOC=3]
## Setting up the cache
The cache system requires a small amount of setup. Namely, you have to tell it where your cached data should live; whether in a database, on the filesystem or directly in memory. This is an important decision that affects your caches performance.
Your cache preference goes in the `CACHES` setting in your settings file.
### Memcached
The fastest, most efficient type of cache supported natively by Django, [Memcached](http://memcached.org/) is an entirely memory-based cache server, originally developed to handle high loads at LiveJournal.com and subsequently open-sourced by Danga Interactive. It is used by sites such as Facebook and Wikipedia to reduce database access and dramatically increase site performance.
Memcached runs as a daemon and is allotted a specified amount of RAM. All it does is provide a fast interface for adding, retrieving and deleting data in the cache. All data is stored directly in memory, so there’s no overhead of database or filesystem usage.
After installing Memcached itself, you’ll need to install a Memcached binding. There are several Python Memcached bindings available; the two most common are [python-memcached](ftp://ftp.tummy.com/pub/python-memcached/) and[pylibmc](http://sendapatch.se/projects/pylibmc/).
To use Memcached with Django:
* Set `BACKEND <CACHES-BACKEND>` to `django.core.cache.backends.memcached.MemcachedCache` or`django.core.cache.backends.memcached.PyLibMCCache` (depending on your chosen memcached binding)
* Set `LOCATION <CACHES-LOCATION>` to `ip:port` values, where `ip` is the IP address of the Memcached daemon and `port` is the port on which Memcached is running, or to a `unix:path` value, where `path` is the path to a Memcached Unix socket file.
In this example, Memcached is running on localhost (127.0.0.1) port 11211, using the `python-memcached` binding:
~~~
CACHES = {
'default': {
'BACKEND': 'django.core.cache.backends.memcached.MemcachedCache',
'LOCATION': '127.0.0.1:11211',
}
}
~~~
In this example, Memcached is available through a local Unix socket file `/tmp/memcached.sock` using the `python-memcached` binding:
~~~
CACHES = {
'default': {
'BACKEND': 'django.core.cache.backends.memcached.MemcachedCache',
'LOCATION': 'unix:/tmp/memcached.sock',
}
}
~~~
One excellent feature of Memcached is its ability to share a cache over multiple servers. This means you can run Memcached daemons on multiple machines, and the program will treat the group of machines as a *single* cache, without the need to duplicate cache values on each machine. To take advantage of this feature, include all server addresses in `LOCATION <CACHES-LOCATION>`, either separated by semicolons or as a list.
In this example, the cache is shared over Memcached instances running on IP address 172.19.26.240 and 172.19.26.242, both on port 11211:
~~~
CACHES = {
'default': {
'BACKEND': 'django.core.cache.backends.memcached.MemcachedCache',
'LOCATION': [
'172.19.26.240:11211',
'172.19.26.242:11211',
]
}
}
~~~
In the following example, the cache is shared over Memcached instances running on the IP addresses 172.19.26.240 (port 11211), 172.19.26.242 (port 11212), and 172.19.26.244 (port 11213):
~~~
CACHES = {
'default': {
'BACKEND': 'django.core.cache.backends.memcached.MemcachedCache',
'LOCATION': [
'172.19.26.240:11211',
'172.19.26.242:11212',
'172.19.26.244:11213',
]
}
}
~~~
A final point about Memcached is that memory-based caching has a disadvantage: because the cached data is stored in memory, the data will be lost if your server crashes. Clearly, memory isn’t intended for permanent data storage, so don’t rely on memory-based caching as your only data storage. Without a doubt, *none* of the Django caching backends should be used for permanent storage they’re all intended to be solutions for caching, not storage but we point this out here because memory-based caching is particularly temporary.
### Database caching
Django can store its cached data in your database. This works best if youve got a fast, well-indexed database server.
To use a database table as your cache backend:
* Set `BACKEND <CACHES-BACKEND>` to `django.core.cache.backends.db.DatabaseCache`
* Set `LOCATION <CACHES-LOCATION>` to `tablename`, the name of the database table. This name can be whatever you want, as long as its a valid table name thats not already being used in your database.
In this example, the cache tables name is `my_cache_table`:
~~~
CACHES = {
'default': {
'BACKEND': 'django.core.cache.backends.db.DatabaseCache',
'LOCATION': 'my_cache_table',
}
}
~~~
#### CREATING THE CACHE TABLE
Before using the database cache, you must create the cache table with this command:
~~~
python manage.py createcachetable
~~~
This creates a table in your database that is in the proper format that Django’s database-cache system expects. The name of the table is taken from `LOCATION <CACHES-LOCATION>`.
If you are using multiple database caches, `createcachetable` creates one table for each cache.
If you are using multiple databases, `createcachetable` observes the `allow_migrate()` method of your database routers (see below).
Like ```migrate`, ``createcachetable``` wont touch an existing table. It will only create missing tables.
#### MULTIPLE DATABASES
If you use database caching with multiple databases, you’ll also need to set up routing instructions for your database cache table. For the purposes of routing, the database cache table appears as a model named `CacheEntry`, in an application named `django_cache`. This model won’t appear in the models cache, but the model details can be used for routing purposes.
For example, the following router would direct all cache read operations to `cache_replica`, and all write operations to `cache_primary`. The cache table will only be synchronized onto `cache_primary`:
~~~
class CacheRouter(object):
"""A router to control all database cache operations"""
def db_for_read(self, model, **hints):
"All cache read operations go to the replica"
if model._meta.app_label in ('django_cache',):
return 'cache_replica'
return None
def db_for_write(self, model, **hints):
"All cache write operations go to primary"
if model._meta.app_label in ('django_cache',):
return 'cache_primary'
return None
def allow_migrate(self, db, model):
"Only install the cache model on primary"
if model._meta.app_label in ('django_cache',):
return db == 'cache_primary'
return None
~~~
If you don’t specify routing directions for the database cache model, the cache backend will use the `default` database.
Of course, if you don’t use the database cache backend, you don’t need to worry about providing routing instructions for the database cache model.
### Filesystem caching
The file-based backend serializes and stores each cache value as a separate file. To use this backend set `BACKEND <CACHES-BACKEND>` to `"django.core.cache.backends.filebased.FileBasedCache"` and`LOCATION <CACHES-LOCATION>` to a suitable directory. For example, to store cached data in`/var/tmp/django_cache`, use this setting:
~~~
CACHES = {
'default': {
'BACKEND': 'django.core.cache.backends.filebased.FileBasedCache',
'LOCATION': '/var/tmp/django_cache',
}
}
~~~
If youre on Windows, put the drive letter at the beginning of the path, like this:
~~~
CACHES = {
'default': {
'BACKEND': 'django.core.cache.backends.filebased.FileBasedCache',
'LOCATION': 'c:/foo/bar',
}
}
~~~
The directory path should be absolute that is, it should start at the root of your filesystem. It doesn’t matter whether you put a slash at the end of the setting.
Make sure the directory pointed to by this setting exists and is readable and writable by the system user under which your Web server runs. Continuing the above example, if your server runs as the user `apache`, make sure the directory `/var/tmp/django_cache` exists and is readable and writable by the user `apache`.
### Local-memory caching
This is the default cache if another is not specified in your settings file. If you want the speed advantages of in-memory caching but don’t have the capability of running Memcached, consider the local-memory cache backend. This cache is per-process (see below) and thread-safe. To use it, set `BACKEND` to `"django.core.cache.backends.locmem.LocMemCache"`. For example:
~~~
CACHES = {
'default': {
'BACKEND': 'django.core.cache.backends.locmem.LocMemCache',
'LOCATION': 'unique-snowflake'
}
}
~~~
The cache `LOCATION <CACHES-LOCATION>` is used to identify individual memory stores. If you only have one `locmem` cache, you can omit the `LOCATION <CACHES-LOCATION>`; however, if you have more than one local memory cache, you will need to assign a name to at least one of them in order to keep them separate.
Note that each process will have its own private cache instance, which means no cross-process caching is possible. This obviously also means the local memory cache isnt particularly memory-efficient, so its probably not a good choice for production environments. Its nice for development.
### Dummy caching (for development)
Finally, Django comes with a dummy cache that doesnt actually cache it just implements the cache interface without doing anything.
This is useful if you have a production site that uses heavy-duty caching in various places but a development/test environment where you don’t want to cache and don’t want to have to change your code to special-case the latter. To activate dummy caching, set `BACKEND <CACHES-BACKEND>` like so:
~~~
CACHES = {
'default': {
'BACKEND': 'django.core.cache.backends.dummy.DummyCache',
}
}
~~~
### Using a custom cache backend
While Django includes support for a number of cache backends out-of-the-box, sometimes you might want to use a customized cache backend. To use an external cache backend with Django, use the Python import path as the `BACKEND <CACHES-BACKEND>` of the `CACHES` setting, like so:
~~~
CACHES = {
'default': {
'BACKEND': 'path.to.backend',
}
}
~~~
If youre building your own backend, you can use the standard cache backends as reference implementations. Youll find the code in the `django/core/cache/backends/` directory of the Django source.
Note: Without a really compelling reason, such as a host that doesn’t support them, you should stick to the cache backends included with Django. Theyve been well-tested and are easy to use.
### Cache arguments
Each cache backend can be given additional arguments to control caching behavior. These arguments are provided as additional keys in the `CACHES` setting. Valid arguments are as follows:
* `TIMEOUT <CACHES-TIMEOUT>`: The default timeout, in seconds, to use for the cache. This argument defaults to `300` seconds (5 minutes). You can set `TIMEOUT` to `None` so that, by default, cache keys never expire. A value of `0` causes keys to immediately expire (effectively dont cache).
* `OPTIONS <CACHES-OPTIONS>`: Any options that should be passed to the cache backend. The list of valid options will vary with each backend, and cache backends backed by a third-party library will pass their options directly to the underlying cache library.
Cache backends that implement their own culling strategy (i.e., the `locmem`, `filesystem` and`database` backends) will honor the following options:
* `MAX_ENTRIES`: The maximum number of entries allowed in the cache before old values are deleted. This argument defaults to `300`.
* `CULL_FREQUENCY`: The fraction of entries that are culled when `MAX_ENTRIES` is reached. The actual ratio is `1 / CULL_FREQUENCY`, so set `CULL_FREQUENCY` to `2` to cull half the entries when `MAX_ENTRIES` is reached. This argument should be an integer and defaults to `3`.
A value of `0` for `CULL_FREQUENCY` means that the entire cache will be dumped when `MAX_ENTRIES` is reached. On some backends (`database` in particular) this makes culling *much* faster at the expense of more cache misses.
* `KEY_PREFIX <CACHES-KEY_PREFIX>`: A string that will be automatically included (prepended by default) to all cache keys used by the Django server.
See the cache documentation for more information.
* `VERSION <CACHES-VERSION>`: The default version number for cache keys generated by the Django server.
See the cache documentation for more information.
* `KEY_FUNCTION <CACHES-KEY_FUNCTION>` A string containing a dotted path to a function that defines how to compose a prefix, version and key into a final cache key.
See the cache documentation for more information.
In this example, a filesystem backend is being configured with a timeout of 60 seconds, and a maximum capacity of 1000 items:
~~~
CACHES = {
'default': {
'BACKEND': 'django.core.cache.backends.filebased.FileBasedCache',
'LOCATION': '/var/tmp/django_cache',
'TIMEOUT': 60,
'OPTIONS': {
'MAX_ENTRIES': 1000
}
}
}
~~~
Invalid arguments are silently ignored, as are invalid values of known arguments.
## The per-site cache
Once the cache is set up, the simplest way to use caching is to cache your entire site. Youll need to add `'django.middleware.cache.UpdateCacheMiddleware'` and`'django.middleware.cache.FetchFromCacheMiddleware'` to your `MIDDLEWARE_CLASSES` setting, as in this example:
~~~
MIDDLEWARE_CLASSES = [
'django.middleware.cache.UpdateCacheMiddleware',
'django.middleware.common.CommonMiddleware',
'django.middleware.cache.FetchFromCacheMiddleware',
]
~~~
Note
No, thats not a typo: the update middleware must be first in the list, and the fetch middleware must be last. The details are a bit obscure, but see [Order of MIDDLEWARE_CLASSES](http://masteringdjango.com/django%c2%92-cache-framework/#order-of-middleware-classes) below if youd like the full story.
Then, add the following required settings to your Django settings file:
* `CACHE_MIDDLEWARE_ALIAS` The cache alias to use for storage.
* `CACHE_MIDDLEWARE_SECONDS` The number of seconds each page should be cached.
* `CACHE_MIDDLEWARE_KEY_PREFIX` If the cache is shared across multiple sites using the same Django installation, set this to the name of the site, or some other string that is unique to this Django instance, to prevent key collisions. Use an empty string if you dont care.
`FetchFromCacheMiddleware` caches GET and HEAD responses with status 200, where the request and response headers allow. Responses to requests for the same URL with different query parameters are considered to be unique pages and are cached separately. This middleware expects that a HEAD request is answered with the same response headers as the corresponding GET request; in which case it can return a cached GET response for HEAD request.
Additionally, `UpdateCacheMiddleware` automatically sets a few headers in each `HttpResponse`:
* Sets the `Last-Modified` header to the current date/time when a fresh (not cached) version of the page is requested.
* Sets the `Expires` header to the current date/time plus the defined `CACHE_MIDDLEWARE_SECONDS`.
* Sets the `Cache-Control` header to give a max age for the page again, from the`CACHE_MIDDLEWARE_SECONDS` setting.
See Chapter 19 for more on middleware.
If a view sets its own cache expiry time (i.e. it has a `max-age` section in its `Cache-Control` header) then the page will be cached until the expiry time, rather than `CACHE_MIDDLEWARE_SECONDS`. Using the decorators in `django.views.decorators.cache` you can easily set a views expiry time (using the`cache_control` decorator) or disable caching for a view (using the `never_cache` decorator). See the[using other headers](http://masteringdjango.com/django%c2%92-cache-framework/#controlling-cache-using-other-headers) section for more on these decorators.
If `USE_I18N` is set to `True` then the generated cache key will include the name of the active [language](http://masteringdjango.com/django%c2%92-cache-framework/chapter_20.html#term-language-code) see also how-django-discovers-language-preference). This allows you to easily cache multilingual sites without having to create the cache key yourself.
Cache keys also include the active [language](http://masteringdjango.com/django%c2%92-cache-framework/chapter_20.html#term-language-code) when `USE_L10N` is set to `True` and the current time zone when `USE_TZ` is set to `True`.
## The per-view cache
`django.views.decorators.cache.``cache_page`()
A more granular way to use the caching framework is by caching the output of individual views.`django.views.decorators.cache` defines a `cache_page` decorator that will automatically cache the views response for you. Its easy to use:
~~~
from django.views.decorators.cache import cache_page
@cache_page(60 * 15)
def my_view(request):
...
~~~
`cache_page` takes a single argument: the cache timeout, in seconds. In the above example, the result of the `my_view()` view will be cached for 15 minutes. (Note that weve written it as `60 * 15` for the purpose of readability. `60 * 15` will be evaluated to `900` that is, 15 minutes multiplied by 60 seconds per minute.)
The per-view cache, like the per-site cache, is keyed off of the URL. If multiple URLs point at the same view, each URL will be cached separately. Continuing the `my_view` example, if your URLconf looks like this:
~~~
urlpatterns = [
url(r'^foo/([0-9]{1,2})/$', my_view),
]
~~~
then requests to `/foo/1/` and `/foo/23/` will be cached separately, as you may expect. But once a particular URL (e.g., `/foo/23/`) has been requested, subsequent requests to that URL will use the cache.
`cache_page` can also take an optional keyword argument, `cache`, which directs the decorator to use a specific cache (from your `CACHES` setting) when caching view results. By default, the `default` cache will be used, but you can specify any cache you want:
~~~
@cache_page(60 * 15, cache="special_cache")
def my_view(request):
...
~~~
You can also override the cache prefix on a per-view basis. `cache_page` takes an optional keyword argument, `key_prefix`, which works in the same way as the `CACHE_MIDDLEWARE_KEY_PREFIX` setting for the middleware. It can be used like this:
~~~
@cache_page(60 * 15, key_prefix="site1")
def my_view(request):
...
~~~
The ```key_prefix and ``cache``` arguments may be specified together. The `key_prefix` argument and the `KEY_PREFIX <CACHES-KEY_PREFIX>` specified under `CACHES` will be concatenated.
### Specifying per-view cache in the URLconf
The examples in the previous section have hard-coded the fact that the view is cached, because`cache_page` alters the `my_view` function in place. This approach couples your view to the cache system, which is not ideal for several reasons. For instance, you might want to reuse the view functions on another, cache-less site, or you might want to distribute the views to people who might want to use them without being cached. The solution to these problems is to specify the per-view cache in the URLconf rather than next to the view functions themselves.
Doing so is easy: simply wrap the view function with `cache_page` when you refer to it in the URLconf. Heres the old URLconf from earlier:
~~~
urlpatterns = [
url(r'^foo/([0-9]{1,2})/$', my_view),
]
~~~
Heres the same thing, with `my_view` wrapped in `cache_page`:
~~~
from django.views.decorators.cache import cache_page
urlpatterns = [
url(r'^foo/([0-9]{1,2})/$', cache_page(60 * 15)(my_view)),
]
~~~
## Template fragment caching
If youre after even more control, you can also cache template fragments using the `cache` template tag. To give your template access to this tag, put `{% load cache %}` near the top of your template.
The `{% cache %}` template tag caches the contents of the block for a given amount of time. It takes at least two arguments: the cache timeout, in seconds, and the name to give the cache fragment. The name will be taken as is, do not use a variable. For example:
~~~
{% load cache %}
{% cache 500 sidebar %}
.. sidebar ..
{% endcache %}
~~~
Sometimes you might want to cache multiple copies of a fragment depending on some dynamic data that appears inside the fragment. For example, you might want a separate cached copy of the sidebar used in the previous example for every user of your site. Do this by passing additional arguments to the `{% cache %}` template tag to uniquely identify the cache fragment:
~~~
{% load cache %}
{% cache 500 sidebar request.user.username %}
.. sidebar for logged in user ..
{% endcache %}
~~~
Its perfectly fine to specify more than one argument to identify the fragment. Simply pass as many arguments to `{% cache %}` as you need.
If `USE_I18N` is set to `True` the per-site middleware cache will respect the active language. For the`cache` template tag you could use one of the translation-specific variables available in templates to achieve the same result:
~~~
{% load i18n %}
{% load cache %}
{% get_current_language as LANGUAGE_CODE %}
{% cache 600 welcome LANGUAGE_CODE %}
{% trans "Welcome to example.com" %}
{% endcache %}
~~~
The cache timeout can be a template variable, as long as the template variable resolves to an integer value. For example, if the template variable `my_timeout` is set to the value `600`, then the following two examples are equivalent:
~~~
{% cache 600 sidebar %} ... {% endcache %}
{% cache my_timeout sidebar %} ... {% endcache %}
~~~
This feature is useful in avoiding repetition in templates. You can set the timeout in a variable, in one place, and just reuse that value.
By default, the cache tag will try to use the cache called template_fragments. If no such cache exists, it will fall back to using the default cache. You may select an alternate cache backend to use with the `using` keyword argument, which must be the last argument to the tag.
~~~
{% cache 300 local-thing ... using="localcache" %}
~~~
It is considered an error to specify a cache name that is not configured.
`django.core.cache.utils.``make_template_fragment_key`(*fragment_name*, *vary_on=None*)
If you want to obtain the cache key used for a cached fragment, you can use`make_template_fragment_key`. `fragment_name` is the same as second argument to the `cache` template tag; `vary_on` is a list of all additional arguments passed to the tag. This function can be useful for invalidating or overwriting a cached item, for example:
~~~
>>> from django.core.cache import cache
>>> from django.core.cache.utils import make_template_fragment_key
# cache key for {% cache 500 sidebar username %}
>>> key = make_template_fragment_key('sidebar', [username])
>>> cache.delete(key) # invalidates cached template fragment
~~~
## The low-level cache API
Sometimes, caching an entire rendered page doesnt gain you very much and is, in fact, inconvenient overkill.
Perhaps, for instance, your site includes a view whose results depend on several expensive queries, the results of which change at different intervals. In this case, it would not be ideal to use the full-page caching that the per-site or per-view cache strategies offer, because you wouldnt want to cache the entire result (since some of the data changes often), but youd still want to cache the results that rarely change.
For cases like this, Django exposes a simple, low-level cache API. You can use this API to store objects in the cache with any level of granularity you like. You can cache any Python object that can be pickled safely: strings, dictionaries, lists of model objects, and so forth. (Most common Python objects can be pickled; refer to the Python documentation for more information about pickling.)
### Accessing the cache
`django.core.cache.``caches`
You can access the caches configured in the `CACHES` setting through a dict-like object:`django.core.cache.caches`. Repeated requests for the same alias in the same thread will return the same object.
~~~
>>> from django.core.cache import caches
>>> cache1 = caches['myalias']
>>> cache2 = caches['myalias']
>>> cache1 is cache2
True
~~~
If the named key does not exist, `InvalidCacheBackendError` will be raised.
To provide thread-safety, a different instance of the cache backend will be returned for each thread.
`django.core.cache.``cache`
As a shortcut, the default cache is available as `django.core.cache.cache`:
~~~
>>> from django.core.cache import cache
~~~
This object is equivalent to `caches['default']`.
### Basic usage
The basic interface is `set(key, value, timeout)` and `get(key)`:
~~~
>>> cache.set('my_key', 'hello, world!', 30)
>>> cache.get('my_key')
'hello, world!'
~~~
The `timeout` argument is optional and defaults to the `timeout` argument of the appropriate backend in the `CACHES` setting (explained above). Its the number of seconds the value should be stored in the cache. Passing in `None` for `timeout` will cache the value forever. A `timeout` of `0` wont cache the value.
If the object doesnt exist in the cache, `cache.get()` returns `None`:
~~~
# Wait 30 seconds for 'my_key' to expire...
>>> cache.get('my_key')
None
~~~
We advise against storing the literal value `None` in the cache, because you wont be able to distinguish between your stored `None` value and a cache miss signified by a return value of `None`.
`cache.get()` can take a `default` argument. This specifies which value to return if the object doesnt exist in the cache:
~~~
>>> cache.get('my_key', 'has expired')
'has expired'
~~~
To add a key only if it doesnt already exist, use the `add()` method. It takes the same parameters as`set()`, but it will not attempt to update the cache if the key specified is already present:
~~~
>>> cache.set('add_key', 'Initial value')
>>> cache.add('add_key', 'New value')
>>> cache.get('add_key')
'Initial value'
~~~
If you need to know whether `add()` stored a value in the cache, you can check the return value. It will return `True` if the value was stored, `False` otherwise.
Theres also a `get_many()` interface that only hits the cache once. `get_many()` returns a dictionary with all the keys you asked for that actually exist in the cache (and havent expired):
~~~
>>> cache.set('a', 1)
>>> cache.set('b', 2)
>>> cache.set('c', 3)
>>> cache.get_many(['a', 'b', 'c'])
{'a': 1, 'b': 2, 'c': 3}
~~~
To set multiple values more efficiently, use `set_many()` to pass a dictionary of key-value pairs:
~~~
>>> cache.set_many({'a': 1, 'b': 2, 'c': 3})
>>> cache.get_many(['a', 'b', 'c'])
{'a': 1, 'b': 2, 'c': 3}
~~~
Like `cache.set()`, `set_many()` takes an optional `timeout` parameter.
You can delete keys explicitly with `delete()`. This is an easy way of clearing the cache for a particular object:
~~~
>>> cache.delete('a')
~~~
If you want to clear a bunch of keys at once, `delete_many()` can take a list of keys to be cleared:
~~~
>>> cache.delete_many(['a', 'b', 'c'])
~~~
Finally, if you want to delete all the keys in the cache, use `cache.clear()`. Be careful with this;`clear()` will remove *everything* from the cache, not just the keys set by your application.
~~~
>>> cache.clear()
~~~
You can also increment or decrement a key that already exists using the `incr()` or `decr()` methods, respectively. By default, the existing cache value will incremented or decremented by 1\. Other increment/decrement values can be specified by providing an argument to the increment/decrement call. A ValueError will be raised if you attempt to increment or decrement a nonexistent cache key.:
~~~
>>> cache.set('num', 1)
>>> cache.incr('num')
2
>>> cache.incr('num', 10)
12
>>> cache.decr('num')
11
>>> cache.decr('num', 5)
6
~~~
Note
`incr()`/`decr()` methods are not guaranteed to be atomic. On those backends that support atomic increment/decrement (most notably, the memcached backend), increment and decrement operations will be atomic. However, if the backend doesnt natively provide an increment/decrement operation, it will be implemented using a two-step retrieve/update.
You can close the connection to your cache with `close()` if implemented by the cache backend.
~~~
>>> cache.close()
~~~
Note
For caches that dont implement `close` methods it is a no-op.
### Cache key prefixing
If you are sharing a cache instance between servers, or between your production and development environments, its possible for data cached by one server to be used by another server. If the format of cached data is different between servers, this can lead to some very hard to diagnose problems.
To prevent this, Django provides the ability to prefix all cache keys used by a server. When a particular cache key is saved or retrieved, Django will automatically prefix the cache key with the value of the `KEY_PREFIX <CACHES-KEY_PREFIX>` cache setting.
By ensuring each Django instance has a different `KEY_PREFIX <CACHES-KEY_PREFIX>`, you can ensure that there will be no collisions in cache values.
### Cache versioning
When you change running code that uses cached values, you may need to purge any existing cached values. The easiest way to do this is to flush the entire cache, but this can lead to the loss of cache values that are still valid and useful.
Django provides a better way to target individual cache values. Djangos cache framework has a system-wide version identifier, specified using the `VERSION <CACHES-VERSION>` cache setting. The value of this setting is automatically combined with the cache prefix and the user-provided cache key to obtain the final cache key.
By default, any key request will automatically include the site default cache key version. However, the primitive cache functions all include a `version` argument, so you can specify a particular cache key version to set or get. For example:
~~~
# Set version 2 of a cache key
>>> cache.set('my_key', 'hello world!', version=2)
# Get the default version (assuming version=1)
>>> cache.get('my_key')
None
# Get version 2 of the same key
>>> cache.get('my_key', version=2)
'hello world!'
~~~
The version of a specific key can be incremented and decremented using the `incr_version()` and`decr_version()` methods. This enables specific keys to be bumped to a new version, leaving other keys unaffected. Continuing our previous example:
~~~
# Increment the version of 'my_key'
>>> cache.incr_version('my_key')
# The default version still isn't available
>>> cache.get('my_key')
None
# Version 2 isn't available, either
>>> cache.get('my_key', version=2)
None
# But version 3 *is* available
>>> cache.get('my_key', version=3)
'hello world!'
~~~
### Cache key transformation
As described in the previous two sections, the cache key provided by a user is not used verbatim it is combined with the cache prefix and key version to provide a final cache key. By default, the three parts are joined using colons to produce a final string:
~~~
def make_key(key, key_prefix, version):
return ':'.join([key_prefix, str(version), key])
~~~
If you want to combine the parts in different ways, or apply other processing to the final key (e.g., taking a hash digest of the key parts), you can provide a custom key function.
The `KEY_FUNCTION <CACHES-KEY_FUNCTION>` cache setting specifies a dotted-path to a function matching the prototype of `make_key()` above. If provided, this custom key function will be used instead of the default key combining function.
### Cache key warnings
Memcached, the most commonly-used production cache backend, does not allow cache keys longer than 250 characters or containing whitespace or control characters, and using such keys will cause an exception. To encourage cache-portable code and minimize unpleasant surprises, the other built-in cache backends issue a warning (`django.core.cache.backends.base.CacheKeyWarning`) if a key is used that would cause an error on memcached.
If you are using a production backend that can accept a wider range of keys (a custom backend, or one of the non-memcached built-in backends), and want to use this wider range without warnings, you can silence `CacheKeyWarning` with this code in the `management` module of one of your`INSTALLED_APPS`:
~~~
import warnings
from django.core.cache import CacheKeyWarning
warnings.simplefilter("ignore", CacheKeyWarning)
~~~
If you want to instead provide custom key validation logic for one of the built-in backends, you can subclass it, override just the `validate_key` method, and follow the instructions for [using a custom cache backend](http://masteringdjango.com/django%c2%92-cache-framework/#using-a-custom-cache-backend). For instance, to do this for the `locmem` backend, put this code in a module:
~~~
from django.core.cache.backends.locmem import LocMemCache
class CustomLocMemCache(LocMemCache):
def validate_key(self, key):
"""Custom validation, raising exceptions or warnings as needed."""
# ...
~~~
…and use the dotted Python path to this class in the `BACKEND <CACHES-BACKEND>` portion of your`CACHES` setting.
## Downstream caches
So far, this document has focused on caching your *own* data. But another type of caching is relevant to Web development, too: caching performed by downstream caches. These are systems that cache pages for users even before the request reaches your Web site.
Here are a few examples of downstream caches:
* Your ISP may cache certain pages, so if you requested a page from [http://example.com/](http://example.com/), your ISP would send you the page without having to access example.com directly. The maintainers of example.com have no knowledge of this caching; the ISP sits between example.com and your Web browser, handling all of the caching transparently.
* Your Django Web site may sit behind a *proxy cache*, such as Squid Web Proxy Cache ([http://www.squid-cache.org/](http://www.squid-cache.org/)), that caches pages for performance. In this case, each request first would be handled by the proxy, and it would be passed to your application only if needed.
* Your Web browser caches pages, too. If a Web page sends out the appropriate headers, your browser will use the local cached copy for subsequent requests to that page, without even contacting the Web page again to see whether it has changed.
Downstream caching is a nice efficiency boost, but theres a danger to it: Many Web pages contents differ based on authentication and a host of other variables, and cache systems that blindly save pages based purely on URLs could expose incorrect or sensitive data to subsequent visitors to those pages.
For example, say you operate a Web email system, and the contents of the inbox page obviously depend on which user is logged in. If an ISP blindly cached your site, then the first user who logged in through that ISP would have their user-specific inbox page cached for subsequent visitors to the site. Thats not cool.
Fortunately, HTTP provides a solution to this problem. A number of HTTP headers exist to instruct downstream caches to differ their cache contents depending on designated variables, and to tell caching mechanisms not to cache particular pages. Well look at some of these headers in the sections that follow.
## Using Vary headers
The `Vary` header defines which request headers a cache mechanism should take into account when building its cache key. For example, if the contents of a Web page depend on a users language preference, the page is said to vary on language.
By default, Djangos cache system creates its cache keys using the requested fully-qualified URL e.g., `"http://www.example.com/stories/2005/?order_by=author"`. This means every request to that URL will use the same cached version, regardless of user-agent differences such as cookies or language preferences. However, if this page produces different content based on some difference in request headers such as a cookie, or a language, or a user-agent youll need to use the `Vary`header to tell caching mechanisms that the page output depends on those things.
To do this in Django, use the convenient `django.views.decorators.vary.vary_on_headers()` view decorator, like so:
~~~
from django.views.decorators.vary import vary_on_headers
@vary_on_headers('User-Agent')
def my_view(request):
# ...
~~~
In this case, a caching mechanism (such as Djangos own cache middleware) will cache a separate version of the page for each unique user-agent.
The advantage to using the `vary_on_headers` decorator rather than manually setting the `Vary`header (using something like `response['Vary'] = 'user-agent'`) is that the decorator *adds* to the`Vary` header (which may already exist), rather than setting it from scratch and potentially overriding anything that was already in there.
You can pass multiple headers to `vary_on_headers()`:
~~~
@vary_on_headers('User-Agent', 'Cookie')
def my_view(request):
# ...
~~~
This tells downstream caches to vary on *both*, which means each combination of user-agent and cookie will get its own cache value. For example, a request with the user-agent `Mozilla` and the cookie value `foo=bar` will be considered different from a request with the user-agent `Mozilla` and the cookie value `foo=ham`.
Because varying on cookie is so common, theres a `django.views.decorators.vary.vary_on_cookie()`decorator. These two views are equivalent:
~~~
@vary_on_cookie
def my_view(request):
# ...
@vary_on_headers('Cookie')
def my_view(request):
# ...
~~~
The headers you pass to `vary_on_headers` are not case sensitive; `"User-Agent"` is the same thing as`"user-agent"`.
You can also use a helper function, `django.utils.cache.patch_vary_headers()`, directly. This function sets, or adds to, the `Vary header`. For example:
~~~
from django.utils.cache import patch_vary_headers
def my_view(request):
# ...
response = render_to_response('template_name', context)
patch_vary_headers(response, ['Cookie'])
return response
~~~
`patch_vary_headers` takes an `HttpResponse` instance as its first argument and a list/tuple of case-insensitive header names as its second argument.
For more on Vary headers, see the [official Vary spec](http://www.w3.org/Protocols/rfc2616/rfc2616-sec14.html#sec14.44).
## Controlling cache: Using other headers
Other problems with caching are the privacy of data and the question of where data should be stored in a cascade of caches.
A user usually faces two kinds of caches: their own browser cache (a private cache) and their providers cache (a public cache). A public cache is used by multiple users and controlled by someone else. This poses problems with sensitive datayou dont want, say, your bank account number stored in a public cache. So Web applications need a way to tell caches which data is private and which is public.
The solution is to indicate a pages cache should be private. To do this in Django, use the`cache_control` view decorator. Example:
~~~
from django.views.decorators.cache import cache_control
@cache_control(private=True)
def my_view(request):
# ...
~~~
This decorator takes care of sending out the appropriate HTTP header behind the scenes.
Note that the cache control settings private and public are mutually exclusive. The decorator ensures that the public directive is removed if private should be set (and vice versa). An example use of the two directives would be a blog site that offers both private and public entries. Public entries may be cached on any shared cache. The following code uses`django.utils.cache.patch_cache_control()`, the manual way to modify the cache control header (it is internally called by the `cache_control` decorator):
~~~
from django.views.decorators.cache import patch_cache_control
from django.views.decorators.vary import vary_on_cookie
@vary_on_cookie
def list_blog_entries_view(request):
if request.user.is_anonymous():
response = render_only_public_entries()
patch_cache_control(response, public=True)
else:
response = render_private_and_public_entries(request.user)
patch_cache_control(response, private=True)
return response
~~~
There are a few other ways to control cache parameters. For example, HTTP allows applications to do the following:
* Define the maximum time a page should be cached.
* Specify whether a cache should always check for newer versions, only delivering the cached content when there are no changes. (Some caches might deliver cached content even if the server page changed, simply because the cache copy isnt yet expired.)
In Django, use the `cache_control` view decorator to specify these cache parameters. In this example, `cache_control` tells caches to revalidate the cache on every access and to store cached versions for, at most, 3,600 seconds:
~~~
from django.views.decorators.cache import cache_control
@cache_control(must_revalidate=True, max_age=3600)
def my_view(request):
# ...
~~~
Any valid `Cache-Control` HTTP directive is valid in `cache_control()`. Heres a full list:
* `public=True`
* `private=True`
* `no_cache=True`
* `no_transform=True`
* `must_revalidate=True`
* `proxy_revalidate=True`
* `max_age=num_seconds`
* `s_maxage=num_seconds`
For explanation of Cache-Control HTTP directives, see the [Cache-Control spec](http://www.w3.org/Protocols/rfc2616/rfc2616-sec14.html#sec14.9).
(Note that the caching middleware already sets the cache headers max-age with the value of the`CACHE_MIDDLEWARE_SECONDS` setting. If you use a custom `max_age` in a `cache_control` decorator, the decorator will take precedence, and the header values will be merged correctly.)
If you want to use headers to disable caching altogether,`django.views.decorators.cache.never_cache` is a view decorator that adds headers to ensure the response wont be cached by browsers or other caches. Example:
~~~
from django.views.decorators.cache import never_cache
@never_cache
def myview(request):
# ...
~~~
## Order of MIDDLEWARE_CLASSES
If you use caching middleware, its important to put each half in the right place within the`MIDDLEWARE_CLASSES` setting. Thats because the cache middleware needs to know which headers by which to vary the cache storage. Middleware always adds something to the `Vary` response header when it can.
`UpdateCacheMiddleware` runs during the response phase, where middleware is run in reverse order, so an item at the top of the list runs *last* during the response phase. Thus, you need to make sure that `UpdateCacheMiddleware` appears *before* any other middleware that might add something to the`Vary` header. The following middleware modules do so:
* `SessionMiddleware` adds `Cookie`
* `GZipMiddleware` adds `Accept-Encoding`
* `LocaleMiddleware` adds `Accept-Language`
`FetchFromCacheMiddleware`, on the other hand, runs during the request phase, where middleware is applied first-to-last, so an item at the top of the list runs *first* during the request phase. The`FetchFromCacheMiddleware` also needs to run after other middleware updates the `Vary` header, so`FetchFromCacheMiddleware` must be *after* any item that does so.
Chapter 16 – Django sessions
最后更新于:2022-04-01 04:48:09
A fundamental trade-off in dynamic Web sites is, well, they’re dynamic. Each time a user requests a page, the Web server makes all sorts of calculations from database queries to template rendering to business logic to creating the page that your site visitors see. This is a lot more expensive, from a processing-overhead perspective, than your standard read-a-file-off-the-filesystem server arrangement.
For most Web applications, this overhead isn’t a big deal. Most Web applications aren’t `washingtonpost.com`or `slashdot.org`; they’re simply small- to medium-sized sites with so-so traffic. But for medium- to high-traffic sites, its essential to cut as much overhead as possible.
Thats where caching comes in.
To cache something is to save the result of an expensive calculation so that you don’t have to perform the calculation next time. Heres some pseudocode explaining how this would work for a dynamically generated Web page:
~~~
given a URL, try finding that page in the cache
if the page is in the cache:
return the cached page
else:
generate the page
save the generated page in the cache (for next time)
return the generated page
~~~
Django comes with a robust cache system that lets you save dynamic pages so they don’t have to be calculated for each request. For convenience, Django offers different levels of cache granularity: You can cache the output of specific views, you can cache only the pieces that are difficult to produce, or you can cache your entire site.
Django also works well with downstream caches, such as [Squid](http://www.squid-cache.org/) and browser-based caches. These are the types of caches that you don’t directly control, but to which you can provide hints (via HTTP headers) about which parts of your site should be cached, and how.
[TOC=3]
## Setting up the cache
The cache system requires a small amount of setup. Namely, you have to tell it where your cached data should live; whether in a database, on the filesystem or directly in memory. This is an important decision that affects your caches performance.
Your cache preference goes in the `CACHES` setting in your settings file.
### Memcached
The fastest, most efficient type of cache supported natively by Django, [Memcached](http://memcached.org/) is an entirely memory-based cache server, originally developed to handle high loads at LiveJournal.com and subsequently open-sourced by Danga Interactive. It is used by sites such as Facebook and Wikipedia to reduce database access and dramatically increase site performance.
Memcached runs as a daemon and is allotted a specified amount of RAM. All it does is provide a fast interface for adding, retrieving and deleting data in the cache. All data is stored directly in memory, so there’s no overhead of database or filesystem usage.
After installing Memcached itself, you’ll need to install a Memcached binding. There are several Python Memcached bindings available; the two most common are [python-memcached](ftp://ftp.tummy.com/pub/python-memcached/) and [pylibmc](http://sendapatch.se/projects/pylibmc/).
To use Memcached with Django:
* Set `BACKEND <CACHES-BACKEND>` to `django.core.cache.backends.memcached.MemcachedCache` or`django.core.cache.backends.memcached.PyLibMCCache` (depending on your chosen memcached binding)
* Set `LOCATION <CACHES-LOCATION>` to `ip:port` values, where `ip` is the IP address of the Memcached daemon and`port` is the port on which Memcached is running, or to a `unix:path` value, where `path` is the path to a Memcached Unix socket file.
In this example, Memcached is running on localhost (127.0.0.1) port 11211, using the `python-memcached`binding:
~~~
CACHES = {
'default': {
'BACKEND': 'django.core.cache.backends.memcached.MemcachedCache',
'LOCATION': '127.0.0.1:11211',
}
}
~~~
In this example, Memcached is available through a local Unix socket file `/tmp/memcached.sock` using the`python-memcached` binding:
~~~
CACHES = {
'default': {
'BACKEND': 'django.core.cache.backends.memcached.MemcachedCache',
'LOCATION': 'unix:/tmp/memcached.sock',
}
}
~~~
One excellent feature of Memcached is its ability to share a cache over multiple servers. This means you can run Memcached daemons on multiple machines, and the program will treat the group of machines as a *single* cache, without the need to duplicate cache values on each machine. To take advantage of this feature, include all server addresses in `LOCATION <CACHES-LOCATION>`, either separated by semicolons or as a list.
In this example, the cache is shared over Memcached instances running on IP address 172.19.26.240 and 172.19.26.242, both on port 11211:
~~~
CACHES = {
'default': {
'BACKEND': 'django.core.cache.backends.memcached.MemcachedCache',
'LOCATION': [
'172.19.26.240:11211',
'172.19.26.242:11211',
]
}
}
~~~
In the following example, the cache is shared over Memcached instances running on the IP addresses 172.19.26.240 (port 11211), 172.19.26.242 (port 11212), and 172.19.26.244 (port 11213):
~~~
CACHES = {
'default': {
'BACKEND': 'django.core.cache.backends.memcached.MemcachedCache',
'LOCATION': [
'172.19.26.240:11211',
'172.19.26.242:11212',
'172.19.26.244:11213',
]
}
}
~~~
A final point about Memcached is that memory-based caching has a disadvantage: because the cached data is stored in memory, the data will be lost if your server crashes. Clearly, memory isn’t intended for permanent data storage, so don’t rely on memory-based caching as your only data storage. Without a doubt, *none* of the Django caching backends should be used for permanent storage they’re all intended to be solutions for caching, not storage but we point this out here because memory-based caching is particularly temporary.
### Database caching
Django can store its cached data in your database. This works best if youve got a fast, well-indexed database server.
To use a database table as your cache backend:
* Set `BACKEND <CACHES-BACKEND>` to `django.core.cache.backends.db.DatabaseCache`
* Set `LOCATION <CACHES-LOCATION>` to `tablename`, the name of the database table. This name can be whatever you want, as long as its a valid table name thats not already being used in your database.
In this example, the cache tables name is `my_cache_table`:
~~~
CACHES = {
'default': {
'BACKEND': 'django.core.cache.backends.db.DatabaseCache',
'LOCATION': 'my_cache_table',
}
}
~~~
#### CREATING THE CACHE TABLE
Before using the database cache, you must create the cache table with this command:
~~~
python manage.py createcachetable
~~~
This creates a table in your database that is in the proper format that Django’s database-cache system expects. The name of the table is taken from `LOCATION <CACHES-LOCATION>`.
If you are using multiple database caches, `createcachetable` creates one table for each cache.
If you are using multiple databases, `createcachetable` observes the `allow_migrate()` method of your database routers (see below).
Like ```migrate`, ``createcachetable``` wont touch an existing table. It will only create missing tables.
#### MULTIPLE DATABASES
If you use database caching with multiple databases, you’ll also need to set up routing instructions for your database cache table. For the purposes of routing, the database cache table appears as a model named `CacheEntry`, in an application named `django_cache`. This model won’t appear in the models cache, but the model details can be used for routing purposes.
For example, the following router would direct all cache read operations to `cache_replica`, and all write operations to `cache_primary`. The cache table will only be synchronized onto `cache_primary`:
~~~
class CacheRouter(object):
"""A router to control all database cache operations"""
def db_for_read(self, model, **hints):
"All cache read operations go to the replica"
if model._meta.app_label in ('django_cache',):
return 'cache_replica'
return None
def db_for_write(self, model, **hints):
"All cache write operations go to primary"
if model._meta.app_label in ('django_cache',):
return 'cache_primary'
return None
def allow_migrate(self, db, model):
"Only install the cache model on primary"
if model._meta.app_label in ('django_cache',):
return db == 'cache_primary'
return None
~~~
If you don’t specify routing directions for the database cache model, the cache backend will use the`default` database.
Of course, if you don’t use the database cache backend, you don’t need to worry about providing routing instructions for the database cache model.
### Filesystem caching
The file-based backend serializes and stores each cache value as a separate file. To use this backend set`BACKEND <CACHES-BACKEND>` to `"django.core.cache.backends.filebased.FileBasedCache"` and `LOCATION <CACHES-LOCATION>` to a suitable directory. For example, to store cached data in `/var/tmp/django_cache`, use this setting:
~~~
CACHES = {
'default': {
'BACKEND': 'django.core.cache.backends.filebased.FileBasedCache',
'LOCATION': '/var/tmp/django_cache',
}
}
~~~
If youre on Windows, put the drive letter at the beginning of the path, like this:
~~~
CACHES = {
'default': {
'BACKEND': 'django.core.cache.backends.filebased.FileBasedCache',
'LOCATION': 'c:/foo/bar',
}
}
~~~
The directory path should be absolute that is, it should start at the root of your filesystem. It doesn’t matter whether you put a slash at the end of the setting.
Make sure the directory pointed to by this setting exists and is readable and writable by the system user under which your Web server runs. Continuing the above example, if your server runs as the user `apache`, make sure the directory `/var/tmp/django_cache` exists and is readable and writable by the user `apache`.
### Local-memory caching
This is the default cache if another is not specified in your settings file. If you want the speed advantages of in-memory caching but don’t have the capability of running Memcached, consider the local-memory cache backend. This cache is per-process (see below) and thread-safe. To use it, set `BACKEND` to`"django.core.cache.backends.locmem.LocMemCache"`. For example:
~~~
CACHES = {
'default': {
'BACKEND': 'django.core.cache.backends.locmem.LocMemCache',
'LOCATION': 'unique-snowflake'
}
}
~~~
The cache `LOCATION <CACHES-LOCATION>` is used to identify individual memory stores. If you only have one`locmem` cache, you can omit the `LOCATION <CACHES-LOCATION>`; however, if you have more than one local memory cache, you will need to assign a name to at least one of them in order to keep them separate.
Note that each process will have its own private cache instance, which means no cross-process caching is possible. This obviously also means the local memory cache isnt particularly memory-efficient, so its probably not a good choice for production environments. Its nice for development.
### Dummy caching (for development)
Finally, Django comes with a dummy cache that doesnt actually cache it just implements the cache interface without doing anything.
This is useful if you have a production site that uses heavy-duty caching in various places but a development/test environment where you don’t want to cache and don’t want to have to change your code to special-case the latter. To activate dummy caching, set `BACKEND <CACHES-BACKEND>` like so:
~~~
CACHES = {
'default': {
'BACKEND': 'django.core.cache.backends.dummy.DummyCache',
}
}
~~~
### Using a custom cache backend
While Django includes support for a number of cache backends out-of-the-box, sometimes you might want to use a customized cache backend. To use an external cache backend with Django, use the Python import path as the `BACKEND <CACHES-BACKEND>` of the `CACHES` setting, like so:
~~~
CACHES = {
'default': {
'BACKEND': 'path.to.backend',
}
}
~~~
If youre building your own backend, you can use the standard cache backends as reference implementations. Youll find the code in the `django/core/cache/backends/` directory of the Django source.
Note: Without a really compelling reason, such as a host that doesn’t support them, you should stick to the cache backends included with Django. Theyve been well-tested and are easy to use.
### Cache arguments
Each cache backend can be given additional arguments to control caching behavior. These arguments are provided as additional keys in the `CACHES` setting. Valid arguments are as follows:
* `TIMEOUT <CACHES-TIMEOUT>`: The default timeout, in seconds, to use for the cache. This argument defaults to`300` seconds (5 minutes). You can set `TIMEOUT` to `None` so that, by default, cache keys never expire. A value of`0` causes keys to immediately expire (effectively dont cache).
* `OPTIONS <CACHES-OPTIONS>`: Any options that should be passed to the cache backend. The list of valid options will vary with each backend, and cache backends backed by a third-party library will pass their options directly to the underlying cache library.
Cache backends that implement their own culling strategy (i.e., the `locmem`, `filesystem` and `database`backends) will honor the following options:
* `MAX_ENTRIES`: The maximum number of entries allowed in the cache before old values are deleted. This argument defaults to `300`.
* `CULL_FREQUENCY`: The fraction of entries that are culled when `MAX_ENTRIES` is reached. The actual ratio is `1 /CULL_FREQUENCY`, so set `CULL_FREQUENCY` to `2` to cull half the entries when `MAX_ENTRIES` is reached. This argument should be an integer and defaults to `3`.
A value of `0` for `CULL_FREQUENCY` means that the entire cache will be dumped when `MAX_ENTRIES` is reached. On some backends (`database` in particular) this makes culling *much* faster at the expense of more cache misses.
* `KEY_PREFIX <CACHES-KEY_PREFIX>`: A string that will be automatically included (prepended by default) to all cache keys used by the Django server.
See the cache documentation for more information.
* `VERSION <CACHES-VERSION>`: The default version number for cache keys generated by the Django server.
See the cache documentation for more information.
* `KEY_FUNCTION <CACHES-KEY_FUNCTION>` A string containing a dotted path to a function that defines how to compose a prefix, version and key into a final cache key.
See the cache documentation for more information.
In this example, a filesystem backend is being configured with a timeout of 60 seconds, and a maximum capacity of 1000 items:
~~~
CACHES = {
'default': {
'BACKEND': 'django.core.cache.backends.filebased.FileBasedCache',
'LOCATION': '/var/tmp/django_cache',
'TIMEOUT': 60,
'OPTIONS': {
'MAX_ENTRIES': 1000
}
}
}
~~~
Invalid arguments are silently ignored, as are invalid values of known arguments.
## The per-site cache
Once the cache is set up, the simplest way to use caching is to cache your entire site. Youll need to add`'django.middleware.cache.UpdateCacheMiddleware'` and `'django.middleware.cache.FetchFromCacheMiddleware'` to your `MIDDLEWARE_CLASSES` setting, as in this example:
~~~
MIDDLEWARE_CLASSES = [
'django.middleware.cache.UpdateCacheMiddleware',
'django.middleware.common.CommonMiddleware',
'django.middleware.cache.FetchFromCacheMiddleware',
]
~~~
Note
No, thats not a typo: the update middleware must be first in the list, and the fetch middleware must be last. The details are a bit obscure, but see [Order of MIDDLEWARE_CLASSES](http://masteringdjango.com/django%c2%92-cache-framework/#order-of-middleware-classes) below if youd like the full story.
Then, add the following required settings to your Django settings file:
* `CACHE_MIDDLEWARE_ALIAS` The cache alias to use for storage.
* `CACHE_MIDDLEWARE_SECONDS` The number of seconds each page should be cached.
* `CACHE_MIDDLEWARE_KEY_PREFIX` If the cache is shared across multiple sites using the same Django installation, set this to the name of the site, or some other string that is unique to this Django instance, to prevent key collisions. Use an empty string if you dont care.
`FetchFromCacheMiddleware` caches GET and HEAD responses with status 200, where the request and response headers allow. Responses to requests for the same URL with different query parameters are considered to be unique pages and are cached separately. This middleware expects that a HEAD request is answered with the same response headers as the corresponding GET request; in which case it can return a cached GET response for HEAD request.
Additionally, `UpdateCacheMiddleware` automatically sets a few headers in each `HttpResponse`:
* Sets the `Last-Modified` header to the current date/time when a fresh (not cached) version of the page is requested.
* Sets the `Expires` header to the current date/time plus the defined `CACHE_MIDDLEWARE_SECONDS`.
* Sets the `Cache-Control` header to give a max age for the page again, from the `CACHE_MIDDLEWARE_SECONDS`setting.
See Chapter 19 for more on middleware.
If a view sets its own cache expiry time (i.e. it has a `max-age` section in its `Cache-Control` header) then the page will be cached until the expiry time, rather than `CACHE_MIDDLEWARE_SECONDS`. Using the decorators in`django.views.decorators.cache` you can easily set a views expiry time (using the `cache_control` decorator) or disable caching for a view (using the `never_cache` decorator). See the [using other headers](http://masteringdjango.com/django%c2%92-cache-framework/#controlling-cache-using-other-headers) section for more on these decorators.
If `USE_I18N` is set to `True` then the generated cache key will include the name of the active [language](http://masteringdjango.com/django%c2%92-cache-framework/chapter_20.html#term-language-code) see also how-django-discovers-language-preference). This allows you to easily cache multilingual sites without having to create the cache key yourself.
Cache keys also include the active [language](http://masteringdjango.com/django%c2%92-cache-framework/chapter_20.html#term-language-code) when `USE_L10N` is set to `True` and the current time zone when`USE_TZ` is set to `True`.
## The per-view cache
`django.views.decorators.cache.``cache_page`()
A more granular way to use the caching framework is by caching the output of individual views.`django.views.decorators.cache` defines a `cache_page` decorator that will automatically cache the views response for you. Its easy to use:
~~~
from django.views.decorators.cache import cache_page
@cache_page(60 * 15)
def my_view(request):
...
~~~
`cache_page` takes a single argument: the cache timeout, in seconds. In the above example, the result of the`my_view()` view will be cached for 15 minutes. (Note that weve written it as `60 * 15` for the purpose of readability. `60 * 15` will be evaluated to `900` that is, 15 minutes multiplied by 60 seconds per minute.)
The per-view cache, like the per-site cache, is keyed off of the URL. If multiple URLs point at the same view, each URL will be cached separately. Continuing the `my_view` example, if your URLconf looks like this:
~~~
urlpatterns = [
url(r'^foo/([0-9]{1,2})/$', my_view),
]
~~~
then requests to `/foo/1/` and `/foo/23/` will be cached separately, as you may expect. But once a particular URL (e.g., `/foo/23/`) has been requested, subsequent requests to that URL will use the cache.
`cache_page` can also take an optional keyword argument, `cache`, which directs the decorator to use a specific cache (from your `CACHES` setting) when caching view results. By default, the `default` cache will be used, but you can specify any cache you want:
~~~
@cache_page(60 * 15, cache="special_cache")
def my_view(request):
...
~~~
You can also override the cache prefix on a per-view basis. `cache_page` takes an optional keyword argument, `key_prefix`, which works in the same way as the `CACHE_MIDDLEWARE_KEY_PREFIX` setting for the middleware. It can be used like this:
~~~
@cache_page(60 * 15, key_prefix="site1")
def my_view(request):
...
~~~
The ```key_prefix and ``cache``` arguments may be specified together. The `key_prefix` argument and the`KEY_PREFIX <CACHES-KEY_PREFIX>` specified under `CACHES` will be concatenated.
### Specifying per-view cache in the URLconf
The examples in the previous section have hard-coded the fact that the view is cached, because `cache_page`alters the `my_view` function in place. This approach couples your view to the cache system, which is not ideal for several reasons. For instance, you might want to reuse the view functions on another, cache-less site, or you might want to distribute the views to people who might want to use them without being cached. The solution to these problems is to specify the per-view cache in the URLconf rather than next to the view functions themselves.
Doing so is easy: simply wrap the view function with `cache_page` when you refer to it in the URLconf. Heres the old URLconf from earlier:
~~~
urlpatterns = [
url(r'^foo/([0-9]{1,2})/$', my_view),
]
~~~
Heres the same thing, with `my_view` wrapped in `cache_page`:
~~~
from django.views.decorators.cache import cache_page
urlpatterns = [
url(r'^foo/([0-9]{1,2})/$', cache_page(60 * 15)(my_view)),
]
~~~
## Template fragment caching
If youre after even more control, you can also cache template fragments using the `cache` template tag. To give your template access to this tag, put `{% load cache %}` near the top of your template.
The `{% cache %}` template tag caches the contents of the block for a given amount of time. It takes at least two arguments: the cache timeout, in seconds, and the name to give the cache fragment. The name will be taken as is, do not use a variable. For example:
~~~
{% load cache %}
{% cache 500 sidebar %}
.. sidebar ..
{% endcache %}
~~~
Sometimes you might want to cache multiple copies of a fragment depending on some dynamic data that appears inside the fragment. For example, you might want a separate cached copy of the sidebar used in the previous example for every user of your site. Do this by passing additional arguments to the `{% cache%}` template tag to uniquely identify the cache fragment:
~~~
{% load cache %}
{% cache 500 sidebar request.user.username %}
.. sidebar for logged in user ..
{% endcache %}
~~~
Its perfectly fine to specify more than one argument to identify the fragment. Simply pass as many arguments to `{% cache %}` as you need.
If `USE_I18N` is set to `True` the per-site middleware cache will respect the active language. For the `cache`template tag you could use one of the translation-specific variables available in templates to achieve the same result:
~~~
{% load i18n %}
{% load cache %}
{% get_current_language as LANGUAGE_CODE %}
{% cache 600 welcome LANGUAGE_CODE %}
{% trans "Welcome to example.com" %}
{% endcache %}
~~~
The cache timeout can be a template variable, as long as the template variable resolves to an integer value. For example, if the template variable `my_timeout` is set to the value `600`, then the following two examples are equivalent:
~~~
{% cache 600 sidebar %} ... {% endcache %}
{% cache my_timeout sidebar %} ... {% endcache %}
~~~
This feature is useful in avoiding repetition in templates. You can set the timeout in a variable, in one place, and just reuse that value.
By default, the cache tag will try to use the cache called template_fragments. If no such cache exists, it will fall back to using the default cache. You may select an alternate cache backend to use with the `using`keyword argument, which must be the last argument to the tag.
~~~
{% cache 300 local-thing ... using="localcache" %}
~~~
It is considered an error to specify a cache name that is not configured.
`django.core.cache.utils.``make_template_fragment_key`(*fragment_name*, *vary_on=None*)
If you want to obtain the cache key used for a cached fragment, you can use `make_template_fragment_key`.`fragment_name` is the same as second argument to the `cache` template tag; `vary_on` is a list of all additional arguments passed to the tag. This function can be useful for invalidating or overwriting a cached item, for example:
~~~
>>> from django.core.cache import cache
>>> from django.core.cache.utils import make_template_fragment_key
# cache key for {% cache 500 sidebar username %}
>>> key = make_template_fragment_key('sidebar', [username])
>>> cache.delete(key) # invalidates cached template fragment
~~~
## The low-level cache API
Sometimes, caching an entire rendered page doesnt gain you very much and is, in fact, inconvenient overkill.
Perhaps, for instance, your site includes a view whose results depend on several expensive queries, the results of which change at different intervals. In this case, it would not be ideal to use the full-page caching that the per-site or per-view cache strategies offer, because you wouldnt want to cache the entire result (since some of the data changes often), but youd still want to cache the results that rarely change.
For cases like this, Django exposes a simple, low-level cache API. You can use this API to store objects in the cache with any level of granularity you like. You can cache any Python object that can be pickled safely: strings, dictionaries, lists of model objects, and so forth. (Most common Python objects can be pickled; refer to the Python documentation for more information about pickling.)
### Accessing the cache
`django.core.cache.``caches`
You can access the caches configured in the `CACHES` setting through a dict-like object:`django.core.cache.caches`. Repeated requests for the same alias in the same thread will return the same object.
~~~
>>> from django.core.cache import caches
>>> cache1 = caches['myalias']
>>> cache2 = caches['myalias']
>>> cache1 is cache2
True
~~~
If the named key does not exist, `InvalidCacheBackendError` will be raised.
To provide thread-safety, a different instance of the cache backend will be returned for each thread.
`django.core.cache.``cache`
As a shortcut, the default cache is available as `django.core.cache.cache`:
~~~
>>> from django.core.cache import cache
~~~
This object is equivalent to `caches['default']`.
### Basic usage
The basic interface is `set(key, value, timeout)` and `get(key)`:
~~~
>>> cache.set('my_key', 'hello, world!', 30)
>>> cache.get('my_key')
'hello, world!'
~~~
The `timeout` argument is optional and defaults to the `timeout` argument of the appropriate backend in the`CACHES` setting (explained above). Its the number of seconds the value should be stored in the cache. Passing in `None` for `timeout` will cache the value forever. A `timeout` of `0` wont cache the value.
If the object doesnt exist in the cache, `cache.get()` returns `None`:
~~~
# Wait 30 seconds for 'my_key' to expire...
>>> cache.get('my_key')
None
~~~
We advise against storing the literal value `None` in the cache, because you wont be able to distinguish between your stored `None` value and a cache miss signified by a return value of `None`.
`cache.get()` can take a `default` argument. This specifies which value to return if the object doesnt exist in the cache:
~~~
>>> cache.get('my_key', 'has expired')
'has expired'
~~~
To add a key only if it doesnt already exist, use the `add()` method. It takes the same parameters as `set()`, but it will not attempt to update the cache if the key specified is already present:
~~~
>>> cache.set('add_key', 'Initial value')
>>> cache.add('add_key', 'New value')
>>> cache.get('add_key')
'Initial value'
~~~
If you need to know whether `add()` stored a value in the cache, you can check the return value. It will return `True` if the value was stored, `False` otherwise.
Theres also a `get_many()` interface that only hits the cache once. `get_many()` returns a dictionary with all the keys you asked for that actually exist in the cache (and havent expired):
~~~
>>> cache.set('a', 1)
>>> cache.set('b', 2)
>>> cache.set('c', 3)
>>> cache.get_many(['a', 'b', 'c'])
{'a': 1, 'b': 2, 'c': 3}
~~~
To set multiple values more efficiently, use `set_many()` to pass a dictionary of key-value pairs:
~~~
>>> cache.set_many({'a': 1, 'b': 2, 'c': 3})
>>> cache.get_many(['a', 'b', 'c'])
{'a': 1, 'b': 2, 'c': 3}
~~~
Like `cache.set()`, `set_many()` takes an optional `timeout` parameter.
You can delete keys explicitly with `delete()`. This is an easy way of clearing the cache for a particular object:
~~~
>>> cache.delete('a')
~~~
If you want to clear a bunch of keys at once, `delete_many()` can take a list of keys to be cleared:
~~~
>>> cache.delete_many(['a', 'b', 'c'])
~~~
Finally, if you want to delete all the keys in the cache, use `cache.clear()`. Be careful with this; `clear()` will remove *everything* from the cache, not just the keys set by your application.
~~~
>>> cache.clear()
~~~
You can also increment or decrement a key that already exists using the `incr()` or `decr()` methods, respectively. By default, the existing cache value will incremented or decremented by 1\. Other increment/decrement values can be specified by providing an argument to the increment/decrement call. A ValueError will be raised if you attempt to increment or decrement a nonexistent cache key.:
~~~
>>> cache.set('num', 1)
>>> cache.incr('num')
2
>>> cache.incr('num', 10)
12
>>> cache.decr('num')
11
>>> cache.decr('num', 5)
6
~~~
Note
`incr()`/`decr()` methods are not guaranteed to be atomic. On those backends that support atomic increment/decrement (most notably, the memcached backend), increment and decrement operations will be atomic. However, if the backend doesnt natively provide an increment/decrement operation, it will be implemented using a two-step retrieve/update.
You can close the connection to your cache with `close()` if implemented by the cache backend.
~~~
>>> cache.close()
~~~
Note
For caches that dont implement `close` methods it is a no-op.
### Cache key prefixing
If you are sharing a cache instance between servers, or between your production and development environments, its possible for data cached by one server to be used by another server. If the format of cached data is different between servers, this can lead to some very hard to diagnose problems.
To prevent this, Django provides the ability to prefix all cache keys used by a server. When a particular cache key is saved or retrieved, Django will automatically prefix the cache key with the value of the`KEY_PREFIX <CACHES-KEY_PREFIX>` cache setting.
By ensuring each Django instance has a different `KEY_PREFIX <CACHES-KEY_PREFIX>`, you can ensure that there will be no collisions in cache values.
### Cache versioning
When you change running code that uses cached values, you may need to purge any existing cached values. The easiest way to do this is to flush the entire cache, but this can lead to the loss of cache values that are still valid and useful.
Django provides a better way to target individual cache values. Djangos cache framework has a system-wide version identifier, specified using the `VERSION <CACHES-VERSION>` cache setting. The value of this setting is automatically combined with the cache prefix and the user-provided cache key to obtain the final cache key.
By default, any key request will automatically include the site default cache key version. However, the primitive cache functions all include a `version` argument, so you can specify a particular cache key version to set or get. For example:
~~~
# Set version 2 of a cache key
>>> cache.set('my_key', 'hello world!', version=2)
# Get the default version (assuming version=1)
>>> cache.get('my_key')
None
# Get version 2 of the same key
>>> cache.get('my_key', version=2)
'hello world!'
~~~
The version of a specific key can be incremented and decremented using the `incr_version()` and`decr_version()` methods. This enables specific keys to be bumped to a new version, leaving other keys unaffected. Continuing our previous example:
~~~
# Increment the version of 'my_key'
>>> cache.incr_version('my_key')
# The default version still isn't available
>>> cache.get('my_key')
None
# Version 2 isn't available, either
>>> cache.get('my_key', version=2)
None
# But version 3 *is* available
>>> cache.get('my_key', version=3)
'hello world!'
~~~
### Cache key transformation
As described in the previous two sections, the cache key provided by a user is not used verbatim it is combined with the cache prefix and key version to provide a final cache key. By default, the three parts are joined using colons to produce a final string:
~~~
def make_key(key, key_prefix, version):
return ':'.join([key_prefix, str(version), key])
~~~
If you want to combine the parts in different ways, or apply other processing to the final key (e.g., taking a hash digest of the key parts), you can provide a custom key function.
The `KEY_FUNCTION <CACHES-KEY_FUNCTION>` cache setting specifies a dotted-path to a function matching the prototype of `make_key()` above. If provided, this custom key function will be used instead of the default key combining function.
### Cache key warnings
Memcached, the most commonly-used production cache backend, does not allow cache keys longer than 250 characters or containing whitespace or control characters, and using such keys will cause an exception. To encourage cache-portable code and minimize unpleasant surprises, the other built-in cache backends issue a warning (`django.core.cache.backends.base.CacheKeyWarning`) if a key is used that would cause an error on memcached.
If you are using a production backend that can accept a wider range of keys (a custom backend, or one of the non-memcached built-in backends), and want to use this wider range without warnings, you can silence `CacheKeyWarning` with this code in the `management` module of one of your `INSTALLED_APPS`:
~~~
import warnings
from django.core.cache import CacheKeyWarning
warnings.simplefilter("ignore", CacheKeyWarning)
~~~
If you want to instead provide custom key validation logic for one of the built-in backends, you can subclass it, override just the `validate_key` method, and follow the instructions for [using a custom cache backend](http://masteringdjango.com/django%c2%92-cache-framework/#using-a-custom-cache-backend). For instance, to do this for the `locmem` backend, put this code in a module:
~~~
from django.core.cache.backends.locmem import LocMemCache
class CustomLocMemCache(LocMemCache):
def validate_key(self, key):
"""Custom validation, raising exceptions or warnings as needed."""
# ...
~~~
…and use the dotted Python path to this class in the `BACKEND <CACHES-BACKEND>` portion of your `CACHES`setting.
## Downstream caches
So far, this document has focused on caching your *own* data. But another type of caching is relevant to Web development, too: caching performed by downstream caches. These are systems that cache pages for users even before the request reaches your Web site.
Here are a few examples of downstream caches:
* Your ISP may cache certain pages, so if you requested a page from [http://example.com/](http://example.com/), your ISP would send you the page without having to access example.com directly. The maintainers of example.com have no knowledge of this caching; the ISP sits between example.com and your Web browser, handling all of the caching transparently.
* Your Django Web site may sit behind a *proxy cache*, such as Squid Web Proxy Cache ([http://www.squid-cache.org/](http://www.squid-cache.org/)), that caches pages for performance. In this case, each request first would be handled by the proxy, and it would be passed to your application only if needed.
* Your Web browser caches pages, too. If a Web page sends out the appropriate headers, your browser will use the local cached copy for subsequent requests to that page, without even contacting the Web page again to see whether it has changed.
Downstream caching is a nice efficiency boost, but theres a danger to it: Many Web pages contents differ based on authentication and a host of other variables, and cache systems that blindly save pages based purely on URLs could expose incorrect or sensitive data to subsequent visitors to those pages.
For example, say you operate a Web email system, and the contents of the inbox page obviously depend on which user is logged in. If an ISP blindly cached your site, then the first user who logged in through that ISP would have their user-specific inbox page cached for subsequent visitors to the site. Thats not cool.
Fortunately, HTTP provides a solution to this problem. A number of HTTP headers exist to instruct downstream caches to differ their cache contents depending on designated variables, and to tell caching mechanisms not to cache particular pages. Well look at some of these headers in the sections that follow.
## Using Vary headers
The `Vary` header defines which request headers a cache mechanism should take into account when building its cache key. For example, if the contents of a Web page depend on a users language preference, the page is said to vary on language.
By default, Djangos cache system creates its cache keys using the requested fully-qualified URL e.g.,`"http://www.example.com/stories/2005/?order_by=author"`. This means every request to that URL will use the same cached version, regardless of user-agent differences such as cookies or language preferences. However, if this page produces different content based on some difference in request headers such as a cookie, or a language, or a user-agent youll need to use the `Vary` header to tell caching mechanisms that the page output depends on those things.
To do this in Django, use the convenient `django.views.decorators.vary.vary_on_headers()` view decorator, like so:
~~~
from django.views.decorators.vary import vary_on_headers
@vary_on_headers('User-Agent')
def my_view(request):
# ...
~~~
In this case, a caching mechanism (such as Djangos own cache middleware) will cache a separate version of the page for each unique user-agent.
The advantage to using the `vary_on_headers` decorator rather than manually setting the `Vary` header (using something like `response['Vary'] = 'user-agent'`) is that the decorator *adds* to the `Vary` header (which may already exist), rather than setting it from scratch and potentially overriding anything that was already in there.
You can pass multiple headers to `vary_on_headers()`:
~~~
@vary_on_headers('User-Agent', 'Cookie')
def my_view(request):
# ...
~~~
This tells downstream caches to vary on *both*, which means each combination of user-agent and cookie will get its own cache value. For example, a request with the user-agent `Mozilla` and the cookie value`foo=bar` will be considered different from a request with the user-agent `Mozilla` and the cookie value`foo=ham`.
Because varying on cookie is so common, theres a `django.views.decorators.vary.vary_on_cookie()` decorator. These two views are equivalent:
~~~
@vary_on_cookie
def my_view(request):
# ...
@vary_on_headers('Cookie')
def my_view(request):
# ...
~~~
The headers you pass to `vary_on_headers` are not case sensitive; `"User-Agent"` is the same thing as `"user-agent"`.
You can also use a helper function, `django.utils.cache.patch_vary_headers()`, directly. This function sets, or adds to, the `Vary header`. For example:
~~~
from django.utils.cache import patch_vary_headers
def my_view(request):
# ...
response = render_to_response('template_name', context)
patch_vary_headers(response, ['Cookie'])
return response
~~~
`patch_vary_headers` takes an `HttpResponse` instance as its first argument and a list/tuple of case-insensitive header names as its second argument.
For more on Vary headers, see the [official Vary spec](http://www.w3.org/Protocols/rfc2616/rfc2616-sec14.html#sec14.44).
## Controlling cache: Using other headers
Other problems with caching are the privacy of data and the question of where data should be stored in a cascade of caches.
A user usually faces two kinds of caches: their own browser cache (a private cache) and their providers cache (a public cache). A public cache is used by multiple users and controlled by someone else. This poses problems with sensitive datayou dont want, say, your bank account number stored in a public cache. So Web applications need a way to tell caches which data is private and which is public.
The solution is to indicate a pages cache should be private. To do this in Django, use the `cache_control` view decorator. Example:
~~~
from django.views.decorators.cache import cache_control
@cache_control(private=True)
def my_view(request):
# ...
~~~
This decorator takes care of sending out the appropriate HTTP header behind the scenes.
Note that the cache control settings private and public are mutually exclusive. The decorator ensures that the public directive is removed if private should be set (and vice versa). An example use of the two directives would be a blog site that offers both private and public entries. Public entries may be cached on any shared cache. The following code uses `django.utils.cache.patch_cache_control()`, the manual way to modify the cache control header (it is internally called by the `cache_control` decorator):
~~~
from django.views.decorators.cache import patch_cache_control
from django.views.decorators.vary import vary_on_cookie
@vary_on_cookie
def list_blog_entries_view(request):
if request.user.is_anonymous():
response = render_only_public_entries()
patch_cache_control(response, public=True)
else:
response = render_private_and_public_entries(request.user)
patch_cache_control(response, private=True)
return response
~~~
There are a few other ways to control cache parameters. For example, HTTP allows applications to do the following:
* Define the maximum time a page should be cached.
* Specify whether a cache should always check for newer versions, only delivering the cached content when there are no changes. (Some caches might deliver cached content even if the server page changed, simply because the cache copy isnt yet expired.)
In Django, use the `cache_control` view decorator to specify these cache parameters. In this example,`cache_control` tells caches to revalidate the cache on every access and to store cached versions for, at most, 3,600 seconds:
~~~
from django.views.decorators.cache import cache_control
@cache_control(must_revalidate=True, max_age=3600)
def my_view(request):
# ...
~~~
Any valid `Cache-Control` HTTP directive is valid in `cache_control()`. Heres a full list:
* `public=True`
* `private=True`
* `no_cache=True`
* `no_transform=True`
* `must_revalidate=True`
* `proxy_revalidate=True`
* `max_age=num_seconds`
* `s_maxage=num_seconds`
For explanation of Cache-Control HTTP directives, see the [Cache-Control spec](http://www.w3.org/Protocols/rfc2616/rfc2616-sec14.html#sec14.9).
(Note that the caching middleware already sets the cache headers max-age with the value of the`CACHE_MIDDLEWARE_SECONDS` setting. If you use a custom `max_age` in a `cache_control` decorator, the decorator will take precedence, and the header values will be merged correctly.)
If you want to use headers to disable caching altogether, `django.views.decorators.cache.never_cache` is a view decorator that adds headers to ensure the response wont be cached by browsers or other caches. Example:
~~~
from django.views.decorators.cache import never_cache
@never_cache
def myview(request):
# ...
~~~
## Order of MIDDLEWARE_CLASSES
If you use caching middleware, its important to put each half in the right place within the`MIDDLEWARE_CLASSES` setting. Thats because the cache middleware needs to know which headers by which to vary the cache storage. Middleware always adds something to the `Vary` response header when it can.
`UpdateCacheMiddleware` runs during the response phase, where middleware is run in reverse order, so an item at the top of the list runs *last* during the response phase. Thus, you need to make sure that`UpdateCacheMiddleware` appears *before* any other middleware that might add something to the `Vary` header. The following middleware modules do so:
* `SessionMiddleware` adds `Cookie`
* `GZipMiddleware` adds `Accept-Encoding`
* `LocaleMiddleware` adds `Accept-Language`
`FetchFromCacheMiddleware`, on the other hand, runs during the request phase, where middleware is applied first-to-last, so an item at the top of the list runs *first* during the request phase. The`FetchFromCacheMiddleware` also needs to run after other middleware updates the `Vary` header, so`FetchFromCacheMiddleware` must be *after* any item that does so.
Chapter 15: Generating Non-HTML Content
最后更新于:2022-04-01 04:48:07
Usually when we talk about developing Web sites, were talking about producing HTML. Of course, theres a lot more to the Web than HTML; we use the Web to distribute data in all sorts of formats: RSS, PDFs, images, and so forth.
So far, weve focused on the common case of HTML production, but in this chapter well take a detour and look at using Django to produce other types of content.
Django has convenient built-in tools that you can use to produce some common non-HTML content:
* Comma-delimited (CSV) files for importing into spreadsheet applications.
* PDF files.
* RSS/Atom syndication feeds
* Sitemaps (an XML format originally developed by Google that gives hints to search engines)
Well examine each of those tools a little later, but first well cover the basic principles.
[TOC]
## The basics: views and MIME types
Recall from Chapter 2 that a view function is simply a Python function that takes a Web request and returns a Web response. This response can be the HTML contents of a Web page, or a redirect, or a 404 error, or an XML document, or an image…or anything, really.
More formally, a Django view function *must*
* Accept an `HttpRequest` instance as its first argument
* Return an `HttpResponse` instance
The key to returning non-HTML content from a view lies in the `HttpResponse` class, specifically the`content_type` argument. By default, Django sets `content_type` to text/html. You can however, set `content_type`to any of the official Internet media types (MIME types) managed by [IANA](http://www.iana.org/assignments/media-types/media-types.xhtml).
By tweaking the MIME type, we can indicate to the browser that weve returned a response of a different format.
For example, lets look at a view that returns a PNG image. To keep things simple, well just read the file off the disk:
~~~
from django.http import HttpResponse
def my_image(request):
image_data = open("/path/to/my/image.png", "rb").read()
return HttpResponse(image_data, content_type="image/png")
~~~
Thats it! If you replace the image path in the `open()` call with a path to a real image, you can use this very simple view to serve an image, and the browser will display it correctly.
The other important thing to keep in mind is that `HttpResponse` objects implement Pythons standard file-like object API. This means that you can use an `HttpResponse` instance in any place Python (or a third-party library) expects a file.
For an example of how that works, lets take a look at producing CSV with Django.
## Producing CSV
Python comes with a CSV library, `csv`. The key to using it with Django is that the `csv` modules CSV-creation capability acts on file-like objects, and Djangos `HttpResponse` objects are file-like objects.
Heres an example:
~~~
import csv
from django.http import HttpResponse
def some_view(request):
# Create the HttpResponse object with the appropriate CSV header.
response = HttpResponse(content_type='text/csv')
response['Content-Disposition'] = 'attachment; filename="somefilename.csv"'
writer = csv.writer(response)
writer.writerow(['First row', 'Foo', 'Bar', 'Baz'])
writer.writerow(['Second row', 'A', 'B', 'C', '"Testing"', "Here's a quote"])
return response
~~~
The code and comments should be self-explanatory, but a few things deserve a mention:
* The response gets a special MIME type, `text/csv`. This tells browsers that the document is a CSV file, rather than an HTML file. If you leave this off, browsers will probably interpret the output as HTML, which will result in ugly, scary gobbledygook in the browser window.
* The response gets an additional `Content-Disposition` header, which contains the name of the CSV file. This filename is arbitrary; call it whatever you want. Itll be used by browsers in the Save as… dialogue, etc.
* Hooking into the CSV-generation API is easy: Just pass `response` as the first argument to `csv.writer`. The`csv.writer` function expects a file-like object, and `HttpResponse` objects fit the bill.
* For each row in your CSV file, call `writer.writerow`, passing it an iterable object such as a list or tuple.
* The CSV module takes care of quoting for you, so you dont have to worry about escaping strings with quotes or commas in them. Just pass `writerow()` your raw strings, and itll do the right thing.
### Streaming large CSV files
When dealing with views that generate very large responses, you might want to consider using Djangos`StreamingHttpResponse` instead. For example, by streaming a file that takes a long time to generate you can avoid a load balancer dropping a connection that might have otherwise timed out while the server was generating the response.
In this example, we make full use of Python generators to efficiently handle the assembly and transmission of a large CSV file:
~~~
import csv
from django.utils.six.moves import range
from django.http import StreamingHttpResponse
class Echo(object):
"""An object that implements just the write method of the file-like
interface.
"""
def write(self, value):
"""Write the value by returning it, instead of storing in a buffer."""
return value
def some_streaming_csv_view(request):
"""A view that streams a large CSV file."""
# Generate a sequence of rows. The range is based on the maximum number of
# rows that can be handled by a single sheet in most spreadsheet
# applications.
rows = (["Row {}".format(idx), str(idx)] for idx in range(65536))
pseudo_buffer = Echo()
writer = csv.writer(pseudo_buffer)
response = StreamingHttpResponse((writer.writerow(row) for row in rows),
content_type="text/csv")
response['Content-Disposition'] = 'attachment; filename="somefilename.csv"'
return response
~~~
## Using the template system
Alternatively, you can use the Django template system to generate CSV. This is lower-level than using the convenient Python `csv` module, but the solution is presented here for completeness.
The idea here is to pass a list of items to your template, and have the template output the commas in a `for`loop.
Heres an example, which generates the same CSV file as above:
~~~
from django.http import HttpResponse
from django.template import loader, Context
def some_view(request):
# Create the HttpResponse object with the appropriate CSV header.
response = HttpResponse(content_type='text/csv')
response['Content-Disposition'] = 'attachment; filename="somefilename.csv"'
# The data is hard-coded here, but you could load it from a database or
# some other source.
csv_data = (
('First row', 'Foo', 'Bar', 'Baz'),
('Second row', 'A', 'B', 'C', '"Testing"', "Here's a quote"),
)
t = loader.get_template('my_template_name.txt')
c = Context({
'data': csv_data,
})
response.write(t.render(c))
return response
~~~
The only difference between this example and the previous example is that this one uses template loading instead of the CSV module. The rest of the code such as the `content_type='text/csv'` is the same.
Then, create the template `my_template_name.txt`, with this template code:
~~~
{% for row in data %}
"{{ row.0|addslashes }}",
"{{ row.1|addslashes }}",
"{{ row.2|addslashes }}",
"{{ row.3|addslashes }}",
"{{ row.4|addslashes }}"
{% endfor %}
~~~
This template is quite basic. It just iterates over the given data and displays a line of CSV for each row. It uses the `addslashes` template filter to ensure there arent any problems with quotes.
## Other text-based formats
Notice that there isnt very much specific to CSV here just the specific output format. You can use either of these techniques to output any text-based format you can dream of. You can also use a similar technique to generate arbitrary binary data; For example, generating PDFs.
## Generating PDFs
Django is able to output PDF files dynamically using views. This is made possible by the excellent, open-source [ReportLab](http://www.reportlab.com/opensource/) Python PDF library.
The advantage of generating PDF files dynamically is that you can create customized PDFs for different purposes say, for different users or different pieces of content.
## Install ReportLab
The ReportLab library is [available on PyPI](https://pypi.python.org/pypi/reportlab). A [user guide](http://www.reportlab.com/docs/reportlab-userguide.pdf) (not coincidentally, a PDF file) is also available for download. You can install ReportLab with `pip`:
~~~
$ pip install reportlab
~~~
Test your installation by importing it in the Python interactive interpreter:
~~~
>>> import reportlab
~~~
If that command doesnt raise any errors, the installation worked.
## Write your view
The key to generating PDFs dynamically with Django is that the ReportLab API acts on file-like objects, and Djangos `HttpResponse` objects are file-like objects.
Heres a Hello World example:
~~~
from reportlab.pdfgen import canvas
from django.http import HttpResponse
def some_view(request):
# Create the HttpResponse object with the appropriate PDF headers.
response = HttpResponse(content_type='application/pdf')
response['Content-Disposition'] = 'attachment; filename="somefilename.pdf"'
# Create the PDF object, using the response object as its "file."
p = canvas.Canvas(response)
# Draw things on the PDF. Here's where the PDF generation happens.
# See the ReportLab documentation for the full list of functionality.
p.drawString(100, 100, "Hello world.")
# Close the PDF object cleanly, and we're done.
p.showPage()
p.save()
return response
~~~
The code and comments should be self-explanatory, but a few things deserve a mention:
* The response gets a special MIME type, `application/pdf`. This tells browsers that the document is a PDF file, rather than an HTML file. If you leave this off, browsers will probably interpret the output as HTML, which would result in ugly, scary gobbledygook in the browser window.
* The response gets an additional `Content-Disposition` header, which contains the name of the PDF file. This filename is arbitrary: Call it whatever you want. Itll be used by browsers in the Save as… dialogue, etc.
* The `Content-Disposition` header starts with `'attachment; '` in this example. This forces Web browsers to pop-up a dialog box prompting/confirming how to handle the document even if a default is set on the machine. If you leave off `'attachment;'`, browsers will handle the PDF using whatever program/plugin theyve been configured to use for PDFs. Heres what that code would look like:
~~~
response['Content-Disposition'] = 'filename="somefilename.pdf"'
~~~
* Hooking into the ReportLab API is easy: Just pass `response` as the first argument to `canvas.Canvas`. The`Canvas` class expects a file-like object, and `HttpResponse` objects fit the bill.
* Note that all subsequent PDF-generation methods are called on the PDF object (in this case, `p`) not on`response`.
* Finally, its important to call `showPage()` and `save()` on the PDF file.
Note
ReportLab is not thread-safe. Some of our users have reported odd issues with building PDF-generating Django views that are accessed by many people at the same time.
## Complex PDFs
If youre creating a complex PDF document with ReportLab, consider using the `io` library as a temporary holding place for your PDF file. This library provides a file-like object interface that is particularly efficient. Heres the above Hello World example rewritten to use `io`:
~~~
from io import BytesIO
from reportlab.pdfgen import canvas
from django.http import HttpResponse
def some_view(request):
# Create the HttpResponse object with the appropriate PDF headers.
response = HttpResponse(content_type='application/pdf')
response['Content-Disposition'] = 'attachment; filename="somefilename.pdf"'
buffer = BytesIO()
# Create the PDF object, using the BytesIO object as its "file."
p = canvas.Canvas(buffer)
# Draw things on the PDF. Here's where the PDF generation happens.
# See the ReportLab documentation for the full list of functionality.
p.drawString(100, 100, "Hello world.")
# Close the PDF object cleanly.
p.showPage()
p.save()
# Get the value of the BytesIO buffer and write it to the response.
pdf = buffer.getvalue()
buffer.close()
response.write(pdf)
return response
~~~
## Further resources
* [PDFlib](http://www.pdflib.org/) is another PDF-generation library that has Python bindings. To use it with Django, just use the same concepts explained in this article.
* [Pisa XHTML2PDF](http://www.xhtml2pdf.com/) is yet another PDF-generation library. Pisa ships with an example of how to integrate Pisa with Django.
* [HTMLdoc](http://www.htmldoc.org/) is a command-line script that can convert HTML to PDF. It doesnt have a Python interface, but you can escape out to the shell using `system` or `popen` and retrieve the output in Python.
## Other Possibilities
Theres a whole host of other types of content you can generate in Python. Here are a few more ideas and some pointers to libraries you could use to implement them:
* *ZIP files*: Pythons standard library ships with the `zipfile` module, which can both read and write compressed ZIP files. You could use it to provide on-demand archives of a bunch of files, or perhaps compress large documents when requested. You could similarly produce TAR files using the standard librarys `tarfile` module.
* *Dynamic images*: The Python Imaging Library (PIL; [http://www.pythonware.com/products/pil/](http://www.pythonware.com/products/pil/)) is a fantastic toolkit for producing images (PNG, JPEG, GIF, and a whole lot more). You could use it to automatically scale down images into thumbnails, composite multiple images into a single frame, or even do Web-based image processing.
* *Plots and charts*: There are a number of powerful Python plotting and charting libraries you could use to produce on-demand maps, charts, plots, and graphs. We cant possibly list them all, so here are a couple of the highlights:
* `matplotlib` ([http://matplotlib.sourceforge.net/](http://matplotlib.sourceforge.net/)) can be used to produce the type of high-quality plots usually generated with MatLab or Mathematica.
* `pygraphviz` ([http://networkx.lanl.gov/pygraphviz/](http://networkx.lanl.gov/pygraphviz/)), an interface to the Graphviz graph layout toolkit ([http://graphviz.org/](http://graphviz.org/)), can be used for generating structured diagrams of graphs and networks.
In general, any Python library capable of writing to a file can be hooked into Django. The possibilities are immense.
Now that weve looked at the basics of generating non-HTML content, lets step up a level of abstraction. Django ships with some pretty nifty built-in tools for generating some common types of non-HTML content.
## The Syndication Feed Framework
Django comes with a high-level syndication-feed-generating framework that makes creating RSS and Atom feeds easy.
Whats RSS? Whats Atom?
RSS and Atom are both XML-based formats you can use to provide automatically updating feeds of your sites content. Read more about RSS at [http://www.whatisrss.com/](http://www.whatisrss.com/), and get information on Atom at[http://www.atomenabled.org/](http://www.atomenabled.org/).
To create any syndication feed, all you have to do is write a short Python class. You can create as many feeds as you want.
Django also comes with a lower-level feed-generating API. Use this if you want to generate feeds outside of a Web context, or in some other lower-level way.
## The high-level framework
### Overview
The high-level feed-generating framework is supplied by the `Feed` class. To create a feed, write a `Feed` class and point to an instance of it in your URLconf.
### Feed classes
A `Feed` class is a Python class that represents a syndication feed. A feed can be simple (e.g., a site news feed, or a basic feed displaying the latest entries of a blog) or more complex (e.g., a feed displaying all the blog entries in a particular category, where the category is variable).
Feed classes subclass `django.contrib.syndication.views.Feed`. They can live anywhere in your codebase.
Instances of `Feed` classes are views which can be used in your URLconf .
### A simple example
This simple example, taken from a hypothetical police beat news site describes a feed of the latest five news items:
~~~
from django.contrib.syndication.views import Feed
from django.core.urlresolvers import reverse
from policebeat.models import NewsItem
class LatestEntriesFeed(Feed):
title = "Police beat site news"
link = "/sitenews/"
description = "Updates on changes and additions to police beat central."
def items(self):
return NewsItem.objects.order_by('-pub_date')[:5]
def item_title(self, item):
return item.title
def item_description(self, item):
return item.description
# item_link is only needed if NewsItem has no get_absolute_url method.
def item_link(self, item):
return reverse('news-item', args=[item.pk])
~~~
To connect a URL to this feed, put an instance of the Feed object in your URLconf . For example:
~~~
from django.conf.urls import url
from myproject.feeds import LatestEntriesFeed
urlpatterns = [
# ...
url(r'^latest/feed/$', LatestEntriesFeed()),
# ...
]
~~~
Note:
* The Feed class subclasses `django.contrib.syndication.views.Feed`.
* `title`, `link` and `description` correspond to the standard RSS `<title>`, `<link>` and `<description>` elements, respectively.
* `items()` is, simply, a method that returns a list of objects that should be included in the feed as `<item>`elements. Although this example returns `NewsItem` objects using Djangos object-relational mapper doesnt have to return model instances. Although you get a few bits of functionality for free by using Django models, `items()` can return any type of object you want.
* If youre creating an Atom feed, rather than an RSS feed, set the `subtitle` attribute instead of the`description` attribute. See [Publishing Atom and RSS feeds in tandem](http://masteringdjango.com/generating-non-html-content/#publishing-atom-and-rss-feeds-in-tandem), later, for an example.
One thing is left to do. In an RSS feed, each `<item>` has a `<title>`, `<link>` and `<description>`. We need to tell the framework what data to put into those elements.
* For the contents of `<title>` and `<description>`, Django tries calling the methods `item_title()` and`item_description()` on the `Feed` class. They are passed a single parameter, `item`, which is the object itself. These are optional; by default, the unicode representation of the object is used for both.
If you want to do any special formatting for either the title or description, Django templates can be used instead. Their paths can be specified with the `title_template` and `description_template` attributes on the`Feed` class. The templates are rendered for each item and are passed two template context variables:
* `{{ obj }}` The current object (one of whichever objects you returned in `items()`).
* `{{ site }}` A `django.contrib.sites.models.Site` object representing the current site. This is useful for `{{site.domain }}` or `{{ site.name }}`. If you do *not* have the Django sites framework installed, this will be set to a `RequestSite` object. See the RequestSite section of the sites framework documentation for more.
See [a complex example](http://masteringdjango.com/generating-non-html-content/#a-complex-example) below that uses a description template.
`Feed.``get_context_data`(***kwargs*)
There is also a way to pass additional information to title and description templates, if you need to supply more than the two variables mentioned before. You can provide your implementation of `get_context_data`method in your `Feed` subclass. For example:
~~~
from mysite.models import Article
from django.contrib.syndication.views import Feed
class ArticlesFeed(Feed):
title = "My articles"
description_template = "feeds/articles.html"
def items(self):
return Article.objects.order_by('-pub_date')[:5]
def get_context_data(self, **kwargs):
context = super(ArticlesFeed, self).get_context_data(**kwargs)
context['foo'] = 'bar'
return context
~~~
And the template:
~~~
Something about {{ foo }}: {{ obj.description }}
~~~
This method will be called once per each item in the list returned by `items()` with the following keyword arguments:
* `item`: the current item. For backward compatibility reasons, the name of this context variable is `{{ obj}}`.
* `obj`: the object returned by `get_object()`. By default this is not exposed to the templates to avoid confusion with `{{ obj }}` (see above), but you can use it in your implementation of `get_context_data()`.
* `site`: current site as described above.
* `request`: current request.
The behavior of `get_context_data()` mimics that of generic views – youre supposed to call `super()` to retrieve context data from parent class, add your data and return the modified dictionary.
* To specify the contents of `<link>`, you have two options. For each item in `items()`, Django first tries calling the `item_link()` method on the `Feed` class. In a similar way to the title and description, it is passed it a single parameter, `item`. If that method doesnt exist, Django tries executing a `get_absolute_url()` method on that object. Both `get_absolute_url()` and `item_link()` should return the items URL as a normal Python string. As with `get_absolute_url()`, the result of `item_link()` will be included directly in the URL, so you are responsible for doing all necessary URL quoting and conversion to ASCII inside the method itself.
### A complex example
The framework also supports more complex feeds, via arguments.
For example, a website could offer an RSS feed of recent crimes for every police beat in a city. Itd be silly to create a separate `Feed` class for each police beat; that would violate the DRY principle and would couple data to programming logic. Instead, the syndication framework lets you access the arguments passed from your URLconf so feeds can output items based on information in the feeds URL.
The police beat feeds could be accessible via URLs like this:
* `/beats/613/rss/` Returns recent crimes for beat 613.
* `/beats/1424/rss/` Returns recent crimes for beat 1424.
These can be matched with a URLconf line such as:
~~~
url(r'^beats/(?P<beat_id>[0-9]+)/rss/$', BeatFeed()),
~~~
Like a view, the arguments in the URL are passed to the `get_object()` method along with the request object.
Heres the code for these beat-specific feeds:
~~~
from django.contrib.syndication.views import FeedDoesNotExist
from django.shortcuts import get_object_or_404
class BeatFeed(Feed):
description_template = 'feeds/beat_description.html'
def get_object(self, request, beat_id):
return get_object_or_404(Beat, pk=beat_id)
def title(self, obj):
return "Police beat central: Crimes for beat %s" % obj.beat
def link(self, obj):
return obj.get_absolute_url()
def description(self, obj):
return "Crimes recently reported in police beat %s" % obj.beat
def items(self, obj):
return Crime.objects.filter(beat=obj).order_by('-crime_date')[:30]
~~~
To generate the feeds `<title>`, `<link>` and `<description>`, Django uses the `title()`, `link()` and `description()`methods. In the previous example, they were simple string class attributes, but this example illustrates that they can be either strings *or* methods. For each of `title`, `link` and `description`, Django follows this algorithm:
* First, it tries to call a method, passing the `obj` argument, where `obj` is the object returned by `get_object()`.
* Failing that, it tries to call a method with no arguments.
* Failing that, it uses the class attribute.
Also note that `items()` also follows the same algorithm first, it tries `items(obj)`, then `items()`, then finally an `items` class attribute (which should be a list).
We are using a template for the item descriptions. It can be very simple:
~~~
{{ obj.description }}
~~~
However, you are free to add formatting as desired.
The `ExampleFeed` class below gives full documentation on methods and attributes of `Feed` classes.
### Specifying the type of feed
By default, feeds produced in this framework use RSS 2.0.
To change that, add a `feed_type` attribute to your `Feed` class, like so:
~~~
from django.utils.feedgenerator import Atom1Feed
class MyFeed(Feed):
feed_type = Atom1Feed
~~~
Note that you set `feed_type` to a class object, not an instance.
Currently available feed types are:
* `django.utils.feedgenerator.Rss201rev2Feed` (RSS 2.01\. Default.)
* `django.utils.feedgenerator.RssUserland091Feed` (RSS 0.91.)
* `django.utils.feedgenerator.Atom1Feed` (Atom 1.0.)
### Enclosures
To specify enclosures, such as those used in creating podcast feeds, use the `item_enclosure_url`,`item_enclosure_length` and `item_enclosure_mime_type` hooks. See the `ExampleFeed` class below for usage examples.
### Language
Feeds created by the syndication framework automatically include the appropriate `<language>` tag (RSS 2.0) or `xml:lang` attribute (Atom). This comes directly from your `LANGUAGE_CODE` setting.
### URLs
The `link` method/attribute can return either an absolute path (e.g. `"/blog/"`) or a URL with the fully-qualified domain and protocol (e.g. `"http://www.example.com/blog/"`). If `link` doesnt return the domain, the syndication framework will insert the domain of the current site, according to your `SITE_ID setting<SITE_ID>`.
Atom feeds require a `<link rel="self">` that defines the feeds current location. The syndication framework populates this automatically, using the domain of the current site according to the `SITE_ID` setting.
### Publishing Atom and RSS feeds in tandem
Some developers like to make available both Atom *and* RSS versions of their feeds. Thats easy to do with Django: Just create a subclass of your `Feed` class and set the `feed_type` to something different. Then update your URLconf to add the extra versions.
Heres a full example:
~~~
from django.contrib.syndication.views import Feed
from policebeat.models import NewsItem
from django.utils.feedgenerator import Atom1Feed
class RssSiteNewsFeed(Feed):
title = "Police beat site news"
link = "/sitenews/"
description = "Updates on changes and additions to police beat central."
def items(self):
return NewsItem.objects.order_by('-pub_date')[:5]
class AtomSiteNewsFeed(RssSiteNewsFeed):
feed_type = Atom1Feed
subtitle = RssSiteNewsFeed.description
~~~
Note
In this example, the RSS feed uses a `description` while the Atom feed uses a `subtitle`. Thats because Atom feeds dont provide for a feed-level description, but they *do* provide for a subtitle.
If you provide a `description` in your `Feed` class, Django will *not* automatically put that into the `subtitle`element, because a subtitle and description are not necessarily the same thing. Instead, you should define a `subtitle` attribute.
In the above example, we simply set the Atom feeds `subtitle` to the RSS feeds `description`, because its quite short already.
And the accompanying URLconf:
~~~
from django.conf.urls import url
from myproject.feeds import RssSiteNewsFeed, AtomSiteNewsFeed
urlpatterns = [
# ...
url(r'^sitenews/rss/$', RssSiteNewsFeed()),
url(r'^sitenews/atom/$', AtomSiteNewsFeed()),
# ...
]
~~~
### Feed class reference
*class *`views.``Feed`
This example illustrates all possible attributes and methods for a `Feed` class:
~~~
from django.contrib.syndication.views import Feed
from django.utils import feedgenerator
class ExampleFeed(Feed):
# FEED TYPE -- Optional. This should be a class that subclasses
# django.utils.feedgenerator.SyndicationFeed. This designates
# which type of feed this should be: RSS 2.0, Atom 1.0, etc. If
# you don't specify feed_type, your feed will be RSS 2.0\. This
# should be a class, not an instance of the class.
feed_type = feedgenerator.Rss201rev2Feed
# TEMPLATE NAMES -- Optional. These should be strings
# representing names of Django templates that the system should
# use in rendering the title and description of your feed items.
# Both are optional. If a template is not specified, the
# item_title() or item_description() methods are used instead.
title_template = None
description_template = None
# TITLE -- One of the following three is required. The framework
# looks for them in this order.
def title(self, obj):
"""
Takes the object returned by get_object() and returns the
feed's title as a normal Python string.
"""
def title(self):
"""
Returns the feed's title as a normal Python string.
"""
title = 'foo' # Hard-coded title.
# LINK -- One of the following three is required. The framework
# looks for them in this order.
def link(self, obj):
"""
# Takes the object returned by get_object() and returns the URL
# of the HTML version of the feed as a normal Python string.
"""
def link(self):
"""
Returns the URL of the HTML version of the feed as a normal Python
string.
"""
link = '/blog/' # Hard-coded URL.
# FEED_URL -- One of the following three is optional. The framework
# looks for them in this order.
def feed_url(self, obj):
"""
# Takes the object returned by get_object() and returns the feed's
# own URL as a normal Python string.
"""
def feed_url(self):
"""
Returns the feed's own URL as a normal Python string.
"""
feed_url = '/blog/rss/' # Hard-coded URL.
# GUID -- One of the following three is optional. The framework looks
# for them in this order. This property is only used for Atom feeds
# (where it is the feed-level ID element). If not provided, the feed
# link is used as the ID.
def feed_guid(self, obj):
"""
Takes the object returned by get_object() and returns the globally
unique ID for the feed as a normal Python string.
"""
def feed_guid(self):
"""
Returns the feed's globally unique ID as a normal Python string.
"""
feed_guid = '/foo/bar/1234' # Hard-coded guid.
# DESCRIPTION -- One of the following three is required. The framework
# looks for them in this order.
def description(self, obj):
"""
Takes the object returned by get_object() and returns the feed's
description as a normal Python string.
"""
def description(self):
"""
Returns the feed's description as a normal Python string.
"""
description = 'Foo bar baz.' # Hard-coded description.
# AUTHOR NAME --One of the following three is optional. The framework
# looks for them in this order.
def author_name(self, obj):
"""
Takes the object returned by get_object() and returns the feed's
author's name as a normal Python string.
"""
def author_name(self):
"""
Returns the feed's author's name as a normal Python string.
"""
author_name = 'Sally Smith' # Hard-coded author name.
# AUTHOR EMAIL --One of the following three is optional. The framework
# looks for them in this order.
def author_email(self, obj):
"""
Takes the object returned by get_object() and returns the feed's
author's email as a normal Python string.
"""
def author_email(self):
"""
Returns the feed's author's email as a normal Python string.
"""
author_email = 'test@example.com' # Hard-coded author email.
# AUTHOR LINK --One of the following three is optional. The framework
# looks for them in this order. In each case, the URL should include
# the "http://" and domain name.
def author_link(self, obj):
"""
Takes the object returned by get_object() and returns the feed's
author's URL as a normal Python string.
"""
def author_link(self):
"""
Returns the feed's author's URL as a normal Python string.
"""
author_link = 'http://www.example.com/' # Hard-coded author URL.
# CATEGORIES -- One of the following three is optional. The framework
# looks for them in this order. In each case, the method/attribute
# should return an iterable object that returns strings.
def categories(self, obj):
"""
Takes the object returned by get_object() and returns the feed's
categories as iterable over strings.
"""
def categories(self):
"""
Returns the feed's categories as iterable over strings.
"""
categories = ("python", "django") # Hard-coded list of categories.
# COPYRIGHT NOTICE -- One of the following three is optional. The
# framework looks for them in this order.
def feed_copyright(self, obj):
"""
Takes the object returned by get_object() and returns the feed's
copyright notice as a normal Python string.
"""
def feed_copyright(self):
"""
Returns the feed's copyright notice as a normal Python string.
"""
feed_copyright = 'Copyright (c) 2007, Sally Smith' # Hard-coded copyright notice.
# TTL -- One of the following three is optional. The framework looks
# for them in this order. Ignored for Atom feeds.
def ttl(self, obj):
"""
Takes the object returned by get_object() and returns the feed's
TTL (Time To Live) as a normal Python string.
"""
def ttl(self):
"""
Returns the feed's TTL as a normal Python string.
"""
ttl = 600 # Hard-coded Time To Live.
# ITEMS -- One of the following three is required. The framework looks
# for them in this order.
def items(self, obj):
"""
Takes the object returned by get_object() and returns a list of
items to publish in this feed.
"""
def items(self):
"""
Returns a list of items to publish in this feed.
"""
items = ('Item 1', 'Item 2') # Hard-coded items.
# GET_OBJECT -- This is required for feeds that publish different data
# for different URL parameters. (See "A complex example" above.)
def get_object(self, request, *args, **kwargs):
"""
Takes the current request and the arguments from the URL, and
returns an object represented by this feed. Raises
django.core.exceptions.ObjectDoesNotExist on error.
"""
# ITEM TITLE AND DESCRIPTION -- If title_template or
# description_template are not defined, these are used instead. Both are
# optional, by default they will use the unicode representation of the
# item.
def item_title(self, item):
"""
Takes an item, as returned by items(), and returns the item's
title as a normal Python string.
"""
def item_title(self):
"""
Returns the title for every item in the feed.
"""
item_title = 'Breaking News: Nothing Happening' # Hard-coded title.
def item_description(self, item):
"""
Takes an item, as returned by items(), and returns the item's
description as a normal Python string.
"""
def item_description(self):
"""
Returns the description for every item in the feed.
"""
item_description = 'A description of the item.' # Hard-coded description.
def get_context_data(self, **kwargs):
"""
Returns a dictionary to use as extra context if either
description_template or item_template are used.
Default implementation preserves the old behavior
of using {'obj': item, 'site': current_site} as the context.
"""
# ITEM LINK -- One of these three is required. The framework looks for
# them in this order.
# First, the framework tries the two methods below, in
# order. Failing that, it falls back to the get_absolute_url()
# method on each item returned by items().
def item_link(self, item):
"""
Takes an item, as returned by items(), and returns the item's URL.
"""
def item_link(self):
"""
Returns the URL for every item in the feed.
"""
# ITEM_GUID -- The following method is optional. If not provided, the
# item's link is used by default.
def item_guid(self, obj):
"""
Takes an item, as return by items(), and returns the item's ID.
"""
# ITEM_GUID_IS_PERMALINK -- The following method is optional. If
# provided, it sets the 'isPermaLink' attribute of an item's
# GUID element. This method is used only when 'item_guid' is
# specified.
def item_guid_is_permalink(self, obj):
"""
Takes an item, as returned by items(), and returns a boolean.
"""
item_guid_is_permalink = False # Hard coded value
# ITEM AUTHOR NAME -- One of the following three is optional. The
# framework looks for them in this order.
def item_author_name(self, item):
"""
Takes an item, as returned by items(), and returns the item's
author's name as a normal Python string.
"""
def item_author_name(self):
"""
Returns the author name for every item in the feed.
"""
item_author_name = 'Sally Smith' # Hard-coded author name.
# ITEM AUTHOR EMAIL --One of the following three is optional. The
# framework looks for them in this order.
#
# If you specify this, you must specify item_author_name.
def item_author_email(self, obj):
"""
Takes an item, as returned by items(), and returns the item's
author's email as a normal Python string.
"""
def item_author_email(self):
"""
Returns the author email for every item in the feed.
"""
item_author_email = 'test@example.com' # Hard-coded author email.
# ITEM AUTHOR LINK -- One of the following three is optional. The
# framework looks for them in this order. In each case, the URL should
# include the "http://" and domain name.
#
# If you specify this, you must specify item_author_name.
def item_author_link(self, obj):
"""
Takes an item, as returned by items(), and returns the item's
author's URL as a normal Python string.
"""
def item_author_link(self):
"""
Returns the author URL for every item in the feed.
"""
item_author_link = 'http://www.example.com/' # Hard-coded author URL.
# ITEM ENCLOSURE URL -- One of these three is required if you're
# publishing enclosures. The framework looks for them in this order.
def item_enclosure_url(self, item):
"""
Takes an item, as returned by items(), and returns the item's
enclosure URL.
"""
def item_enclosure_url(self):
"""
Returns the enclosure URL for every item in the feed.
"""
item_enclosure_url = "/foo/bar.mp3" # Hard-coded enclosure link.
# ITEM ENCLOSURE LENGTH -- One of these three is required if you're
# publishing enclosures. The framework looks for them in this order.
# In each case, the returned value should be either an integer, or a
# string representation of the integer, in bytes.
def item_enclosure_length(self, item):
"""
Takes an item, as returned by items(), and returns the item's
enclosure length.
"""
def item_enclosure_length(self):
"""
Returns the enclosure length for every item in the feed.
"""
item_enclosure_length = 32000 # Hard-coded enclosure length.
# ITEM ENCLOSURE MIME TYPE -- One of these three is required if you're
# publishing enclosures. The framework looks for them in this order.
def item_enclosure_mime_type(self, item):
"""
Takes an item, as returned by items(), and returns the item's
enclosure MIME type.
"""
def item_enclosure_mime_type(self):
"""
Returns the enclosure MIME type for every item in the feed.
"""
item_enclosure_mime_type = "audio/mpeg" # Hard-coded enclosure MIME type.
# ITEM PUBDATE -- It's optional to use one of these three. This is a
# hook that specifies how to get the pubdate for a given item.
# In each case, the method/attribute should return a Python
# datetime.datetime object.
def item_pubdate(self, item):
"""
Takes an item, as returned by items(), and returns the item's
pubdate.
"""
def item_pubdate(self):
"""
Returns the pubdate for every item in the feed.
"""
item_pubdate = datetime.datetime(2005, 5, 3) # Hard-coded pubdate.
# ITEM UPDATED -- It's optional to use one of these three. This is a
# hook that specifies how to get the updateddate for a given item.
# In each case, the method/attribute should return a Python
# datetime.datetime object.
def item_updateddate(self, item):
"""
Takes an item, as returned by items(), and returns the item's
updateddate.
"""
def item_updateddate(self):
"""
Returns the updateddated for every item in the feed.
"""
item_updateddate = datetime.datetime(2005, 5, 3) # Hard-coded updateddate.
# ITEM CATEGORIES -- It's optional to use one of these three. This is
# a hook that specifies how to get the list of categories for a given
# item. In each case, the method/attribute should return an iterable
# object that returns strings.
def item_categories(self, item):
"""
Takes an item, as returned by items(), and returns the item's
categories.
"""
def item_categories(self):
"""
Returns the categories for every item in the feed.
"""
item_categories = ("python", "django") # Hard-coded categories.
# ITEM COPYRIGHT NOTICE (only applicable to Atom feeds) -- One of the
# following three is optional. The framework looks for them in this
# order.
def item_copyright(self, obj):
"""
Takes an item, as returned by items(), and returns the item's
copyright notice as a normal Python string.
"""
def item_copyright(self):
"""
Returns the copyright notice for every item in the feed.
"""
item_copyright = 'Copyright (c) 2007, Sally Smith' # Hard-coded copyright notice.
~~~
## The low-level framework
Behind the scenes, the high-level RSS framework uses a lower-level framework for generating feeds XML. This framework lives in a single module: [django/utils/feedgenerator.py](https://github.com/django/django/blob/master/django/utils/feedgenerator.py).
You use this framework on your own, for lower-level feed generation. You can also create custom feed generator subclasses for use with the `feed_type` `Feed` option.
### `SyndicationFeed` classes
The `feedgenerator` module contains a base class:
* `django.utils.feedgenerator.SyndicationFeed`
and several subclasses:
* `django.utils.feedgenerator.RssUserland091Feed`
* `django.utils.feedgenerator.Rss201rev2Feed`
* `django.utils.feedgenerator.Atom1Feed`
Each of these three classes knows how to render a certain type of feed as XML. They share this interface:
`SyndicationFeed.__init__()`
Initialize the feed with the given dictionary of metadata, which applies to the entire feed. Required keyword arguments are:
* `title`
* `link`
* `description`
Theres also a bunch of other optional keywords:
* `language`
* `author_email`
* `author_name`
* `author_link`
* `subtitle`
* `categories`
* `feed_url`
* `feed_copyright`
* `feed_guid`
* `ttl`
Any extra keyword arguments you pass to `__init__` will be stored in `self.feed` for use with [custom feed generators](http://masteringdjango.com/generating-non-html-content/#custom-feed-generators).
All parameters should be Unicode objects, except `categories`, which should be a sequence of Unicode objects.
`SyndicationFeed.add_item()`
Add an item to the feed with the given parameters.
Required keyword arguments are:
* `title`
* `link`
* `description`
Optional keyword arguments are:
* `author_email`
* `author_name`
* `author_link`
* `pubdate`
* `comments`
* `unique_id`
* `enclosure`
* `categories`
* `item_copyright`
* `ttl`
* `updateddate`
Extra keyword arguments will be stored for [custom feed generators](http://masteringdjango.com/generating-non-html-content/#custom-feed-generators).
All parameters, if given, should be Unicode objects, except:
* `pubdate` should be a Python `datetime` object.
* `updateddate` should be a Python `datetime` object.
* `enclosure` should be an instance of `django.utils.feedgenerator.Enclosure`.
* `categories` should be a sequence of Unicode objects.
`SyndicationFeed.write()`
Outputs the feed in the given encoding to outfile, which is a file-like object.
`SyndicationFeed.writeString()`
Returns the feed as a string in the given encoding.
For example, to create an Atom 1.0 feed and print it to standard output:
~~~
>>> from django.utils import feedgenerator
>>> from datetime import datetime
>>> f = feedgenerator.Atom1Feed(
... title="My Weblog",
... link="http://www.example.com/",
... description="In which I write about what I ate today.",
... language="en",
... author_name="Myself",
... feed_url="http://example.com/atom.xml")
>>> f.add_item(title="Hot dog today",
... link="http://www.example.com/entries/1/",
... pubdate=datetime.now(),
... description="<p>Today I had a Vienna Beef hot dog. It was pink, plump and perfect.</p>")
>>> print(f.writeString('UTF-8'))
<?xml version="1.0" encoding="UTF-8"?>
<feed xmlns="http://www.w3.org/2005/Atom" xml:lang="en">
...
</feed>
~~~
### Custom feed generators
If you need to produce a custom feed format, youve got a couple of options.
If the feed format is totally custom, youll want to subclass `SyndicationFeed` and completely replace the`write()` and `writeString()` methods.
However, if the feed format is a spin-off of RSS or Atom (i.e. [GeoRSS](http://georss.org/), Apples [iTunes podcast format](http://www.apple.com/itunes/podcasts/specs.html), etc.), youve got a better choice. These types of feeds typically add extra elements and/or attributes to the underlying format, and there are a set of methods that `SyndicationFeed` calls to get these extra attributes. Thus, you can subclass the appropriate feed generator class (`Atom1Feed` or `Rss201rev2Feed`) and extend these callbacks. They are:
`SyndicationFeed.root_attributes(self, )`
Return a `dict` of attributes to add to the root feed element (`feed`/`channel`).
`SyndicationFeed.add_root_elements(self, handler)`
Callback to add elements inside the root feed element (`feed`/`channel`). `handler` is an `XMLGenerator` from Pythons built-in SAX library; youll call methods on it to add to the XML document in process.
`SyndicationFeed.item_attributes(self, item)`
Return a `dict` of attributes to add to each item (`item`/`entry`) element. The argument, `item`, is a dictionary of all the data passed to `SyndicationFeed.add_item()`.
`SyndicationFeed.add_item_elements(self, handler, item)`
Callback to add elements to each item (`item`/`entry`) element. `handler` and `item` are as above.
Warning
If you override any of these methods, be sure to call the superclass methods since they add the required elements for each feed format.
For example, you might start implementing an iTunes RSS feed generator like so:
~~~
class iTunesFeed(Rss201rev2Feed):
def root_attributes(self):
attrs = super(iTunesFeed, self).root_attributes()
attrs['xmlns:itunes'] = 'http://www.itunes.com/dtds/podcast-1.0.dtd'
return attrs
def add_root_elements(self, handler):
super(iTunesFeed, self).add_root_elements(handler)
handler.addQuickElement('itunes:explicit', 'clean')
~~~
Obviously theres a lot more work to be done for a complete custom feed class, but the above example should demonstrate the basic idea.
## The Sitemap Framework
A *sitemap* is an XML file on your Web site that tells search engine indexers how frequently your pages change and how important certain pages are in relation to other pages on your site. This information helps search engines index your site.
For more on sitemaps, see [http://www.sitemaps.org/](http://www.sitemaps.org/).
The Django sitemap framework automates the creation of this XML file by letting you express this information in Python code.
It works much like Djangos syndication framework . To create a sitemap, just write a `Sitemap` class and point to it in your URLconf .
### Installation
To install the sitemap app, follow these steps:
1. Add `'django.contrib.sitemaps'` to your `INSTALLED_APPS` setting.
2. Make sure your `TEMPLATES` setting contains a `DjangoTemplates` backend whose `APP_DIRS` options is set to `True`. Its in there by default, so youll only need to change this if youve changed that setting.
3. Make sure youve installed the `sites framework`.
(Note: The sitemap application doesnt install any database tables. The only reason it needs to go into`INSTALLED_APPS` is so that the `Loader()` template loader can find the default templates.)
### Initialization
`views.``sitemap`(*request*, *sitemaps*, *section=None*, *template_name=’sitemap.xml’*, *content_type=’application/xml’*)
To activate sitemap generation on your Django site, add this line to your URLconf
~~~
from django.contrib.sitemaps.views import sitemap
url(r'^sitemap\.xml$', sitemap, {'sitemaps': sitemaps},
name='django.contrib.sitemaps.views.sitemap')
~~~
This tells Django to build a sitemap when a client accesses `/sitemap.xml`.
The name of the sitemap file is not important, but the location is. Search engines will only index links in your sitemap for the current URL level and below. For instance, if `sitemap.xml` lives in your root directory, it may reference any URL in your site. However, if your sitemap lives at `/content/sitemap.xml`, it may only reference URLs that begin with `/content/`.
The sitemap view takes an extra, required argument: `{'sitemaps': sitemaps}`. `sitemaps` should be a dictionary that maps a short section label (e.g., `blog` or `news`) to its `Sitemap` class (e.g., `BlogSitemap` or`NewsSitemap`). It may also map to an *instance* of a `Sitemap` class (e.g., `BlogSitemap(some_var)`).
### Sitemap classes
A `Sitemap` class is a simple Python class that represents a section of entries in your sitemap. For example, one `Sitemap` class could represent all the entries of your Weblog, while another could represent all of the events in your events calendar.
In the simplest case, all these sections get lumped together into one `sitemap.xml`, but its also possible to use the framework to generate a sitemap index that references individual sitemap files, one per section. (See [Creating a sitemap index](http://masteringdjango.com/generating-non-html-content/#creating-a-sitemap-index) below.)
`Sitemap` classes must subclass `django.contrib.sitemaps.Sitemap`. They can live anywhere in your codebase.
### A simple example
Lets assume you have a blog system, with an `Entry` model, and you want your sitemap to include all the links to your individual blog entries. Heres how your sitemap class might look:
~~~
from django.contrib.sitemaps import Sitemap
from blog.models import Entry
class BlogSitemap(Sitemap):
changefreq = "never"
priority = 0.5
def items(self):
return Entry.objects.filter(is_draft=False)
def lastmod(self, obj):
return obj.pub_date
~~~
Note:
* [`changefreq`](http://masteringdjango.com/generating-non-html-content/#django.contrib.syndication.Sitemap.changefreq "django.contrib.syndication.Sitemap.changefreq") and [`priority`](http://masteringdjango.com/generating-non-html-content/#django.contrib.syndication.Sitemap.priority "django.contrib.syndication.Sitemap.priority") are class attributes corresponding to `<changefreq>` and `<priority>` elements, respectively. They can be made callable as functions, as [`lastmod`](http://masteringdjango.com/generating-non-html-content/#django.contrib.syndication.Sitemap.lastmod "django.contrib.syndication.Sitemap.lastmod") was in the example.
* [`items()`](http://masteringdjango.com/generating-non-html-content/#django.contrib.syndication.Sitemap.items "django.contrib.syndication.Sitemap.items") is simply a method that returns a list of objects. The objects returned will get passed to any callable methods corresponding to a sitemap property ([`location`](http://masteringdjango.com/generating-non-html-content/#django.contrib.syndication.Sitemap.location "django.contrib.syndication.Sitemap.location"), [`lastmod`](http://masteringdjango.com/generating-non-html-content/#django.contrib.syndication.Sitemap.lastmod "django.contrib.syndication.Sitemap.lastmod"), [`changefreq`](http://masteringdjango.com/generating-non-html-content/#django.contrib.syndication.Sitemap.changefreq "django.contrib.syndication.Sitemap.changefreq"), and [`priority`](http://masteringdjango.com/generating-non-html-content/#django.contrib.syndication.Sitemap.priority "django.contrib.syndication.Sitemap.priority")).
* [`lastmod`](http://masteringdjango.com/generating-non-html-content/#django.contrib.syndication.Sitemap.lastmod "django.contrib.syndication.Sitemap.lastmod") should return a Python `datetime` object.
* There is no [`location`](http://masteringdjango.com/generating-non-html-content/#django.contrib.syndication.Sitemap.location "django.contrib.syndication.Sitemap.location") method in this example, but you can provide it in order to specify the URL for your object. By default, [`location()`](http://masteringdjango.com/generating-non-html-content/#django.contrib.syndication.Sitemap.location "django.contrib.syndication.Sitemap.location") calls `get_absolute_url()` on each object and returns the result.
### Sitemap class reference
*class *`django.contrib.syndication.``Sitemap`
A `Sitemap` class can define the following methods/attributes:
`items`
Required. A method that returns a list of objects. The framework doesnt care what *type* of objects they are; all that matters is that these objects get passed to the [`location()`](http://masteringdjango.com/generating-non-html-content/#django.contrib.syndication.Sitemap.location "django.contrib.syndication.Sitemap.location"), [`lastmod()`](http://masteringdjango.com/generating-non-html-content/#django.contrib.syndication.Sitemap.lastmod "django.contrib.syndication.Sitemap.lastmod"), [`changefreq()`](http://masteringdjango.com/generating-non-html-content/#django.contrib.syndication.Sitemap.changefreq "django.contrib.syndication.Sitemap.changefreq") and [`priority()`](http://masteringdjango.com/generating-non-html-content/#django.contrib.syndication.Sitemap.priority "django.contrib.syndication.Sitemap.priority")methods.
`location`
Optional. Either a method or attribute.
If its a method, it should return the absolute path for a given object as returned by [`items()`](http://masteringdjango.com/generating-non-html-content/#django.contrib.syndication.Sitemap.items "django.contrib.syndication.Sitemap.items").
If its an attribute, its value should be a string representing an absolute path to use for *every* object returned by [`items()`](http://masteringdjango.com/generating-non-html-content/#django.contrib.syndication.Sitemap.items "django.contrib.syndication.Sitemap.items").
In both cases, absolute path means a URL that doesnt include the protocol or domain. Examples:
* Good: `'/foo/bar/'`
* Bad: `'example.com/foo/bar/'`
* Bad: `'http://example.com/foo/bar/'`
If [`location`](http://masteringdjango.com/generating-non-html-content/#django.contrib.syndication.Sitemap.location "django.contrib.syndication.Sitemap.location") isnt provided, the framework will call the `get_absolute_url()` method on each object as returned by [`items()`](http://masteringdjango.com/generating-non-html-content/#django.contrib.syndication.Sitemap.items "django.contrib.syndication.Sitemap.items").
To specify a protocol other than `'http'`, use [`protocol`](http://masteringdjango.com/generating-non-html-content/#django.contrib.syndication.Sitemap.protocol "django.contrib.syndication.Sitemap.protocol").
`lastmod`
Optional. Either a method or attribute.
If its a method, it should take one argument an object as returned by [`items()`](http://masteringdjango.com/generating-non-html-content/#django.contrib.syndication.Sitemap.items "django.contrib.syndication.Sitemap.items") and return that objects last-modified date/time, as a Python `datetime.datetime` object.
If its an attribute, its value should be a Python `datetime.datetime` object representing the last-modified date/time for *every* object returned by [`items()`](http://masteringdjango.com/generating-non-html-content/#django.contrib.syndication.Sitemap.items "django.contrib.syndication.Sitemap.items").
If all items in a sitemap have a [`lastmod`](http://masteringdjango.com/generating-non-html-content/#django.contrib.syndication.Sitemap.lastmod "django.contrib.syndication.Sitemap.lastmod"), the sitemap generated by [`views.sitemap()`](http://masteringdjango.com/generating-non-html-content/#django.contrib.syndication.views.sitemap "django.contrib.syndication.views.sitemap") will have a `Last-Modified`header equal to the latest `lastmod`. You can activate the [`ConditionalGetMiddleware`](http://masteringdjango.com/generating-non-html-content/chapter_19.html#django.middleware.http.ConditionalGetMiddleware "django.middleware.http.ConditionalGetMiddleware") to make Django respond appropriately to requests with an `If-Modified-Since` header which will prevent sending the sitemap if it hasnt changed.
`changefreq`
Optional. Either a method or attribute.
If its a method, it should take one argument an object as returned by [`items()`](http://masteringdjango.com/generating-non-html-content/#django.contrib.syndication.Sitemap.items "django.contrib.syndication.Sitemap.items") and return that objects change frequency, as a Python string.
If its an attribute, its value should be a string representing the change frequency of *every* object returned by [`items()`](http://masteringdjango.com/generating-non-html-content/#django.contrib.syndication.Sitemap.items "django.contrib.syndication.Sitemap.items").
Possible values for [`changefreq`](http://masteringdjango.com/generating-non-html-content/#django.contrib.syndication.Sitemap.changefreq "django.contrib.syndication.Sitemap.changefreq"), whether you use a method or attribute, are:
* `'always'`
* `'hourly'`
* `'daily'`
* `'weekly'`
* `'monthly'`
* `'yearly'`
* `'never'`
`priority`
Optional. Either a method or attribute.
If its a method, it should take one argument an object as returned by [`items()`](http://masteringdjango.com/generating-non-html-content/#django.contrib.syndication.Sitemap.items "django.contrib.syndication.Sitemap.items") and return that objects priority, as either a string or float.
If its an attribute, its value should be either a string or float representing the priority of *every* object returned by [`items()`](http://masteringdjango.com/generating-non-html-content/#django.contrib.syndication.Sitemap.items "django.contrib.syndication.Sitemap.items").
Example values for [`priority`](http://masteringdjango.com/generating-non-html-content/#django.contrib.syndication.Sitemap.priority "django.contrib.syndication.Sitemap.priority"): `0.4`, `1.0`. The default priority of a page is `0.5`. See the [sitemaps.org documentation](http://www.sitemaps.org/protocol.html#prioritydef) for more.
`protocol`
Optional.
This attribute defines the protocol (`'http'` or `'https'`) of the URLs in the sitemap. If it isnt set, the protocol with which the sitemap was requested is used. If the sitemap is built outside the context of a request, the default is `'http'`.
`i18n`
Optional.
A boolean attribute that defines if the URLs of this sitemap should be generated using all of your`LANGUAGES`. The default is `False`.
### Shortcuts
The sitemap framework provides a convenience class for a common case:
*class *`django.contrib.syndication.``GenericSitemap`
The `django.contrib.sitemaps.GenericSitemap` class allows you to create a sitemap by passing it a dictionary which has to contain at least a `queryset` entry. This queryset will be used to generate the items of the sitemap. It may also have a `date_field` entry that specifies a date field for objects retrieved from the`queryset`. This will be used for the [`lastmod`](http://masteringdjango.com/generating-non-html-content/#django.contrib.syndication.Sitemap.lastmod "django.contrib.syndication.Sitemap.lastmod") attribute in the generated sitemap. You may also pass [`priority`](http://masteringdjango.com/generating-non-html-content/#django.contrib.syndication.Sitemap.priority "django.contrib.syndication.Sitemap.priority")and [`changefreq`](http://masteringdjango.com/generating-non-html-content/#django.contrib.syndication.Sitemap.changefreq "django.contrib.syndication.Sitemap.changefreq") keyword arguments to the `GenericSitemap` constructor to specify these attributes for all URLs.
#### EXAMPLE
Heres an example of a URLconf using [`GenericSitemap`](http://masteringdjango.com/generating-non-html-content/#django.contrib.syndication.GenericSitemap "django.contrib.syndication.GenericSitemap"):
~~~
from django.conf.urls import url
from django.contrib.sitemaps import GenericSitemap
from django.contrib.sitemaps.views import sitemap
from blog.models import Entry
info_dict = {
'queryset': Entry.objects.all(),
'date_field': 'pub_date',
}
urlpatterns = [
# some generic view using info_dict
# ...
# the sitemap
url(r'^sitemap\.xml$', sitemap,
{'sitemaps': {'blog': GenericSitemap(info_dict, priority=0.6)}},
name='django.contrib.sitemaps.views.sitemap'),
]
~~~
### Sitemap for static views
Often you want the search engine crawlers to index views which are neither object detail pages nor flatpages. The solution is to explicitly list URL names for these views in `items` and call `reverse()` in the`location` method of the sitemap. For example:
~~~
# sitemaps.py
from django.contrib import sitemaps
from django.core.urlresolvers import reverse
class StaticViewSitemap(sitemaps.Sitemap):
priority = 0.5
changefreq = 'daily'
def items(self):
return ['main', 'about', 'license']
def location(self, item):
return reverse(item)
# urls.py
from django.conf.urls import url
from django.contrib.sitemaps.views import sitemap
from .sitemaps import StaticViewSitemap
from . import views
sitemaps = {
'static': StaticViewSitemap,
}
urlpatterns = [
url(r'^$', views.main, name='main'),
url(r'^about/$', views.about, name='about'),
url(r'^license/$', views.license, name='license'),
# ...
url(r'^sitemap\.xml$', sitemap, {'sitemaps': sitemaps},
name='django.contrib.sitemaps.views.sitemap')
]
~~~
### Creating a sitemap index
`views.``index`(*request*, *sitemaps*, *template_name=’sitemap_index.xml’*, *content_type=’application/xml’*,*sitemap_url_name=’django.contrib.sitemaps.views.sitemap’*)
The sitemap framework also has the ability to create a sitemap index that references individual sitemap files, one per each section defined in your `sitemaps` dictionary. The only differences in usage are:
* You use two views in your URLconf: `django.contrib.sitemaps.views.index()` and`django.contrib.sitemaps.views.sitemap()`.
* The `django.contrib.sitemaps.views.sitemap()` view should take a `section` keyword argument.
Heres what the relevant URLconf lines would look like for the example above:
~~~
from django.contrib.sitemaps import views
urlpatterns = [
url(r'^sitemap\.xml$', views.index, {'sitemaps': sitemaps}),
url(r'^sitemap-(?P<section>.+)\.xml$', views.sitemap, {'sitemaps': sitemaps}),
]
~~~
This will automatically generate a `sitemap.xml` file that references both `sitemap-flatpages.xml` and `sitemap-blog.xml`. The `Sitemap` classes and the `sitemaps` dict dont change at all.
You should create an index file if one of your sitemaps has more than 50,000 URLs. In this case, Django will automatically paginate the sitemap, and the index will reflect that.
If youre not using the vanilla sitemap view for example, if its wrapped with a caching decorator you must name your sitemap view and pass `sitemap_url_name` to the index view:
~~~
from django.contrib.sitemaps import views as sitemaps_views
from django.views.decorators.cache import cache_page
urlpatterns = [
url(r'^sitemap\.xml$',
cache_page(86400)(sitemaps_views.index),
{'sitemaps': sitemaps, 'sitemap_url_name': 'sitemaps'}),
url(r'^sitemap-(?P<section>.+)\.xml$',
cache_page(86400)(sitemaps_views.sitemap),
{'sitemaps': sitemaps}, name='sitemaps'),
]
~~~
### Template customization
If you wish to use a different template for each sitemap or sitemap index available on your site, you may specify it by passing a `template_name` parameter to the `sitemap` and `index` views via the URLconf:
~~~
from django.contrib.sitemaps import views
urlpatterns = [
url(r'^custom-sitemap\.xml$', views.index, {
'sitemaps': sitemaps,
'template_name': 'custom_sitemap.html'
}),
url(r'^custom-sitemap-(?P<section>.+)\.xml$', views.sitemap, {
'sitemaps': sitemaps,
'template_name': 'custom_sitemap.html'
}),
]
~~~
These views return `TemplateResponse` instances which allow you to easily customize the response data before rendering.
### Context variables
When customizing the templates for the `index()` and `sitemap()` views, you can rely on the following context variables.
#### INDEX
The variable `sitemaps` is a list of absolute URLs to each of the sitemaps.
#### SITEMAP
The variable `urlset` is a list of URLs that should appear in the sitemap. Each URL exposes attributes as defined in the `Sitemap` class:
* `changefreq`
* `item`
* `lastmod`
* `location`
* `priority`
The `item` attribute has been added for each URL to allow more flexible customization of the templates, such as [Google news sitemaps](https://support.google.com/news/publisher/answer/74288?hl=en). Assuming Sitemaps [`items()`](http://masteringdjango.com/generating-non-html-content/#django.contrib.syndication.Sitemap.items "django.contrib.syndication.Sitemap.items") would return a list of items with`publication_data` and a `tags` field something like this would generate a Google News compatible sitemap:
~~~
<?xml version="1.0" encoding="UTF-8"?>
<urlset
xmlns="http://www.sitemaps.org/schemas/sitemap/0.9"
xmlns:news="http://www.google.com/schemas/sitemap-news/0.9">
{% spaceless %}
{% for url in urlset %}
<url>
<loc>{{ url.location }}</loc>
{% if url.lastmod %}<lastmod>{{ url.lastmod|date:"Y-m-d" }}</lastmod>{% endif %}
{% if url.changefreq %}<changefreq>{{ url.changefreq }}</changefreq>{% endif %}
{% if url.priority %}<priority>{{ url.priority }}</priority>{% endif %}
<news:news>
{% if url.item.publication_date %}<news:publication_date>{{ url.item.publication_date|date:"Y-m-d" }}</news:publication_date>{% endif %}
{% if url.item.tags %}<news:keywords>{{ url.item.tags }}</news:keywords>{% endif %}
</news:news>
</url>
{% endfor %}
{% endspaceless %}
</urlset>
~~~
### Pinging Google
You may want to ping Google when your sitemap changes, to let it know to reindex your site. The sitemaps framework provides a function to do just that: `django.contrib.sitemaps.ping_google()`.
`django.contrib.syndication.``ping_google`()
[`ping_google()`](http://masteringdjango.com/generating-non-html-content/#django.contrib.syndication.ping_google "django.contrib.syndication.ping_google") takes an optional argument, `sitemap_url`, which should be the absolute path to your sites sitemap (e.g., `'/sitemap.xml'`). If this argument isnt provided, [`ping_google()`](http://masteringdjango.com/generating-non-html-content/#django.contrib.syndication.ping_google "django.contrib.syndication.ping_google") will attempt to figure out your sitemap by performing a reverse looking in your URLconf.
[`ping_google()`](http://masteringdjango.com/generating-non-html-content/#django.contrib.syndication.ping_google "django.contrib.syndication.ping_google") raises the exception `django.contrib.sitemaps.SitemapNotFound` if it cannot determine your sitemap URL.
Register with Google first!
The [`ping_google()`](http://masteringdjango.com/generating-non-html-content/#django.contrib.syndication.ping_google "django.contrib.syndication.ping_google") command only works if you have registered your site with [Google Webmaster Tools](http://www.google.com/webmasters/tools/).
One useful way to call [`ping_google()`](http://masteringdjango.com/generating-non-html-content/#django.contrib.syndication.ping_google "django.contrib.syndication.ping_google") is from a models `save()` method:
~~~
from django.contrib.sitemaps import ping_google
class Entry(models.Model):
# ...
def save(self, force_insert=False, force_update=False):
super(Entry, self).save(force_insert, force_update)
try:
ping_google()
except Exception:
# Bare 'except' because we could get a variety
# of HTTP-related exceptions.
pass
~~~
A more efficient solution, however, would be to call [`ping_google()`](http://masteringdjango.com/generating-non-html-content/#django.contrib.syndication.ping_google "django.contrib.syndication.ping_google") from a cron script, or some other scheduled task. The function makes an HTTP request to Googles servers, so you may not want to introduce that network overhead each time you call `save()`.
#### PINGING GOOGLE VIA `MANAGE.PY`
Once the sitemaps application is added to your project, you may also ping Google using the `ping_google`management command:
~~~
python manage.py ping_google [/sitemap.xml]
~~~
## Whats Next?
Next, well continue to dig deeper into the built-in tools Django gives you by taking a closer look at the Django session framework.
Chapter 14 – How to write reusable apps
最后更新于:2022-04-01 04:48:04
Chapter Still in Draft!!
This chapter is still a work in progress. You are welcome to browse and offer suggestions, but it is likely full of errors, jumbled and not recommended for use yet. You have been warned…
[TODO This is from the Django docs. Need to update to follow code examples in the book.]
This advanced tutorial begins where Tutorial 6 left off. Well be turning our Web-poll into a standalone Python package you can reuse in new projects and share with other people.
If you havent recently completed Tutorials 16, we encourage you to review these so that your example project matches the one described below.
[TOC]
## Reusability matters
Its a lot of work to design, build, test and maintain a web application. Many Python and Django projects share common problems. Wouldnt it be great if we could save some of this repeated work?
Reusability is the way of life in Python. [The Python Package Index (PyPI)](https://pypi.python.org/pypi) has a vast range of packages you can use in your own Python programs. Check out [Django Packages](https://www.djangopackages.com/) for existing reusable apps you could incorporate in your project. Django itself is also just a Python package. This means that you can take existing Python packages or Django apps and compose them into your own web project. You only need to write the parts that make your project unique.
Lets say you were starting a new project that needed a polls app like the one weve been working on. How do you make this app reusable? Luckily, youre well on the way already. In Tutorial 3 , we saw how we could decouple polls from the project-level URLconf using an `include`. In this tutorial, well take further steps to make the app easy to use in new projects and ready to publish for others to install and use.
Package? App?
A Python [package](https://docs.python.org/tutorial/modules.html#packages) provides a way of grouping related Python code for easy reuse. A package contains one or more files of Python code (also known as modules).
A package can be imported with `import foo.bar` or `from foo import bar`. For a directory (like `polls`) to form a package, it must contain a special file `__init__.py`, even if this file is empty.
A Django *application* is just a Python package that is specifically intended for use in a Django project. An application may use common Django conventions, such as having `models`, `tests`, `urls`, and `views`submodules.
Later on we use the term *packaging* to describe the process of making a Python package easy for others to install. It can be a little confusing, we know.
## Your project and your reusable app
After the previous tutorials, our project should look like this:
~~~
mysite/
manage.py
mysite/
__init__.py
settings.py
urls.py
wsgi.py
polls/
__init__.py
admin.py
migrations/
__init__.py
0001_initial.py
models.py
static/
polls/
images/
background.gif
style.css
templates/
polls/
detail.html
index.html
results.html
tests.py
urls.py
views.py
templates/
admin/
base_site.html
~~~
You created `mysite/templates` in Tutorial 2 , and `polls/templates` in Tutorial 3 . Now perhaps it is clearer why we chose to have separate template directories for the project and application: everything that is part of the polls application is in `polls`. It makes the application self-contained and easier to drop into a new project.
The `polls` directory could now be copied into a new Django project and immediately reused. Its not quite ready to be published though. For that, we need to package the app to make it easy for others to install.
## Installing some prerequisites
The current state of Python packaging is a bit muddled with various tools. For this tutorial, were going to use [setuptools](https://pypi.python.org/pypi/setuptools) to build our package. Its the recommended packaging tool (merged with the `distribute`fork). Well also be using [pip](https://pypi.python.org/pypi/pip) to install and uninstall it. You should install these two packages now. You can install `setuptools` the same way.
## Packaging your app
Python *packaging* refers to preparing your app in a specific format that can be easily installed and used. Django itself is packaged very much like this. For a small app like polls, this process isnt too difficult.
1. First, create a parent directory for `polls`, outside of your Django project. Call this directory `django-polls`.
Choosing a name for your app
When choosing a name for your package, check resources like PyPI to avoid naming conflicts with existing packages. Its often useful to prepend `django-` to your module name when creating a package to distribute. This helps others looking for Django apps identify your app as Django specific.
Application labels (that is, the final part of the dotted path to application packages) *must* be unique in`INSTALLED_APPS`. Avoid using the same label as any of the Django contrib packages , for example `auth`, `admin`, or `messages`.
2. Move the `polls` directory into the `django-polls` directory.
3. Create a file `django-polls/README.rst` with the following contents:
~~~
# django-polls/README.rst
=====
Polls
=====
Polls is a simple Django app to conduct Web-based polls. For each
question, visitors can choose between a fixed number of answers.
Detailed documentation is in the "docs" directory.
Quick start
-----------
1. Add "polls" to your INSTALLED_APPS setting like this::
INSTALLED_APPS = [
...
'polls',
]
2. Include the polls URLconf in your project urls.py like this::
url(r'^polls/', include('polls.urls')),
3. Run `python manage.py migrate` to create the polls models.
4. Start the development server and visit http://127.0.0.1:8000/admin/
to create a poll (you'll need the Admin app enabled).
5. Visit http://127.0.0.1:8000/polls/ to participate in the poll.
~~~
4. Create a `django-polls/LICENSE` file. Choosing a license is beyond the scope of this tutorial, but suffice it to say that code released publicly without a license is *useless*. Django and many Django-compatible apps are distributed under the BSD license; however, youre free to pick your own license. Just be aware that your licensing choice will affect who is able to use your code.
5. Next well create a `setup.py` file which provides details about how to build and install the app. A full explanation of this file is beyond the scope of this tutorial, but the [setuptools docs](http://pythonhosted.org/setuptools/setuptools.html) have a good explanation. Create a file `django-polls/setup.py` with the following contents:
~~~
# django-polls/setup.py
import os
from setuptools import setup
with open(os.path.join(os.path.dirname(__file__), 'README.rst')) as readme:
README = readme.read()
# allow setup.py to be run from any path
os.chdir(os.path.normpath(os.path.join(os.path.abspath(__file__), os.pardir)))
setup(
name='django-polls',
version='0.1',
packages=['polls'],
include_package_data=True,
license='BSD License', # example license
description='A simple Django app to conduct Web-based polls.',
long_description=README,
url='http://www.example.com/',
author='Your Name',
author_email='yourname@example.com',
classifiers=[
'Environment :: Web Environment',
'Framework :: Django',
'Intended Audience :: Developers',
'License :: OSI Approved :: BSD License', # example license
'Operating System :: OS Independent',
'Programming Language :: Python',
# Replace these appropriately if you are stuck on Python 2.
'Programming Language :: Python :: 3',
'Programming Language :: Python :: 3.2',
'Programming Language :: Python :: 3.3',
'Topic :: Internet :: WWW/HTTP',
'Topic :: Internet :: WWW/HTTP :: Dynamic Content',
],
)
~~~
6. Only Python modules and packages are included in the package by default. To include additional files, well need to create a `MANIFEST.in` file. The setuptools docs referred to in the previous step discuss this file in more details. To include the templates, the `README.rst` and our `LICENSE` file, create a file `django-polls/MANIFEST.in` with the following contents:
~~~
# django-polls/MANIFEST.in
include LICENSE
include README.rst
recursive-include polls/static *
recursive-include polls/templates *
~~~
7. Its optional, but recommended, to include detailed documentation with your app. Create an empty directory `django-polls/docs` for future documentation. Add an additional line to `django-polls/MANIFEST.in`:
~~~
recursive-include docs *
~~~
Note that the `docs` directory wont be included in your package unless you add some files to it. Many Django apps also provide their documentation online through sites like [readthedocs.org](https://readthedocs.org/).
8. Try building your package with `python setup.py sdist` (run from inside `django-polls`). This creates a directory called `dist` and builds your new package, `django-polls-0.1.tar.gz`.
For more information on packaging, see Pythons [Tutorial on Packaging and Distributing Projects](https://packaging.python.org/en/latest/distributing.html).
## Using your own package
Since we moved the `polls` directory out of the project, its no longer working. Well now fix this by installing our new `django-polls` package.
Installing as a user library
The following steps install `django-polls` as a user library. Per-user installs have a lot of advantages over installing the package system-wide, such as being usable on systems where you dont have administrator access as well as preventing the package from affecting system services and other users of the machine.
Note that per-user installations can still affect the behavior of system tools that run as that user, so`virtualenv` is a more robust solution (see below).
1. To install the package, use pip (you already installed it, right?):
~~~
pip install --user django-polls/dist/django-polls-0.1.tar.gz
~~~
2. With luck, your Django project should now work correctly again. Run the server again to confirm this.
3. To uninstall the package, use pip:
~~~
pip uninstall django-polls
~~~
## Publishing your app
Now that weve packaged and tested `django-polls`, its ready to share with the world! If this wasnt just an example, you could now:
* Email the package to a friend.
* Upload the package on your Web site.
* Post the package on a public repository, such as [the Python Package Index (PyPI)](https://pypi.python.org/pypi). [packaging.python.org](https://packaging.python.org/)has [a good tutorial](https://packaging.python.org/en/latest/distributing.html#uploading-your-project-to-pypi) for doing this.
## Installing Python packages with virtualenv
Earlier, we installed the polls app as a user library. This has some disadvantages:
* Modifying the user libraries can affect other Python software on your system.
* You wont be able to run multiple versions of this package (or others with the same name).
Typically, these situations only arise once youre maintaining several Django projects. When they do, the best solution is to use [virtualenv](http://www.virtualenv.org/). This tool allows you to maintain multiple isolated Python environments, each with its own copy of the libraries and package namespace.
## Whats Next
Next we will be digging deeper into a subject common to many modern websites generating non-HTML data.
Chapter 13: Deploying Django
最后更新于:2022-04-01 04:48:02
This chapter covers the last essential step of building a Django application: deploying it to a production server.
If youve been following along with our ongoing examples, youve likely been using the `runserver`, which makes things very easy with `runserver`, you dont have to worry about Web server setup. But `runserver` is intended only for development on your local machine, not for exposure on the public Web. To deploy your Django application, youll need to hook it into an industrial-strength Web server such as Apache. In this chapter, well show you how to do that but, first, well give you a checklist of things to do in your codebase before you go live.
[TOC]
## Preparing Your Codebase for Production
### Deployment checklist
The Internet is a hostile environment. Before deploying your Django project, you should take some time to review your settings, with security, performance, and operations in mind.
Django includes many security features . Some are built-in and always enabled. Others are optional because they arent always appropriate, or because theyre inconvenient for development. For example, forcing HTTPS may not be suitable for all websites, and its impractical for local development.
Performance optimizations are another category of trade-offs with convenience. For instance, caching is useful in production, less so for local development. Error reporting needs are also widely different.
The following checklist includes settings that:
* must be set properly for Django to provide the expected level of security;
* are expected to be different in each environment;
* enable optional security features;
* enable performance optimizations; and
* provide error reporting.
Many of these settings are sensitive and should be treated as confidential. If youre releasing the source code for your project, a common practice is to publish suitable settings for development, and to use a private settings module for production.
Some of the checks described below can be automated using the `--deploy` option of the `check` command. Be sure to run it against your production settings file as described in the options documentation.
## Critical settings
### SECRET_KEY
The secret key must be a large random value and it must be kept secret.
Make sure that the key used in production isnt used anywhere else and avoid committing it to source control. This reduces the number of vectors from which an attacker may acquire the key.
Instead of hardcoding the secret key in your settings module, consider loading it from an environment variable:
~~~
import os
SECRET_KEY = os.environ['SECRET_KEY']
~~~
or from a file:
~~~
with open('/etc/secret_key.txt') as f:
SECRET_KEY = f.read().strip()
~~~
### DEBUG
You must never enable debug in production.
When we created a project in Chapter 1, the command `django-admin startproject` created a `settings.py` file with `DEBUG` set to `True`. Many internal parts of Django check this setting and change their behavior if `DEBUG`mode is on. For example, if `DEBUG` is set to `True`, then:
* All database queries will be saved in memory as the object `django.db.connection.queries`. As you can imagine, this eats up memory!
* Any 404 error will be rendered by Djangos special 404 error page (covered in Chapter 3) rather than returning a proper 404 response. This page contains potentially sensitive information and should *not* be exposed to the public Internet.
* Any uncaught exception in your Django application from basic Python syntax errors to database errors to template syntax errors will be rendered by the Django pretty error page that youve likely come to know and love. This page contains even *more* sensitive information than the 404 page and should *never* be exposed to the public.
In short, setting `DEBUG` to `True` tells Django to assume only trusted developers are using your site. The Internet is full of untrustworthy hooligans, and the first thing you should do when youre preparing your application for deployment is set `DEBUG` to `False`.
## Environment-specific settings
### ALLOWED_HOSTS
When `DEBUG = False`, Django doesnt work at all without a suitable value for `ALLOWED_HOSTS`.
This setting is required to protect your site against some CSRF attacks. If you use a wildcard, you must perform your own validation of the `Host` HTTP header, or otherwise ensure that you arent vulnerable to this category of attacks.
### CACHES
If youre using a cache, connection parameters may be different in development and in production.
Cache servers often have weak authentication. Make sure they only accept connections from your application servers.
If youre using Memcached, consider using cached sessions to improve performance.
### DATABASES
Database connection parameters are probably different in development and in production.
Database passwords are very sensitive. You should protect them exactly like `SECRET_KEY`.
For maximum security, make sure database servers only accept connections from your application servers.
If you havent set up backups for your database, do it right now!
### EMAIL_BACKEND and related settings
If your site sends emails, these values need to be set correctly.
### STATIC_ROOT and STATIC_URL
Static files are automatically served by the development server. In production, you must define a`STATIC_ROOT` directory where `collectstatic` will copy them.
### MEDIA_ROOT and MEDIA_URL
Media files are uploaded by your users. Theyre untrusted! Make sure your web server never attempt to interpret them. For instance, if a user uploads a `.php` file , the web server shouldnt execute it.
Now is a good time to check your backup strategy for these files.
## HTTPS
Any website which allows users to log in should enforce site-wide HTTPS to avoid transmitting access tokens in clear. In Django, access tokens include the login/password, the session cookie, and password reset tokens. (You cant do much to protect password reset tokens if youre sending them by email.)
Protecting sensitive areas such as the user account or the admin isnt sufficient, because the same session cookie is used for HTTP and HTTPS. Your web server must redirect all HTTP traffic to HTTPS, and only transmit HTTPS requests to Django.
Once youve set up HTTPS, enable the following settings.
### `CSRF_COOKIE_SECURE`
Set this to `True` to avoid transmitting the CSRF cookie over HTTP accidentally.
### `SESSION_COOKIE_SECURE`
Set this to `True` to avoid transmitting the session cookie over HTTP accidentally.
## Performance optimizations
Setting `DEBUG = False` disables several features that are only useful in development. In addition, you can tune the following settings.
### `CONN_MAX_AGE`
Enabling persistent database connections can result in a nice speed-up when connecting to the database accounts for a significant part of the request processing time.
This helps a lot on virtualized hosts with limited network performance.
### `TEMPLATES`
Enabling the cached template loader often improves performance drastically, as it avoids compiling each template every time it needs to be rendered. See the template loaders docs for more information.
## Error reporting
By the time you push your code to production, its hopefully robust, but you cant rule out unexpected errors. Thankfully, Django can capture errors and notify you accordingly.
### `LOGGING`
Review your logging configuration before putting your website in production, and check that it works as expected as soon as you have received some traffic.
### `ADMINS` and `MANAGERS`
`ADMINS` will be notified of 500 errors by email.
`MANAGERS` will be notified of 404 errors. `IGNORABLE_404_URLS` can help filter out spurious reports.
Error reporting by email doesnt scale very well
Consider using an error monitoring system such as [Sentry](http://sentry.readthedocs.org/en/latest/) before your inbox is flooded by reports. Sentry can also aggregate logs.
### Customize the default error views
Django includes default views and templates for several HTTP error codes. You may want to override the default templates by creating the following templates in your root template directory: `404.html`, `500.html`,`403.html`, and `400.html`. The default views should suffice for 99% of Web applications, but if you desire to customize them, see these instructions which also contain details about the default templates:
* `http_not_found_view`
* `http_internal_server_error_view`
* `http_forbidden_view`
* `http_bad_request_view`
## Using a virtualenv
If you install your projects Python dependencies inside a [virtualenv](http://www.virtualenv.org/), youll need to add the path to this virtualenvs `site-packages` directory to your Python path as well. To do this, add an additional path to your`WSGIPythonPath` directive, with multiple paths separated by a colon (`:`) if using a UNIX-like system, or a semicolon (`;`) if using Windows. If any part of a directory path contains a space character, the complete argument string to `WSGIPythonPath` must be quoted:
~~~
WSGIPythonPath /path/to/mysite.com:/path/to/your/venv/lib/python3.X/site-packages
~~~
Make sure you give the correct path to your virtualenv, and replace `python3.X` with the correct Python version (e.g. `python3.4`).
## Using Different Settings for Production
So far in this book, weve dealt with only a single settings file: the `settings.py` generated by `django-admin.pystartproject`. But as you get ready to deploy, youll likely find yourself needing multiple settings files to keep your development environment isolated from your production environment. (For example, you probably wont want to change `DEBUG` from `False` to `True` whenever you want to test code changes on your local machine.) Django makes this very easy by allowing you to use multiple settings files.
If youd like to organize your settings files into production and development settings, you can accomplish this in one of three ways:
* Set up two full-blown, independent settings files.
* Set up a base settings file (say, for development) and a second (say, production) settings file that merely imports from the first one and defines whatever overrides it needs to define.
* Use only a single settings file that has Python logic to change the settings based on context.
Well take these one at a time.
First, the most basic approach is to define two separate settings files. If youre following along, youve already got `settings.py`. Now, just make a copy of it called `settings_production.py`. (We made this name up; you can call it whatever you want.) In this new file, change `DEBUG`, etc.
The second approach is similar but cuts down on redundancy. Instead of having two settings files whose contents are mostly similar, you can treat one as the base file and create another file that imports from it. For example:
~~~
# settings.py
DEBUG = True
TEMPLATE_DEBUG = DEBUG
DATABASE_ENGINE = 'postgresql_psycopg2'
DATABASE_NAME = 'devdb'
DATABASE_USER = ''
DATABASE_PASSWORD = ''
DATABASE_PORT = ''
# ...
# settings_production.py
from settings import *
DEBUG = TEMPLATE_DEBUG = False
DATABASE_NAME = 'production'
DATABASE_USER = 'app'
DATABASE_PASSWORD = 'letmein'
~~~
Here, `settings_production.py` imports everything from `settings.py` and just redefines the settings that are particular to production. In this case, `DEBUG` is set to `False`, but weve also set different database access parameters for the production setting. (The latter goes to show that you can redefine *any* setting, not just the basic ones like `DEBUG`.)
Finally, the most concise way of accomplishing two settings environments is to use a single settings file that branches based on the environment. One way to do this is to check the current hostname. For example:
~~~
# settings.py
import socket
if socket.gethostname() == 'my-laptop':
DEBUG = TEMPLATE_DEBUG = True
else:
DEBUG = TEMPLATE_DEBUG = False
# ...
~~~
Here, we import the `socket` module from Pythons standard library and use it to check the current systems hostname. We can check the hostname to determine whether the code is being run on the production server.
A core lesson here is that settings files are *just Python code*. They can import from other files, they can execute arbitrary logic, etc. Just make sure that, if you go down this road, the Python code in your settings files is bulletproof. If it raises any exceptions, Django will likely crash badly.
Renaming settings.py
Feel free to rename your `settings.py` to `settings_dev.py` or `settings/dev.py` or `foobar.py` Django doesnt care, as long as you tell it what settings file youre using.
But if you *do* rename the `settings.py` file that is generated by `django-admin.py startproject`, youll find that`manage.py` will give you an error message saying that it cant find the settings. Thats because it tries to import a module called `settings`. You can fix this either by editing `manage.py` to change `settings` to the name of your module, or by using `django-admin.py` instead of `manage.py`. In the latter case, youll need to set the`DJANGO_SETTINGS_MODULE` environment variable to the Python path to your settings file (e.g.,`'mysite.settings'`).
## Deploying Django to a production server
Headache free deployment
If you are serious about deploying a live website, there is really only one sensible option – find a host that explicitly supports Django. Not only will you get a separate media server out of the box (usually Nginx), but they will also take care of the little things like setting up Apache correctly and setting a cron job that restarts the Python process periodically (to prevent your site hanging up). With the better hosts, you are also likely to get some form of one-click deployment. Save yourself the headache and pay the few bucks a month for a host who knows Django.
## Deploying Django with Apache and mod_wsgi
Deploying Django with [Apache](http://httpd.apache.org/) and [mod_wsgi](http://code.google.com/p/modwsgi/) is a tried and tested way to get Django into production.
mod_wsgi is an Apache module which can host any Python [WSGI](http://www.wsgi.org/) application, including Django. Django will work with any version of Apache which supports mod_wsgi.
The [official mod_wsgi documentation](http://code.google.com/p/modwsgi/) is fantastic; its your source for all the details about how to use mod_wsgi. Youll probably want to start with the [installation and configuration documentation](http://code.google.com/p/modwsgi/wiki/InstallationInstructions).
### Basic configuration
Once youve got mod_wsgi installed and activated, edit your Apache servers `httpd.conf` file and add the following. If you are using a version of Apache older than 2.4, replace `Require all granted` with `Allow fromall` and also add the line `Order deny,allow` above it.
~~~
WSGIScriptAlias / /path/to/mysite.com/mysite/wsgi.py
WSGIPythonPath /path/to/mysite.com
<Directory /path/to/mysite.com/mysite>
<Files wsgi.py>
Require all granted
</Files>
</Directory>
~~~
The first bit in the `WSGIScriptAlias` line is the base URL path you want to serve your application at (`/`indicates the root url), and the second is the location of a WSGI file see below on your system, usually inside of your project package (`mysite` in this example). This tells Apache to serve any request below the given URL using the WSGI application defined in that file.
The `WSGIPythonPath` line ensures that your project package is available for import on the Python path; in other words, that `import mysite` works.
The `<Directory>` piece just ensures that Apache can access your `wsgi.py` file.
Next well need to ensure this `wsgi.py` with a WSGI application object exists. As of Django version 1.4,`startproject` will have created one for you; otherwise, youll need to create it. See the WSGI overview for the default contents you should put in this file, and what else you can add to it.
Warning
If multiple Django sites are run in a single mod_wsgi process, all of them will use the settings of whichever one happens to run first. This can be solved by changing:
~~~
os.environ.setdefault("DJANGO_SETTINGS_MODULE", "{{ project_name }}.settings")
~~~
in `wsgi.py`, to:
~~~
os.environ["DJANGO_SETTINGS_MODULE"] = "{{ project_name }}.settings"
~~~
or by using mod_wsgi daemon mode and ensuring that each site runs in its own daemon process.
### Using mod_wsgi daemon mode
Daemon mode is the recommended mode for running mod_wsgi (on non-Windows platforms). To create the required daemon process group and delegate the Django instance to run in it, you will need to add appropriate `WSGIDaemonProcess` and `WSGIProcessGroup` directives. A further change required to the above configuration if you use daemon mode is that you cant use `WSGIPythonPath`; instead you should use the`python-path` option to `WSGIDaemonProcess`, for example:
~~~
WSGIDaemonProcess example.com python-path=/path/to/mysite.com:/path/to/venv/lib/python2.7/site-packages
WSGIProcessGroup example.com
~~~
See the official mod_wsgi documentation for [details on setting up daemon mode](http://code.google.com/p/modwsgi/wiki/QuickConfigurationGuide#Delegation_To_Daemon_Process).
### Serving files
Django doesnt serve files itself; it leaves that job to whichever Web server you choose.
We recommend using a separate Web server i.e., one thats not also running Django for serving media. Here are some good choices:
* [Nginx](http://wiki.nginx.org/Main)
* A stripped-down version of [Apache](http://httpd.apache.org/)
If, however, you have no option but to serve media files on the same Apache `VirtualHost` as Django, you can set up Apache to serve some URLs as static media, and others using the mod_wsgi interface to Django.
This example sets up Django at the site root, but explicitly serves `robots.txt`, `favicon.ico`, any CSS file, and anything in the `/static/` and `/media/` URL space as a static file. All other URLs will be served using mod_wsgi:
~~~
Alias /robots.txt /path/to/mysite.com/static/robots.txt
Alias /favicon.ico /path/to/mysite.com/static/favicon.ico
Alias /media/ /path/to/mysite.com/media/
Alias /static/ /path/to/mysite.com/static/
<Directory /path/to/mysite.com/static>
Require all granted
</Directory>
<Directory /path/to/mysite.com/media>
Require all granted
</Directory>
WSGIScriptAlias / /path/to/mysite.com/mysite/wsgi.py
<Directory /path/to/mysite.com/mysite>
<Files wsgi.py>
Require all granted
</Files>
</Directory>
~~~
If you are using a version of Apache older than 2.4, replace `Require all granted` with `Allow from all` and also add the line `Order deny,allow` above it.
### Serving the admin files
When `django.contrib.staticfiles` is in `INSTALLED_APPS`, the Django development server automatically serves the static files of the admin app (and any other installed apps). This is however not the case when you use any other server arrangement. Youre responsible for setting up Apache, or whichever Web server youre using, to serve the admin files.
The admin files live in (`django/contrib/admin/static/admin`) of the Django distribution.
We strongly recommend using `django.contrib.staticfiles` to handle the admin files (along with a Web server as outlined in the previous section; this means using the `collectstatic` management command to collect the static files in `STATIC_ROOT`, and then configuring your Web server to serve `STATIC_ROOT` at`STATIC_URL`), but here are three other approaches:
1. Create a symbolic link to the admin static files from within your document root (this may require`+FollowSymLinks` in your Apache configuration).
2. Use an `Alias` directive, as demonstrated above, to alias the appropriate URL (probably `STATIC_URL` + `admin/`) to the actual location of the admin files.
3. Copy the admin static files so that they live within your Apache document root.
### If you get a UnicodeEncodeError
If youre taking advantage of the internationalization features of Django and you intend to allow users to upload files, you must ensure that the environment used to start Apache is configured to accept non-ASCII file names. If your environment is not correctly configured, you will trigger `UnicodeEncodeError`exceptions when calling functions like the ones in `os.path` on filenames that contain non-ASCII characters.
To avoid these problems, the environment used to start Apache should contain settings analogous to the following:
~~~
export LANG='en_US.UTF-8'
export LC_ALL='en_US.UTF-8'
~~~
Consult the documentation for your operating system for the appropriate syntax and location to put these configuration items; `/etc/apache2/envvars` is a common location on Unix platforms. Once you have added these statements to your environment, restart Apache.
## Serving static files in production
The basic outline of putting static files into production is simple: run the `collectstatic` command when static files change, then arrange for the collected static files directory (`STATIC_ROOT`) to be moved to the static file server and served. Depending on `STATICFILES_STORAGE`, files may need to be moved to a new location manually or the `post_process` method of the `Storage` class might take care of that.
Of course, as with all deployment tasks, the devils in the details. Every production setup will be a bit different, so youll need to adapt the basic outline to fit your needs. Below are a few common patterns that might help.
### Serving the site and your static files from the same server
If you want to serve your static files from the same server thats already serving your site, the process may look something like:
* Push your code up to the deployment server.
* On the server, run `collectstatic` to copy all the static files into `STATIC_ROOT`.
* Configure your web server to serve the files in `STATIC_ROOT` under the URL `STATIC_URL`. For example, heres how to do this with Apache and mod_wsgi .
Youll probably want to automate this process, especially if youve got multiple web servers. Theres any number of ways to do this automation, but one option that many Django developers enjoy is [Fabric](http://fabfile.org/).
Below, and in the following sections, well show off a few example fabfiles (i.e. Fabric scripts) that automate these file deployment options. The syntax of a fabfile is fairly straightforward but wont be covered here; consult [Fabrics documentation](http://docs.fabfile.org/), for a complete explanation of the syntax.
So, a fabfile to deploy static files to a couple of web servers might look something like:
~~~
from fabric.api import *
# Hosts to deploy onto
env.hosts = ['www1.example.com', 'www2.example.com']
# Where your project code lives on the server
env.project_root = '/home/www/myproject'
def deploy_static():
with cd(env.project_root):
run('./manage.py collectstatic -v0 --noinput')
~~~
### Serving static files from a dedicated server
Most larger Django sites use a separate Web server i.e., one thats not also running Django for serving static files. This server often runs a different type of web server faster but less full-featured. Some common choices are:
* [Nginx](http://wiki.nginx.org/Main)
* A stripped-down version of [Apache](http://httpd.apache.org/)
Configuring these servers is out of scope of this document; check each servers respective documentation for instructions.
Since your static file server wont be running Django, youll need to modify the deployment strategy to look something like:
* When your static files change, run `collectstatic` locally.
* Push your local `STATIC_ROOT` up to the static file server into the directory thats being served. [rsync](https://rsync.samba.org/) is a common choice for this step since it only needs to transfer the bits of static files that have changed.
Heres how this might look in a fabfile:
~~~
from fabric.api import *
from fabric.contrib import project
# Where the static files get collected locally. Your STATIC_ROOT setting.
env.local_static_root = '/tmp/static'
# Where the static files should go remotely
env.remote_static_root = '/home/www/static.example.com'
@roles('static')
def deploy_static():
local('./manage.py collectstatic')
project.rsync_project(
remote_dir = env.remote_static_root,
local_dir = env.local_static_root,
delete = True
)
~~~
### Serving static files from a cloud service or CDN
Another common tactic is to serve static files from a cloud storage provider like Amazons S3 and/or a CDN (content delivery network). This lets you ignore the problems of serving static files and can often make for faster-loading webpages (especially when using a CDN).
When using these services, the basic workflow would look a bit like the above, except that instead of using `rsync` to transfer your static files to the server youd need to transfer the static files to the storage provider or CDN.
Theres any number of ways you might do this, but if the provider has an API a custom file storage backend will make the process incredibly simple. If youve written or are using a 3rd party custom storage backend, you can tell `collectstatic` to use it by setting `STATICFILES_STORAGE` to the storage engine.
For example, if youve written an S3 storage backend in `myproject.storage.S3Storage` you could use it with:
~~~
STATICFILES_STORAGE = 'myproject.storage.S3Storage'
~~~
Once thats done, all you have to do is run `collectstatic` and your static files would be pushed through your storage package up to S3\. If you later needed to switch to a different storage provider, it could be as simple as changing your `STATICFILES_STORAGE` setting.
There are 3rd party apps available that provide storage backends for many common file storage APIs. A good starting point is the [overview at djangopackages.com](https://www.djangopackages.com/grids/g/storage-backends/).
## Scaling
Now that you know how to get Django running on a single server, lets look at how you can scale out a Django installation. This section walks through how a site might scale from a single server to a large-scale cluster that could serve millions of hits an hour.
Its important to note, however, that nearly every large site is large in different ways, so scaling is anything but a one-size-fits-all operation. The following coverage should suffice to show the general principle, and whenever possible well try to point out where different choices could be made.
First off, well make a pretty big assumption and exclusively talk about scaling under Apache and mod_python. Though we know of a number of successful medium- to large-scale FastCGI deployments, were much more familiar with Apache.
### Running on a Single Server
Most sites start out running on a single server, with an architecture that looks something like Figure 13-1.
[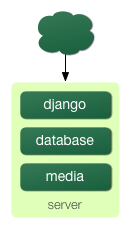](http://masteringdjango.com/wp-content/uploads/2015/09/scaling-1.png)
Figure 13-1: a single server Django setup.
However, as traffic increases youll quickly run into *resource contention* between the different pieces of software. Database servers and Web servers *love* to have the entire server to themselves, so when run on the same server they often end up fighting over the same resources (RAM, CPU) that theyd prefer to monopolize.
This is solved easily by moving the database server to a second machine, as explained in the following section.
### Separating Out the Database Server
As far as Django is concerned, the process of separating out the database server is extremely easy: youll simply need to change the `DATABASE_HOST` setting to the IP or DNS name of your database server. Its probably a good idea to use the IP if at all possible, as relying on DNS for the connection between your Web server and database server isnt recommended.
With a separate database server, our architecture now looks like Figure 13-2.
[](http://masteringdjango.com/wp-content/uploads/2015/09/scaling-2.png)
Figure 13-2: Moving the database onto a dedicated server.
Here were starting to move into whats usually called *n-tier* architecture. Dont be scared by the buzzword it just refers to the fact that different tiers of the Web stack get separated out onto different physical machines.
At this point, if you anticipate ever needing to grow beyond a single database server, its probably a good idea to start thinking about connection pooling and/or database replication. Unfortunately, theres not nearly enough space to do those topics justice in this book, so youll need to consult your databases documentation and/or community for more information.
### Running a Separate Media Server
We still have a big problem left over from the single-server setup: the serving of media from the same box that handles dynamic content.
Those two activities perform best under different circumstances, and by smashing them together on the same box you end up with neither performing particularly well. So the next step is to separate out the media that is, anything *not* generated by a Django view onto a dedicated server (see Figure 13-3).
[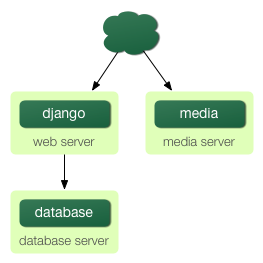](http://masteringdjango.com/wp-content/uploads/2015/09/scaling-3.png)
Figure 13-3: Separating out the media server.
Ideally, this media server should run a stripped-down Web server optimized for static media delivery.[Nginx](http://wiki.nginx.org/Main) is the preferred option here, although lighttpd is another option, or a heavily stripped down Apache could work too.
For sites heavy in static content (photos, videos, etc.), moving to a separate media server is doubly important and should likely be the *first* step in scaling up.
This step can be slightly tricky, however. If your application involves file uploads, Django needs to be able to write uploaded media to the media server. If media lives on another server, youll need to arrange a way for that write to happen across the network.
### Implementing Load Balancing and Redundancy
At this point, weve broken things down as much as possible. This three-server setup should handle a very large amount of traffic we served around 10 million hits a day from an architecture of this sort so if you grow further, youll need to start adding redundancy.
This is a good thing, actually. One glance at Figure 13-3 shows you that if even a single one of your three servers fails, youll bring down your entire site. So as you add redundant servers, not only do you increase capacity, but you also increase reliability.
For the sake of this example, lets assume that the Web server hits capacity first. Its relatively easy to get multiple copies of a Django site running on different hardware just copy all the code onto multiple machines, and start Apache on both of them.
However, youll need another piece of software to distribute traffic over your multiple servers: a *load balancer*. You can buy expensive and proprietary hardware load balancers, but there are a few high-quality open source software load balancers out there.
Apaches `mod_proxy` is one option, but weve found Perlbal ([http://www.djangoproject.com/r/perlbal/](http://www.djangoproject.com/r/perlbal/)) to be fantastic. Its a load balancer and reverse proxy written by the same folks who wrote `memcached` (see Chapter 17).
With the Web servers now clustered, our evolving architecture starts to look more complex, as shown in Figure 13-4.
[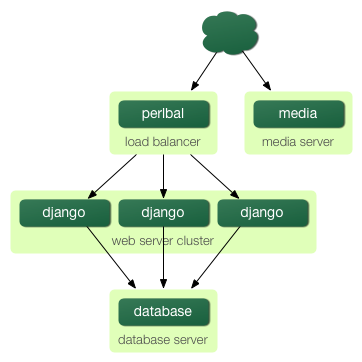](http://masteringdjango.com/wp-content/uploads/2015/09/scaling-4.png)
Figure 13-4: A load-balanced, redundant server setup.
Notice that in the diagram the Web servers are referred to as a cluster to indicate that the number of servers is basically variable. Once you have a load balancer out front, you can easily add and remove back-end Web servers without a second of downtime.
### Going Big
At this point, the next few steps are pretty much derivatives of the last one:
* As you need more database performance, you might want to add replicated database servers. MySQL includes built-in replication; PostgreSQL users should look into Slony ([http://www.djangoproject.com/r/slony/](http://www.djangoproject.com/r/slony/)) and pgpool ([http://www.djangoproject.com/r/pgpool/](http://www.djangoproject.com/r/pgpool/)) for replication and connection pooling, respectively.
* If the single load balancer isnt enough, you can add more load balancer machines out front and distribute among them using round-robin DNS.
* If a single media server doesnt suffice, you can add more media servers and distribute the load with your load-balancing cluster.
* If you need more cache storage, you can add dedicated cache servers.
* At any stage, if a cluster isnt performing well, you can add more servers to the cluster.
After a few of these iterations, a large-scale architecture might look like Figure 13-5.
[](http://masteringdjango.com/wp-content/uploads/2015/09/scaling-5.png)
Figure 13-5\. An example large-scale Django setup.
Though weve shown only two or three servers at each level, theres no fundamental limit to how many you can add.
## Performance Tuning
If you have huge amount of money, you can just keep throwing hardware at scaling problems. For the rest of us, though, performance tuning is a must.
Note
Incidentally, if anyone with monstrous gobs of cash is actually reading this book, please consider a substantial donation to the Django Foundation. We accept uncut diamonds and gold ingots, too.
Unfortunately, performance tuning is much more of an art than a science, and it is even more difficult to write about than scaling. If youre serious about deploying a large-scale Django application, you should spend a great deal of time learning how to tune each piece of your stack.
The following sections, though, present a few Django-specific tuning tips weve discovered over the years.
### Theres No Such Thing As Too Much RAM
Even the really expensive RAM is relatively affordable these days. Buy as much RAM as you can possibly afford, and then buy a little bit more.
Faster processors wont improve performance all that much; most Web servers spend up to 90% of their time waiting on disk I/O. As soon as you start swapping, performance will just die. Faster disks might help slightly, but theyre much more expensive than RAM, such that it doesnt really matter.
If you have multiple servers, the first place to put your RAM is in the database server. If you can afford it, get enough RAM to get fit your entire database into memory. This shouldnt be too hard; weve developed a site with more than half a million newspaper articles, and it took under 2GB of space.
Next, max out the RAM on your Web server. The ideal situation is one where neither server swaps ever. If you get to that point, you should be able to withstand most normal traffic.
### Turn Off Keep-Alive
`Keep-Alive` is a feature of HTTP that allows multiple HTTP requests to be served over a single TCP connection, avoiding the TCP setup/teardown overhead.
This looks good at first glance, but it can kill the performance of a Django site. If youre properly serving media from a separate server, each user browsing your site will only request a page from your Django server every ten seconds or so. This leaves HTTP servers waiting around for the next keep-alive request, and an idle HTTP server just consumes RAM that an active one should be using.
### Use memcached
Although Django supports a number of different cache back-ends, none of them even come *close* to being as fast as memcached. If you have a high-traffic site, dont even bother with the other backends go straight to memcached.
### Use memcached Often
Of course, selecting memcached does you no good if you dont actually use it. Chapter 17 is your best friend here: learn how to use Djangos cache framework, and use it everywhere possible. Aggressive, preemptive caching is usually the only thing that will keep a site up under major traffic.
### Join the Conversation
Each piece of the Django stack from Linux to Apache to PostgreSQL or MySQL has an awesome community behind it. If you really want to get that last 1% out of your servers, join the open source communities behind your software and ask for help. Most free-software community members will be happy to help.
And also be sure to join the Django community. Your humble authors are only two members of an incredibly active, growing group of Django developers. Our community has a huge amount of collective experience to offer.
## Whats Next?
The remaining chapters focus on other Django features that you may or may not need, depending on your application. Feel free to read them in any order you choose.
Chapter 12 – testing in Django
最后更新于:2022-04-01 04:48:00
[TOC=3]
## Introducing automated testing
### What are automated tests?
Tests are simple routines that check the operation of your code.
Testing operates at different levels. Some tests might apply to a tiny detail (*does a particular model method return values as expected?*) while others examine the overall operation of the software (*does a sequence of user inputs on the site produce the desired result?*). That’s no different from the kind of testing we did earlier in the book, using the shell to examine the behavior of a method, or running the application and entering data to check how it behaves.
What’s different in *automated* tests is that the testing work is done for you by the system. You create a set of tests once, and then as you make changes to your app, you can check that your code still works as you originally intended, without having to perform time consuming manual testing.
### Why you need to create tests
So why create tests, and why now?
You may feel that you have quite enough on your plate just learning Python/Django, and having yet another thing to learn and do may seem overwhelming and perhaps unnecessary. After all, our polls application is working quite happily now; going through the trouble of creating automated tests is not going to make it work any better. If creating the polls application is the last bit of Django programming you will ever do, then true, you don’t need to know how to create automated tests. But, if that’s not the case, now is an excellent time to learn.
#### TESTS WILL SAVE YOU TIME
Up to a certain point, ‘checking that it seems to work’ will be a satisfactory test. In a more sophisticated application, you might have dozens of complex interactions between components.
A change in any of those components could have unexpected consequences on the application’s behavior. Checking that it still ‘seems to work’ could mean running through your code’s functionality with twenty different variations of your test data just to make sure you haven’t broken something – not a good use of your time.
That’s especially true when automated tests could do this for you in seconds. If something’s gone wrong, tests will also assist in identifying the code that’s causing the unexpected behavior.
Sometimes it may seem a chore to tear yourself away from your productive, creative programming work to face the unglamorous and unexciting business of writing tests, particularly when you know your code is working properly.
However, the task of writing tests is a lot more fulfilling than spending hours testing your application manually or trying to identify the cause of a newly-introduced problem.
#### TESTS DON’T JUST IDENTIFY PROBLEMS, THEY PREVENT THEM
It’s a mistake to think of tests merely as a negative aspect of development.
Without tests, the purpose or intended behavior of an application might be rather opaque. Even when it’s your own code, you will sometimes find yourself poking around in it trying to find out what exactly it’s doing.
Tests change that; they light up your code from the inside, and when something goes wrong, they focus light on the part that has gone wrong – *even if you hadn’t even realized it had gone wrong*.
#### TESTS MAKE YOUR CODE MORE ATTRACTIVE
You might have created a brilliant piece of software, but you will find that many other developers will simply refuse to look at it because it lacks tests; without tests, they won’t trust it. Jacob Kaplan-Moss, one of Django’s original developers, says “Code without tests is broken by design.”
That other developers want to see tests in your software before they take it seriously is yet another reason for you to start writing tests.
#### TESTS HELP TEAMS WORK TOGETHER
The previous points are written from the point of view of a single developer maintaining an application. Complex applications will be maintained by teams. Tests guarantee that colleagues don’t inadvertently break your code (and that you don’t break theirs without knowing). If you want to make a living as a Django programmer, you must be good at writing tests!
## Basic testing strategies
There are many ways to approach writing tests.
Some programmers follow a discipline called “[test-driven development](http://en.wikipedia.org/wiki/Test-driven_development)“; they actually write their tests before they write their code. This might seem counter-intuitive, but in fact it’s similar to what most people will often do anyway: they describe a problem, then create some code to solve it. Test-driven development simply formalizes the problem in a Python test case.
More often, a newcomer to testing will create some code and later decide that it should have some tests. Perhaps it would have been better to write some tests earlier, but it’s never too late to get started.
Sometimes it’s difficult to figure out where to get started with writing tests. If you have written several thousand lines of Python, choosing something to test might not be easy. In such a case, it’s fruitful to write your first test the next time you make a change, either when you add a new feature or fix a bug.
## Writing tests
Django’s unit tests use a Python standard library module: `unittest`. This module defines tests using a class-based approach.
Here is an example which subclasses from `django.test.TestCase`, which is a subclass of `unittest.TestCase`that runs each test inside a transaction to provide isolation:
~~~
from django.test import TestCase
from myapp.models import Animal
class AnimalTestCase(TestCase):
def setUp(self):
Animal.objects.create(name="lion", sound="roar")
Animal.objects.create(name="cat", sound="meow")
def test_animals_can_speak(self):
"""Animals that can speak are correctly identified"""
lion = Animal.objects.get(name="lion")
cat = Animal.objects.get(name="cat")
self.assertEqual(lion.speak(), 'The lion says "roar"')
self.assertEqual(cat.speak(), 'The cat says "meow"')
~~~
When you run your tests, the default behavior of the test utility is to find all the test cases (that is, subclasses of `unittest.TestCase`) in any file whose name begins with `test`, automatically build a test suite out of those test cases, and run that suite.
For more details about `unittest`, see the Python documentation.
Warning
If your tests rely on database access such as creating or querying models, be sure to create your test classes as subclasses of `django.test.TestCase` rather than `unittest.TestCase`.
Using `unittest.TestCase` avoids the cost of running each test in a transaction and flushing the database, but if your tests interact with the database their behavior will vary based on the order that the test runner executes them. This can lead to unit tests that pass when run in isolation but fail when run in a suite.
## Running tests
Once you’ve written tests, run them using the test command of your project’s `manage.py` utility:
~~~
$ ./manage.py test
~~~
Test discovery is based on the unittest module’s built-in test discovery. By default, this will discover tests in any file named “test*.py” under the current working directory.
You can specify particular tests to run by supplying any number of “test labels” to `./manage.py test`. Each test label can be a full Python dotted path to a package, module, `TestCase` subclass, or test method. For instance:
~~~
# Run all the tests in the animals.tests module
$ ./manage.py test animals.tests
# Run all the tests found within the 'animals' package
$ ./manage.py test animals
# Run just one test case
$ ./manage.py test animals.tests.AnimalTestCase
# Run just one test method
$ ./manage.py test animals.tests.AnimalTestCase.test_animals_can_speak
~~~
You can also provide a path to a directory to discover tests below that directory:
~~~
$ ./manage.py test animals/
~~~
You can specify a custom filename pattern match using the `-p` (or `--pattern`) option, if your test files are named differently from the `test*.py` pattern:
~~~
$ ./manage.py test --pattern="tests_*.py"
~~~
If you press `Ctrl-C` while the tests are running, the test runner will wait for the currently running test to complete and then exit gracefully. During a graceful exit the test runner will output details of any test failures, report on how many tests were run and how many errors and failures were encountered, and destroy any test databases as usual. Thus pressing `Ctrl-C` can be very useful if you forget to pass the `--failfast` option, notice that some tests are unexpectedly failing, and want to get details on the failures without waiting for the full test run to complete.
If you do not want to wait for the currently running test to finish, you can press `Ctrl-C` a second time and the test run will halt immediately, but not gracefully. No details of the tests run before the interruption will be reported, and any test databases created by the run will not be destroyed.
Test with warnings enabled
It’s a good idea to run your tests with Python warnings enabled: `python -Wall manage.py test`. The `-Wall` flag tells Python to display deprecation warnings. Django, like many other Python libraries, uses these warnings to flag when features are going away. It also might flag areas in your code that aren’t strictly wrong but could benefit from a better implementation.
### The test database
Tests that require a database (namely, model tests) will not use your “real” (production) database. Separate, blank databases are created for the tests.
Regardless of whether the tests pass or fail, the test databases are destroyed when all the tests have been executed.
You can prevent the test databases from being destroyed by adding the `--keepdb` flag to the test command. This will preserve the test database between runs. If the database does not exist, it will first be created. Any migrations will also be applied in order to keep it up to date.
By default the test databases get their names by prepending `test_` to the value of the `NAME` settings for the databases defined in `DATABASES`. When using the SQLite database engine the tests will by default use an in-memory database (i.e., the database will be created in memory, bypassing the filesystem entirely!). If you want to use a different database name, specify `NAME <TEST_NAME>` in the `TEST <DATABASE-TEST>` dictionary for any given database in `DATABASES`.
On PostgreSQL, `USER` will also need read access to the built-in `postgres` database.
Aside from using a separate database, the test runner will otherwise use all of the same database settings you have in your settings file: `ENGINE <DATABASE-ENGINE>`, `USER`, `HOST`, etc. The test database is created by the user specified by `USER`, so you’ll need to make sure that the given user account has sufficient privileges to create a new database on the system.
For fine-grained control over the character encoding of your test database, use the `CHARSET <TEST_CHARSET>`TEST option. If you’re using MySQL, you can also use the `COLLATION <TEST_COLLATION>` option to control the particular collation used by the test database. See the settings documentation for details of these and other advanced settings.
If using a SQLite in-memory database with Python 3.4+ and SQLite 3.7.13+, shared cache will be enabled, so you can write tests with ability to share the database between threads.
Finding data from your production database when running tests?
If your code attempts to access the database when its modules are compiled, this will occur *before* the test database is set up, with potentially unexpected results. For example, if you have a database query in module-level code and a real database exists, production data could pollute your tests. *It is a bad idea to have such import-time database queries in your code* anyway – rewrite your code so that it doesn’t do this.
This also applies to customized implementations of `ready()`.
### Order in which tests are executed
In order to guarantee that all `TestCase` code starts with a clean database, the Django test runner reorders tests in the following way:
* All `TestCase` subclasses are run first.
* Then, all other Django-based tests (test cases based on `SimpleTestCase`, including `TransactionTestCase`) are run with no particular ordering guaranteed nor enforced among them.
* Then any other `unittest.TestCase` tests (including doctests) that may alter the database without restoring it to its original state are run.
Note
The new ordering of tests may reveal unexpected dependencies on test case ordering. This is the case with doctests that relied on state left in the database by a given `TransactionTestCase` test, they must be updated to be able to run independently.
You may reverse the execution order inside groups by passing `--reverse` to the test command. This can help with ensuring your tests are independent from each other.
### Rollback emulation
Any initial data loaded in migrations will only be available in `TestCase` tests and not in `TransactionTestCase`tests, and additionally only on backends where transactions are supported (the most important exception being MyISAM). This is also true for tests which rely on `TransactionTestCase` such as `LiveServerTestCase` and`StaticLiveServerTestCase`.
Django can reload that data for you on a per-testcase basis by setting the `serialized_rollback` option to `True`in the body of the `TestCase` or `TransactionTestCase`, but note that this will slow down that test suite by approximately 3x.
Third-party apps or those developing against MyISAM will need to set this; in general, however, you should be developing your own projects against a transactional database and be using `TestCase` for most tests, and thus not need this setting.
The initial serialization is usually very quick, but if you wish to exclude some apps from this process (and speed up test runs slightly), you may add those apps to `TEST_NON_SERIALIZED_APPS`.
### Other test conditions
Regardless of the value of the `DEBUG` setting in your configuration file, all Django tests run with`DEBUG`=False. This is to ensure that the observed output of your code matches what will be seen in a production setting.
Caches are not cleared after each test, and running “manage.py test fooapp” can insert data from the tests into the cache of a live system if you run your tests in production because, unlike databases, a separate “test cache” is not used. This behavior may change in the future.
### Understanding the test output
When you run your tests, you’ll see a number of messages as the test runner prepares itself. You can control the level of detail of these messages with the `verbosity` option on the command line:
~~~
Creating test database...
Creating table myapp_animal
Creating table myapp_mineral
~~~
This tells you that the test runner is creating a test database, as described in the previous section.
Once the test database has been created, Django will run your tests. If everything goes well, you’ll see something like this:
~~~
----------------------------------------------------------------------
Ran 22 tests in 0.221s
OK
~~~
If there are test failures, however, you’ll see full details about which tests failed:
~~~
======================================================================
FAIL: test_was_published_recently_with_future_poll (polls.tests.PollMethodTests)
----------------------------------------------------------------------
Traceback (most recent call last):
File "/dev/mysite/polls/tests.py", line 16, in test_was_published_recently_with_future_poll
self.assertEqual(future_poll.was_published_recently(), False)
AssertionError: True != False
----------------------------------------------------------------------
Ran 1 test in 0.003s
FAILED (failures=1)
~~~
A full explanation of this error output is beyond the scope of this document, but it’s pretty intuitive. You can consult the documentation of Python’s `unittest` library for details.
Note that the return code for the test-runner script is 1 for any number of failed and erroneous tests. If all the tests pass, the return code is 0\. This feature is useful if you’re using the test-runner script in a shell script and need to test for success or failure at that level.
### Speeding up the tests
In recent versions of Django, the default password hasher is rather slow by design. If during your tests you are authenticating many users, you may want to use a custom settings file and set the `PASSWORD_HASHERS`setting to a faster hashing algorithm:
~~~
PASSWORD_HASHERS = [
'django.contrib.auth.hashers.MD5PasswordHasher',
]
~~~
Don’t forget to also include in `PASSWORD_HASHERS` any hashing algorithm used in fixtures, if any.
## Testing tools
Django provides a small set of tools that come in handy when writing tests.
### The test client
The test client is a Python class that acts as a dummy Web browser, allowing you to test your views and interact with your Django-powered application programmatically.
Some of the things you can do with the test client are:
* Simulate GET and POST requests on a URL and observe the response – everything from low-level HTTP (result headers and status codes) to page content.
* See the chain of redirects (if any) and check the URL and status code at each step.
* Test that a given request is rendered by a given Django template, with a template context that contains certain values.
Note that the test client is not intended to be a replacement for [Selenium](http://seleniumhq.org/) or other “in-browser” frameworks. Django’s test client has a different focus. In short:
* Use Django’s test client to establish that the correct template is being rendered and that the template is passed the correct context data.
* Use in-browser frameworks like [Selenium](http://seleniumhq.org/) to test *rendered* HTML and the *behavior* of Web pages, namely JavaScript functionality. Django also provides special support for those frameworks; see the section on`LiveServerTestCase` for more details.
A comprehensive test suite should use a combination of both test types.
#### OVERVIEW AND A QUICK EXAMPLE
To use the test client, instantiate `django.test.Client` and retrieve Web pages:
~~~
>>> from django.test import Client
>>> c = Client()
>>> response = c.post('/login/', {'username': 'john', 'password': 'smith'})
>>> response.status_code
200
>>> response = c.get('/customer/details/')
>>> response.content
'<!DOCTYPE html...'
~~~
As this example suggests, you can instantiate `Client` from within a session of the Python interactive interpreter.
Note a few important things about how the test client works:
* The test client does *not* require the Web server to be running. In fact, it will run just fine with no Web server running at all! That’s because it avoids the overhead of HTTP and deals directly with the Django framework. This helps make the unit tests run quickly.
* When retrieving pages, remember to specify the *path* of the URL, not the whole domain. For example, this is correct:
~~~
>>> c.get('/login/')
~~~
This is incorrect:
~~~
>>> c.get('http://www.example.com/login/')
~~~
The test client is not capable of retrieving Web pages that are not powered by your Django project. If you need to retrieve other Web pages, use a Python standard library module such as `urllib`.
* To resolve URLs, the test client uses whatever URLconf is pointed-to by your `ROOT_URLCONF` setting.
* Although the above example would work in the Python interactive interpreter, some of the test client’s functionality, notably the template-related functionality, is only available *while tests are running*.
The reason for this is that Django’s test runner performs a bit of black magic in order to determine which template was loaded by a given view. This black magic (essentially a patching of Django’s template system in memory) only happens during test running.
* By default, the test client will disable any CSRF checks performed by your site.
If, for some reason, you *want* the test client to perform CSRF checks, you can create an instance of the test client that enforces CSRF checks. To do this, pass in the `enforce_csrf_checks` argument when you construct your client:
~~~
>>> from django.test import Client
>>> csrf_client = Client(enforce_csrf_checks=True)
~~~
#### MAKING REQUESTS
Use the `django.test.Client` class to make requests.
*class *`Client`(*enforce_csrf_checks=False*, ***defaults*)
It requires no arguments at time of construction. However, you can use keywords arguments to specify some default headers. For example, this will send a `User-Agent` HTTP header in each request:
~~~
>>> c = Client(HTTP_USER_AGENT='Mozilla/5.0')
~~~
The values from the `extra` keywords arguments passed to `get()`, `post()`, etc. have precedence over the defaults passed to the class constructor.
The `enforce_csrf_checks` argument can be used to test CSRF protection (see above).
Once you have a `Client` instance, you can call any of the following methods:
`get`(*path*, *data=None*, *follow=False*, *secure=False*, ***extra*)
Makes a GET request on the provided `path` and returns a `Response` object, which is documented below.
The key-value pairs in the `data` dictionary are used to create a GET data payload. For example:
~~~
>>> c = Client()
>>> c.get('/customers/details/', {'name': 'fred', 'age': 7})
~~~
…will result in the evaluation of a GET request equivalent to:
~~~
/customers/details/?name=fred&age=7
~~~
The `extra` keyword arguments parameter can be used to specify headers to be sent in the request. For example:
~~~
>>> c = Client()
>>> c.get('/customers/details/', {'name': 'fred', 'age': 7},
... HTTP_X_REQUESTED_WITH='XMLHttpRequest')
~~~
…will send the HTTP header `HTTP_X_REQUESTED_WITH` to the details view, which is a good way to test code paths that use the `django.http.HttpRequest.is_ajax()` method.
CGI specification
The headers sent via `**extra` should follow [CGI](http://www.w3.org/CGI/) specification. For example, emulating a different “Host” header as sent in the HTTP request from the browser to the server should be passed as `HTTP_HOST`.
If you already have the GET arguments in URL-encoded form, you can use that encoding instead of using the data argument. For example, the previous GET request could also be posed as:
~~~
>>> c = Client()
>>> c.get('/customers/details/?name=fred&age=7')
~~~
If you provide a URL with both an encoded GET data and a data argument, the data argument will take precedence.
If you set `follow` to `True` the client will follow any redirects and a `redirect_chain` attribute will be set in the response object containing tuples of the intermediate urls and status codes.
If you had a URL `/redirect_me/` that redirected to `/next/`, that redirected to `/final/`, this is what you’d see:
~~~
>>> response = c.get('/redirect_me/', follow=True)
>>> response.redirect_chain
[('http://testserver/next/', 302), ('http://testserver/final/', 302)]
~~~
If you set `secure` to `True` the client will emulate an HTTPS request.
`post`(*path*, *data=None*, *content_type=MULTIPART_CONTENT*, *follow=False*, *secure=False*, ***extra*)
Makes a POST request on the provided `path` and returns a `Response` object, which is documented below.
The key-value pairs in the `data` dictionary are used to submit POST data. For example:
~~~
>>> c = Client()
>>> c.post('/login/', {'name': 'fred', 'passwd': 'secret'})
~~~
…will result in the evaluation of a POST request to this URL:
~~~
/login/
~~~
…with this POST data:
~~~
name=fred&passwd=secret
~~~
If you provide `content_type` (e.g. *text/xml* for an XML payload), the contents of `data` will be sent as-is in the POST request, using `content_type` in the HTTP `Content-Type` header.
If you don’t provide a value for `content_type`, the values in `data` will be transmitted with a content type of*multipart/form-data*. In this case, the key-value pairs in `data` will be encoded as a multipart message and used to create the POST data payload.
To submit multiple values for a given key – for example, to specify the selections for a `<select multiple>` – provide the values as a list or tuple for the required key. For example, this value of `data` would submit three selected values for the field named `choices`:
~~~
{'choices': ('a', 'b', 'd')}
~~~
Submitting files is a special case. To POST a file, you need only provide the file field name as a key, and a file handle to the file you wish to upload as a value. For example:
~~~
>>> c = Client()
>>> with open('wishlist.doc') as fp:
... c.post('/customers/wishes/', {'name': 'fred', 'attachment': fp})
~~~
(The name `attachment` here is not relevant; use whatever name your file-processing code expects.)
You may also provide any file-like object (e.g., `StringIO` or `BytesIO`) as a file handle.
Note that if you wish to use the same file handle for multiple `post()` calls then you will need to manually reset the file pointer between posts. The easiest way to do this is to manually close the file after it has been provided to `post()`, as demonstrated above.
You should also ensure that the file is opened in a way that allows the data to be read. If your file contains binary data such as an image, this means you will need to open the file in `rb` (read binary) mode.
The `extra` argument acts the same as for `Client.get()`.
If the URL you request with a POST contains encoded parameters, these parameters will be made available in the request.GET data. For example, if you were to make the request:
~~~
>>> c.post('/login/?visitor=true', {'name': 'fred', 'passwd': 'secret'})
~~~
… the view handling this request could interrogate request.POST to retrieve the username and password, and could interrogate request.GET to determine if the user was a visitor.
If you set `follow` to `True` the client will follow any redirects and a `redirect_chain` attribute will be set in the response object containing tuples of the intermediate urls and status codes.
If you set `secure` to `True` the client will emulate an HTTPS request.
`head`(*path*, *data=None*, *follow=False*, *secure=False*, ***extra*)
Makes a HEAD request on the provided `path` and returns a `Response` object. This method works just like`Client.get()`, including the `follow`, `secure` and `extra` arguments, except it does not return a message body.
`options`(*path*, *data=”*, *content_type=’application/octet-stream’*, *follow=False*, *secure=False*, ***extra*)
Makes an OPTIONS request on the provided `path` and returns a `Response` object. Useful for testing RESTful interfaces.
When `data` is provided, it is used as the request body, and a `Content-Type` header is set to `content_type`.
The `follow`, `secure` and `extra` arguments act the same as for `Client.get()`.
`put`(*path*, *data=”*, *content_type=’application/octet-stream’*, *follow=False*, *secure=False*, ***extra*)
Makes a PUT request on the provided `path` and returns a `Response` object. Useful for testing RESTful interfaces.
When `data` is provided, it is used as the request body, and a `Content-Type` header is set to `content_type`.
The `follow`, `secure` and `extra` arguments act the same as for `Client.get()`.
`patch`(*path*, *data=”*, *content_type=’application/octet-stream’*, *follow=False*, *secure=False*, ***extra*)
Makes a PATCH request on the provided `path` and returns a `Response` object. Useful for testing RESTful interfaces.
The `follow`, `secure` and `extra` arguments act the same as for `Client.get()`.
`delete`(*path*, *data=”*, *content_type=’application/octet-stream’*, *follow=False*, *secure=False*, ***extra*)
Makes an DELETE request on the provided `path` and returns a `Response` object. Useful for testing RESTful interfaces.
When `data` is provided, it is used as the request body, and a `Content-Type` header is set to `content_type`.
The `follow`, `secure` and `extra` arguments act the same as for `Client.get()`.
`trace`(*path*, *follow=False*, *secure=False*, ***extra*)
Makes a TRACE request on the provided `path` and returns a `Response` object. Useful for simulating diagnostic probes.
Unlike the other request methods, `data` is not provided as a keyword parameter in order to comply with[RFC 2616](https://tools.ietf.org/html/rfc2616.html), which mandates that TRACE requests should not have an entity-body.
The `follow`, `secure`, and `extra` arguments act the same as for `Client.get()`.
`login`(***credentials*)
If your site uses Django’s authentication system and you deal with logging in users, you can use the test client’s `login()` method to simulate the effect of a user logging into the site.
After you call this method, the test client will have all the cookies and session data required to pass any login-based tests that may form part of a view.
The format of the `credentials` argument depends on which authentication backend you’re using (which is configured by your `AUTHENTICATION_BACKENDS` setting). If you’re using the standard authentication backend provided by Django (`ModelBackend`), `credentials` should be the user’s username and password, provided as keyword arguments:
~~~
>>> c = Client()
>>> c.login(username='fred', password='secret')
# Now you can access a view that's only available to logged-in users.
~~~
If you’re using a different authentication backend, this method may require different credentials. It requires whichever credentials are required by your backend’s `authenticate()` method.
`login()` returns `True` if it the credentials were accepted and login was successful.
Finally, you’ll need to remember to create user accounts before you can use this method. As we explained above, the test runner is executed using a test database, which contains no users by default. As a result, user accounts that are valid on your production site will not work under test conditions. You’ll need to create users as part of the test suite – either manually (using the Django model API) or with a test fixture. Remember that if you want your test user to have a password, you can’t set the user’s password by setting the password attribute directly – you must use the `set_password()` function to store a correctly hashed password. Alternatively, you can use the `create_user()` helper method to create a new user with a correctly hashed password.
`logout`()
If your site uses Django’s authentication system, the `logout()` method can be used to simulate the effect of a user logging out of your site.
After you call this method, the test client will have all the cookies and session data cleared to defaults. Subsequent requests will appear to come from an `AnonymousUser`.
#### TESTING RESPONSES
The `get()` and `post()` methods both return a `Response` object. This `Response` object is *not* the same as the`HttpResponse` object returned by Django views; the test response object has some additional data useful for test code to verify.
Specifically, a `Response` object has the following attributes:
*class *`Response`
`client`
The test client that was used to make the request that resulted in the response.
`content`
The body of the response, as a string. This is the final page content as rendered by the view, or any error message.
`context`
The template `Context` instance that was used to render the template that produced the response content.
If the rendered page used multiple templates, then `context` will be a list of `Context` objects, in the order in which they were rendered.
Regardless of the number of templates used during rendering, you can retrieve context values using the `[]`operator. For example, the context variable `name` could be retrieved using:
~~~
>>> response = client.get('/foo/')
>>> response.context['name']
'Arthur'
~~~
`request`
The request data that stimulated the response.
`wsgi_request`
The `WSGIRequest` instance generated by the test handler that generated the response.
`status_code`
The HTTP status of the response, as an integer. See [RFC 2616#section-10](https://tools.ietf.org/html/rfc2616.html#section-10) for a full list of HTTP status codes.
`templates`
A list of `Template` instances used to render the final content, in the order they were rendered. For each template in the list, use `template.name` to get the template’s file name, if the template was loaded from a file. (The name is a string such as `'admin/index.html'`.)
`resolver_match`
An instance of `ResolverMatch` for the response. You can use the `func` attribute, for example, to verify the view that served the response:
~~~
# my_view here is a function based view
self.assertEqual(response.resolver_match.func, my_view)
# class based views need to be compared by name, as the functions
# generated by as_view() won't be equal
self.assertEqual(response.resolver_match.func.__name__, MyView.as_view().__name__)
~~~
If the given URL is not found, accessing this attribute will raise a `Resolver404` exception.
You can also use dictionary syntax on the response object to query the value of any settings in the HTTP headers. For example, you could determine the content type of a response using `response['Content-Type']`.
#### EXCEPTIONS
If you point the test client at a view that raises an exception, that exception will be visible in the test case. You can then use a standard `try ... except` block or `assertRaises()` to test for exceptions.
The only exceptions that are not visible to the test client are `Http404`, `PermissionDenied`, `SystemExit`, and`SuspiciousOperation`. Django catches these exceptions internally and converts them into the appropriate HTTP response codes. In these cases, you can check `response.status_code` in your test.
#### PERSISTENT STATE
The test client is stateful. If a response returns a cookie, then that cookie will be stored in the test client and sent with all subsequent `get()` and `post()` requests.
Expiration policies for these cookies are not followed. If you want a cookie to expire, either delete it manually or create a new `Client` instance (which will effectively delete all cookies).
A test client has two attributes that store persistent state information. You can access these properties as part of a test condition.
`Client.``cookies`
A Python `SimpleCookie` object, containing the current values of all the client cookies. See the documentation of the `http.cookies` module for more.
`Client.``session`
A dictionary-like object containing session information. See the session documentation for full details.
To modify the session and then save it, it must be stored in a variable first (because a new `SessionStore` is created every time this property is accessed):
~~~
def test_something(self):
session = self.client.session
session['somekey'] = 'test'
session.save()
~~~
#### EXAMPLE
The following is a simple unit test using the test client:
~~~
import unittest
from django.test import Client
class SimpleTest(unittest.TestCase):
def setUp(self):
# Every test needs a client.
self.client = Client()
def test_details(self):
# Issue a GET request.
response = self.client.get('/customer/details/')
# Check that the response is 200 OK.
self.assertEqual(response.status_code, 200)
# Check that the rendered context contains 5 customers.
self.assertEqual(len(response.context['customers']), 5)
~~~
### Provided test case classes
Normal Python unit test classes extend a base class of `unittest.TestCase`. Django provides a few extensions of this base class:
#### SIMPLETESTCASE
*class *`SimpleTestCase`
A thin subclass of `unittest.TestCase`, it extends it with some basic functionality like:
* Saving and restoring the Python warning machinery state.
* Some useful assertions like:
* Checking that a callable `raises a certain exception`.
* Testing form field `rendering and error treatment`.
* Testing `HTML responses for the presence/lack of a given fragment`.
* Verifying that a template `has/hasn't been used to generate a given response content`.
* Verifying a HTTP `redirect` is performed by the app.
* Robustly testing two `HTML fragments` for equality/inequality or `containment`.
* Robustly testing two `XML fragments` for equality/inequality.
* Robustly testing two `JSON fragments` for equality.
* The ability to run tests with modified settings.
* Using the `client` `Client`.
* Custom test-time `URL maps`.
If you need any of the other more complex and heavyweight Django-specific features like:
* Testing or using the ORM.
* Database `fixtures`.
* Test skipping based on database backend features.
* The remaining specialized `assert*` methods.
then you should use `TransactionTestCase` or `TestCase` instead.
`SimpleTestCase` inherits from `unittest.TestCase`.
Warning
`SimpleTestCase` and its subclasses (e.g. `TestCase`, …) rely on `setUpClass()` and `tearDownClass()` to perform some class-wide initialization (e.g. overriding settings). If you need to override those methods, don’t forget to call the `super` implementation:
~~~
class MyTestCase(TestCase):
@classmethod
def setUpClass(cls):
super(cls, MyTestCase).setUpClass() # Call parent first
...
@classmethod
def tearDownClass(cls):
...
super(cls, MyTestCase).tearDownClass() # Call parent last
~~~
#### TRANSACTIONTESTCASE
*class *`TransactionTestCase`
Django’s `TestCase` class (described below) makes use of database transaction facilities to speed up the process of resetting the database to a known state at the beginning of each test. A consequence of this, however, is that some database behaviors cannot be tested within a Django `TestCase` class. For instance, you cannot test that a block of code is executing within a transaction, as is required when using`select_for_update()`. In those cases, you should use `TransactionTestCase`.
In older versions of Django, the effects of transaction commit and rollback could not be tested within a`TestCase`. With the completion of the deprecation cycle of the old-style transaction management in Django 1.8, transaction management commands (e.g. `transaction.commit()`) are no longer disabled within `TestCase`.
`TransactionTestCase` and `TestCase` are identical except for the manner in which the database is reset to a known state and the ability for test code to test the effects of commit and rollback:
* A `TransactionTestCase` resets the database after the test runs by truncating all tables. A `TransactionTestCase`may call commit and rollback and observe the effects of these calls on the database.
* A `TestCase`, on the other hand, does not truncate tables after a test. Instead, it encloses the test code in a database transaction that is rolled back at the end of the test. This guarantees that the rollback at the end of the test restores the database to its initial state.
Warning
`TestCase` running on a database that does not support rollback (e.g. MySQL with the MyISAM storage engine), and all instances of `TransactionTestCase`, will roll back at the end of the test by deleting all data from the test database.
Apps will not see their data reloaded; if you need this functionality (for example, third-party apps should enable this) you can set `serialized_rollback = True` inside the `TestCase` body.
`TransactionTestCase` inherits from `SimpleTestCase`.
#### TESTCASE
*class *`TestCase`
This class provides some additional capabilities that can be useful for testing Web sites.
Converting a normal `unittest.TestCase` to a Django `TestCase` is easy: Just change the base class of your test from `'unittest.TestCase'` to `'django.test.TestCase'`. All of the standard Python unit test functionality will continue to be available, but it will be augmented with some useful additions, including:
* Automatic loading of fixtures.
* Wraps the tests within two nested `atomic` blocks: one for the whole class and one for each test.
* Creates a TestClient instance.
* Django-specific assertions for testing for things like redirection and form errors.
*classmethod *`TestCase.``setUpTestData`()
The class-level `atomic` block described above allows the creation of initial data at the class level, once for the whole `TestCase`. This technique allows for faster tests as compared to using `setUp()`.
For example:
~~~
from django.test import TestCase
class MyTests(TestCase):
@classmethod
def setUpTestData(cls):
# Set up data for the whole TestCase
cls.foo = Foo.objects.create(bar="Test")
...
def test1(self):
# Some test using self.foo
...
def test2(self):
# Some other test using self.foo
...
~~~
Note that if the tests are run on a database with no transaction support (for instance, MySQL with the MyISAM engine), `setUpTestData()` will be called before each test, negating the speed benefits.
Warning
If you want to test some specific database transaction behavior, you should use `TransactionTestCase`, as`TestCase` wraps test execution within an `atomic()` block.
`TestCase` inherits from `TransactionTestCase`.
#### LIVESERVERTESTCASE
*class *`LiveServerTestCase`
`LiveServerTestCase` does basically the same as `TransactionTestCase` with one extra feature: it launches a live Django server in the background on setup, and shuts it down on teardown. This allows the use of automated test clients other than the Django dummy client such as, for example, the [Selenium](http://seleniumhq.org/) client, to execute a series of functional tests inside a browser and simulate a real user’s actions.
By default the live server’s address is `'localhost:8081'` and the full URL can be accessed during the tests with `self.live_server_url`. If you’d like to change the default address (in the case, for example, where the 8081 port is already taken) then you may pass a different one to the test command via the `--liveserver`option, for example:
~~~
./manage.py test --liveserver=localhost:8082
~~~
Another way of changing the default server address is by setting the DJANGO_LIVE_TEST_SERVER_ADDRESSenvironment variable somewhere in your code (for example, in a custom test runner):
~~~
import os
os.environ['DJANGO_LIVE_TEST_SERVER_ADDRESS'] = 'localhost:8082'
~~~
In the case where the tests are run by multiple processes in parallel (for example, in the context of several simultaneous [continuous integration](http://en.wikipedia.org/wiki/Continuous_integration) builds), the processes will compete for the same address, and therefore your tests might randomly fail with an “Address already in use” error. To avoid this problem, you can pass a comma-separated list of ports or ranges of ports (at least as many as the number of potential parallel processes). For example:
~~~
./manage.py test --liveserver=localhost:8082,8090-8100,9000-9200,7041
~~~
Then, during test execution, each new live test server will try every specified port until it finds one that is free and takes it.
To demonstrate how to use `LiveServerTestCase`, let’s write a simple Selenium test. First of all, you need to install the [selenium package](https://pypi.python.org/pypi/selenium) into your Python path:
~~~
pip install selenium
~~~
Then, add a `LiveServerTestCase`-based test to your app’s tests module (for example: `myapp/tests.py`). The code for this test may look as follows:
~~~
from django.test import LiveServerTestCase
from selenium.webdriver.firefox.webdriver import WebDriver
class MySeleniumTests(LiveServerTestCase):
fixtures = ['user-data.json']
@classmethod
def setUpClass(cls):
super(MySeleniumTests, cls).setUpClass()
cls.selenium = WebDriver()
@classmethod
def tearDownClass(cls):
cls.selenium.quit()
super(MySeleniumTests, cls).tearDownClass()
def test_login(self):
self.selenium.get('%s%s' % (self.live_server_url, '/login/'))
username_input = self.selenium.find_element_by_name("username")
username_input.send_keys('myuser')
password_input = self.selenium.find_element_by_name("password")
password_input.send_keys('secret')
self.selenium.find_element_by_xpath('//input[@value="Log in"]').click()
~~~
Finally, you may run the test as follows:
~~~
./manage.py test myapp.tests.MySeleniumTests.test_login
~~~
This example will automatically open Firefox then go to the login page, enter the credentials and press the “Log in” button. Selenium offers other drivers in case you do not have Firefox installed or wish to use another browser. The example above is just a tiny fraction of what the Selenium client can do; check out the [full reference](http://selenium-python.readthedocs.org/en/latest/api.html) for more details.
Tip
If you use the `staticfiles` app in your project and need to perform live testing, then you might want to use the `StaticLiveServerTestCase` subclass which transparently serves all the assets during execution of its tests in a way very similar to what we get at development time with `DEBUG=True`, i.e. without having to collect them using `collectstatic`.
Note
When using an in-memory SQLite database to run the tests, the same database connection will be shared by two threads in parallel: the thread in which the live server is run and the thread in which the test case is run. It’s important to prevent simultaneous database queries via this shared connection by the two threads, as that may sometimes randomly cause the tests to fail. So you need to ensure that the two threads don’t access the database at the same time. In particular, this means that in some cases (for example, just after clicking a link or submitting a form), you might need to check that a response is received by Selenium and that the next page is loaded before proceeding with further test execution. Do this, for example, by making Selenium wait until the `<body>` HTML tag is found in the response (requires Selenium > 2.13):
~~~
def test_login(self):
from selenium.webdriver.support.wait import WebDriverWait
timeout = 2
...
self.selenium.find_element_by_xpath('//input[@value="Log in"]').click()
# Wait until the response is received
WebDriverWait(self.selenium, timeout).until(
lambda driver: driver.find_element_by_tag_name('body'))
~~~
The tricky thing here is that there’s really no such thing as a “page load,” especially in modern Web apps that generate HTML dynamically after the server generates the initial document. So, simply checking for the presence of `<body>` in the response might not necessarily be appropriate for all use cases. Please refer to the [Selenium FAQ](http://code.google.com/p/selenium/wiki/FrequentlyAskedQuestions#Q:_WebDriver_fails_to_find_elements_/_Does_not_block_on_page_loa) and [Selenium documentation](http://seleniumhq.org/docs/04_webdriver_advanced.html#explicit-waits) for more information.
### Test cases features
#### DEFAULT TEST CLIENT
`SimpleTestCase.``client`
Every test case in a `django.test.*TestCase` instance has access to an instance of a Django test client. This client can be accessed as `self.client`. This client is recreated for each test, so you don’t have to worry about state (such as cookies) carrying over from one test to another.
This means, instead of instantiating a `Client` in each test:
~~~
import unittest
from django.test import Client
class SimpleTest(unittest.TestCase):
def test_details(self):
client = Client()
response = client.get('/customer/details/')
self.assertEqual(response.status_code, 200)
def test_index(self):
client = Client()
response = client.get('/customer/index/')
self.assertEqual(response.status_code, 200)
~~~
…you can just refer to `self.client`, like so:
~~~
from django.test import TestCase
class SimpleTest(TestCase):
def test_details(self):
response = self.client.get('/customer/details/')
self.assertEqual(response.status_code, 200)
def test_index(self):
response = self.client.get('/customer/index/')
self.assertEqual(response.status_code, 200)
~~~
#### CUSTOMIZING THE TEST CLIENT
`SimpleTestCase.``client_class`
If you want to use a different `Client` class (for example, a subclass with customized behavior), use the`client_class` class attribute:
~~~
from django.test import TestCase, Client
class MyTestClient(Client):
# Specialized methods for your environment
...
class MyTest(TestCase):
client_class = MyTestClient
def test_my_stuff(self):
# Here self.client is an instance of MyTestClient...
call_some_test_code()
~~~
#### FIXTURE LOADING
`TransactionTestCase.``fixtures`
A test case for a database-backed Web site isn’t much use if there isn’t any data in the database. To make it easy to put test data into the database, Django’s custom `TransactionTestCase` class provides a way of loading fixtures.
A fixture is a collection of data that Django knows how to import into a database. For example, if your site has user accounts, you might set up a fixture of fake user accounts in order to populate your database during tests.
The most straightforward way of creating a fixture is to use the manage.py dumpdata command. This assumes you already have some data in your database. See the dumpdata documentation for more details.
Once you’ve created a fixture and placed it in a `fixtures` directory in one of your `INSTALLED_APPS`, you can use it in your unit tests by specifying a `fixtures` class attribute on your `django.test.TestCase` subclass:
~~~
from django.test import TestCase
from myapp.models import Animal
class AnimalTestCase(TestCase):
fixtures = ['mammals.json', 'birds']
def setUp(self):
# Test definitions as before.
call_setup_methods()
def testFluffyAnimals(self):
# A test that uses the fixtures.
call_some_test_code()
~~~
Here’s specifically what will happen:
* At the start of each test case, before `setUp()` is run, Django will flush the database, returning the database to the state it was in directly after `migrate` was called.
* Then, all the named fixtures are installed. In this example, Django will install any JSON fixture named`mammals`, followed by any fixture named `birds`. See the `loaddata` documentation for more details on defining and installing fixtures.
This flush/load procedure is repeated for each test in the test case, so you can be certain that the outcome of a test will not be affected by another test, or by the order of test execution.
By default, fixtures are only loaded into the `default` database. If you are using multiple databases and set`multi_db=True`, fixtures will be loaded into all databases.
#### MULTI-DATABASE SUPPORT
`TransactionTestCase.``multi_db`
Django sets up a test database corresponding to every database that is defined in the `DATABASES` definition in your settings file. However, a big part of the time taken to run a Django TestCase is consumed by the call to `flush` that ensures that you have a clean database at the start of each test run. If you have multiple databases, multiple flushes are required (one for each database), which can be a time consuming activity – especially if your tests don’t need to test multi-database activity.
As an optimization, Django only flushes the `default` database at the start of each test run. If your setup contains multiple databases, and you have a test that requires every database to be clean, you can use the`multi_db` attribute on the test suite to request a full flush.
For example:
~~~
class TestMyViews(TestCase):
multi_db = True
def testIndexPageView(self):
call_some_test_code()
~~~
This test case will flush *all* the test databases before running `testIndexPageView`.
The `multi_db` flag also affects into which databases the attr:TransactionTestCase.fixtures are loaded. By default (when `multi_db=False`), fixtures are only loaded into the `default` database. If `multi_db=True`, fixtures are loaded into all databases.
#### OVERRIDING SETTINGS
Warning
Use the functions below to temporarily alter the value of settings in tests. Don’t manipulate`django.conf.settings` directly as Django won’t restore the original values after such manipulations.
`SimpleTestCase.``settings`()
For testing purposes it’s often useful to change a setting temporarily and revert to the original value after running the testing code. For this use case Django provides a standard Python context manager (see [PEP 343](https://www.python.org/dev/peps/pep-0343)) called `settings()`, which can be used like this:
~~~
from django.test import TestCase
class LoginTestCase(TestCase):
def test_login(self):
# First check for the default behavior
response = self.client.get('/sekrit/')
self.assertRedirects(response, '/accounts/login/?next=/sekrit/')
# Then override the LOGIN_URL setting
with self.settings(LOGIN_URL='/other/login/'):
response = self.client.get('/sekrit/')
self.assertRedirects(response, '/other/login/?next=/sekrit/')
~~~
This example will override the `LOGIN_URL` setting for the code in the `with` block and reset its value to the previous state afterwards.
`SimpleTestCase.``modify_settings`()
It can prove unwieldy to redefine settings that contain a list of values. In practice, adding or removing values is often sufficient. The `modify_settings()` context manager makes it easy:
~~~
from django.test import TestCase
class MiddlewareTestCase(TestCase):
def test_cache_middleware(self):
with self.modify_settings(MIDDLEWARE_CLASSES={
'append': 'django.middleware.cache.FetchFromCacheMiddleware',
'prepend': 'django.middleware.cache.UpdateCacheMiddleware',
'remove': [
'django.contrib.sessions.middleware.SessionMiddleware',
'django.contrib.auth.middleware.AuthenticationMiddleware',
'django.contrib.messages.middleware.MessageMiddleware',
],
}):
response = self.client.get('/')
# ...
~~~
For each action, you can supply either a list of values or a string. When the value already exists in the list,`append` and `prepend` have no effect; neither does `remove` when the value doesn’t exist.
`override_settings`()
In case you want to override a setting for a test method, Django provides the `override_settings()` decorator (see [PEP 318](https://www.python.org/dev/peps/pep-0318)). It’s used like this:
~~~
from django.test import TestCase, override_settings
class LoginTestCase(TestCase):
@override_settings(LOGIN_URL='/other/login/')
def test_login(self):
response = self.client.get('/sekrit/')
self.assertRedirects(response, '/other/login/?next=/sekrit/')
~~~
The decorator can also be applied to `TestCase` classes:
~~~
from django.test import TestCase, override_settings
@override_settings(LOGIN_URL='/other/login/')
class LoginTestCase(TestCase):
def test_login(self):
response = self.client.get('/sekrit/')
self.assertRedirects(response, '/other/login/?next=/sekrit/')
~~~
`modify_settings`()
Likewise, Django provides the `modify_settings()` decorator:
~~~
from django.test import TestCase, modify_settings
class MiddlewareTestCase(TestCase):
@modify_settings(MIDDLEWARE_CLASSES={
'append': 'django.middleware.cache.FetchFromCacheMiddleware',
'prepend': 'django.middleware.cache.UpdateCacheMiddleware',
})
def test_cache_middleware(self):
response = self.client.get('/')
# ...
~~~
The decorator can also be applied to test case classes:
~~~
from django.test import TestCase, modify_settings
@modify_settings(MIDDLEWARE_CLASSES={
'append': 'django.middleware.cache.FetchFromCacheMiddleware',
'prepend': 'django.middleware.cache.UpdateCacheMiddleware',
})
class MiddlewareTestCase(TestCase):
def test_cache_middleware(self):
response = self.client.get('/')
# ...
~~~
Note
When given a class, these decorators modify the class directly and return it; they don’t create and return a modified copy of it. So if you try to tweak the above examples to assign the return value to a different name than `LoginTestCase` or `MiddlewareTestCase`, you may be surprised to find that the original test case classes are still equally affected by the decorator. For a given class, `modify_settings()` is always applied after `override_settings()`.
Warning
The settings file contains some settings that are only consulted during initialization of Django internals. If you change them with `override_settings`, the setting is changed if you access it via the`django.conf.settings` module, however, Django’s internals access it differently. Effectively, using`override_settings()` or `modify_settings()` with these settings is probably not going to do what you expect it to do.
We do not recommend altering the `DATABASES` setting. Altering the `CACHES` setting is possible, but a bit tricky if you are using internals that make using of caching, like `django.contrib.sessions`. For example, you will have to reinitialize the session backend in a test that uses cached sessions and overrides `CACHES`.
Finally, avoid aliasing your settings as module-level constants as `override_settings()` won’t work on such values since they are only evaluated the first time the module is imported.
You can also simulate the absence of a setting by deleting it after settings have been overridden, like this:
~~~
@override_settings()
def test_something(self):
del settings.LOGIN_URL
...
~~~
When overriding settings, make sure to handle the cases in which your app’s code uses a cache or similar feature that retains state even if the setting is changed. Django provides the`django.test.signals.setting_changed` signal that lets you register callbacks to clean up and otherwise reset state when settings are changed.
Django itself uses this signal to reset various data:
| Overridden settings | Data reset |
| --- | --- |
| USE_TZ, TIME_ZONE | Databases timezone |
| TEMPLATES | Template engines |
| SERIALIZATION_MODULES | Serializers cache |
| LOCALE_PATHS, LANGUAGE_CODE | Default translation and loaded translations |
| MEDIA_ROOT, DEFAULT_FILE_STORAGE | Default file storage |
#### EMPTYING THE TEST OUTBOX
If you use any of Django’s custom `TestCase` classes, the test runner will clear the contents of the test email outbox at the start of each test case.
For more detail on email services during tests, see [Email services](http://masteringdjango.com/testing-in-django/#email-services) below.
#### ASSERTIONS
As Python’s normal `unittest.TestCase` class implements assertion methods such as `assertTrue()` and`assertEqual()`, Django’s custom `TestCase` class provides a number of custom assertion methods that are useful for testing Web applications:
The failure messages given by most of these assertion methods can be customized with the `msg_prefix`argument. This string will be prefixed to any failure message generated by the assertion. This allows you to provide additional details that may help you to identify the location and cause of an failure in your test suite.
`SimpleTestCase.``assertRaisesMessage`(*expected_exception*, *expected_message*, *callable_obj=None*, **args*,***kwargs*)
Asserts that execution of callable `callable_obj` raised the `expected_exception` exception and that such exception has an `expected_message` representation. Any other outcome is reported as a failure. Similar to unittest’s `assertRaisesRegex()` with the difference that `expected_message` isn’t a regular expression.
`SimpleTestCase.``assertFieldOutput`(*fieldclass*, *valid*, *invalid*, *field_args=None*, *field_kwargs=None*,*empty_value=”*)
Asserts that a form field behaves correctly with various inputs.
| Parameters: |
* fieldclass – the class of the field to be tested.
* valid – a dictionary mapping valid inputs to their expected cleaned values.
* invalid – a dictionary mapping invalid inputs to one or more raised error messages.
* field_args – the args passed to instantiate the field.
* field_kwargs – the kwargs passed to instantiate the field.
* empty_value – the expected clean output for inputs in `empty_values`.
|
For example, the following code tests that an `EmailField` accepts `a@a.com` as a valid email address, but rejects `aaa` with a reasonable error message:
~~~
self.assertFieldOutput(EmailField, {'a@a.com': 'a@a.com'}, {'aaa': ['Enter a valid email address.']})
~~~
`SimpleTestCase.``assertFormError`(*response*, *form*, *field*, *errors*, *msg_prefix=”*)
Asserts that a field on a form raises the provided list of errors when rendered on the form.
`form` is the name the `Form` instance was given in the template context.
`field` is the name of the field on the form to check. If `field` has a value of `None`, non-field errors (errors you can access via `form.non_field_errors()`) will be checked.
`errors` is an error string, or a list of error strings, that are expected as a result of form validation.
`SimpleTestCase.``assertFormsetError`(*response*, *formset*, *form_index*, *field*, *errors*, *msg_prefix=”*)
Asserts that the `formset` raises the provided list of errors when rendered.
`formset` is the name the `Formset` instance was given in the template context.
`form_index` is the number of the form within the `Formset`. If `form_index` has a value of `None`, non-form errors (errors you can access via `formset.non_form_errors()`) will be checked.
`field` is the name of the field on the form to check. If `field` has a value of `None`, non-field errors (errors you can access via `form.non_field_errors()`) will be checked.
`errors` is an error string, or a list of error strings, that are expected as a result of form validation.
`SimpleTestCase.``assertContains`(*response*, *text*, *count=None*, *status_code=200*, *msg_prefix=”*, *html=False*)
Asserts that a `Response` instance produced the given `status_code` and that `text` appears in the content of the response. If `count` is provided, `text` must occur exactly `count` times in the response.
Set `html` to `True` to handle `text` as HTML. The comparison with the response content will be based on HTML semantics instead of character-by-character equality. Whitespace is ignored in most cases, attribute ordering is not significant. See `assertHTMLEqual()` for more details.
`SimpleTestCase.``assertNotContains`(*response*, *text*, *status_code=200*, *msg_prefix=”*, *html=False*)
Asserts that a `Response` instance produced the given `status_code` and that `text` does not appears in the content of the response.
Set `html` to `True` to handle `text` as HTML. The comparison with the response content will be based on HTML semantics instead of character-by-character equality. Whitespace is ignored in most cases, attribute ordering is not significant. See `assertHTMLEqual()` for more details.
`SimpleTestCase.``assertTemplateUsed`(*response*, *template_name*, *msg_prefix=”*, *count=None*)
Asserts that the template with the given name was used in rendering the response.
The name is a string such as `'admin/index.html'`.
The count argument is an integer indicating the number of times the template should be rendered. Default is `None`, meaning that the template should be rendered one or more times.
You can use this as a context manager, like this:
~~~
with self.assertTemplateUsed('index.html'):
render_to_string('index.html')
with self.assertTemplateUsed(template_name='index.html'):
render_to_string('index.html')
~~~
`SimpleTestCase.``assertTemplateNotUsed`(*response*, *template_name*, *msg_prefix=”*)
Asserts that the template with the given name was *not* used in rendering the response.
You can use this as a context manager in the same way as `assertTemplateUsed()`.
`SimpleTestCase.``assertRedirects`(*response*, *expected_url*, *status_code=302*, *target_status_code=200*,*host=None*, *msg_prefix=”*, *fetch_redirect_response=True*)
Asserts that the response returned a `status_code` redirect status, redirected to `expected_url` (including any`GET` data), and that the final page was received with `target_status_code`.
If your request used the `follow` argument, the `expected_url` and `target_status_code` will be the url and status code for the final point of the redirect chain.
The `host` argument sets a default host if `expected_url` doesn’t include one (e.g. `"/bar/"`). If `expected_url` is an absolute URL that includes a host (e.g. `"http://testhost/bar/"`), the `host` parameter will be ignored. Note that the test client doesn’t support fetching external URLs, but the parameter may be useful if you are testing with a custom HTTP host (for example, initializing the test client with`Client(HTTP_HOST="testhost")`.
If `fetch_redirect_response` is `False`, the final page won’t be loaded. Since the test client can’t fetch externals URLs, this is particularly useful if `expected_url` isn’t part of your Django app.
Scheme is handled correctly when making comparisons between two URLs. If there isn’t any scheme specified in the location where we are redirected to, the original request’s scheme is used. If present, the scheme in `expected_url` is the one used to make the comparisons to.
`SimpleTestCase.``assertHTMLEqual`(*html1*, *html2*, *msg=None*)
Asserts that the strings `html1` and `html2` are equal. The comparison is based on HTML semantics. The comparison takes following things into account:
* Whitespace before and after HTML tags is ignored.
* All types of whitespace are considered equivalent.
* All open tags are closed implicitly, e.g. when a surrounding tag is closed or the HTML document ends.
* Empty tags are equivalent to their self-closing version.
* The ordering of attributes of an HTML element is not significant.
* Attributes without an argument are equal to attributes that equal in name and value (see the examples).
The following examples are valid tests and don’t raise any `AssertionError`:
~~~
self.assertHTMLEqual('<p>Hello <b>world!</p>',
'''<p>
Hello <b>world! <b/>
</p>''')
self.assertHTMLEqual(
'<input type="checkbox" checked="checked" id="id_accept_terms" />',
'<input id="id_accept_terms" type='checkbox' checked>')
~~~
`html1` and `html2` must be valid HTML. An `AssertionError` will be raised if one of them cannot be parsed.
Output in case of error can be customized with the `msg` argument.
`SimpleTestCase.``assertHTMLNotEqual`(*html1*, *html2*, *msg=None*)
Asserts that the strings `html1` and `html2` are *not* equal. The comparison is based on HTML semantics. See`assertHTMLEqual()` for details.
`html1` and `html2` must be valid HTML. An `AssertionError` will be raised if one of them cannot be parsed.
Output in case of error can be customized with the `msg` argument.
`SimpleTestCase.``assertXMLEqual`(*xml1*, *xml2*, *msg=None*)
Asserts that the strings `xml1` and `xml2` are equal. The comparison is based on XML semantics. Similarly to`assertHTMLEqual()`, the comparison is made on parsed content, hence only semantic differences are considered, not syntax differences. When invalid XML is passed in any parameter, an `AssertionError` is always raised, even if both string are identical.
Output in case of error can be customized with the `msg` argument.
`SimpleTestCase.``assertXMLNotEqual`(*xml1*, *xml2*, *msg=None*)
Asserts that the strings `xml1` and `xml2` are *not* equal. The comparison is based on XML semantics. See`assertXMLEqual()` for details.
Output in case of error can be customized with the `msg` argument.
`SimpleTestCase.``assertInHTML`(*needle*, *haystack*, *count=None*, *msg_prefix=”*)
Asserts that the HTML fragment `needle` is contained in the `haystack` one.
If the `count` integer argument is specified, then additionally the number of `needle` occurrences will be strictly verified.
Whitespace in most cases is ignored, and attribute ordering is not significant. The passed-in arguments must be valid HTML.
`SimpleTestCase.``assertJSONEqual`(*raw*, *expected_data*, *msg=None*)
Asserts that the JSON fragments `raw` and `expected_data` are equal. Usual JSON non-significant whitespace rules apply as the heavyweight is delegated to the `json` library.
Output in case of error can be customized with the `msg` argument.
`SimpleTestCase.``assertJSONNotEqual`(*raw*, *expected_data*, *msg=None*)
Asserts that the JSON fragments `raw` and `expected_data` are *not* equal. See `assertJSONEqual()` for further details.
Output in case of error can be customized with the `msg` argument.
`TransactionTestCase.``assertQuerysetEqual`(*qs*, *values*, *transform=repr*, *ordered=True*, *msg=None*)
Asserts that a queryset `qs` returns a particular list of values `values`.
The comparison of the contents of `qs` and `values` is performed using the function `transform`; by default, this means that the `repr()` of each value is compared. Any other callable can be used if `repr()` doesn’t provide a unique or helpful comparison.
By default, the comparison is also ordering dependent. If `qs` doesn’t provide an implicit ordering, you can set the `ordered` parameter to `False`, which turns the comparison into a `collections.Counter` comparison. If the order is undefined (if the given `qs` isn’t ordered and the comparison is against more than one ordered values), a `ValueError` is raised.
Output in case of error can be customized with the `msg` argument.
`TransactionTestCase.``assertNumQueries`(*num*, *func*, **args*, ***kwargs*)
Asserts that when `func` is called with `*args` and `**kwargs` that `num` database queries are executed.
If a `"using"` key is present in `kwargs` it is used as the database alias for which to check the number of queries. If you wish to call a function with a `using` parameter you can do it by wrapping the call with a`lambda` to add an extra parameter:
~~~
self.assertNumQueries(7, lambda: my_function(using=7))
~~~
You can also use this as a context manager:
~~~
with self.assertNumQueries(2):
Person.objects.create(name="Aaron")
Person.objects.create(name="Daniel")
~~~
### Email services
If any of your Django views send email using Django’s email functionality, you probably don’t want to send email each time you run a test using that view. For this reason, Django’s test runner automatically redirects all Django-sent email to a dummy outbox. This lets you test every aspect of sending email – from the number of messages sent to the contents of each message – without actually sending the messages.
The test runner accomplishes this by transparently replacing the normal email backend with a testing backend. (Don’t worry – this has no effect on any other email senders outside of Django, such as your machine’s mail server, if you’re running one.)
`django.core.mail.``outbox`
During test running, each outgoing email is saved in `django.core.mail.outbox`. This is a simple list of all`EmailMessage` instances that have been sent. The `outbox` attribute is a special attribute that is created *only*when the `locmem` email backend is used. It doesn’t normally exist as part of the `django.core.mail` module and you can’t import it directly. The code below shows how to access this attribute correctly.
Here’s an example test that examines `django.core.mail.outbox` for length and contents:
~~~
from django.core import mail
from django.test import TestCase
class EmailTest(TestCase):
def test_send_email(self):
# Send message.
mail.send_mail('Subject here', 'Here is the message.',
'from@example.com', ['to@example.com'],
fail_silently=False)
# Test that one message has been sent.
self.assertEqual(len(mail.outbox), 1)
# Verify that the subject of the first message is correct.
self.assertEqual(mail.outbox[0].subject, 'Subject here')
~~~
As noted previously, the test outbox is emptied at the start of every test in a Django `*TestCase`. To empty the outbox manually, assign the empty list to `mail.outbox`:
~~~
from django.core import mail
# Empty the test outbox
mail.outbox = []
~~~
### Management Commands
Management commands can be tested with the `call_command()` function. The output can be redirected into a `StringIO` instance:
~~~
from django.core.management import call_command
from django.test import TestCase
from django.utils.six import StringIO
class ClosepollTest(TestCase):
def test_command_output(self):
out = StringIO()
call_command('closepoll', stdout=out)
self.assertIn('Expected output', out.getvalue())
~~~
### Skipping tests
The unittest library provides the `@skipIf` and `@skipUnless` decorators to allow you to skip tests if you know ahead of time that those tests are going to fail under certain conditions.
For example, if your test requires a particular optional library in order to succeed, you could decorate the test case with `@skipIf`. Then, the test runner will report that the test wasn’t executed and why, instead of failing the test or omitting the test altogether.
To supplement these test skipping behaviors, Django provides two additional skip decorators. Instead of testing a generic boolean, these decorators check the capabilities of the database, and skip the test if the database doesn’t support a specific named feature.
The decorators use a string identifier to describe database features. This string corresponds to attributes of the database connection features class. See `django.db.backends.BaseDatabaseFeatures` class for a full list of database features that can be used as a basis for skipping tests.
`django.test.``skipIfDBFeature`(**feature_name_strings*)
Skip the decorated test or `TestCase` if all of the named database features are supported.
For example, the following test will not be executed if the database supports transactions (e.g., it would*not* run under PostgreSQL, but it would under MySQL with MyISAM tables):
~~~
class MyTests(TestCase):
@skipIfDBFeature('supports_transactions')
def test_transaction_behavior(self):
# ... conditional test code
``skipIfDBFeature`` can accept multiple feature strings.
~~~
`django.test.``skipUnlessDBFeature`(**feature_name_strings*)
Skip the decorated test or `TestCase` if any of the named database features are *not* supported.
For example, the following test will only be executed if the database supports transactions (e.g., it would run under PostgreSQL, but *not* under MySQL with MyISAM tables):
~~~
class MyTests(TestCase):
@skipUnlessDBFeature('supports_transactions')
def test_transaction_behavior(self):
# ... conditional test code
``skipUnlessDBFeature`` can accept multiple feature strings.
~~~
## Using the Django test runner to test reusable applications
If you are writing a reusable application you may want to use the Django test runner to run your own test suite and thus benefit from the Django testing infrastructure.
A common practice is a *tests* directory next to the application code, with the following structure:
~~~
runtests.py
polls/
__init__.py
models.py
...
tests/
__init__.py
models.py
test_settings.py
tests.py
~~~
Let’s take a look inside a couple of those files:
~~~
# runtests.py
#!/usr/bin/env python
import os
import sys
import django
from django.conf import settings
from django.test.utils import get_runner
if __name__ == "__main__":
os.environ['DJANGO_SETTINGS_MODULE'] = 'tests.test_settings'
django.setup()
TestRunner = get_runner(settings)
test_runner = TestRunner()
failures = test_runner.run_tests(["tests"])
sys.exit(bool(failures))
~~~
This is the script that you invoke to run the test suite. It sets up the Django environment, creates the test database and runs the tests.
For the sake of clarity, this example contains only the bare minimum necessary to use the Django test runner. You may want to add command-line options for controlling verbosity, passing in specific test labels to run, etc.
~~~
# tests/test_settings.py
SECRET_KEY = 'fake-key'
INSTALLED_APPS = [
"tests",
]
~~~
This file contains the Django settings required to run your app’s tests.
Again, this is a minimal example; your tests may require additional settings to run.
Since the *tests* package is included in `INSTALLED_APPS` when running your tests, you can define test-only models in its `models.py` file.
## Using different testing frameworks
Clearly, `unittest` is not the only Python testing framework. While Django doesn’t provide explicit support for alternative frameworks, it does provide a way to invoke tests constructed for an alternative framework as if they were normal Django tests.
When you run `./manage.py test`, Django looks at the `TEST_RUNNER` setting to determine what to do. By default,““TEST_RUNNER“ points to `'django.test.runner.DiscoverRunner'`. This class defines the default Django testing behavior. This behavior involves:
1. Performing global pre-test setup.
2. Looking for tests in any file below the current directory whose name matches the pattern `test*.py`.
3. Creating the test databases.
4. Running `migrate` to install models and initial data into the test databases.
5. Running the tests that were found.
6. Destroying the test databases.
7. Performing global post-test teardown.
If you define your own test runner class and point `TEST_RUNNER` at that class, Django will execute your test runner whenever you run `./manage.py test`. In this way, it is possible to use any test framework that can be executed from Python code, or to modify the Django test execution process to satisfy whatever testing requirements you may have.
### Defining a test runner
A test runner is a class defining a `run_tests()` method. Django ships with a `DiscoverRunner` class that defines the default Django testing behavior. This class defines the `run_tests()` entry point, plus a selection of other methods that are used to by `run_tests()` to set up, execute and tear down the test suite.
*class *`django.test.runner.``DiscoverRunner`(*pattern=’test*.py’*, *top_level=None*, *verbosity=1*, *interactive=True*,*failfast=True*, *keepdb=False*, *reverse=False*, *debug_sql=False*, ***kwargs*)
`DiscoverRunner` will search for tests in any file matching `pattern`.
`top_level` can be used to specify the directory containing your top-level Python modules. Usually Django can figure this out automatically, so it’s not necessary to specify this option. If specified, it should generally be the directory containing your `manage.py` file.
`verbosity` determines the amount of notification and debug information that will be printed to the console; `0` is no output, `1` is normal output, and `2` is verbose output.
If `interactive` is `True`, the test suite has permission to ask the user for instructions when the test suite is executed. An example of this behavior would be asking for permission to delete an existing test database. If `interactive` is `False`, the test suite must be able to run without any manual intervention.
If `failfast` is `True`, the test suite will stop running after the first test failure is detected.
If `keepdb` is `True`, the test suite will use the existing database, or create one if necessary. If `False`, a new database will be created, prompting the user to remove the existing one, if present.
If `reverse` is `True`, test cases will be executed in the opposite order. This could be useful to debug tests that aren’t properly isolated and have side effects. Grouping by test class is preserved when using this option.
If `debug_sql` is `True`, failing test cases will output SQL queries logged to the django.db.backends logger as well as the traceback. If `verbosity` is `2`, then queries in all tests are output.
Django may, from time to time, extend the capabilities of the test runner by adding new arguments. The`**kwargs` declaration allows for this expansion. If you subclass `DiscoverRunner` or write your own test runner, ensure it accepts `**kwargs`.
Your test runner may also define additional command-line options. Create or override an`add_arguments(cls, parser)` class method and add custom arguments by calling `parser.add_argument()` inside the method, so that the `test` command will be able to use those arguments.
#### ATTRIBUTES
`DiscoverRunner.``test_suite`
The class used to build the test suite. By default it is set to `unittest.TestSuite`. This can be overridden if you wish to implement different logic for collecting tests.
`DiscoverRunner.``test_runner`
This is the class of the low-level test runner which is used to execute the individual tests and format the results. By default it is set to `unittest.TextTestRunner`. Despite the unfortunate similarity in naming conventions, this is not the same type of class as `DiscoverRunner`, which covers a broader set of responsibilities. You can override this attribute to modify the way tests are run and reported.
`DiscoverRunner.``test_loader`
This is the class that loads tests, whether from TestCases or modules or otherwise and bundles them into test suites for the runner to execute. By default it is set to `unittest.defaultTestLoader`. You can override this attribute if your tests are going to be loaded in unusual ways.
#### METHODS
`DiscoverRunner.``run_tests`(*test_labels*, *extra_tests=None*, ***kwargs*)
Run the test suite.
`test_labels` allows you to specify which tests to run and supports several formats (see`DiscoverRunner.build_suite()` for a list of supported formats).
`extra_tests` is a list of extra `TestCase` instances to add to the suite that is executed by the test runner. These extra tests are run in addition to those discovered in the modules listed in `test_labels`.
This method should return the number of tests that failed.
*classmethod *`DiscoverRunner.``add_arguments`(*parser*)
Override this class method to add custom arguments accepted by the `test` management command. See`argparse.ArgumentParser.add_argument()` for details about adding arguments to a parser.
`DiscoverRunner.``setup_test_environment`(***kwargs*)
Sets up the test environment by calling `setup_test_environment()` and setting `DEBUG` to `False`.
`DiscoverRunner.``build_suite`(*test_labels*, *extra_tests=None*, ***kwargs*)
Constructs a test suite that matches the test labels provided.
`test_labels` is a list of strings describing the tests to be run. A test label can take one of four forms:
* `path.to.test_module.TestCase.test_method` – Run a single test method in a test case.
* `path.to.test_module.TestCase` – Run all the test methods in a test case.
* `path.to.module` – Search for and run all tests in the named Python package or module.
* `path/to/directory` – Search for and run all tests below the named directory.
If `test_labels` has a value of `None`, the test runner will search for tests in all files below the current directory whose names match its `pattern` (see above).
`extra_tests` is a list of extra `TestCase` instances to add to the suite that is executed by the test runner. These extra tests are run in addition to those discovered in the modules listed in `test_labels`.
Returns a `TestSuite` instance ready to be run.
`DiscoverRunner.``setup_databases`(***kwargs*)
Creates the test databases.
Returns a data structure that provides enough detail to undo the changes that have been made. This data will be provided to the `teardown_databases()` function at the conclusion of testing.
`DiscoverRunner.``run_suite`(*suite*, ***kwargs*)
Runs the test suite.
Returns the result produced by the running the test suite.
`DiscoverRunner.``teardown_databases`(*old_config*, ***kwargs*)
Destroys the test databases, restoring pre-test conditions.
`old_config` is a data structure defining the changes in the database configuration that need to be reversed. It is the return value of the `setup_databases()` method.
`DiscoverRunner.``teardown_test_environment`(***kwargs*)
Restores the pre-test environment.
`DiscoverRunner.``suite_result`(*suite*, *result*, ***kwargs*)
Computes and returns a return code based on a test suite, and the result from that test suite.
### Testing utilities
#### DJANGO.TEST.UTILS
To assist in the creation of your own test runner, Django provides a number of utility methods in the`django.test.utils` module.
`django.test.utils.``setup_test_environment`()
Performs any global pre-test setup, such as the installing the instrumentation of the template rendering system and setting up the dummy email outbox.
`django.test.utils.``teardown_test_environment`()
Performs any global post-test teardown, such as removing the black magic hooks into the template system and restoring normal email services.
#### DJANGO.DB.CONNECTION.CREATION
The creation module of the database backend also provides some utilities that can be useful during testing.
`django.db.connection.creation.``create_test_db`([*verbosity=1*, *autoclobber=False*, *serialize=True*,*keepdb=False*])
Creates a new test database and runs `migrate` against it.
`verbosity` has the same behavior as in `run_tests()`.
`autoclobber` describes the behavior that will occur if a database with the same name as the test database is discovered:
* If `autoclobber` is `False`, the user will be asked to approve destroying the existing database. `sys.exit` is called if the user does not approve.
* If autoclobber is `True`, the database will be destroyed without consulting the user.
`serialize` determines if Django serializes the database into an in-memory JSON string before running tests (used to restore the database state between tests if you don’t have transactions). You can set this to `False`to speed up creation time if you don’t have any test classes with serialized_rollback=True.
If you are using the default test runner, you can control this with the the `SERIALIZE <TEST_SERIALIZE>` entry in the `TEST`
`keepdb` determines if the test run should use an existing database, or create a new one. If `True`, the existing database will be used, or created if not present. If `False`, a new database will be created, prompting the user to remove the existing one, if present.
Returns the name of the test database that it created.
`create_test_db()` has the side effect of modifying the value of `NAME` in `DATABASES` to match the name of the test database.
`django.db.connection.creation.``destroy_test_db`(*old_database_name*[, *verbosity=1*, *keepdb=False*])
Destroys the database whose name is the value of `NAME` in `DATABASES`, and sets `NAME` to the value of`old_database_name`.
The `verbosity` argument has the same behavior as for `DiscoverRunner`.
If the `keepdb` argument is `True`, then the connection to the database will be closed, but the database will not be destroyed.