Lession8: 自己动手写组件
最后更新于:2022-04-01 05:20:19
## 第七篇动手写组件
React-Native的核心思想就是组件化,相当于MVC的view,因此开发应用的最佳方式就是将功能组件化。
### 一、最简单的方式
这里我们实现一个最简单的组件,就是邮件的末尾署名的组件。组件意味着复用,意味着统一。现在有这样一个需求,我们需要根据不同用户发送邮件时,生成每个用户的名片(即邮件末尾的署名)。
1、一般一开始的实现方式如下,直接将组件内容写到功能需求的地方:
~~~
<View>
<View>..........这里是当前邮件组的其它功能</View>
<View>
<Text>框架研发部</Text>
<Text>www.ctrip.com</Text>
</View>
</View>
~~~
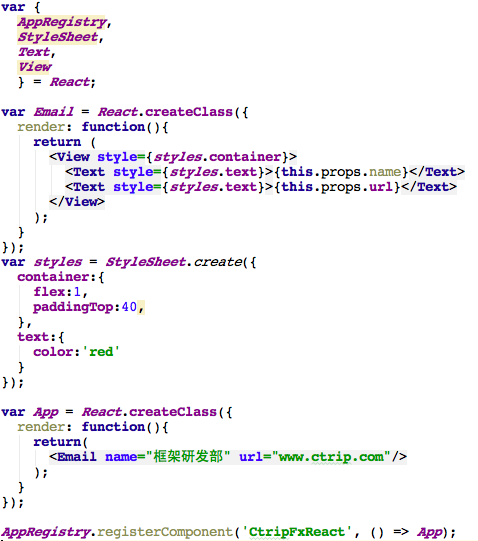
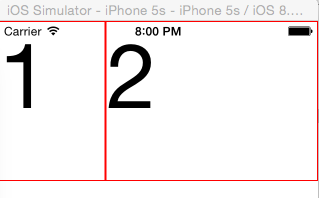
2、有一天,其它的部门的同事提出他们也需要在其他的地方,增加他们的邮件署名,那么你是否又会复制一份代码呢,当然不是,我们可以组件化:
~~~
var Email = React.createClass({
render: function(){
return (
<View style={styles.container}>
<Text style={styles.text}>{this.props.name}</Text>
<Text style={styles.text}>{this.props.url}</Text>
</View>
);
}
});
~~~
3、整体的代码如下:
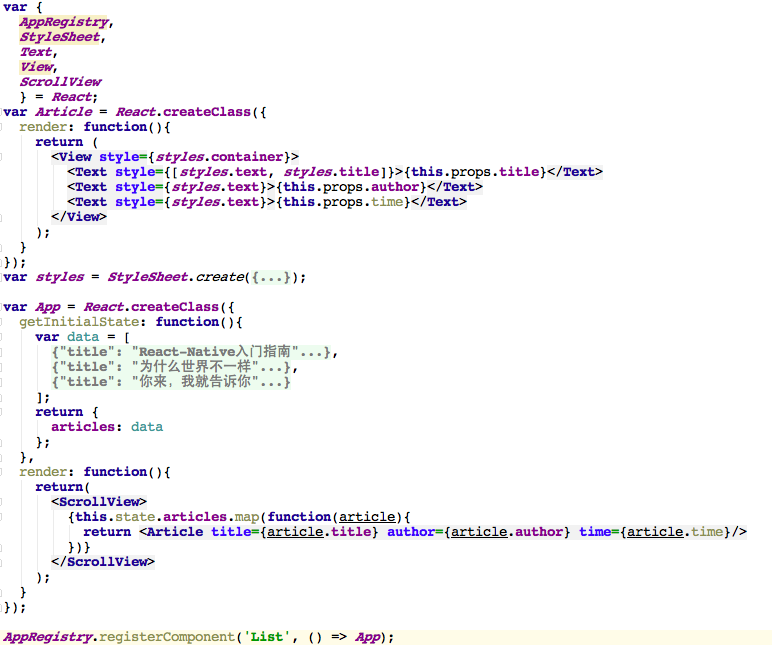
### 二、循环一个文章列表
要实现的效果如下图:

第一步改造我们的组件
~~~
var Article = React.createClass({
render: function(){
return (
<View style={styles.container}>
<Text style={[styles.text, styles.title]}>{this.props.title}</Text>
<Text style={styles.text}>{this.props.author}</Text>
<Text style={styles.text}>{this.props.time}</Text>
</View>
);
}
});
~~~
第二步定义数据model和循环
~~~
var App = React.createClass({
getInitialState: function(){
var data = [
{
title: "React-Native入门指南",
author: "vczero",
time: "2015-06-28"
},
{
title: "为什么世界不一样",
author: "vczero",
time: "2015-06-8"
},
{
title: "你来,我就告诉你",
author: "vczero",
time: "2015-04-01"
}
];
return {
articles: data
};
},
render: function(){
return(
<ScrollView>
{this.state.articles.map(function(article){
return <Article title={article.title} author={article.author} time={article.time}/>
})}
</ScrollView>
);
}
});
~~~
整个代码如下:
Lession7: JSX在React-Native中的应用
最后更新于:2022-04-01 05:20:16
## 第六篇JSX在React-Native中的应用
### 一、JSX概述
你一定疑问为什么要用JSX?其实这不是必需,而是建议。只是因为React是作为MVC中的V,是为UI而生,所以,React-Native使用JSX更能像HTML样表达树形结构,其实HTML的超类就是XML,React-Native将这个带到了解放前,不可否认的是JSX相比节省了很多的代码。JSX不是什么新奇的东西,JSX只是对JavaScript进行了拓展,仅此而已。
### 二、语法介绍
1、类XML UI组件表达,在React-Native中表现为:
~~~
render: function() {
return (
<View style={styles.container}>
<Text style={styles.welcome}>
Welcome to React Native!
</Text>
</View>
);
}
~~~
2、js表达式
在JSX中,表达式需要{}包裹,例如:
~~~
render: function() {
return (
<View style={styles.container}>
<Text style={styles.welcome}>
{0? '第一段': '第二段'}
</Text>
</View>
);
}
~~~
上面的代码我们可以看出,style={}是一个表达式;{0? '第一段': '第二段'}是表达式,最后显示的应该是“第二段”。
3、属性
在HTML中,属性可以是任何值,例如:<div tagid="00_1"></div>,tagid就是属性;同样,在组件上可以使用属性。
建议使用以下方式:
~~~
var props = {
tagid: 'GGFSJGFFATQ',
poiname: '东方明珠'
};
return (<View {...props}></View>);
~~~
4、如果需要在调用组件的时候动态增加或者覆盖属性,又该如何呢?
很简单:<View {...props} poiname={'虹桥机场'}></View>
5、关于样式
(1)普通内联样式:{{}},第一层{}是表达式,第二层{}是js对象;
<View style={{fontSize:40, width:80,}}> </View>
(2)调用样式表:{样式类.属性}
<View style={styles.container}></View>
(3)样式表和内联样式共存:{[]}
<View style={[styles.container, {fontSize:40, width:80}]}>
(4)多个样式表:{[样式类1, 样式类2]}
<View style={[styles.container, styles.color]}>
6、属性校验
为了实现强类型语言的效果,我们可以使用propTypes来声明数据属性的合法性校验。例如:
~~~
React.createClass({
porpTypes:{
username: React.PropTypes.string,
age: React.propTypes.number,
}
});
~~~
7、设定默认属性
~~~
React.createClass({
getDefaultProps: function(){
return {
sign: '这个家伙很懒,什么都没留下'
};
}
});
~~~
8、组件的生命周期
componentWillMount:组件创建之前
getInitialState:初始化状态
render:渲染视图
componentDidMount:渲染视图完成后
componentWillUnmount:组件被卸载之前
### 三、了解虚拟DOM
React进行了虚拟DOM的封装,所有的视图的更新都是虚拟DOM做了一个校验(diff)后最小更新。为什么这么做,因为现在机器的内存已经足以支撑这样视图UI的diff计算,用内存计算换取UI渲染效率。
1、我们需要获取组件中真实的dom
React.findDOMNode(component)
2、第二节已经简单说了组件的生命周期(will, did)
组件的生命周期分为3个部分:
Mounting:正在装载组件;
Updating:重新计算渲染组件;
Unmounting:卸载组件
Lession6: UI组件
最后更新于:2022-04-01 05:20:14
## 第5篇UI组件
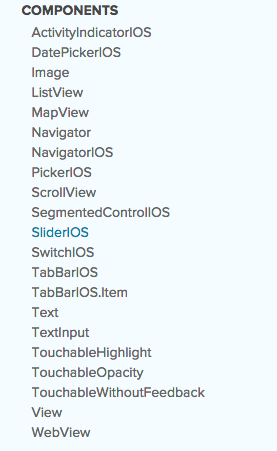
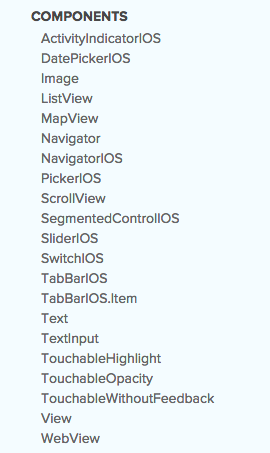
### 一、目前React-Native支持的组件
在facebook React-native的官网可以看到目前支持的组件如下:
https://facebook.github.io/react-native/docs/getting-started.html#content
### 二、如何正确运行UI组件Example
我们可以到react-native的github项目地址找到example,地址是https://github.com/facebook/react-native/tree/master/Examples/UIExplorer。下载react-native的代码库,将UIExplorer目录下的所有文件拷贝到你新建的项目中。其实UIExplorerApp.js就是整个项目的启动的文件。有两种方式可以启动项目:
1、第一种是修改jsCodeLocation = [NSURL URLWithString:@"http://localhost:8081/index.ios.bundle"];
2、第二种就是将UIExplorerApp.js里面的代码复制到index.ios.js中,此时,注意:
AppRegistry.registerComponent('HelloWorld', () => UIExplorerApp);
HelloWorld是你的项目名称,如果已经启动项目,需要确保这个名称一致。
项目启动后的界面如下,你就可改改UI组件看效果了。

### 三、活动指示器组件
其实,每个组件如何使用,可以到demo中去看代码。这里做简单的介绍.活动指示器组件可以做loading,下拉刷新等

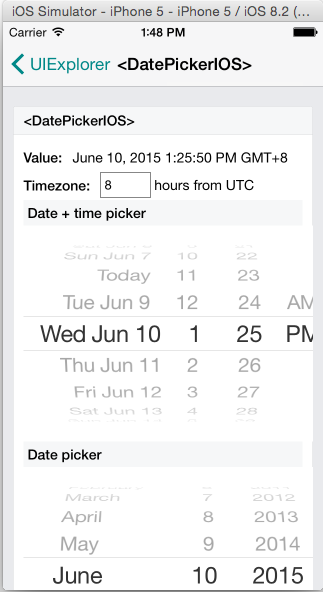
### 四、日历组件
### 五、图片组件

### 六、列表组件

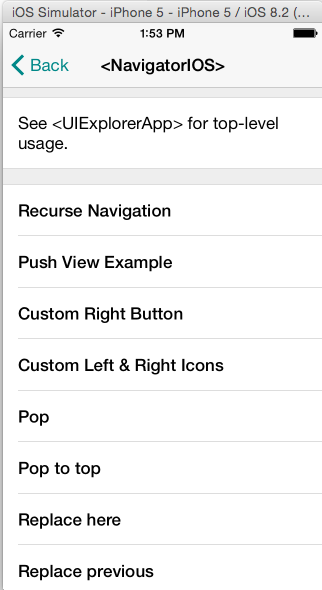
### 七、导航器组件

### 八、导航组件
### 九、开关组件
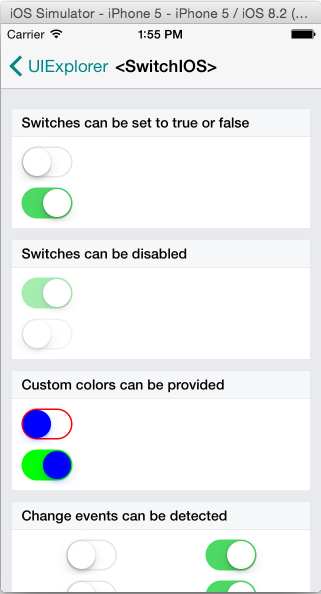
其余组件可以查看demo运行和学习,其实就是相当于html标签,具有某种功能,习惯就好。
Lession5: 学会React-Native布局(二)
最后更新于:2022-04-01 05:20:12
## 第四篇React-Native布局实战(二)
在不断深入的过程中,发现React-Native布局和样式的坑还有很多,他没有像浏览器那样灵活和有规律可循,其中的规律需要我自己踩坑的时候发现。比如:不存在zIndex,后面的元素覆盖前面的元素;内层元素覆盖外层元素等等,borderRadius的设置,需要考虑到内层元素的位置等等。
### 一、实战的内容
这里选用携程的App首页作为栗子,随不是严格的9宫格(比9宫格稍微难点...),但是可以很好的让我们练习flexbox.最后需要完成的结果如下:
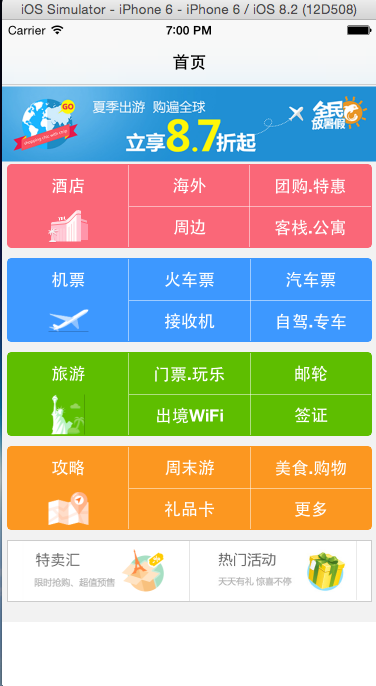
### 二、分解内容
整个页面我们可以分为几个部分,大致如下:
* 头部
* 图片轮播
* 9宫格
* 底部活动
### 三、头部导航栏
因为,组件还没有讲,这里只是做一个简单的介绍。在React-Native中实现头部导航栏很简单,只要使用NavigatorIOS组件即可。现在开工。
1、我们在index.ios.js中添加如下代码;同时创建文件夹pagaes和pages下创建Index.js
~~~
var React = require('react-native');
var Index = require('./pages/Index');
var {
NavigatorIOS,
AppRegistry,
StyleSheet,
} = React;
var NV = React.createClass({
render: function(){
return(
<NavigatorIOS
style={styles.container}
initialRoute={{
title: '首页',
component: Index,
}}
/>
);
}
});
var styles = StyleSheet.create({
container: {
flex: 1,
}
});
AppRegistry.registerComponent('HelloWorld', () => NV);
~~~
分析代码:
(1)require:引入外部模块,就像,引入我们自己创建的/pages/Index.js一样。
(2)引入定义NavigatorIOS、AppRegistry、StyleSheet组件和类。
(3)在render中调用NavigatorIOS组件,initialRoute是初始化路由,title是当前页面的头部标题;component是当前路由下显示的组件;
(4)注意:这里NavigatorIOS的style需要设置大小,比如这里设置是flex:1,否则就不能显示内容主体;
(5)最后我们需要注册当前应用:AppRegistry.registerComponent('HelloWorld', () => NV);
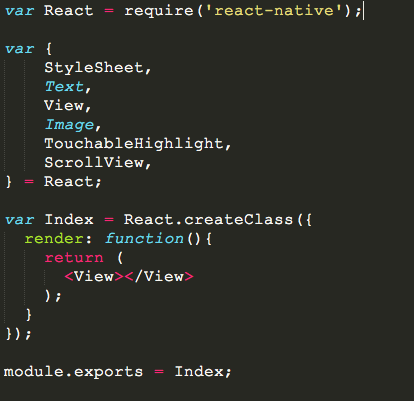
2、创建Index.js文件,文件的内容如下, module.exports就暴露了Index模块。
 效果如下图: 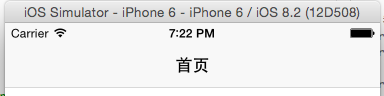
### 四、图片轮播
这里图片轮播使用的是第三方组件react-native-swiper,当然React-Native是支持transform可以直接实现一套。我们启动npm命令行,在项目的根目录使用如下命令安装模块。
~~~
$ npm install react-native-swiper --save
$ npm i react-timer-mixin --save
~~~
(2)需要关闭React packager命令行和模拟器,在xcode中重启项目
安装完成后,我们需要完成轮播功能。因为可以到github看看swiper暴露的接口和参数。github地址是:https://github.com/leecade/react-native-swiper
(1)引入swiper,前面也提到了require.
~~~
var Swiper = require('react-native-swiper');
~~~
(2)使用swiper,将轮播图封装成单独的组件
~~~
var sliderImgs = [
'http://images3.c-ctrip.com/SBU/apph5/201505/16/app_home_ad16_640_128.png',
'http://images3.c-ctrip.com/rk/apph5/C1/201505/app_home_ad49_640_128.png',
'http://images3.c-ctrip.com/rk/apph5/D1/201506/app_home_ad05_640_128.jpg'
];
var Slider = React.createClass({
render: function(){
return (
<Swiper style={styles.wrapper} showsButtons={false} autoplay={true} height={150} showsPagination={false}>
<Image style={[styles.slide,]} source={{uri: sliderImgs[0]}}></Image>
<Image style={[styles.slide,]} source={{uri: sliderImgs[1]}}></Image>
<Image style={[styles.slide,]} source={{uri: sliderImgs[2]}}></Image>
</Swiper>
);
}
});
~~~
(3)这样我们可以直接在render的时候直接用:`<Slider/>`
### 五、完成第一个9宫格布局,后面复制拷贝
其实4个九宫格都是一样,这个其实可以封装成组件,这里采用拷贝的形式,开发一个,其他3个就ok的,不会偷懒的工程师,不是好工程师[偷笑]。分析下布局:
(1)其实首先是3个列在一行的布局,那么外层组件是需要flexDirection: 'row',各占据宽度的1/3,即各自flex:1;
(2)每个列内又分两行, 需要每个行都是flex:1,各占据高度的一半;
(3)第一列是文字图片组合,其余都是文字组合;
(4)所有行内元素都是水平、垂直居中;
(5)这里使用了个TouchableHighlight组件,是为了出发onPress事件,类似于click或者touch事件。
~~~
<View style={[styles.sbu_red, styles.sbu_view]}>
<TouchableHighlight underlayColor={'#FA6778'} style={{flex:1}}>
<View style={[styles.sbu_flex, styles.sbu_borderRight]}>
<View style={[styles.sub_con_flex, styles.sub_text]}>
<Text style={[styles.font16]}>酒店</Text>
</View>
<View style={[styles.sub_con_flex]}>
<Image style={[styles.sbu_icon_img]} source={{uri:BUIcon[0]}}></Image>
</View>
</View>
</TouchableHighlight>
<View style={[styles.sbu_flex, styles.sbu_borderRight]}>
<View style={[styles.sub_con_flex, styles.sub_text, styles.sbu_borderBottom]}>
<Text style={[styles.font16]}>海外</Text>
</View>
<View style={[styles.sub_con_flex, styles.sub_text]}>
<Text style={[styles.font16]}>周边</Text>
</View>
</View>
<View style={[styles.sbu_flex]}>
<View style={[styles.sub_con_flex, styles.sub_text, styles.sbu_borderBottom]}>
<Text style={[styles.font16]}>团购.特惠</Text>
</View>
<View style={[styles.sub_con_flex, styles.sub_text]}>
<Text style={[styles.font16]}>客栈.公寓</Text>
</View>
</View>
</View>
~~~
### 六、样式类
说完了布局的原理,这里需要贴上样式仅供参考:
~~~
var styles = StyleSheet.create({
//container
container:{
backgroundColor:'#F2F2F2',
flex:1,
},
//slider
wrapper: {
height:80,
},
slide: {
height:80,
resizeMode: Image.resizeMode.contain,
},
//sbu
sbu_view:{
height:84,
marginLeft: 5,
marginRight:5,
borderWidth:1,
borderRadius:5,
marginBottom:10,
flexDirection:'row',
},
sbu_red:{
backgroundColor: '#FA6778',
borderColor:'#FA6778',
marginTop:-70,
},
sbu_blue:{
backgroundColor: '#3D98FF',
borderColor:'#3D98FF',
},
sbu_green:{
backgroundColor: '#5EBE00',
borderColor:'#5EBE00',
},
sbu_yellow:{
backgroundColor: '#FC9720',
borderColor:'#FC9720',
},
sbu_flex:{
flex:1,
},
sbu_borderRight:{
borderColor:'#fff',
borderRightWidth: 0.5,
},
sbu_icon_img:{
height:40,
width:40,
resizeMode:Image.resizeMode.contain,
},
sub_con_flex:{
flex:1,
justifyContent: 'center',
alignItems: 'center',
},
sub_text:{
justifyContent:'center',
},
font16:{
fontSize:17,
color:'#FFF',
fontWeight:'900',
},
sbu_borderBottom:{
borderBottomWidth:0.5,
borderBottomColor:'#fff',
},
img_view:{
height:62,
marginLeft:5,
marginRight:5,
flexDirection: 'row',
marginBottom:20,
backgroundColor:'#fff',
},
img_flex:{
flex:1,
borderWidth:1,
borderColor:'#ccc',
},
img_wh: {
height:59,
borderRightWidth:0,
resizeMode:Image.resizeMode.contain,
}
});
~~~
着重说下resizeMode:Image.resizeMode.contain。在React-Native中图片的大小是不会根据给定一个宽度或者高度而自适应大小的,因此我们需要让图片根据宽度或者高度来自适应,那么可以使用resizeMode:Image.resizeMode.contain。facebook提示错误信息的样式表中也没有提及,文档中也没有提及。所以后续还有不少的坑需要大家去一起探索。
### 七、Index.js整个代码,仅供参考
实例代码中会涉及ScrollView组件,主要是为了适应小屏的机器,可以滚动视图。
Lession4: 学会React-Native布局(一)
最后更新于:2022-04-01 05:20:10
## 第4篇React-Native布局实战
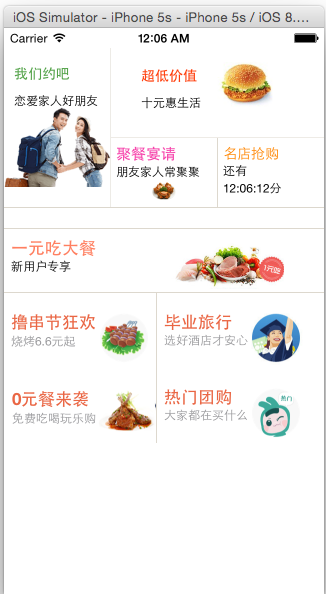
前辈教导我们,掌握一门新技术的最快方法是练习。因此,我找了下比较有爱,暖气的界面。当然不是给美团打广告了,只是觉得页面蛮清新的。下面就是要显示的效果:

第三篇文章基本上对React-Native的布局基本上有个大致的认识,现在开工吧。总体上,该页面分三个部分:(1)我们约会吧及其右边3栏;(2)1元吃大餐及其底下的4栏;(3)红火来袭的三栏。
### 一、实现第一部分
1、首先,我们创建一个项目
现在我们需要创建一个React-Native的项目,因此可以按照下面的步骤:
打开终端,开始React-Native开发的旅程吧。
(1)安装命令行工具(已经安装了就不用再安装了):sudo npm install -g react-native-cli
(2)创建一个空项目:react-native init HelloWorld
(3)找到创建的HelloWorld项目,双击HelloWorld.xcodeproj即可在xcode中打开项目。xcodeproj是xcode的项目文件。
(4)在xcode中,使用快捷键cmd + R即可启动项目。
2、清除其余多余的代码,剩下的代码如下:
~~~
/**
* Sample React Native App
* https://github.com/facebook/react-native
*/
'use strict';
var React = require('react-native');
var {
AppRegistry,
StyleSheet,
Text,
View,
} = React;
var HelloWorld = React.createClass({
render: function() {
return (
<View></View>
);
}
});
var styles = StyleSheet.create({
});
AppRegistry.registerComponent('HelloWorld', () => HelloWorld);
~~~
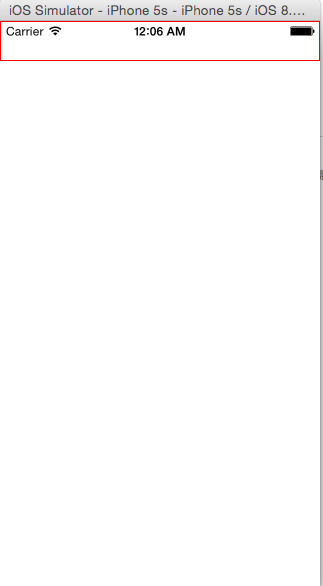
3、此时,除了闪屏外,看到应该是空白的页面。开工,分析页面:
(1)大致有4个板块
(2)先是左右两栏(1/3和2/3);后是上下两栏(1/2)。我们先用View组件布局。

4、完成初步布局
看如下代码,应该很清楚了,View里面嵌入并列的两栏。
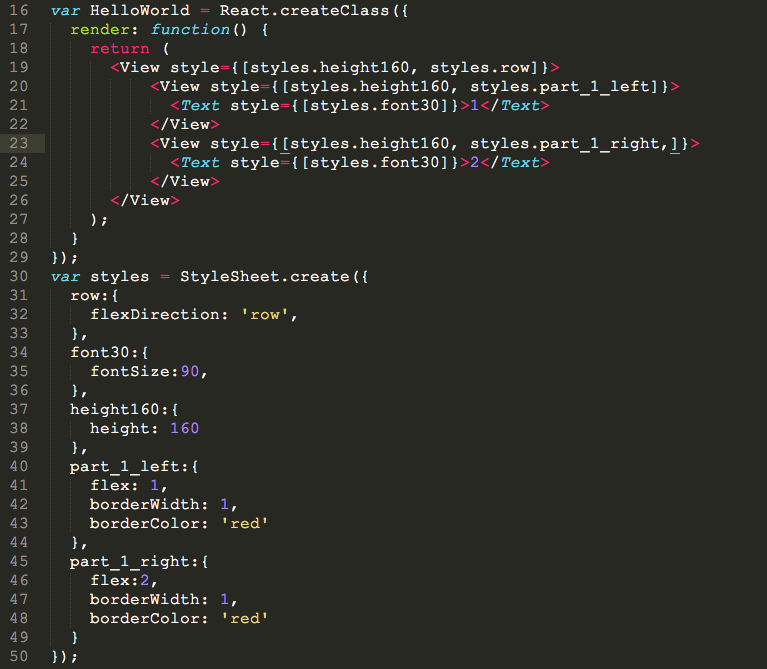
实现效果如下:
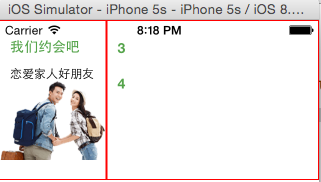
5、添加内部图片和文字
其实做这种布局,还是有很多的细节,粗糙的效果如下,这块代码暂时不贴了,最后一并贴出来:
### 二、按照第一部分原理,完成整个页面
完成的效果如下:
整个代码如下:
~~~
/**
* Sample React Native App
* https://github.com/facebook/react-native
*/
'use strict';
var React = require('react-native');
var {
AppRegistry,
StyleSheet,
Text,
View,
Image,
} = React;
var HelloWorld = React.createClass({
render: function() {
return (
<View style={{}}>
<View style={[styles.height160, styles.row,]}>
<View style={[styles.height160, styles.part_1_left,]}>
<Text style={[styles.font14, styles.marTop18, styles.marLeft10, styles.green]}>我们约吧</Text>
<Text style={[styles.font10, styles.marTop14, styles.marLeft10]}>恋爱家人好朋友</Text>
<Image style={[styles.yue]} source={{uri: 'http://p0.meituan.net/mmc/fe4d2e89827aa829e12e2557ded363a112289.png'}}></Image>
</View>
<View style={[styles.height160, styles.part_1_right,]}>
<View style={[styles.row, {flex:1}]}>
<View style={{flex:1}}>
<Text style={[styles.font14, {marginLeft:30}, styles.red]}>超低价值</Text>
<Text style={[styles.font14, {fontSize:12, marginTop:14, marginLeft:30,color: 'black'}]}>十元惠生活</Text>
</View>
<View style={[{flex:1}, {marginTop:-13}]}>
<Image style={[styles.hanbao]} source={{uri: 'http://p0.meituan.net/mmc/a06d0c5c0a972e784345b2d648b034ec9710.jpg'}}></Image>
</View>
</View>
<View style={[{flex:1, flexDirection: 'row',borderTopWidth:0.5, borderColor:'#DDD8CE'}]}>
<View style={{flex:1, borderRightWidth:1, borderColor:'#DDD8CE',}}>
<Text style={{color:'#F742AB', marginLeft:5,fontWeight:'bold', fontSize:15, marginTop:8}}>聚餐宴请</Text>
<Text style={{fontSize:12,marginTop:4, marginLeft:5}}>朋友家人常聚聚</Text>
<Image style={{height:25,width:25, alignSelf: 'center'}} source={{uri: 'http://p1.meituan.net/mmc/08615b8ae15d03c44cc5eb9bda381cb212714.png'}}></Image>
</View>
<View style={{flex:1,}}>
<Text style={[styles.font14,{color:'#FF8601', marginTop:8, marginLeft:5}]}>名店抢购</Text>
<Text style={[{marginLeft:5, fontSize:12,marginTop:4,}]}>还有</Text>
<Text style={[{marginLeft:5, fontSize:12,marginTop:4,}]}>12:06:12分</Text>
</View>
</View>
</View>
</View>
<View>
<View style={{borderBottomWidth:1,borderTopWidth:1, borderColor:'#DDD8CE', marginTop:40,height:65, flexDirection: 'row',paddingTop:10}}>
<View style={[{flex:1}]}>
<Text style={{fontSize:17, color:'#FF7F60', fontWeight:'900', marginLeft:7}}>一元吃大餐</Text>
<Text style={{marginLeft:7, fontSize:12, marginTop:3}}>新用户专享</Text>
</View>
<View style={{flex:1}}>
<Image style={{height:50, width:120}} source={{uri:'http://p1.meituan.net/280.0/groupop/7f8208b653aa51d2175848168c28aa0b23269.jpg'}}></Image>
</View>
</View>
</View>
<View>
<View style={{flexDirection: 'row',}}>
<View style={[styles.row, {borderColor:'#DDD8CE', borderRightWidth:1}]}>
<View style={{flex:1,}}>
<Text style={{fontSize:17, color:'#EA6644', fontWeight:'bold', marginLeft:7}}>撸串节狂欢</Text>
<Text style={{fontSize:12, color:'#97979A', marginTop:3, marginLeft:7}}>烧烤6.6元起</Text>
</View>
<View style={{flex:1}}>
<Image style={{width:60,height:55}} source={{uri: 'http://p1.meituan.net/280.0/groupop/fd8484743cbeb9c751a00e07573c3df319183.png'}}></Image>
</View>
</View>
<View style={styles.row}>
<View style={{flex:1}}>
<Text style={{fontSize:17, color:'#EA6644', fontWeight:'bold', marginLeft:7}}>毕业旅行</Text>
<Text style={{fontSize:12, color:'#97979A', marginTop:3, marginLeft:7}}>选好酒店才安心</Text>
</View>
<View style={{flex:1}}>
<Image style={{width:60,height:55}} source={{uri: 'http://p0.meituan.net/280.0/groupop/ba4422451254f23e117dedb4c6c865fc10596.jpg'}}></Image>
</View>
</View>
</View>
<View style={{flexDirection: 'row',}}>
<View style={[styles.row, {borderColor:'#DDD8CE', borderRightWidth:1, marginLeft:1},]}>
<View style={{flex:1}}>
<Text style={{fontSize:17, color:'#EA6644', fontWeight:'bold', marginLeft:7}}>0元餐来袭</Text>
<Text style={{fontSize:12, color:'#97979A', marginTop:3, marginLeft:7}}>免费吃喝玩乐购</Text>
</View>
<View style={{flex:1}}>
<Image style={{width:60,height:55}} source={{uri: 'http://p0.meituan.net/280.0/groupop/6bf3e31d75559df76d50b2d18630a7c726908.png'}}></Image>
</View>
</View>
<View style={styles.row}>
<View style={{flex:1}}>
<Text style={{fontSize:17, color:'#EA6644', fontWeight:'bold', marginLeft:7}}>热门团购</Text>
<Text style={{fontSize:12, color:'#97979A', marginTop:3, marginLeft:7}}>大家都在买什么</Text>
</View>
<View style={{flex:1}}>
<Image style={{width:60,height:55}} source={{uri: 'http://p1.meituan.net/mmc/a616a48152a895ddb34ca45bd97bbc9d13050.png'}}></Image>
</View>
</View>
</View>
</View>
</View>
);
} });
var styles = StyleSheet.create({
row:{
flexDirection: 'row',
paddingTop:20
},
marTop18:{
marginTop:18,
},
marTop14:{
marginTop:14,
},
font14:{
fontSize:14,
},
font10:{
fontSize:12,
},
height160:{
height: 160
},
yue:{
height:80,
},
green:{
color:'#55A44B',
fontWeight: '900'
},
red:{
color: '#FF3F0D',
fontWeight: '900'
},
marLeft10:{
marginLeft:10,
},
part_1_left:{
flex: 1,
borderColor: '#DCD7CD',
borderRightWidth: 0.5,
borderBottomWidth: 1,
},
part_1_right:{
flex:2,
borderColor: '#DCD7CD',
borderBottomWidth: 1,
},
hanbao:{
height:55,
width:55
}
});
AppRegistry.registerComponent('HelloWorld', () => HelloWorld);
~~~
Lession3: css和布局
最后更新于:2022-04-01 05:20:07
## 第3篇CSS和UI布局
### 一、了解React-Native组件
作为开发者都知道,UI组件对于一个应用的重要性。也许,在一款应用中,你还没有完整的,有体系的构建UI组件,但是你一定或多或少有种想把组件抽出来的冲动,就像有些冲动是人类的本能一样....这是作为一个开发者的本能。那么组件的复用和统一话是十分必要的。常见的组件有:日历、下来列表(常在应用中表现为下拉刷新)、导航栏、头部、底部、选项卡等等。React-Native就提供了一套iOS原生的组件,这样就不用HTML5去模拟组件了。React-Native使用css来构建页面布局,使用Native iOS Components给我们提供强大的组件功能。目前已有组件如下图:
### 二、使用CSS样式 & Flexbox布局
第一篇,已经知道了如何构建工程。这里同样创建一个HelloWorld工程。默认启动界面如下图:

1、基本样式
这里使用View和Text组件作为演示对象,首先,修改index.ios.js里面的代码,这里只需要关注StyleSheet和render里面的模板。修改后的代码如下:
~~~
/**
* Sample React Native App
* https://github.com/facebook/react-native
*/
'use strict';
var React = require('react-native');
var {
AppRegistry,
StyleSheet,
Text,
View,
} = React;
var HelloWorld = React.createClass({
render: function() {
return (
<View>
<View></View>
</View>
);
}
});
var styles = StyleSheet.create({
});
AppRegistry.registerComponent('HelloWorld', () => HelloWorld);
~~~
这时候,你cmd + R刷新模拟器应该看到是空白的界面。现在,是展现css魅力的时候了。React-native使用的css 表达是一个JS自面量对象,并且严格区分该对象属性的类型,所以要遵循对象的写法,而不能使用以前css的写法,这个需要自己熟悉了。
(1)增加一个带边框的矩形,红色边框
直接在组件上添加样式是这样的:style={{height:40, borderWidth: 1, borderColor: 'red'}}style是组件的一个自有属性,第一个{}JS执行环境或者说是模板,第二个{}只是css样式对象的括号而已(慢慢体会,不难理解)。这样修改后的代码如下:
~~~
render: function() {
return (
<View>
<View style={{height:40, borderWidth: 1, borderColor: 'red'}}>
</View>
</View>
);
}
~~~
cmd + R刷新模拟器,结果如下:
(2)如何知道该组件支持哪些样式呢?
上面的已经很简单了,作为web开发者用脚趾头都能闭眼写出来。如果我们需要知道该组件又哪些样式,又不用查手册,一个最为简单的方法是,在样式表里写错一个属性,比如我写一个没有的属性“border”。但是该属性必须写到样式的创建中去,而不能写为内联样式。写成内联样式,你是看不到报错提示的。我门改写成样式表创建类里面:
~~~
var HelloWorld = React.createClass({
render: function() {
return (
<View>
<View style={styles.style_1}>
</View>
</View>
);
}
});
var styles = StyleSheet.create({
style_1:{
border: '1px solid red',
height:40,
borderWidth: 1,
borderColor: 'red',
}
});
~~~
这个时候你就能齐刷刷的看到样式表的报错和提示有哪些样式了,如下图所示:

(3)独立样式类
其实上面已经展示了独立样式类了,那么样式类创建很简单,我们只需要使用React.StyleSheet来创建类。其实创建的类就是一个js对象而已。那么在组件上引用是这样的<View style={{对象名称.对象属性}}></View>,就跟上面(2)的代码一样。
2、说说Flexbox布局
其实,这样的css样式,作为web开发这一用就会,那么说说布局的事儿。除去margin, padding, position等大家熟悉的web布局的话,最为重要的就是flexbox,目前支持的属性如下,有6个:

(1)先说flex属性,上一段代码
~~~
var HelloWorld = React.createClass({
render: function() {
return (
<View style={styles.style_0}>
<View style={styles.style_1}></View>
<View style={styles.style_1}></View>
<View style={{flex:10}}></View>
</View>
);
}
});
var styles = StyleSheet.create({
style_0:{
flex:1,
},
style_1:{
flex: 5,
height:40,
borderWidth: 1,
borderColor: 'red',
}
});
~~~
当一个(元素)组件,定义了flex属性时,表示改元素是可伸缩的。当然flex的属性值是大于0的时候才伸缩,其他小于和等于0的时候不伸缩,例如:flex:0, flex:-1等。上面的代码,最外层的view是可伸缩的,因为没有兄弟节点和他抢占空间。里层是3个view,可以看到三个view的flex属性加起来是5+5+10=20,所以第一个view和第二个view分别占1/4伸缩空间, 最后一个view占据1/2空间,具体如下图:

(2) flexDirection
flexDirection在React-Native中只有两个属性,一个是row(横向伸缩)和column(纵向伸缩)。具体的想过可见如下代码:
~~~
var HelloWorld = React.createClass({
render: function() {
return (
<View style={styles.style_0}>
<View style={styles.style_1}>
<Text style={{marginTop:40, fontSize:25}}>1/4高</Text>
<Text style={{marginTop:40, fontSize:25}}>1/4高</Text>
</View>
<View style={[styles.style_1, {flexDirection: 'column'}]}>
<Text style={{marginTop:40, fontSize:25}}>1/4高</Text>
<Text style={{marginTop:40, fontSize:25}}>1/4高</Text>
</View>
<View style={{flex:10, borderWidth: 1, borderColor: 'red',}}>
<Text style={{marginTop:40, fontSize:25}}>1/2高</Text>
</View>
</View>
);
}
});
var styles = StyleSheet.create({
style_0:{
flex:1,
},
style_1:{
flex: 5,
flexDirection: 'row',
height:40,
borderWidth: 1,
borderColor: 'red',
}
});
~~~
具体的效果如下:

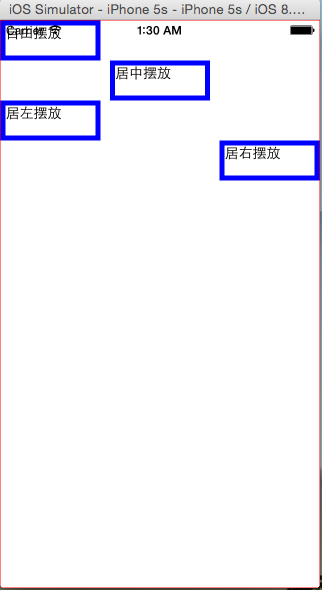
(3)alignSelf:对齐方式
alignSelf的对齐方式主要有四种:flex-start、 flex-end、 center、 auto、 stretch。看看代码,应该就很清楚了:

效果如下图
(4)水平垂直居中
alignItems是alignSelf的变种,跟alignSelf的功能类似,可用于水平居中;justifyContent用于垂直居中,属性较多,可以了解下。
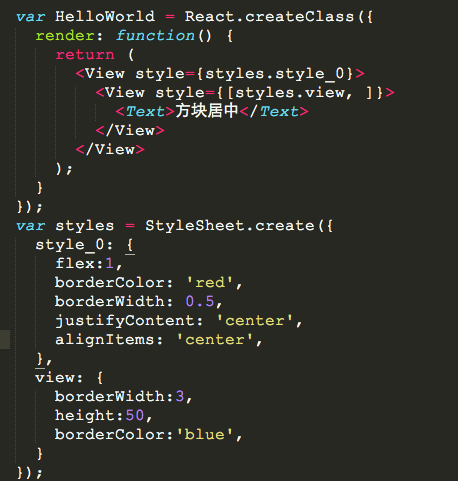
效果如下图

Lession2: 认识代码结构
最后更新于:2022-04-01 05:20:05
## 第2篇代码结构
### 一、了解index.ios.js
大家都清楚,React-Native就是在开发效率和用户体验间做的一种权衡。React-native是使用JS开发,开发效率高、发布能力强,不仅拥有hybrid的开发效率,同时拥有native app相媲美的用户体验。目前天猫也在这块开始试水。
用编辑器打开index.ios.js文件,分析代码结构:
1、第一句:
~~~
var React = require('react-native');
~~~
有Node.js开发经验的同学都清楚,require可以引入其他模块。如果没有node.js开发经验的同学,可以脑补下java的import和c++的#include。
2、第二句代码,批量定义组件:
~~~
var {
AppRegistry,
StyleSheet,
Text,
View,
} = React;
~~~
其实,这只是一个语法糖而已,比如AppRegistry我们可以这样定义:
~~~
var AppRegistry = React.AppRegistry;
~~~
3、构建Heollo World入口类。React提供了React.createClass的方法创建一个类。里面的render方法就是渲染视图用的。return返回的是视图的模板代码。其实这是JSX的模板语法,可以提前学习下。
4、相对于web开发,我们需要提供视图的样式,那么StyleSheet.create就是干这件事的,只是用JS的自面量表达了css样式。
5、如何引入css样式?其实在render方法返回的视图模板里已经体现出来了,即style={styles.container}.其中style是视图的一个属性,styles是我们定义的样式表,container是样式表中的一个样式。
6、注册应用入口,这个一定不能少,否则模拟器会提示报错:
~~~
AppRegistry.registerComponent('HelloWorld', () => HelloWorld);
~~~
### 二、其实你还需要看点这方面的知识
对于React-Native开发,仅仅有基础前端开发的知识是不够的,你还需要了解和掌握的有:
* Node.js基础
* JSX语法基础
* Flexbox布局
### 三、目前需要关注的文件
1、目前阶段有几个文件时需要注意下的:
(1)在xcode项目代码中AppDelegate.m会标识入口文件,例如:
jsCodeLocation = [NSURL URLWithString:@"http://localhost:8081/index.ios.bundle"];
如果是网上下载别人的源码,注意此处的ip和端口是否有被修改。
(2)闪屏界面在哪修改?在xcode项目中找到LaunchScreen.xib文件,点击,你会看到界面,这个就是启动界面,你手动添加组件或者修改文本即可,最好了解下xcode的使用。
(3)文本编辑器打开index.ios.js文件,是js代码的入口文件,所有的代码编写从这开始,可以定义自己的模块和引入第三方模块。
### 四、修改文件index.ios.js
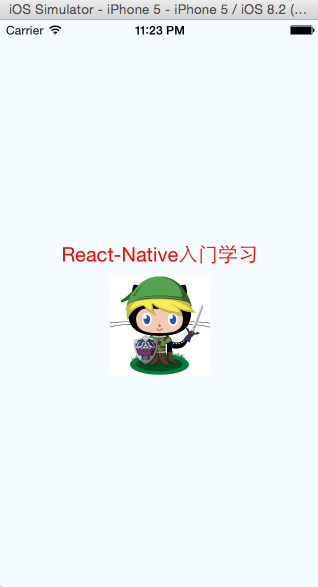
1、修改启动界面,如下图

2、添加图片和修改样式.我们在第一篇的demo基础上修改。去掉第二个和第三个<Text>,增加我们需要的图片,因为图片更具表达力,就像最近的图片社交应用很火一样。
(1)添加Image组件,将代码修改成如下即可:
~~~
var {
StyleSheet,
Text,
View,
Image,
} = React;
~~~
(2)将render返回中的模版增加Image组件视图,具体如下:
~~~
render: function() {
return (
<View style={styles.container}>
<Text style={styles.welcome}>
React-Native入门学习
</Text>
<Image style={styles.pic} source={{uri: 'https://avatars3.githubusercontent.com/u/6133685?v=3&s=460'}}>
</Image>
</View>
);
}
~~~
其中,Image标签的source的第一个大括号是模板,第二个大括号是js对象,js对象里面有个key是uri,表示图片的地址。
(3)修改图片视图的样式,删除多余的样式,增加pic样式:
~~~
var styles = StyleSheet.create({
container: {
flex: 1,
justifyContent: 'center',
alignItems: 'center',
backgroundColor: '#F5FCFF',
},
welcome: {
fontSize: 20,
textAlign: 'center',
margin: 10,
color: 'red',
},
pic: {
width:100,
height:100,
}
});
~~~
(4)可以cmd + Q 停止模拟器,然后再cmd + R开启模拟器,你会发现启动界面和首页都你想要的样子:
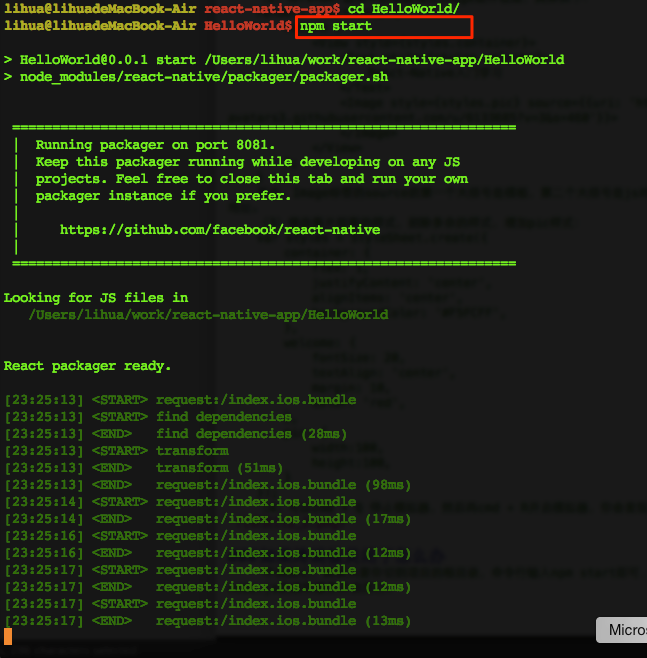
### 如果终端被关闭了怎么办
~~~
不用担心,其实只要你切到项目的根目录,命令行输入npm start即可,这样即可开发终端监听。实际上也是node.js的监听服务开启而已。如下图表示成功。
~~~
Lession1: Hello React-Native
最后更新于:2022-04-01 05:20:03
## 第一篇环境配置 & Hello World
### 一、前言
最近手头的工作繁多,有研究性的项目和系统研发,正好遇到同事离职,接手了框架的UI组件,不仅需要维护和填坑,还需要开发新的功能组件。因为身在H5-Hybird的框架部门,最近团队开始尝试使用React-Native来做些东西。之前也有过开发iOS App的冲动,学了点Object-c,这次正好借此机会进入App开发,以弥补自己在Native-App上的经验不足。
### 二、环境配置
(1)需要一台Mac(OSX),这个是前提,建议还是入手一本啦。
(2)在Mac上安装Xcode,建议Xcode 6.3以上版本
(3)安装node.js:https://nodejs.org/download/
(4)建议安装watchman,终端命令:brew install watchman
(5)安装flow:brew install flow
ok,按照以上步骤,你应该已经配置好了环境。
### 三、Hello, React-Native
现在我们需要创建一个React-Native的项目,因此可以按照下面的步骤:
打开终端,开始React-Native开发的旅程吧。
(1)安装命令行工具:sudo npm install -g react-native-cli
(2)创建一个空项目:react-native init HelloWorld
(3)找到创建的HelloWorld项目,双击HelloWorld.xcodeproj即可在xcode中打开项目。xcodeproj是xcode的项目文件。
(4)在xcode中,使用快捷键cmd + R即可启动项目。基本的Xcode功能可以熟悉,比如模拟器的选择等。
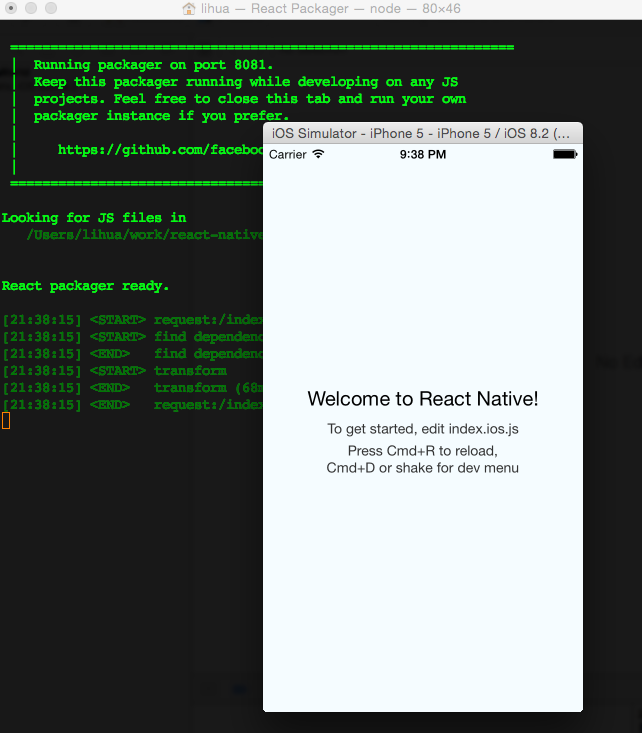
启动完成后,你会看到React-Packger和iOS模拟器,具体的效果如下,说明你创建项目成功了。
### 四、改改HelloWorld
Xcode里面的代码目录结构暂时不用管了,打开HelloWorld项目文件夹,找到index.ios.js文件。
index.ios.js文件就是React-Native JS 开发之旅的入口文件了。 先来个感性的认识,修改一
些文本,下一篇会解读里面的代码。用文本编辑器打开index.ios.js文件。
(1)找到代码<Text></Text>部分:
~~~
<Text style={styles.welcome}>
Welcome to React Native!
</Text>
~~~
修改成如下:
~~~
<Text style={styles.welcome}>
React-Native入门学习
</Text>
~~~
(2)找到代码
~~~
welcome: {
fontSize: 20,
textAlign: 'center',
margin: 10,
},
~~~
修改成如下:
~~~
welcome: {
fontSize: 20,
textAlign: 'center',
margin: 10,
color: 'red',
},
~~~
(3)有web开发经验的你,上面的修改你一定会体会到些什么。点击模拟器,cmd + R,刷新视图,会看到如下截图:

### 五、恭喜你,万里长征已经走了1000步
如果有过web开发经验的你,一定觉得很容易理解和学习React-Native,所以这一小步也是一大步
(1000步)。千里之行,始于此步。
前言
最后更新于:2022-04-01 05:20:00
> 原文出处:https://github.com/vczero/react-native-lession
## 实例应用
基于RecatNative & Node的通讯录app: [https://github.com/vczero/React-Native-App](https://github.com/vczero/React-Native-App)
包含示例App:
* 百灵鸟App: [https://github.com/vczero/React-Native-App/tree/master/address_book](https://github.com/vczero/React-Native-App/tree/master/address_book)
* 附近App:[https://github.com/vczero/React-Native-App/tree/master/nearby](https://github.com/vczero/React-Native-App/tree/master/nearby)
* 豆搜App: [https://github.com/vczero/React-Dou](https://github.com/vczero/React-Dou)
* 天黑闭眼App: [https://github.com/vczero/closeEye](https://github.com/vczero/closeEye)
## [](https://github.com/vczero/react-native-lession?hmsr=toutiao.io&utm_medium=toutiao.io&utm_source=toutiao.io#实例组件)实例组件
React Native日历组件: [https://github.com/vczero/react-native-calendar](https://github.com/vczero/react-native-calendar)
React Native Tab二级菜单组件:[https://github.com/vczero/react-native-tab](https://github.com/vczero/react-native-tab)
## [](https://github.com/vczero/react-native-lession?hmsr=toutiao.io&utm_medium=toutiao.io&utm_source=toutiao.io#基于react-native开发原生ios应用)基于React Native开发原生iOS应用
2015年7月18日在oschina分享PPT: [https://github.com/vczero/react-native-lession/blob/master/React-Native开发原生iOSApp携程vczero.ppt](https://github.com/vczero/react-native-lession/blob/master/React-Native%E5%BC%80%E5%8F%91%E5%8E%9F%E7%94%9FiOSApp%E6%90%BA%E7%A8%8Bvczero.ppt)
个人公司内部培训分享:[https://github.com/vczero/sharePPT](https://github.com/vczero/sharePPT)