ym—— Android 5.0学习之感想篇(含Demo)
最后更新于:2022-04-01 09:35:03
前言
最近写了多篇关于Android 5.0的技术博文,希望能够对大家学习Android 5.0的知识有帮助。([点击查看](http://blog.csdn.net/column/details/android5.html))

2011年的时候接触Android,是从我的第一部Android手机开始的,我还清晰的记得是ME525 Defy(Android 2.1,电容屏速度很快,黑白的机身,当时打着全球第一款三防的智能手机的名号)我买的第一天就自己放水里去了,果然没事。在此之前我上一部手机是诺基亚5230电阻屏操作起来很费劲,那时候诺基亚还算流行着(买Defy的时候还被同事给鄙视了,他们用的都是诺基亚的)那是我第一次被Android深深的吸引住了!一晃眼,2014年了,我看着手上的已经刷到Andorid 5.0的Nexus 5 仿佛又回到了当年那种看到Defy的感觉,这次因为Material Design。3年多了,Android已经不仅仅是我工作中的离不开的一部分,更多的是生活中的一部分。

Material Design
谷歌推出了全新的设计语言Material Design。

Android 5.0 Lollipop的界面设计的灵感来源于自然、物理学以及基于打印效果的粗体、图表化的设计,换句话说,它的设计是一种基于高品质纸张的效果——扁平、易于操作。
如上图所示,当我们体验这种Material Design设计风格时,可以去寻找一种我们已经非常熟悉的材料的感觉——“用熟悉的感知”和“真实的光影效果”来提供一种“合理的空间感”和一种“系统级人机互动”体验。据此而言,Android 5.0给我们的第二种体验就是其“动作”。谷歌深刻地阐释了Android新版本系统和终端之间的“水乳交融”:“所有的动作都在一个单独的环境中发生。任何操作都呈现在用户眼前,即便是界面的更换和重组,都没有一丝一毫的间断。回馈机制是如此的精妙而清晰,衔接也是高效且连贯。
让我们去学习如何创建Material Design的App:
# [ym—— Android 5.0学习之创建模拟器](http://blog.csdn.net/cym492224103/article/details/41480857)
# [ym—— Android 5.0学习之使用Material主题](http://blog.csdn.net/cym492224103/article/details/41515859)
# [ym—— Android 5.0学习之使用Palette](http://blog.csdn.net/cym492224103/article/details/41626889)
# [ym—— Android 5.0学习之AnimatedVectorDrawable](http://blog.csdn.net/cym492224103/article/details/41677825)
# [ym—— Android 5.0学习之ListView升级版RecyclerView](http://blog.csdn.net/cym492224103/article/details/41719497)
# [ym—— Android 5.0学习之CardView](http://blog.csdn.net/cym492224103/article/details/41753071)
# [ym—— Android 5.0学习之Activity过渡动画](http://blog.csdn.net/cym492224103/article/details/41761267)
# [ym—— Android 5.0学习之定义阴影](http://blog.csdn.net/cym492224103/article/details/41779795)
# [ym—— Android 5.0学习之动画](http://blog.csdn.net/cym492224103/article/details/41781265)
# [ym—— Android 5.0学习之Tinting和Clipping](http://blog.csdn.net/cym492224103/article/details/41786289)
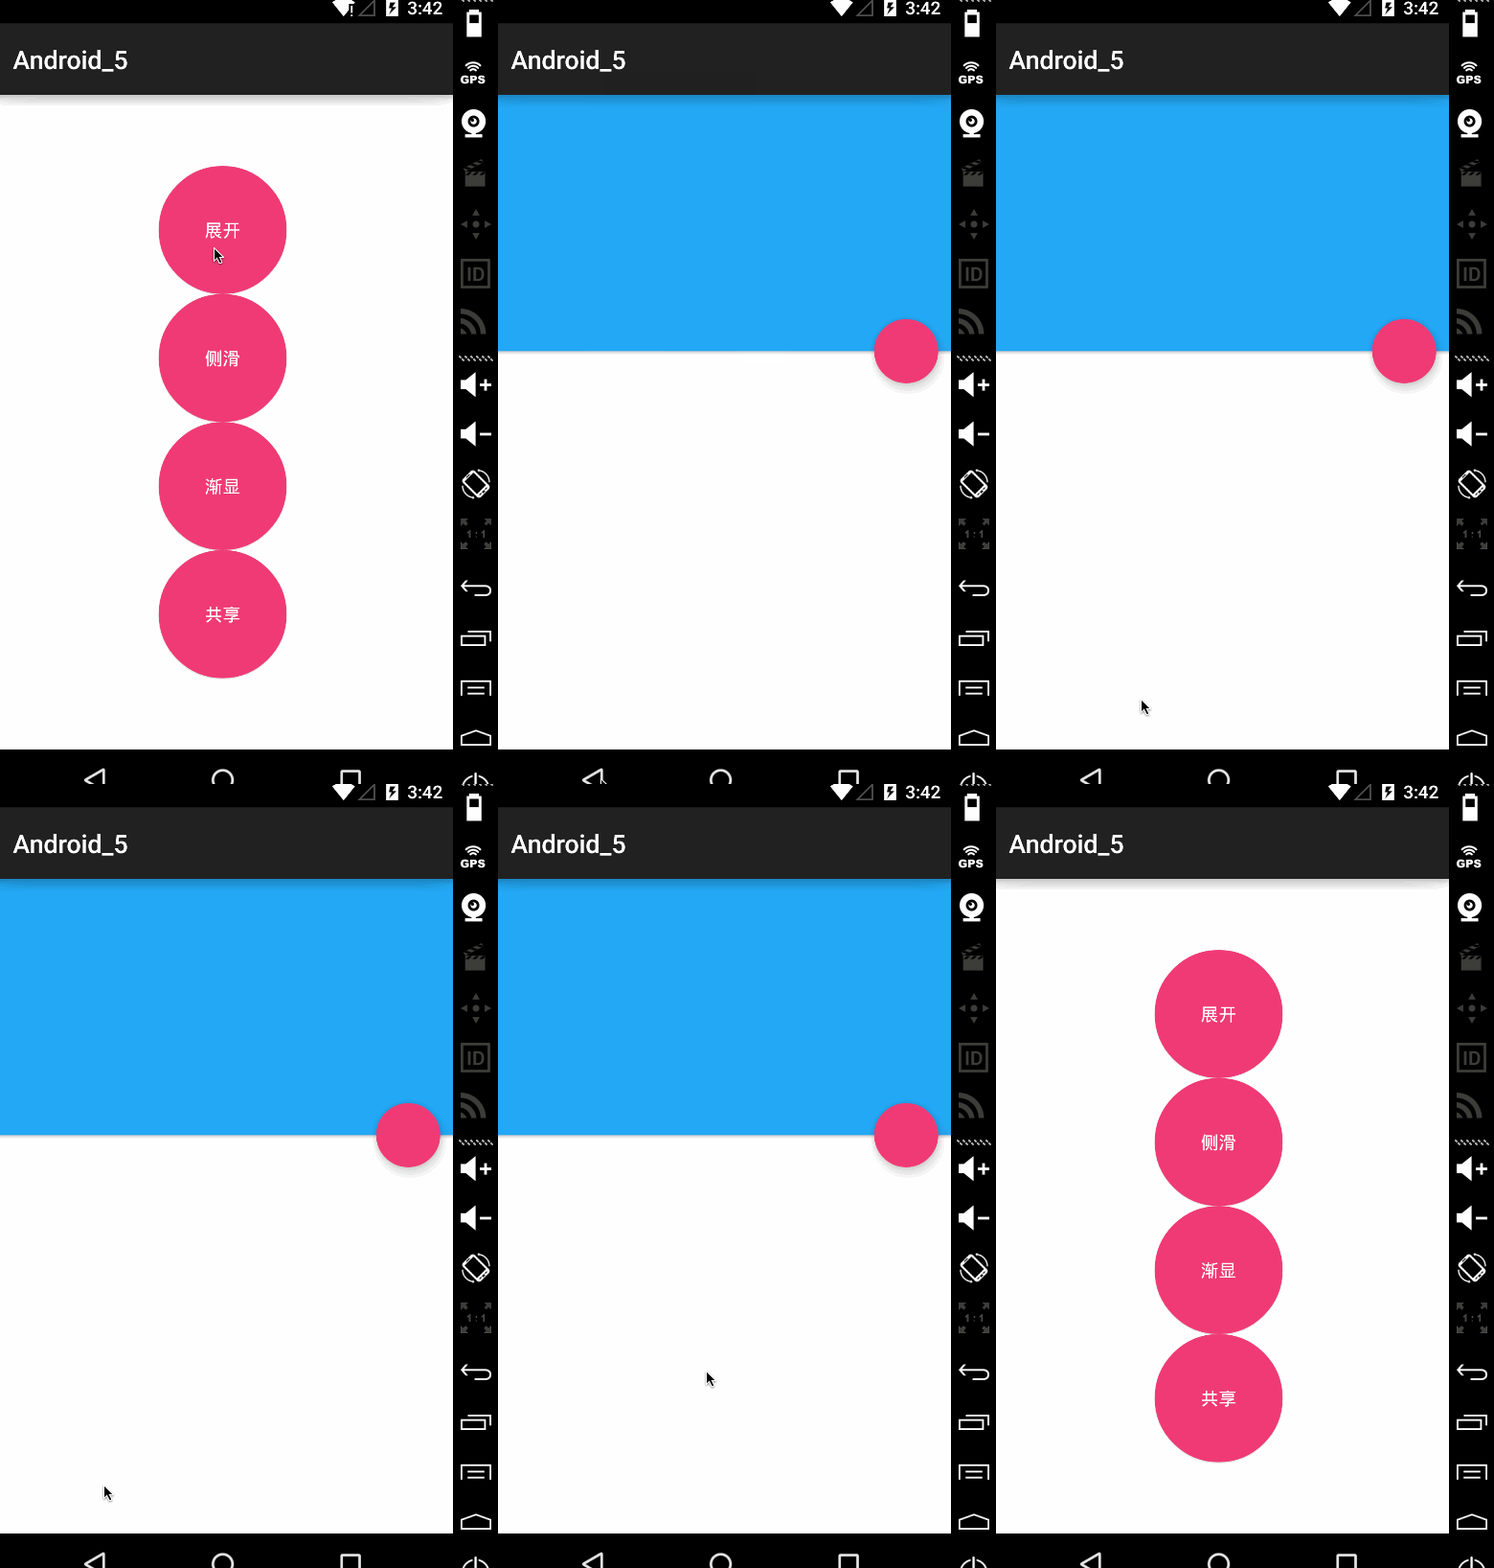
通过学习以上知识你们可以做出如下图所示的Demo:
# 
关于学习:
有很多人学习的时候很浮躁,我推荐你看看《[学习其实就是这么回事](http://blog.csdn.net/cym492224103/article/details/38442811)》,如果你是第一篇就是看到本篇文章的同学,请不要急着下载Demo源码,你可以先从上面的教程按顺序一篇一篇看,看到最后你会发现,你根本不需要下载此Demo,都可以做出比我自己写的Demo更优秀的Demo,相信自己一定能行。
源码地址:[点击传送](http://download.csdn.net/detail/cym492224103/8233567)
[](http://blog.csdn.net/cym492224103/article/details/41790149#)[](http://blog.csdn.net/cym492224103/article/details/41790149# "分享到QQ空间")[](http://blog.csdn.net/cym492224103/article/details/41790149# "分享到新浪微博")[](http://blog.csdn.net/cym492224103/article/details/41790149# "分享到腾讯微博")[](http://blog.csdn.net/cym492224103/article/details/41790149# "分享到人人网")[](http://blog.csdn.net/cym492224103/article/details/41790149# "分享到微信")
ym—— Android 5.0学习之Tinting和Clipping
最后更新于:2022-04-01 09:35:01
**转载请注明本文出自Cym的博客([http://blog.csdn.net/cym492224103](http://blog.csdn.net/cym492224103)****),谢谢支持!**
**
**
前言
Android 5.0的知识点讲完,下一篇要给大家带来一个综合例子的Demo,以及谈谈我对Android 5.0的看法。
有人肯定会想为什么不是每一篇博文带一个demo,我觉得无论学习什么东西都需要自己去实践,所以我没有提供Demo,想先让大家自己去按照我写的博文步骤去实现这个,在实现的过程中会遇到困难,然后自己去查找解决方案,最后自己做出来,这样学习到的东西才能让我们印象深刻。
Drawable Tinting(着色)
设置 ImageView 的 android:tint 属性,可以达到以下效果:

layout:
~~~
<ImageView
android:layout_width="100dp"
android:layout_height="100dp"
android:elevation="1dip"
android:layout_gravity="center"
android:src="@drawable/ic_launcher"
/>
<ImageView
android:layout_width="100dp"
android:layout_height="100dp"
android:elevation="1dip"
android:layout_gravity="center"
android:src="@drawable/ic_launcher"
android:tint="@android:color/holo_red_dark"
/>
~~~
不仅可以设置tint还可以设置tintMode,分别设置不同的mode效果如下:
srceen

multiply

add

src_atop/src_in/src_over

Clipping Views(裁剪视图)
首先我们layout,设置两个正方形的TextView
~~~
<TextView
android:id="@+id/tv_1"
android:layout_width="100dp"
android:layout_height="100dp"
android:elevation="1dip"
android:layout_gravity="center"
/>
<TextView
android:id="@+id/tv_2"
android:layout_width="100dp"
android:layout_height="100dp"
android:elevation="1dip"
android:layout_gravity="center"
/>
~~~
然后我们将它们两分别裁剪成圆角正方形和圆形:
~~~
<span style="white-space:pre"> </span>v1 = findViewById(R.id.tv_1);
v2 = findViewById(R.id.tv_2);
ViewOutlineProvider viewOutlineProvider = new ViewOutlineProvider() {
@Override
public void getOutline(View view, Outline outline) {
outline.setRoundRect(0, 0, view.getWidth(), view.getHeight(), 10);
}
};
ViewOutlineProvider viewOutlineProvider1 = new ViewOutlineProvider() {
@Override
public void getOutline(View view, Outline outline) {
outline.setRoundRect(0, 0, view.getWidth(), view.getHeight(), view.getHeight() / 2);
}
};
v1.setOutlineProvider(viewOutlineProvider);
v2.setOutlineProvider(viewOutlineProvider1);
~~~
效果如下:

ym—— Android 5.0学习之动画
最后更新于:2022-04-01 09:34:59
**转载请注明本文出自Cym的博客([http://blog.csdn.net/cym492224103](http://blog.csdn.net/cym492224103)**),谢谢支持!**
**
**
前言
用户跟你的App进行交互时,Material Design中的动画给予用户动作的反馈和提供视觉的一致感。
包括之前我学习过的:
[Activity transitions(Activity过渡效果)](http://blog.csdn.net/cym492224103/article/details/41761267)
[Animate Vector Drawables(可绘矢量动画)](http://blog.csdn.net/cym492224103/article/details/41677825)
除我们已经学习过的动画之外,Material Design还给我们提供了什么动画?
Touch feedback(触摸反馈)
Reveal effect(揭露效果)
Curved motion(曲线运动)
View state changes (视图状态改变)
**Touch feedback**(触摸反馈)
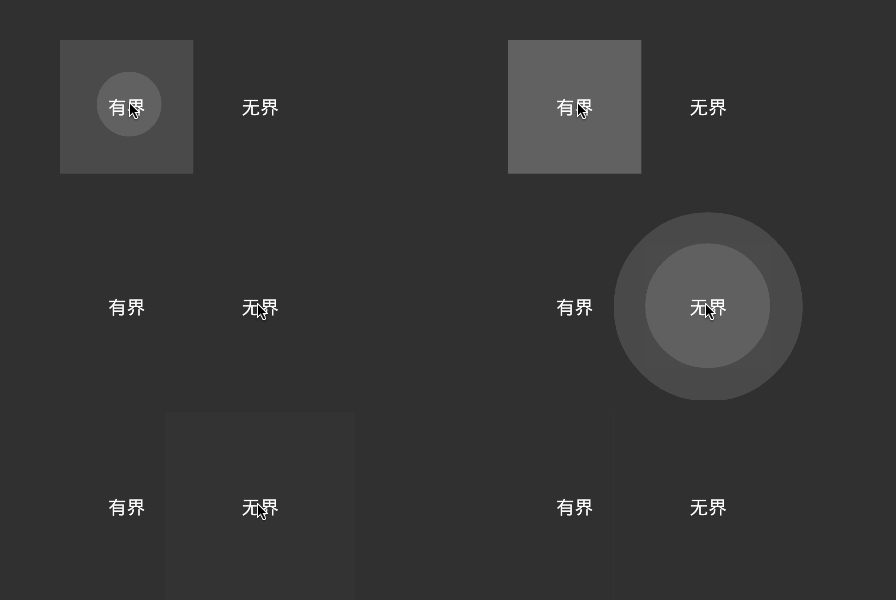
当用户与用户界面进行交互时,materialdesign中的触摸反馈在触摸点上提供了一种瞬时视觉确认。按钮的默认触摸反馈动画使用新的[RippleDrawable](http://developer.android.com/reference/android/graphics/drawable/RippleDrawable.html)类,它使用涟漪(波纹)效应在不同状态间转换。
在大多数情况下,你应该在你的布局XML文件中使用如下的方法去指定视图的背景:
?android:attr/selectableItemBackground (有界波纹)
?android:attr/selectableItemBackgroundBorderless (无界波纹)
注意:selectableItemBackgroundBorderless是API级别21上的新属性。
效果如下:
layout:
~~~
<Button android:layout_width="100dp" android:layout_height="100dp"
android:background="?android:attr/selectableItemBackground"
android:text="有界"
android:textColor="@android:color/white"
android:colorControlHighlight="@android:color/holo_red_dark"/>
<Button android:layout_width="100dp" android:layout_height="100dp"
android:background="?android:attr/selectableItemBackgroundBorderless"
android:textColor="@android:color/white"
android:text="无界"/>
~~~
或者,你可以定义一个[RippleDrawable](http://developer.android.com/reference/android/graphics/drawable/RippleDrawable.html)作为波纹元素的XML资源
~~~
<ripple
xmlns:android="http://schemas.android.com/apk/res/android"
android:color="@color/accent_dark">
<item>
<shape
android:shape="oval">
<solid android:color="?android:colorAccent" />
</shape>
</item>
</ripple>
~~~
你可以给RippleDrawable对象指定一种颜色。要更改默认的触摸反馈颜色,使用主题的android:colorControlHighlight属性**。**
**Reveal effect**(揭示效果)
使用[ViewAnimationUtils.createCircularReveal()](http://developer.android.com/reference/android/view/ViewAnimationUtils.html#createCircularReveal(android.view.View,) 方法

~~~
public Animator createAnimation(View v, Boolean isFirst) {
Animator animator;
if (isFirst) {
animator = ViewAnimationUtils.createCircularReveal(
v,// 操作的视图
0,// 动画开始的中心点X
0,// 动画开始的中心点Y
v.getWidth(),// 动画开始半径
0);// 动画结束半径
} else {
animator = ViewAnimationUtils.createCircularReveal(
v,// 操作的视图
0,// 动画开始的中心点X
0,// 动画开始的中心点Y
0,// 动画开始半径
v.getWidth());// 动画结束半径
}
animator.setInterpolator(new DecelerateInterpolator());
animator.setDuration(500);
return animator;
}
static boolean isFirst = false;
@Override
public void onClick(View v) {
createAnimation(myView, isFirst).start();
isFirst = !isFirst;
}
~~~
**Curved motion**(曲线运动)
Material design中的动画依靠曲线,这个曲线适用于时间插值器和控件运动模式。
[PathInterpolator](http://developer.android.com/reference/android/view/animation/PathInterpolator.html)类是一个基于贝塞尔曲线(Bézier curve)或路径([Path](http://developer.android.com/reference/android/graphics/Path.html))对象上的新的插值器。
在materialdesign规范中,系统提供了三个基本的曲线:
@interpolator/fast_out_linear_in.xml
@interpolator/fast_out_slow_in.xml
@interpolator/linear_out_slow_in.xml
你可以传递一个[PathInterpolator](http://developer.android.com/reference/android/view/animation/PathInterpolator.html)对象给[Animator.setInterpolator()](http://developer.android.com/reference/android/animation/Animator.html#setInterpolator(android.animation.TimeInterpolator))方法。
[ObjectAnimator](http://developer.android.com/reference/android/animation/ObjectAnimator.html)类有了新的构造方法,使你能够一次能同时使用两个或多个属性去绘制动画的路径。例如,下面的动画使用一个Path对象进行视图X和Y属性的动画绘制:
~~~
ObjectAnimator mAnimator;
mAnimator = ObjectAnimator.ofFloat(view, View.X, View.Y, path);
...
mAnimator.start();
~~~
在Android 5.0 提供的API Demos -》Animation/Path Animations 就有一个例子使用了曲线动画:

Path Animations 源码:
~~~
/*
* Copyright (C) 2013 The Android Open Source Project
*
* Licensed under the Apache License, Version 2.0 (the "License");
* you may not use this file except in compliance with the License.
* You may obtain a copy of the License at
*
* http://www.apache.org/licenses/LICENSE-2.0
*
* Unless required by applicable law or agreed to in writing, software
* distributed under the License is distributed on an "AS IS" BASIS,
* WITHOUT WARRANTIES OR CONDITIONS OF ANY KIND, either express or implied.
* See the License for the specific language governing permissions and
* limitations under the License.
*/
package com.example.android.apis.animation;
import android.animation.ObjectAnimator;
import android.animation.TypeConverter;
import android.animation.ValueAnimator;
import android.app.Activity;
import android.content.Context;
import android.graphics.Canvas;
import android.graphics.Matrix;
import android.graphics.Paint;
import android.graphics.Path;
import android.graphics.Point;
import android.graphics.PointF;
import android.graphics.RectF;
import android.os.Bundle;
import android.util.AttributeSet;
import android.util.FloatMath;
import android.util.Log;
import android.util.Property;
import android.view.View;
import android.view.animation.Animation;
import android.view.animation.LinearInterpolator;
import android.widget.FrameLayout;
import android.widget.RadioGroup;
import com.example.android.apis.R;
/**This application demonstrates the use of Path animation. */
public class PathAnimations extends Activity implements
RadioGroup.OnCheckedChangeListener, View.OnLayoutChangeListener {
final static Path sTraversalPath = new Path();
final static float TRAVERSE_PATH_SIZE = 7.0f;
final static Property<PathAnimations, Point> POINT_PROPERTY
= new Property<PathAnimations, Point>(Point.class, "point") {
@Override
public Point get(PathAnimations object) {
View v = object.findViewById(R.id.moved_item);
return new Point(Math.round(v.getX()), Math.round(v.getY()));
}
@Override
public void set(PathAnimations object, Point value) {
object.setCoordinates(value.x, value.y);
}
};
static {
float inverse_sqrt8 = FloatMath.sqrt(0.125f);
RectF bounds = new RectF(1, 1, 3, 3);
sTraversalPath.addArc(bounds, 45, 180);
sTraversalPath.addArc(bounds, 225, 180);
bounds.set(1.5f + inverse_sqrt8, 1.5f + inverse_sqrt8, 2.5f + inverse_sqrt8,
2.5f + inverse_sqrt8);
sTraversalPath.addArc(bounds, 45, 180);
sTraversalPath.addArc(bounds, 225, 180);
bounds.set(4, 1, 6, 3);
sTraversalPath.addArc(bounds, 135, -180);
sTraversalPath.addArc(bounds, -45, -180);
bounds.set(4.5f - inverse_sqrt8, 1.5f + inverse_sqrt8, 5.5f - inverse_sqrt8, 2.5f + inverse_sqrt8);
sTraversalPath.addArc(bounds, 135, -180);
sTraversalPath.addArc(bounds, -45, -180);
sTraversalPath.addCircle(3.5f, 3.5f, 0.5f, Path.Direction.CCW);
sTraversalPath.addArc(new RectF(1, 2, 6, 6), 0, 180);
}
private CanvasView mCanvasView;
private ObjectAnimator mAnimator;
/**Called when the activity is first created. */
@Override
public void onCreate(Bundle savedInstanceState) {
super.onCreate(savedInstanceState);
setContentView(R.layout.path_animations);
mCanvasView = (CanvasView) findViewById(R.id.canvas);
mCanvasView.addOnLayoutChangeListener(this);
((RadioGroup) findViewById(R.id.path_animation_type)).setOnCheckedChangeListener(this);
}
public void setCoordinates(int x, int y) {
changeCoordinates((float) x, (float) y);
}
public void changeCoordinates(float x, float y) {
View v = findViewById(R.id.moved_item);
v.setX(x);
v.setY(y);
}
public void setPoint(PointF point) {
changeCoordinates(point.x, point.y);
}
@Override
public void onCheckedChanged(RadioGroup group, int checkedId) {
startAnimator(checkedId);
}
@Override
public void onLayoutChange(View v, int left, int top, int right, int bottom, int oldLeft,
int oldTop, int oldRight, int oldBottom) {
int checkedId = ((RadioGroup)findViewById(R.id.path_animation_type)).getCheckedRadioButtonId();
if (checkedId != RadioGroup.NO_ID) {
startAnimator(checkedId);
}
}
private void startAnimator(int checkedId) {
if (mAnimator != null) {
mAnimator.cancel();
mAnimator = null;
}
View view = findViewById(R.id.moved_item);
Path path = mCanvasView.getPath();
if (path.isEmpty()) {
return;
}
switch (checkedId) {
case R.id.named_components:
// Use the named "x" and "y" properties for individual (x, y)
// coordinates of the Path and set them on the view object.
// The setX(float) and setY(float) methods are called on view.
// An int version of this method also exists for animating
// int Properties.
mAnimator = ObjectAnimator.ofFloat(view, "x", "y", path);
break;
case R.id.property_components:
// Use two Properties for individual (x, y) coordinates of the Path
// and set them on the view object.
// An int version of this method also exists for animating
// int Properties.
mAnimator = ObjectAnimator.ofFloat(view, View.X, View.Y, path);
break;
case R.id.multi_int:
// Use a multi-int setter to animate along a Path. The method
// setCoordinates(int x, int y) is called on this during the animation.
// Either "setCoordinates" or "coordinates" are acceptable parameters
// because the "set" can be implied.
mAnimator = ObjectAnimator.ofMultiInt(this, "setCoordinates", path);
break;
case R.id.multi_float:
// Use a multi-float setter to animate along a Path. The method
// changeCoordinates(float x, float y) is called on this during the animation.
mAnimator = ObjectAnimator.ofMultiFloat(this, "changeCoordinates", path);
break;
case R.id.named_setter:
// Use the named "point" property to animate along the Path.
// There must be a method setPoint(PointF) on the animated object.
// Because setPoint takes a PointF parameter, no TypeConverter is necessary.
// In this case, the animated object is PathAnimations.
mAnimator = ObjectAnimator.ofObject(this, "point", null, path);
break;
case R.id.property_setter:
// Use the POINT_PROPERTY property to animate along the Path.
// POINT_PROPERTY takes a Point, not a PointF, so the TypeConverter
// PointFToPointConverter is necessary.
mAnimator = ObjectAnimator.ofObject(this, POINT_PROPERTY,
new PointFToPointConverter(), path);
break;
}
mAnimator.setDuration(10000);
mAnimator.setRepeatMode(Animation.RESTART);
mAnimator.setRepeatCount(ValueAnimator.INFINITE);
mAnimator.setInterpolator(new LinearInterpolator());
mAnimator.start();
}
public static class CanvasView extends FrameLayout {
Path mPath = new Path();
Paint mPathPaint = new Paint();
public CanvasView(Context context) {
super(context);
init();
}
public CanvasView(Context context, AttributeSet attrs) {
super(context, attrs);
init();
}
public CanvasView(Context context, AttributeSet attrs, int defStyle) {
super(context, attrs, defStyle);
init();
}
private void init() {
setWillNotDraw(false);
mPathPaint.setColor(0xFFFF0000);
mPathPaint.setStrokeWidth(2.0f);
mPathPaint.setStyle(Paint.Style.STROKE);
}
@Override
protected void onLayout(boolean changed, int left, int top, int right, int bottom) {
super.onLayout(changed, left, top, right, bottom);
if (changed) {
Matrix scale = new Matrix();
float scaleWidth = (right-left)/TRAVERSE_PATH_SIZE;
float scaleHeight= (bottom-top)/TRAVERSE_PATH_SIZE;
scale.setScale(scaleWidth, scaleHeight);
sTraversalPath.transform(scale, mPath);
}
}
public Path getPath() {
return mPath;
}
@Override
public void draw(Canvas canvas) {
canvas.drawPath(mPath, mPathPaint);
super.draw(canvas);
}
}
private static class PointFToPointConverter extends TypeConverter<PointF, Point> {
Point mPoint = new Point();
public PointFToPointConverter() {
super(PointF.class, Point.class);
}
@Override
public Point convert(PointF value) {
mPoint.set(Math.round(value.x), Math.round(value.y));
return mPoint;
}
}
}
~~~
layout:
~~~
<?xml version="1.0" encoding="utf-8"?>
<LinearLayout xmlns:android="http://schemas.android.com/apk/res/android"
android:orientation="vertical"
android:layout_width="match_parent"
android:layout_height="match_parent">
<ScrollView android:layout_width="match_parent"
android:layout_height="wrap_content">
<RadioGroup android:orientation="horizontal"
android:layout_width="wrap_content"
android:layout_height="wrap_content"
android:id="@+id/path_animation_type"
>
<RadioButton android:id="@+id/named_components"
android:layout_width="wrap_content"
android:layout_height="wrap_content"
android:text="Named Components"/>
<RadioButton android:id="@+id/property_components"
android:layout_width="wrap_content"
android:layout_height="wrap_content"
android:text="Property Components"/>
<RadioButton android:id="@+id/multi_int"
android:layout_width="wrap_content"
android:layout_height="wrap_content"
android:text="Multi-int"/>
<RadioButton android:id="@+id/multi_float"
android:layout_width="wrap_content"
android:layout_height="wrap_content"
android:text="Multi-float"/>
<RadioButton android:id="@+id/named_setter"
android:layout_width="wrap_content"
android:layout_height="wrap_content"
android:text="Named Property"/>
<RadioButton android:id="@+id/property_setter"
android:layout_width="wrap_content"
android:layout_height="wrap_content"
android:text="Property"/>
</RadioGroup>
</ScrollView>
<view class="com.example.android.apis.animation.PathAnimations$CanvasView"
android:id="@+id/canvas"
android:layout_width="match_parent"
android:layout_height="0px"
android:layout_weight="1">
<ImageView android:id="@+id/moved_item"
android:layout_width="wrap_content"
android:layout_height="wrap_content"
android:src="@drawable/frog"/>
</view>
</LinearLayout>
~~~
**View state changes(视图状态改变)**
[StateListAnimator](http://developer.android.com/reference/android/animation/StateListAnimator.html)类可以让你定义动画集,能在view状态改变时工作。下面的实例显示了如何定义一个XML资源的[StateListAnimator](http://developer.android.com/reference/android/animation/StateListAnimator.html)。
使用步骤
1.定义一个XML资源的[StateListAnimator](http://developer.android.com/reference/android/animation/StateListAnimator.html)
~~~
<?xml version="1.0" encoding="utf-8"?>
<selector xmlns:android="http://schemas.android.com/apk/res/android">
<item android:state_pressed="true">
<set>
<objectAnimator android:propertyName="translationZ"
android:duration="@android:integer/config_shortAnimTime"
android:valueTo="10"
android:valueType="floatType"/>
<objectAnimator android:propertyName="rotationX"
android:duration="@android:integer/config_shortAnimTime"
android:valueTo="360"
android:valueType="floatType"/>
</set>
</item>
<item
android:state_pressed="false"
>
<set>
<objectAnimator android:propertyName="translationZ"
android:duration="10000"
android:valueTo="0"
android:valueType="floatType"/>
<objectAnimator android:propertyName="rotationX"
android:duration="@android:integer/config_shortAnimTime"
android:valueTo="0"
android:valueType="floatType"/>
</set>
</item>
</selector>
~~~
定义了翻转的效果的xml,
配置两种方式:
1.layout:android:stateListAnimator属性将其分配给你的视图,
2.代码:使用[AnimationInflater.loadStateListAnimator()](http://developer.android.com/reference/android/animation/AnimatorInflater.html#loadStateListAnimator(android.content.Context,)方法,并且通过[View.setStateListAnimator()](http://developer.android.com/reference/android/view/View.html#setStateListAnimator(android.animation.StateListAnimator))方法分配动画到你的视图上。
效果如下:
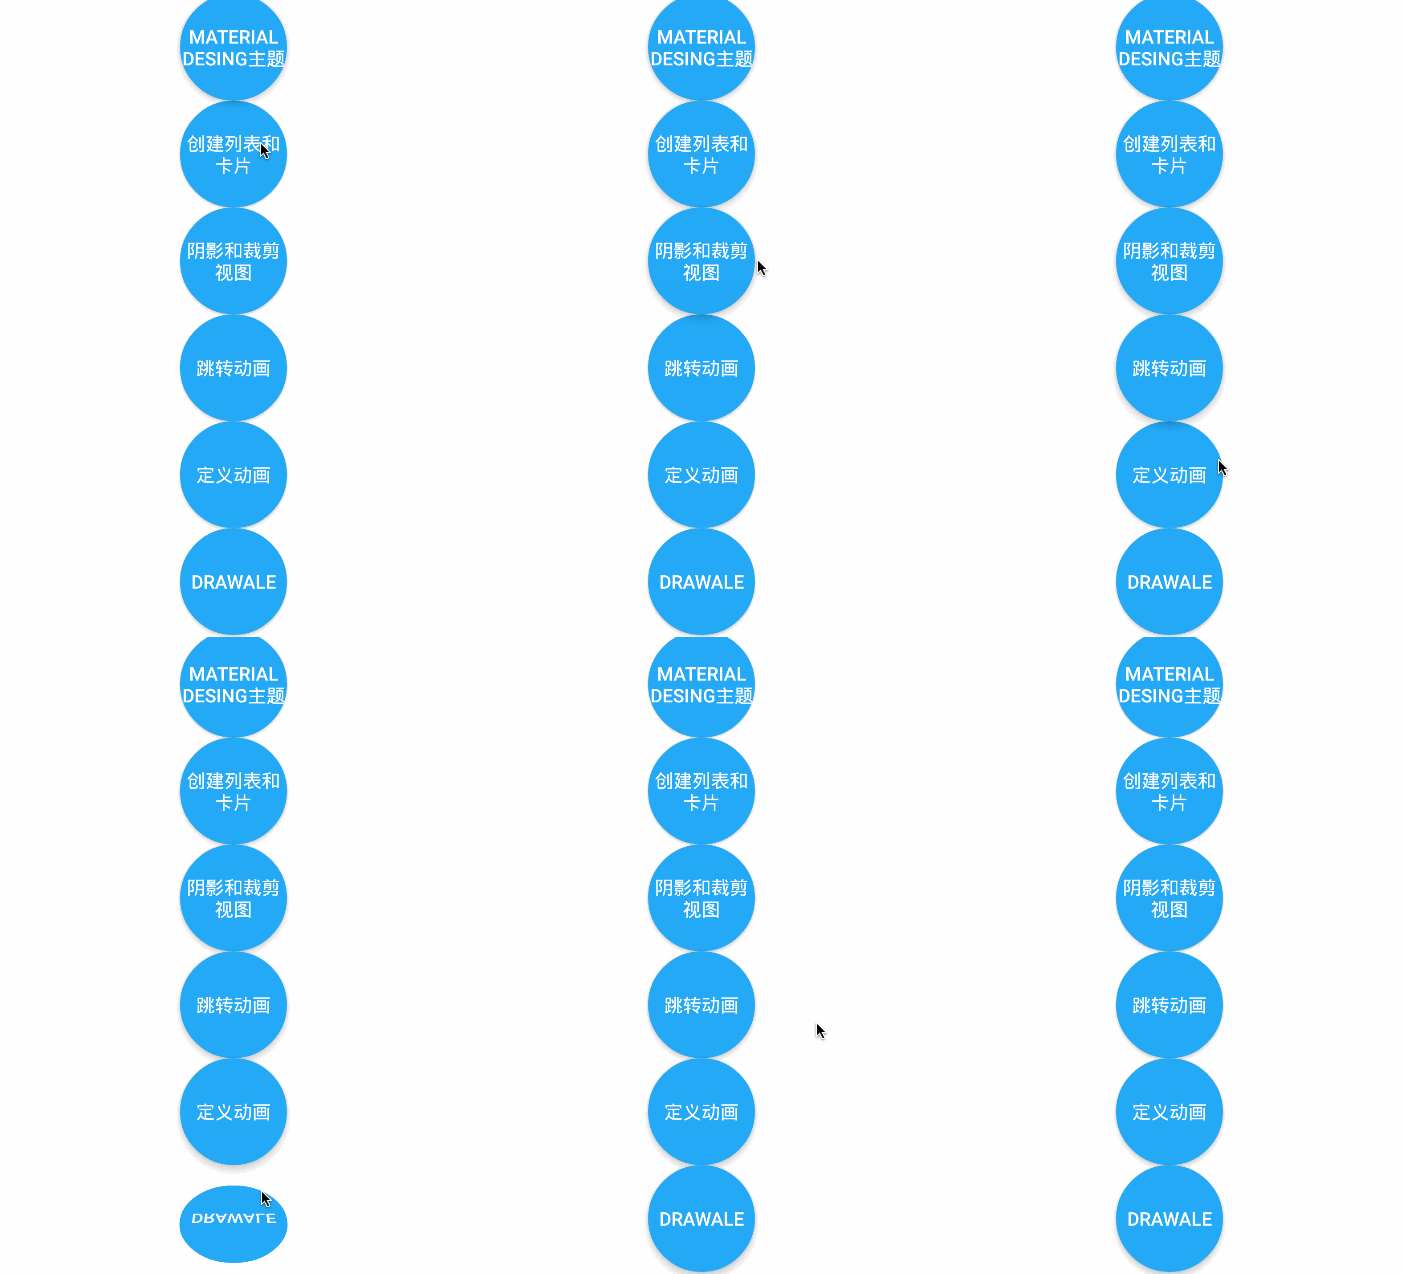
当然动画任你自己定义,如果只定义Z轴的话也可以轻松的实现此效果:

[AnimatedStateListDrawable](http://developer.android.com/reference/android/graphics/drawable/AnimatedStateListDrawable.html)类让你去创建drawable资源,该资源在相关联的视图的状态更改时展示动画。一些Android5.0中的系统控件使用这些默认的动画。下面的例子显示了如何定义一个[AnimatedStateListDrawable](http://developer.android.com/reference/android/graphics/drawable/AnimatedStateListDrawable.html)作为XML资源:
~~~
<!-- res/drawable/myanimstatedrawable.xml -->
<animated-selector
xmlns:android="http://schemas.android.com/apk/res/android">
<!-- provide a different drawable for each state-->
<item android:id="@+id/pressed" android:drawable="@drawable/drawableP"
android:state_pressed="true"/>
<item android:id="@+id/focused" android:drawable="@drawable/drawableF"
android:state_focused="true"/>
<item android:id="@id/default"
android:drawable="@drawable/drawableD"/>
<!-- specify a transition -->
<transition android:fromId="@+id/default" android:toId="@+id/pressed">
<animation-list>
<item android:duration="15" android:drawable="@drawable/dt1"/>
<item android:duration="15" android:drawable="@drawable/dt2"/>
...
</animation-list>
</transition>
...
</animated-selector>
~~~
ym—— Android 5.0学习之定义阴影
最后更新于:2022-04-01 09:34:56
**转载请注明本文出自Cym的博客([http://blog.csdn.net/cym492224103](http://blog.csdn.net/cym492224103)**),谢谢支持!**
**
**
前言
Material Design 规范指导里面特别提出了阴影的重要性和如何正确使用的方法([点击传送](http://www.google.com/design/spec/what-is-material/objects-in-3d-space.html#)),那我们就更加不能忽视这一点了,本篇文章就要教大家如何设置阴影,做出一个有层次感的界面。

设置方法:
android:elevation
分别设置不同数值的elevation效果如下:

layout:
~~~
<LinearLayout
android:layout_width="match_parent"
android:layout_height="wrap_content"
android:orientation="horizontal">
<TextView android:layout_width="100dp"
android:layout_margin="2dp"
android:layout_height="100dp"
android:text="test"
android:background="@android:color/white"
android:gravity="center"
android:elevation="1dip"
/>
<TextView android:layout_width="100dp"
android:layout_margin="2dp"
android:layout_height="100dp"
android:text="test"
android:background="@android:color/white"
android:gravity="center"
android:elevation="4dip"/>
<TextView android:layout_width="100dp"
android:layout_margin="2dp"
android:layout_height="100dp"
android:text="test"
android:background="@android:color/white"
android:gravity="center"
android:elevation="8dip"
/>
</LinearLayout>
~~~
View的z值由两部分组成,elevation和translationZ.
eleavation是静态的成员,translationZ是用来做动画。
Z = elevation + translationZ
在布局中使用**android:elevation**属性去定义
在代码中使用 **View.setElevation**方法去定义
设置视图的translation,可以使用**View.setTranslationZ**方法
新的**ViewPropertyAnimator.z**和**ViewPropertyAnimator.translationZ**方法可以设置视图的**elevation**值
在5.0 的API Demos中 Graphics-》Shadow Card Drag 和 Shadow Card stack 这两个例子就很好的使用translationZ和eleavation

Shadow Card Drag 源码:
~~~
/*
* Copyright (C) 2014 The Android Open Source Project
*
* Licensed under the Apache License, Version 2.0 (the "License");
* you may not use this file except in compliance with the License.
* You may obtain a copy of the License at
*
* http://www.apache.org/licenses/LICENSE-2.0
*
* Unless required by applicable law or agreed to in writing, software
* distributed under the License is distributed on an "AS IS" BASIS,
* WITHOUT WARRANTIES OR CONDITIONS OF ANY KIND, either express or implied.
* See the License for the specific language governing permissions and
* limitations under the License.
*/
package com.example.android.apis.graphics;
import android.animation.ObjectAnimator;
import android.app.Activity;
import android.graphics.Canvas;
import android.graphics.Color;
import android.graphics.Outline;
import android.graphics.Paint;
import android.graphics.Path;
import android.graphics.PorterDuff;
import android.graphics.drawable.ShapeDrawable;
import android.graphics.drawable.shapes.OvalShape;
import android.graphics.drawable.shapes.RectShape;
import android.graphics.drawable.shapes.RoundRectShape;
import android.graphics.drawable.shapes.Shape;
import android.os.Bundle;
import android.view.MotionEvent;
import android.view.View;
import android.view.animation.AccelerateInterpolator;
import android.view.animation.DecelerateInterpolator;
import android.widget.Button;
import android.widget.CheckBox;
import android.widget.CompoundButton;
import com.example.android.apis.R;
import java.util.ArrayList;
public class ShadowCardDrag extends Activity {
private static final float MAX_Z_DP = 10;
private static final float MOMENTUM_SCALE = 10;
private static final int MAX_ANGLE = 10;
private class CardDragState {
long lastEventTime;
float lastX;
float lastY;
float momentumX;
float momentumY;
public void onDown(long eventTime, float x, float y) {
lastEventTime = eventTime;
lastX = x;
lastY = y;
momentumX = 0;
momentumY = 0;
}
public void onMove(long eventTime, float x, float y) {
final long deltaT = eventTime - lastEventTime;
if (deltaT != 0) {
float newMomentumX = (x - lastX) / (mDensity * deltaT);
float newMomentumY = (y - lastY) / (mDensity * deltaT);
momentumX = 0.9f * momentumX + 0.1f * (newMomentumX * MOMENTUM_SCALE);
momentumY = 0.9f * momentumY + 0.1f * (newMomentumY * MOMENTUM_SCALE);
momentumX = Math.max(Math.min((momentumX), MAX_ANGLE), -MAX_ANGLE);
momentumY = Math.max(Math.min((momentumY), MAX_ANGLE), -MAX_ANGLE);
//noinspection SuspiciousNameCombination
mCard.setRotationX(-momentumY);
//noinspection SuspiciousNameCombination
mCard.setRotationY(momentumX);
if (mShadingEnabled) {
float alphaDarkening = (momentumX * momentumX + momentumY * momentumY) / (90 * 90);
alphaDarkening /= 2;
int alphaByte = 0xff - ((int)(alphaDarkening * 255) & 0xff);
int color = Color.rgb(alphaByte, alphaByte, alphaByte);
mCardBackground.setColorFilter(color, PorterDuff.Mode.MULTIPLY);
}
}
lastX = x;
lastY = y;
lastEventTime = eventTime;
}
public void onUp() {
ObjectAnimator flattenX = ObjectAnimator.ofFloat(mCard, "rotationX", 0);
flattenX.setDuration(100);
flattenX.setInterpolator(new AccelerateInterpolator());
flattenX.start();
ObjectAnimator flattenY = ObjectAnimator.ofFloat(mCard, "rotationY", 0);
flattenY.setDuration(100);
flattenY.setInterpolator(new AccelerateInterpolator());
flattenY.start();
mCardBackground.setColorFilter(null);
}
}
/**
* Simple shape example that generates a shadow casting outline.
*/
private static class TriangleShape extends Shape {
private final Path mPath = new Path();
@Override
protected void onResize(float width, float height) {
mPath.reset();
mPath.moveTo(0, 0);
mPath.lineTo(width, 0);
mPath.lineTo(width / 2, height);
mPath.lineTo(0, 0);
mPath.close();
}
@Override
public void draw(Canvas canvas, Paint paint) {
canvas.drawPath(mPath, paint);
}
@Override
public void getOutline(Outline outline) {
outline.setConvexPath(mPath);
}
}
private final ShapeDrawable mCardBackground = new ShapeDrawable();
private final ArrayList<Shape> mShapes = new ArrayList<Shape>();
private float mDensity;
private View mCard;
private final CardDragState mDragState = new CardDragState();
private boolean mTiltEnabled;
private boolean mShadingEnabled;
@Override
protected void onCreate(Bundle savedInstanceState) {
super.onCreate(savedInstanceState);
setContentView(R.layout.shadow_card_drag);
mDensity = getResources().getDisplayMetrics().density;
mShapes.add(new RectShape());
mShapes.add(new OvalShape());
float r = 10 * mDensity;
float radii[] = new float[] {r, r, r, r, r, r, r, r};
mShapes.add(new RoundRectShape(radii, null, null));
mShapes.add(new TriangleShape());
mCardBackground.getPaint().setColor(Color.WHITE);
mCardBackground.setShape(mShapes.get(0));
final View cardParent = findViewById(R.id.card_parent);
mCard = findViewById(R.id.card);
mCard.setBackground(mCardBackground);
final CheckBox tiltCheck = (CheckBox) findViewById(R.id.tilt_check);
tiltCheck.setOnCheckedChangeListener(new CompoundButton.OnCheckedChangeListener() {
@Override
public void onCheckedChanged(CompoundButton buttonView, boolean isChecked) {
mTiltEnabled = isChecked;
if (!mTiltEnabled) {
mDragState.onUp();
}
}
});
final CheckBox shadingCheck = (CheckBox) findViewById(R.id.shading_check);
shadingCheck.setOnCheckedChangeListener(new CompoundButton.OnCheckedChangeListener() {
@Override
public void onCheckedChanged(CompoundButton buttonView, boolean isChecked) {
mShadingEnabled = isChecked;
if (!mShadingEnabled) {
mCardBackground.setColorFilter(null);
}
}
});
final Button shapeButton = (Button) findViewById(R.id.shape_select);
shapeButton.setOnClickListener(new View.OnClickListener() {
int index = 0;
@Override
public void onClick(View v) {
index = (index + 1) % mShapes.size();
mCardBackground.setShape(mShapes.get(index));
}
});
/**
* Enable any touch on the parent to drag the card. Note that this doesn't do a proper hit
* test, so any drag (including off of the card) will work.
*
* This enables the user to see the effect more clearly for the purpose of this demo.
*/
cardParent.setOnTouchListener(new View.OnTouchListener() {
float downX;
float downY;
long downTime;
@Override
public boolean onTouch(View v, MotionEvent event) {
switch (event.getAction()) {
case MotionEvent.ACTION_DOWN:
downX = event.getX() - mCard.getTranslationX();
downY = event.getY() - mCard.getTranslationY();
downTime = event.getDownTime();
ObjectAnimator upAnim = ObjectAnimator.ofFloat(mCard, "translationZ",
MAX_Z_DP * mDensity);
upAnim.setDuration(100);
upAnim.setInterpolator(new DecelerateInterpolator());
upAnim.start();
if (mTiltEnabled) {
mDragState.onDown(event.getDownTime(), event.getX(), event.getY());
}
break;
case MotionEvent.ACTION_MOVE:
mCard.setTranslationX(event.getX() - downX);
mCard.setTranslationY(event.getY() - downY);
if (mTiltEnabled) {
mDragState.onMove(event.getEventTime(), event.getX(), event.getY());
}
break;
case MotionEvent.ACTION_UP:
ObjectAnimator downAnim = ObjectAnimator.ofFloat(mCard, "translationZ", 0);
downAnim.setDuration(100);
downAnim.setInterpolator(new AccelerateInterpolator());
downAnim.start();
if (mTiltEnabled) {
mDragState.onUp();
}
break;
}
return true;
}
});
}
}
~~~
layout:
~~~
<?xml version="1.0" encoding="utf-8"?>
<!-- Copyright (C) 2014 The Android Open Source Project
Licensed under the Apache License, Version 2.0 (the "License");
you may not use this file except in compliance with the License.
You may obtain a copy of the License at
http://www.apache.org/licenses/LICENSE-2.0
Unless required by applicable law or agreed to in writing, software
distributed under the License is distributed on an "AS IS" BASIS,
WITHOUT WARRANTIES OR CONDITIONS OF ANY KIND, either express or implied.
See the License for the specific language governing permissions and
limitations under the License.
-->
<FrameLayout
xmlns:android="http://schemas.android.com/apk/res/android"
android:id="@+id/card_parent"
android:layout_width="match_parent"
android:layout_height="match_parent"
android:clipChildren="false"
android:clipToPadding="false"
android:orientation="horizontal" >
<LinearLayout
android:layout_width="match_parent"
android:layout_height="wrap_content"
android:orientation="horizontal">
<CheckBox
android:id="@+id/tilt_check"
android:layout_width="wrap_content"
android:layout_height="wrap_content"
android:checked="false"
android:text="@string/enable_tilt"/>
<CheckBox
android:id="@+id/shading_check"
android:layout_width="wrap_content"
android:layout_height="wrap_content"
android:checked="false"
android:text="@string/enable_shading"/>
<Button
android:id="@+id/shape_select"
android:layout_width="wrap_content"
android:layout_height="wrap_content"
android:text="@string/select_shape"/>
</LinearLayout>
<TextView
android:id="@+id/card"
android:layout_width="150dp"
android:layout_height="150dp"
android:background="@drawable/round_rect"
android:clipToPadding="false"
android:gravity="center"
android:padding="20dp"
android:text="@string/draggable_card"
android:textSize="20sp"
android:elevation="2dp"/>
</FrameLayout>
~~~
Shadow Card stack 源码:
~~~
/*
* Copyright (C) 2014 The Android Open Source Project
*
* Licensed under the Apache License, Version 2.0 (the "License");
* you may not use this file except in compliance with the License.
* You may obtain a copy of the License at
*
* http://www.apache.org/licenses/LICENSE-2.0
*
* Unless required by applicable law or agreed to in writing, software
* distributed under the License is distributed on an "AS IS" BASIS,
* WITHOUT WARRANTIES OR CONDITIONS OF ANY KIND, either express or implied.
* See the License for the specific language governing permissions and
* limitations under the License.
*/
package com.example.android.apis.graphics;
import android.animation.Animator;
import android.animation.AnimatorSet;
import android.animation.ObjectAnimator;
import android.app.Activity;
import android.os.Bundle;
import android.view.ViewGroup;
import android.widget.TextView;
import com.example.android.apis.R;
import java.util.ArrayList;
public class ShadowCardStack extends Activity {
private static final float X_SHIFT_DP = 1000;
private static final float Y_SHIFT_DP = 50;
private static final float Z_LIFT_DP = 8;
private static final float ROTATE_DEGREES = 15;
public AnimatorSet createSet(ArrayList<Animator> items, long startDelay) {
AnimatorSet set = new AnimatorSet();
set.playTogether(items);
set.setStartDelay(startDelay);
return set;
}
@Override
protected void onCreate(Bundle savedInstanceState) {
super.onCreate(savedInstanceState);
setContentView(R.layout.shadow_card_stack);
float density = getResources().getDisplayMetrics().density;
final ViewGroup cardParent = (ViewGroup) findViewById(R.id.card_parent);
final float X = X_SHIFT_DP * density;
final float Y = Y_SHIFT_DP * density;
final float Z = Z_LIFT_DP * density;
ArrayList<Animator> towardAnimators = new ArrayList<Animator>();
ArrayList<Animator> expandAnimators = new ArrayList<Animator>();
ArrayList<Animator> moveAwayAnimators = new ArrayList<Animator>();
ArrayList<Animator> moveBackAnimators = new ArrayList<Animator>();
ArrayList<Animator> awayAnimators = new ArrayList<Animator>();
ArrayList<Animator> collapseAnimators = new ArrayList<Animator>();
final int max = cardParent.getChildCount();
for (int i = 0; i < max; i++) {
TextView card = (TextView) cardParent.getChildAt(i);
card.setText("Card number " + i);
float targetY = (i - (max-1) / 2.0f) * Y;
Animator expand = ObjectAnimator.ofFloat(card, "translationY", targetY);
expandAnimators.add(expand);
Animator toward = ObjectAnimator.ofFloat(card, "translationZ", i * Z);
toward.setStartDelay(200 * ((max) - i));
towardAnimators.add(toward);
card.setPivotX(X_SHIFT_DP);
Animator rotateAway = ObjectAnimator.ofFloat(card, "rotationY",
i == 0 ? 0 : ROTATE_DEGREES);
rotateAway.setStartDelay(200 * ((max) - i));
rotateAway.setDuration(100);
moveAwayAnimators.add(rotateAway);
Animator slideAway = ObjectAnimator.ofFloat(card, "translationX",
i == 0 ? 0 : X);
slideAway.setStartDelay(200 * ((max) - i));
slideAway.setDuration(100);
moveAwayAnimators.add(slideAway);
Animator rotateBack = ObjectAnimator.ofFloat(card, "rotationY", 0);
rotateBack.setStartDelay(200 * i);
moveBackAnimators.add(rotateBack);
Animator slideBack = ObjectAnimator.ofFloat(card, "translationX", 0);
slideBack.setStartDelay(200 * i);
moveBackAnimators.add(slideBack);
Animator away = ObjectAnimator.ofFloat(card, "translationZ", 0);
away.setStartDelay(200 * i);
awayAnimators.add(away);
Animator collapse = ObjectAnimator.ofFloat(card, "translationY", 0);
collapseAnimators.add(collapse);
}
AnimatorSet totalSet = new AnimatorSet();
totalSet.playSequentially(
createSet(expandAnimators, 250),
createSet(towardAnimators, 0),
createSet(moveAwayAnimators, 250),
createSet(moveBackAnimators, 0),
createSet(awayAnimators, 250),
createSet(collapseAnimators, 0));
totalSet.start();
totalSet.addListener(new RepeatListener(totalSet));
}
public static class RepeatListener implements Animator.AnimatorListener {
final Animator mRepeatAnimator;
public RepeatListener(Animator repeatAnimator) {
mRepeatAnimator = repeatAnimator;
}
@Override
public void onAnimationStart(Animator animation) {}
@Override
public void onAnimationEnd(Animator animation) {
if (animation == mRepeatAnimator) {
mRepeatAnimator.start();
}
}
@Override
public void onAnimationCancel(Animator animation) {}
@Override
public void onAnimationRepeat(Animator animation) {}
}
}
~~~
layout:
~~~
<?xml version="1.0" encoding="utf-8"?>
<!-- Copyright (C) 2014 The Android Open Source Project
Licensed under the Apache License, Version 2.0 (the "License");
you may not use this file except in compliance with the License.
You may obtain a copy of the License at
http://www.apache.org/licenses/LICENSE-2.0
Unless required by applicable law or agreed to in writing, software
distributed under the License is distributed on an "AS IS" BASIS,
WITHOUT WARRANTIES OR CONDITIONS OF ANY KIND, either express or implied.
See the License for the specific language governing permissions and
limitations under the License.
-->
<RelativeLayout
xmlns:android="http://schemas.android.com/apk/res/android"
android:id="@+id/card_parent"
android:orientation="vertical"
android:layout_width="match_parent"
android:layout_height="match_parent"
android:clipChildren="false"
android:clipToPadding="false"
android:gravity="center">
<TextView
android:layout_width="250dp"
android:layout_height="150dp"
android:background="@drawable/round_rect"
android:padding="20dp"
android:textSize="20sp" />
<TextView
android:layout_width="250dp"
android:layout_height="150dp"
android:background="@drawable/round_rect"
android:padding="20dp"
android:textSize="20sp" />
<TextView
android:layout_width="250dp"
android:layout_height="150dp"
android:background="@drawable/round_rect"
android:padding="20dp"
android:textSize="20sp" />
<TextView
android:layout_width="250dp"
android:layout_height="150dp"
android:background="@drawable/round_rect"
android:padding="20dp"
android:textSize="20sp" />
<TextView
android:layout_width="250dp"
android:layout_height="150dp"
android:background="@drawable/round_rect"
android:padding="20dp"
android:textSize="20sp" />
</RelativeLayout>
~~~
ym—— Android 5.0学习之Activity过渡动画
最后更新于:2022-04-01 09:34:54
**转载请注明本文出自Cym的博客([http://blog.csdn.net/cym492224103](http://blog.csdn.net/cym492224103)**),谢谢支持!**
**
**
前言
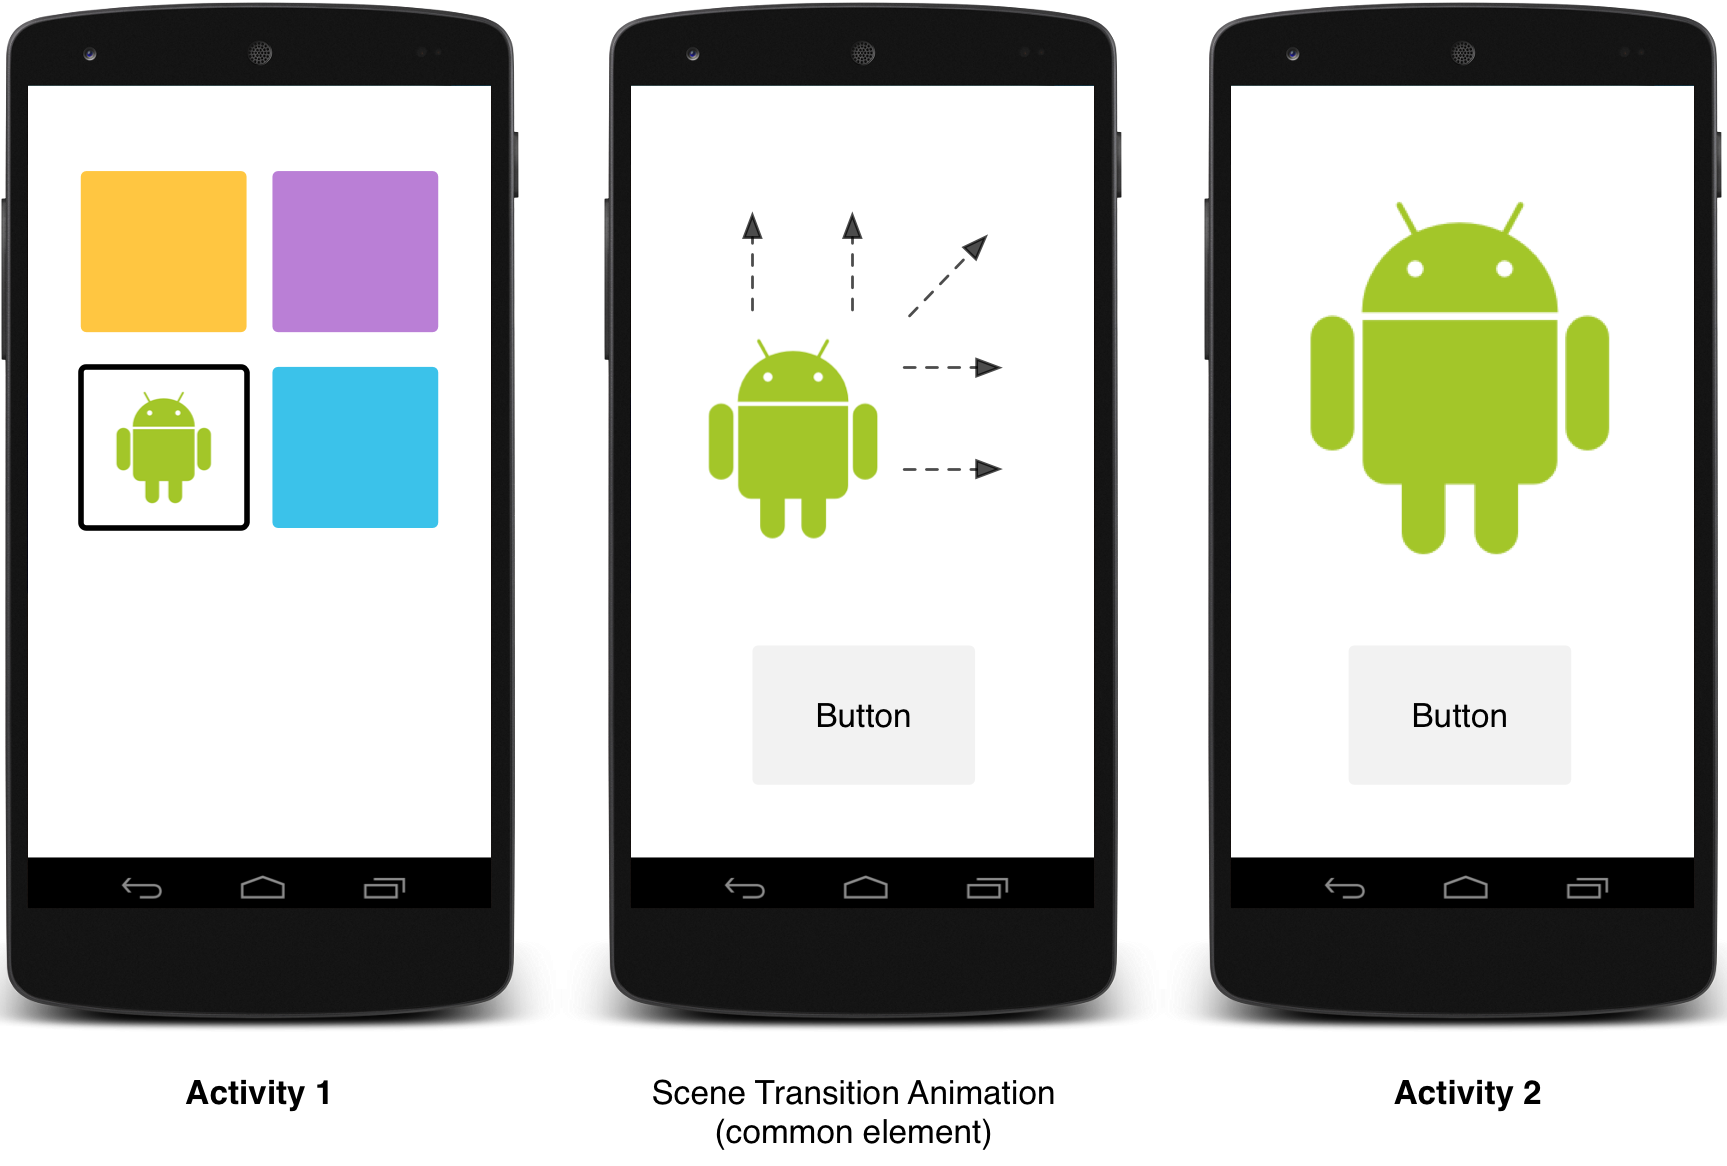
Activity Transition:
提供了三种Transition类型:
**进入**:一个进入的过渡(动画)决定activity中的所有的视图怎么进入屏幕。
**退出**:一个退出的过渡(动画)决定一个activity中的所有视图怎么退出屏幕。
**共享元素**:一个共享元素过渡(动画)决定两个activities之间的过渡,怎么共享(它们)的视图。
~~~
<span style="font-size:18px;color:#ff6666;">支持这些进入和退出的过渡动画:</span>
~~~
~~~
<span style="font-size:18px;">explode(分解) –进或出地移动视图,从屏幕中间
slide(滑动) -进或出地移动视图,从屏幕边缘
fade(淡出) –通过改变屏幕上视图的不透明度达到添加或者移除视图(的效果)</span>
~~~
**
**
**
~~~
<span style="font-size:18px;color:#ff6666;">在以上动画基础上还可以添加还支持共享元素过渡:(以上效果的共享元素效果基于分解动画基础上进行)</span>
~~~
它的作用就是共享两个acitivity种共同的元素,在Android 5.0下支持如下效果:
changeBounds - 改变目标视图的布局边界
changeClipBounds - 裁剪目标视图边界
changeTransform - 改变目标视图的缩放比例和旋转角度
changeImageTransform - 改变目标图片的大小和缩放比例
使用步骤:
1.设置动画(两种方式):
1.1xml设置
当你定义继承了material主题样式时,使用android:windowContentTransitions属性启用窗口的内容转换(效果)。你还可以指定进入、退出、和共享元素的转换:
~~~
<style name="myTheme" parent="android:Theme.Material">
<!-- 允许使用transitions -->
<item name="android:windowContentTransitions">true</item>
<!-- 指定进入和退出transitions -->
<item name="android:windowEnterTransition">@transition/explode</item>
<item name="android:windowExitTransition">@transition/explode</item>
<!-- 指定shared element transitions -->
<item name="android:windowSharedElementEnterTransition">
@transition/change_image_transform</item>
<item name="android:windowSharedElementExitTransition">
@transition/change_image_transform</item>
</style>
~~~
定义transition动画:
~~~
<transitionSet xmlns:android="http://schemas.android.com/apk/res/android">
<explode/>
<changeBounds/>
<changeTransform/>
<changeClipBounds/>
<changeImageTransform/>
</transitionSet>
~~~
1.2代码设置
~~~
// 允许使用transitions
getWindow().requestFeature(Window.FEATURE_CONTENT_TRANSITIONS);
// 设置一个exit transition
getWindow().setExitTransition(new Explode());//new Slide() new Fade()
~~~
Window.setEnterTransition():设置进入动画
Window.setExitTransition():设置退出效果
Window.setSharedElementEnterTransition():设置共享元素的进入动画
Window.setSharedElementExitTransition():设置共享元素的退出动画
2.Activity跳转方法:
进入退出动画跳转:
~~~
startActivity(intent,
ActivityOptions.makeSceneTransitionAnimation(this).toBundle());
~~~
共享元素跳转:
为了使有一个共享元素的两个activities间使用过渡动画:
1.在你的主题中启用窗口内容过渡
2.在你的主题样式中指定共享元素的过渡
3.定义你的过渡动画为XML资源
4.使用android:transitionName属性给两个布局中的共享元素指定一个相同的名字(名字一定不要写错)
5.使用[ActivityOptions.makeSceneTransitionAnimation()](http://developer.android.com/reference/android/app/ActivityOptions.html#makeSceneTransitionAnimation(android.app.Activity,) 方法
代码:
~~~
// 共享跳转
~~~
~~~
intent = new Intent(Transitions.this, Transitions4.class);
startActivity(intent, ActivityOptions.makeSceneTransitionAnimation(this,view,"shareName").toBundle());
~~~
跳转目标xml:
~~~
<?xml version="1.0" encoding="utf-8"?>
<AbsoluteLayout xmlns:android="http://schemas.android.com/apk/res/android"
android:orientation="vertical"
android:layout_width="match_parent"
android:layout_height="match_parent"
android:background="@android:color/white">
<LinearLayout
android:orientation="horizontal"
android:id="@+id/ll"
android:background="#2faaf3"
android:elevation="2dip"
android:layout_width="fill_parent" android:layout_height="200dp"/>
<TextView
android:id="@+id/btn_test"
android:elevation="8dip"
android:padding="10dip"
android:layout_x="300dip"
android:layout_y="175dip"
android:transitionName="shareName"
android:layout_width="50dp" android:layout_height="50dp" android:background="@drawable/myrect"
android:layout_below="@+id/ll" android:layout_alignParentEnd="true"
android:layout_marginRight="56dp"/>
</AbsoluteLayout>
~~~
如果有多个共享元素:
~~~
ActivityOptions options = ActivityOptions.makeSceneTransitionAnimation(this,
Pair.create(view1, "agreedName1"),
Pair.create(view2, "agreedName2"));
~~~
去试试吧~!
ym—— Android 5.0学习之CardView
最后更新于:2022-04-01 09:34:52
**转载请注明本文出自Cym的博客([http://blog.csdn.net/cym492224103](http://blog.csdn.net/cym492224103)**),谢谢支持!**
**
**
前言
CardView顾名思义,就是想卡片一样的控件,如图:

Android 5.0之前,我们有两种方案做出这种效果:
1.通过设置背景图
2.设置配置Shape文件
而现在我们需要麻烦美工MM,也不需要配置麻烦的Shape文件,只需要简单的设置几个属性即可,那就是用我们CardView
CardView
[CardView](http://developer.android.com/reference/android/support/v7/widget/CardView.html)继承了[FrameLayout](http://developer.android.com/reference/android/widget/FrameLayout.html)类,并让你在里面的卡片中(显示)有跨平台一致性的外观。[CardView](http://developer.android.com/reference/android/support/v7/widget/CardView.html)控件可以有阴影和圆角(效果)。
要创建具有阴影效果的卡片,可以使用card_view:cardElevation属性。[CardView](http://developer.android.com/reference/android/support/v7/widget/CardView.html)会在Android5.0(API级别21)以上的系统中使用真实高程(elevation)和动态阴影,(而)在较低的系统版本中会回落到程序式的阴影效果显示。欲了解更多信息,请参阅[Maintaining Compatibility(保持兼容性)](http://blog.csdn.net/bbld_/article/details/40634829)。
使用这些属性来定制[CardView](http://developer.android.com/reference/android/support/v7/widget/CardView.html)控件的外观:
在布局中设置圆角半径,使用card_view:cardCornerRadius属性
在代码中设置圆角半径,使用CardView.setRadius方法
要设置一个卡片的背景颜色,使用card_view:cardBackgroundColor属性
为了让大家更好理解并使用本人所讲的知识点,本次CardView作为item添加到[RecyclerView](http://blog.csdn.net/cym492224103/article/details/41719497)中。
使用步骤:
1.导入/sdk/extras/android/support/v7/cardview/libs/android-support-v7-cardview.jar
2.把/sdk/extras/android/support/v7/cardview作为Library工程引用到工程
3.修改下item的layout
原有的xml
~~~
<?xml version="1.0" encoding="utf-8"?>
<LinearLayout
xmlns:android="http://schemas.android.com/apk/res/android"
xmlns:tools="http://schemas.android.com/tools"
android:orientation="horizontal"
android:layout_width="match_parent"
android:layout_height="match_parent"
>
<TextView
android:id="@+id/textViewSample"
android:layout_width="0dp"
android:layout_height="wrap_content"
android:layout_weight="1"
android:textSize="20sp"
android:padding="30dp"
android:fontFamily="sans-serif-light"
tools:text="Sample text"
/>
</LinearLayout>
~~~
修改后的xml
~~~
<?xml version="1.0" encoding="utf-8"?>
<android.support.v7.widget.CardView xmlns:android="http://schemas.android.com/apk/res/android"
xmlns:card_view="http://schemas.android.com/apk/res-auto"
android:id="@+id/card_view"
android:layout_width="match_parent"
android:layout_height="match_parent"
android:layout_margin="5dp" >
<TextView
android:id="@+id/textViewSample"
android:layout_width="0dp"
android:layout_height="wrap_content"
android:layout_weight="1"
android:fontFamily="sans-serif-light"
android:padding="30dp"
android:textSize="20sp" />
</android.support.v7.widget.CardView>
~~~
哦了~!赶快去试试吧~!
ym—— Android 5.0学习之ListView升级版RecyclerView
最后更新于:2022-04-01 09:34:50
**转载请注明本文出自Cym的博客([http://blog.csdn.net/cym492224103](http://blog.csdn.net/cym492224103)**),谢谢支持!**
**
**
前言
大家都知道ListView在我们开发中很常用,Android5.0的到来,它给我们带来了一个替代
ListView的新的控件,也可以说是ListView的升级版,那就是RecyclerView。
接下来就让我们看一下,它们的作用的用法吧~!
RecyclerView
[RecyclerView](http://developer.android.com/reference/android/support/v7/widget/RecyclerView.html)控件是比[ListView](http://developer.android.com/reference/android/widget/ListView.html)更先进、灵活的版本。
该[RecyclerView](http://developer.android.com/reference/android/support/v7/widget/RecyclerView.html)类通过以下几点简化了显示和处理大量的数据:
1.为每个条目位置提供了布局管理器(**RecyclerView.setLayoutManager**)
[RecyclerView](http://developer.android.com/reference/android/support/v7/widget/RecyclerView.html)提供这些内置的布局管理器:
[LinearLayoutManager](http://developer.android.com/reference/android/support/v7/widget/LinearLayoutManager.html)(用来)显示垂直或水平滚动的列表项
[GridLayoutManager](http://developer.android.com/reference/android/support/v7/widget/GridLayoutManager.html)(用来)显示网格中的item(项)
[StaggeredGridLayoutManager](http://developer.android.com/reference/android/support/v7/widget/StaggeredGridLayoutManager.html)(用来)显示交错的网格item(项目)
可以通过继承[RecyclerView.LayoutManager](http://developer.android.com/reference/android/support/v7/widget/RecyclerView.LayoutManager.html)类来自定义自己的布局管理器。
2.为每个条目设置了操作动画(**RecyclerView.setItemAnimator**)
使用步骤:
1.导入sdk/extras/android/support/v7/recyclerview/libs/android-support-v7-recyclerview.jar
2.xml配置
~~~
<RelativeLayout xmlns:android="http://schemas.android.com/apk/res/android"
xmlns:tools="http://schemas.android.com/tools"
android:layout_width="match_parent"
android:layout_height="match_parent"
tools:context=".MainActivity"
>
<android.support.v7.widget.RecyclerView
android:id="@+id/recycler_view"
android:layout_width="match_parent"
android:layout_height="match_parent"
android:scrollbars="vertical"
tools:listitem="@layout/list_basic_item"
/>
</RelativeLayout>
~~~
3.Activity代码
~~~
public class Main extends Activity {
@Override
protected void onCreate(Bundle savedInstanceState) {
// TODO Auto-generated method stub
super.onCreate(savedInstanceState);
setContentView(R.layout.activity_main);
// 获取RecyclerView对象
final RecyclerView recyclerView = (RecyclerView) findViewById(R.id.recycler_view);
// 创建线性布局管理器(默认是垂直方向)
final LinearLayoutManager layoutManager = new LinearLayoutManager(this);
// 为RecyclerView指定布局管理对象
recyclerView.setLayoutManager(layoutManager);
// 创建Adapter
final SampleRecyclerAdapter sampleRecyclerAdapter = new SampleRecyclerAdapter();
// 填充Adapter
recyclerView.setAdapter(sampleRecyclerAdapter);
}
}
~~~
4.Adapter代码
~~~
public class SampleRecyclerAdapter extends
RecyclerView.Adapter<SampleRecyclerAdapter.ViewHolder>
{
private final ArrayList<SampleModel> sampleData = DemoApp.getSampleData(20);
// 用于创建控件
@Override
public ViewHolder onCreateViewHolder(ViewGroup parentViewGroup, int i)
{
// 获得列表项控件(LinearLayer对象)
// list_basic_item.xml布局文件中只包含一个<LinearLayer>标签,在该标签中包含
// 了一个<TextView>标签
// item是LinearLayout对象
View item = LayoutInflater.from(parentViewGroup.getContext()).inflate(
R.layout.list_basic_item, parentViewGroup, false);
return new ViewHolder(item);
}
// 为控件设置数据
@Override
public void onBindViewHolder(ViewHolder viewHolder, final int position)
{
// 获取当前item中显示的数据
final SampleModel rowData = sampleData.get(position);
// 设置要显示的数据
viewHolder.textViewSample.setText(rowData.getSampleText());
viewHolder.itemView.setTag(rowData);
}
@Override
public int getItemCount()
{
return sampleData.size();
}
// 删除指定的Item
public void removeData(int position)
{
sampleData.remove(position);
// 通知RecyclerView控件某个Item已经被删除
notifyItemRemoved(position);
}
// 在指定位置添加一个新的Item
public void addItem(int positionToAdd)
{
sampleData.add(positionToAdd,new SampleModel("新的列表项" + new Random().nextInt(10000)));
// 通知RecyclerView控件插入了某个Item
notifyItemInserted(positionToAdd);
}
public static class ViewHolder extends RecyclerView.ViewHolder
{
private final TextView textViewSample;
public ViewHolder(View itemView)
{
super(itemView);
textViewSample = (TextView) itemView
.findViewById(R.id.textViewSample);
}
}
}
~~~
ym—— Android 5.0学习之AnimatedVectorDrawable
最后更新于:2022-04-01 09:34:47
**转载请注明本文出自Cym的博客([http://blog.csdn.net/cym492224103](http://blog.csdn.net/cym492224103)**),谢谢支持!**
**
**
前言

示例代码地址:[animated-vector-drawable](https://github.com/chiuki/animated-vector-drawable)
几句代码,几个配置文件即可实现以上效果,流畅的体验,无缝的动画,赞~!
官方文档:[点击传送](http://developer.android.com/reference/android/graphics/drawable/AnimatedVectorDrawable.html)
# VectorDrawable
在Android 5.0(API级别21)或以上的系统中,则可以定义矢量drawables,它可以在不失清晰度的情况下进行缩放。你仅仅需要需要一个矢量图片的资源文件,而需要为每个屏幕密度设置一个资源文件。要创建一个矢量图片,你需要定义形状元素的细节在<vector>XML文件中。
建议大家下载以上例子,我根据这个例子进行讲解。
我们先看看笑脸的vector文件:

矢量图像在Android中被表示为[VectorDrawable](http://developer.android.com/reference/android/graphics/drawable/VectorDrawable.html)对象。首先看到这个pathData肯定会很疑惑,更多有关pathData语法的信息,请参阅[SVG Path](http://www.w3.org/TR/SVG11/paths.html#PathData) 的文档参考。学好了PathData的语法,什么都能绘制的出来~!我在github上面就看到一哥们画了一个地雷有图有真相哦。看上去虽然很复杂,但是越复杂的东西,却往往是越灵活的东西

好了,我相信大家通过代码和文档已经简单的解了vector标签。接下来我们来看看如何给它添加动画吧。
# AnimatedVectorDrawable
[AnimatedVectorDrawable](http://developer.android.com/reference/android/graphics/drawable/AnimatedVectorDrawable.html)类可以去创建一个矢量资源的动画。
你通常在三个XML文件中定义矢量资源的动画载体:
<vector>元素的矢量资源,在res/drawable/(文件夹)
<animated-vector>元素的矢量资源动画,在res/drawable/(文件夹)
< objectAnimator>元素的一个或多个对象动画器,在res/anim/(文件夹)
矢量资源动画能创建<group>和<path>元素属性的动画。<group>元素定义了一组路径或子组,并且<path>元素定义了要被绘制的路径。
当你想要创建动画时去定义矢量资源,使用android:name属性分配一个唯一的名字给组和路径,这样你可以从你的动画定义中查询到它们。
接下来我就以旋转的小三角为例:
看之前我们要思考一个问题,它是如何做到在边旋转的过程中变化形状的。
首先我们先看一下小三角的vector文件:

然后在看一下animated-vector文件:
~~~
<animated-vector xmlns:android="http://schemas.android.com/apk/res/android"
android:drawable="@drawable/vectordrawable" >
<target
android:name="rotationGroup"
android:animation="@anim/rotation" />
<target
android:name="v"
android:animation="@anim/path_morph" />
</animated-vector>
~~~
从上面代码我们可以看出配置了两个动画,一个是旋转动画一个是变化形状的动画。
旋转动画:
~~~
<objectAnimator
xmlns:android="http://schemas.android.com/apk/res/android"
android:duration="6000"
android:propertyName="rotation"
android:valueFrom="0"
android:valueTo="360"/>
~~~
变化形状动画:
~~~
<objectAnimator
xmlns:android="http://schemas.android.com/apk/res/android"
android:duration="3000"
android:propertyName="pathData"
android:valueFrom="M300,70 l 0,-70 70,70 0,0 -70,70z"
android:valueTo="M300,70 l 0,-70 70,0 0,140 -70,0 z"
android:valueType="pathType"/>
~~~
最后我们再来看下它是如何配置到layout里面的:
~~~
<LinearLayout
xmlns:android="http://schemas.android.com/apk/res/android"
xmlns:tools="http://schemas.android.com/tools"
android:id="@+id/container"
android:layout_width="wrap_content"
android:layout_height="wrap_content"
android:layout_gravity="center"
android:paddingBottom="@dimen/activity_vertical_margin"
android:paddingLeft="@dimen/activity_horizontal_margin"
android:paddingRight="@dimen/activity_horizontal_margin"
android:paddingTop="@dimen/activity_vertical_margin"
android:gravity="center_horizontal"
android:orientation="vertical"
tools:context=".ExampleActivity">
<TextView
android:layout_width="wrap_content"
android:layout_height="wrap_content"
android:layout_margin="@dimen/margin"
android:text="@string/example_from_documentation"
android:drawableBottom="@drawable/avd"/>
<TextView
android:layout_width="wrap_content"
android:layout_height="wrap_content"
android:layout_margin="@dimen/margin"
android:text="@string/rotation_only"
android:drawableBottom="@drawable/avd_rotation_only"/>
<TextView
android:layout_width="wrap_content"
android:layout_height="wrap_content"
android:layout_margin="@dimen/margin"
android:text="@string/path_morph_only"
android:drawableBottom="@drawable/avd_path_morph_only"/>
</LinearLayout>
~~~
3个TextView,我们只需要关注第一个TextView即可,因为其他都是一样的配置。
配置了一个avb也就是上面贴的animated-vector文件。
最后看一下Activity的启动动画代码:
~~~
TextView textView = (TextView) view;
for (final Drawable drawable : textView.getCompoundDrawables()) {
if (drawable instanceof Animatable) {
((Animatable) drawable).start();
}
}
~~~
找到这个view 拿到他们Drawables对象start即可,容易吧,赶紧去试试吧~!
ym—— Android 5.0学习之使用Palette
最后更新于:2022-04-01 09:34:45
**转载请注明本文出自Cym的博客([http://blog.csdn.net/cym492224103](http://blog.csdn.net/cym492224103)**),谢谢支持!**
**
**
前言
动态色彩
根据图片来决定标题的颜色和标题栏的背景色,这样视觉上更具有冲击力和新鲜感,而不像统一色调那样呆板。

大家想知道这个效果如何实现的吗?
学习Palette轻轻松松搞定此效果哦~!
Palette是什么?
它能让你从图像中提取突出的颜色。这个类能提取以下突出的颜色:
Vibrant(充满活力的)
Vibrant dark(充满活力的黑)
Vibrant light(充满活力的亮)
Muted(柔和的)
Muted dark(柔和的黑)
Muted lighr(柔和的亮)
如何使用?
要提取这些颜色,在你加载图片的后台线程中传递一个位图对象给[Palette.generate()](http://developer.android.com/reference/android/support/v7/graphics/Palette.html#generate(android.graphics.Bitmap))静态方法。如果你不适用线程,则调用[Palette.generateAsync()](http://blog.csdn.net/bbld_/article/details/android.support.v7.graphics.Palette.PaletteAsyncListener))方法并且提供一个监听器去替代。
你可以在[Palette](http://developer.android.com/reference/android/support/v7/graphics/Palette.html)类中使用getter方法来从检索突出的颜色,比如Palette.getVibrantColor。
如果是Android Studio 要在你的项目中使用Palette类,增加下面的[Gradle依赖](http://developer.android.com/sdk/installing/studio-build.html#dependencies)到你的程序的模块(module)中:
~~~
dependencies {
...
compile 'com.android.support:palette-v7:21.0.+'
}
~~~
如果是Eclipse首先我们找到sdk/extras/android/support/v7/palette/libs/android-support-v7-palette.jar导入我们的工程。
然后使用generateAsync方法传入当前图片的bitmap,在传入一个监听,在监听里面我们拿到图片上颜色充满活力的颜色,最后设置标题背景和字体的颜色,代码如下:
~~~
Palette.generateAsync(bitmap,
new Palette.PaletteAsyncListener() {
@Override
public void onGenerated(Palette palette) {
Palette.Swatch vibrant =
palette.getVibrantSwatch();
if (swatch != null) {
// If we have a vibrant color
// update the title TextView
titleView.setBackgroundColor(
vibrant.getRgb());
titleView.setTextColor(
vibrant.getTitleTextColor());
}
}
});
~~~
ym—— Android 5.0学习之使用Material主题
最后更新于:2022-04-01 09:34:43
**转载请注明本文出自Cym的博客([http://blog.csdn.net/cym492224103](http://blog.csdn.net/cym492224103)**),谢谢支持!**
**
**
前言
创建完模拟器了,我想大家已经迫不及待的想开发Android 5.0的项目了,
看完这篇后我们将可以自定义Material主题了~!
新的material主题提供了什么?
可以让你设置调色板的系统控件。
为控件(设计的)触摸反馈动画。
Activity过渡动画
我们来看一下Android给我提供了多少Material的主题吧~!

看来给我不少常用的主题,但是这些主题远远满足不了我大佬们的需求~!至于为什么,我想大家都懂得
。
让我们来自定义Material主题吧
根据官方提供图片提示的来自定义颜色基调(自定义其他的东西原理一样)

首先我们来定义几种不同的颜色

然后新增一个自定义主题继承Material主题设置对应部位颜色
~~~
<?xml version="1.0" encoding="utf-8"?>
<resources>
<!-- inherit from the material theme -->
<style name="AppTheme" parent="android:Theme.Material">
<item name="android:colorPrimary">@color/color1
</item>
<item name="android:colorPrimaryDark">@color/color2
</item>
<item name="android:textColorPrimary">@color/color3
</item>
<item name="android:windowBackground">@color/color4
</item>
<item name="android:navigationBarColor">@color/color5</item>
</style>
</resources>
~~~
最后在AndroidManifast配置该主题

运行看效果

OK~!搞定,很简单吧,大家试试吧~!
ym—— Android 5.0学习之创建模拟器
最后更新于:2022-04-01 09:34:41
**转载请注明本文出自Cym的博客([http://blog.csdn.net/cym492224103](http://blog.csdn.net/cym492224103)**),谢谢支持!**
**
**
前言
学习Android5.0的提前是你必须要有Android 5.0模拟器或者真机。
让我们来学习如果创建Android5.0的模拟器吧~!
两种方式:
1.使用Genymotion[安装教程](http://jingyan.baidu.com/article/3ea51489e7d8bd52e61bba36.html)
优点:运行速度很快
缺点:性能消耗高,电脑配置高的话强烈推荐~!
选择5.0系统

安装直接运
速度杠杠的~!
2.用Android自带的模拟器
优点:性能消耗低
缺点:速度一般
1.下载SDK
1.1.打开Android SDK Manager
1.2.将Android SDK Tools, Platform-tools, and Build-tools.更新到最新
1.3.下载Android 5.0 包内所有的内容
1.4.下载Extras中的Intel x86 Emulator Accelerator (HAXM installer).


2.设置AVD
2.1.到SDK目录的Extras文件夹中安装刚才下好的Intel HAXM。
2.2.打开AVD,Device选择:Nexus 5 或者Nexus 7
2.3.Target选择:Android 5.0
2.4.CPU选择:Intel Atom (x86)

配置完成,点击Start即可运行。
两种方式看自己喜欢,任意选一种即可。
如果遇到下载SDK很慢的问题可以查看:[解决Android SDK 下载太慢](http://blog.csdn.net/cym492224103/article/details/40422673)
前言
最后更新于:2022-04-01 09:34:38
> 原文出处:[跟着ym学习Android5.0](http://blog.csdn.net/column/details/android5.html)
作者:[陈宇明](http://blog.csdn.net/cym492224103)
**本系列文章经作者授权在看云整理发布,未经作者允许,请勿转载!**
# 跟着ym学习Android5.0
> 学习android 5.0,是时候逆袭了~!