打包python文件为exe文件(PyInstaller工具使用方法)
最后更新于:2022-04-01 23:02:49
最近做的新浪微博爬虫程序,打算打包成.exe软件以方便使用,网上找到一个很好的打包工具pyinstaller,这里记录一下打包的方法。
##一、下载pyinstaller
我使用的版本为PyInstaller-2.1,支持python版本2.3-2.7,[点击这里下载](http://download.csdn.net/detail/dianacody/8000503)。
##二、安装pyinstaller
下载完成后,解压即可。我的解压目录为D:\Python27\PyInstaller-2.1\
##三、使用pyinstaller打包.py成.exe应用程序
1.注意使用前要安装pywin32,[点击这里下载](http://download.csdn.net/detail/dianacody/7997941)。
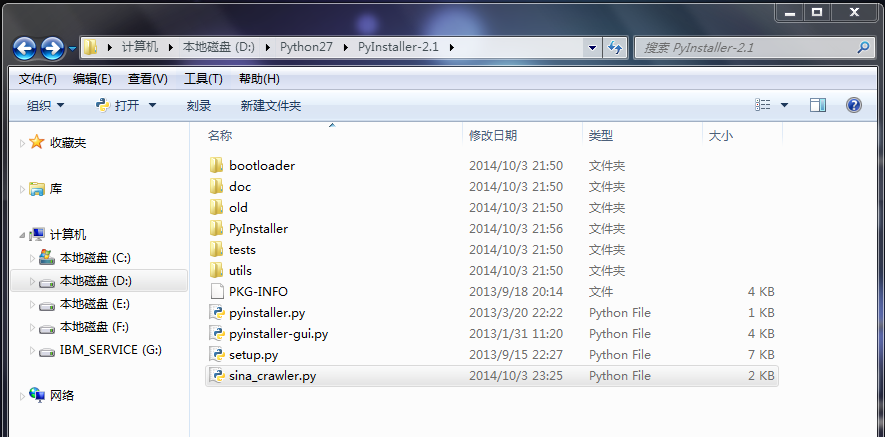
2.将需要打包的.py放到PyInstaller-2.1目录下,如下图所示。
在命令行,cd进入可执行python命令的目录,执行命令:python pyinstaller.py [opts] yourprogram.py
主要选项包括:
-F, –onefile 打包成一个exe文件。
-D, –onedir 创建一个目录,包含exe文件,但会依赖很多文件(默认选项)。
-c, –console, –nowindowed 使用控制台,无界面(默认)
-w, –windowed, –noconsole 使用窗口,无控制台
更详细的使用方法可以参考下载包里的doc目录下的Manual.html文件。
具体操作:
python pyinstaller.py-F sina_crawler.py
**实际操作:(其实就是注意文件路径,我的pyinstaller安装目录D:\Python27\pyinstaller-2.1\)**
**cd到d:\Python27\目录下,然后命令:**
**python pyinstaller-2.1\pyinstaller.py -F pyinstaller-2.1\sina_crawler.py**
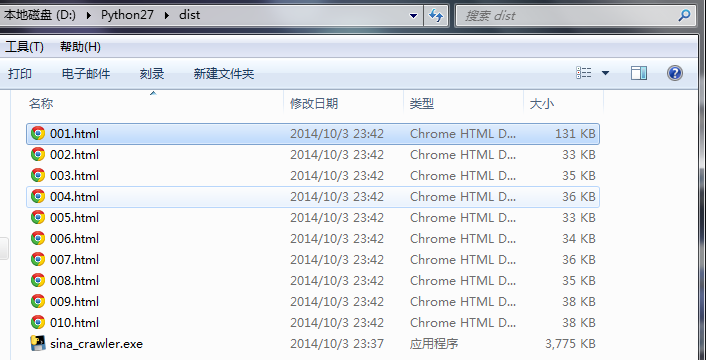
如果最后出现Appending archive to EXE,则生成成功。

**注意会生成(均在Python27目录下):**
**1. dist文件夹(包含生成好的sina_crawler.exe)**
**2.build文件夹(中间生成,没用,事后可以删掉)**
**3.sina_crawler.spec文件(中间生成,没用,事后可以删掉)**
## 四、生成的微博爬虫软件
双击生成的dist文件夹里的sina-crawler.exe文件,运行软件开始爬取微博。

顺便说句题外话,对于控制台程序运行,无论是.py文件还是生成的.exe文件,程序运行完闪退的情况:可以在程序加上raw_input()函数,表示运行结束等待回车输入再退出。
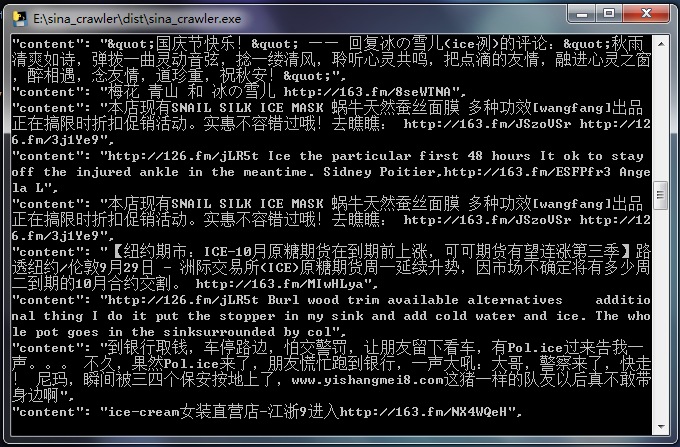
爬下来的页面:
';
【python】网络爬虫(五):scrapy爬虫初探——爬取网页及选择器
最后更新于:2022-04-01 23:02:47
在上一篇文章的末尾,我们创建了一个scrapy框架的爬虫项目test,现在来运行下一个简单的爬虫,看看scrapy爬取的过程是怎样的。
##一、爬虫类编写(spider.py)
~~~
from scrapy.spider import BaseSpider
class test(BaseSpider):
name = "test"
allowed_domains = ["yuedu.baidu.com"]
start_urls = ["http://yuedu.baidu.com/book/list/0?od=0&show=1&pn=0"]
def parse(self, response):
print response.url
~~~
##二、爬网页:运行scrapy项目
这里选择从命令行启动运行项目的方式,一定要注意工程目录结构,能够运行scrapy命令的只有scrapy安装的根目录下。
cd到scrapy的根目录,我的是D:\Python27\,然后运行scrapy命令:scrapy runspider test\test\spiders\spider.py。(或者直接运行工程项目的命令scrapy crawl test),可以看到爬虫爬取的过程有一些debug信息输出:

scrapy给爬虫的start_urls属性中的每个url创建了一个scrapy.http.Request对象,指定parse()方法为回调函数。当这些Request被调度并执行,之后通过parse()返回scrapy.http.Response对象,返回给爬虫。
##三、取网页:网页解析
这里用shell爬取网页,cd到项目的根目录test\下,在cmd中输入:
~~~
scrapy shell http://yuedu.baidu.com
~~~
可以看到结果如下图:

刚才的整个过程中,shell载入url后获得了响应,由本地变量response存储响应结果。
来看下response的内容,输入response.body可以查看response的body部分,即抓到的网页内容:

要查看head部分,输入response.headers:

##四、用选择器xpath提取网页
之前提取网页是用的正则,这里选择器xpath提供了更好的接口。shell有一个selector对象sel,可以根据返回的数据类型自动选择最佳的解析方式(XML or HTML),无需再指明了。
1.抓取网页标题,即标签,在命令行里输入:response.selector.xpath(‘//title’)

或者:response.xpath(‘//title’)

2.抓取下的<text>内容,命令sel.xpath(‘//title/text()’).extract()

先写到这里,下篇文章给出一个关于scrapy项目的完整实例。
原创文章,转载请注明出处:[http://blog.csdn.net/dianacody/article/details/39753933](http://blog.csdn.net/dianacody/article/details/39753933)
</div>
<script src="https://docs.gechiui.com/digest-spiders/gc-content/themes/gechiui-book/js/marked.min.js"></script>
<script>content=document.getElementById("md-view").innerHTML;</script>';
<script>document.getElementById("md-view").innerHTML = marked.parse(content)</script>
</section>
<section class="normal markdown-section">
<h1 id="【python】网络爬虫(四):scrapy爬虫框架(架构、win/linux安装、文件结构)">【python】网络爬虫(四):scrapy爬虫框架(架构、win/linux安装、文件结构)<a class="anchorjs-link " href="#【python】网络爬虫(四):scrapy爬虫框架(架构、win/linux安装、文件结构)" data-anchorjs-icon=""></a></h1>
<p><span class="sa-last-update-time">最后更新于:2022-04-01 23:02:44</span></p>
<div id="md-view">
scrapy框架的学习,目前个人觉得比较详尽的资料主要有两个:
1.官方教程文档、scrapy的github wiki;
2.一个很好的scrapy中文文档:[http://scrapy-chs.readthedocs.org/zh_CN/0.24/index.html](http://scrapy-chs.readthedocs.org/zh_CN/0.24/index.html);
剩下的就是网上其他的一些demo。
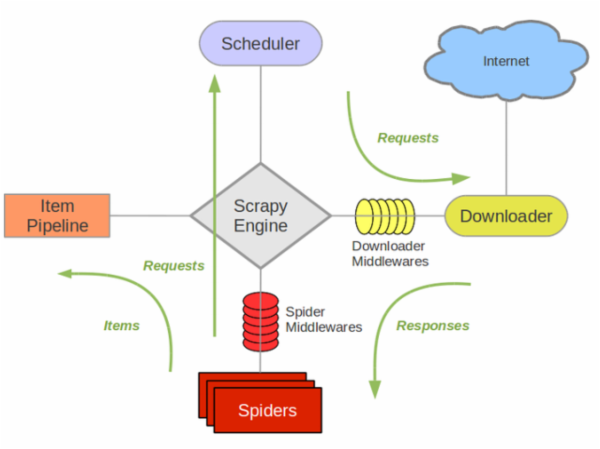
##一、scrapy框架结构
还是先上个图吧,这个图几乎在网上一搜scrapy随处可见,其实它很好地反应了这个框架的运作流程及各个组件之间交互的过程。
scrapy之所以能作为框架,是因为其抽取了普通爬虫的共同特征和基本原理并加以封装,有没有发现其实我们之前写的各种爬虫,原理其实都大同小异?什么抓页面、存储、解析页面、提取特征信息……爬虫就这么几个步骤,当然工业界的爬虫可能还要考虑更多比如爬虫效率、稳定性、分布式爬虫协调、兼容、信息清洗判重、数据结构化存储等等。一般程序员的习惯是在写过程序之后总想着重构一下,抽出一些公共的方法将其模板化,下次再用时就方便了。是的,你当然可以将自己写过的代码重构,但是这些工作早就有人帮做好了,直接拿来用甚至还比你自己写的要方便:“scrapy是一套基于Twisted的异步处理框架,是纯python实现的爬虫框架,用户只需要定制开发几个模块就可以轻松的实现一个爬虫”。并且其优秀的思想也是值得借鉴的——入门阶段:学会怎么使用scrapy,调用其接口能完成一个爬虫的功能;提高阶段:研究scrapy的源码也很有必要,看看一个优秀的爬虫框架是怎么写的。
scrapy的几个组件:
(1) **Scrapy Engine**(引擎):整体驱动数据流和控制流,触发事务处理。
(2) **Scheduler**(调度):维护一个引擎与其交互的请求队列,引擎发出请求后返还给它们。
(3) **Downloader**(下载器):下载网页,将网页给蜘蛛Spider.
(4) **Spider**(蜘蛛):这个是核心,一个蜘蛛能处理一个域名或一组域名,作用是定义特定网站的抓取和解析规则。定义对于不同网页结构,处理的方式也不一样,需要定义不同的蜘蛛。
蜘蛛抓取流程:
- step1:调用start_requests()获取第一个url请求,请求返回后调取回调函数parse。
- step2:回调函数中解析网页,返回项目对象、请求对象或两者的迭代。请求也包含一个回调,然后被scrapy下载,然后指定其他回调处理。
- step3:回调函数parse()中解析网页,方法:**Xpath选择器**(或者可以用BeautifulSoup, lxml等),生成解析的数据项。
- step4:蜘蛛spider返回项目给项目管道Item Pipeline。
(5) **Item Pipeline**(项目管道):处理蜘蛛解析过后的数据结果,清洗、验证、存储数据,存放给item字段field。
(6) **Downloader middlewares**(下载器中间件):引擎与下载器之间的钩子框架,处理引擎与下载器之间的请求/响应。可以**自定义代码**来扩展scrapy。
(7) **Spider middlewares**(蜘蛛中间件):引擎与蜘蛛之间的钩子框架,处理蜘蛛的响应输入/请求输出。可以**自定义代码**来扩展scrapy。
(8) **Scheduler middlewares**(调度中间件):引擎与调度之间的中间件,处理引擎与调度的请求/响应。可以**自定义代码**来扩展scrapy。
##二、Scrapy安装(win/linux)
搭建scrapy框架需要的几个模块:python2.7.6, pywin32, twisted(zope.interface + pyOpenSSL + twisted),lxml, scrapy(安装之前要安装easytool)
###1.windows安装
(1) 安装python 2.7:官网下载安装包,双击运行,最后需要将python安装目录添加到系统变量里,然后才能在控制台进入python shell。
(2) 安装pywin32:注意对应python版本,下载地址:[http://sourceforge.net/projects/pywin32/files/](http://sourceforge.net/projects/pywin32/files/),或者[点击这里下载](http://download.csdn.net/detail/dianacody/7997941)。
(3) 安装twisted
依赖几个包:
- zope.interface:[https://pypi.python.org/pypi/zope.interface#download](https://pypi.python.org/pypi/zope.interface#download),或者[点击这里下载](http://download.csdn.net/detail/dianacody/7997947),安装后在cmd进入python shell,如果”import zope.interface“没有问题说明安装成功。
- pyOpenSSL:(注意对应python版本)[https://pypi.python.org/pypi/pyOpenSSL](https://pypi.python.org/pypi/pyOpenSSL),或者[点击这里下载](http://download.csdn.net/detail/dianacody/7997953),安装后在cmd进入python shell,如果”import OpenSSL”没有问题说明安装成功。
- twisted:(注意对应python版本)[http://twistedmatrix.com/trac/wiki/Downloads](http://twistedmatrix.com/trac/wiki/Downloads),或者[点击这里下载](http://download.csdn.net/detail/dianacody/7997961)。安装后在cmd进入python shell,如果”import twisted”没有问题说明安装成功。
(4) 安装lxml:[https://pypi.python.org/pypi/lxml/](https://pypi.python.org/pypi/lxml/),或者[点击这里下载](http://download.csdn.net/detail/dianacody/7997965),安装后在cmd进入python shell,如果”import lxml”没有问题说明安装成功。
(5) 安装scrapy:
- 通过easytool安装,easytool下载:[http://pypi.python.org/packages/2.7/s/setuptools/setuptools-0.6c11.win32-py2.7.exe](http://pypi.python.org/packages/2.7/s/setuptools/setuptools-0.6c11.win32-py2.7.exe),或者[点击这里下载](http://download.csdn.net/detail/dianacody/7998115),安装完后要将python安装目录下Scripts目录路径添加到系统变量中(就是**Path变量**D:\Python27\Scripts)。
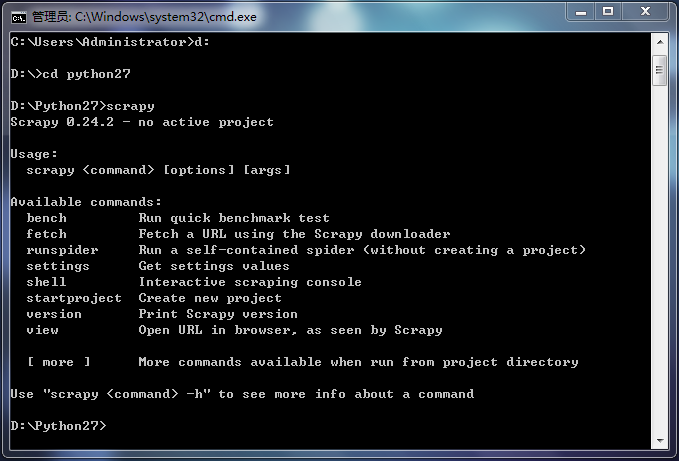
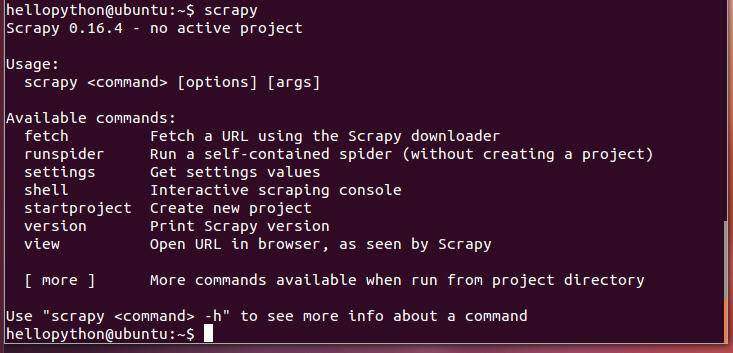
- 下载scrapy:[https://pypi.python.org/pypi/Scrapy](https://pypi.python.org/pypi/Scrapy),或者[点击这里下载](http://download.csdn.net/detail/dianacody/7997969),下载完后,在D:\Python27,解压出来(有个dist文件夹,里面有Scrapy-0.24.2.tar文件),运行cmd,cd到该解压目录下,在cmd中输入”easy_install Scrapy”,完成scrapy的安装,然后在cmd中,cd D:\Python27,输入scrapy进行验证,如果下图,则安装成功。
###2.linux安装
可以按照这里的方法安装:(转载[http://www.cnblogs.com/HelloPython/](http://www.cnblogs.com/HelloPython/))
第一步:为了安装这个packages,在ubuntu下运行lsb_release -cs,显示

第二步:现在需要做的就是用vi添加deb http://archive.scrapy.org/ubuntu precise main 到 /etc/apt/sources.list中去

第三步:然后运行 curl -s http://archive.scrapy.org/ubuntu/archive.key | sudo apt-key add-
第四步:再更新源sudo apt-get update
第五步:最后安装 sudo apt-get install scrapy-0.1X,可选择不同版本,我安装的是0.16
##三、scrapy文件结构
###1.新建scrapy项目
设定项目名称为mytest,cd到需要创建项目的目录:scrapy startproject mytest,会自动生成目录结构,如下:
~~~
mytest/
scrapy.cfg #-------------------项目配置文件
mytest/
__init__.py
items.py #-------项目数据字段文件
pipelines.py #-------项目管道文件
settings.py #---------项目配置文件
spiders/ #----------项目存放蜘蛛的目录
__init__.py
...
~~~
###2.文件结构
(1)**item.py**:项目数据字段文件,定义需要的数据段,这些字段即为爬取下来数据中提取的,可以通过定义Item类实现。
~~~
from scrapy.item import Item, Field
class MyItem(Item):
userid = Field()
username = Field()
tweeted = Field()
time = Field()
~~~
(2) **spider.py**:用户自定义蜘蛛,其中:
- name:网络蜘蛛名称,要**唯一**。
- start_urls:是网络蜘蛛开始爬取第一个url,可以包括多个url。
- parse()函数: 网络蜘蛛爬取后response的对象。负责解析响应数据,是spider函数抓到第一个网页以后默认调用的callback,避免使用个这个名字来定义自己的方法。
~~~
from scrapy.spider import BaseSpider
class MySpider(BaseSpider):
name = "myspider"
allowed_domains = ["sina.com"]
start_urls = ["http://www.sina.com",
"http://www.sina.com/news"
]
def parse(self, response): #--------------------这就是callback回调函数
filename = response.url.split("/")[-2]
open(filename, 'wb').write(response.body)
~~~
(3) **pipeline.py**:管道文件,接收item各字段对应数据,放到数据库mongodb或mysqldb
(4) **setting.py**:配置信息
###3.spider的选择器Xpath(解析网页)
(1) *选择器的四个基本方法*
**xpath()**:返回一个选择器列表,每个代表xpath选择的,当于**正则解析**。
**css()**:返回一选择器列表,每个代表css选择的。
**extract()**:返回一个unicode字符串。
**re()**:返回一个unicode字符串从正则表达式中选出的。
(2) *几个xpath例子*
**/html/head/title**: 选择所有<head>标签内部的<title>标签内容
**/html/head/title/text()**: 选择所有的位于<title>标签内部的<text>标签(文本)内容
**//td**: 选择所有的<td>元素
**//div[@class="mine"]**: 选择所有包含class=”mine“属性的div标签元素
(3) xpath路径表达式:
<table border="1" cellspacing="0" cellpadding="0" width="527"><tbody><tr><td valign="top"><p><strong>表达式</strong></p></td><td valign="top"><p><strong>描述</strong></p></td></tr><tr><td valign="top"><p>nodename</p></td><td valign="top"><p>选取此节点的所有子节点</p></td></tr><tr><td valign="top"><p>/</p></td><td valign="top"><p>从根节点选取</p></td></tr><tr><td valign="top"><p>//</p></td><td valign="top"><p>从匹配选择的当前节点选择文档中的节点,不考虑它们的位置</p></td></tr><tr><td valign="top"><p>.</p></td><td valign="top"><p>选取当前节点</p></td></tr><tr><td valign="top"><p>..</p></td><td valign="top"><p>选取当前节点的父节点</p></td></tr><tr><td valign="top"><p>@</p></td><td valign="top"><p>选取属性</p></td></tr></tbody></table>
关于选择器,这个再下一篇python系列五当中会提到具体实例应用,这里暂且先写到这里。
原创文章,转载请注明出处[http://blog.csdn.net/dianacody/article/details/39743379](http://blog.csdn.net/dianacody/article/details/39743379)
</div>
<script src="https://docs.gechiui.com/digest-spiders/gc-content/themes/gechiui-book/js/marked.min.js"></script>
<script>content=document.getElementById("md-view").innerHTML;</script>';
<script>document.getElementById("md-view").innerHTML = marked.parse(content)</script>
</section>
<section class="normal markdown-section">
<h1 id="【python】网络爬虫(三):模拟登录——伪装浏览器登录爬取过程">【python】网络爬虫(三):模拟登录——伪装浏览器登录爬取过程<a class="anchorjs-link " href="#【python】网络爬虫(三):模拟登录——伪装浏览器登录爬取过程" data-anchorjs-icon=""></a></h1>
<p><span class="sa-last-update-time">最后更新于:2022-04-01 23:02:42</span></p>
<div id="md-view">
##一、关于抓包分析和debug Log信息
模拟登录访问需要设置request header信息,对于这个没有概念的朋友可以参见本系列前面的java版爬虫中提到的模拟登录过程,主要就是添加请求头request header。
而python抓包可以直接使用urllib2把debug Log打开,数据包的内容可以打印出来,这样都可以不用抓包了,直接可以看到request header里的内容。
~~~
import urllib2
httpHandler = urllib2.HTTPHandler(debuglevel = 1)
httpsHandler = urllib2.HTTPSHandler(debuglevel = 1)
opener = urllib2.build_opener(httpHandler, httpsHandler)
urllib2.install_opener(opener)
response = urllib2.urlopen(‘http://www.baidu.com’)
html = response.read()
~~~

另外对于抓包,对比里各款浏览器自带的开发者工具,觉得firefox的比Chrome的要好用,不仅数据包显示清晰,而且各种操作也比Chrome的方便得多,还有一些Chrome没有的功能。
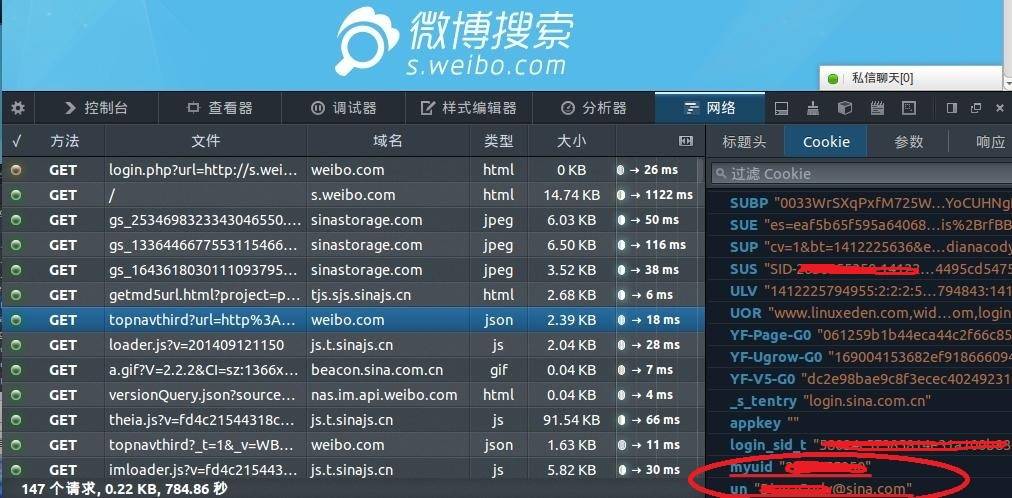
分析下登录新浪微博过程的数据包。
登录前页面:
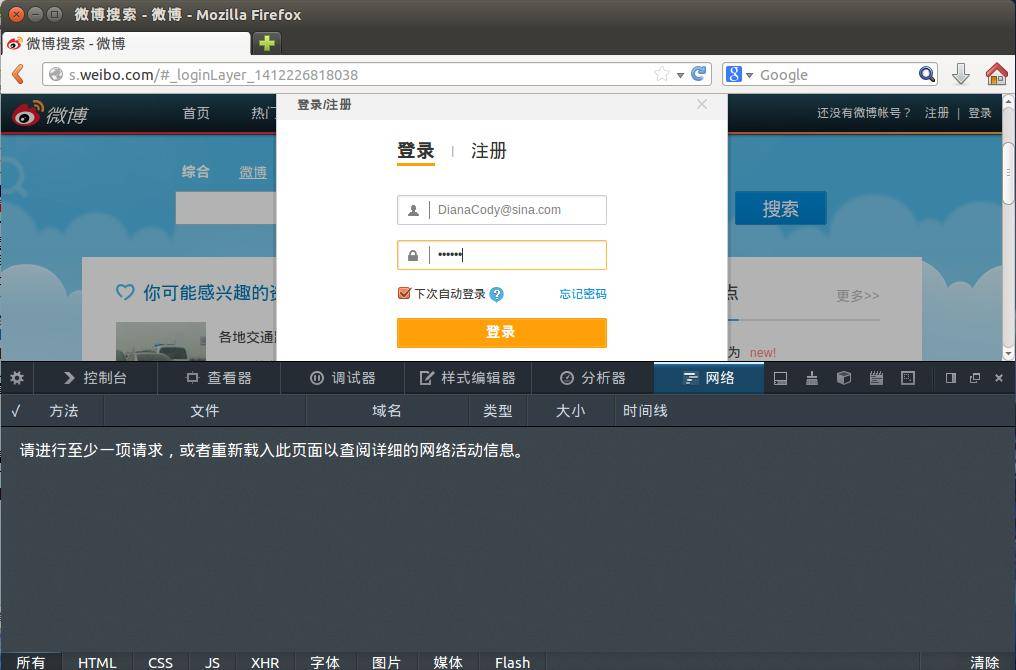
点击登录,看下这个过程:
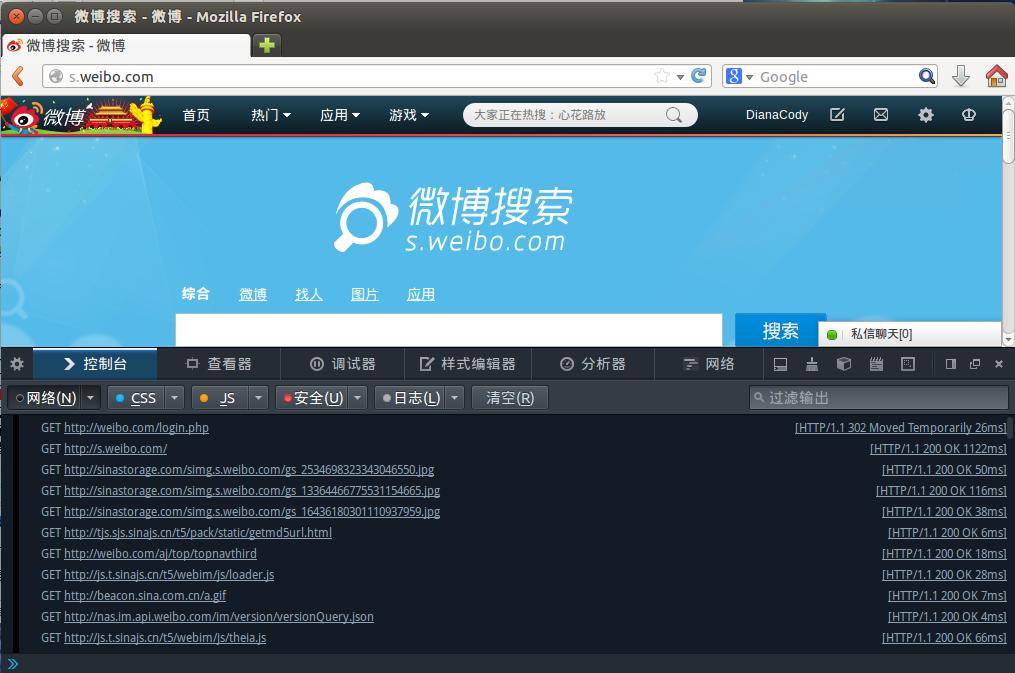
打开看数据包可以看到详细的请求头、发送Cookie、响应头、传回的文件/数据等信息。
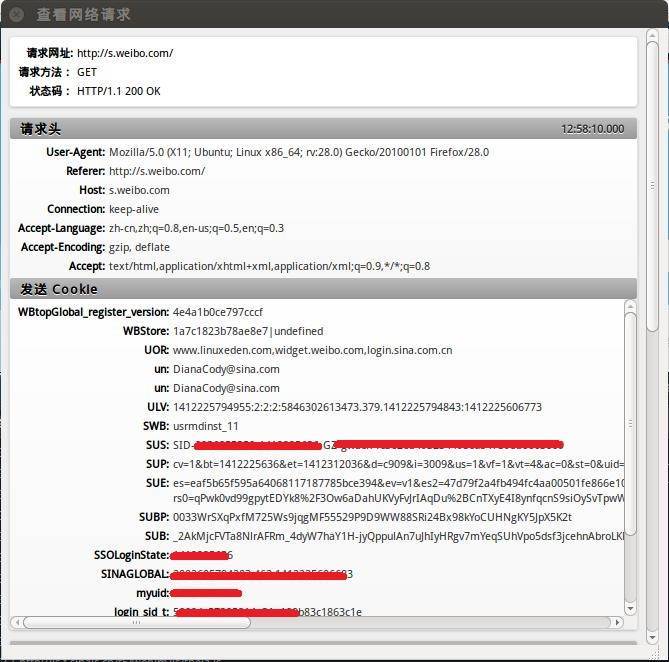
在Network选项卡里看看详细的情况,这里是请求头:

cookie存放的就是myuid和un账号,之后模拟登录要用到的cookie信息:
##二、设置Headers到http请求
先看一个官方教程上的例子:
~~~
import urllib
import urllib2
url = 'http://s.weibo.com'
user_agent = 'Mozilla/5.0 (X11; Linux x86_64) AppleWebKit/537.11 (KHTML, like Gecko) Chrome/23.0.1271.64 Safari/537.11'
values = {'name':'denny',
'location':'BUPT',
'language':'Python'
}
headers = {'User-Agent':user_agent}
data = urllib.urlencode(values, 1)
request = urllib2.Request(url, data,headers)
response = urllib2.urlopen(request)
the_page = response.read()
print the_page
~~~
一个完整例子:
~~~
# -*- coding:utf8 -*-
import urllib2
import re
import StringIO
import gzip
ua = {#'User-Agent':'Mozilla/5.0 (compatible; Googlebot/2.1; +Googlebot - Webmaster Tools Help)',
'User-Agent':'Mozilla/5.0 (Windows NT 6.1) AppleWebKit/537.36 (KHTML, like Gecko) Chrome/37.0.2062.124 Safari/537.36',
'Connection':'Keep-Alive',
'Accept-Language':'zh-CN,zh;q=0.8',
'Accept-Encoding':'gzip,deflate,sdch',
'Accept':'*/*',
'Accept-Charset':'GBK,utf-8;q=0.7,*;q=0.3',
'Cache-Control':'max-age=0'
}
def get_html(url_address):
'''open url and read it'''
req_http = urllib2.Request(url_address, headers = ua)
html = urllib2.urlopen(req_http).read()
return html
def controller():
'''make url list and download page'''
url = 'http://s.weibo.com/wb/iPhone&nodup=1&page=10'
reget = re.compile('(<div class=\"post-wrapper.*?)<p class=\"pagination\">', re.DOTALL)
fp = open("e:/weibo/head.txt", "w+")
for i in range(1, 131):
html_c = get_html(url % (i))
print url % (i)
html_c = gzip.GzipFile(fileobj = StringIO.StringIO(html_c)).read()
res = reget.findall(html_c)
for x in res:
fp.write(x)
fp.write("\n\n\n")
fp.close()
return
if __name__ == '__main__':
controller()
~~~
原创文章,转载请注明出处:[http://blog.csdn.net/dianacody/article/details/39742711](http://blog.csdn.net/dianacody/article/details/39742711)
</div>
<script src="https://docs.gechiui.com/digest-spiders/gc-content/themes/gechiui-book/js/marked.min.js"></script>
<script>content=document.getElementById("md-view").innerHTML;</script>';
<script>document.getElementById("md-view").innerHTML = marked.parse(content)</script>
</section>
<section class="normal markdown-section">
<h1 id="【python】网络爬虫(二):网易微博爬虫软件开发实例(附软件源码)">【python】网络爬虫(二):网易微博爬虫软件开发实例(附软件源码)<a class="anchorjs-link " href="#【python】网络爬虫(二):网易微博爬虫软件开发实例(附软件源码)" data-anchorjs-icon=""></a></h1>
<p><span class="sa-last-update-time">最后更新于:2022-04-01 23:02:40</span></p>
<div id="md-view">
对于urllib2的学习,这里先推荐一个教程《IronPython In Action》,上面有很多简明例子,并且也有很详尽的原理解释:[http://www.voidspace.org.uk/python/articles/urllib2.shtml](http://www.voidspace.org.uk/python/articles/urllib2.shtml)
最基本的爬虫,主要就是两个函数的使用urllib2.urlopen()和re.compile()。
##一、网页抓取简单例子
先来看一个最简单的例子,以百度音乐页面为例,访问返回页面html的string形式,程序如下:
~~~
# -*- coding: utf8 -*-
import urllib2
response = urllib2.urlopen('http://music.baidu.com')
html = response.read()
print html
~~~
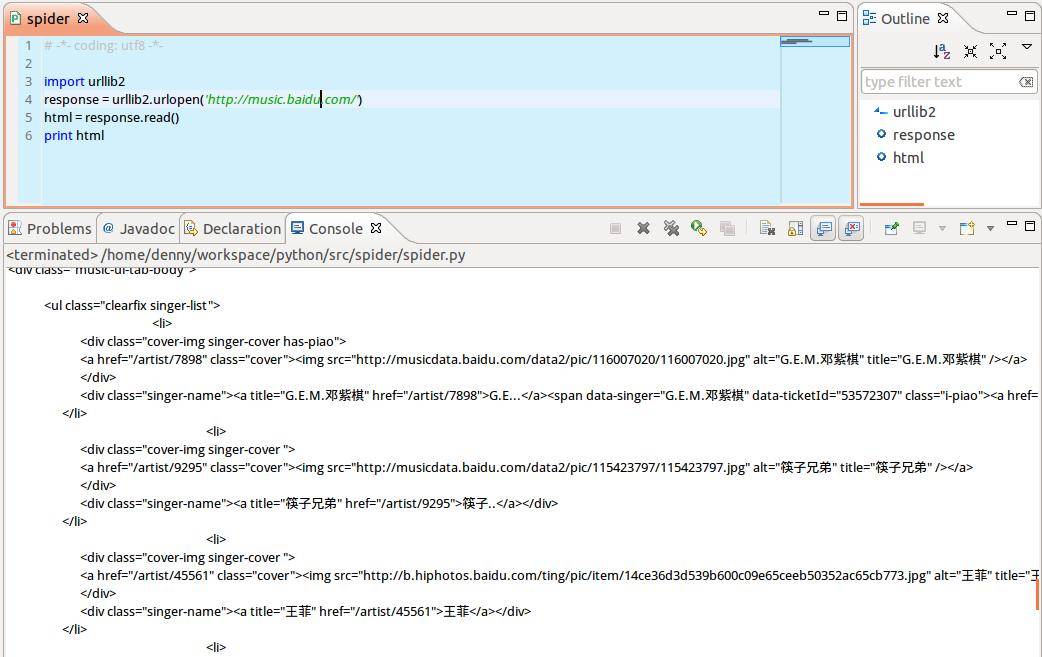
这个例子主要说下urllib2.open()函数,其作用是:用一个request对象来映射发出的http请求(这里的请求头不一定是http,还可以是ftp:或file:等),http基于请求和应答机制,即客户端提出请求request,服务端应答response。
urllib2用你请求的地址创建一个request对象,调用urlopen并将结果返回作为response对象,并且可以用.read()来读取response对象的内容。所以上面的程序也可以这么写:
~~~
# -*- coding: utf8 -*-
import urllib2
request = urllib2.Request(‘http://music.baidu.com’)
response = urllib2.urlopen(request)
html = response.read()
print html
~~~
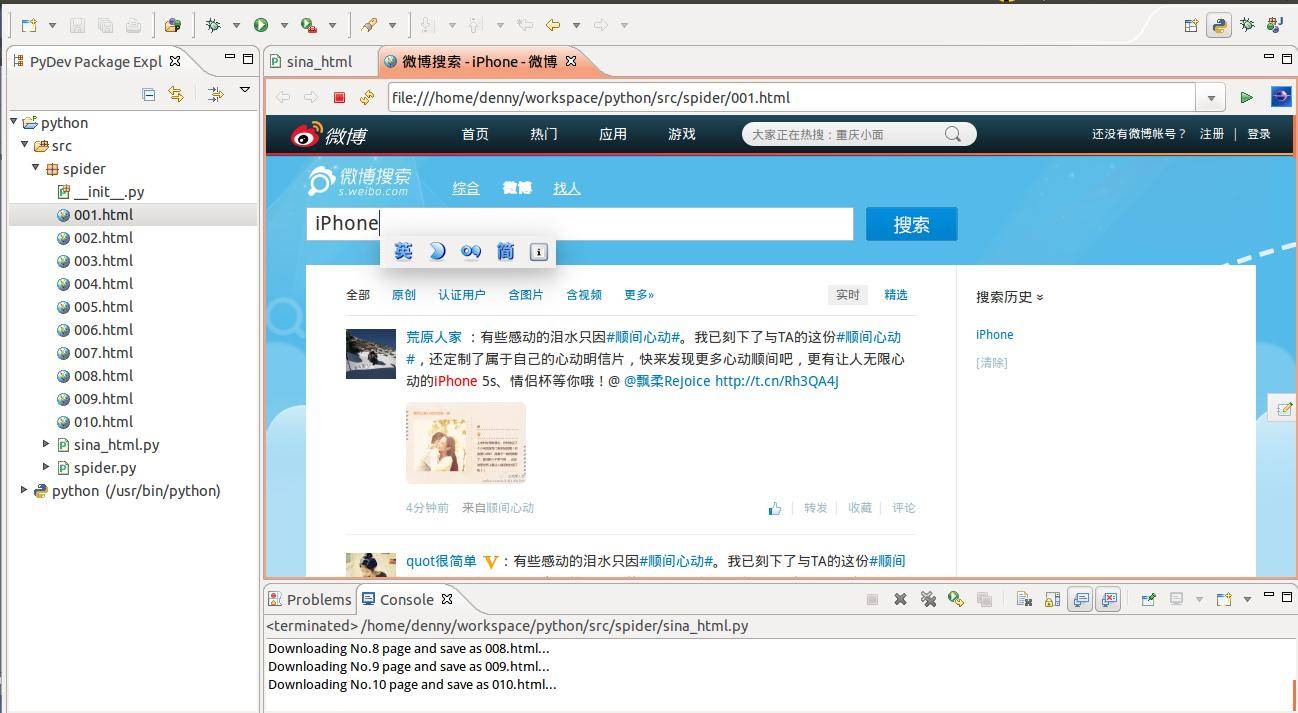
##二、网易微博爬虫实例
仍旧以之前的微博爬虫为例,抓取新浪微博一个话题下所有页面,并以html文件形式储存在本地,路径为当前工程目录。url=http://s.weibo.com/wb/苹果手机&nodup=1&page=20
源码如下:
~~~
# -*- coding:utf-8 -*-
'''
#=====================================================
# FileName: sina_html.py
# Desc: download html pages from sina_weibo and save to local files
# Author: DianaCody
# Version: 1.0
# Since: 2014-09-27 15:20:21
#=====================================================
'''
import string, urllib2
# sina tweet's url = 'http://s.weibo.com/wb/topic&nodup=1&page=20'
def writeHtml(url, start_page, end_page):
for i in range(start_page, end_page+1):
FileName = string.zfill(i, 3)
HtmlPath = FileName + '.html'
print 'Downloading No.' + str(i) + ' page and save as ' + FileName + '.html...'
f = open(HtmlPath, 'w+')
html = urllib2.urlopen(url + str(i)).read()
f.write(html)
f.close()
def crawler():
url = 'http://s.weibo.com/wb/iPhone&nodup=1&page='
s_page = 1;
e_page = 10;
print 'Now begin to download html pages...'
writeHtml(url, s_page, e_page)
if __name__ == '__main__':
crawler()
~~~
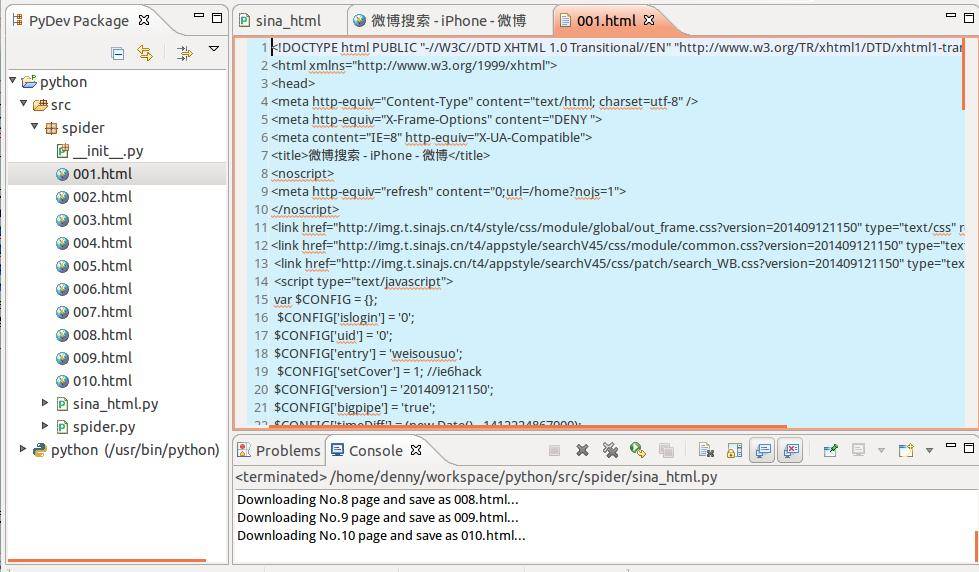
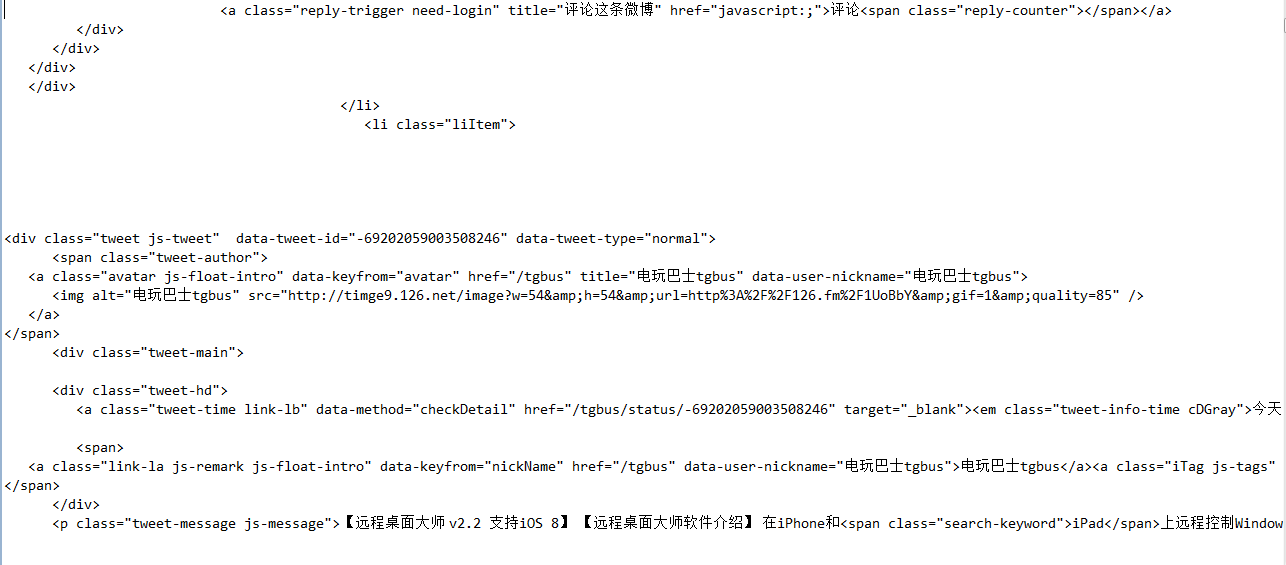
程序运行完毕后,html页面存放在当前工程目录下,在左侧Package Explorer里刷新一下,可以看到抓回来的html页面,这里先抓了10个页面,打开一个看看:
html页面的源码:
剩下的就是正则解析提取字段了,主要用到python的re模块。
##三、网易微博爬虫软件开发(python版)
上面只是给出了基本爬取过程,后期加上正则解析提取微博文本数据,中文字符编码处理等等,下面给出这个爬虫软件。(已转换为可执行exe程序)
完整源码:
~~~
# -*- coding:utf-8 -*-
'''
#=====================================================
# FileName: tweet163_crawler.py
# Desc: download html pages from 163 tweet and save to local files
# Author: DianaCody
# Version: 1.0
# Since: 2014-09-27 15:20:21
#=====================================================
'''
import string
import urllib2
import re
import chardet
# sina tweet's url = 'http://s.weibo.com/wb/topic&nodup=1&page=20'
# 163 tweet's url = 'http://t.163.com/tag/topic&nodup=1&page=20'
def writeHtml(url, start_page, end_page):
for i in range(start_page, end_page+1):
FileName = string.zfill(i, 3)
HtmlPath = FileName + '.html'
print 'Downloading No.' + str(i) + ' page and save as ' + FileName + '.html...'
f = open(HtmlPath, 'w+')
html = urllib2.urlopen(url + str(i)).read()
f.write(html)
f.close()
def crawler(key, s_page, e_page):
url = 'http://t.163.com/tag/'+ key +'&nodup=1&page='
print 'Now begin to download html pages...'
writeHtml(url, s_page, e_page)
def regex():
start_page = 1
end_page = 9
for i in range(start_page, end_page):
HtmlPath = '00'+str(i)+'.html'
page = open(HtmlPath).read()
# set encode format
charset = chardet.detect(page)
charset = charset['encoding']
if charset!='utf-8' and charset!='UTF-8':
page = page.decode('gb2312', 'ignore').encode("utf-8")
unicodePage = page.decode('utf-8')
pattern = re.compile('"content":\s".*?",', re.DOTALL)
contents = pattern.findall(unicodePage)
for content in contents:
print content
if __name__ == '__main__':
key = str(raw_input(u'please input you search key: \n'))
begin_page = int(raw_input(u'input begin pages:\n'))
end_page = int(raw_input(u'input end pages:\n'))
crawler(key, begin_page, end_page)
print'Crawler finished... \n'
print'The contents are: '
regex()
raw_input()
~~~
**实现自定义输入关键词,指定要爬取的页面数据,根据关键词提取页面中的微博信息数据。**
- 自定义搜索关键字
- 自定义爬取页面数目
- 非登录,爬取当天微博信息数据存储于本地文件
- 解析微博页面获取微博文本内容信息
- 软件为exe程序,无python环境也可运行
1.软件功能
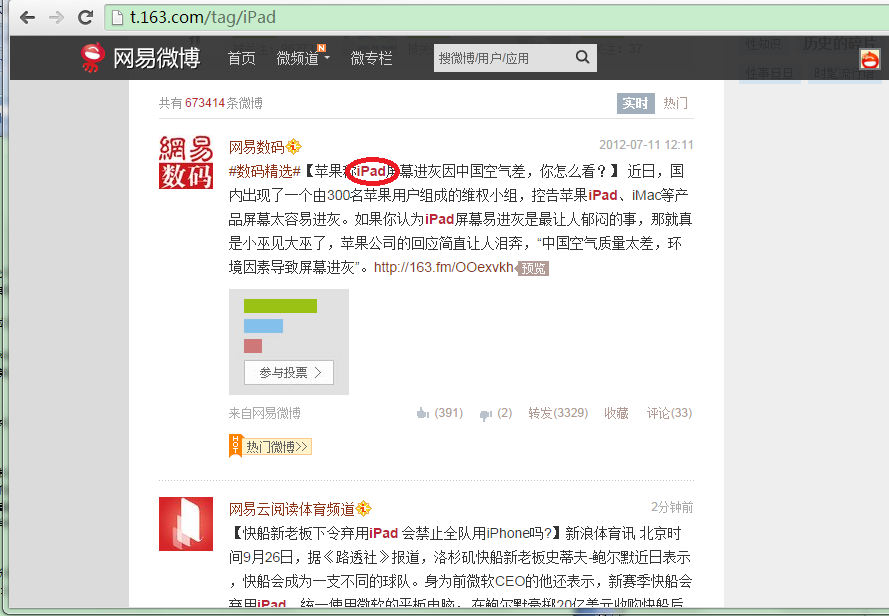
实时爬取微博信息数据,数据源 [http://t.163.com/tag/searchword/](http://t.163.com/tag/yourkey/)
2.软件演示
1.自定义关键词、抓取页面数量

2.爬取结果显示微博文本内容
3.软件下载
软件已经放到github,地址 [https://github.com/DianaCody/Spider_python](https://github.com/DianaCody/Spider_python/tree/master/Tweet163_Crawler/release)/。
软件地址: [https://github.com/DianaCody/Spider_python/tree/master/Tweet163_Crawler/release](https://github.com/DianaCody/Spider_python/tree/master/Tweet163_Crawler/release)
exe的软件也可以在这里下载:[点击下载](http://download.csdn.net/detail/dianacody/7659093)
[http://download.csdn.net/detail/dianacody/8001441](http://download.csdn.net/detail/dianacody/8001441)
原创文章,转载请注明出处:[http://blog.csdn.net/dianacody/article/details/39741413](http://blog.csdn.net/dianacody/article/details/39741413)
</div>
<script src="https://docs.gechiui.com/digest-spiders/gc-content/themes/gechiui-book/js/marked.min.js"></script>
<script>content=document.getElementById("md-view").innerHTML;</script>';
<script>document.getElementById("md-view").innerHTML = marked.parse(content)</script>
</section>
<section class="normal markdown-section">
<h1 id="【python】网络爬虫(一):python爬虫概述">【python】网络爬虫(一):python爬虫概述<a class="anchorjs-link " href="#【python】网络爬虫(一):python爬虫概述" data-anchorjs-icon=""></a></h1>
<p><span class="sa-last-update-time">最后更新于:2022-04-01 23:02:38</span></p>
<div id="md-view">
python爬虫的实现方式:
1.简单点的urllib2 + regex,足够了,可以实现最基本的网页下载功能。实现思路就是前面java版爬虫差不多,把网页拉回来,再正则regex解析信息……总结起来,两个函数:urllibw.urlopen()和re.compile()。其实对于正则解析html网页,python同样有和jsoup类似的工具包——BeautifulSoup,用好了同样比正则省事多了。同时BeautifulSoup还针对非结构化html标签有清洗功能,比如网页中标签不完整,有些源代码中出现起始标签而没有结束标签,html标签不完整会影响抓取结构化数据,通过BeautifulSoup先对源代码清洗,再分析获取内容。
进阶版本:异步爬取可以使用多线程、效率更高可以采用非阻塞方案tornado和curl可以实现非阻塞的下载。
2.成熟的开源爬虫框架scrapy,后边系列文章再写吧……不再多说了,网上对于这两种实现方式也有很多demo项目。
其实关于如何学习python爬虫,知乎有个话题《如何入门Python爬虫》:
[http://www.zhihu.com/question/20899988](http://www.zhihu.com/question/20899988)
python爬虫系列部分先几个简单的例子开始,python工具库urllib2很多库函数已经帮我们做了之前java实现版的某些繁重工作和一些步骤,所以没必要再重复劳动。之后会再介绍scrapy框架。
关于scrapy,一个优秀的基于twisted开源爬虫框架,并且作为GSoC (Google Summer of Code),这个开源项目也是有很高的关注度的,该项目的版本也在不断更新。其实对于scrapy框架的学习,更多的可以参见官方文档,在这里也顺便推荐一个中文的scrapy学习资料:[http://scrapy-chs.readthedocs.org/zh_CN/0.24/index.html](http://scrapy-chs.readthedocs.org/zh_CN/0.24/index.html)[](http://scrapy-chs.readthedocs.org/zh-CN/latest/),来自github开源社区的几位学生,目前该文档大部分已经翻译完成,翻译质量不错,学scrapy的同时可以看下。
原创文章,转载请注明出处:[http://blog.csdn.net/dianacody/article/details/39726007](http://blog.csdn.net/dianacody/article/details/39726007)
</div>
<script src="https://docs.gechiui.com/digest-spiders/gc-content/themes/gechiui-book/js/marked.min.js"></script>
<script>content=document.getElementById("md-view").innerHTML;</script>';
<script>document.getElementById("md-view").innerHTML = marked.parse(content)</script>
</section>
<section class="normal markdown-section">
<h1 id="【java】微博爬虫(五):防止爬虫被墙的几个技巧(总结篇)">【java】微博爬虫(五):防止爬虫被墙的几个技巧(总结篇)<a class="anchorjs-link " href="#【java】微博爬虫(五):防止爬虫被墙的几个技巧(总结篇)" data-anchorjs-icon=""></a></h1>
<p><span class="sa-last-update-time">最后更新于:2022-04-01 23:02:35</span></p>
<div id="md-view">
爬虫的目的就是大规模地、长时间地获取数据,跟我们正常浏览器获取数据相比,虽然机理相差不大,但总是一个IP去爬网站,大规模集中对服务器访问,时间一长就有可能被拒绝。关于爬虫长时间爬取数据,可能会要求验证码,即便是多个账号轮流爬取仍然会出现要求输入验证码的情况。
##技巧一:设置下载等待时间/下载频率
大规模集中访问对服务器的影响较大,爬虫可以短时间增大服务器负载。这里需要注意的是:设定下载等待时间的范围控制,等待时间过长,不能满足短时间大规模抓取的要求,等待时间过短则很有可能被拒绝访问。
(1) 在之前“从url获取HTML”的方法里,对于httpGet的配置设置了socket超时和连接connect超时,其实这里的时长不是绝对的,主要取决于目标网站对爬虫的控制。
(2) 另外,在scrapy爬虫框架里,专有参数可以设置下载等待时间download_delay,这个参数可以设置在setting.py里,也可以设置在spider里。
##技巧二:设置cookies
cookie其实是储存在用户终端的一些被加密的数据,有些网站通过cookies来识别用户身份,如果某个访问总是高频率地发请求,很可能会被网站注意到,被嫌疑为爬虫,这时网站就可以通过cookie找到这个访问的用户而拒绝其访问。
可以**自定义设置cookie策略(防止cookie rejected问题:拒绝写入cookie)**或者**禁止cookies**。
(1) *自定义设置cookies策略(防止cookierejected问题,拒绝写入cookie)*
在系列一那篇文章里就有自定义cookie策略设置,但更多的借鉴是官方文档的例子,设置方法其实都大同小异,因为HttpClient-4.3.1组件版本跟以前旧版本的不同,写法也有不同,另见官方文档:[http://hc.apache.org/httpcomponents-client-4.3.x/tutorial/html/statemgmt.html#d5e553](http://hc.apache.org/httpcomponents-client-4.3.x/tutorial/html/statemgmt.html#d5e553)
(2) *禁止cookies*
通过禁止cookie,这是客户端主动阻止服务器写入。禁止cookie可以防止可能使用cookies识别爬虫的网站来ban掉我们。
在scrapy爬虫中可以设置COOKIES_ENABLES= FALSE,即不启用cookies middleware,不向web server发送cookies。
##技巧三:修改User-Agent
最常见的就是**伪装浏览器**,修改User-Agent(用户代理)。
User-Agent是指包含浏览器信息、操作系统信息等的一个字符串,也称之为一种特殊的网络协议。服务器通过它判断当前访问对象是浏览器、邮件客户端还是网络爬虫。在request.headers里可以查看user-agent,关于怎么分析数据包、查看其User-Agent等信息,这个在前面的文章里提到过。
具体方法可以把User-Agent的值改为浏览器的方式,甚至可以设置一个**User-Agent池**(list,数组,字典都可以),存放多个“浏览器”,每次爬取的时候随机取一个来设置request的User-Agent,这样User-Agent会一直在变化,防止被墙。
##技巧四:修改IP
其实微博识别的是IP,不是账号。也就是说,当需要连续抓取很多数据的时候,**模拟登录没有意义**。只要是同一个IP,不管怎么换账号也没有用,主要的是**换IP**。
web server应对爬虫的策略之一就是直接将IP或者整个IP段都封掉禁止访问,当IP被禁封后,转换到其他IP继续访问即可。方法:**代理IP**、**本地IP数据库(使用IP池)**。
(1) 从代理IP网站获取大量IP
如果总是请求代理IP站点也未免有些麻烦,况且某些代理IP站点有时还可能被禁封,当然再换一个代理IP站点也可以,如果你不嫌麻烦的话。
(2) 使用IP地址库
网上也有很多现成可用的IP地址库,可以存放到本地,如果本地有IP数据库就方便很多,至少不用每次都去请求代理IP站点了(当然可以一次性把站点内所有代理IP先爬下来存储好,形成本地IP数据库),总之获取IP的方法有很多,不一定非要是通过代理IP站点。关于IP地址库解析,可以参见我博客内另外一篇文章:[http://blog.csdn.net/dianacody/article/details/38467875](http://blog.csdn.net/dianacody/article/details/38467875)
道理相同,把IP解析出来就可以用了。
##技巧五:分布式爬取
分布式爬取的也有很多Githubrepo。原理主要是维护一个所有集群机器能够有效分享的分布式队列。
使用分布式爬取还有另外一个目的:大规模抓取,单台机器的负荷很大,况且速度很慢,多台机器可以设置一个master管理多台slave去同时爬取。
另外关于网页判重问题,可以用Bloom Filter。
java版微博爬虫的项目就写到这里。之后再写python版爬虫,其实利用python自带的类库、甚至成熟的爬虫框架scrapy,代码远比java版简洁,有些在java版中用一个方法写几十行,在python库函数可以搞定大部分问题,后续系列将继续跟进“python版网络爬虫”。
原创文章,转载请注明出处:[http://blog.csdn.net/dianacody/article/details/39717825](http://blog.csdn.net/dianacody/article/details/39717825)
</div>
<script src="https://docs.gechiui.com/digest-spiders/gc-content/themes/gechiui-book/js/marked.min.js"></script>
<script>content=document.getElementById("md-view").innerHTML;</script>';
<script>document.getElementById("md-view").innerHTML = marked.parse(content)</script>
</section>
<section class="normal markdown-section">
<h1 id="【java】微博爬虫(四):数据处理——jsoup工具解析html、dom4j读写xml">【java】微博爬虫(四):数据处理——jsoup工具解析html、dom4j读写xml<a class="anchorjs-link " href="#【java】微博爬虫(四):数据处理——jsoup工具解析html、dom4j读写xml" data-anchorjs-icon=""></a></h1>
<p><span class="sa-last-update-time">最后更新于:2022-04-01 23:02:33</span></p>
<div id="md-view">
之前提到过,对于简单的网页结构解析,可以直接通过观察法、手工写正则解析,可以做出来,比如网易微博。但是对于结构稍微复杂点的,比如新浪微博,如果还用正则,用眼睛一个个去找,未免太麻烦了。
本文介绍两个工具包:解析html, xml的jsoup,和读写xml的dom4j。
工具包jsoup是解析html、xml的利器,利用jsoup可以快速读取html等规范文档格式的节点数据,比正则解析省事多了,而且自己写正则容易考虑不周导致潜在bug,也很容易出错。
同时我们提取出来的微博数据直接存在txt文档里显得结构层次不太清晰,也可以以xml的形式输出,自定义节点,当然首先是得对xml格式有所了解,写xml文件有个工具包dom4j。
下面仅仅给出这两个工具包在这个微博爬虫项目中使用的例子,其实这两个强大的工具包还有其他很多的用法,更多的应用详见官方说明文档。
##一、jsoup解析HTML
Jsoup是一个基于java的html解析器,可直接解析某个URL地址、HTML文本内容,其提供的API可以通过DOM, CSS,类jQuery的操作方法读取和操纵数据。
Jsoup主要功能:
1.从一个url、文件或字符串解析html。
2.使用DOM或CSS选择器查找、取出数据。
3.可以操作HTML的元素、属性、文本。
当然jsoup比其他解析器更有优势的地方就是它的**选择器**功能,很多解析只要一行代码就搞定,而用其他工具包至少都要写很多行。选择器操作比如doc.select(“a[herf]”);选择器select可以选择你想要的任何元素。
在本项目中的代码:
~~~
public String parse(String html) {
String s = "";
Document doc = Jsoup.parse(html);
Elements userNames = doc.select("dt[class].face > a");
Elements userids = doc.select("span > a[action-data]");
Elements dates = doc.select("a[date]");
Elements tweetids = doc.select("dl[mid]");
Elements tweets = doc.select("p > em");
Elements forwardNums = doc.select("a:contains(转发)");
Elements commentNums = doc.select("a:contains(评论)");
for(Element userName : userNames) {
String attr = userName.attr("title");
s += "<userName> " + attr + " </userName>";
}
for(Element userid : userids) {
String attr = userid.attr("action-data");
attr = attr.substring(attr.indexOf("uid="));
Pattern p = Pattern.compile("[0-9]+");
Matcher m = p.matcher(attr);
if(m.find()) {
attr = m.group();
}
s += "<userid> " + attr + " </userid>";
}
for(Element date : dates) {
String attr = date.text();
s += "<date> " + attr + " </date>";
}
for(Element tweetid : tweetids) {
String attr = tweetid.attr("mid");
s += "<tweetid> " + attr + " </tweetid>";
}
for(Element tweet : tweets) {
String attr = tweet.text();
s += "<tweetSentence> " + attr + " </tweetSentence>";
}
for(Element forwardNum : forwardNums) {
String attr = forwardNum.text();
if(attr.equals("转发")) {
attr = "0";
}
else {
if(!attr.contains("转发(")) {
attr = "0";
}
else {
attr = attr.substring(attr.indexOf("转发(")+3, attr.indexOf(")"));
}
}
System.out.println(attr);
s += "<forwardNum> " + attr + " </forwardNum>";
}
for(Element commentNum : commentNums) {
String attr = commentNum.text();
if(attr.equals("评论")) {
attr = "0";
}
else {
if(!attr.contains("评论(")) {
attr = "0";
}
else {
attr = attr.substring(attr.indexOf("评论(")+3, attr.indexOf(""));
}
}
System.out.println(attr);
s += "<commentNum> " + attr + " </commentNum>";
}
//System.out.println(s);
return s;
}
~~~
##二、dom4j写出微博数据到xml
在本项目中的代码:
~~~
public void writeVector2xml(Vector<String> vector, String saveXMLPath) throws IOException {
int vectorSize = vector.size();
String oneIniTweet;
OutputFormat format = OutputFormat.createPrettyPrint();
format.setEncoding("GB2312"); //xml被识别格式仅为gb2312,默认utf8不被识别
File f = new File(saveXMLPath);
f.createNewFile(); //先建立一个空xml文件
FileWriter fw = new FileWriter(f);
org.dom4j.Document document = DocumentHelper.createDocument(); //建document对象实例
org.dom4j.Element rootElement = document.addElement("tweets"); //节点增加方法
rootElement.addAttribute("totalNumber", String.valueOf(vectorSize)); //设置属性
for(int j=0; j<vectorSize; j++) {
oneIniTweet = vector.get(j);
String userName = oneIniTweet.substring(oneIniTweet.indexOf("<userName> "), oneIniTweet.indexOf(" </userName>"));
String userId = oneIniTweet.substring(oneIniTweet.indexOf("<userName> "), oneIniTweet.indexOf(" </userName>"));
String prettyTime = oneIniTweet.substring(oneIniTweet.indexOf("<userName> "), oneIniTweet.indexOf(" </userName>"));
String tweetSentence = oneIniTweet.substring(oneIniTweet.indexOf("<tweetSentence> "), oneIniTweet.indexOf(" </tweetSentence>"));
org.dom4j.Element tweetElement = rootElement.addElement("tweet");
tweetElement.addAttribute("userName", userName);
tweetElement.addAttribute("userId", userId);
tweetElement.addAttribute("prettyTime", prettyTime);
tweetElement.setText(tweetSentence); // 设置节点文本内容
}
XMLWriter xw = new XMLWriter(fw, format);
xw.write(document);
xw.close();
}
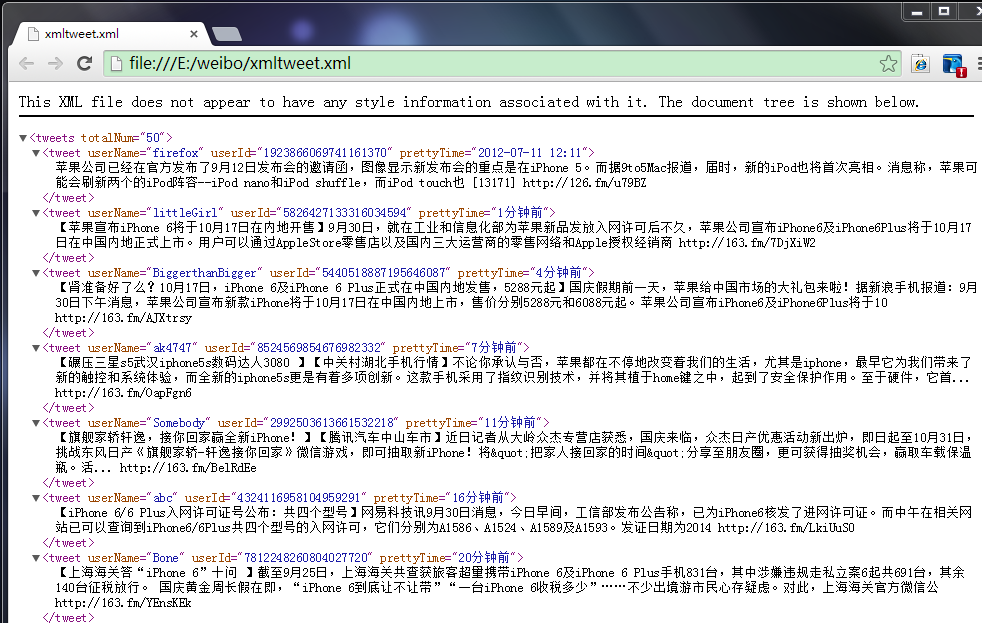
~~~
写出的xml的结果:
原创文章,转载请注明出处:[http://blog.csdn.net/dianacody/article/details/39716637](http://blog.csdn.net/dianacody/article/details/39716637)
</div>
<script src="https://docs.gechiui.com/digest-spiders/gc-content/themes/gechiui-book/js/marked.min.js"></script>
<script>content=document.getElementById("md-view").innerHTML;</script>';
<script>document.getElementById("md-view").innerHTML = marked.parse(content)</script>
</section>
<section class="normal markdown-section">
<h1 id="【java】微博爬虫(三):庖丁解牛——HTML结构分析与正则切分">【java】微博爬虫(三):庖丁解牛——HTML结构分析与正则切分<a class="anchorjs-link " href="#【java】微博爬虫(三):庖丁解牛——HTML结构分析与正则切分" data-anchorjs-icon=""></a></h1>
<p><span class="sa-last-update-time">最后更新于:2022-04-01 23:02:31</span></p>
<div id="md-view">
在上一篇文章中已经通过请求的url地址把html页面爬取下来了,这里分别以网易微博的html和新浪微博的html为例来分析如何提取微博数据。
##一、网易微博解析**
相比新浪微博的html结构,网易微博的比较容易明显地看出来,也容易找到微博数据。查看其html结构不是网页里右键→“查看网页源代码”,那里的微博正文是以html标签形式显示的,而程序实际请求返回得到的html的微博正文是以json格式,这个在控制台里输出看的很清楚。
~~~
<script id=”data_searchTweet” type=”application/json”>
…
{
"searchTag":"",
"list": [
{
"id": "-6794651520897765848",
"content": "#数码精选#【苹果称iPad屏幕进灰因中国空气差,你怎么看?】 近日,国内出现了一个由300名苹果用户组成的维权小组,控告苹果iPad、iMac等产品屏幕太容易进灰。如果你认为iPad屏幕易进灰是最让人郁闷的事,那就真是小巫见大巫了,苹果公司的回应简直让人泪奔,“中国空气质量太差,环境因素导致屏幕进灰”。http://163.fm/OOexvkh",
"albumContent": "#数码精选#【苹果称iPad屏幕进灰因中国空气差,你怎么看?】 近日,国内出现了一个由300名苹果用户组成的维权小组,…
…
~~~
其实解析就是关键把要解析对应位置找到,总之对网易微博的解析是个json串解析,这里可以正则匹配回json,甚至可以直接用正则匹配相应字段,可以匹配userid、content、prettyTime等,最后写入到txt文件里。便于项目后期的处理,这里直接爬取微博正文content,其它像userid、prettyTime等直接在程序里用Vector<String>处理,这个在系列的第一篇文章里写的了,代码也给出了,此处不再赘述。
最后解析出来正文的txt形式的微博数据:(已用字符串替换的方式去除”content”字段名称,直接保留正文)

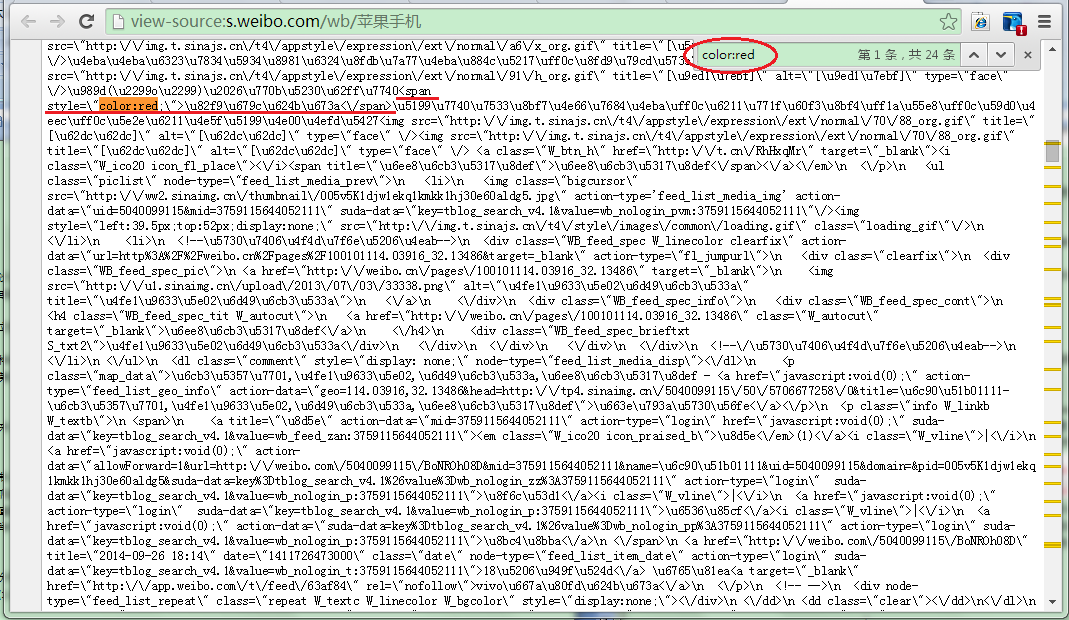
##二、新浪微博解析**
相比之下新浪的html就要复杂得多,这个在第一篇文章里谈到过,其微博不是以json格式展现而是以javascript形式,每条微博包含在<em>…</em>元素里。依据关键字标红快速定位:color:red。

首先把em元素及其中间的文本都匹配出来,匹配的正则表达式:<em>.+?color:red.+?</em>,然后再去掉所有<…>的标签得到utf8,最后用.*parseInt*(utf8CodeStr, 16)把所有utf8的十六进制换成char。
~~~
private Vector<String> getTweet(String htmlPath) throws IOException {
File f = new File(htmlPath);
FileReader fr = new FileReader(f);
BufferedReader br = new BufferedReader(fr);
Vector<String> tweets = new Vector<String>();
String html = "";
Pattern p = Pattern.compile("<em>.+?color:red.+?</em>");
String tweetTemp = "";
while(br.readLine() != null) {
html += br.readLine();
}
br.close();
Matcher m = p.matcher(html);
while(m.find()) {
tweetTemp = m.group();
tweets.add(tweetTemp);
}
Vector<String> realTweets = new Vector<String>();
for(int i=0; i<tweets.size(); i++) {
//filt the <...> labels
Pattern pdel = Pattern.compile("<.+?>");
Matcher mdel = pdel.matcher(tweetTemp);
Vector<String> del = new Vector<String>();
while(mdel.find()) {
if(!del.contains(mdel.group())) {
del.add(mdel.group());
}
}
for(int j=0; j<del.size(); j++) {
tweetTemp = tweetTemp.replace(del.get(j), "");
}
StringBuilder sb = new StringBuilder();
Pattern utf8p = Pattern.compile("\\\\u[0-9a-f]{4}"); //utf8 code
Matcher utf8m = utf8p.matcher(tweetTemp);
String utf8codeStr;
while(utf8m.find()) {
utf8codeStr = utf8m.group().substring(2);
sb.append((char)Integer.parseInt(utf8codeStr, 16));//parse to chinese
}
if(!realTweets.contains(sb.toString())) {
//only save different tweets
realTweets.add(sb.toString());
}
}
return realTweets;
}
~~~
原创文章,转载请注明出处:[http://blog.csdn.net/dianacody/article/details/39716611](http://blog.csdn.net/dianacody/article/details/39716611)
</div>
<script src="https://docs.gechiui.com/digest-spiders/gc-content/themes/gechiui-book/js/marked.min.js"></script>
<script>content=document.getElementById("md-view").innerHTML;</script>';
<script>document.getElementById("md-view").innerHTML = marked.parse(content)</script>
</section>
<section class="normal markdown-section">
<h1 id="【java】微博爬虫(二):如何抓取HTML页面及HttpClient使用">【java】微博爬虫(二):如何抓取HTML页面及HttpClient使用<a class="anchorjs-link " href="#【java】微博爬虫(二):如何抓取HTML页面及HttpClient使用" data-anchorjs-icon=""></a></h1>
<p><span class="sa-last-update-time">最后更新于:2022-04-01 23:02:29</span></p>
<div id="md-view">
##一、写在前面
上篇文章以网易微博爬虫为例,给出了一个很简单的微博爬虫的爬取过程,大概说明了网络爬虫其实也就这么回事,或许初次看到这个例子觉得有些复杂,不过没有关系,上篇文章给的例子只是让大家对爬虫过程有所了解。接下来的系列里,将一步一步地剖析每个过程。
爬虫总体流程在上篇文章已经说得很清楚了,没有看过的朋友可以去看下:[【网络爬虫】[java]微博爬虫(一):网易微博爬虫(自定义关键字爬取微博信息数据)](http://blog.csdn.net/dianacody/article/details/39584977)
现在再回顾下爬虫过程:
step1: 通过请求url得到html的string,用httpClient-4.3.1工具,同时设置socket超时和连接超时connectTimeout,本文将详解此步骤。
step2: 对于上步得到的html,验证是否为合法HTML,判断是否为有效搜索页面,因为有些请求的html页面不存在。
step3: 把html这个string存放到本地,写入txt文件;
step4: 从txt文件解析微博数据:userid,timestamp……解析过程才是重点,对于不同网页结构的分析及特征提取,将在系列三中详细讲解。
step5: 解析出来的数据放入txt和xml中,这里主要jsoup解析html,dom4j工具读写xml,将在系列四中讲解。
然后在系列五中会给出一些防止被墙的方法,使用代理IP访问或解析本地IP数据库(前提是你有存放的IP数据库),后面再说。
##二、HttpClient工具包
搞过web开发的朋友对这个应该很熟悉了,不需要再多说,这是个很基本的工具包,一个代码级Http客户端工具,可以使用其模拟浏览器向http服务器发送请求。HttpClient是HttpComponents(简称hc)项目其中的一部分,可以直接下载组件。使用HttpClient还需要HttpCore,后者包括Http请求与Http响应代码封装。它使客户端发送http请求变得容易,同时也会更加深入理解http协议。
在这里可以下载HttpComponents组件:[http://hc.apache.org/](http://hc.apache.org/),下载后目录结构:

首先要注意的有以下几点:
1.httpclient**链接后释放**问题很重要,就跟用database connection要释放资源一样。
2.https网站使用ssl加密传输,证书导入要注意。
3.对于**http协议**要有基本的了解,比如http的200,301,302,400,404,500等返回代码时什么意思(这个是最基本的),还有cookie和session机制(这个在之后的python爬虫系列三“模拟登录”的方法需要抓取数据包分析,主要就是看cookie这些东西,要学会分析数据包)
4.httpclient的redirect(重定向)状态默认是自动的,这在很大程度上给开发者很大的方便(如一些授权获得的cookie),但有时需要手动设置,比如有时会遇到CircularRedictException异常,出现这样的情况是因为返回的头文件中location值指向之前重复地址(端口号可以不同),导致可能会出现死循环递归重定向,此时可以手动关闭:method.setFollowRedirects(false)。
5.模拟浏览器登录,这个对于爬虫来说相当重要,有的网站会先判别用户的请求是否来自浏览器,如果不是直接拒绝访问,这个直接伪装成浏览器访问就好了,好用httpclient抓取信息时在头部加入一些信息:header.put(“User-Agent”, “Mozilla/5.0 (Windows NT 6.1)AppleWebKit/537.36 (KHTML, like Gecko) Chrome/37.0.2062.124 Safari/537.36)”);
6.当post请求提交数据时要改变默认编码,不然提交上去的数据会出现乱码。重写postMethod的setContentCharSet()方法就可以了。
下面给几个例子:
(1)发post请求访问本地应用并根据传递参数不同返回不同结果
~~~
public void post() {
//创建默认httpClient实例
CloseableHttpClient httpclient = HttpClients.createDefault();
//创建httpPost
HttpPost httppost = new HttpPost("http://localhost:8088/weibo/Ajax/service.action");
//创建参数队列
List<keyvalue> formparams = new ArrayList<keyvalue>();
formparams.add(new BasicKeyValue("name", "alice"));
UrlEncodeFormEntity uefEntity;
try {
uefEntity = new UrlEncodeFormEntity(formparams, "utf-8");
httppost.setEntity(uefEntity);
System.out.println("executing request " + httppost.getURI());
CloseableHttpResponse response = httpclient.execute(httppost);
try {
HttpEntity entity = response.getEntity();
if(entity != null) {
System.out.println("Response content: " + EntityUtils.toString(entity, "utf-8"));
}
} finally {
response.close();
}
} catch (ClientProtocolException e) {
e.printStackTrace();
} catch (UnsupportedEncodingException e) {
e.printStackTrace();
} catch (IOException e) {
e.printStackTrace();
} finally {
//关闭连接,释放资源
try {
httpclient.close();
} catch (IOException e) {
e.printStackTrace();
}
}
}
~~~
(2)发get请求
~~~
public void get() {
CloseableHttpClient httpclient = HttpClients.createDefault();
try {
//创建httpget
HttpGet httpget = new HttpGet("http://www.baidu.com");
System.out.println("executing request " + httpget.getURI());
//执行get请求
CloseableHttpResponse response = httpclient.execute(httpget);
try {
//获取响应实体
HttpEntity entity = response.getEntity();
//响应状态
System.out.println(response.getStatusLine());
if(entity != null) {
//响应内容长度
System.out.println("response length: " + entity.getContentLength());
//响应内容
System.out.println("response content: " + EntityUtils.toString(entity));
}
} finally {
response.close();
}
} catch (ClientProtocolException e) {
e.printStackTrace();
} catch (ParseException e) {
e.printStackTrace();
} catch (IOException e) {
e.printStackTrace();
} finally {
//关闭链接,释放资源
try {
httpclient.close();
} catch(IOException e) {
e.printStackTrace();
}
}
}
~~~
(3)设置header
比如在百度搜索”httpclient”关键字,百度一下,发送请求,chrome里按F12开发者工具,在Network选项卡查看分析数据包,可以看到数据包相关信息,比如这里请求头Request Header里的信息。
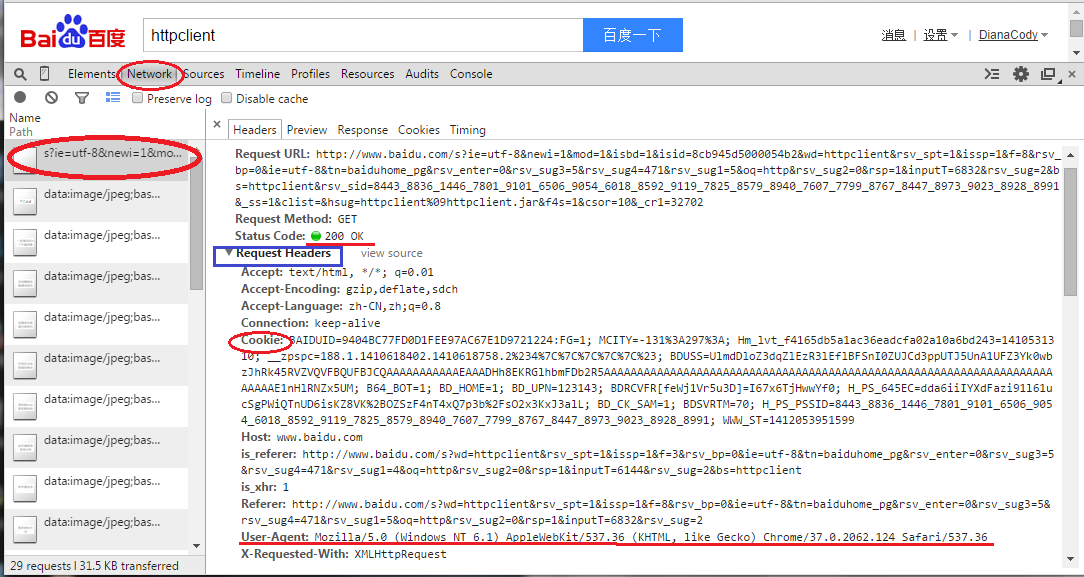
有时需要**模拟浏览器登录**,把header设置一下就OK,照着这里改吧。
~~~
public void header() {
HttpClient httpClient = new DefaultHttpClient();
try {
HttpGet httpget = new HttpGet("http://www.baidu.com");
httpget.setHeader("Accept", "text/html, */*; q=0.01");
httpget.setHeader("Accept-Encoding", "gzip, deflate,sdch");
httpget.setHeader("Accept-Language", "zh-CN,zh;q=0.8");
httpget.setHeader("Connection", "keep-alive");
httpget.setHeader("User-Agent", "Mozilla/5.0 (Windows NT 6.1) AppleWebKit/537.36 (KHTML, like Gecko) Chrome/37.0.2062.124 Safari/537.36)");
HttpResponse response = httpClient.execute(httpget);
HttpEntity entity = response.getEntity();
System.out.println(response.getStatusLine()); //状态码
if(entity != null) {
System.out.println(entity.getContentLength());
System.out.println(entity.getContent());
}
} catch (Exception e) {
e.printStackTrace();
}
}
~~~
##三、通过url得到html页面
前面说了这么多,都是些准备工作主要是HttpClient的一些基本使用,其实还有很多,网上其他资料更详细,也不是这里要讲的重点。下面来看如何通过url来得到html页面,其实方法已经在上一篇文章中说过了:[【网络爬虫】[java]微博爬虫(一):网易微博爬虫(自定义关键字爬取微博信息数据)](http://blog.csdn.net/dianacody/article/details/39584977)
新浪微博和网易微博:**(这里尤其要注意地址及参数!)**
新浪微博搜索话题地址:http://s.weibo.com/weibo/苹果手机&nodup=1&page=50
网易微博搜索话题地址:http://t.163.com/tag/苹果手机
这里参数&nodup和参数&page=50,表示从搜索结果返回的前50个html页面,从第50个页面开始爬取。也可以修改参数的值,爬取的页面个数不同。
在这里写了三个方法,分别设置用户cookie、默认一般的方法、代理IP方法,基本思路差不多,主要是在RequestConfig和CloseableHttpClient的custom()可以自定义配置。
~~~
/**
* @note 三种连接url并获取html的方法(有一般方法,自定义cookie方法,代理IP方法)
* @author DianaCody
* @since 2014-09-26 16:03
*
*/
import java.io.IOException;
import java.io.UnsupportedEncodingException;
import java.net.URISyntaxException;
import java.text.ParseException;
import org.apache.http.HttpEntity;
import org.apache.http.HttpHost;
import org.apache.http.HttpResponse;
import org.apache.http.HttpStatus;
import org.apache.http.client.ClientProtocolException;
import org.apache.http.client.HttpClient;
import org.apache.http.client.config.CookieSpecs;
import org.apache.http.client.config.RequestConfig;
import org.apache.http.client.methods.CloseableHttpResponse;
import org.apache.http.client.methods.HttpGet;
import org.apache.http.client.methods.HttpPost;
import org.apache.http.config.Registry;
import org.apache.http.config.RegistryBuilder;
import org.apache.http.cookie.Cookie;
import org.apache.http.cookie.CookieOrigin;
import org.apache.http.cookie.CookieSpec;
import org.apache.http.cookie.CookieSpecProvider;
import org.apache.http.cookie.MalformedCookieException;
import org.apache.http.impl.client.CloseableHttpClient;
import org.apache.http.impl.client.HttpClients;
import org.apache.http.impl.conn.DefaultProxyRoutePlanner;
import org.apache.http.impl.cookie.BestMatchSpecFactory;
import org.apache.http.impl.cookie.BrowserCompatSpec;
import org.apache.http.impl.cookie.BrowserCompatSpecFactory;
import org.apache.http.protocol.HttpContext;
import org.apache.http.util.EntityUtils;
public class HTML {
/**默认方法 */
public String[] getHTML(String url) throws ClientProtocolException, IOException {
String[] html = new String[2];
html[1] = "null";
RequestConfig requestConfig = RequestConfig.custom()
.setSocketTimeout(5000) //socket超时
.setConnectTimeout(5000) //connect超时
.build();
CloseableHttpClient httpClient = HttpClients.custom()
.setDefaultRequestConfig(requestConfig)
.build();
HttpGet httpGet = new HttpGet(url);
try {
CloseableHttpResponse response = httpClient.execute(httpGet);
html[0] = String.valueOf(response.getStatusLine().getStatusCode());
html[1] = EntityUtils.toString(response.getEntity(), "utf-8");
//System.out.println(html);
} catch (IOException e) {
System.out.println("----------Connection timeout--------");
}
return html;
}
/**cookie方法的getHTMl() 设置cookie策略,防止cookie rejected问题,拒绝写入cookie --重载,3参数:url, hostName, port */
public String getHTML(String url, String hostName, int port) throws URISyntaxException, ClientProtocolException, IOException {
//采用用户自定义的cookie策略
HttpHost proxy = new HttpHost(hostName, port);
DefaultProxyRoutePlanner routePlanner = new DefaultProxyRoutePlanner(proxy);
CookieSpecProvider cookieSpecProvider = new CookieSpecProvider() {
public CookieSpec create(HttpContext context) {
return new BrowserCompatSpec() {
@Override
public void validate(Cookie cookie, CookieOrigin origin) throws MalformedCookieException {
//Oh, I am easy...
}
};
}
};
Registry<CookieSpecProvider> r = RegistryBuilder
.<CookieSpecProvider> create()
.register(CookieSpecs.BEST_MATCH, new BestMatchSpecFactory())
.register(CookieSpecs.BROWSER_COMPATIBILITY, new BrowserCompatSpecFactory())
.register("easy", cookieSpecProvider)
.build();
RequestConfig requestConfig = RequestConfig.custom()
.setCookieSpec("easy")
.setSocketTimeout(5000) //socket超时
.setConnectTimeout(5000) //connect超时
.build();
CloseableHttpClient httpClient = HttpClients.custom()
.setDefaultCookieSpecRegistry(r)
.setRoutePlanner(routePlanner)
.build();
HttpGet httpGet = new HttpGet(url);
httpGet.setConfig(requestConfig);
String html = "null"; //用于验证是否正常取到html
try {
CloseableHttpResponse response = httpClient.execute(httpGet);
html = EntityUtils.toString(response.getEntity(), "utf-8");
} catch (IOException e) {
System.out.println("----Connection timeout----");
}
return html;
}
/**proxy代理IP方法 */
public String getHTMLbyProxy(String targetUrl, String hostName, int port) throws ClientProtocolException, IOException {
HttpHost proxy = new HttpHost(hostName, port);
String html = "null";
DefaultProxyRoutePlanner routePlanner = new DefaultProxyRoutePlanner(proxy);
RequestConfig requestConfig = RequestConfig.custom()
.setSocketTimeout(5000) //socket超时
.setConnectTimeout(5000) //connect超时
.build();
CloseableHttpClient httpClient = HttpClients.custom()
.setRoutePlanner(routePlanner)
.setDefaultRequestConfig(requestConfig)
.build();
HttpGet httpGet = new HttpGet(targetUrl);
try {
CloseableHttpResponse response = httpClient.execute(httpGet);
int statusCode = response.getStatusLine().getStatusCode();
if(statusCode == HttpStatus.SC_OK) { //状态码200: OK
html = EntityUtils.toString(response.getEntity(), "gb2312");
}
response.close();
//System.out.println(html); //打印返回的html
} catch (IOException e) {
System.out.println("----Connection timeout----");
}
return html;
}
}
~~~
##四、验证是否存在HTML页面
有时请求的html不存在,比如在上篇文章中提到的情况一样,这里加个判断函数。
~~~
private boolean isExistHTML(String html) throws InterruptedException {
boolean isExist = false;
Pattern pNoResult = Pattern.compile("\\\\u6ca1\\\\u6709\\\\u627e\\\\u5230\\\\u76f8"
+ "\\\\u5173\\\\u7684\\\\u5fae\\\\u535a\\\\u5462\\\\uff0c\\\\u6362\\\\u4e2a"
+ "\\\\u5173\\\\u952e\\\\u8bcd\\\\u8bd5\\\\u5427\\\\uff01"); //没有找到相关的微博呢,换个关键词试试吧!(html页面上的信息)
Matcher mNoResult = pNoResult.matcher(html);
if(!mNoResult.find()) {
isExist = true;
}
return isExist;
}
~~~
##五、爬取微博返回的HTML字符串
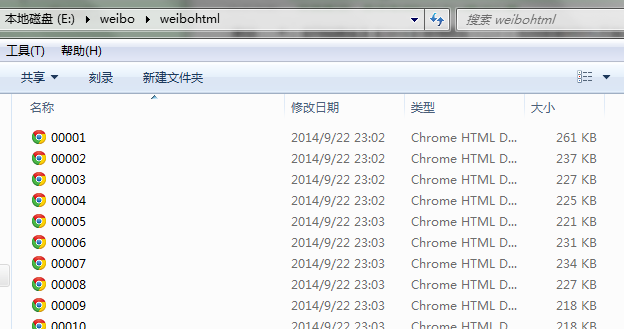
把所有html写到本地txt文件里。
~~~
/**把所有html写到本地txt文件存储 */
public static void writeHTML2txt(String html, int num) throws IOException {
String savePath = "e:/weibo/weibohtml/" + num + ".txt";
File f = new File(savePath);
FileWriter fw = new FileWriter(f);
BufferedWriter bw = new BufferedWriter(fw);
bw.write(html);
bw.close();
}
~~~
爬下来的html:
来看下每个html页面,头部一些数据:
微博正文数据信息,是个json格式,包含一些信息:

至于如何解析提取关键数据,在下篇文章中再写。
原创文章,转载请注明出处:[http://blog.csdn.net/dianacody/article/details/39695285](http://blog.csdn.net/dianacody/article/details/39695285)
</div>
<script src="https://docs.gechiui.com/digest-spiders/gc-content/themes/gechiui-book/js/marked.min.js"></script>
<script>content=document.getElementById("md-view").innerHTML;</script>';
<script>document.getElementById("md-view").innerHTML = marked.parse(content)</script>
</section>
<section class="normal markdown-section">
<h1 id="【java】微博爬虫(一):小试牛刀——网易微博爬虫(自定义关键字爬取微博数据)(附软件源码)">【java】微博爬虫(一):小试牛刀——网易微博爬虫(自定义关键字爬取微博数据)(附软件源码)<a class="anchorjs-link " href="#【java】微博爬虫(一):小试牛刀——网易微博爬虫(自定义关键字爬取微博数据)(附软件源码)" data-anchorjs-icon=""></a></h1>
<p><span class="sa-last-update-time">最后更新于:2022-04-01 23:02:26</span></p>
<div id="md-view">
##一、写在前面
**(本专栏分为“java版微博爬虫”和“python版网络爬虫”两个项目,系列里所有文章将基于这两个项目讲解,项目完整源码已经整理到我的Github,有兴趣的可以去看下,链接地址在文末。)**
网络爬虫根据需求的不同也分不同种类:
1.一种是爬取网页链接,通过url链接得到这个html页面中指定的链接,把这些链接存储起来,再依次以这些链接为源,再次爬取连接指向html页面中的链接……如此层层递归下去,常用的方法是广度优先或者深度优先,根据爬取层次需求不同而选择不同的方法达到最优效果,爬虫的效率优化是一个关键。
搜索引擎的第一个步骤就是通过爬虫得到需要索引的链接或数据,存放于数据库,然后对这些数据建立索引,然后定义查询语句,解析查询语句并利用检索器对数据库里的数据进行检索。
2.一种是爬取数据信息,如文本信息、图片信息等,有时需要做数据分析,通过某种手段来获取数据样本以供后续分析,常用的方法是爬虫获取指定数据样本或利用现有的公共数据库。本文的微博爬虫属于第二种类,根据自定义搜索关键字爬取微博信息数据。
对于网络爬虫原理,其实并不复杂。基本思路是:由关键字指定的url把所有相关的html页面全抓下来(html即为字符串),然后解析html文本(通常是正则表达式或者现成工具包如jsoup),提取微博文本信息,然后把文本信息存储起来。
重点在于对html页面源码结构的分析,不同的html需要不同的解析方法;还有就是长时间爬取可能对IP有影响,有时需要获取代理IP,甚至需要伪装浏览器爬取。
对于微博,通常情况下是必须登录才能看到微博信息数据(比如腾讯微博),但是有的微博有搜索机制,在非登录的情况下可以直接通过**搜索话题**来查找相关信息(如新浪微博、网易微博)。考虑到某些反爬虫机制,如果一个账号总是爬取信息可能会有些影响(比如被封号),所以本文采用的爬虫都是非登录、直接进入微博搜索页面爬取。这里关键是初始url地址。
##二、网页分析
举个例子,对于有搜索机制的微博,如新浪微博和网易微博:(这里尤其要注意地址及参数!)
新浪微博搜索话题地址:http://s.weibo.com/weibo/苹果手机&nodup=1&page=50
网易微博搜索话题地址:http://t.163.com/tag/苹果手机
分别来看下网页截图和对应网页源码:
(1) 新浪微博:

(2) 网易微博:

我们需要做的就是把微博的文本提取出来,这里有些特征信息:根据关键字搜到的微博,其关键字会被标红,在html源码里有体现,分别查看两个网页的源代码。
可以看到,新浪微博的源码全部为html标签,为了反爬虫故意将源码混乱,并且汉字也做了处理,显示汉字的utf-8编码而不是直接显示汉字,不太好找,这里就需要查找红色字体color:red的部分,其中<span style=\”color:red;\”>\u82f9\u679c\u624b\u673a<\span>中间夹着的哪些utf8编码其实就是关键字“苹果手机”。后面的那些utf8编码就是本条微博的文本内容。
而网易微博在这方面就要看起来容易许多,至少html里直接显示的是汉字,比较好找,而且微博文本部分其实是以json格式体现的,直接解析json就可以提取文本数据了,当然也可以直接用正则。
##三、爬取微博
这里先写个简单的爬虫,原理都差不多,就拿网易微博为例,先说下爬虫程序需要用到的工具包:
httpclient-4.3.1.jar -------建立HTTP链接,用于从url获取html
httpcore-4.3.jar
httpmime-4.3.1.jar
httpclient-cache-4.3.1.jar
fluent-hc-4.3.1.jar
fastjson-1.1.41.jar ------解析json的工具包
jsoup-1.7.3.jar -------解析xml,html的工具包
dom4j-1.6.1.jar -------读写xml的工具包
commons-lang-2.1.jar
commons-logging-1.2.jar
commons-codec-1.8.jar
总体思路:
1. getHTML()方法:从url得到html字符串。
这里有两个关键点:
(1) 设置用户cookie策略,屏蔽掉cookie rejected的报错,当然可以不设置,直接用默认的client,即是CloseableHttpClient client = HttpClients.createDefault();创建的客户端,但是会报错;设置cookie的代码如下:
~~~
CookieSpecProvider cookieSpecProvider = new CookieSpecProvider(){
public CookieSpec create(HttpContext context){
return new BrowserCompatSpec(){
@Override
public void validate(Cookie cookie, CookieOrigin origin) throws MalformedCookieException {
//Oh, I am easy;
}
};
}
};
Registry<CookieSpecProvider> r = RegistryBuilder
.<CookieSpecProvider> create()
.register(CookieSpecs.BEST_MATCH, new BestMatchSpecFactory())
.register(CookieSpecs.BROWSER_COMPATIBILITY, new BrowserCompatSpecFactory())
.register("easy", cookieSpecProvider)
.build();
~~~
(2) 设置socket超时socketTimeout和连接超时connectTimeout,这很关键,如果不设置的话,当网络不好的情况下,某次请求没有及时得到响应,程序可能会卡死。但是设置连接超时,超时之后再自动重连就可以避免这个问题。代码如下:
~~~
RequestConfig requestConfig = RequestConfig.custom()
.setCookieSpec("easy")
.setSocketTimeout(5000) //设置socket超时时间
.setConnectTimeout(5000) //设置connect超时时间
.build();
~~~
2.isExitHTML()方法:
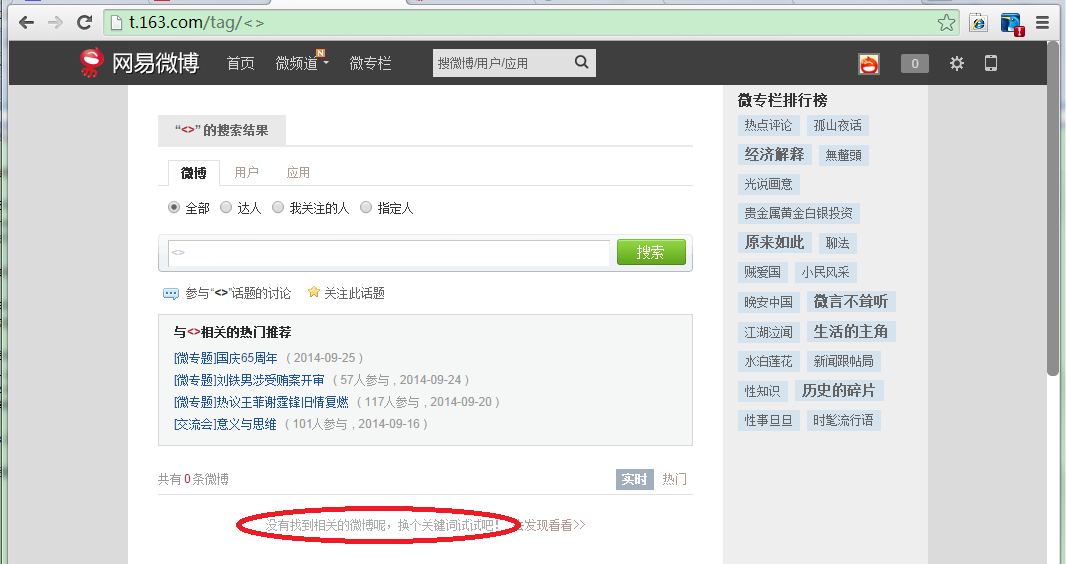
判断html是否合法(有效html,有微博内容的),有时候会出现页面不存在的情况,是因为该关键字没有微博信息,这是页面有提示:“没有找到相关的微博呢,换个关键词试试吧!”如下图;
3.writeWeibo2txt()方法:
正则解析(这里主要解析微博文本内容content、用户id、发文时间prettyTime),得到微博文本数据:控制台输出、写到txt文件;
(这里没有用jsoup去解析html,直接用的正则,有时间后面再写jsoup解析html的,比正则方便,当然对正则表达式这个工具掌握很熟练的朋友可以忽略……)
我的博客里另外有一篇正则教程完全总结,可以去看下:[正则表达式总结](http://blog.csdn.net/dianacody/article/details/39122645)
本来网易微博的源代码里嵌入了json元素,前面的html标签的都不是微博文本数据,在这个标签后面 <scriptid="data_searchTweet" type="application/json">才是json格式包括的微博文本,本来打算先把json串用正则匹配出来,后来发现,直接匹配关键字岂不更好?但这里要注意的是匹配的时候可能会有很多换行符之类的东西,我这里只匹配了三个field,正则表达式"id":\s"\d{19}",(\n*?)|(\s*?)"content":\s".*?",(\n*?)|(\s*?)"prettyTime":\s".*?"
顺便推荐一个检测正则的工具:[http://tool.oschina.net/regex?optionGlobl=global](http://tool.oschina.net/regex?optionGlobl=global)
把源码贴上来吧:
~~~
/**
* @note 1.根据搜索关键词从指定url得到相应的html页面,并验证其合法性;
* 2.得到微博样本:写到txt文件里
*
* @author DianaCody
* @since 2014-09-26 15:08
*
*/
import java.io.BufferedReader;
import java.io.BufferedWriter;
import java.io.File;
import java.io.FileReader;
import java.io.FileWriter;
import java.io.IOException;
import java.net.URI;
import java.net.URISyntaxException;
import java.util.regex.Pattern;
import java.util.regex.Matcher;
import org.apache.http.client.ClientProtocolException;
import org.apache.http.client.config.CookieSpecs;
import org.apache.http.client.config.RequestConfig;
import org.apache.http.client.methods.CloseableHttpResponse;
import org.apache.http.client.methods.HttpGet;
import org.apache.http.config.Registry;
import org.apache.http.config.RegistryBuilder;
import org.apache.http.cookie.Cookie;
import org.apache.http.cookie.CookieOrigin;
import org.apache.http.cookie.CookieSpec;
import org.apache.http.cookie.CookieSpecProvider;
import org.apache.http.cookie.MalformedCookieException;
import org.apache.http.impl.client.CloseableHttpClient;
import org.apache.http.impl.client.HttpClients;
import org.apache.http.impl.cookie.BestMatchSpecFactory;
import org.apache.http.impl.cookie.BrowserCompatSpec;
import org.apache.http.impl.cookie.BrowserCompatSpecFactory;
import org.apache.http.protocol.HttpContext;
import org.apache.http.util.EntityUtils;
public class Weibo163 {
private String getHTML(String url) throws URISyntaxException, ClientProtocolException, IOException {
//采用用户自定义cookie策略,不显示cookie rejected的报错
CookieSpecProvider cookieSpecProvider = new CookieSpecProvider(){
public CookieSpec create(HttpContext context){
return new BrowserCompatSpec(){
@Override
public void validate(Cookie cookie, CookieOrigin origin) throws MalformedCookieException {
}
};
}
};
Registry<CookieSpecProvider> r = RegistryBuilder
.<CookieSpecProvider> create()
.register(CookieSpecs.BEST_MATCH, new BestMatchSpecFactory())
.register(CookieSpecs.BROWSER_COMPATIBILITY, new BrowserCompatSpecFactory())
.register("cookie", cookieSpecProvider)
.build();
RequestConfig requestConfig = RequestConfig.custom()
.setCookieSpec("cookie")
.setSocketTimeout(5000) //设置socket超时时间
.setConnectTimeout(5000) //设置connect超时时间
.build();
CloseableHttpClient httpClient = HttpClients.custom()
.setDefaultCookieSpecRegistry(r)
.setDefaultRequestConfig(requestConfig)
.build();
HttpGet httpGet = new HttpGet(url);
httpGet.setConfig(requestConfig);
String html = "html获取失败"; //用于验证是否取到正常的html
try{
CloseableHttpResponse response = httpClient.execute(httpGet);
html = EntityUtils.toString(response.getEntity());
//System.out.println(html); //打印返回的html
} catch (IOException e) {
e.printStackTrace();
}
return html;
}
private boolean isExistHTML(String html) throws InterruptedException {
boolean isExist = false;
Pattern pNoResult = Pattern.compile("\\\\u6ca1\\\\u6709\\\\u627e\\\\u5230\\\\u76f8"
+ "\\\\u5173\\\\u7684\\\\u5fae\\\\u535a\\\\u5462\\\\uff0c\\\\u6362\\\\u4e2a"
+ "\\\\u5173\\\\u952e\\\\u8bcd\\\\u8bd5\\\\u5427\\\\uff01"); //没有找到相关的微博呢,换个关键词试试吧!(html页面上的信息)
Matcher mNoResult = pNoResult.matcher(html);
if(!mNoResult.find()) {
isExist = true;
}
return isExist;
}
private void writeWeibo2txt(String html, String savePath) throws IOException {
File htmltxt = new File(savePath); //新建一个txt文件用于存放爬取的结果信息
FileWriter fw = new FileWriter(htmltxt);
BufferedWriter bw = new BufferedWriter(fw);
//regex-----"id":\s"\d{19}",(\n*?)|(\s*?)"content":\s".*?",(\n*?)|(\s*?)"prettyTime":\s".*?"
Pattern p = Pattern.compile("\"id\":\\s\"\\d{19}\",(\\n*?)|(\\s*?)\"content\":\\s\".*?\",(\\n*?)|(\\s*?)\"prettyTime\":\\s\".*?\"");
Matcher m = p.matcher(html);
while(m.find()) {
System.out.println(m.group());
bw.write(m.group());
}
bw.close();
}
public static void main(String[] args) throws IOException, URISyntaxException, InterruptedException {
Weibo163 crawler = new Weibo163();
String searchword = "iPad"; //搜索关键字为"iPad"的微博html页面
String html = crawler.getHTML("http://t.163.com/tag/"+searchword);
String savePath = "e:/weibo/html.txt"; //输出到txt文件的存放路径
if(html != "html获取失败") {
if(crawler.isExistHTML(html)) {
System.out.println(html);
crawler.writeWeibo2txt(html, savePath);
}
}
//Pattern p = Pattern.compile("<script id=\"data_searchTweet\" type=\"application/json\">.+?<\script>"); //<script id="data_searchTweet" type="application/json">.*?<\script>
//Matcher m = p.matcher(html);
//html = crawler.getHTML("http://s.weibo.com/weibo/"+searchword+"&nodup=1&page="+1);
//System.out.println(html);
}
}
~~~
程序运行截图:


该java爬虫项目源码github地址:[https://github.com/DianaCody/Spider_SinaTweetCrawler_java](https://github.com/DianaCody/Spider_SinaTweetCrawler_java)。
原创文章,转载请注明出处:[http://blog.csdn.net/dianacody/article/details/39584977](http://blog.csdn.net/dianacody/article/details/39584977)
**另外一个系列对爬虫的整理笔记**:[http://www.crifan.com/files/doc/docbook/web_scrape_emulate_login/release/html/web_scrape_emulate_login.html](http://www.crifan.com/files/doc/docbook/web_scrape_emulate_login/release/html/web_scrape_emulate_login.html)
</div>
<script src="https://docs.gechiui.com/digest-spiders/gc-content/themes/gechiui-book/js/marked.min.js"></script>
<script>content=document.getElementById("md-view").innerHTML;</script>';
<script>document.getElementById("md-view").innerHTML = marked.parse(content)</script>
</section>
<section class="normal markdown-section">
<h1 id="前言">前言<a class="anchorjs-link " href="#前言" data-anchorjs-icon=""></a></h1>
<p><span class="sa-last-update-time">最后更新于:2022-04-01 23:02:24</span></p>
<div id="md-view">
> 原文出处:[网络爬虫系列](http://blog.csdn.net/column/details/spiders.html)
作者:[dianacody](http://blog.csdn.net/dianacody)
**本系列文章经作者授权在看云整理发布,未经作者允许,请勿转载!**
# 网络爬虫系列
> 系列分为两个部分:(java版)以网易和新浪微博爬虫实际项目为例,介绍爬虫原理。(python版)介绍爬虫urllib2工具爬虫实例和scrapy框架爬虫实例。爬虫系列所有实例可以到github查看完整项目源码。
</div>
<script src="https://docs.gechiui.com/digest-spiders/gc-content/themes/gechiui-book/js/marked.min.js"></script>
<script>content=document.getElementById("md-view").innerHTML;</script>';
<script>document.getElementById("md-view").innerHTML = marked.parse(content)</script>
</section>
</div>
</div>
<div class="banquan">
</div>
</div>
<a href="" rel="nofollow" class="navigation navigation-prev" id="shangyige">
<i class="fa fa-angle-left"></i>
</a>
<a href="" rel="nofollow" class="navigation navigation-next" id="xiayige">
<i class="fa fa-angle-right"></i>
</a>
</div>
</div>
<script src="https://docs.gechiui.com/digest-spiders/gc-content/themes/gechiui-book/js/js.js"></script>
<script src="https://docs.gechiui.com/digest-spiders/gc-content/themes/gechiui-book/js/ciambook.js"></script>
<script src="https://docs.gechiui.com/digest-spiders/gc-content/themes/gechiui-book/js/theme.js"></script>
<script src="https://docs.gechiui.com/digest-spiders/gc-content/themes/gechiui-book/js/bootstrap.js"></script>
<script src="https://docs.gechiui.com/digest-spiders/gc-content/themes/gechiui-book/js/fontsettings.js"></script>
</body>
</html>