工具
最后更新于:2022-04-01 15:26:48
书籍
最后更新于:2022-04-01 15:26:46
# 书籍
- [程序员必读书单 1.0](http://lucida.me/blog/developer-reading-list/)
- [【年终特刊】2013年我们读过的好书](http://weekly.manong.io/issues/15)
- [【年终特刊】2014 年最受欢迎的技术干货](http://weekly.manong.io/issues/56?ref=wechat#rd&sukey=fd39034cdd3ad743b280ffef9af25891aa1a9a051e1f9a773a149f68b5db01e9eb3173610fad1bb3863457c27a735cb9)
### 个人提升
- [知道创宇研发技能表v2.2](http://vdisk.weibo.com/s/EPyLE0kt9Mow): 国内著名黑客余弦总结。
### 数据可视化
- [data-design](https://github.com/infoactive/data-design/): 提高我们对于数据和设计的理解的集体行动的开始。
- [一位前端开发者的计算机视觉学习之路——专访《Chrome扩展及应用开发》作者李喆](http://www.ituring.com.cn/article/123884)
网站
最后更新于:2022-04-01 15:26:44
计算机科学与技术
最后更新于:2022-04-01 15:26:41
# 计算机科学与技术
Computer Science,大学的专业,但也没有很认真的学。
### 参考资料
- [网易云课堂](http://study.163.com/curricula/cs.htm)
- [Github干货:计算机科学公开课](http://top.jobbole.com/18025/)
- [林建:计算机专业学习浅谈](http://mp.weixin.qq.com/s?__biz=MjM5MzA0OTkwMA==&mid=208006388&idx=2&sn=eb5ad9b8afd4c6bfadea76889c131304#rd)
附录
最后更新于:2022-04-01 15:26:39
[计算机科学与技术](computer-science.md)
[网站](websites.md)
[书籍](books.md)
[工具](tools.md)
IDE设置
最后更新于:2022-04-01 15:26:37
# IDE设置
下载安装完成后,我首先会设置一下编辑器。JetBrains的设置在旗下的IDE中是通用的,所以配置是可以随时导入导出的。进入设置的方式为: `File->Settings`。
### 界面设置
- 设置行号: `show line numbers`
- 设置softwrap: `soft Wraps`
- 设置工程和文件编码
- 设置换行模式
- 设置index空格数
### keymaps
- 设置emacs移动光标方式
- 设置基本的编辑方式
- 设置快捷打开文件方式
- 设置快捷访问功能方式
JetBrains
最后更新于:2022-04-01 15:26:34
# JetBrains
JetBrains是一家专注开发开发工具的公司,旗下的IEDA, WebStorm获得了开发者的极大喜爱。
它们家的IDE是收费的,广大开发者最好还是支持一下正版。
GitHub秘籍
最后更新于:2022-04-01 15:26:32
# GitHub秘籍
本秘籍收录了一些Git和Github非常酷同时又少有人知的功能。灵感来自于[Zach Holman](https://github.com/holman)在2012年Aloha Ruby Conference和2013年WDCNZ上所做的演讲:[Git and GitHub Secrets](http://www.confreaks.com/videos/1229-aloharuby2012-git-and-github-secrets)([slides](https://speakerdeck.com/holman/git-and-github-secrets))和[More Git and GitHub Secrets](https://vimeo.com/72955426)([slides](https://speakerdeck.com/holman/more-git-and-github-secrets))。
*Read this in other languages: [English](#), [한국어](#), [日本語](#), [简体中文](#).*
# 目录
- [GitHub](#)
- [忽略空白字符变化](#)
- [调整Tab字符所代表的空格数](#)
- [查看某个用户的Commit历史](#)
- [克隆某个仓库](#)
- [分支](#)
- [将某个分支与其他所有分支进行对比](#)
- [比较分支](#)
- [比较不同派生库的分支](#)
- [Gists](#)
- [Git.io](#)
- [键盘快捷键](#)
- [整行高亮](#)
- [用commit信息关闭Issue](#)
- [链接其他仓库的Issue](#)
- [设置CI对每条Pull Request都进行构建](#)
- [Markdown文件高亮语法](#)
- [表情符](#)
- [静态与动态图片](#)
- [在GitHub Wiki中嵌入图片](#)
- [快速引用](#)
- [快速添加许可证](#)
- [任务列表](#)
- [Markdown文件中的任务列表](#)
- [相对链接](#)
- [GitHub Pages的元数据与插件支持](#)
- [查看YAML格式的元数据](#)
- [渲染表格数据](#)
- [撤销Pull Request](#)
- [Diffs](#)
- [可渲染文档的Diffs](#)
- [可变化地图](#)
- [在diff中折叠与扩展代码](#)
- [查看Pull Request的diff和patch](#)
- [渲染图像发生的变动](#)
- [Hub](#)
- [贡献者指南](#)
- [GitHub资源](#)
- [GitHub讨论](#)
- [Git](#)
- [前一个分支](#)
- [Stripspace命令](#)
- [检出Pull Requests](#)
- [提交空改动 :trollface:](#)
- [更直观的Git Status](#)
- [更直观的Git Log](#)
- [Git查询](#)
- [合并分支](#)
- [使用网页查看本地仓库](#)
- [Git配置](#)
- [Git命令自定义别名](#)
- [自动更正](#)
- [带颜色输出](#)
- [Git资源](#)
- [Git参考书籍](#)
### GitHub
### 忽略空白字符变化
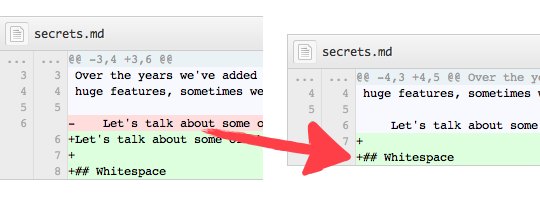
在任意diff页面的URL后加上`?w=1`,可以去掉那些只是空白字符的变化,使你能更专注于代码的变化。
[*详见 GitHub secrets.*](https://github.com/blog/967-github-secrets)
### 调整Tab字符所代表的空格数
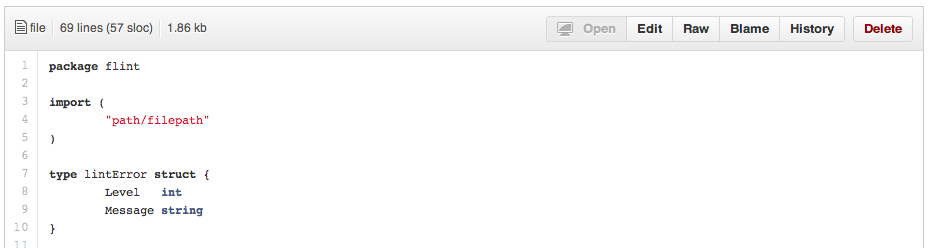
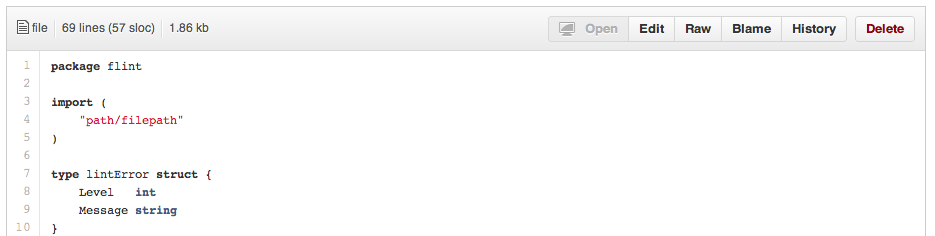
在diff或者file页面的URL后面加上`?ts=4`,这样当显示tab字符的长度时就会是4个空格的长度,不再是默认的8个空格。`ts`后面的数字还可以根据你个人的偏好进行修改。不过,这个小诀窍在Gists页面和raw file页面不起作用。
下面是我们在Go语言的source file页面URL后加`?ts=4`[前](https://github.com/pengwynn/flint/blob/master/flint/flint.go)的例子:
然后是我们添加`?ts=4`[后](https://github.com/pengwynn/flint/blob/master/flint/flint.go?ts=4)的例子:
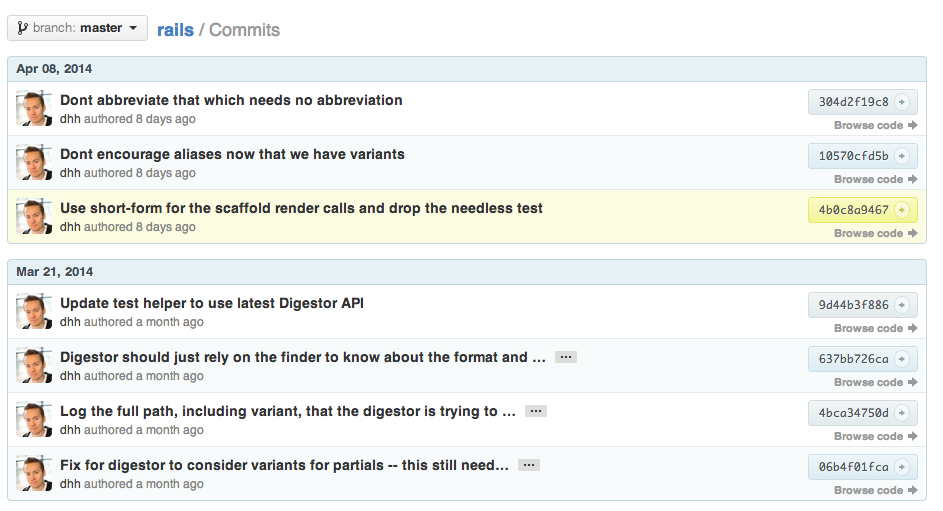
### 查看某个用户的Commit历史
查看某个用户的所有提交历史,只需在commits页面URL后加上`?author=username`。
~~~
https://github.com/rails/rails/commits/master?author=dhh
~~~
[*深入了解提交视图之间的区别*](https://help.github.com/articles/differences-between-commit-views)
### 克隆某个仓库
当我们克隆某一资源时,可以不要那个`.git`后缀。
~~~
$ git clone https://github.com/tiimgreen/github-cheat-sheet
~~~
[*更多对 Git `clone` 命令的介绍.*](http://git-scm.com/docs/git-clone)
### 分支
#### 将某个分支与其他所有分支进行对比
当你点击某个仓库的分支(Branches)选项卡时
~~~
https://github.com/{user}/{repo}/branches
~~~
你会看到一个包含所有未合并的分支的列表。
你可以在这里查看比较(Compare)页面或点击删除某个分支。
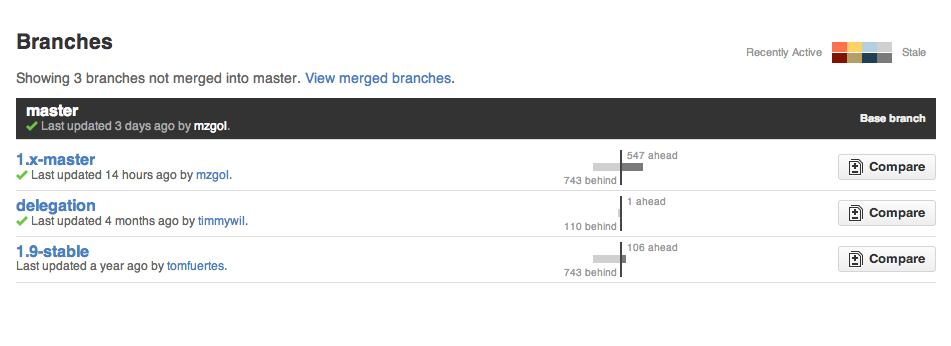
有的时候我们需要将多个分支与一个非主分支(master)进行对比,此时可以通过在URL后加入要比较的分支名来实现:
~~~
https://github.com/{user}/{repo}/branches/{branch}
~~~

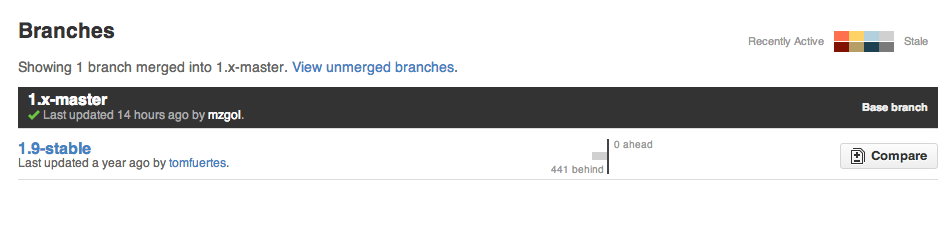
可以在URL后加上`?merged=1`来查看已经合并了的分支。
你可以使用这个界面来替代命令行直接删除分支。
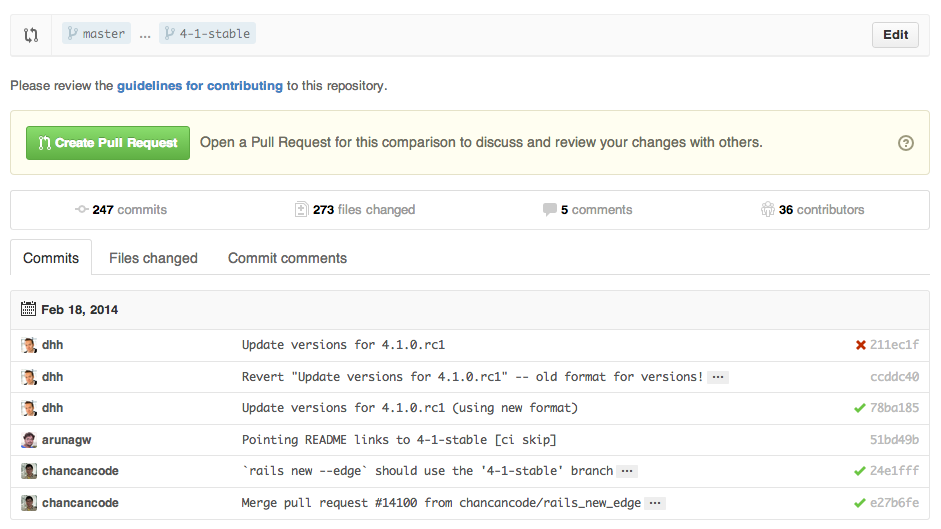
#### 比较分支
如果我们想要比较两个分支,可以像下面一样修改URL:
~~~
https://github.com/user/repo/compare/{range}
~~~
其中`{range} = master...4-1-stable`
例如:
~~~
https://github.com/rails/rails/compare/master...4-1-stable
~~~
`{range}`还可以使用下面的形式:
~~~
https://github.com/rails/rails/compare/master@{1.day.ago}...master
https://github.com/rails/rails/compare/master@{2014-10-04}...master
~~~
*日期格式 `YYYY-DD-MM`*
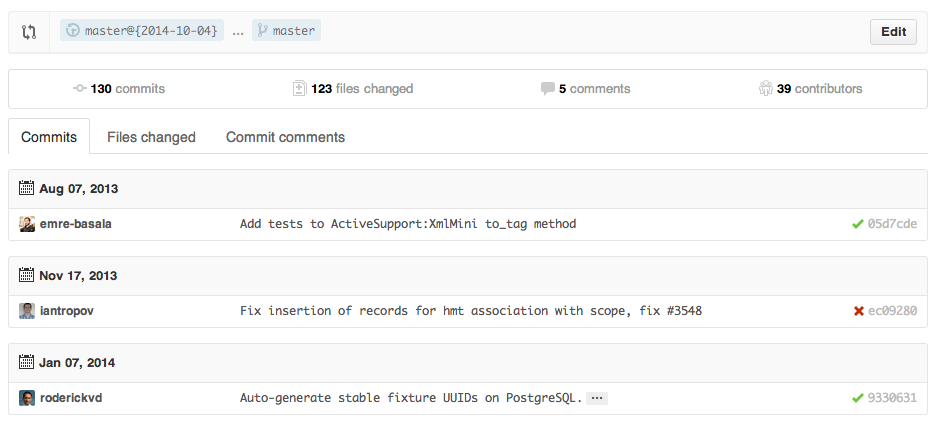
...这样你就能查看master分支上一段时间或者指定日期内的改动。
[*了解更多关于比较跨时间段的提交记录.*](https://help.github.com/articles/comparing-commits-across-time)
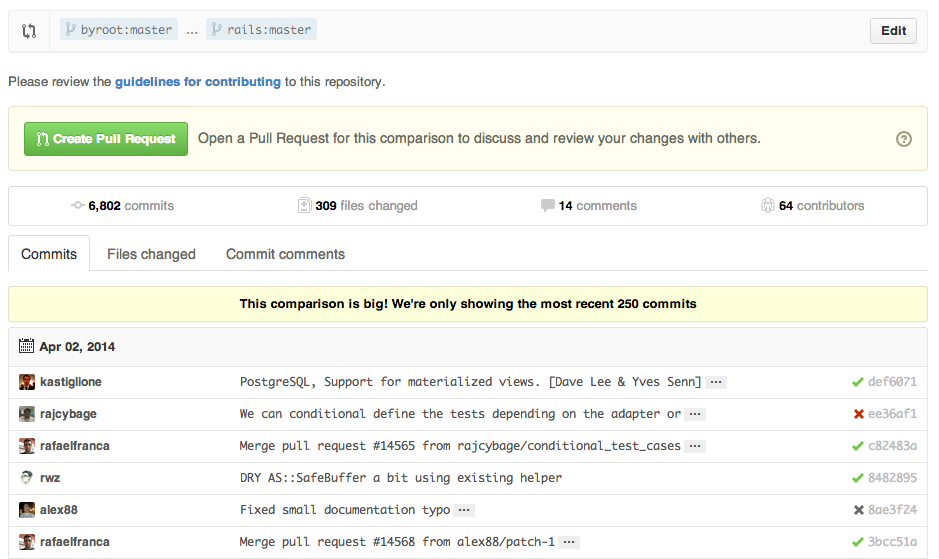
#### 比较不同派生库的分支
想要对派生仓库(Forked Repository)之间的分支进行比较,可以像下面这样修改URL实现:
~~~
https://github.com/user/repo/compare/{foreign-user}:{branch}...{own-branch}
~~~
例如:
~~~
https://github.com/rails/rails/compare/byroot:master...master
~~~
### Gists
[Gists](https://gist.github.com/) 给我们提供了一种不需要创建一个完整的仓库,使小段代码也可以工作的简单方式。

Gist的URL后加上`.pibb`,可以得到更适合嵌入到其他网站的HTML版本。
Gists还可以像任何标准仓库一样被克隆。
~~~
$ git clone https://gist.github.com/tiimgreen/10545817
~~~
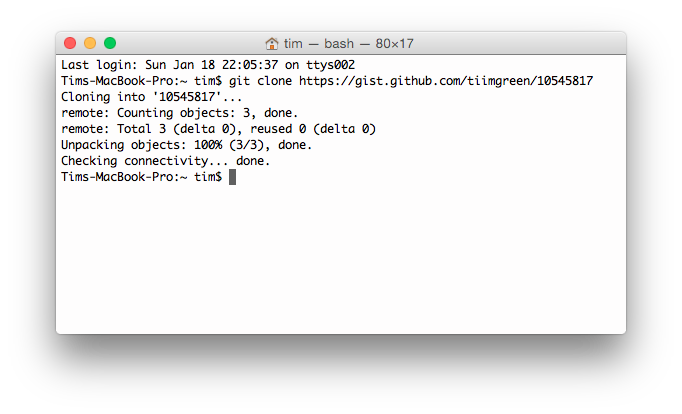
这意味着你可以像 Github 仓库一样修改和更新 Gists :
~~~
$ git commit
$ Username for 'https://gist.github.com':
$ Password for 'https://tiimgreen@gist.github.com':
~~~
[*进一步了解如何创建 gists.*](https://help.github.com/articles/creating-gists)
### Git.io
[Git.io](http://git.io)是Github的短网址服务。

你可以通过Curl命令以普通HTTP协议使用它:
~~~
$ curl -i http://git.io -F "url=https://github.com/..."
HTTP/1.1 201 Created
Location: http://git.io/abc123
$ curl -i http://git.io/abc123
HTTP/1.1 302 Found
Location: https://github.com/...
~~~
[*进一步了解 Git.io.*](https://github.com/blog/985-git-io-github-url-shortener)
### 键盘快捷键
在仓库主页上提供了快捷键方便快速导航。
- 按 `t` 键会打开一个文件浏览器。
- 按 `w` 键会打开分支选择菜单。
- 按 `s` 键会激活顶端的命令栏 (Command Bar)。
- 按 `l` 键编辑Issue列表页的标签。
- **查看文件内容时**(如:`https://github.com/tiimgreen/github-cheat-sheet/blob/master/README.md`),按 `y` 键将会冻结这个页面,这样就算代码被修改了也不会影响你当前看到的。
按`?`查看当前页面支持的快捷键列表:
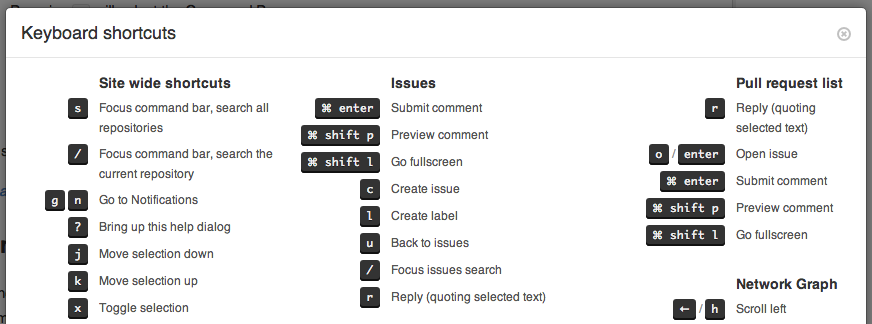
[*进一步了解如何使用 Command Bar.*](https://help.github.com/articles/using-the-command-bar)
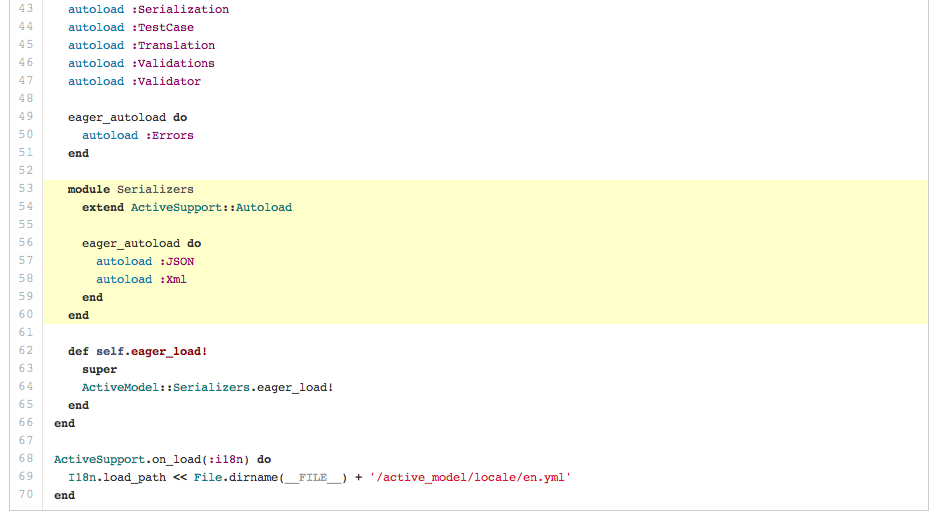
### 整行高亮
在代码文件地址后加上`#L52`或者单击行号52都会将第52行代码高亮显示。
多行高亮也可以,比如用`#L53-L60`选择范围,或者按住 `shift`键,然后再点击选择的两行。
~~~
https://github.com/rails/rails/blob/master/activemodel/lib/active_model.rb#L53-L60
~~~
### 用commit信息关闭Issue
如果某个提交修复了一个Issue,当提交到master分支时,提交信息里可以使用`fix/fixes/fixed`, `close/closes/closed` 或者 `resolve/resolves/resolved`等关键词,后面再跟上Issue号,这样就会关闭这个Issue。
~~~
$ git commit -m "Fix screwup, fixes #12"
~~~
这将会关闭Issue #12,并且在Issue讨论列表里关联引用这次提交。

[*进一步了解通过提交信息关闭Issue.*](https://help.github.com/articles/closing-issues-via-commit-messages)
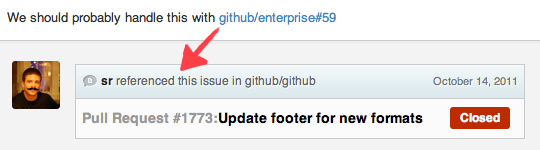
### 链接其他仓库的Issue
如果你想引用到同一个仓库中的一个Issue,只需使用井号 `#` 加上Issue号,这样就会自动创建到此Issue的链接。
要链接到其他仓库的Issue,就使用`user_name/repo_name#ISSUE_NUMBER`的方式,例如`tiimgreen/toc#12`。
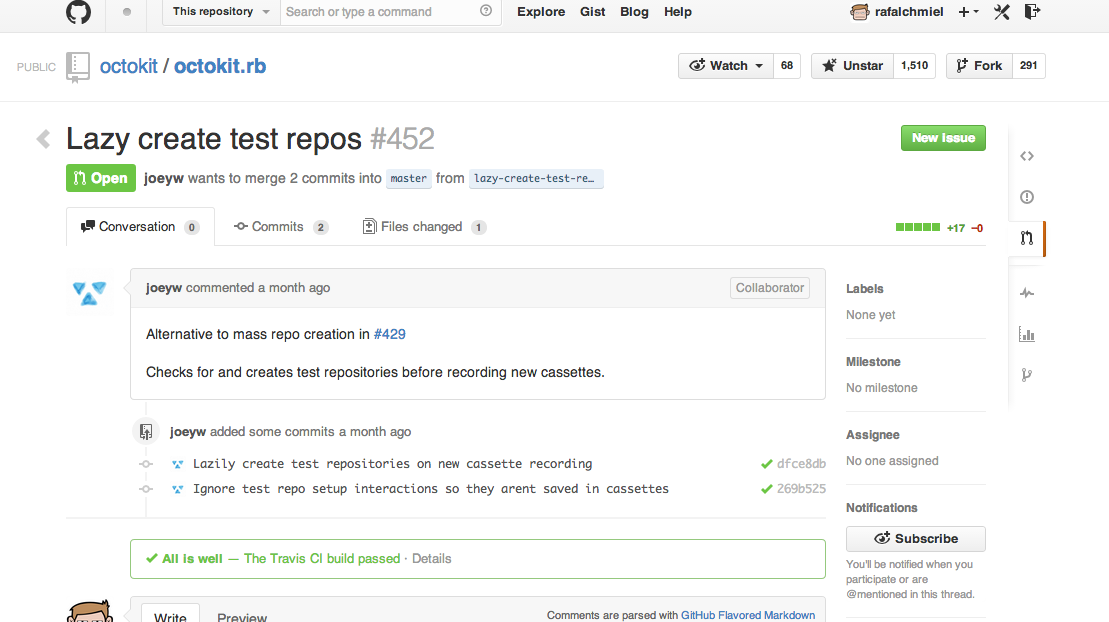
### 设置CI对每条Pull Request都进行构建
如果配置正确,[Travis CI](https://travis-ci.org/)会为每个你收到的Pull Request执行构建,就像每次提交也会触发构建一样。想了解更多关于Travis CI的信息,请看 [Travis CI入门](http://docs.travis-ci.com/user/getting-started/)。
[](https://github.com/octokit/octokit.rb/pull/452)
[*进一步了解 Commit status API.*](https://github.com/blog/1227-commit-status-api)
### Markdown文件高亮语法
例如,可以像下面这样在你的Markdown文件里为Ruby代码添加语法高亮:
~~~
```ruby
require 'tabbit'
table = Tabbit.new('Name', 'Email')
table.add_row('Tim Green', 'tiimgreen@gmail.com')
puts table.to_s
```
~~~
效果像下面这样:
~~~
require 'tabbit'
table = Tabbit.new('Name', 'Email')
table.add_row('Tim Green', 'tiimgreen@gmail.com')
puts table.to_s
~~~
Github使用 [Linguist](https://github.com/github/linguist) 做语言识别和语法高亮。你可以仔细阅读 [languages YAML file](https://github.com/github/linguist/blob/master/lib/linguist/languages.yml),了解有哪些可用的关键字。
[*进一步了解 GitHub Flavored Markdown.*](https://help.github.com/articles/github-flavored-markdown)
### 表情符
可以在Pull Requests, Issues, 提交消息, Markdown文件里加入表情符。使用方法`:name_of_emoji:`
~~~
:smile:
~~~
将输出一个笑脸:
:smile:
Github支持的完整表情符号列表详见[emoji-cheat-sheet.com](http://www.emoji-cheat-sheet.com/) 或 [scotch-io/All-Github-Emoji-Icons](https://github.com/scotch-io/All-Github-Emoji-Icons)。
Github上使用最多的5个表情符号是:
1. :shipit: - `:shipit:`
1. :sparkles: - `:sparkles:`
1. :-1: - `:-1:`
1. :+1: - `:+1:`
1. :clap: - `:clap:`
### 静态与动态图片
注释和README等文件里也可以使用图片和GIF动画:
~~~

~~~
仓库中的原始图片可以被直接调用:
~~~
/(repo)/raw/master/path/to/image.gif)
~~~

所有图片都缓存在Github,不用担心你的站点不能访问时就看不到图片了。
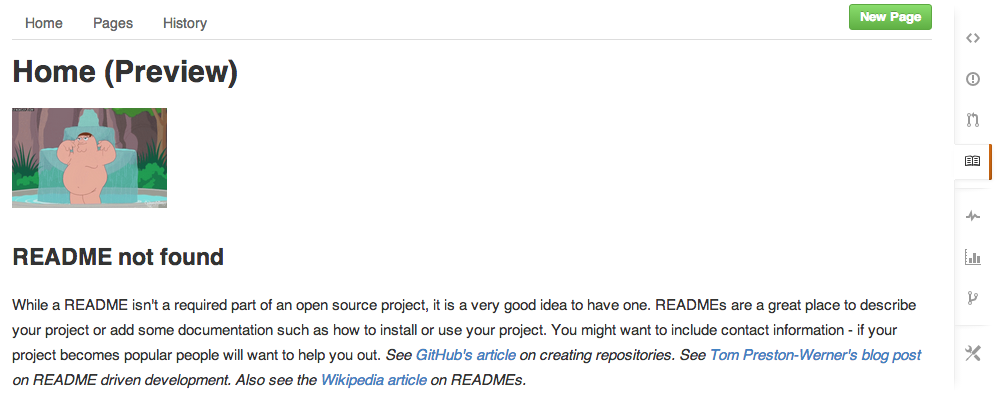
#### 在GitHub Wiki中嵌入图片
有多种方法可以在Wiki页面里嵌入图片。既可以像上一条里那样使用标准的Markdown语法,也可以像下面这样指定图片的高度或宽度:
~~~
[[ http://www.sheawong.com/wp-content/uploads/2013/08/keephatin.gif | height = 100px ]]
~~~
结果:
### 快速引用
在主题评论中引用之前某个人所说的,只需选中文本,然后按 `r`键,想要的就会以引用的形式复制到你的输入框里。
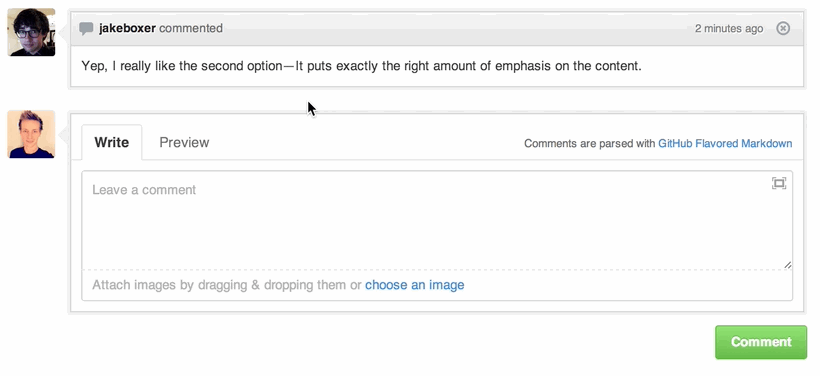
[*进一步了解快速引用.*](https://github.com/blog/1399-quick-quotes)
### 快速添加许可证
创建一个仓库时,Github会为你提供一个预置的软件许可列表:
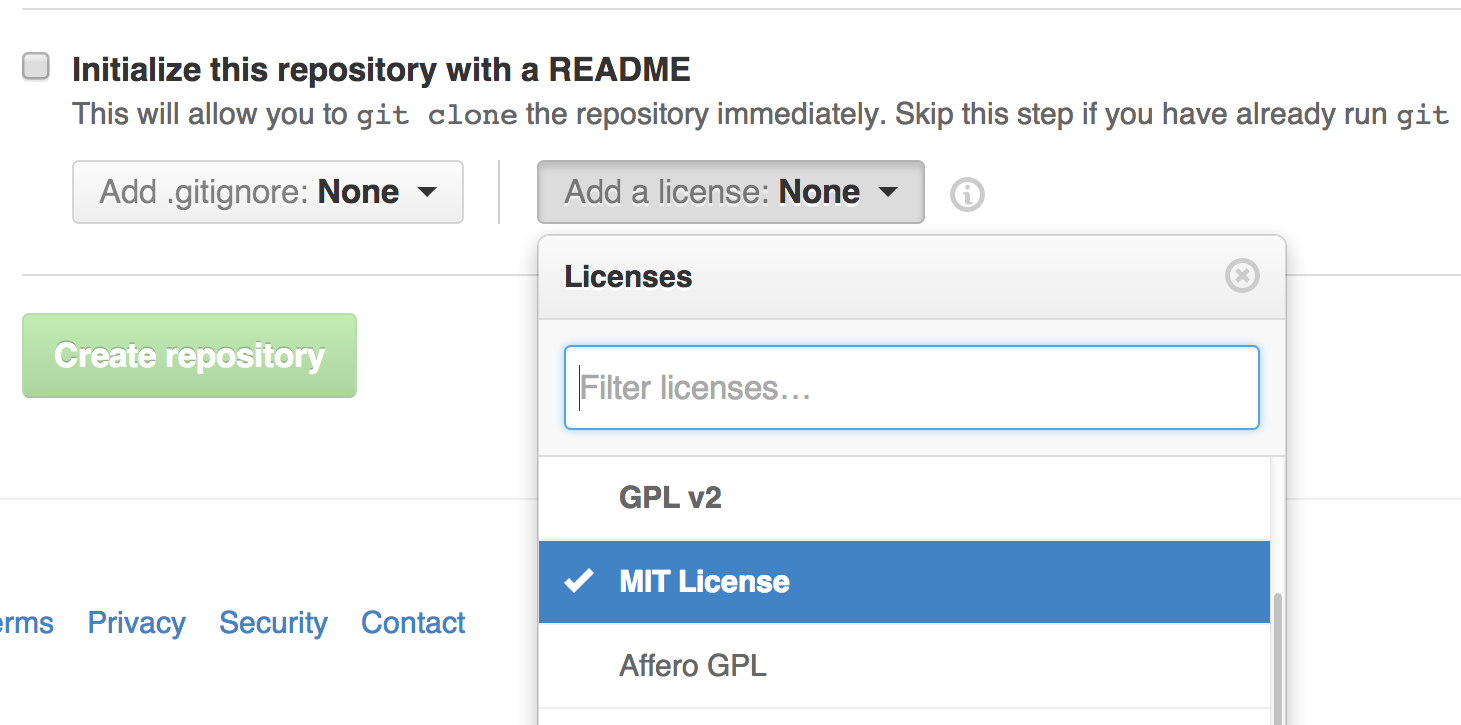
对于已有的仓库,可以通过web界面创建文件来添加软件许可。输入`LICENSE`作为文件名后,同样可以从预置的列表中选择一个作为模板。
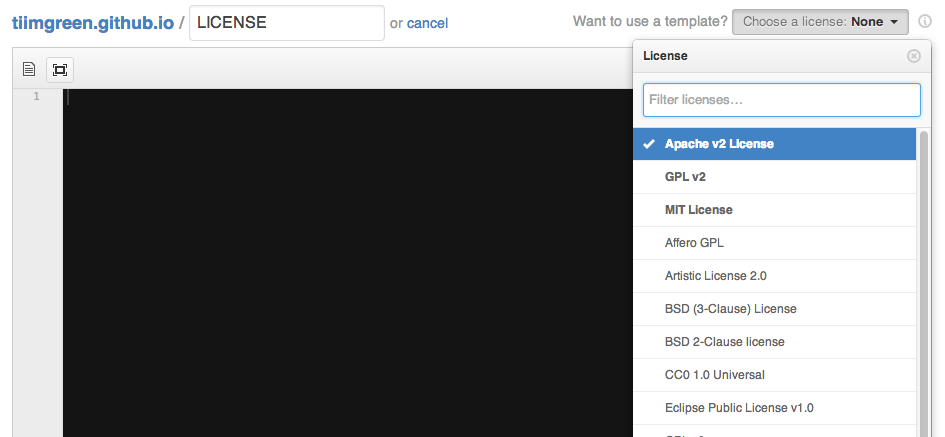
这个技巧也适用于 `.gitignore` 文件。
[*进一步了解 open source licensing.*](https://help.github.com/articles/open-source-licensing)
### 任务列表
Issues和Pull requests里可以添加复选框,语法如下(注意空白符):
~~~
- [ ] Be awesome
- [ ] Prepare dinner
- [ ] Research recipe
- [ ] Buy ingredients
- [ ] Cook recipe
- [ ] Sleep
~~~
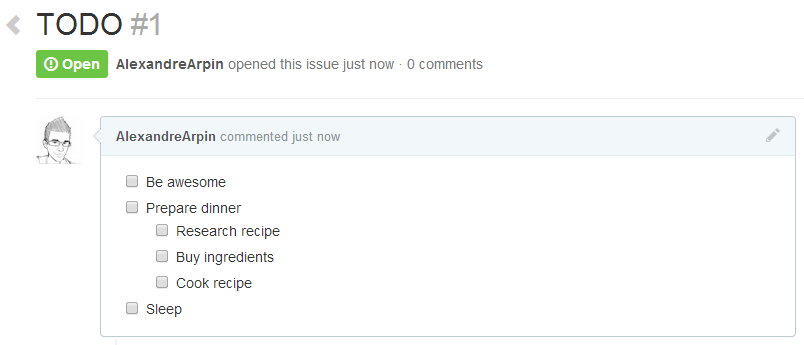
当项目被选中时,它对应的Markdown源码也被更新了:
~~~
- [x] Be awesome
- [ ] Prepare dinner
- [x] Research recipe
- [x] Buy ingredients
- [ ] Cook recipe
- [ ] Sleep
~~~
[*进一步了解任务列表.*](https://help.github.com/articles/writing-on-github#task-lists)
#### Markdown文件中的任务列表
在完全适配Markdown语法的文件中可以使用以下语法加入一个**只读**的任务列表
~~~
- [ ] Mercury
- [x] Venus
- [x] Earth
- [x] Moon
- [x] Mars
- [ ] Deimos
- [ ] Phobos
~~~
- [ ] Mercury
- [x] Venus
- [x] Earth
- [x] Moon
- [x] Mars
- [ ] Deimos
- [ ] Phobos
[*进一步了解Markdown文件中的任务列表*](https://github.com/blog/1825-task-lists-in-all-markdown-documents)
### 相对链接
Markdown文件里链接到内部内容时推荐使用相对链接。
~~~
[Link to a header](#awesome-section)
[Link to a file](docs/readme)
~~~
绝对链接会在URL改变时(例如重命名仓库、用户名改变,建立分支项目)被更新。使用相对链接能够保证你的文档不受此影响。
[*进一步了解相对链接.*](https://help.github.com/articles/relative-links-in-readmes)
### GitHub Pages的元数据与插件支持
在Jekyll页面和文章里,仓库信息可在 `site.github` 命名空间下找到,也可以显示出来,例如,使用 `{{ site.github.project_title }}`显示项目标题。
Jemoji和jekyll-mentions插件为你的Jekyll文章和页面增加了[emoji](#)和[@mentions](https://github.com/blog/821)功能。
[*了解更多 GitHub Pages的元数据和插件支持.*](https://github.com/blog/1797-repository-metadata-and-plugin-support-for-github-pages)
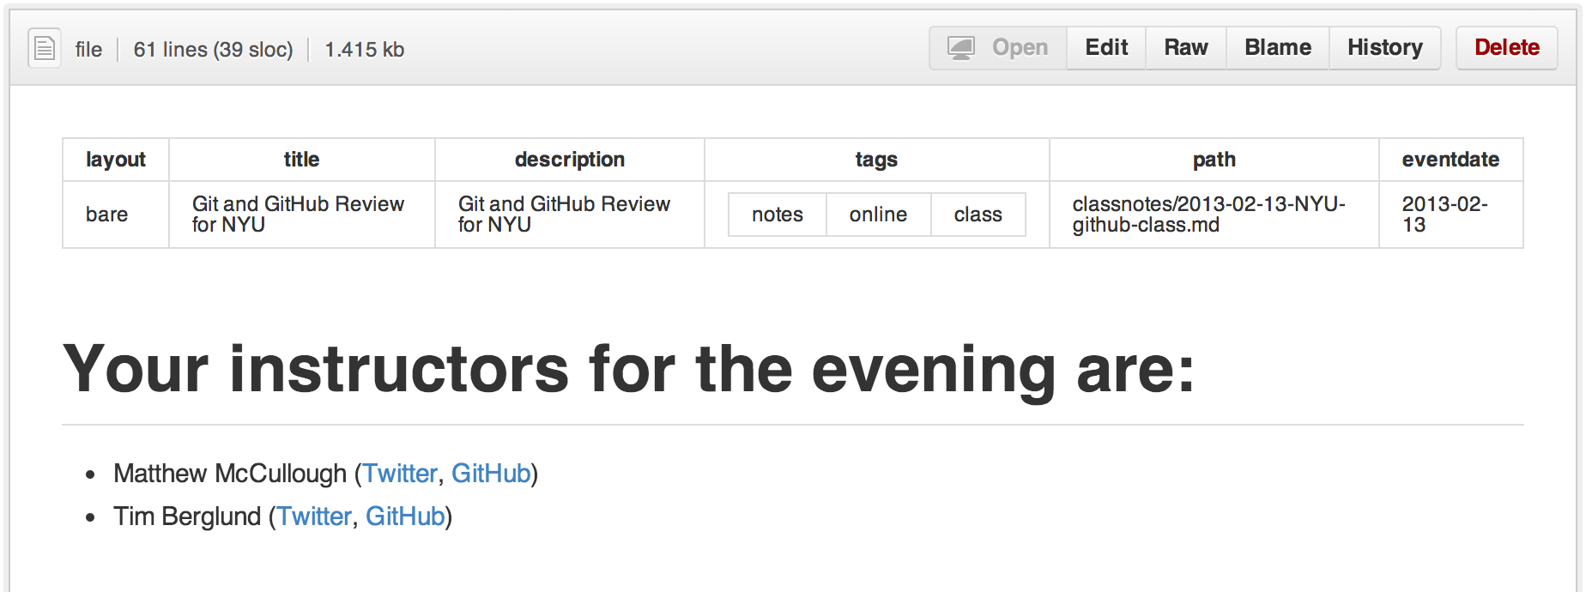
### 查看YAML格式的元数据
许多博客站点,比如基于[Jekyll](http://jekyllrb.com/)的[GitHub Pages](http://pages.github.com/),都依赖于一些文章头部的YAML格式的元数据。Github会将其渲染成一个水平表格,方便阅读。
[*进一步了解 在文档里查看YAML元数据.*](https://github.com/blog/1647-viewing-yaml-metadata-in-your-documents)
### 渲染表格数据
GitHub支持将 `.csv` (逗号分隔)和`.tsv` (制表符分隔)格式的文件渲染成表格数据。
[*进一步了解渲染表格数据.*](https://github.com/blog/1601-see-your-csvs)
### 撤销Pull Request
可以通过Pull Request中的Revert按钮来撤销一个已合并的Pull Request中的commit。按下按钮后会自动生成一个进行逆向操作的Pull Request。
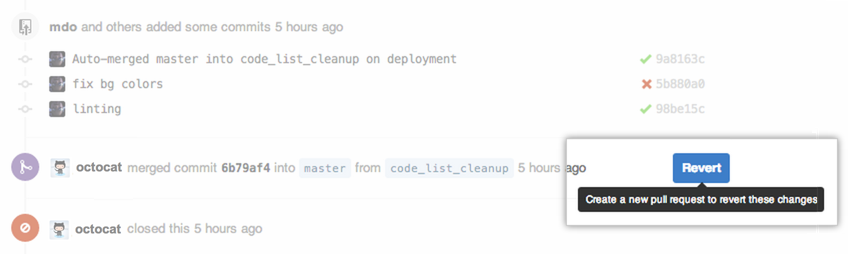
[*进一步了解“撤销”按钮](https://github.com/blog/1857-introducing-the-revert-button)
### Diffs
#### 可渲染文档的Diffs
提交和Pull Requests里包含有Github支持的可渲染文档(比如Markdown)会提供*source* 和 *rendered* 两个视图功能。

点击 "rendered" 按钮,看看改动在渲染后的显示效果。当你添加、删除或修改文本时,渲染纯文本视图非常方便。

[*进一步了解渲染纯文本视图Diffs.*](https://github.com/blog/1784-rendered-prose-diffs)
#### 可变化地图
当你在GitHub上查看一个包含地理数据的提交或pull request时,Github 将以可视化的方式对比版本之间的差异。
[](https://github.com/benbalter/congressional-districts/commit/2233c76ca5bb059582d796f053775d8859198ec5)
[*进一步了解可比较地图.*](https://github.com/blog/1772-diffable-more-customizable-maps)
#### 在diff中折叠与扩展代码
你可以通过点击diff边栏里的 *unfold* 按钮来多显示几行上下文。你可以一直点击 *unfold* 按钮直到显示了文件的全部内容。这个功能在所有GitHub产生的diff界面都可以使用。

[*进一步了解扩展Diff上下文.*](https://github.com/blog/1705-expanding-context-in-diffs)
#### 查看Pull Request的diff和patch
在Pull Request的URL后面加上 `.diff` 或 `.patch` 的扩展名就可以得到它的diff或patch文件,例如:
~~~
https://github.com/tiimgreen/github-cheat-sheet/pull/15
https://github.com/tiimgreen/github-cheat-sheet/pull/15.diff
https://github.com/tiimgreen/github-cheat-sheet/pull/15.patch
~~~
`.diff` 扩展会使用普通文本格式显示如下内容:
~~~
diff --git a/README.md b/README.md
index 88fcf69..8614873 100644
--- a/README.md
+++ b/README.md
@@ -28,6 +28,7 @@ All the hidden and not hidden features of Git and GitHub. This cheat sheet was i
- [Merged Branches](#merged-branches)
- [Quick Licensing](#quick-licensing)
- [TODO Lists](#todo-lists)
+- [Relative Links](#relative-links)
- [.gitconfig Recommendations](#gitconfig-recommendations)
- [Aliases](#aliases)
- [Auto-correct](#auto-correct)
@@ -381,6 +382,19 @@ When they are clicked, they will be updated in the pure Markdown:
- [ ] Sleep
(...)
~~~
#### 渲染图像发生的变动
GitHub可以显示包括PNG、JPG、GIF、PSD在内的多种图片格式并提供了几种方式来比较这些格式的图片文件版本间的不同。
[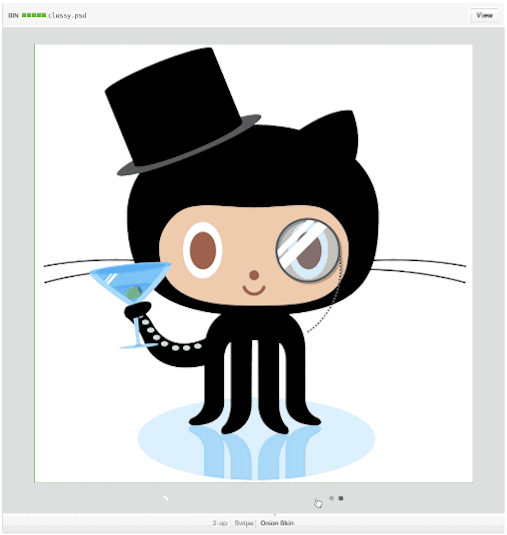](https://github.com/blog/1845-psd-viewing-diffing)
[*查看更多关于渲染图像变动的内容*](https://help.github.com/articles/rendering-and-diffing-images)
### Hub
[Hub](https://github.com/github/hub)是一个对Git进行了封装的命令行工具,可以帮助你更方便的使用Github。
这使得你可以像下面这样进行克隆:
~~~
$ hub clone tiimgreen/toc
~~~
[*查看更多Hub提供的超酷命令.*](https://github.com/github/hub#commands)
### 贡献者指南
在你的仓库的根目录添加一个名为 `CONTRIBUTING` 的文件后,贡献者在新建Issue或Pull Request时会看到这个文件的链接。
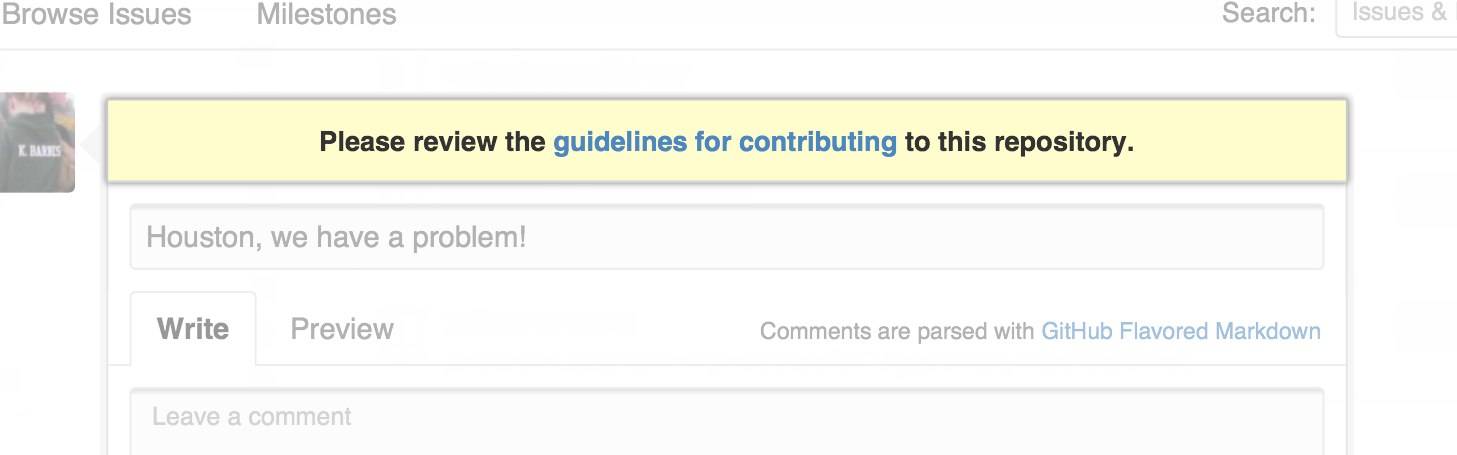
[*进一步了解贡献者指南.*](https://github.com/blog/1184-contributing-guidelines)
### GitHub资源
| Title | Link |
|-----|-----|
| GitHub Explore | [https://github.com/explore](https://github.com/explore) |
| GitHub Blog | [https://github.com/blog](https://github.com/blog) |
| GitHub Help | [https://help.github.com/](https://help.github.com/) |
| GitHub Training | [http://training.github.com/](http://training.github.com/) |
| GitHub Developer | [https://developer.github.com/](https://developer.github.com/) |
#### GitHub讨论
| Title | Link |
|-----|-----|
| How GitHub Uses GitHub to Build GitHub | [https://www.youtube.com/watch?v=qyz3jkOBbQY](https://www.youtube.com/watch?v=qyz3jkOBbQY) |
| Introduction to Git with Scott Chacon of GitHub | [https://www.youtube.com/watch?v=ZDR433b0HJY](https://www.youtube.com/watch?v=ZDR433b0HJY) |
| How GitHub No Longer Works | [https://www.youtube.com/watch?v=gXD1ITW7iZI](https://www.youtube.com/watch?v=gXD1ITW7iZI) |
| Git and GitHub Secrets | [https://www.youtube.com/watch?v=Foz9yvMkvlA](https://www.youtube.com/watch?v=Foz9yvMkvlA) |
| More Git and GitHub Secrets | [https://www.youtube.com/watch?v=p50xsL-iVgU](https://www.youtube.com/watch?v=p50xsL-iVgU) |
### Git
### 前一个分支
快速检出上一个分支:
~~~
$ git checkout -
# Switched to branch 'master'
$ git checkout -
# Switched to branch 'next'
$ git checkout -
# Switched to branch 'master'
~~~
[*进一步了解 Git 分支.*](http://git-scm.com/book/en/Git-Branching-Basic-Branching-and-Merging)
### Stripspace命令
Git Stripspace命令可以:
- 去掉行尾空白符
- 多个空行压缩成一行
- 必要时在文件末尾增加一个空行
使用此命令时必须传入一个文件,像这样:
~~~
$ git stripspace < README.md
~~~
[*进一步了解 Git `stripspace` 命令.*](http://git-scm.com/docs/git-stripspace)
### 检出Pull Requests
Pull Request是一种GitHub上可以通过以下多种方式在本地被检索的特别分支:
检索某个分支并临时储存在本地的`FETCH_HEAD`中以便快速查看更改(diff)以及合并(merge):
~~~
$ git fetch origin refs/pull/[PR-Number]/head
~~~
通过refspec获取所有的Pull Request为本地分支:
~~~
$ git fetch origin '+refs/pull/*/head:refs/remotes/origin/pr/*'
~~~
或在仓库的`.git/config`中加入下列设置来自动获取远程仓库中的Pull Request
~~~
[remote "origin"]
fetch = +refs/heads/*:refs/remotes/origin/*
url = git@github.com:tiimgreen/github-cheat-sheet.git
~~~
~~~
[remote "origin"]
fetch = +refs/heads/*:refs/remotes/origin/*
url = git@github.com:tiimgreen/github-cheat-sheet.git
fetch = +refs/pull/*/head:refs/remotes/origin/pr/*
~~~
对基于派生库的Pull Request,可以通过先`checkout`代表此Pull Request的远端分支再由此分支建立一个本地分支:
~~~
$ git checkout pr/42 pr-42
~~~
操作多个仓库的时候,可以在Git中设置获取Pull Request的全局选项。
~~~
git config --global --add remote.origin.fetch "+refs/pull/*/head:refs/remotes/origin/pr/*"
~~~
此时可以在任意仓库中使用以下命令:
~~~
git fetch origin
~~~
~~~
git checkout pr/42
~~~
[*进一步了解如何检出pull request到本地.*](https://help.github.com/articles/checking-out-pull-requests-locally)
### 提交空改动 :trollface:
可以使用`--allow-empty`选项强制创建一个没有任何改动的提交:
~~~
$ git commit -m "Big-ass commit" --allow-empty
~~~
这样做在如下几种情况下是有意义的:
- 标记新的工作或一个新功能的开始。
- 记录对项目的跟代码无关的改动。
- 跟使用你仓库的其他人交流。
- 作为仓库的第一次提交,因为第一次提交后不能被rebase: `git commit -m "init repo" --allow-empty`.
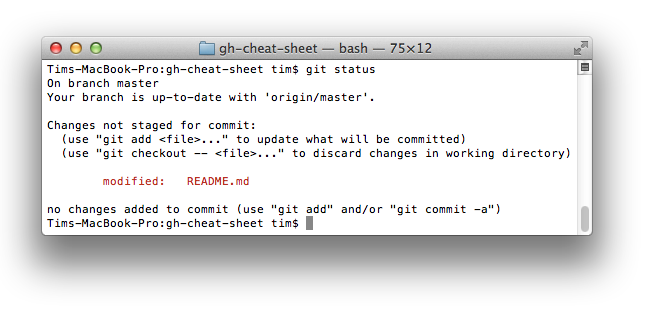
### 更直观的Git Status
在命令行输入如下命令:
~~~
$ git status
~~~
可以看到:
加上`-sb`选项:
~~~
$ git status -sb
~~~
这会得到:
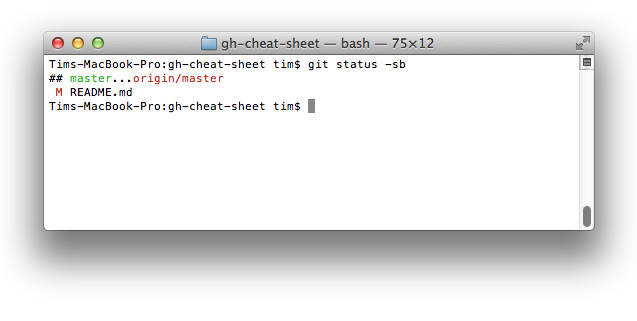
[*进一步了解 Git `status` 命令.*](http://git-scm.com/docs/git-status)
### 更直观的Git Log
输入如下命令:
~~~
$ git log --all --graph --pretty=format:'%Cred%h%Creset -%C(yellow)%d%Creset %s %Cgreen(%cr) %C(bold blue)<%an>%Creset' --abbrev-commit --date=relative
~~~
可以看到:

这要归功于[Palesz](http://stackoverflow.com/users/88355/palesz)在stackoverflow的回答。
*这个命令可以被用作别名,详细做法见[这里](https://github.com/tiimgreen/github-cheat-sheet#aliases)。*
[*进一步了解 Git `log` 命令.*](http://git-scm.com/docs/git-log)
### Git查询
Git查询运行你在之前的所有提交信息里进行搜索,找到其中和搜索条件相匹配的最近的一条。
~~~
$ git show :/query
~~~
这里 `query` (区别大小写)是你想要搜索的词语, 这条命令会找到包含这个词语的最后那个提交并显示变动详情。
~~~
$ git show :/typo
~~~

- 按 `q` 键退出命令。*
### 合并分支
输入命令:
~~~
$ git branch --merged
~~~
这会显示所有已经合并到你当前分支的分支列表。
相反地:
~~~
$ git branch --no-merged
~~~
会显示所有还没有合并到你当前分支的分支列表。
[*进一步了解 Git `branch` 命令.*](http://git-scm.com/docs/git-branch)
### 使用网页查看本地仓库
使用Git的 `instaweb` 可以立即在 `gitweb`中浏览你的工作仓库。这个命令是个简单的脚本,配置了`gitweb`和用来浏览本地仓库的Web服务器。*(译者注:默认需要lighttpd支持)*
~~~
$ git instaweb
~~~
执行后打开:
[*进一步了解 Git `instaweb` 命令.*](http://git-scm.com/docs/git-instaweb)
### Git配置
所有Git配置都保存在你的`.gitconfig` 文件中。
#### Git命令自定义别名
别名用来帮助你定义自己的git命令。比如你可以定义 `git a` 来运行 `git add --all`。
要添加一个别名, 一种方法是打开 `~/.gitconfig` 文件并添加如下内容:
~~~
[alias]
co = checkout
cm = commit
p = push
# Show verbose output about tags, branches or remotes
tags = tag -l
branches = branch -a
remotes = remote -v
~~~
...或者在命令行里键入:
~~~
$ git config --global alias.new_alias git_function
~~~
例如:
~~~
$ git config --global alias.cm commit
~~~
指向多个命令的别名可以用引号来定义:
~~~
$ git config --global alias.ac 'add -A . && commit'
~~~
下面列出了一些有用的别名:
| 别名 Alias | 命令 Command | 如何设置 What to Type |
|-----|-----|-----|
| `git cm` | `git commit` | `git config --global alias.cm commit` |
| `git co` | `git checkout` | `git config --global alias.co checkout` |
| `git ac` | `git add . -A``git commit` | `git config --global alias.ac '!git add -A && git commit'` |
| `git st` | `git status -sb` | `git config --global alias.st 'status -sb'` |
| `git tags` | `git tag -l` | `git config --global alias.tags 'tag -l'` |
| `git branches` | `git branch -a` | `git config --global alias.branches 'branch -a'` |
| `git remotes` | `git remote -v` | `git config --global alias.remotes 'remote -v'` |
| `git lg` | `git log --color --graph --pretty=format:'%Cred%h%Creset -%C(yellow)%d%Creset %s %Cgreen(%cr) %C(bold blue)<%an>%Creset' --abbrev-commit --` | `git config --global alias.lg "log --color --graph --pretty=format:'%Cred%h%Creset -%C(yellow)%d%Creset %s %Cgreen(%cr) %C(bold blue)<%an>%Creset' --abbrev-commit --"` |
#### 自动更正
如果键入 `git comit` 你会看到如下输出:
~~~
$ git comit -m "Message"
# git: 'comit' is not a git command. See 'git --help'.
# Did you mean this?
# commit
~~~
为了在键入 `comit` 调用 `commit`命令,只需启用自动纠错功能:
~~~
$ git config --global help.autocorrect 1
~~~
现在你就会看到:
~~~
$ git comit -m "Message"
# WARNING: You called a Git command named 'comit', which does not exist.
# Continuing under the assumption that you meant 'commit'
# in 0.1 seconds automatically...
~~~
#### 带颜色输出
要在你的Git命令输出里加上颜色的话,可以用如下命令:
~~~
$ git config --global color.ui 1
~~~
[*进一步了解 Git `config` 命令.*](http://git-scm.com/docs/git-config)
### Git资源
| Title | Link |
|-----|-----|
| Official Git Site | [http://git-scm.com/](http://git-scm.com/) |
| Official Git Video Tutorials | [http://git-scm.com/videos](http://git-scm.com/videos) |
| Code School Try Git | [http://try.github.com/](http://try.github.com/) |
| Introductory Reference & Tutorial for Git | [http://gitref.org/](http://gitref.org/) |
| Official Git Tutorial | [http://git-scm.com/docs/gittutorial](http://git-scm.com/docs/gittutorial) |
| Everyday Git | [http://git-scm.com/docs/everyday](http://git-scm.com/docs/everyday) |
| Git Immersion | [http://gitimmersion.com/](http://gitimmersion.com/) |
| Ry's Git Tutorial | [http://rypress.com/tutorials/git/index.html](http://rypress.com/tutorials/git/index.html) |
| Git for Designer | [http://hoth.entp.com/output/git_for_designers.html](http://hoth.entp.com/output/git_for_designers.html) |
| Git for Computer Scientists | [http://eagain.net/articles/git-for-computer-scientists/](http://eagain.net/articles/git-for-computer-scientists/) |
| Git Magic | [http://www-cs-students.stanford.edu/~blynn/gitmagic/](http://www-cs-students.stanford.edu/~blynn/gitmagic/) |
#### Git参考书籍
| Title | Link |
|-----|-----|
| Pragmatic Version Control Using Git | [http://www.pragprog.com/titles/tsgit/pragmatic-version-control-using-git](http://www.pragprog.com/titles/tsgit/pragmatic-version-control-using-git) |
| Pro Git | [http://git-scm.com/book](http://git-scm.com/book) |
| Git Internals Peepcode | [http://peepcode.com/products/git-internals-pdf](http://peepcode.com/products/git-internals-pdf) |
| Git in the Trenches | [http://cbx33.github.com/gitt/](http://cbx33.github.com/gitt/) |
| Version Control with Git | [http://www.amazon.com/Version-Control-Git-collaborative-development/dp/1449316387](http://www.amazon.com/Version-Control-Git-collaborative-development/dp/1449316387) |
| Pragmatic Guide to Git | [http://www.pragprog.com/titles/pg_git/pragmatic-guide-to-git](http://www.pragprog.com/titles/pg_git/pragmatic-guide-to-git) |
| Git: Version Control for Everyone | [http://www.packtpub.com/git-version-control-for-everyone/book](http://www.packtpub.com/git-version-control-for-everyone/book) |
15分钟学会使用Git和远程代码库
最后更新于:2022-04-01 15:26:30
# 15分钟学会使用Git和远程代码库
### 工作步骤
- 创建一个远程的空代码库(在BitBucket上)
- 在本地代码库添加一个项目
- 在分支上开发新功能
- a) 保留新功能 或者 b) 丢弃它们
- 也许,回到某个早先的时间点
- 将本地代码库推送到远程代码库
- 在另一台机器上取得远程代码库
### 参考资料
- [15分钟学会使用Git和远程代码库](http://blog.jobbole.com/53573/)
git进阶
最后更新于:2022-04-01 15:26:28
[15分钟学会使用Git和远程代码库](getting-start.md)
[GitHub秘籍](github-cheat-sheet.md)
使用Trello管理项目的经验
最后更新于:2022-04-01 15:26:25
# 使用Trello管理项目的经验
### 参考资料
- [使用Trello实现敏捷项目管理](http://www.infoq.com/cn/news/2012/05/trello-project-management)
- [用 Trello 做项目管理](http://www.jianshu.com/p/dd980d1ee947)
Trello
最后更新于:2022-04-01 15:26:23
# Trello
Trello由Joel Spolsky创建的Fog Creek公司开发,是一种在线的看板式管理应用程序,从创建以来一直不断改进,已经有多家公司开始使用它来管理敏捷项目。
Sketch中文学习资料
最后更新于:2022-04-01 15:26:21
本项目派生自 [github.com/diessica/awesome-sketch](https://github.com/diessica/awesome-sketch) 并进行中文化,同时适当增加了一些内容。欢迎派生并提交合并请求来完善此文档。谢谢!
# awesome Sketch
> 你是否知道 [**Sketch 3**](http://bohemiancoding.com/sketch/) 正在成为最好的 UI/UX 设计工具? 好吧... 那你知道多少?
这是一份为想学 Sketch 的设计师、前端工程师们准备的不完全列表,包含了 Sketch 视频、文章、手册等。
-
视频
- **[Sketch 3 教程](https://www.youtube.com/playlist?list=PLLnpHn493BHE6UIsdKYlS5zu-ZYvx22CS)** (19 *惊赞* 课程)
- [LearnSketch 频道](https://www.youtube.com/user/learnsketch/videos)
- [一步一步学 Sketch 3 for iOS 程序设计](https://www.youtube.com/watch?v=6SyFaRNVuUA)
-
手册
- [Sketch 快捷键英文版](http://sketchshortcuts.com/) / [中文版](http://ss.tto.me/)
- [官方文档](http://www.bohemiancoding.com/sketch/support/documentation/) / [中文版](http://sketchcn.com/sketch-chinese-user-manual.html)
-
文章
- [Fireworks vs. Sketch](http://unitid.nl/english/spot-the-difference-fireworks-and-sketch-3)
- [Supercharge your Workflow in Sketch](https://medium.com/@bazdeas/supercharge-your-workflow-in-sketch-ebc9e5274845)
- [Sketch for Beginners: Design a Login Form Interface](http://webdesign.tutsplus.com/tutorials/sketch-for-beginners-design-a-login-form-interface--cms-21534)
- [The A to Z of Sketch](http://webdesign.tutsplus.com/articles/the-a-to-z-of-sketch--cms-22030)
- [7 Tips for Sketch Users](https://medium.com/design-idea/7-tips-for-sketch-users-e09c27c7ce08)
- [9 Sketch Features You Should be Using](http://webdesign.tutsplus.com/tutorials/9-sketch-features-you-should-be-using--webdesign-18016)
- [Mastering the Bézier Curve in Sketch](https://medium.com/sketch-app/mastering-the-bezier-curve-in-sketch-4da8fdf0dbbb)
- [10 Tips & Tricks for Sketch](http://saloon.io/10-tips-tricks-for-sketch/)
- [Typography in Sketch 3: Linked Text Styles](https://medium.com/@ericajaclyn/typography-in-sketch-3-linked-text-styles-9946a32af688)
- [11 tips for prototyping with Sketch](http://blog.invisionapp.com/11-tips-for-prototyping-with-sketch/)
-
社区
- [TeamSketch](http://teamsketch.io/), 基于 Slack 的 Sketch 交流社区
- [Sketch 中文用户讨论组](http://sketchcn.tto.me/), 基于 Slack 的交流社区
- [Google+ 群组](https://plus.google.com/communities/105292892811319179094)
- [Facebook 群组](https://www.facebook.com/groups/sketchformac/)
- [位于 Reddit](http://www.reddit.com/r/sketchapp)
- [SketchTalk](http://sketchtalk.io/), 非官方论坛
- [Sketch 中文网](http://sketchcn.com/index.html)
-
其它
- (邮件列表) [Sketch 官方邮件列表](https://bohemian.curated.co/)
- (邮件列表) [Sketch tricks](http://sketchtricks.com/)
- (Screencast) [SketchCasts](http://www.sketchcasts.net/)
- (资源) [SketchApp Resources](http://www.sketchappsources.com/)
- (资源) [SketchLand](http://sketch.land)
- (资源) [SketchResources](http://sketchresources.com/)
- [SketchTips](http://www.sketchtips.info/), 一个关于 Sketch 的博客
- [Medium 上的 sketch-tricks](https://medium.com/sketch-tricks)
-
插件
> 插件管理器 [Sketch Toolbox](http://sketchtoolbox.com/) 强烈推荐.
- 必不可少的插件
- [Content Generator:内容自动生成工具](https://github.com/timuric/Content-generator-sketch-plugin)
- [RenameIt:改名工具](https://github.com/rodi01/RenameIt)
- [Sketch Measure:测量工具](https://github.com/utom/sketch-measure)
- [Style Inventory: 样式清单](https://github.com/getflourish/Sketch-Style-Inventory/)
- [Dynamic Button:可调整按钮](https://github.com/ddwht/sketch-dynamic-button)
- [Page Switch:页面切换](https://github.com/mauehara/sketch-page-switch)
- 哪里可以得到更多
- [SketchApp Resources: Plugins for Sketch](http://www.sketchappsources.com/plugins-for-sketch.html)
- [Sketch Plugin Directory](https://github.com/sketchplugins/plugin-directory)
- [SketchPlugins mailing list](http://sketchplugins.com/)
- [Awesome Sketch Plugins](http://awesome-sket.ch/)
Sketch
最后更新于:2022-04-01 15:26:18
[Sketch中文学习资料](Awesome-Sketch.md)
tmux
最后更新于:2022-04-01 15:26:16
# tmux
tmux是指通过一个终端登录远程主机并运行后,在其中可以开启多个控制台而的终端复用软件。使用了tmux,你就可以在一个终端中同时运行多个会话,只需开启一个终端。
### 为什么使用tmux
如果只是分隔屏幕,配色的变化,其实客户端item2以及screen就已经很好了。那我们为什么要使用tmux呢?
为什么使用tmux:
- 保持会话: 断开ssh或关闭电脑,你的ssh可以重新连接,能够保持你的工作环境连续性。前提实在服务器端装上tumx
使用tmux会话的分离与连接就可以轻松解决以上问题,分离(detach)可以使终端会话在后台运行,连接(attach)可以重新打开在后台运行的会话,也可以多个终端连接同一会话。
### 安装
### Mac
`brew install tmux`即可
### Linux
`yum install tmux`类似命令即可
### Windows
Windows下可以使用cygwin来安装 cygwin,cygwin是图形安装界面,请确保在 Select Packages 界面出现时,选中 tmux 即可。
### tmux的基本概念
启动之后,可以看到命令行最底部多了一条绿色的状态条,上面显示了一些信息,比如计算机名和时间等。
### Session(会话)
一组窗口的集合,通常用来概括同一个任务。session可以有自己的名字便于任务之间的切换。
### Window(窗口)
单个可见窗口。Windows有自己的编号,也可以认为和ITerm2中的Tab类似。
当你新建一个会话的时候,tmux 已经自动给你在新会话中自动创建了一个窗口(Window),窗口的编号从`0`开始,名称则默认为当前工作目录或者当前运行的程序,都显示在下方的状态条中。如下图所示,我将工作目录切换到了`~/Documents`,窗口`0`的名称也随之变换。
### Pane(窗格)
tmux 下可以有多个会话,会话下又可以有多个窗口,那么同样,窗口下还可以有多个窗格, 一个窗口可以切分成多个窗格,主要的切分方法有两种,垂直切分和水平切分。
### tmux的基本操作
前置操作(`Prefix-Command`),所有下面介绍的快捷键,都必须以前置操作开始。tmux默认的前置操作是`CTRL+b`。
### 会话相关
- 新建会话(create): `tmux new-session -s <会话名称>` or `tmux new -s <会话名称>`
- 分离会话(detach): `prefix d`,退出tmux但是不关闭掉进程,方便下次进入
- 连接会话(attach): `tmux attach -t <目标会话名>` or `tmux a -t <目标会话名>`, 被分离的会话,还可以重新连接上
- `tmux ls`: 列出所有的会话
- `prefix $`: 重命名当前会话
### 窗口相关
- `tmux new -n <窗口名>`: 创建会话的时候附上 `-n` 参数,来给窗口制定一个名称
- 新建窗口: `prefix c`
- 上一个窗口(previous): `prefix p`
- 下一个窗口(next): `prefix n`
- 切换到上一个活动的窗口: `prefix space`
- 使用窗口号切换: `prefix 窗口号`
- 窗口列表: `prefix w`
- 关闭一个窗口: `prefix &`
- 更改窗口名称: `prefix ,`
### 窗格相关
- 查看所有窗格的编号: `prefix q`
- 垂直切分(把窗口垂直切分成左右两等分):`prefix %`
- 水平切分(把窗口水平切分成上下两等分):`prefix "`
- 窗格切换: `prefix o`
- 按制定方向切换窗格: `prefix 方向键`
- 更改窗格布局: `prefix 空格`, 可以在这五个默认的窗格布局之中轮流切换:
- 水平平分(even-horizontal)
- 垂直平分(even-vertical)
- 主窗格最大化,其他窗格水平平分(main-horizontal)
- 主窗格最大化,其他窗格垂直平分(main-vertical)
- 平铺,窗格均等分(tiled)
### 参考资料
- [Tmux - Linux从业者必备利器](http://cenalulu.github.io/linux/tmux/)
- [图灵: tmux入门](http://www.ituring.com.cn/minibook/10707)
WebStorm
最后更新于:2022-04-01 15:26:14
# WebStorm
刚接触Web开发的时候使用过一段时间的WebStorm,它还是比较适合管理大型项目的。但是由于工作中小型项目占据多数,后来还是选择了sublimeText3作为主力开发工具,配合常用的插件以及gulp工具,效率也还是妥妥的。但是每当需要阅读源代码的时候,还是会发现文本编辑器的缺点,确实不直观。索性最近又购买了一个Licensing,购买地址: [Licensing & Renew](http://www.jetbrains.com/webstorm/buy/)。
### 下载安装
任何软件优选还是官方途径,地址:[webstorm](https://www.jetbrains.com/webstorm/)。使用 `OS X 10 Yosemite`的用户,还可以选择绑定了`JDK 1.8`的版本。据说性能更好,但是有一些issues。
### 设置配置
如果之前有配置文件的话,再初次打开的时候可以设置,恢复之前的配置,如果没有,就选择默认配置。以后的配置文件,还是建议通过dotfiles保存起来,方便同步。
### 常规设置
进入WebStorm之后,我首先会设置的是配色和字体。当然,配色是可以在之前的时候设置的,如果没有,这里也可以修改。打开`Preference`,选择`Editor->Colors & Fonts`, 另存为一个配色文件,然后修改。
### 设置相关
### 参考资料
- [快捷键PDF:WebStorm_ReferenceCard](http://www.jetbrains.com/webstorm/documentation/WebStorm_ReferenceCard.pdf)
Emacs
最后更新于:2022-04-01 15:26:12
# Emacs
### 参考资料
- [一年成为Emacs高手(像神一样使用编辑器)](https://github.com/redguardtoo/mastering-emacs-in-one-year-guide/blob/master/guide-zh.org)
字体的选择
最后更新于:2022-04-01 15:26:09
# 字体的选择
编程的字体,最好选择的是等宽,这样代码看起来比较规整。
### 参考资料
- [最佳编程字体:M+](http://blog.jobbole.com/73327/)
gulp
最后更新于:2022-04-01 15:26:07
# Gulp
前端自动化流程管理。在JavaScript的世界里,Grunt.js是基于Node.js的自动化任务运行器。2013年02月18日,Grunt v0.4.0 发布。Fractal公司积极参与了数个流行Node.js模块的开发,它去年发布了一个新的构建系统Gulp,希望能够取其精华,并取代Grunt,成为最流行的JavaScript任务运行器。
### Gulp和Grunt的异同点
- 易于使用:采用代码优于配置策略,Gulp让简单的事情继续简单,复杂的任务变得可管理。
- 高效:通过利用Node.js强大的流,不需要往磁盘写中间文件,可以更快地完成构建。
- 高质量:Gulp严格的插件指导方针,确保插件简单并且按你期望的方式工作。
- 易于学习:通过把API降到最少,你能在很短的时间内学会Gulp。构建工作就像你设想的一样:是一系列流管道。
### Gulp特点
- **易用**:Gulp相比Grunt更简洁,而且遵循代码优于配置策略,维护Gulp更像是写代码。
- **高效**:Gulp相比Grunt更有设计感,核心设计基于Unix流的概念,通过管道连接,不需要写中间文件。
- **高质量**:Gulp的每个插件只完成一个功能,这也是Unix的设计原则之一,各个功能通过流进行整合并完成复杂的任务。例如:Grunt的imagemin插件不仅压缩图片,同时还包括缓存功能。他表示,在Gulp中,缓存是另一个插件,可以被别的插件使用,这样就促进了插件的可重用性。目前官方列出的有673个插件。
### Gulp示例
~~~
var gulp = require('gulp');
var jshint = require('gulp-jshint');
var concat = require('gulp-concat');
var rename = require('gulp-rename');
var uglify = require('gulp-uglify');
// Lint JS
gulp.task('lint', function() {
return gulp.src('src/*.js')
.pipe(jshint())
.pipe(jshint.reporter('default'));
});
// Concat & Minify JS
gulp.task('minify', function(){
return gulp.src('src/*.js')
.pipe(concat('all.js'))
.pipe(gulp.dest('dist'))
.pipe(rename('all.min.js'))
.pipe(uglify())
.pipe(gulp.dest('dist'));
});
// Watch Our Files
gulp.task('watch', function() {
gulp.watch('src/*.js', ['lint', 'minify']);
});
// Default
gulp.task('default', ['lint', 'minify', 'watch']);
~~~
### 参考资料
- [gulp](http://gulpjs.com/)
- [gulp fiction](http://gulpfiction.divshot.io/): 可视化配置gulp工作流程。
- [前端工程的构建工具对比 Gulp vs Grunt](http://segmentfault.com/blog/aomine_2450732/1190000002491282)
ST3–Mac篇
最后更新于:2022-04-01 15:26:05
# Sublime Text 3--Mac版
Mac篇其实应该和Windows差不多,主要区别是一些按键的设置和插件的配置。
### 特色功能
- super+p,搜索。这个搜索可以左侧的Folders里所以文件,而且是模糊搜索,不需要完整的文件名。配合#, @, :可以搜索变量,函数,行数。
- 多行编辑。按住super加左击,可以出现多个光标位置。
- 多重选择, super+d可以多重选择,结合光标键,可以批量修改。
- 多屏编辑,super+alt+数字键。
- Projects,通过View->Side Bar->show Side Bar左侧文件结构管理。
- snippet, 不同格式的文件,可以设置不同的snippet,就是简写,通过tab扩展成相应的内容。
- 各种插件支持
- 正则表达式搜索,比如我要删除所有的空行,可以使用`^[\s]*\n`来选择所有空行。可以使用`(?<=<h2>).+(?=</h2>)`来匹配h2标签内的内容。
- super+shift+p,功能菜单。只有你想不到,没有做不到的事情。
### 下载安装
ST3虽然没有提供稳定版本,但是相比ST2,速度提升还是很明显的。缺点就是插件不够完善,以及插件的编写全部采用Python3.x版本。这里给出ST3[下载地址](http://www.sublimetext.com/3)。
个人最喜欢的一点新特性是:新增了跳转到函数定义处功能,在大菜单Goto中可以查看到。
首次使用,建议先打开侧栏,方便管理文件结构。打开方式:`View->Side Bar->Show Side Bar`。
### 插件安装
插件通过[Package Control](https://sublime.wbond.net/installation#Simple)来管理。
### 安装Package Control
进入Package Control页面,选择对应版本的代码进行复制,比如ST3如下:
~~~
import urllib.request,os,hashlib; h = '7183a2d3e96f11eeadd761d777e62404' + 'e330c659d4bb41d3bdf022e94cab3cd0'; pf = 'Package Control.sublime-package'; ipp = sublime.installed_packages_path(); urllib.request.install_opener( urllib.request.build_opener( urllib.request.ProxyHandler()) ); by = urllib.request.urlopen( 'http://sublime.wbond.net/' + pf.replace(' ', '%20')).read(); dh = hashlib.sha256(by).hexdigest(); print('Error validating download (got %s instead of %s), please try manual install' % (dh, h)) if dh != h else open(os.path.join( ipp, pf), 'wb' ).write(by)
~~~
使用`View->Show Console`打开控制台,粘贴复制的代码,敲击回车运行。待程序右下角提示`success`后,重启ST。
再次进入ST后,可以通过菜单`Preferences->Package Control`或者按键`ctrl+shift+p`查找`install package`。输入对应的插件名称,即可安装插件。
更多插件,可以通过Package Control中的[search](https://sublime.wbond.net/search)查找。
### 配置修改
配置包括Preferences->Settings-Default和Key Bindings-Default。
修改配置文件时,以上两个默认文件最好不要修改,自行讲需要设置的参数写入到Settings-User和Key Bindings-User里,它们会自动覆盖Default相同属性。
### 备份配置
配置文件的路径,点击Preferences->Browse Packages打开目录,找到User目录,这里的文件就是自己的配置文件,最好备份,方便下次替换。
### 插件推荐
### 已安装的插件
~~~
{
"in_process_packages":
[
],
"installed_dependencies":
[
"0_package_control_loader",
"bz2"
],
"installed_packages":
[
"AlignTab",
"All Autocomplete",
"AutoFileName",
"BracketHighlighter",
"CSScomb",
"DocBlockr",
"EditorConfig",
"Emmet",
"Git",
"HTML-CSS-JS Prettify",
"JSHint Gutter",
"LiveStyle",
"Markdown Preview",
"Modific",
"Package Control",
"SideBarEnhancements",
"Sublimerge Pro",
"Terminal",
"Theme - Phoenix"
]
}
~~~
### 主题配色和代码配色
配色其实分为主题配色和代码配色。主题配色就是程序的外形设置,代码配色则是打开文件高亮显示的配置。
代码配色我是选择的自己备份的主题`Peacock (SL).tmTheme`,放置在了`Packages/User/theme/`目录下,主要是我针对`markdown`语法进行了设置,其他可选择的推荐`Dayle Rees Color Schemes`插件。
主题配色我使用的是`Theme-Phoenix`插件,插播一句,编程的字体应该选择等宽类型的,所以Mac下选择的是`Monaco`字体。
安装完了插件,可以在`Perferences->Color Scheme`中查看修改。也可以通过配置文件修改:
~~~
{
"caret_style": "phase",
"color_scheme": "Packages/User/theme/Peacock (SL).tmTheme",
"default_line_ending": "unix",
"font_face": "Monaco",
"font_size": 18.0,
"highlight_line": true,
"hot_exit": false,
"highlight_modified_tabs": true,
"show_encoding": true,
"ignored_packages":
[
"Vintage"
],
"original_color_scheme": "Packages/User/theme/Peacock (SL).tmTheme",
"phoenix_color_green": true,
"phoenix_dirty_bottom_bar_red": true,
"phoenix_eighties": true,
"phoenix_highlight_current_tab": true,
"phoenix_sidebar_tree_large": true,
"phoenix_solid_current_tab": true,
"phoenix_tabs_medium": true,
"rulers":
[
80,
100,
120
],
"soda_folder_icons": false,
"tab_size": 4,
"theme": "Phoenix Dark.sublime-theme",
"translate_tabs_to_spaces": true,
"word_separators": "./\\()\"':,.;<>~!@#$%^&*|+=[]{}`~?",
"word_wrap": true,
"wrap_width": 0
}
~~~
这里我列出的是我的全部配置文件,可以看到相关的主题配色、代码配色和字体设置。
### ST辅助类
-
**SideBarEnhancements**提升右侧导航栏功能
-
**Sublimerge Pro**文件对比功能
-
**Markdown Preview**书写markdown格式文本,预览等功能。
-
**Terminal**直接在对应文件所在目录打开terminal功能。
### 代码显示辅助类
-
**BracketHighlighter**高亮显示匹配括号,会在左侧的行号标识处显示对应的括号位置和范围。
-
**HTML-CSS-JS Prettify**格式化代码工具,默认快捷键`ctrl+shift+h`。
-
**CSScomb**按照一定规律格式化CSS的属性顺序。
### 代码书写辅助类
-
**Emmet**必装插件,辅助书写HTML, CSS。
-
**AutoFileName**书写代码时,自动提示补充文件路径。
-
**DocBlockr**辅助书写注释。
-
**JSHint Gutter**利用`jslint`检测js代码是否规范的插件。
-
**LiveStyle**配合对应的chrome插件,可以达到修改文件后,自动刷新页面的效果。但目前对`less`,`sass`之类预编译语言支持不够好。
-
**AlignTab**变量竖向对齐工具。
-
**All Autocomplete**代码补全插件。
-
**EditorConfig**代码编码规范。
-
**MultiEditUtils**增强了SublimeText内置的“multi-cursor”和“multi-selection”功能
### 使用技巧
### 快捷键操作
默认的快捷操作,可以查看`Preferences->Key Binding`,或者文档:[Keyboard Shortcuts-Windows/Linux](http://docs.sublimetext.info/en/latest/reference/keyboard_shortcuts_win.html)和[Keyboard Shortcuts-OSX](http://docs.sublimetext.info/en/latest/reference/keyboard_shortcuts_osx.html)。
个人常用的快捷键设置如下:
~~~
[
/*============= Emacs Style =============*/
{ "keys": ["ctrl+b"], "command": "move", "args": {"by": "characters", "forward": false} },
{ "keys": ["ctrl+f"], "command": "move", "args": {"by": "characters", "forward": true} },
{ "keys": ["ctrl+p"], "command": "move", "args": {"by": "lines", "forward":
false} },
{ "keys": ["ctrl+n"], "command": "move", "args": {"by": "lines", "forward":
true} },
{ "keys": ["ctrl+a"], "command": "move_to", "args": {"to": "bol", "extend": false} },
{ "keys": ["ctrl+e"], "command": "move_to", "args": {"to": "eol", "extend": false} },
{ "keys": ["ctrl+l"], "command": "show_at_center" },
/*============= End Emacs Style =============*/
/*============= switch tabs =============*/
{ "keys": ["ctrl+1"], "command": "select_by_index", "args": { "index": 0 } },
{ "keys": ["ctrl+2"], "command": "select_by_index", "args": { "index": 1 } },
{ "keys": ["ctrl+3"], "command": "select_by_index", "args": { "index": 2 } },
{ "keys": ["ctrl+4"], "command": "select_by_index", "args": { "index": 3 } },
{ "keys": ["ctrl+5"], "command": "select_by_index", "args": { "index": 4 } },
{ "keys": ["ctrl+6"], "command": "select_by_index", "args": { "index": 5 } },
{ "keys": ["ctrl+7"], "command": "select_by_index", "args": { "index": 6 } },
{ "keys": ["ctrl+8"], "command": "select_by_index", "args": { "index": 7 } },
{ "keys": ["ctrl+9"], "command": "select_by_index", "args": { "index": 8 } },
{ "keys": ["super+shift+t"], "command": "reopen_last_file" },
/*============= End switch tabs =============*/
/*============= Modify Default key-mapping =============*/
{ "keys": ["super+a"], "command": "select_all" },
{ "keys": ["super+t"], "command": "new_file" },
{ "keys": ["f5"], "command": "open_in_browser" },
// autocomplate
{ "keys": ["ctrl+/"], "command": "auto_complete" },
// paste
{ "keys": ["super+v"], "command": "paste_and_indent" },
{ "keys": ["super+shift+v"], "command": "paste" },
// reindex
{ "keys": ["ctrl+i"], "command": "reindent" },
// find and goto
{ "keys": ["super+f"], "command": "show_panel", "args": {"panel": "find"} },
{ "keys": ["super+p"], "command": "show_overlay", "args": {"overlay": "goto", "show_files": true} },
{ "keys": ["super+r"], "command": "show_overlay", "args": {"overlay": "goto", "text": "@"} },
{ "keys": ["super+l"], "command": "show_overlay", "args": {"overlay": "goto", "text": ":"} },
{ "keys": ["super+;"], "command": "show_overlay", "args": {"overlay": "goto", "text": "#"} },
{ "keys": ["super+d"], "command": "goto_definition" },
{ "keys": ["super+-"], "command": "jump_back" },
{ "keys": ["super+="], "command": "jump_forward" },
// keep the shortcut as Windows
{ "keys": ["ctrl+d"], "command": "find_under_expand" },
{ "keys": ["ctrl+g"], "command": "find_all_under" },
{ "keys": ["ctrl+j"], "command": "join_lines" },
{ "keys": ["ctrl+shift+j"], "command": "expand_selection", "args": {"to": "indentation"} },
{ "keys": ["ctrl+shift+k"], "command": "run_macro_file", "args": {"file": "res://Packages/Default/Delete Line.sublime-macro"} },
/*============= End Modify Default key-mapping =============*/
/*============= Plugin =============*/
// Emmet expand
{"keys": ["super+e"], "args": {"action": "expand_abbreviation"}, "command": "run_emmet_action", "context": [{"key": "emmet_action_enabled.expand_abbreviation"} ] },
// js Hint Grunt
{"keys": ["super+j"], "command": "jshint"},
// markdown preview
{ "keys": ["super+m"], "command": "markdown_preview", "args": {"target": "browser", "parser":"markdown"} },
// terminal
{ "keys": ["ctrl+super+t"], "command": "open_terminal" },
{ "keys": ["ctrl+shift+super+t"], "command": "open_terminal_project_folder" }
/*============= End Plugin =============*/
]
~~~
其中涉及到了emacs移动光标,多标签切换,以及快速查找等方式。
### snippet
snippet是代码片段,可以方便的自动补全。创建方式通过`Tools->New Snippet`完成。
默认的文件如下:
~~~
<snippet>
<content><![CDATA[
Hello, ${1:this} is a ${2:snippet}.
]]></content>
<!-- Optional: Set a tabTrigger to define how to trigger the snippet -->
<!-- <tabTrigger>hello</tabTrigger> -->
<!-- Optional: Set a scope to limit where the snippet will trigger -->
<!-- <scope>source.python</scope> -->
</snippet>
~~~
代码段写在`CDATA[]`中,`${}`为占位字符。
`tabTrigger`为自动补全需要的字符,`scope`设置的是文件格式。
创建完成之后,个人建议保存在`User->snippet`目录下,`snippet`需要自行创建,方便管理。
### build命令和Macro命令
这些命令的使用请参考文档->[Reference](http://docs.sublimetext.info/en/latest/reference/reference.html)。
### 参考文档
- [sublimeText官网](http://www.sublimetext.com/)
- [非官方手册](http://docs.sublimetext.info/en/latest)
- [Package Control](https://sublime.wbond.net/installation#Simple)
- [推荐!Sublime Text 最佳插件列表](http://blog.jobbole.com/79326/)
- [Gif多图:我常用的 16 个 Sublime Text 快捷键](http://blog.jobbole.com/82527/)