GitHub秘籍
最后更新于:2022-04-01 15:26:32
# GitHub秘籍
本秘籍收录了一些Git和Github非常酷同时又少有人知的功能。灵感来自于[Zach Holman](https://github.com/holman)在2012年Aloha Ruby Conference和2013年WDCNZ上所做的演讲:[Git and GitHub Secrets](http://www.confreaks.com/videos/1229-aloharuby2012-git-and-github-secrets)([slides](https://speakerdeck.com/holman/git-and-github-secrets))和[More Git and GitHub Secrets](https://vimeo.com/72955426)([slides](https://speakerdeck.com/holman/more-git-and-github-secrets))。
*Read this in other languages: [English](#), [한국어](#), [日本語](#), [简体中文](#).*
# 目录
- [GitHub](#)
- [忽略空白字符变化](#)
- [调整Tab字符所代表的空格数](#)
- [查看某个用户的Commit历史](#)
- [克隆某个仓库](#)
- [分支](#)
- [将某个分支与其他所有分支进行对比](#)
- [比较分支](#)
- [比较不同派生库的分支](#)
- [Gists](#)
- [Git.io](#)
- [键盘快捷键](#)
- [整行高亮](#)
- [用commit信息关闭Issue](#)
- [链接其他仓库的Issue](#)
- [设置CI对每条Pull Request都进行构建](#)
- [Markdown文件高亮语法](#)
- [表情符](#)
- [静态与动态图片](#)
- [在GitHub Wiki中嵌入图片](#)
- [快速引用](#)
- [快速添加许可证](#)
- [任务列表](#)
- [Markdown文件中的任务列表](#)
- [相对链接](#)
- [GitHub Pages的元数据与插件支持](#)
- [查看YAML格式的元数据](#)
- [渲染表格数据](#)
- [撤销Pull Request](#)
- [Diffs](#)
- [可渲染文档的Diffs](#)
- [可变化地图](#)
- [在diff中折叠与扩展代码](#)
- [查看Pull Request的diff和patch](#)
- [渲染图像发生的变动](#)
- [Hub](#)
- [贡献者指南](#)
- [GitHub资源](#)
- [GitHub讨论](#)
- [Git](#)
- [前一个分支](#)
- [Stripspace命令](#)
- [检出Pull Requests](#)
- [提交空改动 :trollface:](#)
- [更直观的Git Status](#)
- [更直观的Git Log](#)
- [Git查询](#)
- [合并分支](#)
- [使用网页查看本地仓库](#)
- [Git配置](#)
- [Git命令自定义别名](#)
- [自动更正](#)
- [带颜色输出](#)
- [Git资源](#)
- [Git参考书籍](#)
### GitHub
### 忽略空白字符变化
在任意diff页面的URL后加上`?w=1`,可以去掉那些只是空白字符的变化,使你能更专注于代码的变化。
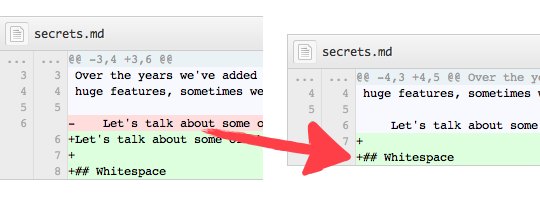
[*详见 GitHub secrets.*](https://github.com/blog/967-github-secrets)
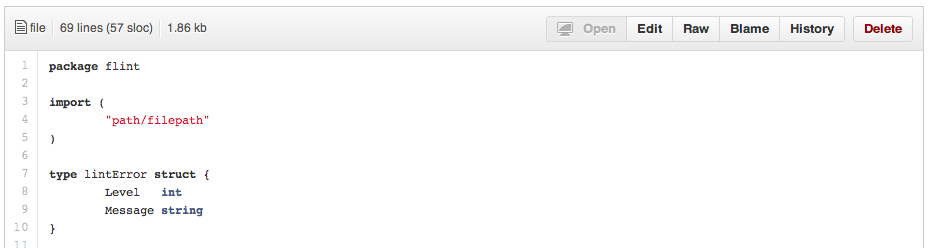
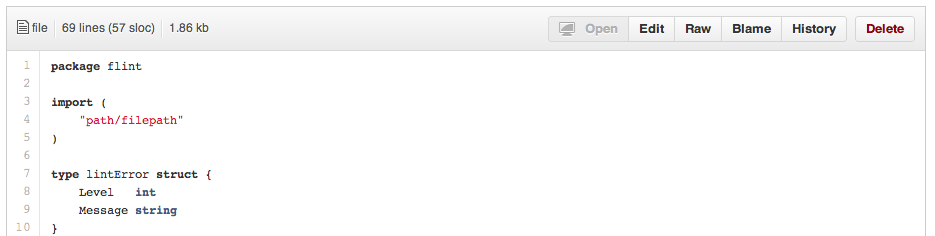
### 调整Tab字符所代表的空格数
在diff或者file页面的URL后面加上`?ts=4`,这样当显示tab字符的长度时就会是4个空格的长度,不再是默认的8个空格。`ts`后面的数字还可以根据你个人的偏好进行修改。不过,这个小诀窍在Gists页面和raw file页面不起作用。
下面是我们在Go语言的source file页面URL后加`?ts=4`[前](https://github.com/pengwynn/flint/blob/master/flint/flint.go)的例子:
然后是我们添加`?ts=4`[后](https://github.com/pengwynn/flint/blob/master/flint/flint.go?ts=4)的例子:
### 查看某个用户的Commit历史
查看某个用户的所有提交历史,只需在commits页面URL后加上`?author=username`。
~~~
https://github.com/rails/rails/commits/master?author=dhh
~~~
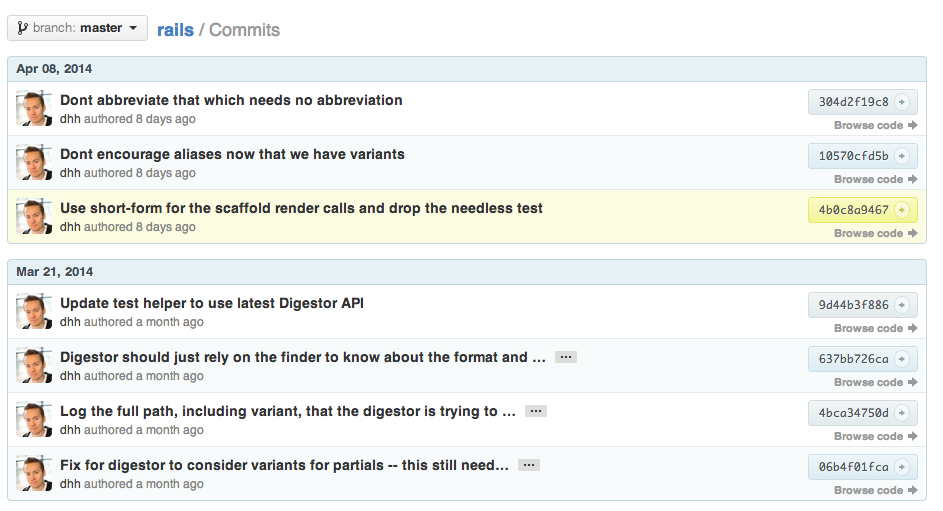
[*深入了解提交视图之间的区别*](https://help.github.com/articles/differences-between-commit-views)
### 克隆某个仓库
当我们克隆某一资源时,可以不要那个`.git`后缀。
~~~
$ git clone https://github.com/tiimgreen/github-cheat-sheet
~~~
[*更多对 Git `clone` 命令的介绍.*](http://git-scm.com/docs/git-clone)
### 分支
#### 将某个分支与其他所有分支进行对比
当你点击某个仓库的分支(Branches)选项卡时
~~~
https://github.com/{user}/{repo}/branches
~~~
你会看到一个包含所有未合并的分支的列表。
你可以在这里查看比较(Compare)页面或点击删除某个分支。
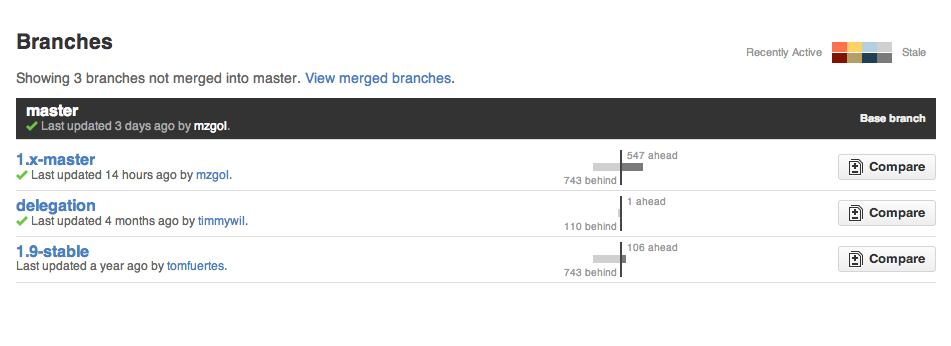
有的时候我们需要将多个分支与一个非主分支(master)进行对比,此时可以通过在URL后加入要比较的分支名来实现:
~~~
https://github.com/{user}/{repo}/branches/{branch}
~~~

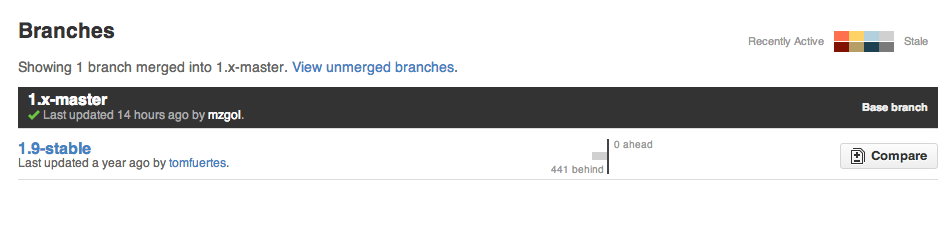
可以在URL后加上`?merged=1`来查看已经合并了的分支。
你可以使用这个界面来替代命令行直接删除分支。
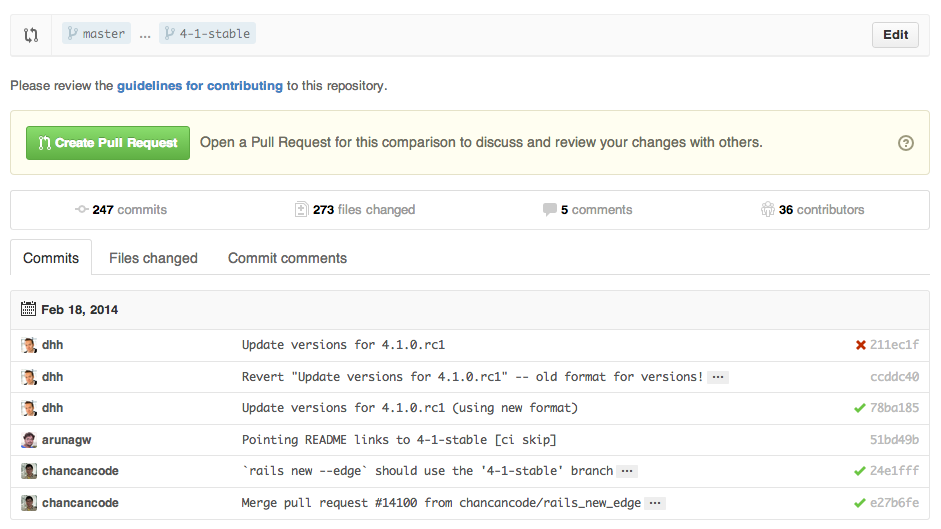
#### 比较分支
如果我们想要比较两个分支,可以像下面一样修改URL:
~~~
https://github.com/user/repo/compare/{range}
~~~
其中`{range} = master...4-1-stable`
例如:
~~~
https://github.com/rails/rails/compare/master...4-1-stable
~~~
`{range}`还可以使用下面的形式:
~~~
https://github.com/rails/rails/compare/master@{1.day.ago}...master
https://github.com/rails/rails/compare/master@{2014-10-04}...master
~~~
*日期格式 `YYYY-DD-MM`*
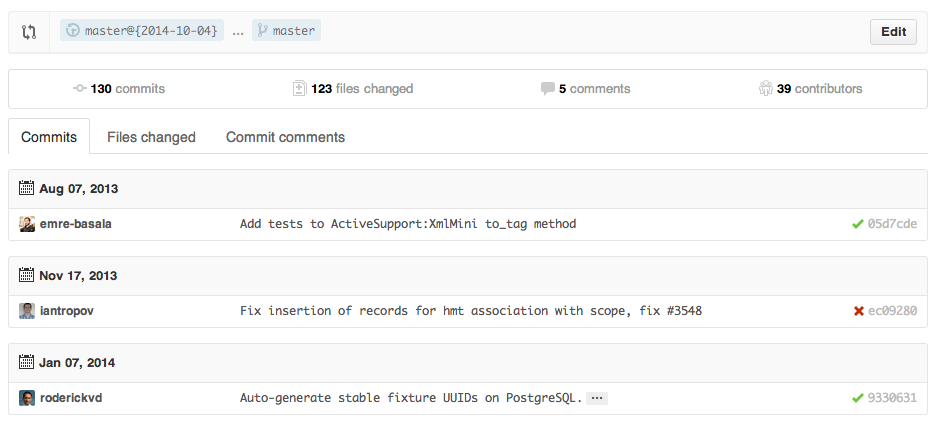
...这样你就能查看master分支上一段时间或者指定日期内的改动。
[*了解更多关于比较跨时间段的提交记录.*](https://help.github.com/articles/comparing-commits-across-time)
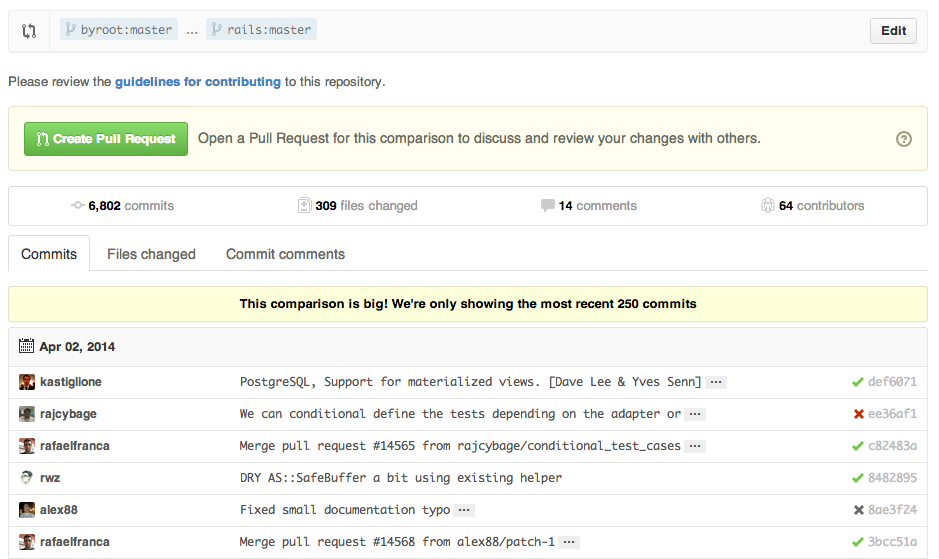
#### 比较不同派生库的分支
想要对派生仓库(Forked Repository)之间的分支进行比较,可以像下面这样修改URL实现:
~~~
https://github.com/user/repo/compare/{foreign-user}:{branch}...{own-branch}
~~~
例如:
~~~
https://github.com/rails/rails/compare/byroot:master...master
~~~
### Gists
[Gists](https://gist.github.com/) 给我们提供了一种不需要创建一个完整的仓库,使小段代码也可以工作的简单方式。

Gist的URL后加上`.pibb`,可以得到更适合嵌入到其他网站的HTML版本。
Gists还可以像任何标准仓库一样被克隆。
~~~
$ git clone https://gist.github.com/tiimgreen/10545817
~~~
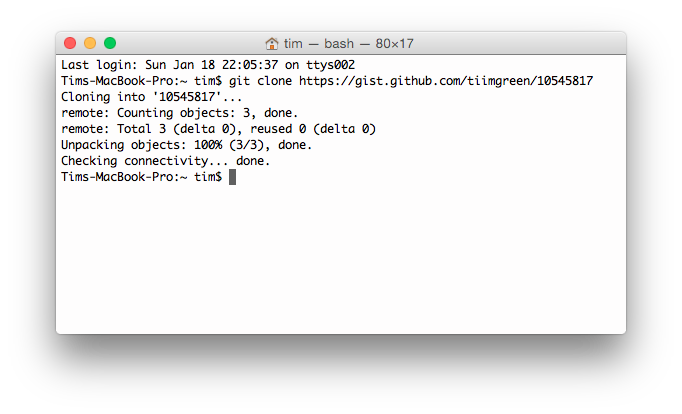
这意味着你可以像 Github 仓库一样修改和更新 Gists :
~~~
$ git commit
$ Username for 'https://gist.github.com':
$ Password for 'https://tiimgreen@gist.github.com':
~~~
[*进一步了解如何创建 gists.*](https://help.github.com/articles/creating-gists)
### Git.io
[Git.io](http://git.io)是Github的短网址服务。

你可以通过Curl命令以普通HTTP协议使用它:
~~~
$ curl -i http://git.io -F "url=https://github.com/..."
HTTP/1.1 201 Created
Location: http://git.io/abc123
$ curl -i http://git.io/abc123
HTTP/1.1 302 Found
Location: https://github.com/...
~~~
[*进一步了解 Git.io.*](https://github.com/blog/985-git-io-github-url-shortener)
### 键盘快捷键
在仓库主页上提供了快捷键方便快速导航。
- 按 `t` 键会打开一个文件浏览器。
- 按 `w` 键会打开分支选择菜单。
- 按 `s` 键会激活顶端的命令栏 (Command Bar)。
- 按 `l` 键编辑Issue列表页的标签。
- **查看文件内容时**(如:`https://github.com/tiimgreen/github-cheat-sheet/blob/master/README.md`),按 `y` 键将会冻结这个页面,这样就算代码被修改了也不会影响你当前看到的。
按`?`查看当前页面支持的快捷键列表:
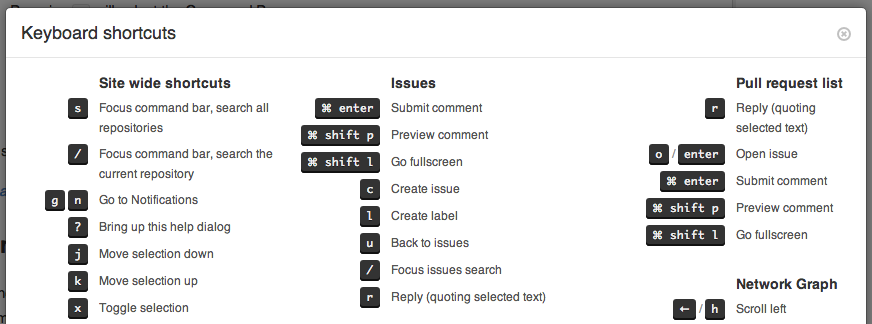
[*进一步了解如何使用 Command Bar.*](https://help.github.com/articles/using-the-command-bar)
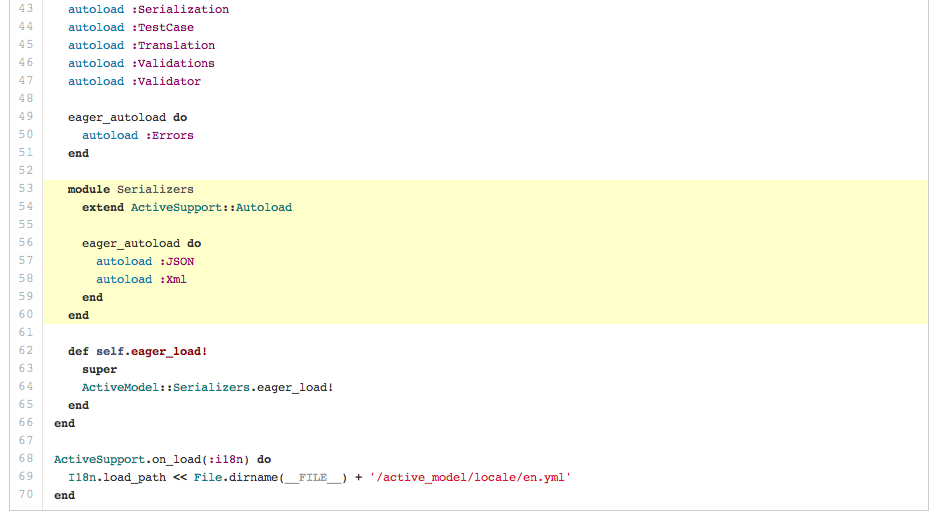
### 整行高亮
在代码文件地址后加上`#L52`或者单击行号52都会将第52行代码高亮显示。
多行高亮也可以,比如用`#L53-L60`选择范围,或者按住 `shift`键,然后再点击选择的两行。
~~~
https://github.com/rails/rails/blob/master/activemodel/lib/active_model.rb#L53-L60
~~~
### 用commit信息关闭Issue
如果某个提交修复了一个Issue,当提交到master分支时,提交信息里可以使用`fix/fixes/fixed`, `close/closes/closed` 或者 `resolve/resolves/resolved`等关键词,后面再跟上Issue号,这样就会关闭这个Issue。
~~~
$ git commit -m "Fix screwup, fixes #12"
~~~
这将会关闭Issue #12,并且在Issue讨论列表里关联引用这次提交。

[*进一步了解通过提交信息关闭Issue.*](https://help.github.com/articles/closing-issues-via-commit-messages)
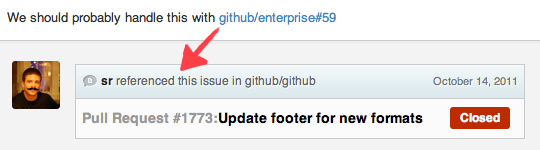
### 链接其他仓库的Issue
如果你想引用到同一个仓库中的一个Issue,只需使用井号 `#` 加上Issue号,这样就会自动创建到此Issue的链接。
要链接到其他仓库的Issue,就使用`user_name/repo_name#ISSUE_NUMBER`的方式,例如`tiimgreen/toc#12`。
### 设置CI对每条Pull Request都进行构建
如果配置正确,[Travis CI](https://travis-ci.org/)会为每个你收到的Pull Request执行构建,就像每次提交也会触发构建一样。想了解更多关于Travis CI的信息,请看 [Travis CI入门](http://docs.travis-ci.com/user/getting-started/)。
[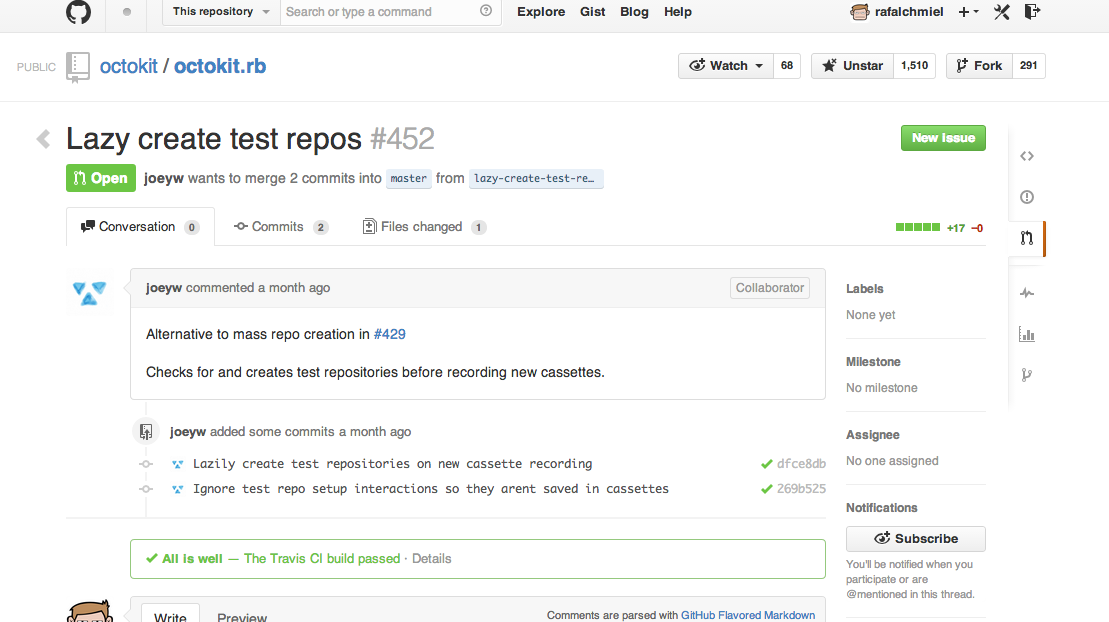](https://github.com/octokit/octokit.rb/pull/452)
[*进一步了解 Commit status API.*](https://github.com/blog/1227-commit-status-api)
### Markdown文件高亮语法
例如,可以像下面这样在你的Markdown文件里为Ruby代码添加语法高亮:
~~~
```ruby
require 'tabbit'
table = Tabbit.new('Name', 'Email')
table.add_row('Tim Green', 'tiimgreen@gmail.com')
puts table.to_s
```
~~~
效果像下面这样:
~~~
require 'tabbit'
table = Tabbit.new('Name', 'Email')
table.add_row('Tim Green', 'tiimgreen@gmail.com')
puts table.to_s
~~~
Github使用 [Linguist](https://github.com/github/linguist) 做语言识别和语法高亮。你可以仔细阅读 [languages YAML file](https://github.com/github/linguist/blob/master/lib/linguist/languages.yml),了解有哪些可用的关键字。
[*进一步了解 GitHub Flavored Markdown.*](https://help.github.com/articles/github-flavored-markdown)
### 表情符
可以在Pull Requests, Issues, 提交消息, Markdown文件里加入表情符。使用方法`:name_of_emoji:`
~~~
:smile:
~~~
将输出一个笑脸:
:smile:
Github支持的完整表情符号列表详见[emoji-cheat-sheet.com](http://www.emoji-cheat-sheet.com/) 或 [scotch-io/All-Github-Emoji-Icons](https://github.com/scotch-io/All-Github-Emoji-Icons)。
Github上使用最多的5个表情符号是:
1. :shipit: - `:shipit:`
1. :sparkles: - `:sparkles:`
1. :-1: - `:-1:`
1. :+1: - `:+1:`
1. :clap: - `:clap:`
### 静态与动态图片
注释和README等文件里也可以使用图片和GIF动画:
~~~

~~~
仓库中的原始图片可以被直接调用:
~~~
/(repo)/raw/master/path/to/image.gif)
~~~

所有图片都缓存在Github,不用担心你的站点不能访问时就看不到图片了。
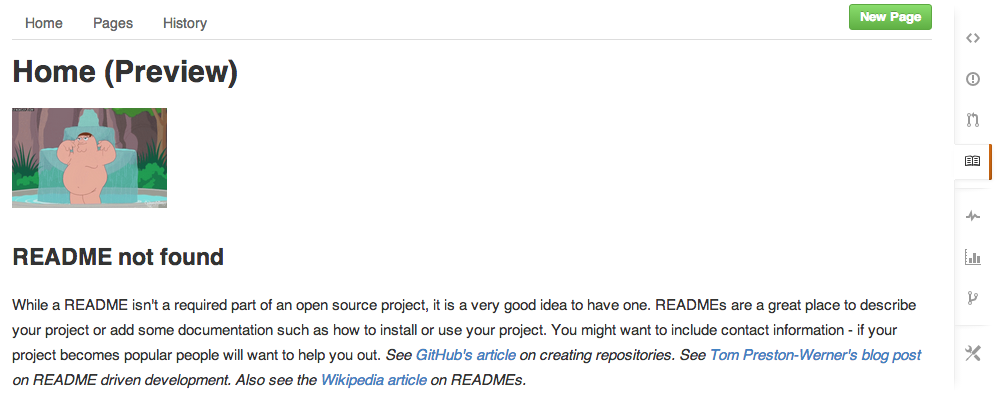
#### 在GitHub Wiki中嵌入图片
有多种方法可以在Wiki页面里嵌入图片。既可以像上一条里那样使用标准的Markdown语法,也可以像下面这样指定图片的高度或宽度:
~~~
[[ http://www.sheawong.com/wp-content/uploads/2013/08/keephatin.gif | height = 100px ]]
~~~
结果:
### 快速引用
在主题评论中引用之前某个人所说的,只需选中文本,然后按 `r`键,想要的就会以引用的形式复制到你的输入框里。
[*进一步了解快速引用.*](https://github.com/blog/1399-quick-quotes)
### 快速添加许可证
创建一个仓库时,Github会为你提供一个预置的软件许可列表:
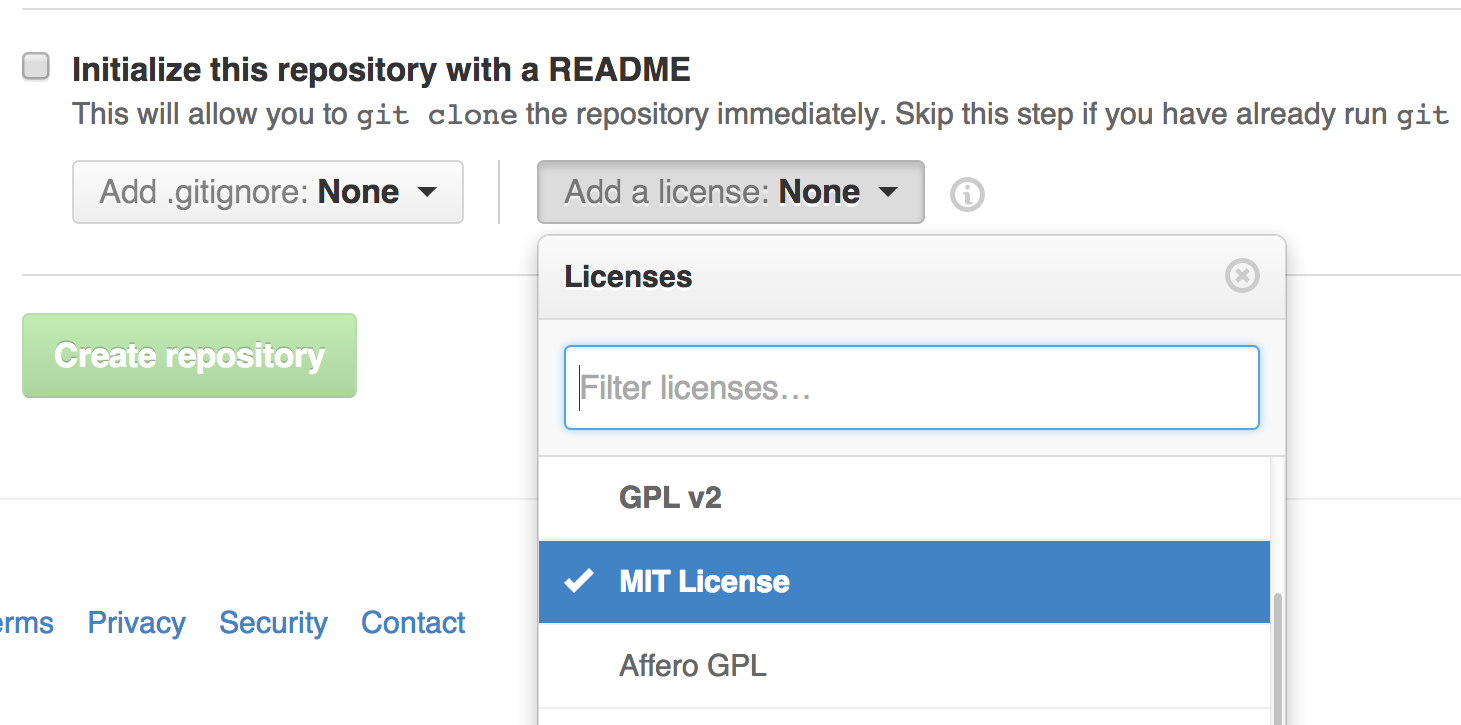
对于已有的仓库,可以通过web界面创建文件来添加软件许可。输入`LICENSE`作为文件名后,同样可以从预置的列表中选择一个作为模板。
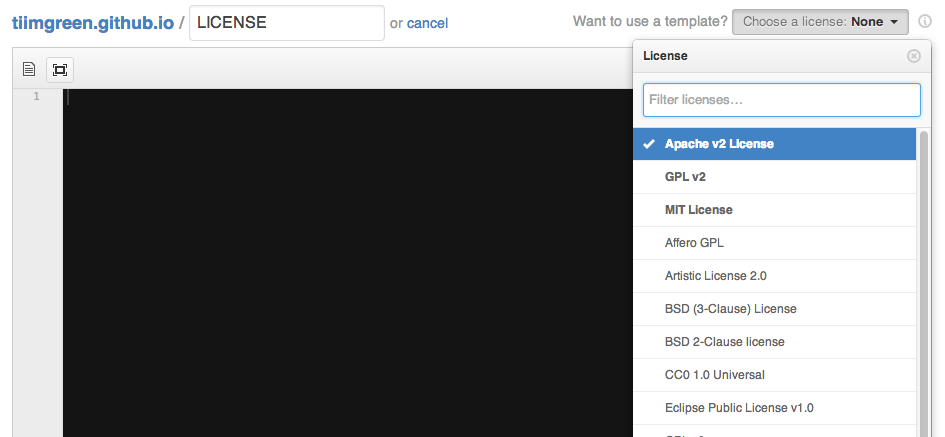
这个技巧也适用于 `.gitignore` 文件。
[*进一步了解 open source licensing.*](https://help.github.com/articles/open-source-licensing)
### 任务列表
Issues和Pull requests里可以添加复选框,语法如下(注意空白符):
~~~
- [ ] Be awesome
- [ ] Prepare dinner
- [ ] Research recipe
- [ ] Buy ingredients
- [ ] Cook recipe
- [ ] Sleep
~~~
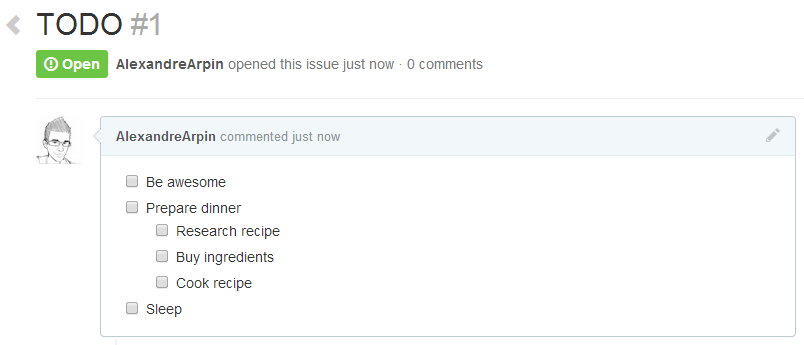
当项目被选中时,它对应的Markdown源码也被更新了:
~~~
- [x] Be awesome
- [ ] Prepare dinner
- [x] Research recipe
- [x] Buy ingredients
- [ ] Cook recipe
- [ ] Sleep
~~~
[*进一步了解任务列表.*](https://help.github.com/articles/writing-on-github#task-lists)
#### Markdown文件中的任务列表
在完全适配Markdown语法的文件中可以使用以下语法加入一个**只读**的任务列表
~~~
- [ ] Mercury
- [x] Venus
- [x] Earth
- [x] Moon
- [x] Mars
- [ ] Deimos
- [ ] Phobos
~~~
- [ ] Mercury
- [x] Venus
- [x] Earth
- [x] Moon
- [x] Mars
- [ ] Deimos
- [ ] Phobos
[*进一步了解Markdown文件中的任务列表*](https://github.com/blog/1825-task-lists-in-all-markdown-documents)
### 相对链接
Markdown文件里链接到内部内容时推荐使用相对链接。
~~~
[Link to a header](#awesome-section)
[Link to a file](docs/readme)
~~~
绝对链接会在URL改变时(例如重命名仓库、用户名改变,建立分支项目)被更新。使用相对链接能够保证你的文档不受此影响。
[*进一步了解相对链接.*](https://help.github.com/articles/relative-links-in-readmes)
### GitHub Pages的元数据与插件支持
在Jekyll页面和文章里,仓库信息可在 `site.github` 命名空间下找到,也可以显示出来,例如,使用 `{{ site.github.project_title }}`显示项目标题。
Jemoji和jekyll-mentions插件为你的Jekyll文章和页面增加了[emoji](#)和[@mentions](https://github.com/blog/821)功能。
[*了解更多 GitHub Pages的元数据和插件支持.*](https://github.com/blog/1797-repository-metadata-and-plugin-support-for-github-pages)
### 查看YAML格式的元数据
许多博客站点,比如基于[Jekyll](http://jekyllrb.com/)的[GitHub Pages](http://pages.github.com/),都依赖于一些文章头部的YAML格式的元数据。Github会将其渲染成一个水平表格,方便阅读。
[*进一步了解 在文档里查看YAML元数据.*](https://github.com/blog/1647-viewing-yaml-metadata-in-your-documents)
### 渲染表格数据
GitHub支持将 `.csv` (逗号分隔)和`.tsv` (制表符分隔)格式的文件渲染成表格数据。
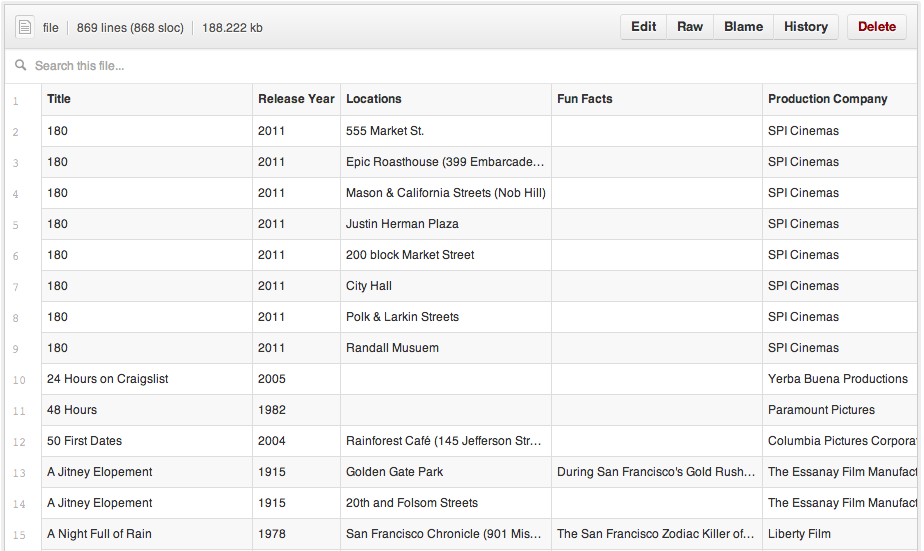
[*进一步了解渲染表格数据.*](https://github.com/blog/1601-see-your-csvs)
### 撤销Pull Request
可以通过Pull Request中的Revert按钮来撤销一个已合并的Pull Request中的commit。按下按钮后会自动生成一个进行逆向操作的Pull Request。
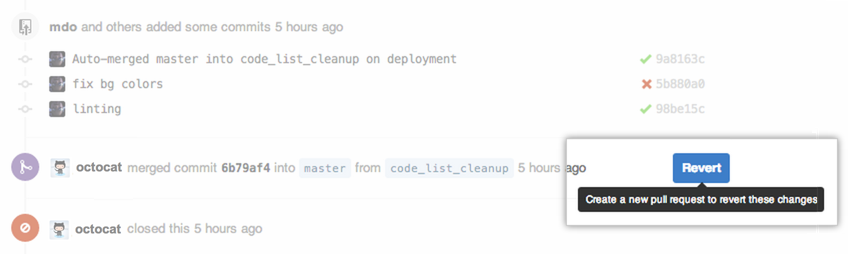
[*进一步了解“撤销”按钮](https://github.com/blog/1857-introducing-the-revert-button)
### Diffs
#### 可渲染文档的Diffs
提交和Pull Requests里包含有Github支持的可渲染文档(比如Markdown)会提供*source* 和 *rendered* 两个视图功能。

点击 "rendered" 按钮,看看改动在渲染后的显示效果。当你添加、删除或修改文本时,渲染纯文本视图非常方便。

[*进一步了解渲染纯文本视图Diffs.*](https://github.com/blog/1784-rendered-prose-diffs)
#### 可变化地图
当你在GitHub上查看一个包含地理数据的提交或pull request时,Github 将以可视化的方式对比版本之间的差异。
[](https://github.com/benbalter/congressional-districts/commit/2233c76ca5bb059582d796f053775d8859198ec5)
[*进一步了解可比较地图.*](https://github.com/blog/1772-diffable-more-customizable-maps)
#### 在diff中折叠与扩展代码
你可以通过点击diff边栏里的 *unfold* 按钮来多显示几行上下文。你可以一直点击 *unfold* 按钮直到显示了文件的全部内容。这个功能在所有GitHub产生的diff界面都可以使用。

[*进一步了解扩展Diff上下文.*](https://github.com/blog/1705-expanding-context-in-diffs)
#### 查看Pull Request的diff和patch
在Pull Request的URL后面加上 `.diff` 或 `.patch` 的扩展名就可以得到它的diff或patch文件,例如:
~~~
https://github.com/tiimgreen/github-cheat-sheet/pull/15
https://github.com/tiimgreen/github-cheat-sheet/pull/15.diff
https://github.com/tiimgreen/github-cheat-sheet/pull/15.patch
~~~
`.diff` 扩展会使用普通文本格式显示如下内容:
~~~
diff --git a/README.md b/README.md
index 88fcf69..8614873 100644
--- a/README.md
+++ b/README.md
@@ -28,6 +28,7 @@ All the hidden and not hidden features of Git and GitHub. This cheat sheet was i
- [Merged Branches](#merged-branches)
- [Quick Licensing](#quick-licensing)
- [TODO Lists](#todo-lists)
+- [Relative Links](#relative-links)
- [.gitconfig Recommendations](#gitconfig-recommendations)
- [Aliases](#aliases)
- [Auto-correct](#auto-correct)
@@ -381,6 +382,19 @@ When they are clicked, they will be updated in the pure Markdown:
- [ ] Sleep
(...)
~~~
#### 渲染图像发生的变动
GitHub可以显示包括PNG、JPG、GIF、PSD在内的多种图片格式并提供了几种方式来比较这些格式的图片文件版本间的不同。
[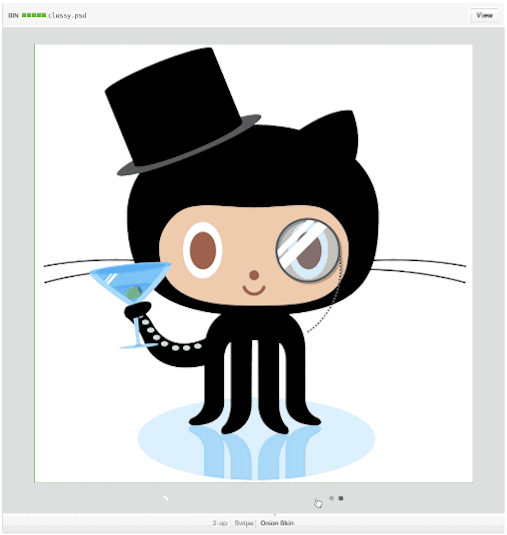](https://github.com/blog/1845-psd-viewing-diffing)
[*查看更多关于渲染图像变动的内容*](https://help.github.com/articles/rendering-and-diffing-images)
### Hub
[Hub](https://github.com/github/hub)是一个对Git进行了封装的命令行工具,可以帮助你更方便的使用Github。
这使得你可以像下面这样进行克隆:
~~~
$ hub clone tiimgreen/toc
~~~
[*查看更多Hub提供的超酷命令.*](https://github.com/github/hub#commands)
### 贡献者指南
在你的仓库的根目录添加一个名为 `CONTRIBUTING` 的文件后,贡献者在新建Issue或Pull Request时会看到这个文件的链接。
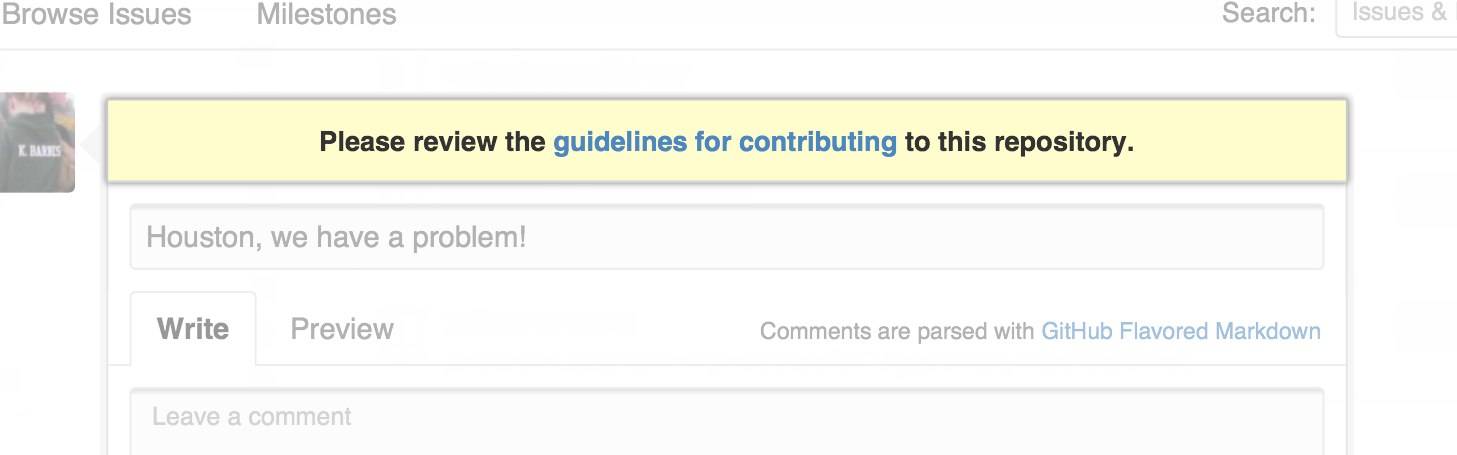
[*进一步了解贡献者指南.*](https://github.com/blog/1184-contributing-guidelines)
### GitHub资源
| Title | Link |
|-----|-----|
| GitHub Explore | [https://github.com/explore](https://github.com/explore) |
| GitHub Blog | [https://github.com/blog](https://github.com/blog) |
| GitHub Help | [https://help.github.com/](https://help.github.com/) |
| GitHub Training | [http://training.github.com/](http://training.github.com/) |
| GitHub Developer | [https://developer.github.com/](https://developer.github.com/) |
#### GitHub讨论
| Title | Link |
|-----|-----|
| How GitHub Uses GitHub to Build GitHub | [https://www.youtube.com/watch?v=qyz3jkOBbQY](https://www.youtube.com/watch?v=qyz3jkOBbQY) |
| Introduction to Git with Scott Chacon of GitHub | [https://www.youtube.com/watch?v=ZDR433b0HJY](https://www.youtube.com/watch?v=ZDR433b0HJY) |
| How GitHub No Longer Works | [https://www.youtube.com/watch?v=gXD1ITW7iZI](https://www.youtube.com/watch?v=gXD1ITW7iZI) |
| Git and GitHub Secrets | [https://www.youtube.com/watch?v=Foz9yvMkvlA](https://www.youtube.com/watch?v=Foz9yvMkvlA) |
| More Git and GitHub Secrets | [https://www.youtube.com/watch?v=p50xsL-iVgU](https://www.youtube.com/watch?v=p50xsL-iVgU) |
### Git
### 前一个分支
快速检出上一个分支:
~~~
$ git checkout -
# Switched to branch 'master'
$ git checkout -
# Switched to branch 'next'
$ git checkout -
# Switched to branch 'master'
~~~
[*进一步了解 Git 分支.*](http://git-scm.com/book/en/Git-Branching-Basic-Branching-and-Merging)
### Stripspace命令
Git Stripspace命令可以:
- 去掉行尾空白符
- 多个空行压缩成一行
- 必要时在文件末尾增加一个空行
使用此命令时必须传入一个文件,像这样:
~~~
$ git stripspace < README.md
~~~
[*进一步了解 Git `stripspace` 命令.*](http://git-scm.com/docs/git-stripspace)
### 检出Pull Requests
Pull Request是一种GitHub上可以通过以下多种方式在本地被检索的特别分支:
检索某个分支并临时储存在本地的`FETCH_HEAD`中以便快速查看更改(diff)以及合并(merge):
~~~
$ git fetch origin refs/pull/[PR-Number]/head
~~~
通过refspec获取所有的Pull Request为本地分支:
~~~
$ git fetch origin '+refs/pull/*/head:refs/remotes/origin/pr/*'
~~~
或在仓库的`.git/config`中加入下列设置来自动获取远程仓库中的Pull Request
~~~
[remote "origin"]
fetch = +refs/heads/*:refs/remotes/origin/*
url = git@github.com:tiimgreen/github-cheat-sheet.git
~~~
~~~
[remote "origin"]
fetch = +refs/heads/*:refs/remotes/origin/*
url = git@github.com:tiimgreen/github-cheat-sheet.git
fetch = +refs/pull/*/head:refs/remotes/origin/pr/*
~~~
对基于派生库的Pull Request,可以通过先`checkout`代表此Pull Request的远端分支再由此分支建立一个本地分支:
~~~
$ git checkout pr/42 pr-42
~~~
操作多个仓库的时候,可以在Git中设置获取Pull Request的全局选项。
~~~
git config --global --add remote.origin.fetch "+refs/pull/*/head:refs/remotes/origin/pr/*"
~~~
此时可以在任意仓库中使用以下命令:
~~~
git fetch origin
~~~
~~~
git checkout pr/42
~~~
[*进一步了解如何检出pull request到本地.*](https://help.github.com/articles/checking-out-pull-requests-locally)
### 提交空改动 :trollface:
可以使用`--allow-empty`选项强制创建一个没有任何改动的提交:
~~~
$ git commit -m "Big-ass commit" --allow-empty
~~~
这样做在如下几种情况下是有意义的:
- 标记新的工作或一个新功能的开始。
- 记录对项目的跟代码无关的改动。
- 跟使用你仓库的其他人交流。
- 作为仓库的第一次提交,因为第一次提交后不能被rebase: `git commit -m "init repo" --allow-empty`.
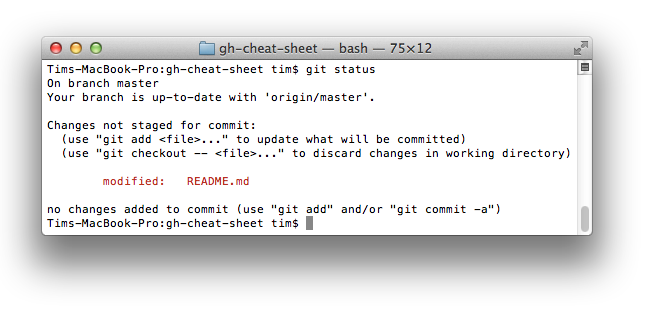
### 更直观的Git Status
在命令行输入如下命令:
~~~
$ git status
~~~
可以看到:
加上`-sb`选项:
~~~
$ git status -sb
~~~
这会得到:
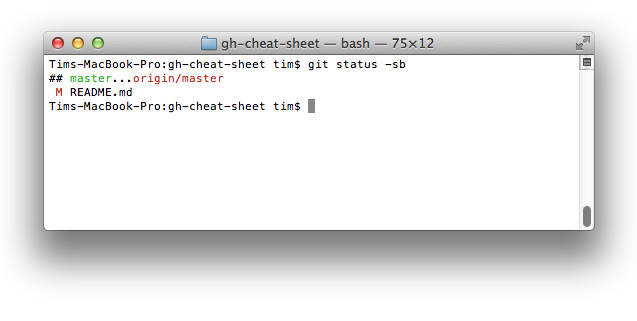
[*进一步了解 Git `status` 命令.*](http://git-scm.com/docs/git-status)
### 更直观的Git Log
输入如下命令:
~~~
$ git log --all --graph --pretty=format:'%Cred%h%Creset -%C(yellow)%d%Creset %s %Cgreen(%cr) %C(bold blue)<%an>%Creset' --abbrev-commit --date=relative
~~~
可以看到:

这要归功于[Palesz](http://stackoverflow.com/users/88355/palesz)在stackoverflow的回答。
*这个命令可以被用作别名,详细做法见[这里](https://github.com/tiimgreen/github-cheat-sheet#aliases)。*
[*进一步了解 Git `log` 命令.*](http://git-scm.com/docs/git-log)
### Git查询
Git查询运行你在之前的所有提交信息里进行搜索,找到其中和搜索条件相匹配的最近的一条。
~~~
$ git show :/query
~~~
这里 `query` (区别大小写)是你想要搜索的词语, 这条命令会找到包含这个词语的最后那个提交并显示变动详情。
~~~
$ git show :/typo
~~~

- 按 `q` 键退出命令。*
### 合并分支
输入命令:
~~~
$ git branch --merged
~~~
这会显示所有已经合并到你当前分支的分支列表。
相反地:
~~~
$ git branch --no-merged
~~~
会显示所有还没有合并到你当前分支的分支列表。
[*进一步了解 Git `branch` 命令.*](http://git-scm.com/docs/git-branch)
### 使用网页查看本地仓库
使用Git的 `instaweb` 可以立即在 `gitweb`中浏览你的工作仓库。这个命令是个简单的脚本,配置了`gitweb`和用来浏览本地仓库的Web服务器。*(译者注:默认需要lighttpd支持)*
~~~
$ git instaweb
~~~
执行后打开:
[*进一步了解 Git `instaweb` 命令.*](http://git-scm.com/docs/git-instaweb)
### Git配置
所有Git配置都保存在你的`.gitconfig` 文件中。
#### Git命令自定义别名
别名用来帮助你定义自己的git命令。比如你可以定义 `git a` 来运行 `git add --all`。
要添加一个别名, 一种方法是打开 `~/.gitconfig` 文件并添加如下内容:
~~~
[alias]
co = checkout
cm = commit
p = push
# Show verbose output about tags, branches or remotes
tags = tag -l
branches = branch -a
remotes = remote -v
~~~
...或者在命令行里键入:
~~~
$ git config --global alias.new_alias git_function
~~~
例如:
~~~
$ git config --global alias.cm commit
~~~
指向多个命令的别名可以用引号来定义:
~~~
$ git config --global alias.ac 'add -A . && commit'
~~~
下面列出了一些有用的别名:
| 别名 Alias | 命令 Command | 如何设置 What to Type |
|-----|-----|-----|
| `git cm` | `git commit` | `git config --global alias.cm commit` |
| `git co` | `git checkout` | `git config --global alias.co checkout` |
| `git ac` | `git add . -A``git commit` | `git config --global alias.ac '!git add -A && git commit'` |
| `git st` | `git status -sb` | `git config --global alias.st 'status -sb'` |
| `git tags` | `git tag -l` | `git config --global alias.tags 'tag -l'` |
| `git branches` | `git branch -a` | `git config --global alias.branches 'branch -a'` |
| `git remotes` | `git remote -v` | `git config --global alias.remotes 'remote -v'` |
| `git lg` | `git log --color --graph --pretty=format:'%Cred%h%Creset -%C(yellow)%d%Creset %s %Cgreen(%cr) %C(bold blue)<%an>%Creset' --abbrev-commit --` | `git config --global alias.lg "log --color --graph --pretty=format:'%Cred%h%Creset -%C(yellow)%d%Creset %s %Cgreen(%cr) %C(bold blue)<%an>%Creset' --abbrev-commit --"` |
#### 自动更正
如果键入 `git comit` 你会看到如下输出:
~~~
$ git comit -m "Message"
# git: 'comit' is not a git command. See 'git --help'.
# Did you mean this?
# commit
~~~
为了在键入 `comit` 调用 `commit`命令,只需启用自动纠错功能:
~~~
$ git config --global help.autocorrect 1
~~~
现在你就会看到:
~~~
$ git comit -m "Message"
# WARNING: You called a Git command named 'comit', which does not exist.
# Continuing under the assumption that you meant 'commit'
# in 0.1 seconds automatically...
~~~
#### 带颜色输出
要在你的Git命令输出里加上颜色的话,可以用如下命令:
~~~
$ git config --global color.ui 1
~~~
[*进一步了解 Git `config` 命令.*](http://git-scm.com/docs/git-config)
### Git资源
| Title | Link |
|-----|-----|
| Official Git Site | [http://git-scm.com/](http://git-scm.com/) |
| Official Git Video Tutorials | [http://git-scm.com/videos](http://git-scm.com/videos) |
| Code School Try Git | [http://try.github.com/](http://try.github.com/) |
| Introductory Reference & Tutorial for Git | [http://gitref.org/](http://gitref.org/) |
| Official Git Tutorial | [http://git-scm.com/docs/gittutorial](http://git-scm.com/docs/gittutorial) |
| Everyday Git | [http://git-scm.com/docs/everyday](http://git-scm.com/docs/everyday) |
| Git Immersion | [http://gitimmersion.com/](http://gitimmersion.com/) |
| Ry's Git Tutorial | [http://rypress.com/tutorials/git/index.html](http://rypress.com/tutorials/git/index.html) |
| Git for Designer | [http://hoth.entp.com/output/git_for_designers.html](http://hoth.entp.com/output/git_for_designers.html) |
| Git for Computer Scientists | [http://eagain.net/articles/git-for-computer-scientists/](http://eagain.net/articles/git-for-computer-scientists/) |
| Git Magic | [http://www-cs-students.stanford.edu/~blynn/gitmagic/](http://www-cs-students.stanford.edu/~blynn/gitmagic/) |
#### Git参考书籍
| Title | Link |
|-----|-----|
| Pragmatic Version Control Using Git | [http://www.pragprog.com/titles/tsgit/pragmatic-version-control-using-git](http://www.pragprog.com/titles/tsgit/pragmatic-version-control-using-git) |
| Pro Git | [http://git-scm.com/book](http://git-scm.com/book) |
| Git Internals Peepcode | [http://peepcode.com/products/git-internals-pdf](http://peepcode.com/products/git-internals-pdf) |
| Git in the Trenches | [http://cbx33.github.com/gitt/](http://cbx33.github.com/gitt/) |
| Version Control with Git | [http://www.amazon.com/Version-Control-Git-collaborative-development/dp/1449316387](http://www.amazon.com/Version-Control-Git-collaborative-development/dp/1449316387) |
| Pragmatic Guide to Git | [http://www.pragprog.com/titles/pg_git/pragmatic-guide-to-git](http://www.pragprog.com/titles/pg_git/pragmatic-guide-to-git) |
| Git: Version Control for Everyone | [http://www.packtpub.com/git-version-control-for-everyone/book](http://www.packtpub.com/git-version-control-for-everyone/book) |