14—innodb的旧式记录结构
最后更新于:2022-04-01 16:05:07
在上一篇里,bingxi和alex聊了关于簇页管理。Innodb的记录分为新旧两种格式,在本篇里,bingxi和alex会讨论下innodb的旧式记录结构。
对应的文件为:
D:/mysql-5.1.7-beta/storage/innobase/rem/rem0rec.c
D:/mysql-5.1.7-beta/storage/innobase/include/rem0rec.h
D:/mysql-5.1.7-beta/storage/innobase/include/rem0rec.ic
## 1)innodb旧式结构组成
Bingxi:“alex,mysql存储的最基本的结构是记录。B树的内结点和叶结点都是由记录组成。实际存储的内容如下:
内容1:存放字段偏移量,用于指明字段的偏移量。长度为字段数*1或者字段数*2
内容2:长度为6,存放记录的控制信息。
内容3:存放实际的内容(记录指针指向内容3的开始处)
Alex,你在代码中看下控制信息相关的6个字节的定义。
”
Alex:“好的,我们看下rem0rec.ic的中旧式记录的控制结构的定义。
/* Offsets of the bit-fields in an old-style record. NOTE! In the table the
most significant bytes and bits are written below less significant.
(1) byte offset (2) bit usage within byte
downward from
origin -> 1 8 bits pointer to next record
2 8 bits pointer to next record
3 1 bit short flag
7 bits number of fields
4 3 bits number of fields
5 bits heap number
5 8 bits heap number
6 4 bits n_owned
4 bits info bits
*/
这个定义是从右往左的,如果转化为从左往右,则如下图所示:

因此,我们继续看代码,假设我们已经得到一个记录指针p,那么我们如何获得对应的控制信息。
~~~
/**********************************************************
The following function is used to get the number of fields
in an old-style record. */
UNIV_INLINE
ulint
rec_get_n_fields_old(
/*=================*/
/* out: number of data fields */
rec_t* rec)/* in: physical record */
{
ulintret;
ut_ad(rec);
//在这里设置断点
ret = rec_get_bit_field_2(rec, REC_OLD_N_FIELDS,
REC_OLD_N_FIELDS_MASK, REC_OLD_N_FIELDS_SHIFT);
ut_ad(ret <= REC_MAX_N_FIELDS);
ut_ad(ret > 0);
return(ret);
}
设置断点,可以看到rec在此次终端时的值为0x0119808c,打开内存监控输入该地址。
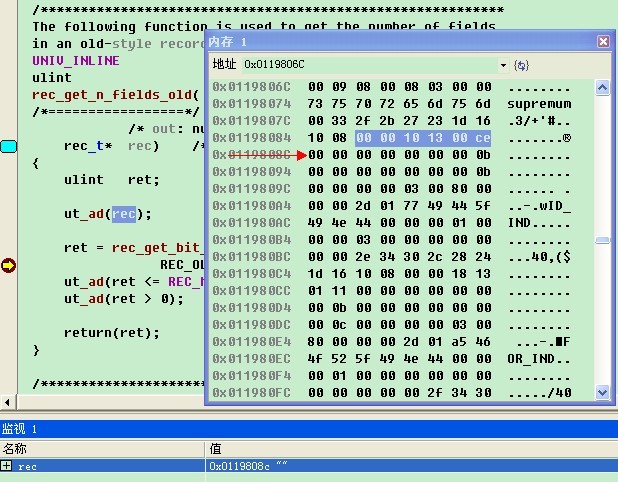
从指针向前数出6个字节,这六个字节是
00 00 10 13 00 ce
根据前面的推算,可以得知如下信息:
4bits info:全为0,也就是表该字段有效
4bits n_owned: 值为0
13bits heap_no: 值为2
10bits n_fiels: 值为9
1bit 1bytes_offs_flag: 值为1,因此1个字节可以表示一个偏移
16bits next 16 bits: 值为0xce
带这这些信息,我们来验证代码,按F11进入rec_get_bit_field_2函数。
/**********************************************************
Gets a bit field from within 2 bytes. */
UNIV_INLINE
ulint
rec_get_bit_field_2(
/*================*/
rec_t* rec, /* in: pointer to record origin */
ulintoffs, /* in: offset from the origin down */
ulintmask, /* in: mask used to filter bits */
ulintshift) /* in: shift right applied after masking */
{
ut_ad(rec);
//在本例中
//rec为0x0119808c
//offs为4
//mask为0x000007fe即,0000 0111 1111 1110
//shift为1
//步骤1:将指针-4,也就是图1中字节3的起始位置,通过与mask的与操作,将与n_fields相关的10个字节“与”出来,将结果右移一位,就得到记录数
return((mach_read_from_2(rec - offs) & mask) >> shift);
}
~~~
继续往下执行,得到返回值9。获取控制信息其他字节的方法类似。
我们接着往下看字段偏移量的类型,在这6个控制信息之前存放的是字段偏移量,也就是相对于记录指针的偏移量。
我们继续进行调试,在rec_1_get_field_start_offs函数设置断点,可以看到rec的值为0x011ac122。
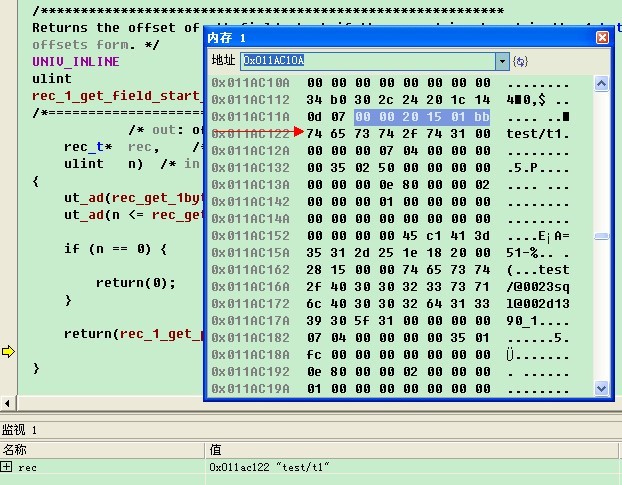
根据控制信息可以知道该记录的字段数为10个。这10个偏移量如下:
34 b0 30 2c 24 20 1c 14 0d 07
这些偏移量是反向存储的,实际上对应的各字段的长度为:
字段0:7
字段1:6 (0d-07=6)
字段2:7 (14-0d=7)
字段3:8 (1c-14=8)
字段4:4 (20-1c=4)
字段5:4 (24-20=4)
字段6:8 (2c-24=8)
字段7:4 (30-2c=4)
字段8::0 (b0的最高位为1,表示该字段为null,b0去掉最高位的0,同样是30)
字段9: 4 (34-30=4)
因此,字段1存储的7是第一个字段的偏移量么?也就是第一个字段开始值是p+7?那么p+0是什么?ok,很明显字段从0开始编码。看下面的代码。
~~~
/**********************************************************
Returns the offset of nth field start if the record is stored in the 1-byte
offsets form. */
UNIV_INLINE
ulint
rec_1_get_field_start_offs(
/*=======================*/
/* out: offset of the start of the field */
rec_t* rec, /* in: record */
ulintn) /* in: field index */
{
ut_ad(rec_get_1byte_offs_flag(rec));
ut_ad(n <= rec_get_n_fields_old(rec));
//步骤1:如果是获得第0个字段的起始地址,那么就是0
if (n == 0) {
return(0);
}
//步骤2:否则调用函数rec_1_get_prev_field_end_info
// rec_1_get_prev_field_end_info的实现为:
// mach_read_from_1(rec - (REC_N_OLD_EXTRA_BYTES + n))
//因此在本例中,假设n为1,则返回7
//假设n为2,则返回13。
return(rec_1_get_prev_field_end_info(rec, n)
& ~REC_1BYTE_SQL_NULL_MASK);
}
~~~
这段代码中出现了宏REC_1BYTE_SQL_NULL_MASK,是因为偏移量的最高为表示是否为null。
当偏移量是1字节时,最高位为0,则是非NULL,为1,则该字段是null。其他的7bit用于表示偏移量,因此可以表示的最大偏移量为127。
当偏移量为2字节时,最高位为0,则是非null,为1,则该字段是null,次最高位用于表示是否字段存储在同一页。
经过重组,本例的记录进行梳理如下:
34 b0 30 2c 24 20 1c 14 0d 07
00 00 20 15 01 bb //6个字节的控制信息
74 65 73 74 2f 74 31 //test/t1 字段0:7字节
00 00 00 00 07 04 //字段1:6字节
00 00 00 00 35 02 50 //字段2:7字节
00 00 00 00 00 00 00 0e //字段3:8字节
80 00 00 02 //字段4:4字节
00 00 00 01 //字段5:4字节
00 00 00 00 //字段6:8字节
00 00 00 00 00 00 00 00 //字段7:4字节
//字段8:null
00 00 00 00 //字段9:4字节
建议将文件中的旧式记录的函数都阅读下。Bingxi,你知道旧式记录用于什么地方么?而新式的又用在什么地方?
”
Bingxi:“默认情况下,5.1.7版本中,数据字典使用还是旧式记录,而用户自己创建的innodb表使用的是新式存储结构。在下一篇里,我们聊下新式记录格式。”
Alex:“ok”
13—innodb的簇页管理
最后更新于:2022-04-01 16:05:05
在上一篇,bingxi和alex聊了关于簇描述结构。在本篇,bingxi和alex会讨论下簇页管理。所谓的簇页,就是用于管理簇结构的页。
对应的文件为:
D:/mysql-5.1.7-beta/storage/innobase/fsp/ fsp0fsp.c
D:/mysql-5.1.7-beta/storage/innobase/include/ fsp0fsp.h
## 1)每个页存放多少个簇描述结构
Bingxi:“alex,我们上一篇聊了簇结构,一个簇描述结构大小为40个字节,管理64个页。这40个字节存储在什么地方呢?0~63页是一个簇,那么n*64~(n+1)*64-1也需要一个簇描述结构。嗯,因此可以将第0页用于存储这些结构,假设存储k个。也就是描述了64k个页,接着第64k这个页继续描述接下来的64k个页,以此类推。如图1
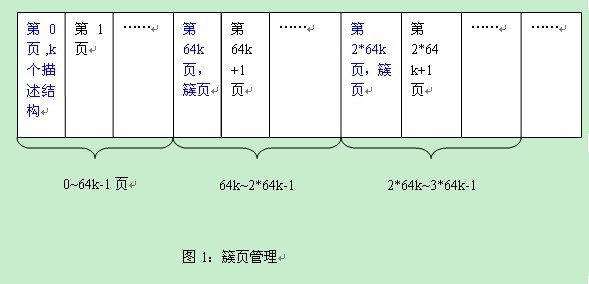
从图1中可以看到,首先是0页管理64k个页(也就是个k个簇),接着第64k这个页管理后面的64k个页,依次类推。
现在转化为,这个k值是多少?alex,你从代码里面看看。
”
Alex:“我们看下fsp0fsp.h中宏定义
~~~
/* Number of pages described in a single descriptor page: currently each page
description takes less than 1 byte; a descriptor page is repeated every
this many file pages */
//该值描述一个簇描述页可以描述的页数,也就是每XDES_DESCRIBED_PER_PAGE个页出现一个簇页,UNIV_PAGE_SIZE的值我们可以知道是16k(也就是16384)。
#define XDES_DESCRIBED_PER_PAGE UNIV_PAGE_SIZE
~~~
从定义中可以看出,一个簇页可以描述16384个页,也就是256个簇描述结构(16384/64=256)。这256个簇占用的大小为10k(256*40=10k)。而一个页是16k,剩下不到6k的空闲是不使用的。
这里面,我们就可以知道1个簇页可以描述的页为16384,对应的大小为256M(16384*16K=256M)。即1个簇页管理256M。因此,实际对应的簇页管理见图2:

接着就带来一个算法,知道一个页号n,它对应的簇页编号是多少。如果n为0~16384-1,则对应的簇页为0,也就是在0页中管理编号为n的页。如果n为16384~2*16384-1,则对应的簇页为16384,以此类推。我们看下具体的代码:
~~~
/************************************************************************
Calculates the page where the descriptor of a page resides. */
UNIV_INLINE
ulint
xdes_calc_descriptor_page(
/*======================*/
/* out: descriptor page offset */
ulintoffset) /* in: page offset */
{
ut_ad(UNIV_PAGE_SIZE > XDES_ARR_OFFSET
+ (XDES_DESCRIBED_PER_PAGE / FSP_EXTENT_SIZE) * XDES_SIZE);
//参数offset为我们需要计算的页号
// XDES_DESCRIBED_PER_PAGE为16384
return(ut_2pow_round(offset, XDES_DESCRIBED_PER_PAGE));
}
/*****************************************************************
Calculates fast a value rounded to a multiple of a power of 2. */
UNIV_INLINE
ulint
ut_2pow_round(
/*==========*/ /* out: value of n rounded down to nearest
multiple of m */
ulintn, /* in: number to be rounded */
ulintm) /* in: divisor; power of 2 */
{
ut_ad(0x80000000UL % m == 0);
//在本例子中,m为16384
// m – 1对应的二进制为00000000000000000111111111111111
//~(m - 1)为11111111111111111000000000000000
// n & ~(m - 1)相当于将n最低的15位置0
//相当于 n-n%16384
return(n & ~(m - 1));
}
~~~
因此,通过函数xdes_calc_descriptor_page就可以知道给定页所在的簇页。
接着有带来一个算法,该给定页对应的簇描述结构是簇页的第几个簇描述结构(从0开始编码)。见下面的代码:
~~~
/************************************************************************
Calculates the descriptor index within a descriptor page. */
UNIV_INLINE
ulint
xdes_calc_descriptor_index(
/*=======================*/
/* out: descriptor index */
ulintoffset) /* in: page offset */
{
//步骤1:ut_2pow_remainder的作用是offset % 16384=n
//步骤2:FSP_EXTENT_SIZE的值是64,那么对应的簇描述结构就是n/64
//举例,假设offset为16386,那么n为2(16386%16384)
//一个簇页描述16384个页,第一个簇描述的页对应的n为0-63,虽然这里n为2,实际上描述的页号是16384(该簇页的页号)+2=16386
//n为2,对应的第0个簇(n/64)
return(ut_2pow_remainder(offset, XDES_DESCRIBED_PER_PAGE) /
FSP_EXTENT_SIZE);
}
/*****************************************************************
Calculates fast the remainder when divided by a power of two. */
UNIV_INLINE
ulint
ut_2pow_remainder(
/*==============*/ /* out: remainder */
ulintn, /* in: number to be divided */
ulintm) /* in: divisor; power of 2 */
{
ut_ad(0x80000000UL % m == 0);
return(n & (m - 1));
}
~~~
通过这个代码,就可以得到给定页对应簇页中的第几个簇描述结构。我们再看下实际的调用,见最后一个函数的调用。
~~~
/************************************************************************
Gets pointer to a the extent descriptor of a page. The page where the extent
descriptor resides is x-locked. If the page offset is equal to the free limit
of the space, adds new extents from above the free limit to the space free
list, if not free limit == space size. This adding is necessary to make the
descriptor defined, as they are uninitialized above the free limit. */
UNIV_INLINE
xdes_t*
xdes_get_descriptor_with_space_hdr(
/*===============================*/
/* out: pointer to the extent descriptor,
NULL if the page does not exist in the
space or if offset > free limit */
fsp_header_t*sp_header,/* in: space header, x-latched */
ulint space, /* in: space id */
ulint offset, /* in: page offset;
if equal to the free limit,
we try to add new extents to
the space free list */
mtr_t* mtr)/* in: mtr handle */
{
ulintlimit;
ulintsize;
ulintdescr_page_no;
page_t* descr_page;
ut_ad(mtr);
ut_ad(mtr_memo_contains(mtr, fil_space_get_latch(space),
MTR_MEMO_X_LOCK));
/* Read free limit and space size */
limit = mtr_read_ulint(sp_header + FSP_FREE_LIMIT, MLOG_4BYTES, mtr);
size = mtr_read_ulint(sp_header + FSP_SIZE, MLOG_4BYTES, mtr);
/* If offset is >= size or > limit, return NULL */
if ((offset >= size) || (offset > limit)) {
return(NULL);
}
/* If offset is == limit, fill free list of the space. */
if (offset == limit) {
fsp_fill_free_list(FALSE, space, sp_header, mtr);
}
descr_page_no = xdes_calc_descriptor_page(offset);
if (descr_page_no == 0) {
/* It is on the space header page */
descr_page = buf_frame_align(sp_header);
} else {
descr_page = buf_page_get(space, descr_page_no, RW_X_LATCH,
mtr);
#ifdef UNIV_SYNC_DEBUG
buf_page_dbg_add_level(descr_page, SYNC_FSP_PAGE);
#endif /* UNIV_SYNC_DEBUG */
}
//看这里
//第0个簇结构相当于簇页头的偏移量为XDES_ARR_OFFSET
//定义:#define XDES_ARR_OFFSET (FSP_HEADER_OFFSET + FSP_HEADER_SIZE)
//FSP_HEADER_OFFSET的值为38,这个是每个页都有的,在第11篇文章中有描述
//定义:#define FSP_HEADER_SIZE (32 + 5 * FLST_BASE_NODE_SIZE)
//#define FLST_BASE_NODE_SIZE (4 + 2 * FIL_ADDR_SIZE)
//#define FIL_ADDR_SIZE 6 /* address size is 6 bytes */
//因此FSP_HEADER_SIZE为112
//所以XDES_ARR_OFFSET为38+112=150
return(descr_page + XDES_ARR_OFFSET
+ XDES_SIZE * xdes_calc_descriptor_index(offset));
}
~~~
通过这个函数就可以得到给定页对应的簇描述结构。这里面需要提示一点的是,FSP_HEADER_SIZE是有意义的,用于描述表空间。
看下该结构的描述:
/* SPACE HEADER
============
File space header data structure: this data structure is contained in the
first page of a space. The space for this header is reserved in every extent
descriptor page, but used only in the first. */
从中可以看出,每个簇页都有这样一个结构,但是只有第一个簇页有效,也就是第0个文件的第0个文件。在如下的配置中,也就是ibdata1文件的第0页。
[mysqld]
innodb_data_file_path = ibdata1:10M;ibdata2:10M:autoextend
关于描述符,就这么多。具体的细节,建议查看代码。
”
Bingxi:“ok,今天就这么多吧”
Alex:“ok”
12—innodb的簇描述结构
最后更新于:2022-04-01 16:05:02
在上一篇里,bingxi和alex聊了关于innodb的页编号。在本篇,bingxi和alex会讨论下簇描述结构。所谓的簇描述结构,对应的英文描述是extent,表达的意思是一些连续的页。
对应的文件为:
D:/mysql-5.1.7-beta/storage/innobase/fsp/ fsp0fsp.c
D:/mysql-5.1.7-beta/storage/innobase/include/ fsp0fsp.h
## 1)簇的定义
Bingxi:“alex,在共享存储空间的情况,多个innodb表存储在同一个表空间里面。对单个表而言,存储并不一定是连续的。在上一篇里面提到这样的一个例子:
a)创建表1,并插入数据
b)创建表2,并插入数据
c)表1插入数据
d)表2插入数据
如果我们每次分配一个页,就会存储得很凌乱。可能第n页属于t1,n+1页属于t2,n+3页属于t1,n+4页属于t2,……
这样就会降低io的读写性能,因此我们可以看到在mysql中有簇的概念,这里的簇也就是指extent。簇是连续的页,数量是64页。那么我问下alex,假设T1表新分配了一个簇,某些页用完了,如何标识?
”
Alex:“bingxi,我也存在这个疑惑。我们用过代码来看这个问题吧。代码如下:
~~~
/* EXTENT DESCRIPTOR
=================
File extent descriptor data structure: contains bits to tell which pages in
the extent are free and which contain old tuple version to clean. */
/*-------------------------------------*/
#define XDES_ID 0 /* The identifier of the segment
to which this extent belongs */
#define XDES_FLST_NODE 8 /* The list node data structure
for the descriptors */
#define XDES_STATE (FLST_NODE_SIZE + 8)
/* contains state information
of the extent */
#define XDES_BITMAP (FLST_NODE_SIZE + 12)
/* Descriptor bitmap of the pages
in the extent */
~~~
定义里面的数字是偏移量,我们来画个图看下。
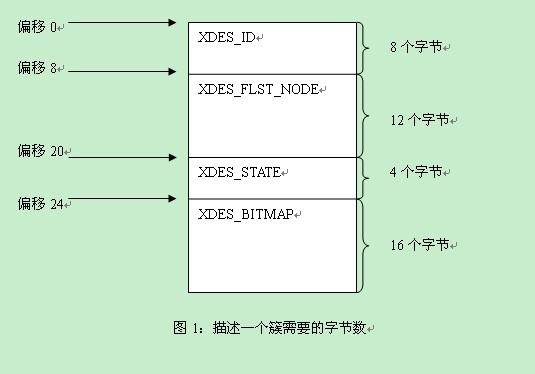
从上面我们可以知道:
XDES_ID //0
XDES_FLST_NODE //8
XDES_STATE //20
XDES_BITMAP //24
这些内容中,我们会产生两个疑问:1)16个字节描述64个页的使用状态,怎么描述?如果只是描述该页是否使用,1个bit位就够了,也就是64个bit位,即8个字节。而实际使用了16个字节,那么是不是可以认为是两个bit位来描述一个页的使用情况。2)每个簇使用40个字节,这些内容存储在什么地方?
Bingxi,你来看看。我们在本篇中,先解决第一个问题,第二个问题留到下一篇。
”
Bingxi:“第一个问题,可以理解。
~~~
//每个页需要两个bit位来描述
#define XDES_BITS_PER_PAGE 2 /* How many bits are there per page */
//这两个bit位中,第一个bit位标识该页是否在使用
#define XDES_FREE_BIT 0 /* Index of the bit which tells if
the page is free */
//第二个标识位目前没有使用
#define XDES_CLEAN_BIT 1 /* NOTE: currently not used!
Index of the bit which tells if
there are old versions of tuples
on the page */
~~~
每个页使用两个位,那么64个页使用的就是16个字节。我们看一下簇的初始化代码:
~~~
/**************************************************************************
Inits an extent descriptor to the free and clean state. */
UNIV_INLINE
void
xdes_init(
/*======*/
xdes_t* descr, /* in: descriptor */
mtr_t* mtr)/* in: mtr */
{
ulinti;
ut_ad(descr && mtr);
ut_ad(mtr_memo_contains(mtr, buf_block_align(descr),
MTR_MEMO_PAGE_X_FIX));
ut_ad((XDES_SIZE - XDES_BITMAP) % 4 == 0);
//其中XDES_BITMAP的值为24
// XDES_SIZE的大小为40
//也就是簇描述结构中24字节开始的16个字节全部设置为1
for (i = XDES_BITMAP; i < XDES_SIZE; i += 4) {
mlog_write_ulint(descr + i, 0xFFFFFFFFUL, MLOG_4BYTES, mtr);
}
//设置簇的使用状态为空闲簇
xdes_set_state(descr, XDES_FREE, mtr);
}
~~~
我们接着看xdes_set_state的实现:
~~~
/**************************************************************************
Sets the state of an xdes. */
UNIV_INLINE
void
xdes_set_state(
/*===========*/
xdes_t* descr, /* in: descriptor */
ulintstate, /* in: state to set */
mtr_t* mtr)/* in: mtr handle */
{
ut_ad(descr && mtr);
ut_ad(state >= XDES_FREE);
ut_ad(state <= XDES_FSEG);
ut_ad(mtr_memo_contains(mtr, buf_block_align(descr),
MTR_MEMO_PAGE_X_FIX));
// descr是该簇的起始指针,相对该指针XDES_STATE的开始4个字节填写status的值
mlog_write_ulint(descr + XDES_STATE, state, MLOG_4BYTES, mtr);
}
~~~
同样的,获取状态也是类似的。我们接着看下xdes_get_n_used函数,该函数表述该簇的页已经使用了多少。
~~~
/**************************************************************************
Returns the number of used pages in a descriptor. */
UNIV_INLINE
ulint
xdes_get_n_used(
/*============*/
/* out: number of pages used */
xdes_t* descr, /* in: descriptor */
mtr_t* mtr)/* in: mtr */
{
ulinti;
ulintcount = 0;
ut_ad(descr && mtr);
ut_ad(mtr_memo_contains(mtr, buf_block_align(descr),
MTR_MEMO_PAGE_X_FIX));
//对该簇的每一页调用函数xdes_get_bit
// xdes_get_bit函数返回对应页的是否使用位
//我们从初始化函数中知道,1表示使用,0表示未使用
//因为如果函数返回的值是false,则表示该页已经使用了,将count加1
for (i = 0; i < FSP_EXTENT_SIZE; i++) {
if (FALSE == xdes_get_bit(descr, XDES_FREE_BIT, i, mtr)) {
count++;
}
}
return(count);
}
~~~
如果所有的页都使用完,那么就表示该页已经使用满。
~~~
/**************************************************************************
Returns true if extent contains no free pages. */
UNIV_INLINE
ibool
xdes_is_full(
/*=========*/
/* out: TRUE if full */
xdes_t* descr, /* in: descriptor */
mtr_t* mtr)/* in: mtr */
{
//如果该簇使用的页等于64(FSP_EXTENT_SIZE),也就是表示该簇已经满了
if (FSP_EXTENT_SIZE == xdes_get_n_used(descr, mtr)) {
return(TRUE);
}
return(FALSE);
}
~~~
其它的函数类似,这里就不一一列举。作为重点,我们再看一下xdes_set_bit函数。
~~~
/**************************************************************************
Sets a descriptor bit of a page. */
UNIV_INLINE
void
xdes_set_bit(
/*=========*/
xdes_t* descr, /* in: descriptor */
ulintbit, /* in: XDES_FREE_BIT or XDES_CLEAN_BIT */
ulintoffset, /* in: page offset within extent:
0 ... FSP_EXTENT_SIZE - 1 */
ibool val, /* in: bit value */
mtr_t* mtr)/* in: mtr */
{
ulintindex;
ulintbyte_index;
ulintbit_index;
ulintdescr_byte;
ut_ad(mtr_memo_contains(mtr, buf_block_align(descr),
MTR_MEMO_PAGE_X_FIX));
ut_ad((bit == XDES_FREE_BIT) || (bit == XDES_CLEAN_BIT));
ut_ad(offset < FSP_EXTENT_SIZE);
//假设offset的值为n
// XDES_BITS_PER_PAGE为2
//index也就是相对于XDES_BITMAP的偏移bit位
index = bit + XDES_BITS_PER_PAGE * offset;
//index/8对应的是相对于XDES_BITMAP的偏移字节
byte_index = index / 8;
//表示所在的位,这里面要重点关注
//字节是从低字节编码的,比如n对应的bit_index是0,实际上表示的是第0位,而不是第7位。即使xxxxxxxy中的y对应的位。
//假设bit_index为6,实际对应的是xyxxxxxx中的y对应的位。
bit_index = index % 8;
//获得对应的字节
descr_byte = mtr_read_ulint(descr + XDES_BITMAP + byte_index,
MLOG_1BYTE, mtr);
//设置对应的bit位
descr_byte = ut_bit_set_nth(descr_byte, bit_index, val);
//重写入
mlog_write_ulint(descr + XDES_BITMAP + byte_index, descr_byte,
MLOG_1BYTE, mtr);
}
~~~
这样,我们对应簇的bit位进行设置,标识对应的页的使用情况。还有一些其他的函数,建议直接看代码。
”
Alex:“ok,今天就到这里吧。”
Bingxi:“ok”
11—innodb的页编号
最后更新于:2022-04-01 16:05:00
在上一篇里,bingxi和alex聊了关于mysql内核调试方法。前10篇是一些基础性的内容,从本篇开始,将开始描述inndob的存储结构,为了便于描述的方便,会将一些细节暂时隐去,在后续说到B时会串起来。
我们可以了解到oracle、sqlserver采用的是段、簇、页的方式进行管理。很多其他的数据库也是采用的这样的方法。本篇,bingxi和alex讨论的是页的编号。
对应的文件为:
D:/mysql-5.1.7-beta/storage/innobase/fil/fil0fil.c
D:/mysql-5.1.7-beta/storage/innobase/include/fil0fil.h
Bingxi:“alex,我们的初级系列终于开始进入存储部分了。存储这边内容,包含的还是比较多。Innodb共享存储空间而言(独立表空间也是一样,这里我们只分析共享表空间),以固定大小划分了很多个页。假设共享存储空间只有一个文件,那么编号就是从0开始,默认页大小为16k。也就是文件的大小,按照16k进行划分。假设是10M,那么就是划分为640页,编号从0-639。
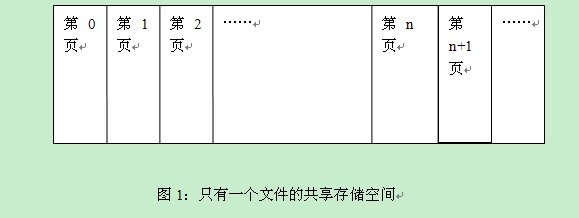
现在问题来了,如果是多个文件呢,如何编号。Alex,你来看看。提示下,mysql的共享表空间,只允许最后一个文件为可扩展的。
”
Alex:“ok,我们通过代码来看这个问题。我们先配置下my.ini,内容如下:
[mysqld]
innodb_data_file_path = ibdata1:10M;ibdata2:10M:autoextend
我们看下fil_io代码的实现,
~~~
/************************************************************************
Reads or writes data. This operation is asynchronous (aio). */
ulint
fil_io(
/*===*/
/* out: DB_SUCCESS, or DB_TABLESPACE_DELETED
if we are trying to do i/o on a tablespace
which does not exist */
ulinttype, /* in: OS_FILE_READ or OS_FILE_WRITE,
ORed to OS_FILE_LOG, if a log i/o
and ORed to OS_AIO_SIMULATED_WAKE_LATER
if simulated aio and we want to post a
batch of i/os; NOTE that a simulated batch
may introduce hidden chances of deadlocks,
because i/os are not actually handled until
all have been posted: use with great
caution! */
ibool sync, /* in: TRUE if synchronous aio is desired */
ulintspace_id,/* in: space id */
ulintblock_offset, /* in: offset in number of blocks */
ulintbyte_offset, /* in: remainder of offset in bytes; in
aio this must be divisible by the OS block
size */
ulintlen, /* in: how many bytes to read or write; this
must not cross a file boundary; in aio this
must be a block size multiple */
void* buf, /* in/out: buffer where to store read data
or from where to write; in aio this must be
appropriately aligned */
void* message)/* in: message for aio handler if non-sync
aio used, else ignored */
{
//1.找到对应的表空间结构
HASH_SEARCH(hash, system->spaces, space_id, space,
space->id == space_id);
……
//2.取得第一个文件结点
node = UT_LIST_GET_FIRST(space->chain);
for (;;) {
……
//文件的大小根据my.ini的配置而定
//第一个文件ibdata1是10M,因此对应的node->size为640
//第二个文件ibdata2是10M,因此对应的node->size为640
//3.假设我们查找的文件号为0-639,则对应为第一个文件。
if (node->size > block_offset) {
/* Found! */
break;
} else {
//4.假设我们查找的文件号>640,则查看是否在第二个文件中。
//假设是640,则在第二个文件的偏移量为0*16k字节处开始的一页,也就是文件开始处,也可以勉强称为第二个文件的第0页,实际上是640页。
//假设是641,则在第二个文件的偏移量为(641-640)*16k字节处开始的一页,也可以勉强称为第二个文件的第1页,实际上是641页。
block_offset -= node->size;
node = UT_LIST_GET_NEXT(chain, node);
}
}
……
//5.计算偏移量,见前面代码中的block_offset
offset_high = (block_offset >> (32 - UNIV_PAGE_SIZE_SHIFT));
offset_low = ((block_offset << UNIV_PAGE_SIZE_SHIFT) & 0xFFFFFFFFUL)
+ byte_offset;
……
//6.进行aio操作,offset_low指相对于文件头的字节偏移,len指长度,即获得长度,通常为16k
ret = os_aio(type, mode | wake_later, node->name, node->handle, buf,
offset_low, offset_high, len, node, message);
……
return(DB_SUCCESS);
}
~~~
因此,两个文件时的页编号在本例中如图2:
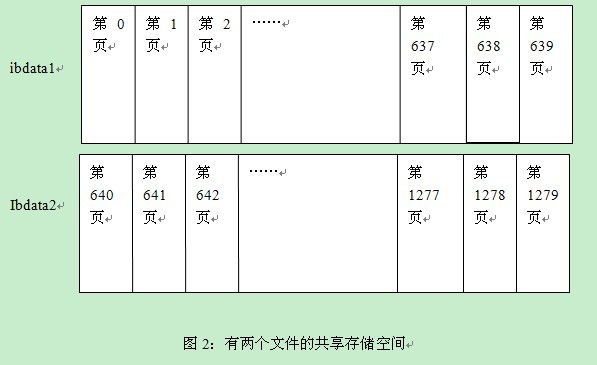
同样,假设有3个文件。对应的大小分别为xMB,yMB,zMB。则第一个文件的编号为0---x*1024/16-1,第二个文件的编号为x*1024/16---(x+y)*1024/16-1,第三个文件的页编号为(x+y)*1024/16---(x+y+z)*1024/16-1。最后一个文件的大小是可变的,可参考fil相关代码。
Bingxi,页编号就是这么回事情了。每个页会一个编号,因此在每一页的开始处,会有38个字节用于描述本页。定义的是相对于页头的偏移量。
~~~
/* The byte offsets on a file page for various variables */
#define FIL_PAGE_SPACE_OR_CHKSUM 0 /* in < MySQL-4.0.14 space id the
page belongs to (== 0) but in later
versions the 'new' checksum of the
page */
//这里记录的是页号
#define FIL_PAGE_OFFSET 4 /* page offset inside space */
//有时候页是连在一起的,比如所引页,这里通过prev和next指向前一页,后一页。
//需要注意的是,假设本页是第n页,下一页不需要是n+1,上一页也不需要是n-1
#define FIL_PAGE_PREV 8 /* if there is a 'natural' predecessor
of the page, its offset */
#define FIL_PAGE_NEXT 12 /* if there is a 'natural' successor
of the page, its offset */
//页中最新日志的日志序列号
#define FIL_PAGE_LSN 16 /* lsn of the end of the newest
modification log record to the page */
//页的类型
#define FIL_PAGE_TYPE 24 /* file page type: FIL_PAGE_INDEX,...,
2 bytes */
#define FIL_PAGE_FILE_FLUSH_LSN 26 /* this is only defined for the
first page in a data file: the file
has been flushed to disk at least up
to this lsn */
#define FIL_PAGE_ARCH_LOG_NO_OR_SPACE_ID 34 /* starting from 4.1.x this
contains the space id of the page */
//这里的38表示的是长度
#define FIL_PAGE_DATA 38 /* start of the data on the page */
~~~
因此文件划分为很多页,每一页有38个字节用于描述页头。而我们知道的是,共享存储空间是有很多数据库共同使用的,假设有如下的操作顺序:
1) 创建表1,并插入数据
2) 创建表2,并插入数据
3) 表1插入数据
4) 表2插入数据
如果我们每次分配一个页,就会存储得很凌乱。可能第n页属于t1,n+1页属于t2,n+3页属于t1,n+4页属于t2,……
这样会降低io读写性能,连续读取性能会更好些,减少了磁头的频繁移动。Bingxi,你觉得mysql是怎么解决这个问题的呢?
”
Bingxi:“ok,这里面就引出了一个新的结构:簇。簇是连续的页,数量为64页。这个我们下篇讲。”
Alex:“ok”
10—mysql内核调试方法
最后更新于:2022-04-01 16:04:58
在前面三篇,bingxi和alex聊了关于innodb的hash、list、以及动态数组的实现方法,这三个结构比较常用。讲完前9篇内容,本篇会描述在windows环境下debug mysql的方法,强烈建议通过debug的方式进行学习。在本篇里,bingxi和alex会聊到windows下常用的调试mysql代码的方法,仅供参考。
## 1)在windows和linux下调试的异同?
Bingxi:“alex,咱们看myslq代码的方法,是通过windows看好呢,还是linux/unix下看呢,两者之间最大的差异是什么?”
Alex:“在mysql 5.1的高版本开始,windows环境与linux环境使用同一套代码。我电脑里面正好有两个版本的代码,我们看下mysql-6.0.4-alpha目录下的INSTALL-WIN-SOURCE文件,其中有这么一段:
To build MySQL on Windows from source, you must satisfy the
following system, compiler, and resource requirements:
* Windows 2000, Windows XP, or newer version. Windows Vista is
not supported until Microsoft certifies Visual Studio 2005 on
Vista.
* CMake, which can be downloaded from http://www.cmake.org.
After installing, modify your path to include the cmake
binary.
* Microsoft Visual C++ 2005 Express Edition, Visual Studio .Net
2003 (7.1), or Visual Studio 2005 (8.0) compiler system.
* If you are using Visual C++ 2005 Express Edition, you must
also install an appropriate Platform SDK. More information and
links to downloads for various Windows platforms is available
from http://msdn.microsoft.com/platformsdk/.
* If you are compiling from a BitKeeper tree or making changes
to the parser, you need bison for Windows, which can be
downloaded from
http://gnuwin32.sourceforge.net/packages/bison.htm.Download
the package labeled "Complete package, excluding sources".
After installing the package, modify your path to include the
bison binary and ensure that this binary is accessible from
Visual Studio.
* Cygwin might be necessary if you want to run the test script
or package the compiled binaries and support files into a Zip
archive. (Cygwin is needed only to test or package the
distribution, not to build it.) Cygwin is available from
http://cygwin.com.
* 3GB to 5GB of disk space.
可以通过这样的方式来生成一份代码,然后用vs2005或者更高版本来调试。
”
Bingxi:“alex,你电脑里面的另外一个软件包是mysql-5.1.7的吧。”
Alex:“嗯,这个版本是mysql5.1.7代码刚出来的时候进行下载的。这个版本的代码直接解压缩之后,可以直接用vs2003进行编译调试。对innodb而言,用这个版本的就可以了,innodb的变化不大,如果需要理解查询引擎,则需要使用更新的版本进行学习。”
Bingxi:“mysql-5.1.7-beta-win-src.zip,这个软件包的内容,我们学了之后,会不会和linux下不一样,有人会有这样的疑问,毕竟在很多公司里面,mysql是运行在linux/unix环境的。我们知道windows与linux/unix的差异还是存在的,尤其是底层的系统函数。”
Alex:“嗯,这个是很多人的疑问。其实mysql进行了代码的封装,比如在5.1.7的windows版本的代码中,也是可以看到系统函数的封装。比如event semaphore。看下对应的代码:
~~~
/*************************************************************
Creates an event semaphore, i.e., a semaphore which may just have two
states: signaled and nonsignaled. The created event is manual reset: it
must be reset explicitly by calling sync_os_reset_event. */
os_event_t
os_event_create(
/*============*/
/* out: the event handle */
const char* name) /* in: the name of the event, if NULL
the event is created without a name */
{
#ifdef __WIN__
os_event_t event;
event = ut_malloc(sizeof(struct os_event_struct));
event->handle = CreateEvent(NULL,/* No security attributes */
TRUE, /* Manual reset */
FALSE, /* Initial state nonsignaled */
(LPCTSTR) name);
if (!event->handle) {
fprintf(stderr,
"InnoDB: Could not create a Windows event semaphore; Windows error %lu/n",
(ulong) GetLastError());
}
#else /* Unix */
os_event_t event;
UT_NOT_USED(name);
event = ut_malloc(sizeof(struct os_event_struct));
os_fast_mutex_init(&(event->os_mutex));
#if defined(UNIV_HOTBACKUP) && defined(UNIV_HPUX10)
ut_a(0 == pthread_cond_init(&(event->cond_var),
pthread_condattr_default));
#else
ut_a(0 == pthread_cond_init(&(event->cond_var), NULL));
#endif
event->is_set = FALSE;
event->signal_count = 0;
#endif /* __WIN__ */
/* Put to the list of events */
os_mutex_enter(os_sync_mutex);
UT_LIST_ADD_FIRST(os_event_list, os_event_list, event);
os_event_count++;
os_mutex_exit(os_sync_mutex);
return(event);
}
~~~
在os_event_create函数体,屏蔽了系统的差异性。开发人员在开发时,需要创建event,只需要os_event_create就行了。
”
Bingxi:“alex,那么按照这个思路,是不是可以获得两个信息:1)如果需要debug系统封装函数,还是建议在linux/unix下也调试下,2)对我们查看非系统函数,在windows与linux/unix下调试,两者都是可以的。”
Alex:“嗯,用哪种调试方法都是可以的。用哪个版本的也是可以的,本系列以描述innodb存储为主,因此使用5.1.7就可以了。”
## 2)搭建windows环境下的mysql5.1.7的调试环境
Bingxi:“好吧,那我们就开始搭建环境吧。”
Alex:“ok,我们先将代码找一个目录进行解压缩,本文中的解压缩位置为d:/。使用vs2003打开D:/bin-mysql-5.1.7-beta/mysql.sln项目文件。
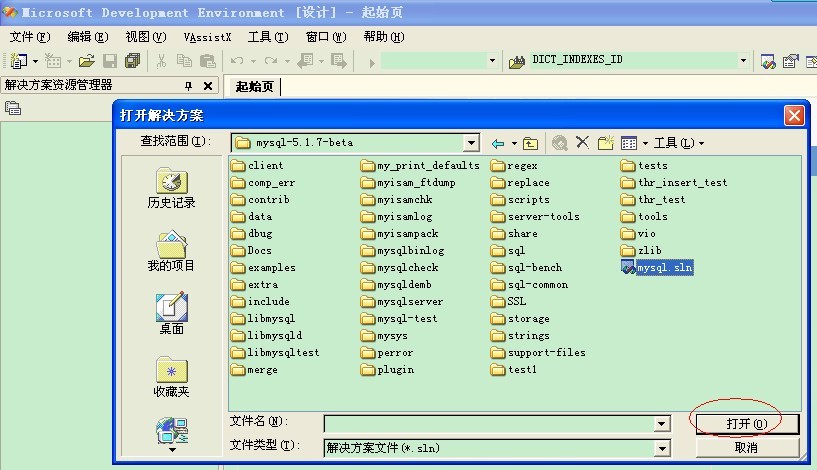
Bingxi,打开之后会有46个project,我们要编译其中哪些工具呢?

”
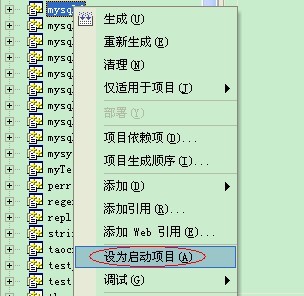
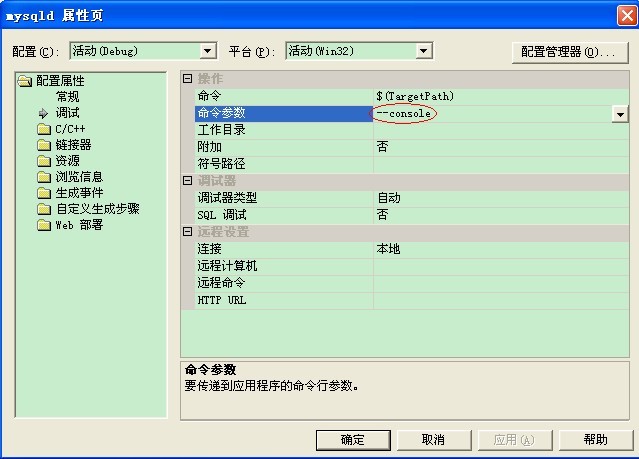
Bingxi:“ok,至少要包含下面三个内容:1)服务端程序,2)客户端程序,3)mysqladmin工具(用于退出调试时使用,直接使用中断调试太暴力了)。顺着这个思路,我们一步步来编译。
首先编译服务端程序,也就是编译mysqld项目。这里有三个建议,1)因为本系列主要调试mysqld的代码,因此需要将mysqld设置为启动项目,2)设置启动方式为console方法,这样可以在console窗口中看到打印信息,3)将D:/bin-mysql-5.1.7-beta下的data文件夹进行压缩保存,这样,我们需要恢复到原始的数据,直接用保存的data进行覆盖就可以了。
设置为启动项目:
设置为console启动方式:
根据个人习惯,决定是否将data进行压缩保存。
接着,我们编译mysqld项目、mysql项目、mysqladmin项目。编译产生的工具在D:/mysql-5.1.7-beta/client_debug目录。
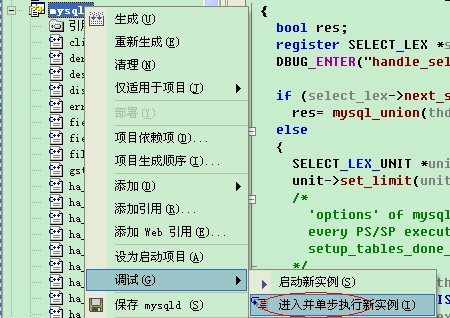
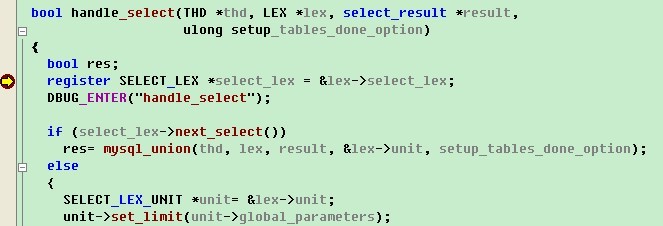
设置断点,比如查询的总入口是handle_select函数(在sql_select.cpp文件中)。使用“进入单步执行新实例”进行调试。如图:
执行时,停止在main函数开始处(可以一步步看看mysql是如何启动的),我们按F5,程序会直接执行,如果断点被执行,那么就会停在断点处,因为我们此处设置的是查询函数,所以没有被执行。因此,我们需要通过客户端执行一条语句,来触发断点对应的代码被执行。
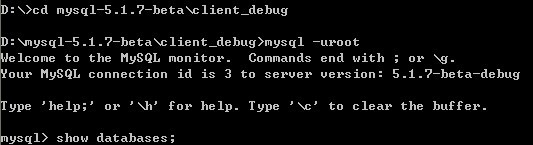
执行show databases命令之后,我们可以看到断点生效了。
这样我们通过F10/F11/F5/shift+F11等常用的快捷键进行调试了。如果需要退出调试状态,则使用mysqladmin,如图(图中打印的一行错误信息不用理它,是系统的一个bug):

”
## 3)调试的技巧
Alex:“bingxi,这个我理解了,有没有一些常用的技巧。Alex常用的是通过快速监控,见下面的两图。
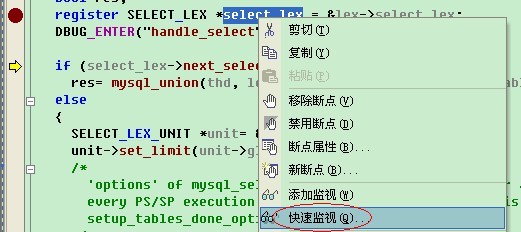
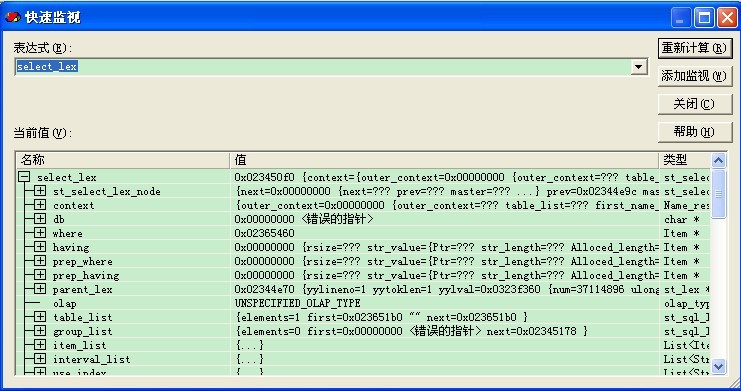
这样,我们可以看到变量的值。但是,遇到想测试函数,或者看宏的值就有点麻烦了。Bingxi,你给我讲讲。
”
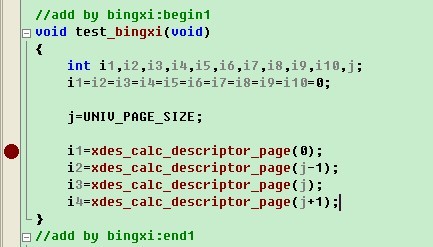
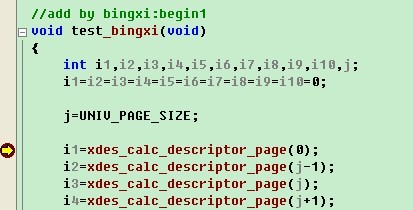
Bingxi:“最常用的方法是直接分析算法,如果有些确实不太明白,可以通过自己写测试函数的方法进行调试。如果我想知道某一页属于哪个簇描述符,可以在fsp0fsp.c的文件尾加上我们自己的测试函数,同时设置断点:
接着在该文件的文件头(添加内容为红色选中处),声明定义:
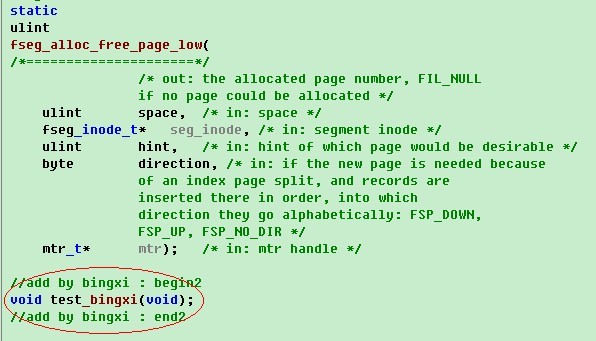
接着找一个函数,进行调用函数test_bingxi,这里我们选择fsp_get_space_header函数,因为这个函数在同一个文件,并且启动的时候会被执行。添加调用,添加内容为红色选中处。
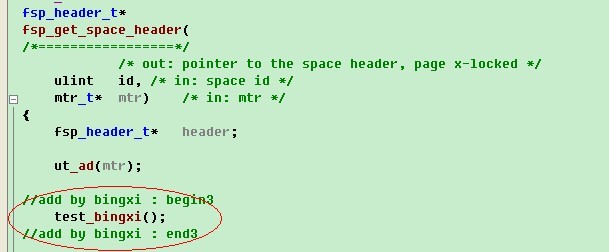
然后,我们启动调试,按F5进入断点。通过j值就可以知道UNIV_PAGE_SIZE的值,如果是多个宏计算后的值,也是一样的方法。通过i1值就可以知道xdes_calc_descriptor_page(0)的返回值。
类似这样的方法,我们可以通过添加测试代码,将疑问的地方进行测试。今天调试的就说到这儿吧。
”
Alex:“ok,说完调试,开始正式进入innodb存储了。咱们也是初学者,需要多debug来解惑。今天不说晚安了,马上6点了,早安。”
Bingxi:“早安。”
9—innodb动态数组的实现
最后更新于:2022-04-01 16:04:55
在上一篇,bingxi和alex聊了关于list的内容。在本篇里,bingxi和alex会聊到innodb的动态数组,也称为dyn。
对应的文件为:
D:/mysql-5.1.7-beta/storage/innobase/include/dyn0dyn.h
D:/mysql-5.1.7-beta/storage/innobase/include/dyn0dyn.ic
D:/mysql-5.1.7-beta/storage/innobase/dyn/dyn0dyn.c
## 1)常用结构体
Alex:“bingxi,我们前两篇聊了常用结构hash、list,这两个结构很常见。我们快要开始聊文件空间存储了,在那里面有一个常用结构,我们看一下fsp0fsp.c中函数,比如fsp_get_space_header函数,调用参数里面有mtr_t。
~~~
/**************************************************************************
Gets a pointer to the space header and x-locks its page. */
UNIV_INLINE
fsp_header_t*
fsp_get_space_header(
/*=================*/
/* out: pointer to the space header, page x-locked */
ulintid, /* in: space id */
mtr_t* mtr)/* in: mtr */
~~~
我们接着看一下mtr_struct的定义,在结构体的定义前一行,我们可以看到Mini-transaction,称为mini事务。用于锁信息、mtr日志信息。
~~~
/* Mini-transaction handle and buffer */
struct mtr_struct{
ulint state; /* MTR_ACTIVE, MTR_COMMITTING, MTR_COMMITTED */
dyn_array_t memo; /* memo stack for locks etc. */
dyn_array_t log; /* mini-transaction log */
ibool modifications;
/* TRUE if the mtr made modifications to
buffer pool pages */
ulint n_log_recs;
/* count of how many page initial log records
have been written to the mtr log */
ulint log_mode; /* specifies which operations should be
logged; default value MTR_LOG_ALL */
dulint start_lsn;/* start lsn of the possible log entry for
this mtr */
dulint end_lsn;/* end lsn of the possible log entry for
this mtr */
ulint magic_n;
};
~~~
我们将要开始fsp0fsp.c的内容,为了便于内容的独立,会将mtr的内容先剥离,在讲完存储之后,会继续讲B树,然后会到事务。
”
Bingxi:“alex,我赞同这一点。不过我认为还是把该结构体中的一个常用算法讲下,就是动态数组,mtr_t结构体中会有两个这样的结构成员:
dyn_array_t memo; /* memo stack for locks etc. */
dyn_array_t log; /* mini-transaction log */
所谓动态数组,就是一个动态的虚拟线性数组,数组的基本元素是byte,主要用于存放mtr的锁信息以及log。如果对于一个block数组不够存放时,需要增加新的block,每个block对应的存放数据字段的长度是固定的(默认值是512),但是不一定会用完。假设已经用了500个字节,这时候需要继续存放18个字节的内容,就会在该块中存放不了,会产生一个新的block用于存放。从而前一个block使用值为500。
我们先看了结构体的定义:
~~~
typedef struct dyn_block_struct dyn_block_t;
typedef dyn_block_t dyn_array_t;
……
/*#################################################################*/
/* NOTE! Do not use the fields of the struct directly: the definition
appears here only for the compiler to know its size! */
struct dyn_block_struct{
mem_heap_t*heap; /* in the first block this is != NULL
if dynamic allocation has been needed */
ulint used; /* number of data bytes used in this block */
byte data[DYN_ARRAY_DATA_SIZE];
/* storage for array elements */
UT_LIST_BASE_NODE_T(dyn_block_t) base;
/* linear list of dyn blocks: this node is
used only in the first block */
UT_LIST_NODE_T(dyn_block_t) list;
/* linear list node: used in all blocks */
#ifdef UNIV_DEBUG
ulint buf_end;/* only in the debug version: if dyn array is
opened, this is the buffer end offset, else
this is 0 */
ulint magic_n;
#endif
};
~~~
在这个结构体中,我们可以看到上一篇聊到的list结构,可以通过list查找prev、next。
Alex,这里面就带来了一些问题:1) dyn_array_t与dyn_block_t是同样的定义,而一个动态数组只有一个首结点,那么UT_LIST_BASE_NODE_T(dyn_block_t) base成员是不是每个结构体都是有效的,2)一开始分配的时候只分配了一个结构体,也就是512字节的大小,如果不够用,则扩展了一个,插入到链表里面,链表成员是1个还是2个?3)使用的时候,如何判断一个block已经使用满了,比如前面我们说到一个情况:500个字节剩下了12个不够18个时候,产生了一个新的block,假设这时候要使用其中的10个字节,两个block都是符合,用哪个?如果用后一个,怎么标识前一个是满的。
”
Alex:“你的问题太多了,呵呵。我们先放下问题,看一下动态数组的初始化过程。这里面,我们还需要主意一点。虽然数据结构用的是同一个dyn_block_struct,但是我们称第一个节点为arr,表明这个是动态数据的头节点。其它的节点,我们称为block节点。
现在开始进行debug,在mtr0mtr.ic文件中的mtr_start函数体内设置断点,这里也是动态数组创建的唯一入口,设置断点进行调试。
~~~
/*******************************************************************
Starts a mini-transaction and creates a mini-transaction handle
and a buffer in the memory buffer given by the caller. */
UNIV_INLINE
mtr_t*
mtr_start(
/*======*/
/* out: mtr buffer which also acts as
the mtr handle */
mtr_t* mtr)/* in: memory buffer for the mtr buffer */
{
//会创建两个动态数组,在两个创建的任一个设置断点
dyn_array_create(&(mtr->memo));
dyn_array_create(&(mtr->log));
mtr->log_mode = MTR_LOG_ALL;
mtr->modifications = FALSE;
mtr->n_log_recs = 0;
#ifdef UNIV_DEBUG
mtr->state = MTR_ACTIVE;
mtr->magic_n = MTR_MAGIC_N;
#endif
return(mtr);
}
~~~
点击F11进入函数,查看动态数据的创建过程:
~~~
/*************************************************************************
Initializes a dynamic array. */
UNIV_INLINE
dyn_array_t*
dyn_array_create(
/*=============*/
/* out: initialized dyn array */
dyn_array_t* arr) /* in: pointer to a memory buffer of
size sizeof(dyn_array_t) */
{
ut_ad(arr);
ut_ad(DYN_ARRAY_DATA_SIZE < DYN_BLOCK_FULL_FLAG);
arr->heap = NULL;
arr->used = 0;
#ifdef UNIV_DEBUG
arr->buf_end = 0;
arr->magic_n = DYN_BLOCK_MAGIC_N;
#endif
return(arr);
}
~~~
执行该函数之后,结构体的情况见图1:

创建完成之后,我们就可以使用该动态数组了。作为例子,我们在mtr_memo_push函数体内设置断点。
~~~
/*******************************************************
Pushes an object to an mtr memo stack. */
UNIV_INLINE
void
mtr_memo_push(
/*==========*/
mtr_t* mtr,/* in: mtr */
void* object, /* in: object */
ulinttype) /* in: object type: MTR_MEMO_S_LOCK, ... */
{
dyn_array_t* memo;
mtr_memo_slot_t*slot;
ut_ad(object);
ut_ad(type >= MTR_MEMO_PAGE_S_FIX);
ut_ad(type <= MTR_MEMO_X_LOCK);
ut_ad(mtr);
ut_ad(mtr->magic_n == MTR_MAGIC_N);
memo = &(mtr->memo);
//从动态中分配大小为sizeof(mtr_memo_slot_t)的空间
//然后对获取的空间进行赋值
slot = dyn_array_push(memo, sizeof(mtr_memo_slot_t));
slot->object = object;
slot->type = type;
}
~~~
从中我们可以得知dyn_array_pus是分配空间的地方(dyn_array_open函数有这样的功能,本文后面会提到),我们按F11进入该函数体。
~~~
/*************************************************************************
Makes room on top of a dyn array and returns a pointer to the added element.
The caller must copy the element to the pointer returned. */
UNIV_INLINE
void*
dyn_array_push(
/*===========*/
/* out: pointer to the element */
dyn_array_t* arr, /* in: dynamic array */
ulint size)/* in: size in bytes of the element */
{
dyn_block_t* block;
ulint used;
ut_ad(arr);
ut_ad(arr->magic_n == DYN_BLOCK_MAGIC_N);
ut_ad(size <= DYN_ARRAY_DATA_SIZE);
ut_ad(size);
//步骤1:取得使用的used
//存在多个节点是,arr表示的是链表中的首节点
block = arr;
used = block->used;
//步骤2:如果首结点block有足够的空间存储,则返回指针,并修改used值。这种情况只出现在:该动态数组只有一个节点。
// used + size <= DYN_ARRAY_DATA_SIZE表示有足够的空间存储
if (used + size > DYN_ARRAY_DATA_SIZE) {
/* Get the last array block */
//步骤3:首结点没有空间存储,则取得base列表的最后一个结点
//该函数等价于:block =UT_LIST_GET_LAST(arr->base);
//如果有多个节点,首先肯定不符合used + size <= DYN_ARRAY_DATA_SIZE,在后文中有描述。
block = dyn_array_get_last_block(arr);
used = block->used;
//步骤4:如果最后一个结点有足够空间,则分配
//否则增加一个新的block
if (used + size > DYN_ARRAY_DATA_SIZE) {
block = dyn_array_add_block(arr);
used = block->used;
}
}
block->used = used + size;
ut_ad(block->used <= DYN_ARRAY_DATA_SIZE);
return((block->data) + used);
}
~~~
该函数的功能就是进行分配空间,如果有足够的空间则分配,否则就调用函数dyn_array_add_block生成一个新的block。假象现在的情形是一个block扩展为两个block的情况。查看该函数的实现。
~~~
/****************************************************************
Adds a new block to a dyn array. */
dyn_block_t*
dyn_array_add_block(
/*================*/
/* out: created block */
dyn_array_t* arr) /* in: dyn array */
{
mem_heap_t*heap;
dyn_block_t* block;
ut_ad(arr);
ut_ad(arr->magic_n == DYN_BLOCK_MAGIC_N);
//步骤1:结点是1扩展为2,还是n扩展为n+1(n>=2)
// arr->heap=NULL则是1扩展为2,将自己作为首结点放在链表上,并分配一个内存堆
if (arr->heap == NULL) {
UT_LIST_INIT(arr->base);
UT_LIST_ADD_FIRST(list, arr->base, arr);
//1扩展为2的时候,创建一个heap,n扩展n+1(n>=2)时,则使用该heap
arr->heap = mem_heap_create(sizeof(dyn_block_t));
}
//步骤2:取得最后一个结点,将该block的used字段进行DYN_BLOCK_FULL_FLAG与操作,表示该结点已经使用满。每增加一个新的block总要将前一个block设置为已满,因此只有最后一个block是可用的。即使如前文所例,500字节不够用时创建了一个新的block,第二次有申请10个字节时,显示显示该块的大小>512了,因为DYN_BLOCK_FULL_FLAG的值为:0x1000000UL
block = dyn_array_get_last_block(arr);
block->used = block->used | DYN_BLOCK_FULL_FLAG;
heap = arr->heap;
//步骤3:创建一个新结点,并插入到链表尾
block = mem_heap_alloc(heap, sizeof(dyn_block_t));
block->used = 0;
UT_LIST_ADD_LAST(list, arr->base, block);
return(block);
}
~~~
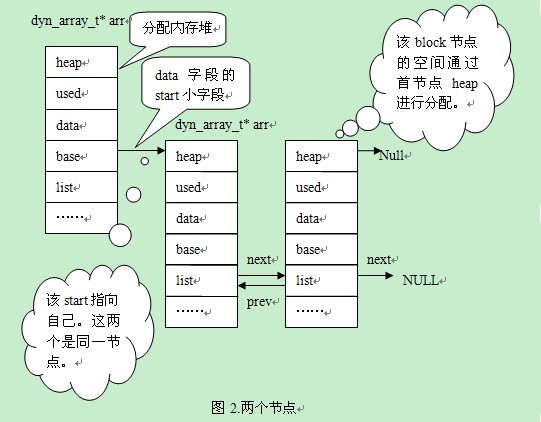
1个结点扩展为2个结点后,见图2(prev和next指向结构的首字节,便于绘图进行了简化,此处加以说明。list的prev和next参考前一篇文章):
2个结点扩展为3个结点,见图3:
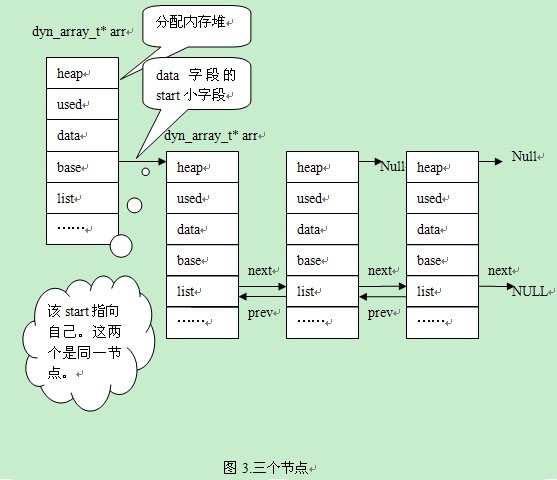
到这里,我们就解决了前面的三个问题。问题1:dyn_array_t与dyn_block_t是同样的定义,而一个动态数组只有一个首结点,那么UT_LIST_BASE_NODE_T(dyn_block_t) base成员是不是每个结构体都是有效的?
”
Alex:“这个问题我明白,只有首结点的base是有效的。从图1中可以看出,只有一个结点时,base是无效。图2中,arr的base有两个成员,首结点是第一个成员,新增加的结点在首结点的后面。图3中,arr的base有三个成员,新增的成员在链表尾。”
Bingxi:“问题2:一开始分配的时候只分配了一个结构体,也就是512字节的大小,如果不够用,则扩展了一个,插入到链表里面,链表成员是1个还是2个?”
Alex:“从1个扩展到2个,链表的成员是2。”
Bingxi:“问题3:使用的时候,如何判断一个block已经使用满了,比如前面我们说到一个情况:500个字节剩下了12个不够18个时候,产生了一个新的block,假设这时候要使用其中的10个字节,两个block都是符合,用哪个?如果用后一个,怎么标识前一个是满的。”
Alex:“始终只有最后一个结点可能被使用,只有一个成员时,本身就是最后一个结点。新增结点时,会将前一个结点设置为已满。设置方法如下:
block->used = block->used | DYN_BLOCK_FULL_FLAG;
这样进行分配操作时候,used + size > DYN_ARRAY_DATA_SIZE这个条件一定为真。表示首结点已经用满了,然后取最后一个结点。该条件只有一种情况为否,就是动态数组只有一个成员。
~~~
if (used + size > DYN_ARRAY_DATA_SIZE) {
/* Get the last array block */
block = dyn_array_get_last_block(arr);
used = block->used;
if (used + size > DYN_ARRAY_DATA_SIZE) {
block = dyn_array_add_block(arr);
used = block->used;
}
}
~~~
”
Bingxi:“good,我现在问第4个问题:我们需要插入三个元素,我们插入一个元素,就需要修改一次used,再插入,又得调用push函数进行操作。频繁的对dyn的数据结构进行操作。这样的效率是很低的。”
Alex:“稍等,我看下代码。找到了,通过dyn_array_open、dyn_array_close函数可以解决这个问题。这两个函数建议大家看下。另外,我也问你第5个问题,是不是大于512字节的数据就不能插入?”
Bingxi:“这个问题,请参考函数dyn_push_string。其它的函数也看一下,养成看函数的习惯,呵呵。今天就到这儿吧。”
Alex:“ok”
8—innodb的list算法
最后更新于:2022-04-01 16:04:53
在上一篇里,bingxi和alex聊了下关于hash表的内容。在本篇里,会聊下关于list的内容。所谓list,就是双向链表,这样的算法在《数据结构》里面都是常见的。为了屏蔽差异性,类似于hash表,mysql将list通过宏来实现。
对应的文件为:
D:/mysql-5.1.7-beta/storage/innobase/include/ut0lst.h
## 1)常用结构体
Alex:“bingxi,考你一个问题:如果共享空间有4个文件,这四个文件是如何连在一起的。我们在ut0lst.h中看到了这样一段注释:
/* This module implements the two-way linear list which should be used
if a list is used in the database. Note that a single struct may belong
to two or more lists, provided that the list are given different names.
An example of the usage of the lists can be found in fil0fil.c. */
在注释中有提到fil0fil.c,那么我就问你共享空间的这个文件组织方式。
”
Bingxi:“要掌握这个具体怎么实现,我们还是需要进行调试。在调试之前,我们先从这段文字中看出几个有用的信息,然后再去验证它。1)这是一个双向链表,因此插入的时候有prev和next指针,2)一个结构体可能会属于多个list。
我们先来验证这两个信息。看fil_node_struct的定义,该结点属于两个list,一个对应的是文件list,另外一个是LURlist。
~~~
/* File node of a tablespace or the log data space */
struct fil_node_struct {
……
UT_LIST_NODE_T(fil_node_t) chain; //属于文件list
UT_LIST_NODE_T(fil_node_t) LRU; //属于LRUlist
……
};
~~~
我们再看一下UT_LIST_NODE_T的定义,如下:
~~~
#define UT_LIST_NODE_T(TYPE)/
struct {/
TYPE * prev; /* pointer to the previous node,/
NULL if start of list *//
TYPE * next; /* pointer to next node, NULL if end of list *//
}/
~~~
从这个定一个中,我们可以看到一个prev指针指向前一个结点,一个next指针指向下一个结点。
我们再来替代法来进行简化,将fil_node_struct中宏定义进行替代。替代后为:
~~~
typedef struct fil_node_struct fil_node_t;
/* File node of a tablespace or the log data space */
struct fil_node_struct {
……
struct {
fil_node_t * prev; /* pointer to the previous node,
NULL if start of list */
fil_node_t * next; /* pointer to next node, NULL if end of list */
}chain;
struct {
fil_node_t * prev; /* pointer to the previous node,
NULL if start of list */
fil_node_t * next; /* pointer to next node, NULL if end of list */
}LRU;
……
};
~~~
这样的,就好办了,取得chain的下一个结点,就是: (node->chain).next(其中fil_node_t* node)。
假设是共享表空间里面有4个文件,那么启动之后,链表是什么情况?
”
Alex:“ok,这个我们就来debug一下。debug之前我们要先看下,file_space_struct中的一个结构成员:chain。共享表空间对应的4个文件会挂在上面,然后每个file_node_t结构通过prev和next进行双向连接。
~~~
typedef struct fil_node_struct fil_node_t;
/* Tablespace or log data space: let us call them by a common name space */
struct fil_space_struct {
……
UT_LIST_BASE_NODE_T(fil_node_t) chain;
……
};
~~~
我们要看一下UT_LIST_BASE_NODE_T的定义:
~~~
#define UT_LIST_BASE_NODE_T(TYPE)/
struct {/
ulintcount; /* count of nodes in list *//
TYPE * start; /* pointer to list start, NULL if empty *//
TYPE * end;/* pointer to list end, NULL if empty *//
}/
~~~
同样的,我们进行替换。会得到如下的情况:
~~~
typedef struct fil_node_struct fil_node_t;
/* Tablespace or log data space: let us call them by a common name space */
struct fil_space_struct {
……
struct {
ulintcount; /* count of nodes in list */
fil_node_t * start; /* pointer to list start, NULL if empty */
fil_node_t * end;/* pointer to list end, NULL if empty */
} chain;
……
};
~~~
从中我们得到第一个list成员,最后一个list成员,以及该list的成员数量。如果我们需要取得第一个成员就是:
fil_space_t* space;
fil_node_t* node;
……
node=(space->chain).start //这个已经通过宏来实
如果要取得再下一个,就是(node->chain).next(这个已经通过宏来实现)。
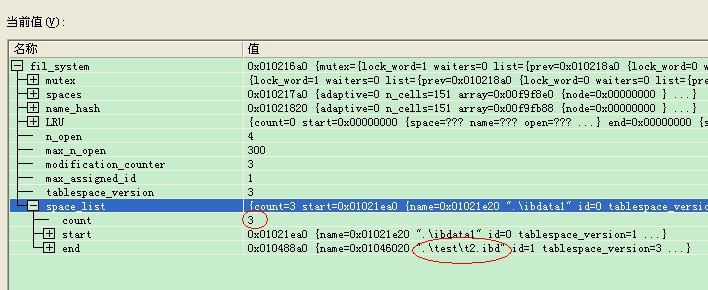
我们接着通过debug进行验证,配置my.ini(本例路径为D:/mysql-5.1.7-beta/my.ini,也可以存放在其它路径)。修改表空间,使用共享表空间为4个文件:
[mysqld]
innodb_data_file_path = ibdata1:10M;ibdata2:20M;ibdata3:30M;ibdata4:40M:autoextend
将D:/mysql-5.1.7-beta/data里面的内容恢复到初始化,所谓的初始化也就是将一开始代码解压缩时产生的原始data目录进行保存。需要初始化数据时,用该文件夹数据替代D:/mysql-5.1.7-beta/data的数据。
在fil_node_create函数设置断点,每执行一次看一次成员变量,等共享表空间对应的4个文件都执行之后我们可以看下该space对应的chain对应的取值。见图1:
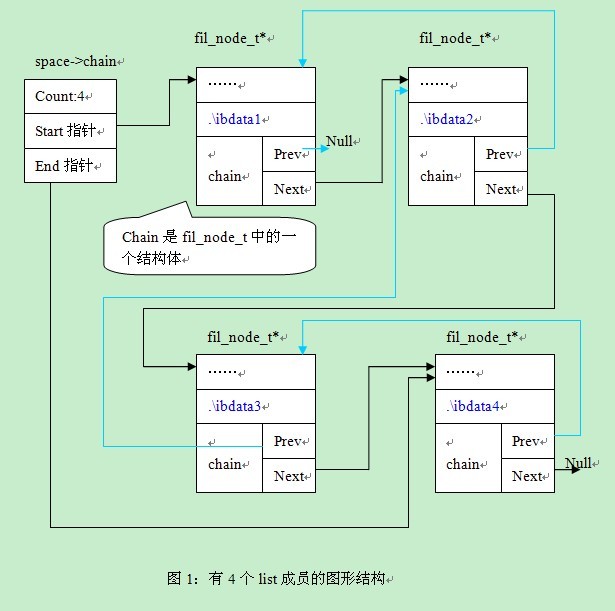
从图1中,我们可以看出4个结点通过prev及next指针相连,通过space->chain我们可以找到第一个结点,和最后一个结点。在图形中,通过天蓝色的线条表示prev。
通过这样的一个图形,我们会对list的表达方式有一个整体的了解。下面我们,在看一些具体函数的实现方式。
”
## 2)常用的函数
Bingxi:“好的,我们来看下插入函数吧。在图1中,我有一个疑问,问什么第一个成员的prev指向的是null,而不是指向space。”
Alex:“赞同,我们还是通过刚刚的例子来看下常用的插入函数UT_LIST_ADD_LAST,这个函数是往链表的末尾插入一个值。我们先看下该函数的定义,先不看其中的实现:
~~~
/***********************************************************************
Adds the node as the last element in a two-way linked list.
BASE has to be the base node (not a pointer to it). N has to be
the pointer to the node to be added to the list. NAME is the list name. */
#define UT_LIST_ADD_LAST(NAME, BASE, N)/
{/
ut_ad(N);/
((BASE).count)++;/
((N)->NAME).prev = (BASE).end;/
((N)->NAME).next = NULL;/
if ((BASE).end != NULL) {/
(((BASE).end)->NAME).next = (N);/
}/
(BASE).end = (N);/
if ((BASE).start == NULL) {/
(BASE).start = (N);/
}/
}/
~~~
插入文件结点的调用方式如下:
~~~
fil_node_t* node;
……
UT_LIST_ADD_LAST(chain, space->chain, node);
进行宏的替换,用下面的伪码表示:
fil_node_t* node;
void ut_list_add_last(chain, space->chain, node)
{
ut_ad(node); //断言语句
((space->chain).count)++; //步骤1:将列表的成员数量+1
//步骤2:设置插入结点的prev和next指针
//因为是插入到最后一个结点,所以next指针设置为null
//prev设置为插入前链表的最后一个结点,如果链表为空:(BASE).end为也为空,所以第一个结点成员的prev为空
((node)->chain).prev = (space->chain).end;
((node)->chain).next = NULL;/
//步骤3:如果插入链表结点不为空,则将node结点挂在已经结点的后面
if ((space->chain).end != NULL) {
(((space->chain).end)->chain).next = (node); //原来的最后一个结点的next指向新的结点
}
//步骤4:重新设置space->chain的end和start结点
//end结点很容易理解,就是指向新插入的结点,因为我们的操作就是插入到最后一个结点
//start的就要确认了:如果之前结点为空,则start也指向该结点,因为插入后只有一个结点,start和end都指向它
//如果start结点之前不为空,也就是链表有成员,将新成员插入到末尾的操作不影响start指针
(space->chain).end = (node);
if ((space->chain).start == NULL) {
(space->chain).start = (node);
}
}
~~~
”
Bingxi:“赞同你的看法,不过你少讲了一个内容,链表在创建的时候会进行初始化,
~~~
UT_LIST_INIT(space->chain); //函数调用
……
#define UT_LIST_INIT(BASE)/
{/
(BASE).count = 0;/
(BASE).start = NULL;/
(BASE).end = NULL;/
}/
~~~
将链表的count设置为0,start和end设置为null。另外,我发现alex最喜欢用代入法这样的傻方法,通过代入的方式来解释宏的实现,这也太傻了吧,哈哈。
”
Alex:“有时候,这样的方法也挺有效的,呵呵。第一次使用的时候可以用这样的方法先理解下,然后再看会简单些。我们现在直接看下类似的插入到链表首的宏的实现,这次我们直接看,不用代入法。
~~~
/***********************************************************************
Adds the node as the first element in a two-way linked list.
BASE has to be the base node (not a pointer to it). N has to be
the pointer to the node to be added to the list. NAME is the list name. */
#define UT_LIST_ADD_FIRST(NAME, BASE, N)/
{/
ut_ad(N);/
//步骤1:将列表的成员数量+1
((BASE).count)++;/
//步骤2,设置插入结点的prev和next指针
//因为是插入到首结点,所以该结点的prev为null
//新插入结点的next指向原链表的首结点
//这样就完成了新结点的prev和next指针的设置
((N)->NAME).next = (BASE).start;/
((N)->NAME).prev = NULL;/
//步骤3:如果插入前链表结点不为空,则原首结点的prev要进行重新设置
//将原首结点的prev指向新的结点
if ((BASE).start != NULL) {/
(((BASE).start)->NAME).prev = (N);/
}/
//步骤4:重新设置space->chain的end和start结点
//start指针很容易理解,因为我们是插入到链表首,所以该结点就是首结点
//同样的,如果插入前链表为空,也就是插入前end为空,则需要将end也指向这个唯一的链表成员
//如果插入前链表不为空,则不需要修改end指针。
(BASE).start = (N);/
if ((BASE).end == NULL) {/
(BASE).end = (N);/
}/
}/
~~~
另外有两个类似的宏,bingxi来看一下:UT_LIST_INSERT_AFTER、UT_LIST_REMOVE。
”
Bingxi:“这两个宏就不用看了吧,都是些链表的算法。留给大家自己看下吧。除了这两个宏之外,还有三个最基本的宏,用于获取base_node的三个成员:count、start、end。这里我把定义贴一下:
~~~
/************************************************************************
Alternative macro to get the number of nodes in a two-way list, i.e.,
its length. BASE is the base node (not a pointer to it). */
#define UT_LIST_GET_LEN(BASE)/
(BASE).count
/************************************************************************
Gets the first node in a two-way list, or returns NULL,
if the list is empty. BASE is the base node (not a pointer to it). */
#define UT_LIST_GET_FIRST(BASE)/
(BASE).start
/************************************************************************
Gets the last node in a two-way list, or returns NULL,
if the list is empty. BASE is the base node (not a pointer to it). */
#define UT_LIST_GET_LAST(BASE)/
(BASE).end
~~~
”
Alex:“嗯,这三个成员的比较简单。这一篇和上一篇,我们聊了两个基本算法结构,下一篇我们还会说一下动态数组。在第十篇写完之后,bingxi公布个list吧。将要开始写到innodb的文件存储内部格式,以及组织方法了。”
Bingxi:“好的,我回去想一下,第十篇出来后,就给你提供一个list,列出段、簇、页、记录等等的物理存储格式以及相互关系,然后按照list的组织方式来往下思考。”
Alex:“ok”
7—innodb的hash表实现
最后更新于:2022-04-01 16:04:51
在上一篇里面,bingxi和alex谈到了文件系统管理,在结构体里面出现了两个常用的结构:hash_table_t、UT_LIST_NODE_T。这两个结构比较常用,在本篇里面,bingxi和alex聊了下关于hash_table_t的内容。
对应的文件为:
D:/mysql-5.1.7-beta/storage/innobase/ha/hash0hash.c
D:/mysql-5.1.7-beta/storage/innobase/include/hash0hash.h
1)常用结构体
Bingxi:“alex,我们今天聊下hash表,所谓hash表,常用的就是通过key,然后取模然后丢到相应的bucket里面。假设bucket的数量是13个,key值对应的bucket就是key%13,相同bucket值的放在一个链表里面。这里需要注意一点的是,1和27具有相同的bucket值,会放在同一个bucket里面,因此查找的时候,首先找到对应的桶(bucket),然后对该桶的链表进行遍历,每个成员里面记录了原始的key,1对应的结构里面有一个字段表示1,27对应的一个结构里面有一个字段表示27,这样就能找到对应的成员。
”
alex:“嗯,是的,bingxi。我们来看下hash表结构。同样地,我们将结构定义的其他元素先忽略,直接看其中的主要成员。如果需要了解其它的成员,则推荐设置debug断点进行调试。
~~~
/* The hash table structure */
struct hash_table_struct {
……
ulint n_cells; //hash表的成员数量,也可以称为bucket的数量
hash_cell_t* array; //指向桶的数组
……
};
~~~
结构中,就是成员的数量,以及一个数组。因为使用hash表的结构是多种多样的,比如前几篇文章中提到过的buf_pool_t、fil_system_t。这两者都使用到了hash,并且成员结构不一样。对于每个桶对应的指针类型是不确定,因此bucket中记录的指针是void*类型的。
~~~
struct hash_cell_struct{
void* node; /* hash chain node, NULL if none */
};
~~~
”
Bingxi:“alex,是这样的,这里带来两个问题:1、hash表的n_cells是个素数用于做模操作,在创建的时候提供一个准确的素数是有难度的,2、对应整型的key可以通过key%n_cells的方法来获得对应的桶,那么对于字符串型的如何处理?
”
Alex:“嗯,好吧。在说这两个问题之前,我们先看下hash表的创建过程。我们在函数fil_system_create如下面所示的行中设置一个断点。
system->spaces = hash_create(hash_size); //在此行设置断开
system->name_hash = hash_create(hash_size);
然后启动mysql,执行到该断点处我们可以发现对应的hash_size为50。F11进入该函数体,看看具体是怎么执行的。
~~~
/*****************************************************************
Creates a hash table with >= n array cells. The actual number of cells is
chosen to be a prime number slightly bigger than n. */
hash_table_t*
hash_create(
/*========*/
/* out, own: created table */
ulintn) /* in: number of array cells */
{
hash_cell_t* array;
ulint prime;
hash_table_t* table;
ulint i;
hash_cell_t* cell;
//在该例中,我们根据输入值50(n的取值),得到一个素数151
prime = ut_find_prime(n);
table = mem_alloc(sizeof(hash_table_t));
//sizeof(hash_cell_t)的值为4
//生成一个有151(prime)个桶的数组
array = ut_malloc(sizeof(hash_cell_t) * prime);
//初始化结构成员
table->adaptive = FALSE;
table->array = array;
table->n_cells = prime;
table->n_mutexes = 0;
table->mutexes = NULL;
table->heaps = NULL;
table->heap = NULL;
table->magic_n = HASH_TABLE_MAGIC_N;
/* Initialize the cell array */
//取得每一个bucket成员,将对应的node指针初始化为NULL
for (i = 0; i < prime; i++) {
//hash_get_nth_cell(table, i)的作用是取得第i个成员,即table->array + i
cell = hash_get_nth_cell(table, i);
cell->node = NULL;
}
return(table);
}
~~~
执行完成之后,我们生成了system->spaces的hash表,该hash表以space id作为key,接着我们又创建了system->name_hash的hash表,这个根据space name进行hash。我们看下space name对应的hash表创建后的情形,见图1。
从中我们可以看出问题1是已经解决掉了的,根据输入值产生一个素数,另外对于space name这样的字符串型,也是可以的,我们看下面的两个函数调用,调用函数ut_fold_string(name)生成了对应的整型key,插入的时候如此,查找、删除的时候也是如此。
~~~
HASH_SEARCH(name_hash, system->name_hash, ut_fold_string(name), space,
0 == strcmp(name, space->name));
HASH_INSERT(fil_space_t, name_hash, system->name_hash,
ut_fold_string(name), space);
HASH_DELETE(fil_space_t, name_hash, system->name_hash,
ut_fold_string(space->name), space);
~~~
”
2)常用的函数
Bingxi:“我们继续往下看,怎么进行hash的操作,我们先看hash表的插入操作。继续以space为例,在函数fil_space_create中创建了space结构,然后根据space id、space name插入相应的hash表。
~~~
/***********************************************************************
Creates a space memory object and puts it to the tablespace memory cache. If
there is an error, prints an error message to the .err log. */
ibool
fil_space_create(
/*=============*/
/* out: TRUE if success */
const char* name, /* in: space name */
ulint id, /* in: space id */
ulint purpose)/* in: FIL_TABLESPACE, or FIL_LOG if log */
{
……
//创建space结构,并初始化成员值
space = mem_alloc(sizeof(fil_space_t));
space->name = mem_strdup(name);
space->id = id;
……
//将新创建的space结构,根据space id插入system->spaces哈希表。
HASH_INSERT(fil_space_t, hash, system->spaces, id, space);
//将新创建的space结构,根据space name插入system->name_hash哈希表
HASH_INSERT(fil_space_t, name_hash, system->name_hash,
ut_fold_string(name), space);
……
return(TRUE);
}
~~~
插入操作调用的是HASH_INSERT宏,我们来看下插入space name哈希表操作的参数值。
~~~
//函数调用
HASH_INSERT(fil_space_t, name_hash, system->name_hash,
ut_fold_string(name), space);
//宏定义
#define HASH_INSERT(TYPE, NAME, TABLE, FOLD, DATA)
~~~
TYPE:表示插入hash表的结构类型,本例中的类型为fil_space_t
NAME:表示的是拥有同一个bucket值的成员,通过结构体中的该字段来指向拥有同bucket值的下一个成员,这里可以这么认为,space->name_hash用于指向同bucket的下一个成员。
TABLE:需要插入的hash表,这里我们可以看到,我们插入的hash表是system->name_hash
FOLD:也就是我们所说的key,通过ut_fold_string(name)函数将name转为key,本例子中name=’./ibdata1’
DATA:插入的结构体
如果查对应的bucket中没有其他的同bucket值成员,插入后的情形是什么样的,假设对应的bucket为1(而实际上该例对应的bucket为51,为了绘图的方便,假设为1)。见图2。
从图2中,我们可以看出如下的步骤:
~~~
//步骤1,将插入成员的name_hash设置为NULL,也就是说,如果同bucket链表上有多个成员,也是插入到末尾
//(DATA)->NAME = NULL;
Space-> name_hash=NULL
//步骤2:找出所在bucket
//cell3333 = hash_get_nth_cell(TABLE, hash_calc_hash(FOLD, TABLE));
hash_cell_t* cell3333;
int i= hash_calc_hash(ut_fold_string(name), system->name_hash))
cell3333 = hash_get_nth_cell(system->name_hash,i);
//步骤3:如果该bucket上没有其他的成员则将该成员插入
if (cell3333->node == NULL) {
cell3333->node = space;
}
~~~
”
Alex:“是这样的,假设我们继续插入一个space,该space对应的bucket值也为1。那么执行到上面的步骤3不符合条件的时候,需要执行步骤4
~~~
//步骤4:如果有其它成员,则将新结点插入到末尾
struct3333 = cell3333->node;
//取得链表上最后一个结点
while (struct3333->name_hash != NULL) {
struct3333 = struct3333->name_hash; //取得下一个结点
}
//将新结点插入到最后一个结点之后
struct3333->name_hash = space;
~~~
假设name为’./itest’,对应的情形见图3.
完整的代码如下:
~~~
/***********************************************************************
Inserts a struct to a hash table. */
#define HASH_INSERT(TYPE, NAME, TABLE, FOLD, DATA)/
do {/
hash_cell_t* cell3333;/
TYPE* struct3333;/
/
HASH_ASSERT_OWNED(TABLE, FOLD)/ //这个是个断言,不考虑
/
(DATA)->NAME = NULL;/ //将新结点的指向的下一个结点设置为NULL
/ //找到对应的bucket
cell3333 = hash_get_nth_cell(TABLE, hash_calc_hash(FOLD, TABLE));/
/ //如果bucket成员为空,则直接插入,否则插入到最后一个结点之后
if (cell3333->node == NULL) {/
cell3333->node = DATA;/
} else {/
struct3333 = cell3333->node;/
/
while (struct3333->NAME != NULL) {/
/
struct3333 = struct3333->NAME;/
}/
/
struct3333->NAME = DATA;/
}/
} while (0)
~~~
”
Alex:“嗯,是这样的。我们再看看查找吧。假设这里需要查找的是./itest对应的space结构。
~~~
Creates a space memory object and puts it to the tablespace memory cache. If
there is an error, prints an error message to the .err log. */
ibool
fil_space_create(
/*=============*/
/* out: TRUE if success */
const char* name, /* in: space name */
ulint id, /* in: space id */
ulint purpose)/* in: FIL_TABLESPACE, or FIL_LOG if log */
{
……
//查看指定name的space是否存在,假设这里的name为./itest
HASH_SEARCH(name_hash, system->name_hash, ut_fold_string(name), space,
0 == strcmp(name, space->name));
……
return(TRUE);
}
~~~
同样地,HASH_SEARCH也是宏定义,我们用相应的c伪码来查看。从中我们可以看出首先找到对应的bucket,如果没有成员,则查找的space为空
~~~
my_key=ut_fold_string('./itest');
void hash_search(name_hash,system->name_hash,my_key,space,0 == strcmp(name, space->name))
{
HASH_ASSERT_OWNED(system->name_hash, my_key); //可以忽略
//取得fold对应的对应的key数据桶值
//取得对应的桶
bucket_id=hash_calc_hash(my_key, system->name_hash)
//取得第一个元素
space = HASH_GET_FIRST(system->name_hash, bucket_id);
while(space != NULL)
{
//因为不同的值,可能属于同一个桶,因此需要判断名称是不是相等
//比如图3中的第一个成员的space->name='./ibdata1',不相等
//获取下一个成员之后,再判断该条件,就相等了
if(0 == strcmp('./itest', space->name)) //注意,第一个参数name是前面传递过来的
{
break; //表示已经找到了对应的元素
}
else
{
//取得链表中的第一个元素
//space = HASH_GET_NEXT(name_hash, space);
space=space->name_hash;
}
}
//如果该桶没有元素或者没有匹配的成员,则space为NULL
}
~~~
查看HASH_SEARCH的定义,我们可以更容易的理解。
~~~
/************************************************************************
Looks for a struct in a hash table. */
#define HASH_SEARCH(NAME, TABLE, FOLD, DATA, TEST)/
{/
/
HASH_ASSERT_OWNED(TABLE, FOLD)/
/ //找到对应bucket的第一个成员
(DATA) = HASH_GET_FIRST(TABLE, hash_calc_hash(FOLD, TABLE));/
/
while ((DATA) != NULL) {/
if (TEST) {/ //要符合TEST条件
break;/
} else {/
(DATA) = HASH_GET_NEXT(NAME, DATA);/
}/
}/
}
~~~
”
Bingxi:“嗯,除了HASH_INSERT、HASH_SEARCH,还有其它的宏定义:HASH_DELETE、HASH_DELETE_AND_COMPACT 、HASH_GET_FIRST、HASH_GET_NEXT。这几个功能的实现也建议看下。这里面就不说这个了。”
Alex:“ok,今天就说到这吧。”
6—innodb文件管理
最后更新于:2022-04-01 16:04:48
在上一篇里面,bingxi和alex思考了information_schema,这个一直在innodb外围打转。没有进入到innodb的内部。在后续的文章中,以innodb的为主,逐个思考。Bingxi和alex今天了解了fil文件管理。
对应的文件为:
D:/mysql-5.1.7-beta/storage/innobase/fil/fil0fil.c
D:/mysql-5.1.7-beta/storage/innobase/include/fil0fil.h
## 1)所谓的tablespace
Bingxi:“alex,配置项有一个选项innodb_file_per_table,也就是每个表有一个自己的tablespace。
14.2.3.1. Using Per-Table Tablespaces
You can store each InnoDB table and its indexes in its own file. This feature is called “multiple tablespaces” because in effect each table has its own tablespace.
”
Alex:“是的,bingxi。不过tablespace这个概念我们借鉴了oracle中的命名:表空间。在oracle中,tablespace表示表的集合,也就是很多个表放到同一个逻辑整体里面。”
Bingxi:“是的,相比myisam,每个myisam表对应三个文件。而innodb可以将很多表放到一个文件或者多个文件里面,这个叫共享表空间。另外,如果innodb_file_per_table加到配置文件,则每个新建的innodb表则使用独立表空间。”
Alex:“bingxi,那什么叫独立表空间呢?我们需要来debug一下代码。假设我们使用系统默认的参数启动,则会有两个tablespace,第一个tablespace包括一个文件ibdata1,这个也可以称为系统表空间,另外一个space包括两个日志文件。”
Bingxi:“是的,我们参考了oracle的系统表空间就知道系统表空间里面会存放很多字典信息。这里我们先不说那么远,先说下如果我们需要将系统表空间的文件数量增加,应该怎么填写?因为我们是debug环境下,我们在D:/mysql-5.1.7-beta目录下创建一个my.ini,在其中写入两行参数:
[mysqld]
[innodb_data_file_path]= ibdata1:10M;ibdata2:20M:autoextend
这表示系统表空间里面就会有两个文件,其中第一个文件ibdata1是10M,第二个文件大小是是20M,并且可以进行自动扩展。
”
Alex:“好吧,我们现在先配置下文件,然后看看系统内部是如何管理这些文件的。先看看文件系统的定义。
~~~
//文件系统管理结构
typedef struct fil_system_struct fil_system_t;
struct fil_system_struct {
……
//下面两个表空间用于快速查找space,fil_system_t结构用于整个fil的管理。
//注意:这里的最低粒度是文件
hash_table_t* spaces; //根据space id进行hash的space
hash_table_t* name_hash; //根据space name进行hahs的space
……
//file space的链表,比如这里有两个space,一个是系统表空间,一个是log space
UT_LIST_BASE_NODE_T(fil_space_t) space_list;
};
从上面的结构中,我们可以看到fil_system_t与fil_space_t是一对多的关系。
/* Tablespace or log data space: let us call them by a common name space */
struct fil_space_struct {
char* name; //space name = 该space的第一个文件名
ulint id; //space id
……
//该space包含的文件结点链表
UT_LIST_BASE_NODE_T(fil_node_t) chain; //文件链表
……
//指向下一个space
UT_LIST_NODE_T(fil_space_t) space_list;
……
};
~~~
从这个结构中我们也可以看出,fil_space_struct与fil_node_t也是一对多的关系,也就是一个space下面可以包含多个文件。从我们的my.ini中可以得知我们的系统表空间是对应两个文件:ibdata1、ibdata2。我们来具体看看fil_node_t的定义。
~~~
/* File node of a tablespace or the log data space */
struct fil_node_struct {
fil_space_t* space; //所属的space
char* name; //文件路径
ibool open; //文件是否打开
os_file_t handle; //文件句柄
ulint size; //文件大小
……
UT_LIST_NODE_T(fil_node_t) chain; //文件结点链表
……
};
~~~
启动后的图如下图1
//file space的链表,比如这里有两个space,一个是系统表空间,一个是log space
UT_LIST_BASE_NODE_T(fil_space_t) space_list;
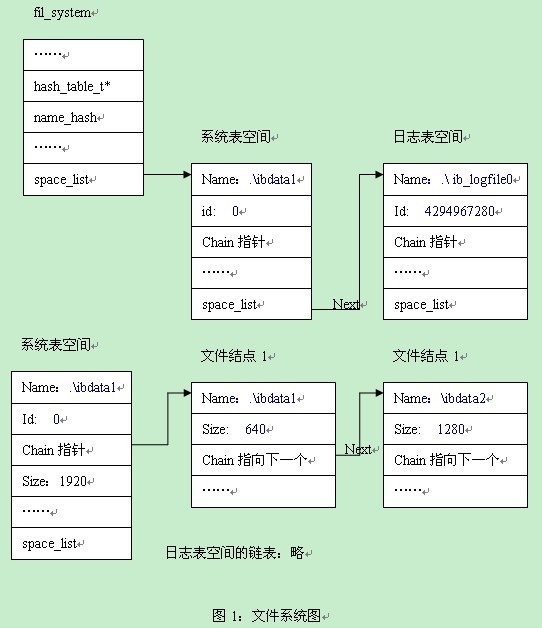
”
Bingxi:“是的,我们看下系统表空间这个space里的size这个字段,里面的size为1920,等于对应的两个文件大小的相加,640+1280。这个640是怎么计算的呢,文件页的大小为16k,而ibdata1的大小为10M,因此对应的页数为640页。因此这里的值为640。同样的ibdata2的页数为20M/16k=1280。”
Alex:“好的,我们可以看到这里仅仅是将结点生成了,还需要将日志文件以及系统表空间的的文件打开,保持打开直到数据库shut down。
~~~
int
innobase_start_or_create_for_mysql(void)
{
……
//打开所有的日志文件以及系统表空间中的文件,保持打开直到数据库shut down
fil_open_log_and_system_tablespace_files();
……
}
~~~
在开始进一步之前,我们先看下独立表空间。目前正在使用的是系统表空间,执行语句,往系统表空间里面插入数据。执行后将数据库shut down。然后往my.ini里面增加一行配置用于使用独立表空间。
[mysqld]
innodb_data_file_path = ibdata1:10M;ibdata2:20M:autoextend
innodb_file_per_table = 1
重启后执行如下语句
mysql> use test;
Database changed
mysql> create table t2(id int) engine=innodb;
Query OK, 0 rows affected (0.02 sec)
执行语句后,我们可以发现test生成了两个文件:t2.frm以及t2.ibd。同时,我们测试下,能不能在配置为独立表空间的情况下,执行查询语句,发现还是可以使用共享表空间(和系统表空间一个意思)的数据。
mysql> select * from t1;
+------+-------+
| id | name |
+------+-------+
| 1 | name1 |
| 2 | name2 |
+------+-------+
2 rows in set (0.02 sec)
同理,我们重新修改my.ini,去掉独立表空间的配置项,也能使用之前创建的t2表。然后看下文件系统的space_list的数量为3了。也就是t2表对应的表空间。
”
Bingxi“我们先说到这里吧,内容还是很多的,建议将fil0fil.c中每个函数设置一个断点,然后通过语句调试的方式来掌握,比如往t1里面插数据,直到30M数据不够,要进行文件的扩展,然后跟踪进去看下如何进行文件的扩展等等。”
Alex:“是的,我们今天聊了表空间管理,那么后续就可以讨论系统表空间内是如何组织数据的了。”
Bingxi:“alex,先把基础的讲下,比如今天里面包含的两个常用结构:hash_table_t、UT_LIST_NODE_T。”
Alex:“嗯,可以的,我们下次聊这个。”
5—information_schema不是innodb数据字典
最后更新于:2022-04-01 16:04:46
上次谈到了innodb缓冲区里面有些页被使用了,这些中有些被数据字典用了。那么什么是数据字典呢?bingxi和alex继续思考。
## 1) information_schema不是innodb数据字典
bingxi:“alex,我觉得information_schema这个里面存储的不是数据字典,为了准确起见,换个说法,information_schema不是innodb数据字典。”
alex:“是的,innodb一直有数据字典的概念,而information_schema是在mysql5之后才出现的。因此,information_schema不是innodb数据字典。”
bingxi:“alex,这样说有点牵强。我们首先举个例子吧。在手册里面,有这么一段话:
23.4. The INFORMATION_SCHEMA STATISTICS Table
The STATISTICS table provides information about table indexes.
这段话表达的意思是:information_schema. statistics存储的是表索引信息。我们在test数据库下面建立一个表t1,并且在c1上有一个索引,语句如下:
~~~
create table test.t1
(
id int,
name varchar(20),
key it1id(id)
)engine=innodb;
~~~
接着我们查询statistics表中t1的索引信息:
mysql> select * from information_schema.statistics where table_name='t1' /G;
*************************** 1. row ***************************
TABLE_CATALOG: NULL
TABLE_SCHEMA: test
TABLE_NAME: t1
NON_UNIQUE: 1
INDEX_SCHEMA: test
INDEX_NAME: it1id
SEQ_IN_INDEX: 1
COLUMN_NAME: id
COLLATION: A
CARDINALITY: 0
SUB_PART: NULL
PACKED: NULL
NULLABLE: YES
INDEX_TYPE: BTREE
COMMENT:
1 row in set (0.02 sec)
ERROR:
No query specified
从中我们可以查到索引的信息,t1表真正只有一个索引么?呵呵,这里先卖个关子,在讲innodb数据字典的时候再说这个。现在我们聚焦在it1c1索引上,这些信息确实可以看到一些索引的信息,但是这个不是数据字典表,而仅仅只能供用户从外部查看使用,不能供mysql内核使用。比如,该索引在数据文件里面存储在什么地方?不知道根页信息,就没法去使用索引。我们再看看真正的innodb数据字典中包含的内容。(见文件D:/mysql-5.1.7-beta/storage/innobase/include/dict0mem.h)
~~~
/* Data structure for an index */
struct dict_index_struct{
……
dict_table_t* table; //指向所属的table字典
ulint space; //索引所在的space
……
dict_tree_t* tree; //索引数结构
……
};
/* Data structure for an index tree */
struct dict_tree_struct{
……
ulint space; //索引所在的space
ulint page; //索引的根结点页号
……
};
~~~
通过space,page我们就可以实实在在地在访问该索引。
”
alex:“顶你,是这样的。通过show create我们还可以看出这些表是临时表。
mysql> show create table information_schema.tables /G;
*************************** 1. row ***************************
~~~
Table: TABLES
Create Table: CREATE TEMPORARY TABLE `TABLES` (
`TABLE_CATALOG` varchar(512) default NULL,
……
) ENGINE=MEMORY DEFAULT CHARSET=utf8
1 row in set (0.00 sec)
ERROR:
No query specified
~~~
”
bingxi:“是的”
## 2)information_schema内容分析
alex:“bingxi,尽管information_schema不是innodb的数据字典,我们还是来摸索下information_schema对应的代码吧。主要的代码目录如下:
D:/mysql-5.1.7-beta/sql/sql_show.h
D:/mysql-5.1.7-beta/sql/sql_show.cpp
”
bingxi:“alex,从文件名我们可以看到show,是不是show status,show variables,show processlist等也是在这个文件里面执行。”
alex:“是的,没错。我们开始吧,先从两个数据结构开始。先看schema_tables数组。
~~~
ST_SCHEMA_TABLE schema_tables[]=
{
{"CHARACTER_SETS", charsets_fields_info, create_schema_table,
fill_schema_charsets, make_character_sets_old_format, 0, -1, -1, 0},
……
{"STATUS", variables_fields_info, create_schema_table, fill_status,
make_old_format, 0, -1, -1, 1},
{"TABLES", tables_fields_info, create_schema_table,
get_all_tables, make_old_format, get_schema_tables_record, 1, 2, 0},
{"TABLE_CONSTRAINTS", table_constraints_fields_info, create_schema_table,
get_all_tables, 0, get_schema_constraints_record, 3, 4, 0},
……
};
~~~
数组有26个成员,而information_schema的5.1.7版本中只有22个表。这是可以理解的,比如该数组里面有status、variable,而这个在information_schema下是没有。我们通过show status,show variables来执行。我们接着说这个数组的成员,每个成员是一个数组结构的取值,见下面的定义:
~~~
typedef struct st_schema_table
{
const char* table_name;
ST_FIELD_INFO *fields_info;
TABLE *(*create_table) (THD *thd, struct st_table_list *table_list);
int (*fill_table) (THD *thd, struct st_table_list *tables, COND *cond);
int (*old_format) (THD *thd, struct st_schema_table *schema_table);
int (*process_table) (THD *thd, struct st_table_list *tables,
TABLE *table, bool res, const char *base_name,
const char *file_name);
int idx_field1, idx_field2;
bool hidden;
} ST_SCHEMA_TABLE;
我们以tables这样表为例
{"TABLES", tables_fields_info, create_schema_table,
get_all_tables, make_old_format, get_schema_tables_record, 1, 2, 0},
tables_fields_info表示的就是。
ST_FIELD_INFO tables_fields_info[]=
{
{"TABLE_CATALOG", FN_REFLEN, MYSQL_TYPE_STRING, 0, 1, 0},
{"TABLE_SCHEMA",NAME_LEN, MYSQL_TYPE_STRING, 0, 0, 0},
{"TABLE_NAME", NAME_LEN, MYSQL_TYPE_STRING, 0, 0, "Name"},
{"TABLE_TYPE", NAME_LEN, MYSQL_TYPE_STRING, 0, 0, 0},
{"ENGINE", NAME_LEN, MYSQL_TYPE_STRING, 0, 1, "Engine"},
{"VERSION", 21 , MYSQL_TYPE_LONG, 0, 1, "Version"},
{"ROW_FORMAT", 10, MYSQL_TYPE_STRING, 0, 1, "Row_format"},
{"TABLE_ROWS", 21 , MYSQL_TYPE_LONG, 0, 1, "Rows"},
{"AVG_ROW_LENGTH", 21 , MYSQL_TYPE_LONG, 0, 1, "Avg_row_length"},
{"DATA_LENGTH", 21 , MYSQL_TYPE_LONG, 0, 1, "Data_length"},
{"MAX_DATA_LENGTH", 21 , MYSQL_TYPE_LONG, 0, 1, "Max_data_length"},
{"INDEX_LENGTH", 21 , MYSQL_TYPE_LONG, 0, 1, "Index_length"},
{"DATA_FREE", 21 , MYSQL_TYPE_LONG, 0, 1, "Data_free"},
{"AUTO_INCREMENT", 21 , MYSQL_TYPE_LONG, 0, 1, "Auto_increment"},
{"CREATE_TIME", 0, MYSQL_TYPE_TIMESTAMP, 0, 1, "Create_time"},
{"UPDATE_TIME", 0, MYSQL_TYPE_TIMESTAMP, 0, 1, "Update_time"},
{"CHECK_TIME", 0, MYSQL_TYPE_TIMESTAMP, 0, 1, "Check_time"},
{"TABLE_COLLATION", 64, MYSQL_TYPE_STRING, 0, 1, "Collation"},
{"CHECKSUM", 21 , MYSQL_TYPE_LONG, 0, 1, "Checksum"},
{"CREATE_OPTIONS", 255, MYSQL_TYPE_STRING, 0, 1, "Create_options"},
{"TABLE_COMMENT", 80, MYSQL_TYPE_STRING, 0, 0, "Comment"},
{0, 0, MYSQL_TYPE_STRING, 0, 0, 0}
};
~~~
这个表示的就是tables表的字段,不考虑这行’ {0, 0, MYSQL_TYPE_STRING, 0, 0, 0}’,对比下desc tables;两边是一样的。
”
Bingxi:“我顶你,我们通过一个例子来看吧,以show status为例。
~~~
{"STATUS", variables_fields_info, create_schema_table, fill_status,
make_old_format, 0, -1, -1, 1},
//根据对比,我们可以知道:
// create_schema_table的功能是:TABLE *(*create_table)
// fill_status的功能是:int (*fill_table)
// make_old_format的功能是:int (*old_format),这个可以暂时不调试
首先我们查看函数mysql_schema_table,在其中调用了函数create_schema_table。
int mysql_schema_table(THD *thd, LEX *lex, TABLE_LIST *table_list)
{
……
// table_list->schema_table对应的结构就是st_schema_table
//对应的值为:{"STATUS", variables_fields_info, create_schema_table, fill_status,
// make_old_format, 0, -1, -1, 1},
//因此这里的create_table等于访问create_schema_table
if (!(table= table_list->schema_table->create_table(thd, table_list)))
{
DBUG_RETURN(1);
}
……
}
~~~
create_schema_table函数作用是什么呢?从名字我们可以看出,就是创建表,创建status的临时表。表的字段有两个:Variable_name、Value。见下面的代码。
~~~
TABLE *create_schema_table(THD *thd, TABLE_LIST *table_list)
{
……
List<Item> field_list;
ST_SCHEMA_TABLE *schema_table= table_list->schema_table;
ST_FIELD_INFO *fields_info= schema_table->fields_info;
……
//fields_info就是schema_table->fields_info,里面记录了查询字段
//第一个fields_info->field_name的值是'Variable_name'
//根据这个值创建了一个item实例,然后丢到field_list这个list里面
//第二个fields_info->field_name的值是'Value'
//同样根据这个值,再创一个item,同样丢到field_list这个list里面
//这样field_list就描述了临时表的列信息
for (; fields_info->field_name; fields_info++)
{
……
//屏蔽调ields_info->field_type的差异性
item->max_length= fields_info->field_length * cs->mbmaxlen;
item->set_name(fields_info->field_name,
strlen(fields_info->field_name), cs);
……
field_list.push_back(item);
item->maybe_null= fields_info->maybe_null;
field_count++;
}
TMP_TABLE_PARAM *tmp_table_param =
(TMP_TABLE_PARAM*) (thd->calloc(sizeof(TMP_TABLE_PARAM)));
tmp_table_param->init();
tmp_table_param->table_charset= cs;
tmp_table_param->field_count= field_count;
tmp_table_param->schema_table= 1;
SELECT_LEX *select_lex= thd->lex->current_select;
//调用函数create_tmp_table
//可以看到参数中有field_list,也就是字段列表有了
//table_list->alias的值是STATUS
//于是就是创建了临时表
if (!(table= create_tmp_table(thd, tmp_table_param,
field_list, (ORDER*) 0, 0, 0,
(select_lex->options | thd->options |
TMP_TABLE_ALL_COLUMNS),
HA_POS_ERROR, table_list->alias)))
……
}
~~~
创建了临时表,但是光有临时表是不够的,因此在查询执行时,需要将值进行填充
~~~
void
JOIN::exec()
{
……
if ((curr_join->select_lex->options & OPTION_SCHEMA_TABLE) &&
get_schema_tables_result(curr_join))
{
DBUG_VOID_RETURN;
}
……
}
get_schema_tables_result函数就是调用fill_status的地方,见函数。
bool get_schema_tables_result(JOIN *join)
{
……
for (JOIN_TAB *tab= join->join_tab; tab < tmp_join_tab; tab++)
{
……
// table_list->schema_table对应的结构就是st_schema_table
//对应的值为:{"STATUS", variables_fields_info, create_schema_table, fill_status,
// make_old_format, 0, -1, -1, 1},
//因此这里的fill_table等于访问fill_status
if (table_list->schema_table->fill_table(thd, table_list,
tab->select_cond))
result= 1;
table_list->is_schema_table_processed= TRUE;
……
}
……
}
~~~
于是执行fill_status进行填充数据的操作。
~~~
int fill_status(THD *thd, TABLE_LIST *tables, COND *cond)
{
DBUG_ENTER("fill_status");
LEX *lex= thd->lex;
const char *wild= lex->wild ? lex->wild->ptr() : NullS;
int res= 0;
STATUS_VAR tmp;
pthread_mutex_lock(&LOCK_status);
//如果是show global,则需要执行calc_sum_of_all_status进行累加。
if (lex->option_type == OPT_GLOBAL)
calc_sum_of_all_status(&tmp);
//进行数据插入操作
res= show_status_array(thd, wild,
(SHOW_VAR *)all_status_vars.buffer,
OPT_GLOBAL,
(lex->option_type == OPT_GLOBAL ?
&tmp: &thd->status_var), "",tables->table);
pthread_mutex_unlock(&LOCK_status);
DBUG_RETURN(res);
}
~~~
为了了解得更清楚,我们再看下show_status_array函数。
~~~
static bool show_status_array(THD *thd, const char *wild,
SHOW_VAR *variables,
enum enum_var_type value_type,
struct system_status_var *status_var,
const char *prefix, TABLE *table)
{
//传递过来的variables是全局变量:(SHOW_VAR *)all_status_vars.buffer
//因此对于变量执行循环操作
for (; variables->name; variables++)
{
……
restore_record(table, s->default_values);
table->field[0]->store(name_buffer, strlen(name_buffer),
system_charset_info);
table->field[1]->store(pos, (uint32) (end - pos), system_charset_info);
//将记录插入表
if (schema_table_store_record(thd, table))
DBUG_RETURN(TRUE);
……
}
……
}
~~~
执行到这里,status表里面已经有了所有的数据。然后继续执行,显示出来就行了。
”
Alex:“我明白了。其它的也是类似的,差异性也是有的,比如tables需要进行数据文件夹的扫描,呵呵。”
Bingxi:“是的,都差不多的。”
Alex:“我的建议是,将该cpp文件里面的函数都设置断点,然后每个语句执行一下。比如select * from information_schema.tables /G,用这样的方法把该模式下的22个表测试一边,并测试下show语句,show processlist,show variable,show ceate table test.t1等”
Bingxi:“是的”
Alex:“已经0点了,早点休息吧。晚安”
Bingxi:“晚安”
4–innodb缓冲区管理
最后更新于:2022-04-01 16:04:44
我们在前面讨论了一些mysql的基础知识,现在将要开始进入innodb引擎,从这里开始我们将开始代码的结构分析,innodb的内容分析之后,将反过来分析查询优化引擎。今天,我们先来讨论innodb缓冲区管理。
文件:
D:/mysql-5.1.7-beta/storage/innobase/include/buf0buf.h
D:/mysql-5.1.7-beta/storage/innobase/buffer /buf0buf.c
Bingxi和alex开始交流innodb缓冲区结构(不考虑AWE的情况)。
Bingxi:“alex,咱们都知道所谓缓冲区就是将文件缓存,避免重复操作数据文件,这样可以有效地减少io。”
Alex:“是的,没错。缓冲区的大小是根据配置文件生成,配置文件中innodb_buffer_pool_size文件,除以16k就得到了对应的页面数。”
Bingxi:“嗯,是的。我们现在在debug的情况进行调试,显示的缓冲的页数为512页。也就是我们能够缓存的数据大小为512*16k=8M。这我们可以通过命令行来验证下。我们可以看到设置的大小为8388608,也就是8M,以16k一页计算,也就是512页。
mysql> show variables like 'innodb_buffer_pool_size';
+-------------------------+---------+
| Variable_name | Value |
+-------------------------+---------+
| innodb_buffer_pool_size | 8388608 |
+-------------------------+---------+
1 row in set (0.00 sec)
执行show innodb status/G;查看其中的片段。从中可以看出buffer pool size果然为512,不过呢,我怎么看到free buffers为493,也就是有19页是使用。这个就奇怪,我没有执行查询语句啊。
----------------------
BUFFER POOL AND MEMORY
----------------------
Total memory allocated 13244152; in additional pool allocated 176384
Buffer pool size 512
Free buffers 493
Database pages 19
Modified db pages 0
Pending reads 0
Pending writes: LRU 0, flush list 0, single page 0
Pages read 19, created 0, written 0
0.00 reads/s, 0.00 creates/s, 0.00 writes/s
No buffer pool page gets since the last printout
”
Alex:“因为innodb会有自己的一些系统表需要加载,也就是所谓的字典表。这个内容我们在以后讨论”
Bingxi:“嗯,好的,alex。咱们继续看buf0buf.h文件,我看buf_pool_struct是缓冲区的总结构。在其中记录了缓冲数据页管理、访问计数、LRU列表管理等等。我们先讨论下该结构的下面4个变量吧。
~~~
struct buf_pool_struct{
……
byte* frame_mem;
byte* frame_zero;
byte* high_end;
ulint n_frames;
……
};
~~~
”
Alex:“好吧,我们对着代码看吧。其实frame_mem就是分配的缓冲区的指针,但是这个指针不一定是16k对齐的,为了提升性能,进行了16k对齐,并将该值赋给frame_zero。high_end作为标识缓冲区的结尾。n_frames表示缓冲页的大小。
~~~
buf_pool_t*
buf_pool_init(
ulintmax_size,
ulintcurr_size,
ulintn_frames) //这三个值,在这里都是相等的。为了方便查看去掉了英文注释,建议对照代码
{
……
//果然buf_pool_t是全局缓冲区管理结构,分配全局值buf_pool
buf_pool = mem_alloc(sizeof(buf_pool_t));
……
//UNIV_PAGE_SIZE=16k,n_frames=512
//奇怪的是为什么分配了513个页,而不是512个页?
buf_pool->frame_mem = os_mem_alloc_large(
UNIV_PAGE_SIZE * (n_frames + 1),
TRUE, FALSE);
//如果分配失败,则返回
if (buf_pool->frame_mem == NULL) {
return(NULL);
}
//调整字节,也就16k字节对齐,也就是frame是16k的整数倍。
//如果buf_pool->frame_mem是16k的整数倍,那么frame=buf_pool->frame_mem
//否则frame>buf_pool->frame_mem and frame<buf_pool->frame_mem+16k,且frame能被frame整除
frame = ut_align(buf_pool->frame_mem, UNIV_PAGE_SIZE);
//frame作为缓冲区的起点
buf_pool->frame_zero = frame;
//buf_pool->high_end作为缓冲区的结尾
buf_pool->high_end = frame + UNIV_PAGE_SIZE * n_frames;
……
}
~~~
”
Bingxi:“我明白了,也缓冲的第0页的指针地址为frame_zero,第n页为frame_zero+n*16k(n从0开始)。”
Alex:“是的,是这样的。问你个问题,怎么知道这些数据缓冲页块当中哪些是空闲的,哪些是正在用的,哪些是被修改过的?”
Bingxi: “啊,我先看下代码。厄,我找到了,应该是另外一个结构体进行控制。从下面这个结构体中,我们可以看出,该结构指向了frame地址,也就是我们刚刚提到的缓冲页块。Space与offset标识着实际的硬盘文件,这样建立起来一个映射关系。也就是space与offset对应的硬盘页,映射到了frame缓冲块。因此在这里需要512(数据缓冲页块数量)个这样的结构。
~~~
/* The buffer control block structure */
struct buf_block_struct{
……
byte* frame; /* pointer to buffer frame which
……
ulint space; /* space id of the page */
ulint offset; /* page number within the space */
……
}
~~~
”
Alex:“是的,我们继续看buf_pool_init函数的代码片段,果然将第n个block与第n个frame进行关联。
~~~
buf_pool_t*
buf_pool_init(
ulintmax_size,
ulintcurr_size,
ulintn_frames) //为了方便讲解,这三个值,在这里都是相等的。为了方便查看去掉了英文注释,建议对照代码。差异性,留给读者去阅读。
{
……
//分配了512个控制块,这里正好一个控制块,控制一个数据缓冲页块。
buf_pool->blocks = ut_malloc(sizeof(buf_block_t) * max_size);
//如果分配失败则返回
if (buf_pool->blocks == NULL) {
return(NULL);
}
//对应每一个控制块进行赋予对应的缓冲页指针
//第n个对应的指针为buf_pool->frame_zero + i * UNIV_PAGE_SIZE
for (i = 0; i < max_size; i++) {
//这行代码等价于:block=i + buf_pool->blocks
block = buf_pool_get_nth_block(buf_pool, i);
frame = buf_pool->frame_zero + i * UNIV_PAGE_SIZE;
//通过另外一个数组管理block数组,这里可以不考虑
*(buf_pool->blocks_of_frames + i) = block;
//调用函数,将第n个block与第n个frame进行关联
buf_block_init(block, frame);
}
……
}
~~~
buf_block_init函数比较简单,我们跟踪进去看下。果然进行block与frame的关联了,但是呢,没有放入空闲列表。
~~~
static void buf_block_init(
/*===========*/
buf_block_t* block, /* in: pointer to control block */
byte* frame) /* in: pointer to buffer frame, or NULL if in
the case of AWE there is no frame */
{
block->state = BUF_BLOCK_NOT_USED;
//在这里进行block与frame的关联
block->frame = frame;
block->awe_info = NULL;
block->modify_clock = ut_dulint_zero;
block->file_page_was_freed = FALSE;
block->check_index_page_at_flush = FALSE;
block->index = NULL;
//特别注意这里,该块此时还没有放入空闲列表。
block->in_free_list = FALSE;
block->in_LRU_list = FALSE;
block->n_pointers = 0;
//创建锁
rw_lock_create(&(block->lock));
ut_ad(rw_lock_validate(&(block->lock)));
#ifdef UNIV_SYNC_DEBUG
rw_lock_create(&(block->debug_latch));
rw_lock_set_level(&(block->debug_latch), SYNC_NO_ORDER_CHECK);
#endif /* UNIV_SYNC_DEBUG */
}
~~~
”
Bingxi:“哈哈,alex,你弱了吧。你再看看,在buf_pool_init函数中紧跟着就将这些block放入了空闲列表。
~~~
buf_pool_t*
buf_pool_init(
ulintmax_size,
ulintcurr_size,
ulintn_frames) //这三个值,在这里都是相等的。为了方便查看去掉了英文注释,建议对照代码
{
……
for (i = 0; i < curr_size; i++) {
//获得第n个block
block = buf_pool_get_nth_block(buf_pool, i);
if (block->frame) {
//添加到空闲列表
UT_LIST_ADD_LAST(free, buf_pool->free, block);
//并设置in_free_list状态为真
block->in_free_list = TRUE;
}
……
}
~~~
”
Alex:“嗯,差不多,就先打住了,也该睡觉了。”
Bingxi:“ok,晚安。”
3—办理业务的流程
最后更新于:2022-04-01 16:04:42
Alex第二天带了身份到银行找了小张,要办理个开户业务。
## 1)语法结构Lex
Alex:“小张,我要开个账户。”
小张:“麻烦填写个开户申请单。”
Alex:“好的,我顺便问个问题,开户要填写开户申请单,兑换港币也要写申请单,汇款等也需要填写,这里面既有共性,又有差异性,是如何管理的。”
小张:“嗯,差不多,都是提供写一些表单填写,假设申请创建表,那么就会用到create_info申请表(数据结构),如下面的代码。
~~~
create:
CREATE opt_table_options TABLE_SYM opt_if_not_exists table_ident
{
THD *thd= YYTHD;
LEX *lex= thd->lex;
lex->sql_command= SQLCOM_CREATE_TABLE;
if (!lex->select_lex.add_table_to_list(thd, $5, NULL,
TL_OPTION_UPDATING,
TL_WRITE))
MYSQL_YYABORT;
lex->alter_info.reset();
lex->col_list.empty();
lex->change=NullS;
bzero((char*) &lex->create_info,sizeof(lex->create_info));
lex->create_info.options=$2 | $4;
lex->create_info.db_type= ha_default_handlerton(thd);
lex->create_info.default_table_charset= NULL;
lex->name.str= 0;
lex->name.length= 0;
}
~~~
而某个类型的select需要填写current_select申请表,select_lex申请表。见下面的代码:
~~~
select_part2:
{
LEX *lex= Lex;
SELECT_LEX *sel= lex->current_select;
if (sel->linkage != UNION_TYPE)
mysql_init_select(lex);
lex->current_select->parsing_place= SELECT_LIST;
}
~~~
”
Alex:“嗯,差不多。如果alter,insert等字句,也会使用到相应的数据结构,维护了一个数据结构LEX,里面有各种各样的字段,根据用户的请求,会填充相应的字段。当然这里面也会有共性的内容,比如身份证复印信息等等。”
小张:“是这样的,在输入的语句转化为LEX结构这一块比较简单,通过阅读yy文件就可以了,但是最好设置断点调试一些重要的函数,比如下面的代码中,有必要在mysql_init_select函数的实现体设置断点调试该函数的功能,该函数的实现体见sql/sql_parse.cpp文件,同时建议将该文件中的各个函数看一下。另外强调一下,yy文件对应的cpp文件设置断点默认情况是无效的,需要特殊设置调试lib,这里不推荐调试。掌握yy文件以及sql_parse.cpp文件就完全满足了。这里不列出每个字段的含义,建议直接查看LEX的定义文件,使用的代码是5.1.7,文件为sql/sql_lex.h
~~~
select_part2:
{
LEX *lex= Lex;
SELECT_LEX *sel= lex->current_select;
if (sel->linkage != UNION_TYPE)
mysql_init_select(lex);
lex->current_select->parsing_place= SELECT_LIST;
}
select_options select_item_list
{
Select->parsing_place= NO_MATTER;
}
select_into select_lock_type
;
~~~
”
## 2)THD结构
Alex:“好的,那我再继续深问下,办理业务的这里内容给你了,你如果在办理的过程中,做到有序。”
小张:“好吧,我们现在先假设一个场景,alex从8楼到1楼办理招商银行账户开户,这样的一个行为,alex如何执行的,同时假想下数据库可能是如何执行的。”
Alex:“好的,如下表。从表中我们可以看出,alex在执行该操作的过程中需要维护很多信息,这些信息数据库是怎么维护的呢,比如执行查找的时候,数据库表t1正在被其他用户上了X锁。
<table class="MsoTableGrid" style="border-collapse: collapse; mso-border-alt: solid windowtext .5pt; mso-yfti-tbllook: 480; mso-padding-alt: 0cm 5.4pt 0cm 5.4pt; mso-border-insideh: .5pt solid windowtext; mso-border-insidev: .5pt solid windowtext;" border="1" cellspacing="0" cellpadding="0"><tbody><tr style="mso-yfti-irow: 0; mso-yfti-firstrow: yes;"><td style="padding-right: 5.4pt; padding-left: 5.4pt; padding-bottom: 0cm; width: 142pt; padding-top: 0cm; background-color: transparent; mso-border-alt: solid windowtext .5pt; border: windowtext 1pt solid;" width="189" valign="top"><p class="MsoNormal" style="margin: 0cm 0cm 0pt;"><span style="font-size: small;"><span style="font-size: medium;"><span style="color: blue; font-family: 宋体; mso-ascii-font-family: 'Times New Roman'; mso-hansi-font-family: 'Times New Roman';">事项</span><span style="color: blue;" lang="EN-US"/></span></span></p></td><td style="border-right: windowtext 1pt solid; padding-right: 5.4pt; border-top: windowtext 1pt solid; padding-left: 5.4pt; padding-bottom: 0cm; border-left: #ffffff; width: 142.05pt; padding-top: 0cm; border-bottom: windowtext 1pt solid; background-color: transparent; mso-border-alt: solid windowtext .5pt; mso-border-left-alt: solid windowtext .5pt;" width="189" valign="top"><p class="MsoNormal" style="margin: 0cm 0cm 0pt;"><span style="color: blue;" lang="EN-US"><span style="font-size: small;"><span style="font-size: medium;">Alex</span></span></span></p></td><td style="border-right: windowtext 1pt solid; padding-right: 5.4pt; border-top: windowtext 1pt solid; padding-left: 5.4pt; padding-bottom: 0cm; border-left: #ffffff; width: 142.05pt; padding-top: 0cm; border-bottom: windowtext 1pt solid; background-color: transparent; mso-border-alt: solid windowtext .5pt; mso-border-left-alt: solid windowtext .5pt;" width="189" valign="top"><p class="MsoNormal" style="margin: 0cm 0cm 0pt;"><span style="font-size: small;"><span style="font-size: medium;"><span style="color: blue; font-family: 宋体; mso-ascii-font-family: 'Times New Roman'; mso-hansi-font-family: 'Times New Roman';">数据库</span><span style="color: blue;" lang="EN-US"/></span></span></p></td></tr><tr style="mso-yfti-irow: 1;"><td style="border-right: windowtext 1pt solid; padding-right: 5.4pt; border-top: #ffffff; padding-left: 5.4pt; padding-bottom: 0cm; border-left: windowtext 1pt solid; width: 142pt; padding-top: 0cm; border-bottom: windowtext 1pt solid; background-color: transparent; mso-border-alt: solid windowtext .5pt; mso-border-top-alt: solid windowtext .5pt;" width="189" valign="top"><p class="MsoNormal" style="margin: 0cm 0cm 0pt;"><span style="font-family: 宋体; mso-ascii-font-family: 'Times New Roman'; mso-hansi-font-family: 'Times New Roman';"><span style="font-size: medium;">语句</span></span></p></td><td style="border-right: windowtext 1pt solid; padding-right: 5.4pt; border-top: #ffffff; padding-left: 5.4pt; padding-bottom: 0cm; border-left: #ffffff; width: 142.05pt; padding-top: 0cm; border-bottom: windowtext 1pt solid; background-color: transparent; mso-border-alt: solid windowtext .5pt; mso-border-left-alt: solid windowtext .5pt; mso-border-top-alt: solid windowtext .5pt;" width="189" valign="top"><p class="MsoNormal" style="margin: 0cm 0cm 0pt;"><span style="font-size: small;"><span style="font-size: medium;"><span lang="EN-US">alex</span><span style="font-family: 宋体; mso-ascii-font-family: 'Times New Roman'; mso-hansi-font-family: 'Times New Roman';">从</span><span lang="EN-US">8</span><span style="font-family: 宋体; mso-ascii-font-family: 'Times New Roman'; mso-hansi-font-family: 'Times New Roman';">楼到</span><span lang="EN-US">1</span><span style="font-family: 宋体; mso-ascii-font-family: 'Times New Roman'; mso-hansi-font-family: 'Times New Roman';">楼办理招商银行账户开户</span></span></span></p></td><td style="border-right: windowtext 1pt solid; padding-right: 5.4pt; border-top: #ffffff; padding-left: 5.4pt; padding-bottom: 0cm; border-left: #ffffff; width: 142.05pt; padding-top: 0cm; border-bottom: windowtext 1pt solid; background-color: transparent; mso-border-alt: solid windowtext .5pt; mso-border-left-alt: solid windowtext .5pt; mso-border-top-alt: solid windowtext .5pt;" width="189" valign="top"><p class="MsoNormal" style="margin: 0cm 0cm 0pt;"><span lang="EN-US"><span style="font-size: medium;">Select id,name from t1 where id=1</span></span></p></td></tr><tr style="mso-yfti-irow: 2;"><td style="border-right: windowtext 1pt solid; padding-right: 5.4pt; border-top: #ffffff; padding-left: 5.4pt; padding-bottom: 0cm; border-left: windowtext 1pt solid; width: 142pt; padding-top: 0cm; border-bottom: windowtext 1pt solid; background-color: transparent; mso-border-alt: solid windowtext .5pt; mso-border-top-alt: solid windowtext .5pt;" width="189" valign="top"><p class="MsoNormal" style="margin: 0cm 0cm 0pt;"><span style="font-family: 宋体; mso-ascii-font-family: 'Times New Roman'; mso-hansi-font-family: 'Times New Roman';"><span style="font-size: medium;">语法分析</span></span></p></td><td style="border-right: windowtext 1pt solid; padding-right: 5.4pt; border-top: #ffffff; padding-left: 5.4pt; padding-bottom: 0cm; border-left: #ffffff; width: 142.05pt; padding-top: 0cm; border-bottom: windowtext 1pt solid; background-color: transparent; mso-border-alt: solid windowtext .5pt; mso-border-left-alt: solid windowtext .5pt; mso-border-top-alt: solid windowtext .5pt;" width="189" valign="top"><p class="MsoNormal" style="margin: 0cm 0cm 0pt;"><span style="font-family: 宋体; mso-ascii-font-family: 'Times New Roman'; mso-hansi-font-family: 'Times New Roman';"><span style="font-size: medium;">通过</span></span></p></td><td style="border-right: windowtext 1pt solid; padding-right: 5.4pt; border-top: #ffffff; padding-left: 5.4pt; padding-bottom: 0cm; border-left: #ffffff; width: 142.05pt; padding-top: 0cm; border-bottom: windowtext 1pt solid; background-color: transparent; mso-border-alt: solid windowtext .5pt; mso-border-left-alt: solid windowtext .5pt; mso-border-top-alt: solid windowtext .5pt;" width="189" valign="top"><p class="MsoNormal" style="margin: 0cm 0cm 0pt;"><span style="font-family: 宋体; mso-ascii-font-family: 'Times New Roman'; mso-hansi-font-family: 'Times New Roman';"><span style="font-size: medium;">通过</span></span></p></td></tr><tr style="mso-yfti-irow: 3;"><td style="border-right: windowtext 1pt solid; padding-right: 5.4pt; border-top: #ffffff; padding-left: 5.4pt; padding-bottom: 0cm; border-left: windowtext 1pt solid; width: 142pt; padding-top: 0cm; border-bottom: windowtext 1pt solid; background-color: transparent; mso-border-alt: solid windowtext .5pt; mso-border-top-alt: solid windowtext .5pt;" width="189" valign="top"><p class="MsoNormal" style="margin: 0cm 0cm 0pt;"><span style="font-family: 宋体; mso-ascii-font-family: 'Times New Roman'; mso-hansi-font-family: 'Times New Roman';"><span style="font-size: medium;">各种检查</span></span></p></td><td style="border-right: windowtext 1pt solid; padding-right: 5.4pt; border-top: #ffffff; padding-left: 5.4pt; padding-bottom: 0cm; border-left: #ffffff; width: 142.05pt; padding-top: 0cm; border-bottom: windowtext 1pt solid; background-color: transparent; mso-border-alt: solid windowtext .5pt; mso-border-left-alt: solid windowtext .5pt; mso-border-top-alt: solid windowtext .5pt;" width="189" valign="top"><p class="MsoNormal" style="margin: 0cm 0cm 0pt;"><span style="font-family: 宋体; mso-ascii-font-family: 'Times New Roman'; mso-hansi-font-family: 'Times New Roman';"><span style="font-size: medium;">是否带了身份证、招商银行现在是否是办公时间等等</span></span></p></td><td style="border-right: windowtext 1pt solid; padding-right: 5.4pt; border-top: #ffffff; padding-left: 5.4pt; padding-bottom: 0cm; border-left: #ffffff; width: 142.05pt; padding-top: 0cm; border-bottom: windowtext 1pt solid; background-color: transparent; mso-border-alt: solid windowtext .5pt; mso-border-left-alt: solid windowtext .5pt; mso-border-top-alt: solid windowtext .5pt;" width="189" valign="top"><p class="MsoNormal" style="margin: 0cm 0cm 0pt;"><span style="font-size: small;"><span style="font-size: medium;"><span lang="EN-US">T1</span><span style="font-family: 宋体; mso-ascii-font-family: 'Times New Roman'; mso-hansi-font-family: 'Times New Roman';">表是否存在,</span><span lang="EN-US">id,name</span><span style="font-family: 宋体; mso-ascii-font-family: 'Times New Roman'; mso-hansi-font-family: 'Times New Roman';">字段是否存在,是否有查询权限等等。</span></span></span></p></td></tr><tr style="mso-yfti-irow: 4;"><td style="border-right: windowtext 1pt solid; padding-right: 5.4pt; border-top: #ffffff; padding-left: 5.4pt; padding-bottom: 0cm; border-left: windowtext 1pt solid; width: 142pt; padding-top: 0cm; border-bottom: windowtext 1pt solid; background-color: transparent; mso-border-alt: solid windowtext .5pt; mso-border-top-alt: solid windowtext .5pt;" width="189" valign="top"><p class="MsoNormal" style="margin: 0cm 0cm 0pt;"><span style="font-family: 宋体; mso-ascii-font-family: 'Times New Roman'; mso-hansi-font-family: 'Times New Roman';"><span style="font-size: medium;">查询优化</span></span></p></td><td style="border-right: windowtext 1pt solid; padding-right: 5.4pt; border-top: #ffffff; padding-left: 5.4pt; padding-bottom: 0cm; border-left: #ffffff; width: 142.05pt; padding-top: 0cm; border-bottom: windowtext 1pt solid; background-color: transparent; mso-border-alt: solid windowtext .5pt; mso-border-left-alt: solid windowtext .5pt; mso-border-top-alt: solid windowtext .5pt;" width="189" valign="top"><p class="MsoNormal" style="margin: 0cm 0cm 0pt;"><span style="font-size: small;"><span style="font-size: medium;"><span style="font-family: 宋体; mso-ascii-font-family: 'Times New Roman'; mso-hansi-font-family: 'Times New Roman';">从备选方案里面选择:电梯直接下、走楼梯、先坐电梯上去逆行然后达到</span><span lang="EN-US">1</span><span style="font-family: 宋体; mso-ascii-font-family: 'Times New Roman'; mso-hansi-font-family: 'Times New Roman';">楼,……</span></span></span></p></td><td style="border-right: windowtext 1pt solid; padding-right: 5.4pt; border-top: #ffffff; padding-left: 5.4pt; padding-bottom: 0cm; border-left: #ffffff; width: 142.05pt; padding-top: 0cm; border-bottom: windowtext 1pt solid; background-color: transparent; mso-border-alt: solid windowtext .5pt; mso-border-left-alt: solid windowtext .5pt; mso-border-top-alt: solid windowtext .5pt;" width="189" valign="top"><p class="MsoNormal" style="margin: 0cm 0cm 0pt;"><span style="font-family: 宋体; mso-ascii-font-family: 'Times New Roman'; mso-hansi-font-family: 'Times New Roman';"><span style="font-size: medium;">从备选方案中选择:全表扫描、非聚集索引查找、聚集所引查找,……</span></span></p></td></tr><tr style="mso-yfti-irow: 5;"><td style="border-right: windowtext 1pt solid; padding-right: 5.4pt; border-top: #ffffff; padding-left: 5.4pt; padding-bottom: 0cm; border-left: windowtext 1pt solid; width: 142pt; padding-top: 0cm; border-bottom: windowtext 1pt solid; background-color: transparent; mso-border-alt: solid windowtext .5pt; mso-border-top-alt: solid windowtext .5pt;" width="189" valign="top"><p class="MsoNormal" style="margin: 0cm 0cm 0pt;"><span style="font-family: 宋体; mso-ascii-font-family: 'Times New Roman'; mso-hansi-font-family: 'Times New Roman';"><span style="font-size: medium;">确定方案</span></span></p></td><td style="border-right: windowtext 1pt solid; padding-right: 5.4pt; border-top: #ffffff; padding-left: 5.4pt; padding-bottom: 0cm; border-left: #ffffff; width: 142.05pt; padding-top: 0cm; border-bottom: windowtext 1pt solid; background-color: transparent; mso-border-alt: solid windowtext .5pt; mso-border-left-alt: solid windowtext .5pt; mso-border-top-alt: solid windowtext .5pt;" width="189" valign="top"><p class="MsoNormal" style="margin: 0cm 0cm 0pt;"><span style="font-family: 宋体; mso-ascii-font-family: 'Times New Roman'; mso-hansi-font-family: 'Times New Roman';"><span style="font-size: medium;">走电梯下去办理</span></span></p></td><td style="border-right: windowtext 1pt solid; padding-right: 5.4pt; border-top: #ffffff; padding-left: 5.4pt; padding-bottom: 0cm; border-left: #ffffff; width: 142.05pt; padding-top: 0cm; border-bottom: windowtext 1pt solid; background-color: transparent; mso-border-alt: solid windowtext .5pt; mso-border-left-alt: solid windowtext .5pt; mso-border-top-alt: solid windowtext .5pt;" width="189" valign="top"><p class="MsoNormal" style="margin: 0cm 0cm 0pt;"><span style="font-family: 宋体; mso-ascii-font-family: 'Times New Roman'; mso-hansi-font-family: 'Times New Roman';"><span style="font-size: medium;">全表扫描</span></span></p></td></tr><tr style="mso-yfti-irow: 6; mso-yfti-lastrow: yes;"><td style="border-right: windowtext 1pt solid; padding-right: 5.4pt; border-top: #ffffff; padding-left: 5.4pt; padding-bottom: 0cm; border-left: windowtext 1pt solid; width: 142pt; padding-top: 0cm; border-bottom: windowtext 1pt solid; background-color: transparent; mso-border-alt: solid windowtext .5pt; mso-border-top-alt: solid windowtext .5pt;" width="189" valign="top"><p class="MsoNormal" style="margin: 0cm 0cm 0pt;"><span style="font-family: 宋体; mso-ascii-font-family: 'Times New Roman'; mso-hansi-font-family: 'Times New Roman';"><span style="font-size: medium;">执行</span></span></p></td><td style="border-right: windowtext 1pt solid; padding-right: 5.4pt; border-top: #ffffff; padding-left: 5.4pt; padding-bottom: 0cm; border-left: #ffffff; width: 142.05pt; padding-top: 0cm; border-bottom: windowtext 1pt solid; background-color: transparent; mso-border-alt: solid windowtext .5pt; mso-border-left-alt: solid windowtext .5pt; mso-border-top-alt: solid windowtext .5pt;" width="189" valign="top"><p class="MsoNormal" style="margin: 0cm 0cm 0pt;"><span style="font-family: 宋体; mso-ascii-font-family: 'Times New Roman'; mso-hansi-font-family: 'Times New Roman';"><span style="font-size: medium;">获取电梯这个互斥资源,到达银行取得号码排队,……</span></span></p></td><td style="border-right: windowtext 1pt solid; padding-right: 5.4pt; border-top: #ffffff; padding-left: 5.4pt; padding-bottom: 0cm; border-left: #ffffff; width: 142.05pt; padding-top: 0cm; border-bottom: windowtext 1pt solid; background-color: transparent; mso-border-alt: solid windowtext .5pt; mso-border-left-alt: solid windowtext .5pt; mso-border-top-alt: solid windowtext .5pt;" width="189" valign="top"><p class="MsoNormal" style="margin: 0cm 0cm 0pt;"><span style="font-size: small;"><span style="font-size: medium;"><span style="font-family: 宋体; mso-ascii-font-family: 'Times New Roman'; mso-hansi-font-family: 'Times New Roman';">取得第一条记录,判断是否满足</span><span lang="EN-US">id=1</span><span style="font-family: 宋体; mso-ascii-font-family: 'Times New Roman'; mso-hansi-font-family: 'Times New Roman';">的条件,如果符合则丢入结果集。对所有的记录执行一遍。将结果集返回用户</span></span></span></p></td></tr></tbody></table>
”
小张:“这个问题问得好,确实我们要维护很多信息。比如开户的过程中,我们需要维护类似的信息。在数据库中是类似的,mysql创建每个线程来响应对应的1个客户的请求。该线程维护的这个结构为该进程所独有,生命周期是线程的生命周期。这里面保存了重要的客户的申请信息Lex,锁信息等等。具体的字段定义见sql_class.h。”
2—我可以为你服务什么?
最后更新于:2022-04-01 16:04:39
Alex取了个号,客户经理小张负责办理alex的服务。
## 1)服务清单
小张:“先生,我可以为你服务什么么?”
Alex:“厄,我要一碗红烧肉。”
小张:“没有”
Alex:“厄,那来碗拉面”
小张:“没有”
Alex:“那有些啥?”
小张:“可以查看sql目录下sql_yacc.yy文件,不过你用的这个5.1.7没有该文件,只有相对应的sql_yacc.cpp文件。你可以使用5.1的其它版本的该文件,比如5.1.34。这里有个6.0.4的sql_yacc.yy文件,你先看下。”
Alex:“啊?那不是要先看lex与yacc。”
小张:“推荐你不必看lex与yacc,我大概给你说说,只要看语法规则就可以了。
每条语法规则包括一个左部和一个右部,左右部之间用冒号’:’来分隔,规则结尾处要用分号”;”标记,所以一条语法规则的格式如下:
nonterminal : BODY;
其中nonterminal是一个非终结符,右部的BODY是一个由终结符和非终结符组成的串、可以为空,请看几个例子,语法1:
create: CREATE opt_table_options TABLE_SYM opt_if_not_exists table_ident create2
语法2:
create: CREATE DATABASE opt_if_not_exists ident opt_create_database_options
从中,我们可以看出语法1是创建表的,语法是创建数据库的。正常情况下,小写字母表示非终结符,用大写字母表示终结符,终结符是前面定义的。
%token CREATE /* SQL-2003-R */
这两个create语法可以合并成一个,中间用‘|’分割,表示’或’:
create: CREATE opt_table_options TABLE_SYM opt_if_not_exists table_ident create2
| CREATE DATABASE opt_if_not_exists ident opt_create_database_options
非终结进一步往下进行扩展,比如看下
opt_if_not_exists:
/* empty */
| IF not EXISTS;
/*empty*/这一行表示用户用户没有输入该子句,看下这个语句:
Create table t1(id int,varchar(20));
“Create”被create语法中的“CREATE”命中,“table”被“TABLE_SYM”命中,opt_if_not_exists对应的为空。而下面一个语句就会命中:
Create table if not exists t1(id int,varchar(20));
”
Alex:“多谢,也就是说,符合规范的语句就会被识别,从而被执行,是这样么。”
小张:“可以勉强这么讲”
## 2)语言的转换
Alex:“小张,我问你哈,语句后面的大括号是什么意思啊。”
小张:“括号里面表示的是触发了语义动作,设置了ts_cmd_type的值为创建表空间。
~~~
create:
//省略了一些内容
| CREATE TABLESPACE tablespace_info
{
Lex->alter_tablespace_info->ts_cmd_type= CREATE_TABLESPACE;
}
//省略了一些内容
~~~
”
alex:“我看到里面有$$,$1,这些是什么含义啊”
小张:“你看下面一个表达式。
A :B C D
其中A的语义值为$$,B、C、D的语义值依次为$1,$2,$3。为了表达得更清晰,看下面的表达式,左边的expr的值应该等于右边的expr的值
~~~
expr: '(' expr ')'
{$$=$2;}
~~~
”
Alex:“不太对啊,你看下这个表达式,$3从哪里来的,只有两个值啊:get_select_lex、derived_table_list。
~~~
select_derived:
get_select_lex
{
LEX *lex= Lex;
if ($1->init_nested_join(lex->thd))
MYSQL_YYABORT;
}
derived_table_list
{
LEX *lex= Lex;
/* for normal joins, $3 != NULL and end_nested_join() != NULL,
for derived tables, both must equal NULL */
if (!($$= $1->end_nested_join(lex->thd)) && $3)
MYSQL_YYABORT;
if (!$3 && $$)
{
my_parse_error(ER(ER_SYNTAX_ERROR));
MYSQL_YYABORT;
}
}
;
~~~
”
小张:“这个情况我们要讲下,有些语法需要在识别出句型的一部分时就完成一些动作,这里我们看到了第一个大括号。Yacc会自动设置一个非终结符$ACT,该$ACT解析为空。
select_derived: get_select_lex $ACT derived_table_list
因此第二个大括号里面的$3就是derived_table_list
”
Alex:“谢谢,我明白一点了。其实yy文件产生的作用就是语句串转化为Lex语法结构。然后系统根据Lex语法结构进行处理。那么是不是可以说,只要通过语句,就可以执行。”
小张:“早着呢,还有语义检查,比如查询的列名不存在,以及权限检查,优化等等。要确保安全,不然你直接来句查了bingxi有多少存款,这可不行。”
3)所谓的5级安全
Alex:“这个安全,是不是所谓的5级安全,B1,B2等等啥的。”
小张:“这两个没有关联,不过你提到了,我就给你提提。
1级安全:以前啊,公司老总算了算,就像DBA。独自管着账本呢,不安全。
2级安全:董事会觉得不安全,就加了个审计员。很多数据库里面都有。但是呢,也不安全,老总把审计员搞定了。合谋合谋。
3级安全:搞了个三权分离,所谓的安全员,保卫科。账本锁起来。不过也不安全,保存账本的安全室不结识,打个洞就进去了。
4级安全:结构化编程,于是进不去了。
5级安全:没有最安全,只有更安全,没有达到这个的。
”
Alex:“有点意思,小张,我要开个户,你给讲讲这个的流程吧。”
小张:“你带身份证了”
Alex:“没带”
小张:“那明天吧”
Alex:“ok”
1— mysql的启动过程
最后更新于:2022-04-01 16:04:37
有一天,两个不懂mysql内核的人想去了解mysql内核代码,两个人不是去调试代码、查找资料,而是在那边思考。因为不了解内核,所以边思考边去验证。
使用的mysql代码是5.1.7,调试环境是windows平台下的vs2003。
ingxi:“alex,你觉得mysql的启动过程会是什么样的呢?我们以银行为例吧。”
Alex:“嗯,bingxi。早上银行开门了,会先准备好环境,然后开门迎客,mysql也是这样。Mysql里面会有一个handle_connections_sockets函数,这个函数就好比是个叫号机,每个用户来了都会取个号,然后就会进行业务处理。”
~~~
pthread_handler_t handle_connections_sockets(void *arg __attribute__((unused)))
{
……
while (!abort_loop)
{
~~~
select((int) max_used_connection,&readFDs,0,0,0) < 0) //有连接了则往下来执行,否则一直等待
~~~
……
accept(sock, my_reinterpret_cast(struct sockaddr *) (&cAddr),&length) //接受请求
……
create_new_thread(thd);
}
//abort_loop=1,则执行到这里进行推出。今天业务不处理了
}
~~~
Bingxi:“啊,这里面存在两种可能的,1)用户来一个就分配一个工作人员处理,2)将排号的人丢进工作队列,根据叫号机到指定窗口获取服务。前者的场景适合于请求量大,并且需要响应速度特别快的情况,但是分配也会有个限制,所谓的最大连接数,这样的情况常见于互联网行业,相应地我们可以看到机器的负载变化范围特别大。同样的,这也是它的一个弊端,假设每个业务都复杂(消耗资源型sql语句),同时处理的话,机器会支撑不住,这时候第二种方法就比较好,这种情况属于事务性场景。”
Alex:“嗯,是的。Mysql选择的是前者,oracle提供两种方法供选择。我们继续往下面的代码看,如果我们配置了线程缓存,且有可用的缓存,则唤醒该线程,否则创建新的线程。”
~~~
static void create_new_thread(THD *thd)
{
if (cached_thread_count > wake_thread)
{
start_cached_thread(thd);
}
else
{
if ((error=pthread_create(&thd->real_id,&connection_attrib,
handle_one_connection,
(void*) thd)))
}
}
~~~
Bingxi:“嗯,老杨。是不是理解银行为客户分配了一个服务人员,在这段期间一直为该客户服务。里面有个代码段,是一直在等用户下命令。但是有可能网络,或者被kill掉了,就像一个人存了100,不断取1块钱一样,被保安带走了。”
~~~
pthread_handler_t handle_one_connection(void *arg)
{
while (!net->error && net->vio != 0 &&
!(thd->killed == THD::KILL_CONNECTION))
{
net->no_send_error= 0;
if (do_command(thd))
break;
}
}
~~~
Alex:“嗯,获取命令,然后执行命令。在dispatch_command函数中,根据不同的客户请求进行响应的处理,比如开账户、存钱等”
~~~
bool do_command(THD *thd)
{
if ((packet_length=my_net_read(net)) == packet_error) //获取命令
DBUG_RETURN(dispatch_command(command,thd, packet+1, (uint) packet_length));
}
~~~
前言
最后更新于:2022-04-01 16:04:35
> 原文出处:[思考mysql内核之初级系列](http://blog.csdn.net/column/details/mysqlpri.html)
作者:[yzyangwanfu](http://blog.csdn.net/yzyangwanfu)
**本系列文章经作者授权在看云整理发布,未经作者允许,请勿转载!**
# 思考mysql内核之初级系列
> 有一天,两个不懂mysql内核的人想去了解mysql内核代码,两个人不是去调试代码、查找资料,而是在那边思考。因为不了解内核,所以边思考边去验证。