打飞机中机种敌机和战机损毁时的爆炸效果
最后更新于:2022-04-01 20:15:19
1.第一步,添加爆炸动画
~~~
//添加玩家飞机飞行动画
id _playerFlyAction;
id _playerBlowupAnimation; //战机爆炸动画
id _enemyBlowupAnimation;//敌机爆炸动画
BOOL _isEnemyCollodable; //敌机是否可碰撞
BOOL _isPlayerCollodable;//玩家飞机是否可碰撞
~~~
2.制作精灵表单
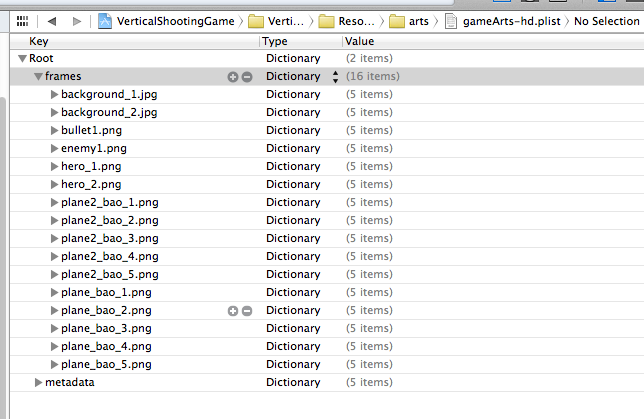
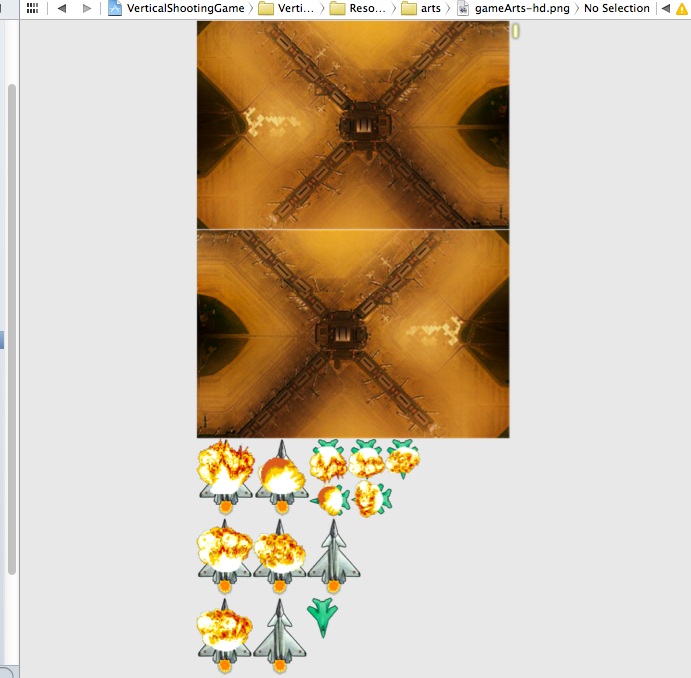
3.初始化爆炸量
~~~
//初始化爆炸效果的量
_playerBlowupAnimation = [self getAnimationByName:@"plane_bao_" delay:0.08 animNum:5];
[_playerBlowupAnimation retain];
_enemyBlowupAnimation = [self getAnimationByName:@"plane2_bao_" delay:0.08 animNum:5];
[_enemyBlowupAnimation retain];
_isEnemyCollodable = YES;
_isPlayerCollodable = YES;
~~~
4.添加获取动画帧的图片 的方法
~~~
#pragma mark 飞机飞行和爆炸动画
- (CCAnimation *)getAnimationByName:(NSString *)animName delay:(float)delay animNum:(int)num
{
NSMutableArray *animFrames = [NSMutableArray arrayWithCapacity:num];
for (int i=1; i<= num; ++i) {
NSString *frameName = [NSString stringWithFormat:@"%@%d.png",animName,i];
CCSpriteFrame *frame = [[CCSpriteFrameCache sharedSpriteFrameCache] spriteFrameByName:frameName];
[animFrames addObject:frame];
}
CCAnimation *animation = [CCAnimation animationWithSpriteFrames:animFrames delay:delay];
return animation;
}
~~~
5.修改碰撞
~~~
-(void) collisionDetection:(ccTime)dt{
CCSprite *enemy;
// CGRect bulletRect = [self rectOfSprite:_bulletSprite];
CCARRAY_FOREACH(_enemySprites, enemy)
{
if (enemy.visible && _isEnemyCollodable ) {
_isEnemyCollodable = NO;
//1.bullet & enemy collision det ection
// CGRect enemyRect = [self rectOfSprite:enemy];
if (_bulletSprite.visible && CGRectIntersectsRect(enemy.boundingBox, _bulletSprite.boundingBox)) {
//使用CCspawn 动作组合
id ac1 = [CCScaleTo actionWithDuration:1.0 scale:1.2];
id ac2 = [CCRotateBy actionWithDuration:1.0 angle:720];
id ac3 = [CCFadeOut actionWithDuration:1.0];
id ac4 = [CCHide action];
id blowup = [CCAnimate actionWithAnimation:_enemyBlowupAnimation ];
id block = ^(){
_isEnemyCollodable = YES;
};
id ac5 = [CCSequence actions:ac3,ac4,[CCCallBlock actionWithBlock:block], nil];
id action = [CCSpawn actions:ac1,ac2,ac5,blowup, nil];
[enemy stopAllActions];
[enemy runAction:action];
enemy.visible = NO;
_bulletSprite.visible = NO;
_totalScore += 100;
if (_totalScore >= 1000) {
[_gameEndLabel setString:@"游戏胜利!"];
_gameEndLabel.visible = YES;
id scaleTo = [CCScaleTo actionWithDuration:1.0 scale:1.2f];
[_gameEndLabel runAction:scaleTo];
[self unscheduleUpdate];
[self performSelector:@selector(onRestartGame) withObject:nil afterDelay:2.0f];
}
[_bulletSprite stopAllActions];
[enemy stopAllActions];
CCLOG(@"collision bullet");
break;
}
//2.enemy & player collision detection
CCSprite *playerSprite = [self getPlayerSprite];
// CGRect playRect = [self rectOfSprite:playerSprite];
if (playerSprite.visible && _isPlayerCollodable &&
playerSprite.numberOfRunningActions == 0
&& CGRectIntersectsRect(enemy.boundingBox, playerSprite.boundingBox)) {
enemy.visible = NO;
_isPlayerCollodable = NO;
_totalLives -= 1;
if (_totalLives <= 0) {
[_gameEndLabel setString:@"游戏失败!"];
_gameEndLabel.visible = YES;
id scaleTo = [CCScaleTo actionWithDuration:1.0 scale:1.2f];
[_gameEndLabel runAction:scaleTo];
[self unscheduleUpdate];
[self performSelector:@selector(onRestartGame) withObject:nil afterDelay:3.0f];
}
id blink = [CCBlink actionWithDuration:2.0 blinks:4];
id blowup = [CCAnimate actionWithAnimation:_playerBlowupAnimation];
id action = [CCSequence actions:blowup,blink,[CCCallBlock actionWithBlock:^(){
_isPlayerCollodable = YES;[playerSprite stopAllActions];
[playerSprite runAction:_playerFlyAction];
playerSprite.opacity = 255;
playerSprite.visible = YES;}], nil];
[playerSprite stopAllActions];
[playerSprite runAction:action];
CCLOG(@"collision player");
break;
}
}
}
}
~~~
';
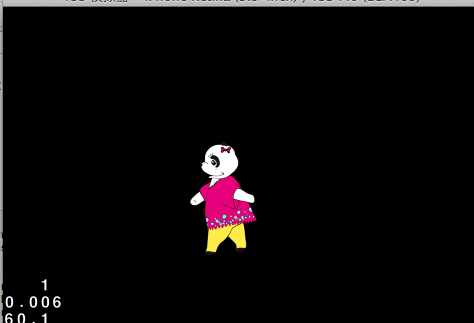
精灵表单的制作以及简易动画的生成
最后更新于:2022-04-01 20:15:17
1.第一步:使用Zwoptex 制作精灵表单
2.制作的表单的名称为 cocos2Dpng,cocos2D.plist;
3.精灵的动画效果 主要分为五部分。
~~~
// on "init" you need to initialize your instance
-(id) init
{
// always call "super" init
// Apple recommends to re-assign "self" with the "super's" return value
if( (self=[super init]) ) {
// ask director for the window size
//
//1将精灵帧纹理添加到精灵帧缓存中
[[CCSpriteFrameCache sharedSpriteFrameCache] addSpriteFramesWithFile:@"cocos2D.plist"];
//2创建一个精灵表单
CCSpriteBatchNode *batchNode = [CCSpriteBatchNode batchNodeWithFile:@"cocos2D.png"];
[self addChild:batchNode];
//穿件图片帧列表
NSMutableArray *animFrames = [NSMutableArray array];
for (int i = 1; i < 4; i ++) {
CCSpriteFrame *temp = [[CCSpriteFrameCache sharedSpriteFrameCache] spriteFrameByName:[NSString stringWithFormat:@"pandawalk%d.png",i]];
[animFrames addObject:temp];
}
//4创建一个 动画对象
CCAnimation *walkAnim = [CCAnimation animationWithSpriteFrames:animFrames delay:0.1f];
//5创建精灵,运行动画动作
CGSize size = [[CCDirector sharedDirector] winSize];
CCSprite *panda = [CCSprite spriteWithSpriteFrameName:@"pandawalk1.png"];
panda.position = ccp(size.width*0.8, size.height*0.4);
id walkAction = [CCRepeatForever actionWithAction:[CCAnimate actionWithAnimation:walkAnim]];
[panda runAction:walkAction];
[panda runAction:[CCMoveTo actionWithDuration:6.0f position:ccp(size.width*0.2, size.height*0.4)]];
[batchNode addChild:panda];
}
return self;
}
~~~
效果图:
';
COCOS2D中的特效
最后更新于:2022-04-01 20:15:14
1.关于特效的种类和使用
~~~
-(id) init
{
// always call "super" init
// Apple recommends to re-assign "self" with the "super's" return value
if( (self=[super init]) ) {
// 创建并初始化精灵对象
CCSprite *mySprite = [CCSprite spriteWithFile:@"panda.png"];
CCSprite *ball = [CCSprite spriteWithFile:@"ball.png"];
// 获取屏幕大小
CGSize size = [CCDirector sharedDirector].winSize;
mySprite.position = ccp(size.width/2,size.height/2);
ball.position = ccp(200+size.width/2,size.height/2);
// 将精灵对象添加为当前层的子节点
[self addChild:mySprite];
[self addChild:ball];
// 下面是各种特效动作的实现代码
// 如果要查看某种特效动作的效果,可以取消对相应代码的注释
// CCWaves:通过更改节点对象的网格属性,让节点对象产生类似波动的效果。
id effect = [CCWaves actionWithWaves:10 amplitude:50 horizontal:YES vertical:YES grid:ccg(10,10) duration:5];
[mySprite runAction:effect];
// CCWaves3D:通过更改节点对象的网格属性,让节点对象产生类似三维波动的效果。
id effectWaves3D = [CCWaves3D actionWithWaves:10 amplitude:40 grid:ccg(12,12) duration:5];
[mySprite runAction:effectWaves3D];
// CCFlipX3D:通过更改节点对象的网格属性,让节点对象沿着水平方向产生三维翻转效果。需要注意的是,虽然这里提供了ccg参数,但默认情况下只能使用ccg(1,1)。
// id effectFlipX3D = [CCFlipX3D actionWithSize:ccg(1,1) duration:2];
// id effectFlipX3Dback =[effectFlipX3D reverse];
// [mySprite runAction:[CCSequence actions:effectFlipX3D,[CCDelayTime actionWithDuration:2], effectFlipX3Dback,nil]];
// CCFlipY3D: 通过更改节点对象的网格属性,让节点对象沿着垂直方向产生三维翻转效果。
// id effectFlipY3D = [CCFlipY3D actionWithDuration:2];
// id effectFlipY3Dback = [effectFlipY3D reverse];
// [mySprite runAction:[CCSequence actions:effectFlipY3D,[CCDelayTime actionWithDuration:2], effectFlipY3Dback, nil]];
// CCLens3D: 通过更改节点对象的网格属性,让节点对象产生类似镜面三维效果。
// id effectLens3D = [CCLens3D actionWithPosition:ccp(size.width/2,size.height/2) radius:240 grid:ccg(15,10) duration:3];
// [mySprite runAction: effectLens3D];
// CCRipple3D: 通过更改节点对象的网格属性,让节点对象产生类似水面涟漪的三维波动效果。
// id effectRipple3D = [CCRipple3D actionWithPosition:ccp(size.width/2,size.height/2) radius:240 waves:4 amplitude:160 grid:ccg(32,24) duration:5];
// [mySprite runAction:effectRipple3D];
// CCShaky3D: 通过更改节点对象的网格属性,让节点对象产生类似三维摇晃效果。
// id effectShaky3D = [CCShaky3D actionWithRange:5 shakeZ:YES grid:ccg(10,10) duration:3];
// [mySprite runAction:effectShaky3D];
// CCLiquid: 通过更改节点对象的网格属性,让节点对象产生类似液体流动的效果。
// id effectLiquid = [CCLiquid actionWithWaves:10 amplitude:22 grid:ccg(16,10) duration:5];
// [ball runAction:effectLiquid];
// CCTwirl: 通过更改节点对象的网格属性,让节点对象产生漩涡效果。
// id effectTwirl = [CCTwirl actionWithPosition:ccp(size.width/2, size.height/2) twirls:1 amplitude:2.5f grid:ccg(12,8) duration:5];
// [ball runAction:effectTwirl];
// CCShatteredTiles3D:通过更改节点对象的网格属性,让节点对象及其瓦片产生类似粉碎的三维效果。
// id effectShatteredTiles3D = [CCShatteredTiles3D actionWithRange:5 shatterZ:YES grid:ccg(16,12) duration:5];
// [mySprite runAction:effectShatteredTiles3D];
// CCShakyTiles3D:通过更改节点对象的网格属性,让节点对象及其瓦片产生类似晃动的三维效果。
// id effectShakyTiles3D = [CCShakyTiles3D actionWithRange:5 shakeZ:YES grid:ccg(16,12) duration:5];
// [mySprite runAction:effectShakyTiles3D];
// CCShuffleTiles:通过更改节点对象的网格属性,让节点对象及其瓦片产生类似洗牌的效果。
// id effectShuffleTiles = [CCShuffleTiles actionWithSeed:25 grid:ccg(16,12) duration:3];
// id shuffleBack = [effectShuffleTiles reverse];
// id delay = [CCDelayTime actionWithDuration:2];
// [mySprite runAction:[CCSequence actions:effectShuffleTiles,delay,shuffleBack, nil]];
// CCFadeOutTRTiles: 通过更改节点对象的网格属性,让节点对象及其瓦片产生从左下角到右上角淡出的效果。
// id effectFadeOutTRTiles = [CCFadeOutTRTiles actionWithSize:ccg(16,12) duration:5];
// id fadeouttrBack = [effectFadeOutTRTiles reverse];
// id trDelay = [CCDelayTime actionWithDuration:2];
// [mySprite runAction:[CCSequence actions:effectFadeOutTRTiles,trDelay,fadeouttrBack, nil]];
// CCFadeOutBLTiles: 通过更改节点对象的网格属性,让节点对象及其瓦片产生从右上角到左下角淡出的效果。
// id effectFadeOutBLTiles = [CCFadeOutBLTiles actionWithSize:ccg(16,12) duration:5];
// id fadeoutblBack = [effectFadeOutBLTiles reverse];
// id blDelay = [CCDelayTime actionWithDuration:2];
// [mySprite runAction:[CCSequence actions:effectFadeOutBLTiles,blDelay,fadeoutblBack, nil]];
// CCFadeOutUpTiles:通过更改节点对象的网格属性,让节点对象及其瓦片产生自下而上淡出的效果。
// id effectFadeOutUpTiles = [CCFadeOutUpTiles actionWithSize:ccg(10,10) duration:5];
// id fadeoutupBack = [effectFadeOutUpTiles reverse];
// id upDelay = [CCDelayTime actionWithDuration:2];
// [mySprite runAction:[CCSequence actions:effectFadeOutUpTiles,upDelay,fadeoutupBack, nil]];
// CCFadeOutDownTiles:通过更改节点对象的网格属性,让节点对象及其瓦片产生自上而下淡出的效果。
// id effectFadeOutDownTiles = [CCFadeOutDownTiles actionWithSize:ccg(10,10) duration:5];
// id fadeoutdownBack = [effectFadeOutDownTiles reverse];
// id downDelay = [CCDelayTime actionWithDuration:2];
// [mySprite runAction:[CCSequence actions:effectFadeOutDownTiles,downDelay,fadeoutdownBack, nil]];
// CCTurnOffTiles:通过更改节点对象的网格属性,产生瓦片逐渐消失的效果。
// id effectTurnOffTiles = [CCTurnOffTiles actionWithSeed:5 grid:ccg(10,10) duration:5];
// id turnoffBack = [effectTurnOffTiles reverse];
// id turnoffDelay = [CCDelayTime actionWithDuration:2];
// [mySprite runAction:[CCSequence actions:effectTurnOffTiles,turnoffDelay,turnoffBack, nil]];
// CCWavesTiles3D: 通过更改节点对象的网格属性,让节点对象及其瓦片产生类似三维波浪的效果。
// id effectWavesTiles3D = [CCWavesTiles3D actionWithWaves:10 amplitude:120 grid:ccg(15,12) duration:5];
// [ball runAction:effectWavesTiles3D];
// CCJumpTiles3D:通过更改节点对象的网格属性,瓦片产生跳动的三维效果。
// id effectJumpTiles3D = [CCJumpTiles3D actionWithJumps:10 amplitude:30 grid:ccg(12,12) duration:5];
// [mySprite runAction:effectJumpTiles3D];
// CCSplitRows:通过更改节点对象的网格属性,让节点对象产生分行分割并消失的效果。
// id effectSplitRows = [CCSplitRows actionWithRows:10 duration:5];
// [mySprite runAction:effectSplitRows];
// CCSplitCols:通过更改节点对象的网格属性,让节点对象产生分列分割并消失的效果。
// id effectSplitCols = [CCSplitCols actionWithCols:10 duration:5];
// [mySprite runAction:effectSplitCols];
// CCPageTurn3D:通过更改节点对象的网格属性,让节点对象产生三维翻页的效果。
// id effectPageTurn3D = [CCPageTurn3D actionWithSize:ccg(15,12) duration:5];
// [mySprite runAction:effectPageTurn3D];
}
return self;
}
~~~
2.让特效恢复
~~~
// 让节点对象在特效动作结束后恢复原貌
id effect = [CCSequence actions:[CCWaves actionWithWaves:10 amplitude:30 horizontal:YES vertical:YES grid:ccg(10,10) duration:5], [CCStopGrid action], nil];
[mySprite runAction:effect];
~~~
3.cocos2d中与动画有关的类
~~~
-(id) init
{
// always call "super" init
// Apple recommends to re-assign "self" with the "super's" return value
if( (self=[super init]) ) {
//以下的内容会在此处添加代码,以生成动画效果。
// 简单的动画实现方式
// 创建精灵对象并将其添加为当前层的子节点
CGSize size = [CCDirector sharedDirector].winSize;
CCSprite *mySprite = [CCSprite spriteWithFile:@"pandawalk1.png"];
mySprite.position = ccp(size.width/2,size.height/2);
[self addChild:mySprite];
// 创建CCAnimation动画,指定动画帧的内容
CCAnimation *anim = [CCAnimation animation];
[anim addFrameWithFilename:@"pandawalk1.png"];
[anim addFrameWithFilename:@"pandawalk2.png"];
[anim addFrameWithFilename:@"pandawalk3.png"];
// 创建CCAnimate动画动作,并让精灵对象执行
id animAction = [CCAnimate actionWithDuration:0.5f animation:anim restoreOriginalFrame:YES];
id repeatanimAction = [CCRepeatForever actionWithAction:animAction];
[mySprite runAction:repeatanimAction];
~~~
';
加载进度条和滚动背景
最后更新于:2022-04-01 20:15:12
我们之前学习了打飞机的游戏,但是我们可能觉得枯燥的画面很不舒服,现在我们就来学习进度条的加载和背景的滚动show
1.首先来看看loadingbar的动态加载
1)首先在哎loading.h文件中加入如下的属性
~~~
CCProgressTimer *progress;
float progressInterval;
~~~
2)。m文件的实现如下
~~~
-(id) init
{
if ( ( self = [ super init] ) )
{
winSize = [[CCDirector sharedDirector] winSize];
winCenter = ccp(winSize.width / 2, winSize.height / 2);
progress = [CCProgressTimer progressWithSprite:[CCSprite spriteWithFile:@"progressbar.png"]];
[progress setPercentage:0]; //设置bar的初始化为0
progress.scale = 0.5f; //缩小一半
progress.midpoint = ccp(0, 0.5); //进度条动画的起始位置,默认是图片的中点。如果想从头开始加载,必须改成(0,y);
progress.barChangeRate = ccp(1, 0); //沿x轴方向加载,y轴不变
progress.type = kCCProgressTimerTypeBar;
[progress setPosition:winCenter];
[self addChild:progress];
CCLabelTTF *loadingText = [CCLabelTTF labelWithString:@"Loading..." fontName:@"Arial" fontSize:20];
loadingText.position = ccpAdd(winCenter, ccp(0,50));
[self addChild:loadingText];
}
return self;
}
~~~
3)更新progressUpdate方法
~~~
-(void) progressUpdate
{
if (--assetCount)
{
[progress setPercentage:(100.0f - (progressInterval *assetCount))];
//留着后面显示进度条用
}
else {
CCProgressFromTo *ac = [CCProgressFromTo actionWithDuration:0.5 from:progress.percentage to:100];
CCCallBlock *callBack = [CCCallBlock actionWithBlock:^(){
[self loadingComplete];
CCLOG(@"All done loading assets.");
}];
id action = [CCSequence actions:ac,callBack, nil];
[progress runAction:action];
}
}
~~~
2.使用CCFollow 和CCParallaxNode 动作添加滚动背景
1)Helloworld.h中加入如下的属性
~~~
//添加滚动背景
CCParallaxNode *_backgroundNode;
int _totalSeconds; //进行的游戏时长
~~~
2).m中更新 updatebackground方法,我们相应的也导入了api:
~~~
#import "CCParallaxNode-Extras.h"
~~~
~~~
#pragma mark 背景的更新方法
- (void)updateBackground:(ccTime)dt
{
CCSprite *sprite;
int index = 0;
CCARRAY_FOREACH([_backgroundNode children],sprite)
{
CGPoint pt = [_backgroundNode convertToWorldSpace:sprite.position];
// CCLOG(@"pt.x = %f, pt.y = %f",pt.x, pt.y);
if ( pt.y <= -sprite.contentSize.height) {
CCLOG(@"===============");
[_backgroundNode incrementOffset:ccp(0,(sprite.contentSize.height - offset) * 2.0f) forChild:sprite];
}
index++;
}
}
~~~
3.init方法的修改
~~~
//16.添加连续滚动背景
_backgroundNode = [CCParallaxNode node];
[self addChild:_backgroundNode z:-1];
CGPoint ratio = ccp(1.0,0.5);
CCSprite *bgSprite1 = [CCSprite spriteWithSpriteFrameName:@"background_1.jpg"];
[[bgSprite1 texture] setAliasTexParameters];
bgSprite1.anchorPoint = ccp(0,0);
[_backgroundNode addChild:bgSprite1 z:1 parallaxRatio:ratio positionOffset:ccp(0,0)];
CCSprite *bgSprite2 = [CCSprite spriteWithSpriteFrameName:@"background_2.jpg"];
[[bgSprite2 texture] setAliasTexParameters];
bgSprite2.anchorPoint = ccp(0,0);
[_backgroundNode addChild:bgSprite2 z:1 parallaxRatio:ratio positionOffset:ccp(0,winSize.height - offset)];
//一定要注意,之前的背景设置要取消掉
}
return self;
}
~~~
4.onEnter方法的修改
~~~
- (void)onEnter
{
[super onEnter]; //一定要注意添加此方法,否则将停留在开始界面
CGSize winSize = [[CCDirector sharedDirector] winSize];
[CCMenuItemFont setFontSize:20];
[CCMenuItemFont setFontName:@"Arial"];
CCMenuItemFont *startItem = [CCMenuItemFont itemWithString:@"开始游戏" block:^(id sender)
{
_isGameStarted = YES;
CCMenuItem *item = (CCMenuItemFont*)sender;
item.visible = NO;
//6.spawn enemy after 1.0 sec
[self performSelector:@selector(spawnEnemy)
withObject:nil
afterDelay:1.0f];
//7.enable accelerometer
self.isAccelerometerEnabled = YES;
//9.enable touch
self.isTouchEnabled = YES;
//8.添加开始连续滚动背景的代码
const int MAX_LEVEL_WIDTH = 320;
const int MAX_LEVEL_HEIGHT = 480 * 100;
CCSprite *hiddenPlayerSprite = [CCSprite spriteWithSpriteFrameName:@"hero_1.png"];
hiddenPlayerSprite.position = ccp(winSize.width / 2, winSize.height / 2);
[self addChild:hiddenPlayerSprite z:-4 tag:1024];
_totalSeconds = 60;
id move = [CCMoveBy actionWithDuration:_totalSeconds position:ccp(0,MAX_LEVEL_HEIGHT)];
[hiddenPlayerSprite runAction:move];
//让背景开始滚动
[_backgroundNode runAction:[CCFollow actionWithTarget:hiddenPlayerSprite
worldBoundary:CGRectMake(0, 0, MAX_LEVEL_WIDTH, MAX_LEVEL_HEIGHT)]];
}];
startItem.position = ccp(winSize.width / 2, -winSize.height / 2);
_startGameMenu = [CCMenu menuWithItems:startItem, nil];
_startGameMenu.position = CGPointZero;
[self addChild:_startGameMenu];
//7 基本动作 从原来的位置移动到新的位置
id moveBy = [CCMoveBy actionWithDuration:1.0 position:ccp(0, winSize.height)]; //位置的移动
[_startGameMenu runAction:moveBy]; //开始移动
//8 和位置有关的基本动作
//1 CCActionManager
[[[CCDirector sharedDirector] actionManager ] pauseTarget:_startGameMenu];//暂停
[self schedule:@selector(resumeStartMenuAction:) interval:1.0]; //等待十秒之后才能开始移动
//2CCAction 抽象类,几乎所有的类都继承该类
//3.CCFiniteTimeAction 该类为有限时间动作,包含CCActionInstant 瞬时动作 和CCActionInterval 区间动作,他们包含了很多不同的动作
//4 CCRepaeatForever 无限重复的动作
//5跟随节点的动作CCFollow .可以替代Camera
//6 CCSpeed 更还节点动作的速度。
// 7CCOrbitCamera 继承与CCActionCamera 。使用球坐标系围绕屏幕中心旋转摄像机的视角
}
~~~
';
COCOS2D方法回调,块语句回调和反转动作和特殊动作
最后更新于:2022-04-01 20:15:10
1.今天学习了有关动作的回调的内容。
1)就方法回调进行说明:简单的说 就是使用了SEL 选择器方法
~~~
-(id) init
{
// always call "super" init
// Apple recommends to re-assign "self" with the "super's" return value
if( (self=[super init]) ) {
//获取当前屏幕的大小
CGSize size = [CCDirector sharedDirector].winSize;
// 创建第一个精灵,并将其添加为当前层的子节点
apple = [CCSprite spriteWithFile:@"apple.png"];
apple.position = ccp(50,100);
apple.opacity = 0;
[self addChild:apple];
// 创建第二个精灵,并将其添加为当前层的子节点
plane = [CCSprite spriteWithFile:@"plane.png"];
plane.position = ccp(size.width/2,size.height/2);
plane.opacity = 0;
[self addChild: plane];
// 创建第三个精灵,并将其添加为当前层的子节点
ball = [CCSprite spriteWithFile:@"ball.png"];
ball.position = ccp(250,100);
ball.opacity = 0;
[self addChild:ball];
// 创建第四个精灵,并将其添加为当前层的子节点
orange = [CCSprite spriteWithFile:@"orange.png"];
orange.position = ccp(250,300);
orange.opacity = 0;
[self addChild:orange];
// 创建第五个精灵,并将其添加为当前层的子节点
tomato = [CCSprite spriteWithFile:@"tomato.png"];
tomato.position = ccp(250,200);
tomato.opacity = 0;
[self addChild:tomato];
// 第一个精灵执行序列组合动作,其中最后一个动作调用了moveSprite方法
[apple runAction:[CCSequence actions:[CCDelayTime actionWithDuration:1],
[CCSpawn actions:
[CCFadeIn actionWithDuration:1],
[CCScaleTo actionWithDuration:1 scale:1.5],
nil],
[CCDelayTime actionWithDuration:1],
[CCCallFunc actionWithTarget:self selector:@selector(moveSprite)],
nil]];
// 第二个精灵执行序列组合动作,其中最后一个动作调用了removeSprite:方法,并将当前的节点对象传递给指定的方法,注意冒号不能省略
[plane runAction:[CCSequence actions:[CCDelayTime actionWithDuration:1],
[CCSpawn actions:
[CCFadeIn actionWithDuration:1],
[CCScaleTo actionWithDuration:1 scale:1.5],
nil],
[CCDelayTime actionWithDuration:1],
[CCCallFuncN actionWithTarget:self selector:@selector(removeSprite:)],
nil]];
// 第三个精灵执行序列组合动作,其中最后一个动作调用了tintSprite:data:方法,并将当前的节点对象和数据传递给指定的方法,注意冒号和参数不能省略
[ball runAction:[CCSequence actions:[CCDelayTime actionWithDuration:1],
[CCSpawn actions:
[CCFadeIn actionWithDuration:1],
[CCScaleTo actionWithDuration:1 scale:1.5],
nil],
[CCDelayTime actionWithDuration:1],
[CCCallFuncND actionWithTarget:self selector:@selector(tintSprite:data:)data:(void *)2],
nil]];
// 第四个精灵执行序列组合动作,其中最后一个动作调用了tintSprite:data:方法,并将当前的节点对象和数据传递给指定的方法,注意冒号和参数不能省略
[orange runAction:[CCSequence actions:[CCDelayTime actionWithDuration:1],
[CCSpawn actions:
[CCFadeIn actionWithDuration:1],
[CCScaleTo actionWithDuration:1 scale:1.5],
nil],
[CCDelayTime actionWithDuration:1],
[CCCallFuncO actionWithTarget:self selector:@selector(rotateSprite:object:) object:tomato],
nil]];
}
return self;
}
~~~
2.块语句回调:一句话就是在代码中嵌入了 block语句
~~~
-(id) init
{
// always call "super" init
// Apple recommends to re-assign "self" with the "super's" return value
if( (self=[super init]) ) {
// ask director for the window size
CGSize size = [[CCDirector sharedDirector] winSize];
// 创建第一个精灵,并将其添加为当前层的子节点
apple = [CCSprite spriteWithFile:@"apple.png"];
apple.position = ccp(50,100);
apple.opacity = 0;
[self addChild:apple];
// 创建第二个精灵,并将其添加为当前层的子节点
plane = [CCSprite spriteWithFile:@"plane.png"];
plane.position = ccp(size.width/2,size.height/2);
plane.opacity = 0;
[self addChild: plane];
// 创建第三个精灵,并将其添加为当前层的子节点
ball = [CCSprite spriteWithFile:@"ball.png"];
ball.position = ccp(250,100);
ball.opacity = 0;
[self addChild:ball];
// 创建第四个精灵,并将其添加为当前层的子节点
orange = [CCSprite spriteWithFile:@"orange.png"];
orange.position = ccp(250,300);
orange.opacity = 0;
[self addChild:orange];
[apple runAction:[CCSequence actions:[CCDelayTime actionWithDuration:1],
[CCSpawn actions:
[CCFadeIn actionWithDuration:1],
[CCScaleTo actionWithDuration:1 scale:1.5],
nil],
[CCDelayTime actionWithDuration:1],
[CCCallBlock actionWithBlock:^{
[apple runAction:[CCMoveTo actionWithDuration:2 position:ccp(50, 200)]];
}], nil]];
[plane runAction:[CCSequence actions:[CCDelayTime actionWithDuration:1],
[CCSpawn actions:
[CCFadeIn actionWithDuration:1],
[CCScaleTo actionWithDuration:1 scale:1.5],
nil],
[CCDelayTime actionWithDuration:1],
[CCCallBlockN actionWithBlock:^(CCNode *node){
CCNode *currentNode = node;
[self removeChild:currentNode cleanup:YES];
}], nil]];
[ball runAction:[CCSequence actions:[CCDelayTime actionWithDuration:1],
[CCSpawn actions:
[CCFadeIn actionWithDuration:1],
[CCScaleTo actionWithDuration:1 scale:1.5],
nil],
[CCDelayTime actionWithDuration:1],
[CCCallBlockO actionWithBlock:^(id object){
CCNode *currentNode = (CCNode *)object;
[currentNode runAction:[CCSequence actions:[CCFadeIn actionWithDuration:2],[CCRotateBy actionWithDuration:3 angle:180], nil]];
} object:orange], nil]];
}
return self;
}
~~~
3.反转动作:如果一系列动作有顺序,那么反转动作就是原来动作的逆向run
与 CCReverseTime 有关
4.特殊动作
CCActionTween 主要是修改一个对象的属性,比如说 scale,width等
id scaleA = 【CCScale actionWithDuration :2 scale:3】;
id scaleB = 【CCActionTween actionWithDuration:2 key: @“Scale” form 1:to:3】;
CCSpeed 可以修改一个飞机的速度。
';
COCOS2D中得动作,特效和动画
最后更新于:2022-04-01 20:15:08
一,CCActionManager 管理所有节点动作的对象
来看看打飞机里面的一个onEnter 方法
~~~
- (void)onEnter
{
[super onEnter]; //一定要注意添加此方法,否则将停留在开始界面
CGSize winSize = [[CCDirector sharedDirector] winSize];
[CCMenuItemFont setFontSize:20];
[CCMenuItemFont setFontName:@"Arial"];
CCMenuItemFont *startItem = [CCMenuItemFont itemWithString:@"开始游戏" block:^(id sender)
{
_isGameStarted = YES;
CCMenuItem *item = (CCMenuItemFont*)sender;
item.visible = NO;
//6.spawn enemy after 1.0 sec
[self performSelector:@selector(spawnEnemy)
withObject:nil
afterDelay:1.0f];
//7.enable accelerometer
self.isAccelerometerEnabled = YES;
//9.enable touch
self.isTouchEnabled = YES;
}];
startItem.position = ccp(winSize.width / 2, -winSize.height / 2);
_startGameMenu = [CCMenu menuWithItems:startItem, nil];
_startGameMenu.position = CGPointZero;
[self addChild:_startGameMenu];
//7 基本动作 从原来的位置移动到新的位置
id moveBy = [CCMoveBy actionWithDuration:1.0 position:ccp(0, winSize.height)]; //位置的移动
[_startGameMenu runAction:moveBy]; //开始移动
//8 和位置有关的基本动作
//1 CCActionManager
[[[CCDirector sharedDirector] actionManager ] pauseTarget:_startGameMenu];//暂停
[self schedule:@selector(resumeStartMenuAction:) interval:1.0]; //等待十秒之后才能开始移动
//2CCAction 抽象类,几乎所有的类都继承该类
//3.CCFiniteTimeAction 该类为有限时间动作,包含CCActionInstant 瞬时动作 和CCActionInterval 区间动作,他们包含了很多不同的动作
//4 CCRepaeatForever 无限重复的动作
//5跟随节点的动作CCFollow .可以替代Camera
//6 CCSpeed 更还节点动作的速度。
// 7CCOrbitCamera 继承与CCActionCamera 。使用球坐标系围绕屏幕中心旋转摄像机的视角
}
- (void)resumeStartMenuAction:(ccTime)dt
{
[self unschedule:_cmd]; //停止当前动作
[[[CCDirector sharedDirector]actionManager] resumeTarget:_startGameMenu];
}
~~~
二,基本动作:和位置相关的基本动作
~~~
CGSize winSize = [[CCDirector sharedDirector] winSize];
CCSprite *plane = [CCSprite spriteWithFile:@"hero_1.png"];
plane.position = ccp(winSize.width/2, winSize.height/2);
[self addChild:plane];
//2 moveBy 让节点对象在一定时间内移动一定的像素值 ,这个是相对于原位置的
[plane runAction:[CCMoveBy actionWithDuration:3 position:ccp(50, 0)]];
//3 CCjumpTo
[plane runAction:[CCJumpTo actionWithDuration:4 position:ccp(winSize.width, winSize.height) height:40 jumps:3]];
//4CCJumpBy 相对于原位置的移动 ,相对于原位置的偏移量为 100,0
[plane runAction:[CCJumpBy actionWithDuration:3 position:ccp(100, 0) height:100 jumps:4]];
//5CCBezier TO
ccBezierConfig c = {ccp(300, 100),ccp(50, 50),ccp(-50, -50)};
//1.参数一 相对于原位置的偏移,2,3分别是贝塞尔曲线的两个控制点
[plane runAction:[CCBezierTo actionWithDuration:3 bezier:c]];
//6 CCplace 将对象直接放到指定的位置
[plane runAction:[CCPlace actionWithPosition:ccp(10, 10)]];
~~~
三,和大小相关的基本动作
~~~
//二 和大小相关的基本动作
// 1 CCScale TO、放大为原来的两倍
[plane runAction:[CCScaleTo actionWithDuration:2 scale:2]];
//2 CCScale By 缩小相应的倍数
[plane runAction:[CCScaleBy actionWithDuration:3 scale:3]];
[plane runAction:[CCScaleBy actionWithDuration:3 scaleX:0.5 scaleY:0.5]]; //对象的高度和宽度的缩小
~~~
四:和旋转有关的基本动作
~~~
//三 和旋转有关的动作
//1 CCRotate To ,by ,超过180逆时针旋转,《180.顺时针旋转
[plane runAction:[CCRotateTo actionWithDuration:2 angle:290]];
~~~
五,和显示有关的基本动作
~~~
//四 和显示有关的动作
//1 CCSHOW
[plane runAction:[CCShow action]];
//2CCHide
[plane runAction:[CCHide action]];
//3 切换uixiang的可视属性
[plane runAction:[CCToggleVisibility action]];
//4 闪动一定的次数
[plane runAction:[CCBlink actionWithDuration:5 blinks:10]];
~~~
六,和透明度有关的基本动作
~~~
//五 和透明度有关的动作
//1 CCFadeIn 透明度从0 -》 255
[plane runAction:[CCFadeIn actionWithDuration:8]];
//2 CCFadeOut 透明度 从255 - 》0
[plane runAction:[CCFadeOut actionWithDuration:5]];
//3 CCFadeto
[plane runAction:[CCFadeTo actionWithDuration:4 opacity:90]];
~~~
七,和色彩有关的基本动作
~~~
//六 和色彩有关的动作
//1 CCTintTO 在一定时间内将节点着色到某个特定的RGB值
[plane runAction:[CCTintTo actionWithDuration:3 red:100 green:0 blue:1]];
//2 CCTintBy 大致相同
~~~
八和翻转相关的基本动作
~~~
//七 和翻转有关的动作
//1 CCFlipX ,CCFlipY
[plane runAction:[CCFlipX actionWithFlipX:YES]];
~~~
2.组合动作
一,组合动作的类
~~~
//八 组合动作
//1 Spawn 动作数据,
[plane runAction:[CCSpawn actions:[CCFadeOut actionWithDuration:4],[CCScaleTo actionWithDuration:3 scale:2], nil]];
// 2 CCSequence 该组合可以按顺序执行多个动作,也可以包含多个组合动作
//九 Ease 动作 使用ease动作修改的是节点内部动作的速度,而不是动作的执行时间
id easeAction = [CCEaseBackOut actionWithAction:[CCMoveTo actionWithDuration:2 position:ccp(100+winSize.width/2, winSize.height/2)]];
id action = [CCSequence actions:easeAction,[CCScaleTo actionWithDuration:2 scale:2], nil];
[plane runAction:action];
~~~
二,一个飞机俯冲的组合动作的代码
~~~
#pragma mark - private methods
-(void) spawnEnemy{
//1.
CGSize winSize = [CCDirector sharedDirector].winSize;
CCSprite *enemySprite = [self getAvailableEnemySprite];
enemySprite.visible = YES;
enemySprite.position = ccp( arc4random() % (int)(winSize.width - enemySprite.contentSize.width) + enemySprite.contentSize.width/2 , winSize.height + enemySprite.contentSize.height + 10);
//2.
float durationTime = arc4random() % 4 + 1;
id moveBy = [CCMoveBy actionWithDuration:durationTime
position:ccp(0,-enemySprite.position.y-enemySprite.contentSize.height)];
int choice = arc4random() % 4 + 1;
id easeMoveBy = nil;
switch (choice) {
case 1:
easeMoveBy = [CCEaseIn actionWithAction:moveBy];
break;
case 2:
easeMoveBy = [CCEaseExponentialIn actionWithAction:moveBy];
break;
case 3:
easeMoveBy = [CCEaseBounceIn actionWithAction:moveBy];
break;
case 4:
easeMoveBy = [CCEaseBackIn actionWithAction:moveBy];
break;
default:
break;
}
id callback = [CCCallBlockN actionWithBlock:^(id sender)
{
CCSprite *sp = (CCSprite*)sender;
sp.visible = NO;
sp.position = ccp(0,winSize.height + sp.contentSize.height + 10);
CCLOG(@"reset enemy plane!");
}];
id action = [CCSequence actions:easeMoveBy,callback, nil];
CCLOG(@"enemySprite x = %f, y = %f",enemySprite.position.x, enemySprite.position.y);
[enemySprite runAction:action];
//3.
[self performSelector:_cmd withObject:nil afterDelay:arc4random()%3 + 1];
}
~~~
三,延迟动作
~~~
//十 延迟动作
id action = [CCSequence actions:[CCDelayTime actionWithDuration:3],[CCMoveTo actionWithDuration:2 position:ccp(100 + winSize.width/2, winSize.height)], nil];
[plane runAction:action];
~~~
';
加载游戏数据和代码重构
最后更新于:2022-04-01 20:15:05
昨天复习了关于COCOS2d的一些基础知识,今天就来学习了关于游戏加载方面的问题和代码重构。
写一个简单的游戏数据加载的demo。
1.如果想在进入游戏前,加载游戏,肯定有进度条什么的吧,当然,也就是我们要再游戏开始前有一个关于游戏加载的场景类。 由于我自己写的demo丢失,只好拿着实例写了。。。sorry,不过我会认真的写注释的
建立如下:
~~~
#import
#import "cocos2d.h"
@interface LoadingScreen : CCLayer {
CGSize winSize;
CGPoint winCenter;
int assetCount;
}
+(CCScene *) scene; //场景类的转化和生成
/**Called if there is any music to load, it loads the files one by one via the NSArray */
-(void) loadMusic:(NSArray *) musicFiles; //音乐文件的加载
/**Called if there are any sfx to load, it loads the files one by one via the NSArray */
-(void) loadSounds:(NSArray *) soundClips;
/**Called if there are any Sprite Sheets to load, it loads the files one by one via the NSArray */
-(void) loadSpriteSheets:(NSArray *) spriteSheets; //精灵表单的加载,我更喜欢叫一组精灵
/**Called if there are any images to load, it loads the files one by one via the NSArray.
Images can be a cache of backgrounds or anything else. You can add to this method
to have it do whatever you want with the list.
*/
-(void) loadImages:(NSArray *) images; //图片的加载
/**Called if there are any assets to load, it loads the files one by one via the NSArray.
Assets basically are anything not of the above. This pretty much should be modified
to your needs. (Such as models, etc)
*/
-(void) loadAssets:(NSArray *) assets; //季度条进度的加载
/**updates the progress bar with the next step. When progress bar reaches 100%
It calls loadingComplete which can change scenes, or do anything else you wish.
*/
-(void) progressUpdate; //主线程 的分线程更新完成之后的调用
/**Called by progressUpdate when all assets are loaded from the manifest. */
-(void) loadingComplete; // 全部完成调用
@end
~~~
2.m文件的准备工作
~~~
#import "LoadingScreen.h"
#import "SimpleAudioEngine.h"
//The next scene you wish to transition to.
#import "HelloWorldLayer.h"
@implementation LoadingScreen
+(CCScene *) scene
{
// 'scene' is an autorelease object.
CCScene *scene = [CCScene node];
NSString *className = NSStringFromClass([self class]);
// 'layer' is an autorelease object.
id layer = [NSClassFromString(className) node];
// add layer as a child to scene
[scene addChild: layer];
// return the scene
return scene;
}
-(id) init
{
if ( ( self = [ super init] ) )
{
winSize = [[CCDirector sharedDirector] winSize];//寻找导演视图的宽高
winCenter = ccp(winSize.width / 2, winSize.height / 2);
CCLabelTTF *loadingText = [CCLabelTTF labelWithString:@"Loading..." fontName:@"Arial" fontSize:20];
loadingText.position = ccpAdd(winCenter, ccp(0,50));
[self addChild:loadingText];//放置加载BAR
}
return self;
}
~~~
3.进入场景之后的加载方法,也别注意不用的资源加载的方式的不同,主线程加载
~~~
-(void) onEnterTransitionDidFinish
{
[super onEnterTransitionDidFinish];
NSString *path = [[CCFileUtils sharedFileUtils] fullPathFromRelativePath:@"preloadAssetManifest.plist"];
NSDictionary *manifest = [NSDictionary dictionaryWithContentsOfFile:path];
NSArray *spriteSheets = [manifest objectForKey:@"SpriteSheets"];
NSArray *images = [manifest objectForKey:@"Images"];
NSArray *soundFX = [manifest objectForKey:@"SoundFX"];
NSArray *music = [manifest objectForKey:@"Music"];
NSArray *assets = [manifest objectForKey:@"Assets"];
assetCount = ([spriteSheets count] + [images count] + [soundFX count] + [music count] + [assets count]);
if (soundFX)
[self performSelectorOnMainThread:@selector(loadSounds:) withObject:soundFX waitUntilDone:YES];
if (spriteSheets)
[self performSelectorOnMainThread:@selector(loadSpriteSheets:) withObject:spriteSheets waitUntilDone:YES];
if (images)
[self performSelectorOnMainThread:@selector(loadImages:) withObject:images waitUntilDone:YES];
if (music)
[self performSelectorOnMainThread:@selector(loadMusic:) withObject:music waitUntilDone:YES];
if (assets)
[self performSelectorOnMainThread:@selector(loadAssets:) withObject:assets waitUntilDone:YES];
}
~~~
4.单个加载方法 SEL方法
~~~
-(void) loadMusic:(NSArray *) musicFiles
{
CCLOG(@"Start loading music");
for (NSString *music in musicFiles)
{
[[SimpleAudioEngine sharedEngine] preloadBackgroundMusic:music];
[self progressUpdate];
}
}
-(void) loadSounds:(NSArray *) soundClips
{
CCLOG(@"Start loading sounds");
for (NSString *soundClip in soundClips)
{
[[SimpleAudioEngine sharedEngine] preloadEffect:soundClip];
[self progressUpdate];
}
}
-(void) loadSpriteSheets:(NSArray *) spriteSheets
{
for (NSString *spriteSheet in spriteSheets)
{
[[CCSpriteFrameCache sharedSpriteFrameCache] addSpriteFramesWithFile:spriteSheet];
[self progressUpdate];
}
}
-(void) loadImages:(NSArray *) images
{
CCLOG(@"LoadingScreen - loadImages : You need to tell me what to do.");
for (NSString *image in images)
{
//Do something with the images
[[CCTextureCache sharedTextureCache] addImage:image];
[self progressUpdate];
}
}
-(void) loadAssets:(NSArray *) assets
{
//Overwrite me
CCLOG(@"LoadingScreen - loadAssets : You need to tell me what to do.");
for (NSString *asset in assets)
{
//Do something with the assets
[self progressUpdate];
}
[self progressUpdate];
}
~~~
4.工具类方法 ,加载,加载一部分,和加载完成的方法
~~~
-(void) progressUpdate
{
if (--assetCount)
{
//留着后面显示进度条用
}
else {
[self loadingComplete];
CCLOG(@"All done loading assets.");
}
}
-(void) loadingComplete
{
CCDelayTime *delay = [CCDelayTime actionWithDuration:2.0f];
CCCallBlock *swapScene = [CCCallBlock actionWithBlock:^(void) {
[[CCDirector sharedDirector] replaceScene:[CCTransitionFade transitionWithDuration:1.0f
scene:[HelloWorldLayer scene]]];
}];
CCSequence *seq = [CCSequence actions:delay, swapScene, nil];
[self runAction:seq];
}
@end
~~~
至此,已经结束了加载场景的vc。
我们将要把这个scene放到我们的game中去
5.一步一步走!
修改 Appdelegate.m方法中得启动方法
只是在启动方法得末尾加上加载的方法而已
~~~
// and add the scene to the stack. The director will run it when it automatically when the view is displayed.
[director_ pushScene: [LoadingScreen scene]];
~~~
6.修改HellpWorldLayer.m文件的init方法
1)增加游戏菜单
~~~
//15.add game start menu & relative game logic
_isGameStarted = NO;
[CCMenuItemFont setFontSize:20];
[CCMenuItemFont setFontName:@"Arial"];
CCMenuItemFont *startItem = [CCMenuItemFont itemWithString:@"开始游戏" block:^(id sender)
{
_isGameStarted = YES;
CCMenuItem *item = (CCMenuItemFont*)sender;
item.visible = NO;
//6.spawn enemy after 1.0 sec
[self performSelector:@selector(spawnEnemy)
withObject:nil
afterDelay:1.0f];
//7.enable accelerometer
self.isAccelerometerEnabled = YES;
//9.enable touch
self.isTouchEnabled = YES;
}];
startItem.position = ccp(winSize.width / 2, winSize.height / 2);
_startGameMenu = [CCMenu menuWithItems:startItem, nil];
_startGameMenu.position = CGPointZero;
[self addChild:_startGameMenu];
}
~~~
由于触摸 开始游戏按钮之后才可以进行游戏,所以MEnu的position一定要设置成CGPointZero
现在可以试试效果了~
二,代码重构
1,添加精灵表单
~~~
enum {
kTagPalyer = 1,
kTagBatchNode = 2,
};
~~~
~~~
//添加精灵表单
CCSpriteBatchNode *batchNode = [CCSpriteBatchNode batchNodeWithFile:@"gameArts.png"];
batchNode.position = CGPointZero;
[self addChild:batchNode z:0 tag:kTagBatchNode];
~~~
2.修改Sprite的初始化方式
~~~
//2.add background
CCSprite *bgSprite = [CCSprite spriteWithSpriteFrameName:@"background_1.jpg"];
bgSprite.position = ccp(winSize.width / 2,winSize.height/2);
[batchNode addChild:bgSprite z:-100];
//3.add player's plane,初始化方式 从 spriteWithFIle改为 spriteWithSpriteFrameName
CCSprite *playerSprite = [CCSprite spriteWithSpriteFrameName:@"hero_1.png"];
playerSprite.position = CGPointMake(winSize.width / 2, playerSprite.contentSize.height/2 + 20);
[batchNode addChild:playerSprite z:4 tag:kTagPalyer];
//4.init enemy sprites array
_enemySprites = [[CCArray alloc] init];
//5.initialize 10 enemy sprites & add them to _enemySprites array for future useage
const int NUM_OF_ENEMIES = 10;
for (int i=0; i < NUM_OF_ENEMIES; ++i) {
CCSprite *enemySprite = [CCSprite spriteWithSpriteFrameName:@"enemy1.png"];
enemySprite.position = ccp(0,winSize.height + enemySprite.contentSize.height + 10);
enemySprite.visible = NO;
[batchNode addChild:enemySprite z:4];
[_enemySprites addObject:enemySprite];
}
//8.game main loop
[self scheduleUpdate];
_isTouchToShoot = NO;
//10.init bullets
_bulletSprite = [CCSprite spriteWithSpriteFrameName:@"bullet1.png"];
_bulletSprite.visible = NO;
[batchNode addChild:_bulletSprite z:4];
~~~
3.为了减少修改的次数,定义一个 - (CCSprite *)getPlayerSPrite方法
~~~
-(CCSprite*)getPlayerSprite{
CCSpriteBatchNode *batchNode = (CCSpriteBatchNode*)[self getChildByTag:kTagBatchNode];
return (CCSprite*)[batchNode getChildByTag:kTagPalyer];
}
~~~
4.修改发射子弹的碰撞检测方法
~~~
-(void) ccTouchesEnded:(NSSet *)touches withEvent:(UIEvent *)event{
//修改成,必须点选中playerSprite才能够发射子弹
//方法1:因为boundingBox是相对于世界坐标系而言的,所以要用self convertTouchToNodeSpace转换成世界坐标系中的坐标
UITouch *touch = [touches anyObject];
CCSprite *playerSprite = [self getPlayerSprite];
CGPoint pt;
// pt = [touch locationInView:[touch view]];
// pt = [[CCDirector sharedDirector] convertToGL:pt];
// pt = [self convertToNodeSpace:pt];
//上面三句调用,可以简化为下面一句调用
//CGPoint pt = [self convertTouchToNodeSpace:touch];
// if (CGRectContainsPoint(playerSprite.boundingBox, pt)) {
// _isTouchToShoot = YES;
// }
//===================================================================
//方法2:
// pt = [touch locationInView:[touch view]];
// pt = [[CCDirector sharedDirector] convertToGL:pt];
// pt = [playerSprite convertToNodeSpace:pt];
//简化为下面的一句代码调用
CCSpriteBatchNode *batchNode = (CCSpriteBatchNode*)[self getChildByTag:kTagBatchNode];
pt = [batchNode convertTouchToNodeSpace:touch];
CCLOG(@"pt.x = %f, pt.y = %f",pt.x, pt.y);
if (CGRectContainsPoint(playerSprite.boundingBox, pt)) {
_isTouchToShoot = YES;
CCLOG(@"touched!");
}
}
~~~
';
COCOS2D基础知识-COCOS2d单例和导演类
最后更新于:2022-04-01 20:15:03
1.关于COCOS2d的单例和导演类
~~~
//1.COCOS2d的常用单例
CCDirector *sharedDirector = [CCDirector sharedDirector];
CCSpriteFrameCache *SpritesharedCache = [CCSpriteFrameCache sharedSpriteFrameCache];
CCTextureCache *TextureCache = [CCTextureCache sharedTextureCache];
// CDAudioManager *sharedManager = [CDAudioManager sharedManager];
// SimpleAudioEngine *sharedEngine = [SimpleAudioEngine sharedEngine];
//2.CCDirector 导演类
//作用:访问和改变场景,访问2d的配置细节,访问视图,暂停,恢复,结束游戏,在UIKit和OPenGLEs之间转化坐标
//1.主程序启动并显示第一个场景
[[CCDirector sharedDirector]runWithScene:[HelloWorldLayer scene]];
//2 讲传入场景作为当前的场景
[[CCDirector sharedDirector]pushScene:[HelloWorldLayer scene]];
//3 运行待运行场景中的倒数第二个场景,当前场景被释放
[[CCDirector sharedDirector]popScene];
//4 直接使用新的场景更换当前的场景,当前场景被释放
[[CCDirector sharedDirector]replaceScene:[HelloWorldLayer scene]];
//5结束当前运行中的场景
[[CCDirector sharedDirector] end];
//6 暂停当前的场景
[[CCDirector sharedDirector]pause];
//7 恢复场景的运行
[[CCDirector sharedDirector]resume];
//8绘制场景
// -(void)draw;
//9讲UIKit坐标系中的坐标转换为OPENGL ES 坐标系中的坐标
UITouch *myTouch = [touches angObject];
CGPoint location = [myTouch locationInView:[myTouch view]];
location = [[CCDirector sharedDirector]convertToGL:location];
~~~
';
COCOS2D基础知识-CCScene
最后更新于:2022-04-01 20:15:01
接着上次的基础知识,我们今天讲解后面的知识点
1.CCscene 场景 ,这个类主要是说明和场景切换有关的类
- 创建、初始化一个场景
~~~
//1)创建一个 场景切换的类
//初始化或者创建一个一个场景
CCTransitionScene *transitionScene = [CCTransitionScene transitionWithDuration:4 scene:newScene];
[transitionScene initWithDuration:1 scene:newScene];
~~~
- 场景过渡效果结束
~~~
//2过渡效果结束的时候使用
[transitionScene finish];
~~~
-
~~~
//3部分过渡效果会使用该方法隐藏更外层的场景
[transitionScene hideOutShowIn];
//一个实例
~~~
- 这是关于一个场景的延迟出现。
~~~
///**creates a base transition with duration and incoming scene */
// +(id) transitionWithDuration:(ccTime) t scene:(CCScene*)s;
~~~
2。CCLayer
~~~
//2CCLayer类的使用
//1)作用 其他子节点的的容器和组织者
//2 接受触摸事件
self.isTouchEnabled = YES;
//3 接受加速器事件
self.isAccelerometerEnabled = YES;
//同样,我们层里需要加入一个特定的方法来接受加速计事件
//4CCLayerColor色彩层
//可以设置RGB颜色的层,试下 CCRGBAprotocol协议的CCLayer子类
//1)CCLayerColor的属性 color,opacity透明度,blendFunc.混合模式
//2)CClayerColor类的方法。
ccColor4F c4f = ccc4f(100, 100, 100, 100);
ccColor4B c4b = ccc4BFromccc4F(c4f);
//
CCLayerColor *layerColor = [[CCLayerColor alloc]init];
//初始化方法
CCLayerColor *layerColor1 = [[CCLayerColor alloc]initWithColor:c4b];
//初始化一个带长宽的色彩层
CCLayerColor *layerColor2 =[[CCLayerColor alloc]initWithColor:c4b width: 100 height:100];
[layerColor2 changeHeight:10];
[layerColor2 changeWidth:22];
[layerColor2 changeWidth:10 height:22];
//5 CCLayerGrdient 渐变色层
//是CClayerColor的子类,继承了其所有的属性,增加了渐变方向,插值模式
//初始化一个特定渐变效果的色彩层
CCLayerGradient *gradient = [[CCLayerGradient alloc]initWithColor:c4b fadingTo:c4b:ccp(0, -1)];
//6CCMenu菜单类 MenuItem 类实例组成各种按钮
//CCmenuItem 子类如下:
// 1)CCmenuItemLabel 点击具有放大效果 iCCLabelBMFont ii:CCLabelAtlas,CCLabelTTF
CCLabelBMFont *label1 = [CCLabelBMFont labelWithString:@"Seeting" fntFile:@"font1.fnt"];
CCMenuItemLabel *item1 = [CCMenuItemLabel itemWithLabel:label1 target:self selector:nil];
//2)CCMenuItemAtlasFont,CCmenuItemSprite,CCMenuItemImage,CCMenuItemToggle
//7CCTexture 纹理类
//1)纹理 Texture,2)纹理图集 TextureAylas
//3纹理的三种方式
//iCCTextureCache 单例使用,用于加载和管理纹理
NSString *filename = @"hell.png";
CCTexture2D *texture = [[CCTextureCache sharedTextureCache] addImage:filename];
//ii:CCTextureAtlas
//8.CCSprite
CCSprite *sprite = [CCSprite spriteWithFile:filename];
//1.)纹理集的索引
[sprite setAtlasIndex:1];//通常不建议修改
//2对渲染CCSprite 的CCSpriteBatchNode的弱引用
//[sprite setBatchNode:<#(CCSpriteBatchNode *)#>]
//3 blendFunc 遵循CCtextureProtocol协议
//4 color:RGB颜色 遵循CCRGBAProtocol协议
//5dirty:判断精灵是否需要在纹理集中更新
//6 filpx:判断精灵是否会沿水平方向旋转
//7 filpy
//8 offsetPosition 以点值计量精灵位置的偏移
//9 opacticy 透明度
//等
//9。精灵的类方法
//很多都是初始化方法,不再赘述
//10 CCSpriteBatchNode 精灵表单需要 OPENGL ES 一次性处理所有的纹理图,减少GPU的压力
//精灵表单的三种方法
//1.初始化一个精灵表单,可以最多容纳 29*1.33
CCSpriteBatchNode *sprites = [CCSpriteBatchNode batchNodeWithFile:filename];
CCSpriteBatchNode *sprites2 = [CCSpriteBatchNode batchNodeWithFile:filename capacity:12];
//CCSpriteBatchNode *sprite3 = [[CCSpriteBatchNode batchNodeWithTexture:[CCTexture2D alloc]];
//2。移除一个子精灵,由于操作速度很慢,不建议使用
// [sprites removeChild:one cleanup:YES];
~~~
3.重启游戏的场景切换
~~~
- (void)onRestartGame
{
CCTransitionFade *tramsitionFade = [CCTransitionFade transitionWithDuration:3 scene:[HelloWorldLayer scene] withColor:ccWHITE];
//重新开游戏的时候使用白色作为过度场景。 当然,除了 fade,还有很多别的过度场景
//使用过度场景对象替代helloworld场景,作为中间过渡场景,也就是延迟helloWorldLyer场景的出现
[[CCDirector sharedDirector]replaceScene:tramsitionFade];
}
~~~
4.加速计的使用
~~~
#pragma mark 如何操作加速计
/*
- (void)accelerometer:(UIAccelerometer *)accelerometer didAccelerate:(UIAcceleration *)acceleration
{
float deceleration = 0.4f;
float sensitivity = 6.0f;
float maxVelocity = 100;
_playerVelocity.x =_playerVelocity.x *deceleration + acceleration.x *sensitivity;
if (_playerVelocity.x > maxVelocity)
_playerVelocity.x = maxVelocity;
else if(_playerVelocity.x < -maxVelocity)
_playerVelocity.x = -maxVelocity;
}
*/
~~~
';
COCOS2D基础知识-CCNode节点类/CCNode节点类方法
最后更新于:2022-04-01 20:14:59
1.CCNode节点类的属性
~~~
//锚点--------------------------------
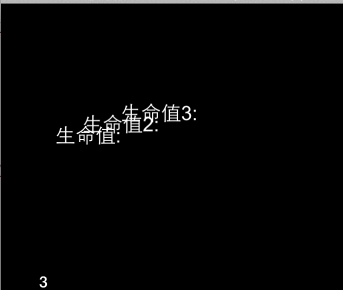
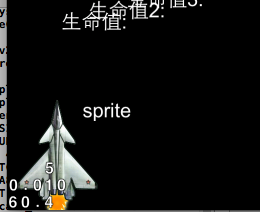
CCLabelTTF *lifeLabel = [CCLabelTTF labelWithString:@"生命值:" fontName:@"Arial" fontSize:20];
//锚点设置
lifeLabel.anchorPoint = CGPointMake(1, 1); //把postion 点作为label的左上角
lifeLabel.position = ccp(120, winSize.height - 120);
[self addChild:lifeLabel z:10];
CCLabelTTF *lifeLabel2 = [CCLabelTTF labelWithString:@"生命值2:" fontName:@"Arial" fontSize:20];
//锚点设置
lifeLabel2.anchorPoint = CGPointMake(0.5, 0.5);//把postion 点作为label的几何中心
lifeLabel2.position = ccp(120, winSize.height - 120);
[self addChild:lifeLabel2 z:10];
CCLabelTTF *lifeLabel3 = [CCLabelTTF labelWithString:@"生命值3:" fontName:@"Arial" fontSize:20];
//锚点设置
lifeLabel3.anchorPoint = CGPointMake(0, 0);////把postion 点作为label的右下角
lifeLabel3.position = ccp(120, winSize.height - 120);
[self addChild:lifeLabel3 z:10];
~~~
~~~
//CCNode 节点类-------------------
/*节点类的属性
1.anchorPoint 锚点
2.camera 游戏视角 3d使用
3.children 子节点. (addchild:)children 为节点的子节点数组,变量类型是CCArray
4.contentSize //未转化的节点大小,也就是本身的宽,高 :主要用于碰撞检测
*/
//得到精灵的矩形区域
CCLabelTTF *label = [CCLabelTTF labelWithString:@"sprite" fontName:@"Arial" fontSize:20];
label.position = ccp(100, 100);
[self addChild:label];
CCSprite *sprite = [[CCSprite alloc]initWithFile:@"hero_1.png"];
sprite.position = ccp(50, 50);
[self addChild:sprite];
//NSLog(@"%@",[self rectOfSprite:sprite]);
NSLog(@"(%f,%f,%f,%f)",[self rectOfSprite:sprite].origin.x,[self rectOfSprite:sprite].origin.y,[self rectOfSprite:sprite].size.width,[self rectOfSprite:sprite].size.height);
//(9.000000,-10.500000,82.000000,121.000000)
~~~
得到精灵位置的类->用于碰撞检测
~~~
//这个矩形位置 是依赖 左下角作为原点进行的
- (CGRect)rectOfSprite:(CCSprite *)sprite
{
//依赖位置坐标和contentSize进行转换,默认的锚点是 (0.5 ,0.5)
return CGRectMake(sprite.position.x - sprite.contentSize.width/2, sprite.position.y - sprite.contentSize.height/2, sprite.contentSize.width, sprite.contentSize.height);
}
~~~
2.CCNode节点类的方法
1)子节点的处理
~~~
//1.子节点的处理--------------
//1)创建一个node
CCNode *node = [CCNode node];
//2增加一个子节点
CCNode *childNode = [CCNode node];
[node addChild:childNode z:10 tag:1];
//3使用tag获得子节点
CCNode *tagNode = [node getChildByTag:1];//等于 childNode
//4使用tag删除子节点
[node removeChildByTag:1];//删除了childNode
//5通过节点指针删除节点
[node removeChild:childNode cleanup:YES];//如果cleanup 为yes,则停止运行中的任何动作
//6删除一个节点的所有节点
[node removeAllChildrenWithCleanup:YES];
//7从当前节点的父节点删除当前节点
[childNode removeFromParentAndCleanup:YES];
~~~
2)子节点执行的动作
~~~
//2执行动作 -----------------
id action = [CCAction action];
[action setTag:2];
//1运行action动作
[node runAction:action];
//2停止该节点的所有动作
[node stopAllActions];
//3停止某个特定的动作/依赖tag
[node stopAction:action];
[node stopActionByTag:2];
//4获取当前节点的某个特定动作
id tempAction = [node getActionByTag:2];
//5获取某节点的所有动作的数量
int numberOfActions = [node numberOfRunningActions];
~~~
3)预定消息
~~~
//3预定消息
//1)每帧都调用的更新方法
- (void)scheduleUpdates
{
[self scheduleUpdate];
}
- (void)update:(ccTime)delta
{
//游戏中每一帧都将调用此方法
}
//2)为消息安排优先级 从小到大开始执行,顺序是 3-> 1 ->2
//1)每帧都调用的更新方法
- (void)scheduleUpdates1
{
[self scheduleUpdate];
}
- (void)scheduleUpdates2
{
[self scheduleUpdateWithPriority:1];
}
- (void)scheduleUpdates3
{
[self scheduleUpdateWithPriority:-1];
}
//3)指定运行特定的更新方法 并设置调用的时间间隔
- (void)scheduleUpdates4
{
[self schedule:@selector(updateTenTimesPerSecond:) interval:0.1f];
}
- (void)updateTenTimesPerSecond:(ccTime)delta
{
}
~~~
~~~
//4)停止某个节点的某个指定选择器,但是不会停止 预定的更新方法
[self unschedule:@selector(updateTenTimesPerSecond:)];
//如果停止预定的更新方法
[self unscheduleUpdate];
//5停止节点的所有选择器,保罗 schduleupdate里设置的Update 选择期.但是不会停止节点的动作
[self unscheduleAllSelectors];
//6)_cmd 关键字停止当前方法的预定
[self unschedule:_cmd];
~~~
4.其他的方法:(不完全)
~~~
//4.其他方法
//1) 获取节点的边框
CGRect spriteBound = [sprite boundingBox];//==rectOfSprite
//
//2)清除所有的动作和预定的方法
[sprite cleanup];//
//坐标转换....
//3)绘制自己的节点
// - (void)draw{};
//4)-(id)init 初始化方法
//5 - (void)onEnter 回调方法:当 CCNode 进入舞台的时候调用
//6 - (void)onEnterTransitionDidFinished //带有过渡效果的进入舞台的时候调用
// - (void)OnExit //离开舞台时候调用
~~~
';
2:我的第一个Cocoa-2d游戏—打飞机
最后更新于:2022-04-01 20:14:56
这一下午边翻书边写代码,效果还是很不错的.先和大家分享下图片~


1.关于代理的内容,和我上一篇的内容大致相同,我今天主要讲解关于 HelloWorldlayer里面的东西.
先看看我们的.h文件
~~~
//
// HelloWorldLayer.h
// 垂直射击游戏
//
// Created by lichan on 13-12-7.
// Copyright com.lichan 2013年. All rights reserved.
//
// When you import this file, you import all the cocos2d classes
#import "cocos2d.h"
// HelloWorldLayer
@interface HelloWorldLayer : CCLayer
{
CCArray *_enemySprites; //敌机的数组
CGPoint _playerVelocity;//玩家战机的位置
BOOL _isTouchToShoot;//是否点击屏幕开始射击
CCSprite *_bulletSprite;//子弹精灵
CCLabelTTF *_lifeLabel;//生命的显示label
CCLabelTTF *_scoreLabel;//战机label
int _totalLives;//所剩命的条数
int _totalScore;//总的分数
CCLabelTTF *_gameEndlabel;//游戏结束的label
}
//@property(nonatomic,) CCArray * _enemySprites;
// returns a CCScene that contains the HelloWorldLayer as the only child
+(CCScene *) scene;
@end
~~~
2.重点!看看我们的 helloWorldlayer.m文件的内容吧.我会在注释中讲解
~~~
//
// HelloWorldLayer.m
// 垂直射击游戏
//
// Created by lichan on 13-12-7.
// Copyright com.lichan 2013年. All rights reserved.
//
// Import the interfaces
#import "HelloWorldLayer.h"
#import "SimpleAudioEngine.h" //加载上声音的头文件,如果想让游戏有刺激感,声音是必不可少的
#define NUM_OF_ENEMIES 10 //敌机的数量
// Needed to obtain the Navigation Controller
#import "AppDelegate.h"
enum{
kTagPlayer = 1, //我方战绩的tag
};
@interface HelloWorldLayer()
- (void)spawnEnemy; //设置 敌机的俯冲效果
- (CCSprite *)getAvaliableEnemySprite; //得到敌机精灵
- (void)updateplayerPosition:(ccTime)dt; //更新我方战绩的位置,刷新位置
- (void)bulletFinishedMoving: (id)sender; //子弹的生命周期的结束
@end
#pragma mark - HelloWorldLayer
// HelloWorldLayer implementation
@implementation HelloWorldLayer
// Helper class method that creates a Scene with the HelloWorldLayer as the only child.
+(CCScene *) scene
{
// 'scene' is an autorelease object.
CCScene *scene = [CCScene node];
// 'layer' is an autorelease object.
HelloWorldLayer *layer = [HelloWorldLayer node];
// add layer as a child to scene
[scene addChild: layer];
// return the scene
return scene;
}
// on "init" you need to initialize your instance
-(id) init //里面定义了很多关于游戏中的一些视图,方法.
{
// always call "super" init
// Apple recommends to re-assign "self" with the "super's" return value
if( (self=[super init]) ) {
CGSize winSize = [[CCDirector sharedDirector] winSize];
CCSprite *bgSprite = [CCSprite spriteWithFile:@"background_1.jpg"];
bgSprite.position = ccp(winSize.width/2, winSize.height/2);
[self addChild:bgSprite];
CCSprite *playerSprite = [CCSprite spriteWithFile:@"hero_1.png"];
playerSprite.position = CGPointMake(winSize.width/2, playerSprite.contentSize.height/2+20);
[self addChild:playerSprite z:4 tag:kTagPlayer];
_enemySprites = [[CCArray alloc]init]; //敌机数组的初始化
//敌机 随机的出现.
for (int i = 0; i < NUM_OF_ENEMIES; i ++) {
CCSprite *enemySprite = [CCSprite spriteWithFile:@"enemy1.png"];
enemySprite.position = ccp(0, winSize.height +enemySprite.contentSize.height + 10);
enemySprite.visible = NO;
[self addChild:enemySprite z:4];
[_enemySprites addObject:enemySprite];
}
[self performSelector:@selector(spawnEnemy) withObject:nil afterDelay:1.0f];
//敌机出现的方法,spawnEnemy (敌机出现的效果)
self.isAccelerometerEnabled = YES; //开启传感器
[self scheduleUpdate]; //更新视图
//玩家的触摸感应
self.isTouchEnabled = YES;
// CCLOG(@" isTouchEnabled %hhd",self.isTouchEnabled);
_isTouchToShoot = NO;
_bulletSprite = [CCSprite spriteWithFile:@"bullet1.png"];
_bulletSprite.visible = NO;
[self addChild:_bulletSprite z:4];
//添加声音效果
[[SimpleAudioEngine sharedEngine] preloadEffect:@"bullet.mp3"];
[[SimpleAudioEngine sharedEngine]playBackgroundMusic:@"game_music.mp3" loop:YES];
[[SimpleAudioEngine sharedEngine] setBackgroundMusicVolume:0.5];
//生命,分数 的读条和字体设置
CCLabelTTF *lifeindicator = [CCLabelTTF labelWithString:@"生命值:" fontName:@"Arial" fontSize:20];
lifeindicator.anchorPoint = ccp(0, 0.5);
lifeindicator.position = ccp(20, winSize.height - 20);
[self addChild:lifeindicator z:10];
_lifeLabel =[CCLabelTTF labelWithString:@"3" fontName:@"Arial" fontSize:20];
_lifeLabel.position = ccpAdd(lifeindicator.position, ccp(lifeindicator.contentSize.width+10, 0));
[self addChild:_lifeLabel z:10];
CCLabelTTF *scoreIndicator = [CCLabelTTF labelWithString:@"分数" fontName:@"Arial" fontSize:20];
scoreIndicator.anchorPoint = ccp(0.0, 0.5f);
scoreIndicator.position = ccp(winSize.width - 100,winSize.height - 20);
[self addChild:scoreIndicator z:10];
_scoreLabel = [CCLabelTTF labelWithString:@"00" fontName:@"Arial" fontSize:20];
_scoreLabel.position = ccpAdd(scoreIndicator.position, ccp(scoreIndicator.contentSize.width + 10, 0));
[self addChild:_scoreLabel z:10];
_totalLives = 3;
_totalScore = 0;
//游戏结束时候的提示
_gameEndlabel = [CCLabelTTF labelWithString:@"" fontName:@"Arial" fontSize:40];
_gameEndlabel.position = ccp(winSize.width/2,winSize.height/2);
_gameEndlabel.visible = NO;
[self addChild:_gameEndlabel z:10];
}
return self;
}
#pragma mark 更新生命值和血量
- (void)updateHUD:(ccTime)dt //更新当前生命的方法.在 update中刷新60次/s
{
[_lifeLabel setString:[NSString stringWithFormat:@"%2d",_totalLives]];
[_scoreLabel setString:[NSString stringWithFormat:@"%04d",_totalScore]];
}
#pragma mark 自动调用的触摸方法
- (void)ccTouchesBegan:(NSSet *)touches withEvent:(UIEvent *)event
{
CCLOG(@"我开始触摸屏幕");
}
- (void)ccTouchesEnded:(NSSet *)touches withEvent:(UIEvent *)event
{
_isTouchToShoot = YES;//设置屏幕触摸生效,开启发射子弹
}
#pragma mark 私有的方法
- (void)update:(ccTime)delta
{
[self updateplayerPosition:delta]; //我方战机位置的刷新
[self updatePlayerShooting:delta];//子弹射击的刷新
[self collisionDetection:delta];//检测碰撞
[self updateHUD:delta];//生命条的读取
// CCLOG(@" isTouchEnabled %hhd",self.isTouchEnabled);
}
- (void)updatePlayerShooting:(ccTime)dt
{
if (_bulletSprite.visible || !_isTouchToShoot)
return;
CCSprite *playerSprite = (CCSprite *)[self getChildByTag:kTagPlayer];
CGPoint pos = playerSprite.position;
CGPoint bulletPos = CGPointMake(pos.x, pos.y + playerSprite.contentSize.height/2 + _bulletSprite.contentSize.height);
_bulletSprite.position = bulletPos;
_bulletSprite.visible = YES;
CGSize winSize = [[CCDirector sharedDirector] winSize];
id moveBy = [CCMoveBy actionWithDuration:1.0 position:ccp(0, winSize.height - bulletPos.y)];
id callBack = [CCCallFuncN actionWithTarget:self selector:@selector(bulletFinishedMoving:)];
id ac = [CCSequence actions:moveBy,callBack, nil];
[_bulletSprite runAction:ac];
[[SimpleAudioEngine sharedEngine]playEffect:@"bullet.mp3"];
}
- (void)bulletFinishedMoving:(id)sender
{
_bulletSprite.visible = NO;
}
- (void)updateplayerPosition:(ccTime)dt
{
CCSprite *playerSprite = (CCSprite *)[self getChildByTag:kTagPlayer];
CGPoint pos = playerSprite.position;
pos.x += _playerVelocity.x;
CGSize screenSize = [[CCDirector sharedDirector] winSize];
float imageWidthhavled = playerSprite.texture.contentSize.width*0.5f;
float leftBoderLimit = imageWidthhavled;
float rightboderLimit = screenSize.width - imageWidthhavled;
if (pos.x < leftBoderLimit) {
pos.x = leftBoderLimit;
_playerVelocity = CGPointZero;
}else if(pos.x
> rightboderLimit)
{
pos.x = rightboderLimit;
_playerVelocity = CGPointZero;
}
playerSprite.position = pos;
}
- (void)spawnEnemy
{
CGSize winSize = [CCDirector sharedDirector].winSize;
CCSprite *enemySprite = [self getAvaliableEnemySprite];
float durationTime = arc4random()%4 +1;
id moveBy = [CCMoveBy actionWithDuration:durationTime position:ccp(0, -enemySprite.position.y - enemySprite.contentSize.height)];
id callBack = [CCCallBlockN actionWithBlock:^(id sender){
CCSprite *sp = (CCSprite *)sender;
sp.visible = NO;
sp.position = ccp(0, winSize.height + sp.contentSize.height + 10);
CCLOG(@"reset enemy plane");
}];
id action = [CCSequence actions:moveBy,callBack, nil];
enemySprite .visible = YES;
enemySprite.position = ccp(arc4random()% (int) (winSize.width -enemySprite.contentSize.width)+ enemySprite.contentSize.width/2, enemySprite.position.y);
CCLOG(@"enemySprite x = %f, y = %f",enemySprite.position.x, enemySprite.position.y);
[enemySprite runAction:action];
[self performSelector:_cmd withObject:nil afterDelay:arc4random()%3 +1];
}
- (CCSprite *)getAvaliableEnemySprite
{
CCSprite *result = nil;
CCARRAY_FOREACH(_enemySprites, result)
{
if (!result.visible)
break;
}
return result;
}
#pragma mark 如何操作加速计
- (void)accelerometer:(UIAccelerometer *)accelerometer didAccelerate:(UIAcceleration *)acceleration
{
float deceleration = 0.4f;
float sensitivity = 6.0f;
float maxVelocity = 100;
_playerVelocity.x =_playerVelocity.x *deceleration + acceleration.x *sensitivity;
if (_playerVelocity.x > maxVelocity)
_playerVelocity.x = maxVelocity;
else if(_playerVelocity.x < -maxVelocity)
_playerVelocity.x = -maxVelocity;
}
//计算精灵的大小位置
- (CGRect)rectOfSprite: (CCSprite *)sprite
{
return CGRectMake(sprite.position.x - sprite.contentSize.width/2, sprite.position.y - sprite.contentSize.height/2, sprite.contentSize.width, sprite.contentSize.height);
}
//碰撞检测
- (void)collisionDetection:(ccTime)dt
{
CCSprite *enemy;
CGRect bulletRect = [self rectOfSprite:_bulletSprite];
CCARRAY_FOREACH(_enemySprites, enemy)
{
if (enemy.visible) {
CGRect enemyRect = [self rectOfSprite:enemy];
if (_bulletSprite.visible &&CGRectIntersectsRect(bulletRect, enemyRect)) {
enemy.visible = NO;
_bulletSprite.visible = NO;
_totalScore += 100;
if (_totalScore >= 1000) {
[_gameEndlabel setString:@"游戏胜利!"];
_gameEndlabel.visible = YES;
id scaleTo = [CCScaleTo actionWithDuration:1.0 scale:1.2f];
[_gameEndlabel runAction:scaleTo];
[self unscheduleUpdate];
[self performSelector:@selector(onRestartGame) withObject:nil afterDelay:2.0f];
}
[_bulletSprite stopAllActions];
[enemy stopAllActions];
CCLOG(@"collision Bullet");
break;
}
CCSprite *playerSprite = (CCSprite *)[self getChildByTag:kTagPlayer];
CGRect playRect = [self rectOfSprite:playerSprite];
if (playerSprite.visible &&playerSprite.numberOfRunningActions == 0 && CGRectIntersectsRect(enemyRect, playRect)) {
enemy.visible = NO;
_totalLives -= 1;
if (_totalLives <= 0) {
[_gameEndlabel setString:@"游戏失败"];
_gameEndlabel.visible = YES;
id scaleTo = [CCScaleTo actionWithDuration:1.0 scale:1.2f];
[_gameEndlabel runAction:scaleTo];
[self unscheduleUpdate];
[self performSelector:@selector(onRestartGame) withObject:nil afterDelay:3.0f];
}
id blink = [CCBlink actionWithDuration:2.0 blinks:4];
[playerSprite stopAllActions];
[playerSprite runAction:blink];
CCLOG(@"collision player");
break;
}
}
}
}
- (void)onRestartGame
{
[[CCDirector sharedDirector] replaceScene:[HelloWorldLayer scene]];
}
// on "dealloc" you need to release all your retained objects
- (void) dealloc
{
// in case you have something to dealloc, do it in this method
// in this particular example nothing needs to be released.
// cocos2d will automatically release all the children (Label)
// don't forget to call "super dealloc"
[_enemySprites release];
_enemySprites = nil;
[super dealloc];
}
@end
~~~
';
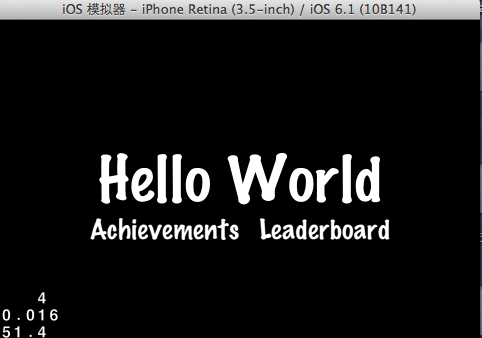
1:我的Cocoa-2d之HelloWorld
最后更新于:2022-04-01 20:14:54
这三年多的时间,我从一个不知道hello_world是什么的小毛小子,到现在开始一点点的进阶,感触颇多.不过幸运的是,我没有把自己的人生旅途交给老天,我更多的交给了我自己.我无时无刻的对自己说 ,加油~ 也是对看这篇博文的你,加油.因为你已经度过了 c->oc->ios的过渡.相信吧,功夫不负有心人.
~来,搞起来,我那和我亲密无间的 helloWorld!
1.代理文件的解读
1).h文件代码如下
~~~
//
// AppDelegate.h
// HelloWorld2D
//
// Created by lichan on 13-12-7.
// Copyright com.lichan 2013年. All rights reserved.
//
#import
#import "cocos2d.h"
// Added only for iOS 6 support
@interface MyNavigationController : UINavigationController
@end
@interface AppController : NSObject
{
UIWindow *window_;
MyNavigationController *navController_;
CCDirectorIOS *director_; // weak ref
}
@property (nonatomic, retain) UIWindow *window;
@property (readonly) MyNavigationController *navController;
@property (readonly) CCDirectorIOS *director;
@end
~~~
和IOS最大的区别在于 协议的不同和 属性的增加.
UINavigationController 继承与导航控制器,并遵守 导演代理.
导航控制器我就不多说了,导演代理是什么呢?相比较而言,就相当于 我们的NSOBject类.导演代理讲会安排我们里面的所有图层,动作等.
CCDirectorIOS*director_;我们定义了一个导演的实体对象,便于调用.
2).m文件有何不一样?
~~~
//
// AppDelegate.m
// HelloWorld2D
//
// Created by lichan on 13-12-7.
// Copyright com.lichan 2013年. All rights reserved.
//
#import "cocos2d.h"
#import "AppDelegate.h"
#import "IntroLayer.h"
@implementation MyNavigationController
// The available orientations should be defined in the Info.plist file.
// And in iOS 6+ only, you can override it in the Root View controller in the "supportedInterfaceOrientations" method.
// Only valid for iOS 6+. NOT VALID for iOS 4 / 5.
-(NSUInteger)supportedInterfaceOrientations { //关于机器类型的选择.
// iPhone only
if( [[UIDevice currentDevice] userInterfaceIdiom] == UIUserInterfaceIdiomPhone )
return UIInterfaceOrientationMaskLandscape;
// iPad only
return UIInterfaceOrientationMaskLandscape;
}
// Supported orientations. Customize it for your own needs
// Only valid on iOS 4 / 5. NOT VALID for iOS 6.
- (BOOL)shouldAutorotateToInterfaceOrientation:(UIInterfaceOrientation)interfaceOrientation
{
// iPhone only //是否设置旋转
if( [[UIDevice currentDevice] userInterfaceIdiom] == UIUserInterfaceIdiomPhone )
return UIInterfaceOrientationIsLandscape(interfaceOrientation);
// iPad only
// iPhone only
return UIInterfaceOrientationIsLandscape(interfaceOrientation);
}
// This is needed for iOS4 and iOS5 in order to ensure
// that the 1st scene has the correct dimensions
// This is not needed on iOS6 and could be added to the application:didFinish...
-(void) directorDidReshapeProjection:(CCDirector*)director //关于 导演类的加载
{
if(director.runningScene == nil) {
// Add the first scene to the stack. The director will draw it immediately into the framebuffer. (Animation is started automatically when the view is displayed.)
// and add the scene to the stack. The director will run it when it automatically when the view is displayed.
[director runWithScene: [IntroLayer scene]];
}
}
@end
@implementation AppController
@synthesize window=window_, navController=navController_, director=director_;//get方法的别名
- (BOOL)application:(UIApplication *)application didFinishLaunchingWithOptions:(NSDictionary *)launchOptions
{
// Create the main window//老规矩! 这都是启动加载的东西
window_ = [[UIWindow alloc] initWithFrame:[[UIScreen mainScreen] bounds]];
// CCGLView creation
// viewWithFrame: size of the OpenGL view. For full screen use [_window bounds]
// - Possible values: any CGRect
// pixelFormat: Format of the render buffer. Use RGBA8 for better color precision (eg: gradients). But it takes more memory and it is slower
// - Possible values: kEAGLColorFormatRGBA8, kEAGLColorFormatRGB565
// depthFormat: Use stencil if you plan to use CCClippingNode. Use Depth if you plan to use 3D effects, like CCCamera or CCNode#vertexZ
// - Possible values: 0, GL_DEPTH_COMPONENT24_OES, GL_DEPTH24_STENCIL8_OES
// sharegroup: OpenGL sharegroup. Useful if you want to share the same OpenGL context between different threads
// - Possible values: nil, or any valid EAGLSharegroup group
// multiSampling: Whether or not to enable multisampling
// - Possible values: YES, NO
// numberOfSamples: Only valid if multisampling is enabled
// - Possible values: 0 to glGetIntegerv(GL_MAX_SAMPLES_APPLE)
CCGLView *glView = [CCGLView viewWithFrame:[window_ bounds]
pixelFormat:kEAGLColorFormatRGB565
depthFormat:0
preserveBackbuffer:NO
sharegroup:nil
multiSampling:NO
numberOfSamples:0];
//建立一个视图,可以认为是根视图,最后加载到 window 的视图上面
director_ = (CCDirectorIOS*) [CCDirector sharedDirector]; //得到导演类的实体
director_.wantsFullScreenLayout = YES; 是否设置全屏
// Display FSP and SPF
[director_ setDisplayStats:YES]; // //是否显示 tsp /spf
// set FPS at 60
[director_ setAnimationInterval:1.0/60]; //游戏的刷新频率
// attach the openglView to the director
[director_ setView:glView]; //把根视图给 导演实体,让他来处理
// 2D projection
[director_ setProjection:kCCDirectorProjection2D]; //设置为2d映像
// [director setProjection:kCCDirectorProjection3D];
// Enables High Res mode (Retina Display) on iPhone 4 and maintains low res on all other devices
if( ! [director_ enableRetinaDisplay:YES] )
CCLOG(@"Retina Display Not supported");//看看我们的机器是否支持最新的 Retina 分辨率
// Default texture format for PNG/BMP/TIFF/JPEG/GIF images
// It can be RGBA8888, RGBA4444, RGB5_A1, RGB565
// You can change this setting at any time.
[CCTexture2D setDefaultAlphaPixelFormat:kCCTexture2DPixelFormat_RGBA8888];//支持的texture类型,加载图片用的
// If the 1st suffix is not found and if fallback is enabled then fallback suffixes are going to searched. If none is found, it will try with the name without suffix.
// On iPad HD : "-ipadhd", "-ipad", "-hd"
// On iPad : "-ipad", "-hd"
// On iPhone HD: "-hd"
CCFileUtils *sharedFileUtils = [CCFileUtils sharedFileUtils];
[sharedFileUtils setEnableFallbackSuffixes:NO]; // Default: NO. No fallback suffixes are going to be used
[sharedFileUtils setiPhoneRetinaDisplaySuffix:@"-hd"]; // Default on iPhone RetinaDisplay is "-hd"
[sharedFileUtils setiPadSuffix:@"-ipad"]; // Default on iPad is "ipad"
[sharedFileUtils setiPadRetinaDisplaySuffix:@"-ipadhd"]; // Default on iPad RetinaDisplay is "-ipadhd"
// Assume that PVR images have premultiplied alpha
[CCTexture2D PVRImagesHavePremultipliedAlpha:YES];
// Create a Navigation Controller with the Director
navController_ = [[MyNavigationController alloc] initWithRootViewController:director_];把导演实体作为到航视图的跟控制类
navController_.navigationBarHidden = YES;
// for rotation and other messages
[director_ setDelegate:navController_];
// set the Navigation Controller as the root view controller
[window_ setRootViewController:navController_];
// make main window visible
[window_ makeKeyAndVisible];
return YES;
}
// getting a call, pause the game
-(void) applicationWillResignActive:(UIApplication *)application//这四个就是代理的四种方法,出现,消失,进后台,出后台,中断
{
if( [navController_ visibleViewController] == director_ )
[director_ pause];
}
// call got rejected
-(void) applicationDidBecomeActive:(UIApplication *)application
{
[[CCDirector sharedDirector] setNextDeltaTimeZero:YES];
if( [navController_ visibleViewController] == director_ )
[director_ resume];
}
-(void) applicationDidEnterBackground:(UIApplication*)application
{
if( [navController_ visibleViewController] == director_ )
[director_ stopAnimation];
}
-(void) applicationWillEnterForeground:(UIApplication*)application
{
if( [navController_ visibleViewController] == director_ )
[director_ startAnimation];
}
// application will be killed
- (void)applicationWillTerminate:(UIApplication *)application
{
CC_DIRECTOR_END();
}
// purge memory
- (void)applicationDidReceiveMemoryWarning:(UIApplication *)application
{
[[CCDirector sharedDirector] purgeCachedData];
}
// next delta time will be zero
-(void) applicationSignificantTimeChange:(UIApplication *)application
{
[[CCDirector sharedDirector] setNextDeltaTimeZero:YES];
}
- (void) dealloc
{
[window_ release];
[navController_ release];
[super dealloc];
}
@end
~~~
2.HelloWorldlayer文件的解读
1).h文件
~~~
//
// HelloWorldLayer.h
// HelloWorld2D
//
// Created by lichan on 13-12-7.
// Copyright com.lichan 2013年. All rights reserved.
//
#import
// When you import this file, you import all the cocos2d classes
#import "cocos2d.h"
// HelloWorldLayer
@interface HelloWorldLayer : CCLayer
{
}
// returns a CCScene that contains the HelloWorldLayer as the only child
+(CCScene *) scene; //这个类方法是干什么的呢?因为导演类只可以加载CCScene对象,而IntroLayer 继承与Layer,这里是转化为导演可以接受的对象.
@end
~~~
2)我们再去看看.m文件吧
~~~
//
// HelloWorldLayer.m
// HelloWorld2D
//
// Created by lichan on 13-12-7.
// Copyright com.lichan 2013年. All rights reserved.
//
// Import the interfaces
#import "HelloWorldLayer.h"
// Needed to obtain the Navigation Controller
#import "AppDelegate.h"
#pragma mark - HelloWorldLayer
// HelloWorldLayer implementation
@implementation HelloWorldLayer
// Helper class method that creates a Scene with the HelloWorldLayer as the only child.
+(CCScene *) scene
{
// 'scene' is an autorelease object.
CCScene *scene = [CCScene node];
// 'layer' is an autorelease object.
HelloWorldLayer *layer = [HelloWorldLayer node];
// add layer as a child to scene
[scene addChild: layer];
// return the scene
return scene;
}
// on "init" you need to initialize your instance
-(id) init //这个方法非常重要,基本我们的视图的很多初始化方法都是从这入手的
{
// always call "super" init
// Apple recommends to re-assign "self" with the "super's" return value
if( (self=[super init]) ) {
// create and initialize a Label
CCLabelTTF *label = [CCLabelTTF labelWithString:@"Hello World" fontName:@"Marker Felt" fontSize:64];
// ask director for the window size
CGSize size = [[CCDirector sharedDirector] winSize];
//得到我们的导演类的尺寸.
// position the label on the center of the screen
label.position = ccp( size.width /2 , size.height/2 );
//设置helloWorld 在view中的位置.ccp 一个新的方法哦
// add the label as a child to this Layer
[self addChild: label]; //增加到视图中去
//上述代码无非就是增加一个 HelloWorld的 label.但是这个字体可是 @"Marker Felt".字体大小64的.
~~~
~~~
~~~
~~~
//其实下面的代码 是 设置 一个飞机小精灵.然后设置位置 并设置他飞行的路径.(到某个位置.)
CCSprite *plane = [CCSprite spriteWithFile:@"plane.png"];
plane.position = ccp(size.width/2, size.height*0.7);
[self addChild:plane];
id flyAction = [CCMoveTo actionWithDuration:4 position:ccp(size.width+200, size.height)];//设置的动作的方法. 其中还有CCMoveBy ,这两种action都是非常常见的
[plane runAction:flyAction];//让飞机飞起来
//
// Leaderboards and Achievements
//
// Default font size will be 28 points.
[CCMenuItemFont setFontSize:28];
// to avoid a retain-cycle with the menuitem and blocks
__block id copy_self = self;
// Achievement Menu Item using blocks
CCMenuItem *itemAchievement = [CCMenuItemFont itemWithString:@"Achievements" block:^(id sender) {
GKAchievementViewController *achivementViewController = [[GKAchievementViewController alloc] init];
achivementViewController.achievementDelegate = copy_self;
AppController *app = (AppController*) [[UIApplication sharedApplication] delegate];
[[app navController] presentModalViewController:achivementViewController animated:YES];
[achivementViewController release];
}];
// Leaderboard Menu Item using blocks
CCMenuItem *itemLeaderboard = [CCMenuItemFont itemWithString:@"Leaderboard" block:^(id sender) {
GKLeaderboardViewController *leaderboardViewController = [[GKLeaderboardViewController alloc] init];
leaderboardViewController.leaderboardDelegate = copy_self;
AppController *app = (AppController*) [[UIApplication sharedApplication] delegate];
[[app navController] presentModalViewController:leaderboardViewController animated:YES];
[leaderboardViewController release];
}];
CCMenu *menu = [CCMenu menuWithItems:itemAchievement, itemLeaderboard, nil];
[menu alignItemsHorizontallyWithPadding:20];
[menu setPosition:ccp( size.width/2, size.height/2 - 50)];
// Add the menu to the layer
[self addChild:menu];
}
return self;
}
// on "dealloc" you need to release all your retained objects
- (void) dealloc
{
// in case you have something to dealloc, do it in this method
// in this particular example nothing needs to be released.
// cocos2d will automatically release all the children (Label)
// don't forget to call "super dealloc"
[super dealloc];
}
#pragma mark GameKit delegate
-(void) achievementViewControllerDidFinish:(GKAchievementViewController *)viewController
{
AppController *app = (AppController*) [[UIApplication sharedApplication] delegate];
[[app navController] dismissModalViewControllerAnimated:YES];
}
-(void) leaderboardViewControllerDidFinish:(GKLeaderboardViewController *)viewController
{
AppController *app = (AppController*) [[UIApplication sharedApplication] delegate];
[[app navController] dismissModalViewControllerAnimated:YES];
}
@end
~~~
';
前言
最后更新于:2022-04-01 20:14:52
> 原文出处:[一位菜鸟的COCOS-2D编程之路](http://blog.csdn.net/column/details/thecocos2d.html)
作者:[ministarler](http://blog.csdn.net/ministarler)
**本系列文章经作者授权在看云整理发布,未经作者允许,请勿转载!**
# 一位菜鸟的COCOS-2D编程之路
> 简述我的cocos2d学习历程
';