Create a free domain for 1 year with the latest Freenom
最后更新于:2022-03-26 21:27:13
格尺建站系统(GeChiUI.com)是基于WordPress深度定制中文版建站系统,优秀的主题与插件都可以无缝迁移到GeChiUI中使用。
Freenom is a domain registrar that offers unlimited free domains for one year. The only downside is that you can only register extensions like .tk, .ml, .ga, .cf, or .gq.
In this post, I will show you how to register a free domain at Freenom step by step. After that, Freenom’s Domain will be redirected to the VPS IP.
目录
Create a free domain for 1 year with the latest Freenom
Step 1: Visit https://www.freenom.com and Enter the domain name to be registered, remember to write the domain extension in .tk, .ga. cf….

Step 2: If you see a green Selected message, you can register this Domain, select Checkout.

Step 3: Select 12Months Free , then click Continue.

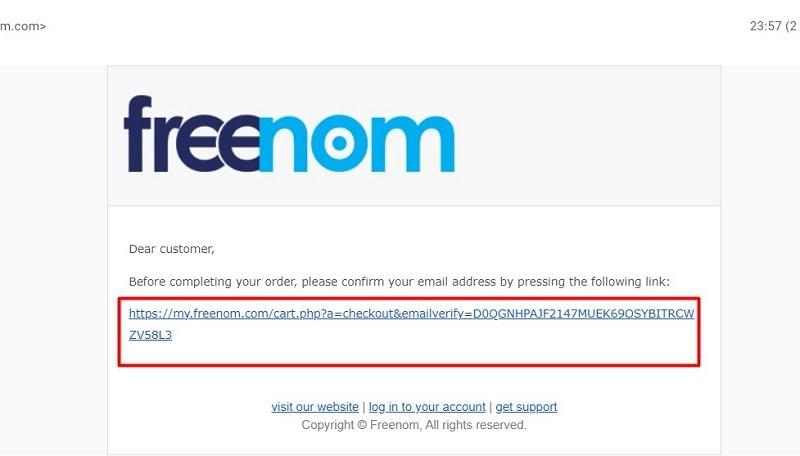
Step 4: Enter your Email to register, click Verify My Email Address

Step 5: At this step you have 90% success, now check your email and confirm your account

Step 6: Click on the confirmation link in the Email
Step 7: Fill in personal information to complete account registration. Check I have read and agree to the Terms & Conditions.

Step 8: Go to this step and you have completed the registration of Freenom’s free domain

Step 9: To access Domain management at Freenom, go to this page https://my.freenom.com/clientarea.php, choose to login with Gmail

How to adjust DNS Domain Freenom
Edit Record at Freenom
First of all, Freenom’s DNS is quite bad, sometimes when you finish editing but the IP still hasn’t pointed to the VPS, you should switch to Cloudflare’s DNS to act as an intermediary (see instructions below)
Step 1: Select Services -> My Domains

Step 2: Now we will go to the domain management step in Freenom, select Manage Domain

Step 3: Select Manage Freenom DNS

Step 4: Enter the IP information of the VPS to point the Domain to
Name: enter your Domain, as in the example above is freewp-test.tk
Target: IP VPS

Point Freenom DNS to Cloudflare
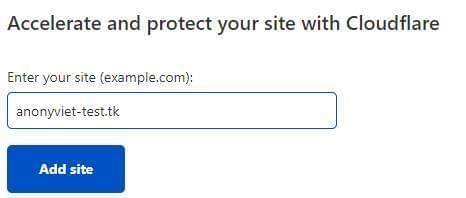
You need to Create a CloudFlare account, enter your email, password. Then select Protect your Internet privacy

Enter the Domain you have registered with Freenom.
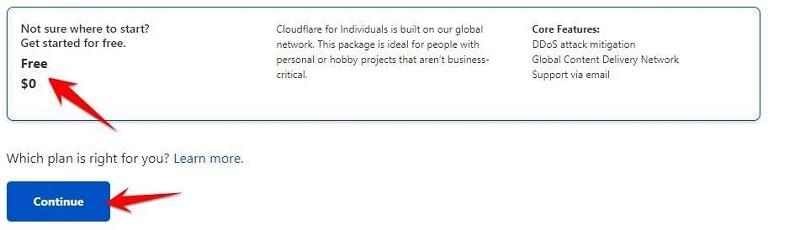
Choose the Free package 0$ and then Continue.
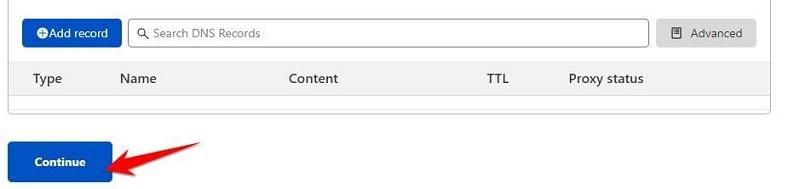
Continue to press Continue -> Confirm
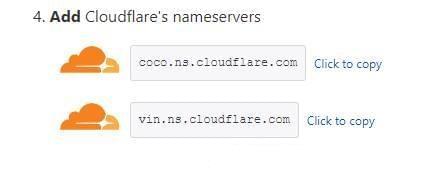
Scroll down to item number 4. Copy the 2 nameservers values again
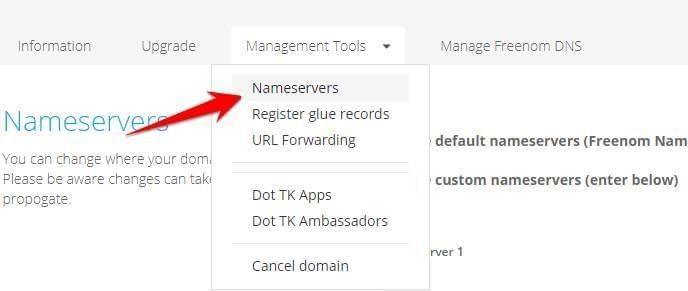
Go back to the Freenom management page, Select Management Tools -> Nameservers
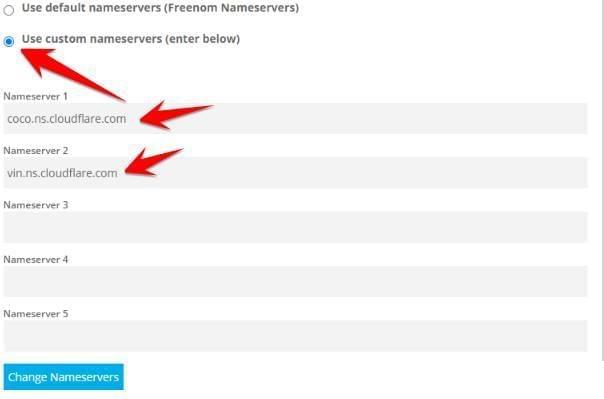
Check: Use custom nameservers (enter below), Enter 2 CloudFlare Nameservers values in the box below:
Return to the CloudFlare page, select Done -> Finish Later

While you wait for Cloudflare to confirm DNS from Freenom, you can set your Domain to the VPS’s IP. Select DNS.

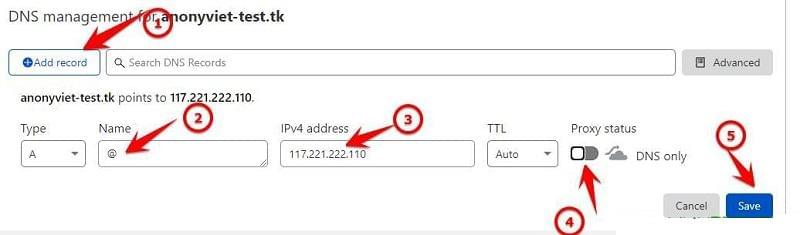
Select Add record:
- Type: A
- Name: @
- IPv4: is the IP of the VPS
- Proxy status: If used to Hack Data 4G, the yellow cloud should be turned off, and the normal web for Website should be turned on to cover the real IP, avoiding the DDOS taste.
So I have completed the instructions to register and use a free domain name at Freenom for 1 year, please note that only .tk, .ml, .ga, .cf, .gq extensions can be used.