Android开发:setContentView切换界面,自定义带CheckBox的ListView显示SQlite条目—–实现
最后更新于:2022-04-01 07:24:21
问题背景:
我在其他Activity里有一个数据库,里面有若干条目,数据库里存的是最简单的“名字”string类型的信息。我在另外一个Activity里,通过按键Button,显示出一个带checkbox的列表,显示出数据库里的姓名,然后可以选中多个。类似于文件夹删除的功能。
下面是实现:
**第一部分,在布局文件夹下新建一个my_checkbox.xml.**
这个布局是用来控制将来listview里,每一行怎么显示。在这里我是左边显示名字,右边显示复选框CheckBox。
<?xml version="1.0" encoding="utf-8"?>
<LinearLayout xmlns:android="[http://schemas.android.com/apk/res/android](http://schemas.android.com/apk/res/android)"
android:layout_width="fill_parent"
android:layout_height="wrap_content"
android:orientation="horizontal" >
<TextView
android:id="@+id/item_text"
android:textSize="25dip"
android:layout_weight="1"
android:layout_width="wrap_content"
android:layout_height="wrap_content"/>
<CheckBox
android:id="@+id/item_check"
android:textSize="25dip"
android:layout_width="wrap_content"
android:layout_height="wrap_content"
android:clickable="false"
android:focusable="false"
android:checkMark="?android:attr/listChoiceIndicatorMultiple"/>
</LinearLayout>
**注意:**
1,上面的TextView里的layout_weight=1用来实现最左边显示名字,最右边显示CheckBox。
2,由于CheckBox的响应优先级高于ListView,这里需要把CheckBox的clickable和focuseable属性都关闭。将来只通过listview的item是否点击来判断。
3,CheckBox的checkMark用来设置当选中之后,是个什么效果。
**第二部分:新建一个布局list_check.xml,用来显示数据库的条目。当在主Activity里点击后就会切换到这个界面。**
<?xml version="1.0" encoding="utf-8"?>
<LinearLayout xmlns:android="http://schemas.android.com/apk/res/android"
android:layout_width="fill_parent"
android:layout_height="wrap_content"
android:orientation="vertical" >
<Button
android:id="@+id/confirmBtn"
android:layout_width="fill_parent"
android:layout_height="wrap_content"
android:text="确定" />
<ListView
android:id="@+id/checkList"
android:layout_width="fill_parent"
android:layout_height="wrap_content" >
</ListView>
</LinearLayout>
**注:**上面的button是选中若干条目后的确定按键,同时也是返回按键,返回到主界面。
**第三部分**:在主Activity里设置利用setContentView的方法切换页面。
这里主Activity的布局文件就不提供了。
下面是主Activity的代码:
~~~
//为了实现新的布局
Button mChoseBtn = null;
Button mConfirmBtn = null;
boolean firstFlag = true;
ListView list2 = null;
View checkListView = null;
View mainView = null;
/**Called when the activity is first created. */
@Override
public void onCreate(Bundle savedInstanceState) {
super.onCreate(savedInstanceState);
LayoutInflater inflater = this.getLayoutInflater();
checkListView = inflater.inflate(R.layout.list_check, null);
mainView = inflater.inflate(R.layout.main, null);
setContentView(mainView);
//切换布局监听
mChoseBtn = (Button)mainView.findViewById(R.id.choseBtn);
mChoseBtn.setOnClickListener(new ButtonListener());
setUpViews();
}
class ButtonListener implements OnClickListener{
public void onClick(View v) {
// TODO Auto-generated method stub
switch (v.getId()){
case R.id.choseBtn:
Jump2CheckList();
break;
case R.id.confirmBtn:
String s = getCheckInfo();
showToast("您选中的姓名有:"+ s);
Jump2Main();
break;
default:
break;
}
}
}
~~~
~~~
/*切换到主布局*/
public void Jump2Main(){
setContentView(mainView);
setUpViews();
}
~~~
~~~
/*切换到选中布局*/
public void Jump2CheckList(){
setContentView(checkListView);
if(firstFlag){
mConfirmBtn = (Button)checkListView.findViewById(R.id.confirmBtn);
mConfirmBtn.setOnClickListener(new ButtonListener());
firstFlag = false;
}
initCheckList();
}
~~~
**第四部分:给ListView写适配器**,其实很简单 也就是上面的initCheckList函数,包含初始化ListView和适配器两个部分。先看源码:
~~~
public void initCheckList(){
list2 = (ListView)(checkListView).findViewById(R.id.checkList);
list2.setItemsCanFocus(false);
list2.setAdapter(new CheckListAdapter(this, cursor));
list2.setChoiceMode(ListView.CHOICE_MODE_MULTIPLE);
list2.setOnItemClickListener(new OnItemClickListener() {
public void onItemClick(AdapterView<?> arg0, View view, int positon,
long id) {
// TODO Auto-generated method stub
ViewHolder vHolder = (ViewHolder) view.getTag();
vHolder.check.toggle();
isSelected.put(positon, vHolder.check.isChecked());
}
});
}
~~~
下面是适配器:
~~~
/*给CheckList设置适配器*/
public static Map<Integer, Boolean> isSelected;
public class CheckListAdapter extends BaseAdapter{
private Context mContext;
private Cursor mCursor;
//构造函数
public CheckListAdapter(Context context, Cursor cursor){
mContext = context;
mCursor = cursor;
isSelected = new HashMap<Integer, Boolean>();
for(int i=0; i<mCursor.getCount(); i++){
isSelected.put(i, false);
}
}
public int getCount() {
// TODO Auto-generated method stub
return cursor.getCount();
}
public Object getItem(int arg0) {
// TODO Auto-generated method stub
return null;
}
public long getItemId(int arg0) {
// TODO Auto-generated method stub
return 0;
}
public View getView(int position, View convertView, ViewGroup arg2) {
// TODO Auto-generated method stub
ViewHolder holder = null;
if(convertView == null){
holder = new ViewHolder();
LayoutInflater inflater = (LayoutInflater) mContext.getSystemService(Context.LAYOUT_INFLATER_SERVICE);
convertView = inflater.inflate(R.layout.my_checkbox, null);
holder.text = (TextView) convertView.findViewById(R.id.item_text);
holder.check = (CheckBox)convertView.findViewById(R.id.item_check);
convertView.setTag(holder);
}
else
{
holder = (ViewHolder)convertView.getTag();
}
mCursor.moveToPosition(position);
holder.text.setText(Integer.toString(mCursor.getInt(0)));
holder.text.append(mCursor.getString(1));
holder.check.setChecked(isSelected.get(position));
return convertView;
}
public final class ViewHolder{
public TextView text;
public CheckBox check;
}
}
~~~
注:
1,initCheckList里要设置相应的参数,如多选等。
2,public static Map<Integer, Boolean> isSelected; 这是一个**全局变量**,且是静态的,用来存储checkbox的选中状态。[http://mobile.51cto.com/android-254823.htm](http://mobile.51cto.com/android-254823.htm) 这里将其设成适配器里的一个静态变量,但奇怪的是到我这就不中了,暂且弄成全局的吧。
3,在适配器的构造函数里初始化上面这个变量,并且所有都设成未选中。
isSelected = new HashMap<Integer, Boolean>();
for(int i=0; i<mCursor.getCount(); i++){
isSelected.put(i, false);
4,由于我跟数据库做了关联,所以在适配器的构造函数里传进去一个cursor,关于cursor的理解可以参考[http://www.cnblogs.com/TerryBlog/archive/2010/07/05/1771459.html](http://www.cnblogs.com/TerryBlog/archive/2010/07/05/1771459.html) 说白了他就是一组信息,是个集合。通过cursor.getCount获得他有多少行的信息。cursor.MoveToposition(i)定位到第i行。获得数据的方法跟数据时建的表的结构有关。
5,
public final class ViewHolder{
public TextView text;
public CheckBox check;
}
至于这个viewholder,实际上不用也可以。他就是把每一行的元素集成了一下,跟布局相对应。但到后来莫名其妙的要用到View.setTag()和View.getTag()来传递数据,所以我又把他加上了。
6,适配器的两大关键。
**第一个是**:
public int getCount() {
// TODO Auto-generated method stub
return cursor.getCount();
}
这里是返回list有多少行。调用**ListView.getCount()**实际上就是在调用这个函数。
**第二个就是**:public View getView(int position, View convertView, ViewGroup arg2)这个函数。注意第二个参数convertView就是给每一行设置的布局。通过
LayoutInflater inflater = (LayoutInflater) mContext.getSystemService(Context.LAYOUT_INFLATER_SERVICE);
convertView = inflater.inflate(R.layout.my_checkbox, null);
将第一个布局文件,和view关联起来。至于convertView.setTag(holder);其实是给view贴标签,也就是传数据的一种方式。当这个布局不为空时通过holder = (ViewHolder)convertView.getTag();直接获得。mCursor包含所有行的信息,
mCursor.moveToPosition(position);这句话将其定位到position的位置,
holder.text.setText(Integer.toString(mCursor.getInt(0)));
holder.text.append(mCursor.getString(1));
这两句话是获得每行的信息。我这个表的结构是第一列(对应索引为0)是一个int,第二列(索引为1)是一个string。
holder.check.setChecked(isSelected.get(position));这句话是设置checkbox的状态。 也就是说通过isSelected来设定,他的初始态是全不选。所以每次跳转时,默认的是都不选。
最后程序return convertView;返回这个view,然后当下次调用时,他又当做参数传进来。
7,解释下listview设置监听:
list2.setOnItemClickListener(new OnItemClickListener() {
public void onItemClick(AdapterView<?> arg0, View view, int positon,
long id) {
// TODO Auto-generated method stub
ViewHolder vHolder = (ViewHolder) view.getTag();
vHolder.check.toggle();
isSelected.put(positon, vHolder.check.isChecked());
}
});
当每个item被点击时,通过被点击的view.getTag获得具体的控件view, CheckBox的状态反转。
isSelected.put(positon, vHolder.check.isChecked());这句话是通过访问position位置的CheckBox的状态来更新保存信息的isSelected。
8,**最后就是我怎么获得选中的信息?**
可以这么写:
~~~
OnClickListener bPop = new OnClickListener() {
@Override
public void onClick(View v) {
for(int i=0;i<list.getCount();i++){
if(MyAdapter.isSelected.get(i)){
ViewHolder vHollder = (ViewHolder) list.getChildAt(i).getTag();
Log.i(TAG, "--onClick --"+vHollder.title.getText());
}
}
}
};
~~~
通过list.getCount进行遍历,通过list.getChildAt(i).getTag得到被选中的ViewHolder,然后得到信息。 因为这里我跟数据库挂了钩,所以我直接读Cursor里面的信息就可以了。
我的写法是:
~~~
public String getCheckInfo()
{
String info = "";
for(int i=0; i<list2.getCount(); i++){
if(isSelected.get(i)){
//ViewHolder holder = (ViewHolder)list2.getChildAt(i).getTag();
cursor.moveToPosition(i);
info+=cursor.getInt(0)+".";
}
}
return info;
}
~~~
上面的list2.getCount和cursor.getCount是一样的效果。
最后说下这个Cursor,因为他包含了数据库里所有行的信息,所以我直接用他来填充到每个item。如果这个填充的信息是其他的,就是用到其他数据结构了,如 List<Map<String, Object>> mData; 来保存信息。具体可以参考:[http://mobile.51cto.com/android-254823.htm](http://mobile.51cto.com/android-254823.htm)
[http://blog.csdn.net/a859522265/article/details/8204646](http://blog.csdn.net/a859522265/article/details/8204646) [http://www.linuxidc.com/Linux/2011-11/47179p2.htm](http://www.linuxidc.com/Linux/2011-11/47179p2.htm) [http://blog.sina.com.cn/s/blog_65570a20010108lp.html](http://blog.sina.com.cn/s/blog_65570a20010108lp.html) [http://bbs.csdn.net/topics/330062289](http://bbs.csdn.net/topics/330062289) 我主要参考的第一篇。
**另外,在数据库里怎么获得Cursor呢?**
cursor = mPalmDB.select();
select()函数的封装是:
~~~
public Cursor select(){
SQLiteDatabase db = this.getReadableDatabase();
Cursor cursor = db.query(TABLE_NAME, null, null, null, null, null, null);
return cursor;
}
~~~
这个可以封装在数据库类里,也可以写到函数里。
源码连同数据库操作部分改日再提供哈!
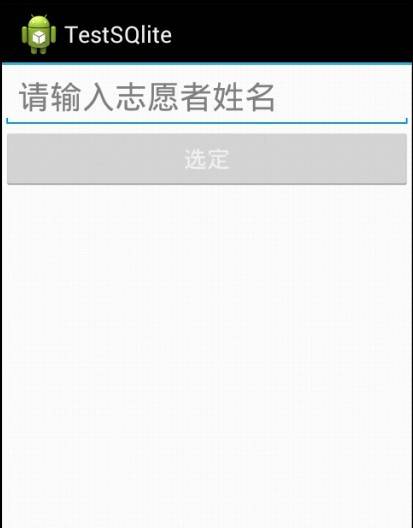
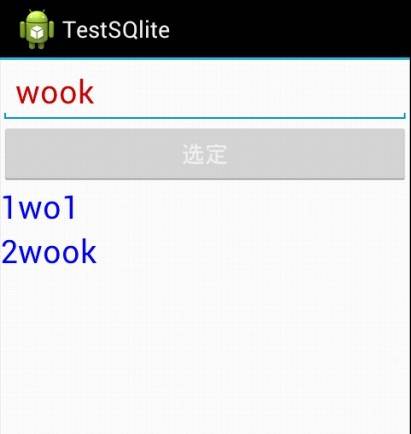
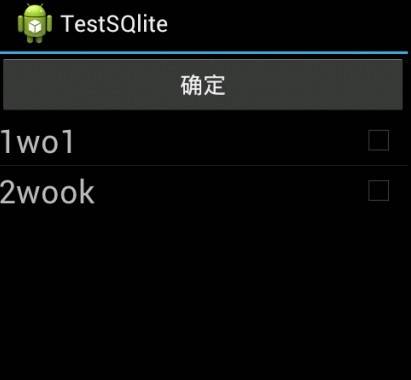
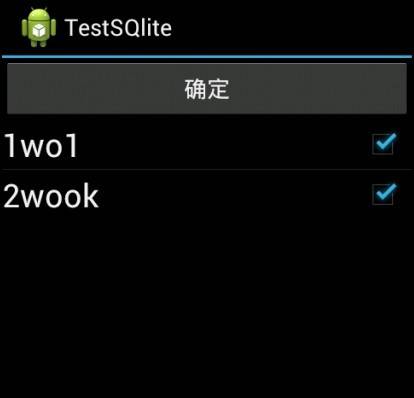
效果图:
1,主界面

2,在数据库里添加两个数据后:

3,点击上面的“选定”按键,切换到另外一个界面

4,选中这两个条目:

源码下载:[http://download.csdn.net/detail/yanzi1225627/5226894](http://download.csdn.net/detail/yanzi1225627/5226894)
欢迎android爱好者加群248217350 备注:yanzi
----------------------------本文系原创,转载请注明作者:yanzi1225627