Python:DNS客户端实现
最后更新于:2022-04-01 19:41:52
这两天在测试IPV6与DNS,晚上查了下资料,写了个DNS客户端,其中请求消息编码部分参考网上实例。
刚完成了编码,功能还没有测试。
1、代码:
~~~
#!/usr/bin/env python
# -*- coding: utf-8 -*-
import ConfigParser
import socket
import time
import string
import os
import re
import struct
def dns_codec(hostname):
'''
Function:请求消息编码
Input:hostname:主机名,如www.baidu.com
Output: 编码后的字节流
author: socrates
date:2012-12-14
'''
index = os.urandom(2)
hoststr = ''.join(chr(len(x))+x for x in hostname.split('.'))
data = '%s\x01\x00\x00\x01\x00\x00\x00\x00\x00\x00%s\x00\x00\x01\x00\x01' % (index, hoststr)
data = struct.pack('!H', len(data)) + data
return data
def dns_decode(in_sock):
'''
Function:响应消息解码
Input:in_sock:接收消息的socket
Output:解码后的内容
author: socrates
date:2012-12-14
'''
rfile = in_sock.makefile('rb')
size = struct.unpack('!H', rfile.read(2))[0]
data = rfile.read(size)
iplist = re.findall('\xC0.\x00\x01\x00\x01.{6}(.{4})', data)
return ['.'.join(str(ord(x)) for x in s) for s in iplist]
def dns_sendmsg():
'''
Function:通过socket发送DNS查询消息
Input:None
Output:None
author: socrates
date:2012-12-14
'''
ens_client_config = ConfigParser.ConfigParser()
#读取配置文件
try:
ens_client_config.readfp(open('ens_client_config.ini'))
except ConfigParser.Error:
print 'read ens_client_config.ini failed.'
#获取需要的信息
server_ip_1 = ens_client_config.get("server_info","ip_1")
server_port_1 = ens_client_config.get("server_info","port_1")
sockettype_1 = ens_client_config.get("server_info","sockettype_1")
heartbeat_1 = ens_client_config.get("server_info","heartbeat_1")
msg_1 = ens_client_config.get("server_info","msg_1")
#IP类型
address_family = {True:socket.AF_INET6, False:socket.AF_INET}[':' in server_ip_1]
#传输类型
socket_type = {True:socket.SOCK_STREAM , False:socket.SOCK_DGRAM}['TCP' == sockettype_1.upper()]
try:
sock = socket.socket(address_family, socket_type)
except socket.error, e:
print 'create socket return error. errno = %d, errmsg = %s' % (e.args[0], e.args[1])
#连接服务器并发送消息
try:
#连接服务端
sock.connect((server_ip_1, string.atoi(server_port_1)))
while True:
#发送频率
time.sleep(string.atoi(heartbeat_1))
#发送消息
sock.sendall(dns_codec(msg_1))
#接收并打印消息
print dns_decode(sock)
except socket.error, e:
print 'connect server failed. errno = %d, errmsg = %s' % (e.args[0], e.args[1])
sock.close()
if __name__ == '__main__':
dns_sendmsg()
~~~
2、配置文件:
文件名:ens_client_config.ini
内容:
~~~
[server_info]
ip_1=192.168.1.1
port_1=53
sockettype_1=UDP
heartbeat_1=2
msg_1=www.google.com
~~~
3、早上测试了下UDP协议下的DNS客户端,功能正常可用。
a、wireshark抓包:
请求:

响应:

b、代码运行结果:

';
Python:读取新浪微博收听列表
最后更新于:2022-04-01 19:41:50
代码:
~~~
#!/usr/bin/env python
# -*- coding: utf-8 -*-
from weibo import *
import time
def press_sina_weibo():
APP_KEY = '220567xxxx'
APP_SECRET = '47970abb02d8f7b4d600d98e9b1fxxxx'
c99'
CALLBACK_URL = 'https://api.weibo.com/oauth2/default.html'
client = APIClient(app_key=APP_KEY, app_secret=APP_SECRET, redirect_uri=CALLBACK_URL)
print client.get_authorize_url()
r = client.request_access_token(raw_input("input code:").strip())
client.set_access_token(r.access_token, r.expires_in)
friends_list = u'收听:'
#
myfriends = client.friendships.friends.get(uid=2601091753)
for s in myfriends.users:
friends_list += s.name
friends_list += ' '
if len(friends_list) >= 140: #最多140个字
client.post.statuses__update(status=friends_list)
print friends_list.encode("gbk") #输出时要编码
friends_list = u'收听:'
time.sleep(10) #别发太快,10秒一条
#输出剩余的
client.post.statuses__update(status=friends_list)
print friends_list.encode("gbk")
if __name__ == '__main__':
press_sina_weibo()
~~~
测试:


';
Python: 发送新浪微博(使用oauth2)
最后更新于:2022-04-01 19:41:48
1、申请个应用,得到App Key和App Secret
2、设置授权回调页地址,如下,如果不设置,打开回调页时会报错“error:redirect_uri_mismatch”,这一点一定要注意。

3、代码:
~~~
#!/usr/bin/env python
# -*- coding: utf-8 -*-
from weibo import *
def press_sina_weibo():
APP_KEY = '220567XXXX'
APP_SECRET = '47970abb02d8f7b4d600d98e9bXXXXXX'
CALLBACK_URL = 'https://api.weibo2.com/oauth2/default.html'
client = APIClient(app_key=APP_KEY, app_secret=APP_SECRET, redirect_uri=CALLBACK_URL)
print client.get_authorize_url()
r = client.request_access_token(raw_input("input code:").strip())
client.set_access_token(r.access_token, r.expires_in)
print client.post.statuses__update(status=u'测试一下发送微博')
if __name__ == '__main__':
press_sina_weibo()
~~~
4、测试:
运行后,会输出一个URL,在地址栏中打开,得到token,然后输入后就可发送了。


';
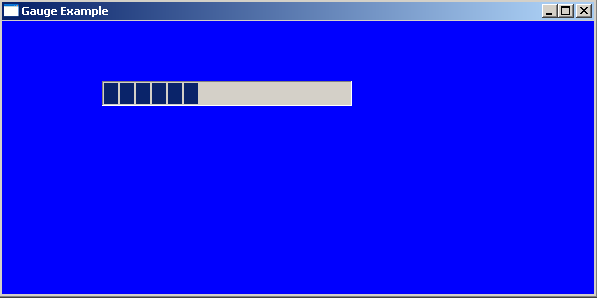
wxPython:进度条Gauge介绍
最后更新于:2022-04-01 19:41:46
本节介绍进度条的使用,先看代码:
~~~
#!/usr/bin/env python
# -*- coding: utf-8 -*-
import wx
'''
Function:绘图
Input:NONE
Output: NONE
author: socrates
blog:http://www.cnblogs.com/dyx1024/
date:2012-07-22
'''
class GuageFrame(wx.Frame):
def __init__(self):
wx.Frame.__init__(self, None, -1, 'Gauge Example', size = (600, 300))
panel = wx.Panel(self, -1)
panel.SetBackgroundColour("white")
self.count = 0
self.gauge = wx.Gauge(panel, -1, 100, (100, 60), (250, 25), style = wx.GA_PROGRESSBAR)
self.gauge.SetBezelFace(3)
self.gauge.SetShadowWidth(3)
self.Bind(wx.EVT_IDLE, self.OnIdle)
def OnIdle(self, event):
self.count = self.count + 1
if self.count >= 80:
self.count = 0
self.gauge.SetValue(self.count)
if __name__ == '__main__':
app = wx.PySimpleApp()
frame = GuageFrame()
frame.Show()
app.MainLoop()
~~~
测试:
知识点介绍:
原型:
bool Create([wxWindow](http://www.cnblogs.com/dyx1024/admin/)* parent, wxWindowID id, int range, const [wxPoint](http://www.cnblogs.com/dyx1024/admin/)& pos = wxDefaultPosition, const [wxSize](http://www.cnblogs.com/dyx1024/admin/)& size = wxDefaultSize, long style = wxGA_HORIZONTAL, const [wxValidator](http://www.cnblogs.com/dyx1024/admin/)& validator = wxDefaultValidator, const [wxString](http://www.cnblogs.com/dyx1024/admin/)& name = "gauge")
方法:
- wxGauge::wxGauge
- wxGauge::~wxGauge
- wxGauge::Create
- wxGauge::GetBezelFace
- wxGauge::GetRange
- wxGauge::GetShadowWidth
- wxGauge::GetValue
- wxGauge::IsVertical
- wxGauge::SetBezelFace
- wxGauge::SetRange
- wxGauge::SetShadowWidth
- wxGauge::SetValue
- wxGauge::Pulse
';
wxPython:绘画按钮BitmapButton介绍
最后更新于:2022-04-01 19:41:43
本节看一个绘图按钮的使用,先看看代码:
~~~
#!/usr/bin/env python
# -*- coding: utf-8 -*-
import wx
'''
Function:绘图
Input:NONE
Output: NONE
author: socrates
blog:http://www.cnblogs.com/dyx1024/
date:2012-07-20
'''
class BitmapButtonFrame(wx.Frame):
def __init__(self):
wx.Frame.__init__(self, None, -1, "Bitmap button example",
size = (600, 400))
panel = wx.Panel(self, -1)
panel.SetBackgroundColour("blue")
#创建一个绘图对象
bmp = wx.Image("test2.bmp", wx.BITMAP_TYPE_BMP).ConvertToBitmap()
#绘图按钮1,默认风格3D
self.button = wx.BitmapButton(panel, -1, bmp, pos = (50, 20))
self.Bind(wx.EVT_BUTTON, self.OnClick, self.button)
self.button.SetDefault()
#绘图按钮1,不带边框
self.button2 = wx.BitmapButton(panel, -1, bmp, style = 0, pos = (350, 20))
self.Bind(wx.EVT_BUTTON, self.OnClick, self.button)
self.button.SetDefault()
def OnClick(self, event):
self.Destroy()
if __name__ == '__main__':
app = wx.PySimpleApp()
frame = BitmapButtonFrame()
frame.Show()
app.MainLoop()
~~~
测试:

知识点介绍:
原型:
wxBitmapButton( [wxWindow](http://www.cnblogs.com/dyx1024/admin/)* parent, wxWindowID id, const [wxBitmap](http://www.cnblogs.com/dyx1024/admin/)& bitmap, const[wxPoint](http://www.cnblogs.com/dyx1024/admin/)& pos = wxDefaultPosition, const [wxSize](http://www.cnblogs.com/dyx1024/admin/)& size = wxDefaultSize, long style = wxBU_AUTODRAW, const [wxValidator](http://www.cnblogs.com/dyx1024/admin/)& validator = wxDefaultValidator, const [wxString](http://www.cnblogs.com/dyx1024/admin/)&name = "button")
方法:
- wxBitmapButton::Create
- wxBitmapButton::GetBitmapDisabled
- wxBitmapButton::GetBitmapFocus
- wxBitmapButton::GetBitmapHover
- wxBitmapButton::GetBitmapLabel
- wxBitmapButton::GetBitmapSelected
- wxBitmapButton::SetBitmapDisabled
- wxBitmapButton::SetBitmapFocus
- wxBitmapButton::SetBitmapHover
- wxBitmapButton::SetBitmapLabel
- wxBitmapButton::SetBitmapSelected
';
wxPython:启动画面SplashScreen介绍
最后更新于:2022-04-01 19:41:41
程序启动时出现一个启动画面,先看代码:
~~~
class PaintApp(wx.App):
def OnInit(self):
bmp = wx.Image("P7080079.JPG").ConvertToBitmap()
wx.SplashScreen(bmp,
wx.SPLASH_CENTER_ON_SCREEN | wx.SPLASH_TIMEOUT,
,
None,
-1)
wx.Yield()
frame = PaintFrame(None)
frame.Show(True)
self.SetTopWindow(frame)
return True
if __name__ == '__main__':
app = PaintApp()
app.MainLoop()
~~~
测试一下,使用一张自己前几天拍的荷花。

知识点:
原型:
wxSplashScreen(const [wxBitmap](http://www.cnblogs.com/dyx1024/admin/)& bitmap, long splashStyle, int milliseconds, [wxWindow](http://www.cnblogs.com/dyx1024/admin/)*parent, wxWindowID id, const [wxPoint](http://www.cnblogs.com/dyx1024/admin/)& pos = wxDefaultPosition, const [wxSize](http://www.cnblogs.com/dyx1024/admin/)& size = wxDefaultSize, long style = wxSIMPLE_BORDER|wxFRAME_NO_TASKBAR|wxSTAY_ON_TOP)
splashStyle is a bitlist of some of the following:
- wxSPLASH_CENTRE_ON_PARENT
- wxSPLASH_CENTRE_ON_SCREEN
- wxSPLASH_NO_CENTRE
- wxSPLASH_TIMEOUT
- wxSPLASH_NO_TIMEOUT
milliseconds is the timeout in milliseconds.
方法:
- wxSplashScreen::OnCloseWindow
- wxSplashScreen::GetSplashStyle
- wxSplashScreen::GetSplashWindow
- wxSplashScreen::GetTimeout
';
wxPython:布局管理器sizer介绍
最后更新于:2022-04-01 19:41:39
创建窗口中部件时显示指定位置和大小对于稍复杂一点的界面来说是非常痛苦的,所以本节看一下wxPython中布局管理器sizer的用法,同样,先看一个实例:
代码:
~~~
#!/usr/bin/env python
# -*- coding: utf-8 -*-
'''
Function:绘图
Input:NONE
Output: NONE
author: socrates
blog:http://www.cnblogs.com/dyx1024/
date:2012-07-15
'''
import wx
import wx.lib.buttons
import cPickle
import os
class PaintWindow(wx.Window):
def __init__(self, parent, id):
wx.Window.__init__(self, parent, id)
self.SetBackgroundColour("Red")
self.color = "Green"
self.thickness = 10
#创建一个画笔
self.pen = wx.Pen(self.color, self.thickness, wx.SOLID)
self.lines = []
self.curLine = []
self.pos = (0, 0)
self.InitBuffer()
#连接事件
self.Bind(wx.EVT_LEFT_DOWN, self.OnLeftDown)
self.Bind(wx.EVT_LEFT_UP, self.OnLeftUp)
self.Bind(wx.EVT_MOTION, self.OnMotion)
self.Bind(wx.EVT_SIZE, self.OnSize)
self.Bind(wx.EVT_IDLE, self.OnIdle)
self.Bind(wx.EVT_PAINT, self.OnPaint)
def InitBuffer(self):
size = self.GetClientSize()
#创建缓存的设备上下文
self.buffer = wx.EmptyBitmap(size.width, size.height)
dc = wx.BufferedDC(None, self.buffer)
#使用设备上下文
dc.SetBackground(wx.Brush(self.GetBackgroundColour()))
dc.Clear()
self.DrawLines(dc)
self.reInitBuffer = False
def GetLinesData(self):
return self.lines[:]
def SetLinesData(self, lines):
self.lines = lines[:]
self.InitBuffer()
self.Refresh()
def OnLeftDown(self, event):
self.curLine = []
#获取鼠标位置
self.pos = event.GetPositionTuple()
self.CaptureMouse()
def OnLeftUp(self, event):
if self.HasCapture():
self.lines.append((self.color,
self.thickness,
self.curLine))
self.curLine = []
self.ReleaseMouse()
def OnMotion(self, event):
if event.Dragging() and event.LeftIsDown():
dc = wx.BufferedDC(wx.ClientDC(self), self.buffer)
self.drawMotion(dc, event)
event.Skip()
def drawMotion(self, dc, event):
dc.SetPen(self.pen)
newPos = event.GetPositionTuple()
coords = self.pos + newPos
self.curLine.append(coords)
dc.DrawLine(*coords)
self.pos = newPos
def OnSize(self, event):
self.reInitBuffer = True
def OnIdle(self, event):
if self.reInitBuffer:
self.InitBuffer()
self.Refresh(False)
def OnPaint(self, event):
dc = wx.BufferedPaintDC(self, self.buffer)
def DrawLines(self, dc):
for colour, thickness, line in self.lines:
pen = wx.Pen(colour, thickness, wx.SOLID)
dc.SetPen(pen)
for coords in line:
dc.DrawLine(*coords)
def SetColor(self, color):
self.color = color
self.pen = wx.Pen(self.color, self.thickness, wx.SOLID)
def SetThickness(self, num):
self.thickness = num
self.pen = wx.Pen(self.color, self.thickness, wx.SOLID)
class PaintFrame(wx.Frame):
def __init__(self, parent):
self.title = "Paint Frame"
wx.Frame.__init__(self, parent, -1, self.title, size = (800, 600))
self.paint = PaintWindow(self, -1)
#状态栏
self.paint.Bind(wx.EVT_MOTION, self.OnPaintMotion)
self.InitStatusBar()
#创建菜单
self.CreateMenuBar()
self.filename = ""
#创建工具栏使用的面板
self.CreatePanel()
def CreatePanel(self):
controlPanel = ControlPanel(self, -1, self.paint)
box = wx.BoxSizer(wx.HORIZONTAL) #放置水平的box sizer
box.Add(controlPanel, 0, wx.EXPAND) #水平方向伸展时不改变尺寸
box.Add(self.paint, -1, wx.EXPAND)
self.SetSizer(box)
def InitStatusBar(self):
self.statusbar = self.CreateStatusBar()
#将状态栏分割为3个区域,比例为1:2:3
self.statusbar.SetFieldsCount(3)
self.statusbar.SetStatusWidths([-1, -2, -3])
def OnPaintMotion(self, event):
#设置状态栏1内容
self.statusbar.SetStatusText(u"鼠标位置:" + str(event.GetPositionTuple()), 0)
#设置状态栏2内容
self.statusbar.SetStatusText(u"当前线条长度:%s" % len(self.paint.curLine), 1)
#设置状态栏3内容
self.statusbar.SetStatusText(u"线条数目:%s" % len(self.paint.lines), 2)
event.Skip()
def MenuData(self):
'''
菜单数据
'''
#格式:菜单数据的格式现在是(标签, (项目)),其中:项目组成为:标签, 描术文字, 处理器, 可选的kind
#标签长度为2,项目的长度是3或4
return [("&File", ( #一级菜单项
("&New", "New paint file", self.OnNew), #二级菜单项
("&Open", "Open paint file", self.OnOpen),
("&Save", "Save paint file", self.OnSave),
("", "", ""), #分隔线
("&Color", (
("&Black", "", self.OnColor, wx.ITEM_RADIO), #三级菜单项,单选
("&Red", "", self.OnColor, wx.ITEM_RADIO),
("&Green", "", self.OnColor, wx.ITEM_RADIO),
("&Blue", "", self.OnColor, wx.ITEM_RADIO),
("&Other", "", self.OnOtherColor, wx.ITEM_RADIO))),
("", "", ""),
("&Quit", "Quit", self.OnCloseWindow)))
]
def CreateMenuBar(self):
'''
创建菜单
'''
menuBar = wx.MenuBar()
for eachMenuData in self.MenuData():
menuLabel = eachMenuData[0]
menuItems = eachMenuData[1]
menuBar.Append(self.CreateMenu(menuItems), menuLabel)
self.SetMenuBar(menuBar)
def CreateMenu(self, menuData):
'''
创建一级菜单
'''
menu = wx.Menu()
for eachItem in menuData:
if len(eachItem) == 2:
label = eachItem[0]
subMenu = self.CreateMenu(eachItem[1])
menu.AppendMenu(wx.NewId(), label, subMenu) #递归创建菜单项
else:
self.CreateMenuItem(menu, *eachItem)
return menu
def CreateMenuItem(self, menu, label, status, handler, kind = wx.ITEM_NORMAL):
'''
创建菜单项内容
'''
if not label:
menu.AppendSeparator()
return
menuItem = menu.Append(-1, label, status, kind)
self.Bind(wx.EVT_MENU, handler,menuItem)
def OnNew(self, event):
pass
def OnOpen(self, event):
'''
打开开文件对话框
'''
file_wildcard = "Paint files(*.paint)|*.paint|All files(*.*)|*.*"
dlg = wx.FileDialog(self, "Open paint file...",
os.getcwd(),
style = wx.OPEN,
wildcard = file_wildcard)
if dlg.ShowModal() == wx.ID_OK:
self.filename = dlg.GetPath()
self.ReadFile()
self.SetTitle(self.title + '--' + self.filename)
dlg.Destroy()
def OnSave(self, event):
'''
保存文件
'''
if not self.filename:
self.OnSaveAs(event)
else:
self.SaveFile()
def OnSaveAs(self, event):
'''
弹出文件保存对话框
'''
file_wildcard = "Paint files(*.paint)|*.paint|All files(*.*)|*.*"
dlg = wx.FileDialog(self,
"Save paint as ...",
os.getcwd(),
style = wx.SAVE | wx.OVERWRITE_PROMPT,
wildcard = file_wildcard)
if dlg.ShowModal() == wx.ID_OK:
filename = dlg.GetPath()
if not os.path.splitext(filename)[1]: #如果没有文件名后缀
filename = filename + '.paint'
self.filename = filename
self.SaveFile()
self.SetTitle(self.title + '--' + self.filename)
dlg.Destroy()
def OnColor(self, event):
'''
更改画笔内容
'''
menubar = self.GetMenuBar()
itemid = event.GetId()
item = menubar.FindItemById(itemid)
color = item.GetLabel() #获取菜单项内容
self.paint.SetColor(color)
def OnOtherColor(self, event):
'''
使用颜色对话框
'''
dlg = wx.ColourDialog(self)
dlg.GetColourData().SetChooseFull(True) #创建颜色对象数据
if dlg.ShowModal() == wx.ID_OK:
self.paint.SetColor(dlg.GetColourData().GetColour()) #根据选择设置画笔颜色
dlg.Destroy()
def OnCloseWindow(self, event):
self.Destroy()
def SaveFile(self):
'''
保存文件
'''
if self.filename:
data = self.paint.GetLinesData()
f = open(self.filename, 'w')
cPickle.dump(data, f)
f.close()
def ReadFile(self):
if self.filename:
try:
f = open(self.filename, 'r')
data = cPickle.load(f)
f.close()
self.paint.SetLinesData(data)
except cPickle.UnpicklingError:
wx.MessageBox("%s is not a paint file."
% self.filename, "error tip",
style = wx.OK | wx.ICON_EXCLAMATION)
class ControlPanel(wx.Panel):
BMP_SIZE = 16
BMP_BORDER = 3
NUM_COLS = 4
SPACING = 4
colorList = ('Black', 'Yellow', 'Red', 'Green', 'Blue', 'Purple',
'Brown', 'Aquamarine', 'Forest Green', 'Light Blue',
'Goldenrod', 'Cyan', 'Orange', 'Navy', 'Dark Grey',
'Light Grey')
maxThickness = 16
def __init__(self, parent, ID, paint):
wx.Panel.__init__(self, parent, ID, style = wx.RAISED_BORDER)
self.paint = paint
buttonSize = (self.BMP_SIZE + 2 * self.BMP_BORDER,
self.BMP_SIZE + 2 * self.BMP_BORDER)
colorGrid = self.createColorGrid(parent, buttonSize) #创建颜色grid sizer
thicknessGrid = self.createThicknessGrid(buttonSize) #创建线条grid sizer
self.layout(colorGrid, thicknessGrid)
def createColorGrid(self, parent, buttonSize):
self.colorMap = {}
self.colorButtons = {}
colorGrid = wx.GridSizer(cols = self.NUM_COLS, hgap = 2, vgap = 2)
for eachColor in self.colorList:
bmp = self.MakeBitmap(eachColor)
b = wx.lib.buttons.GenBitmapToggleButton(self, -1, bmp, size = buttonSize)
b.SetBezelWidth(1)
b.SetUseFocusIndicator(False)
self.Bind(wx.EVT_BUTTON, self.OnSetColour, b)
colorGrid.Add(b, 0)
self.colorMap[b.GetId()] = eachColor
self.colorButtons[eachColor] = b
self.colorButtons[self.colorList[0]].SetToggle(True)
return colorGrid
def createThicknessGrid(self, buttonSize):
self.thicknessIdMap = {}
self.thicknessButtons = {}
thicknessGrid = wx.GridSizer(cols = self.NUM_COLS, hgap = 2, vgap = 2)
for x in range(1, self.maxThickness + 1):
b = wx.lib.buttons.GenToggleButton(self, -1, str(x), size = buttonSize)
b.SetBezelWidth(1)
b.SetUseFocusIndicator(False)
self.Bind(wx.EVT_BUTTON, self.OnSetThickness, b)
thicknessGrid.Add(b, 0)
self.thicknessIdMap[b.GetId()] = 2
self.thicknessButtons[x] = b
self.thicknessButtons[1].SetToggle(True)
return thicknessGrid
def layout(self, colorGrid, thicknessGrid):
box = wx.BoxSizer(wx.VERTICAL) #使用垂直的box szier放置grid sizer
box.Add(colorGrid, 0, wx.ALL, self.SPACING) #参数0表示在垂直方向伸展时不改变尺寸
box.Add(thicknessGrid, 0, wx.ALL, self.SPACING)
self.SetSizer(box)
box.Fit(self)
def OnSetColour(self, event):
color = self.colorMap[event.GetId()]
if color != self.paint.color:
self.colorButtons[self.paint.color].SetToggle(False)
self.paint.SetColor(color)
def OnSetThickness(self, event):
thickness = self.thicknessIdMap[event.GetId()]
if thickness != self.paint.thickness:
self.thicknessButtons[self.paint.thickness].SetToggle(False)
self.paint.SetThickness(thickness)
def MakeBitmap(self, color):
bmp = wx.EmptyBitmap(16, 15)
dc = wx.MemoryDC(bmp)
dc.SetBackground(wx.Brush(color))
dc.Clear()
dc.SelectObject(wx.NullBitmap)
return bmp
if __name__ == '__main__':
app = wx.PySimpleApp()
frame = PaintFrame(None)
frame.Show(True)
app.MainLoop()
~~~
测试:
普通窗口:

最大化窗口:

知识点:
每个不同的sizer基于一套规则管理它的窗口的尺寸和位置。sizer属于一个容器窗口(比如wx.Panel)。在父中创建的子窗口必须被添加给sizer,sizer管理每个窗
口部件的尺寸和位置。
创建一个sizer的步骤:
1. 创建你想用来自动调用尺寸的panel或container(容器)。
1. 创建sizer。
1. 创建你的子窗口。
1. 使用sizer的Add()方法来将每个子窗口添加给sizer。
1. sizer可以嵌套,这意味你可以像窗口对象一样添加别的sizer到父sizer。
1. 调用容器的SetSizer(sizer)方法。
最常用的wxPython的sizer:
- wx.BoxSizer:在一条线上布局子窗口部件。wx.BoxSizer的布局方向可以是水平或坚直的,并且可以在水平或坚直方向上包含子sizer以创建复杂的布局。在项目被添加时传递给sizer的参数控制子窗口部件如何根据box的主体或垂直轴线作相应的尺寸调整。
- wx.FlexGridSizer:一个固定的二维网格,它与wx.GridSizer的区别是,行和列根据所在行或列的最大元素分别被设置。
- wx.GridSizer:一个固定的二维网格,其中的每个元素都有相同的尺寸。当创建一个grid sizer时,你要么固定行的数量,要么固定列的数量。项目被从左到右的添加,直到一行被填满,然后从下一行开始。
- wx.GridBagSizer:一个固定的二维网格,基于wx.FlexGridSizer。允许项目被放置在网格上的特定点,也允许项目跨越多和网格区域。
- wx.StaticBoxSizer:等同于wx.BoxSizer,只是在box周围多了一个附加的边框(有一个可选的标签)。
wx.Sizer的方法:
- Add(size, proportion=0,flag=0, border=0,userData=None):第一个添加一个wxWindow,第二个添加一个嵌套的sizer,第三个添加空的空间,用作分隔符。参数proportion管理窗口总尺寸,它是相对于别的窗口的改变而言的,它只对wx.BoxSizer有意义。参数flag是一个位图,针对对齐、边框位置,增长有许多不同的标志。参数border是窗口或sizer周围以像素为单位的空间总量。userData使你能够将对象与数据关联,例如,在一个子类中,可能需要更多的用于尺寸的信息。
- Fit(window)
- FitInside(window ):调整window尺寸以匹配sizer认为所需要的最小化尺寸。这个参数的值通常是使用sizer的窗口。FitInside()是一个类似的方法,只不过将改变窗口在屏幕上的显示替换为只改变它的内部实现。它用于scroll panel中的窗口以触发滚动栏的显示。
- GetSize():以wx.Size对象的形式返回sizer的尺寸。
- GetPosition():以wx.Point对象的形式返回sizer的位置。
- GetMinSize():以wx.Size对象的形式返回完全填充sizer所需的最小尺寸。
- Layout():强迫sizer去重新计算它的孩子的尺寸和位置。在动态地添加或删除了一个孩子之后调用。
- Prepend(...):与Add()相同(只是为了布局的目的,把新的对象放在sizer列表的开头)。
- Remove(window)
- Remove(sizer)
- Remove(nth):从sizer中删除一个对象。
- SetDimension(x, y, width,height):强迫sizer按照给定的参数重新定位它的所有孩子。
';
wxPython:颜色选择对话框wx.ColourDialog
最后更新于:2022-04-01 19:41:36
本节看一下颜色选择对话框的使用,比较简单,先看实例,再讲解知识点:
代码:
~~~
def OnOtherColor(self, event):
'''
使用颜色对话框
'''
dlg = wx.ColourDialog(self)
dlg.GetColourData().SetChooseFull(True) #创建颜色对象数据
if dlg.ShowModal() == wx.ID_OK:
self.paint.SetColor(dlg.GetColourData().GetColour()) #根据选择设置画笔颜色
dlg.Destroy()
~~~
测试:

wxColourDialog介绍:
原型:
wxColourDialog([wxWindow](http://www.cnblogs.com/dyx1024/admin/)* parent, [wxColourData](http://www.cnblogs.com/dyx1024/admin/)* data = NULL)
方法:
- wxColourDialog::wxColourDialog
- wxColourDialog::~wxColourDialog
- wxColourDialog::Create
- wxColourDialog::GetColourData
- wxColourDialog::ShowModal
';
wxPython:文件对话框wx.FileDialog
最后更新于:2022-04-01 19:41:34
本节看一下文件对话框的使用,先看实例,再介绍具体知识点。
代码:
~~~
#!/usr/bin/env python
# -*- coding: utf-8 -*-
'''
Function:绘图
Input:NONE
Output: NONE
author: socrates
blog:http://www.cnblogs.com/dyx1024/
date:2012-07-14
'''
import wx
import cPickle
import os
class PaintWindow(wx.Window):
def __init__(self, parent, id):
wx.Window.__init__(self, parent, id)
self.SetBackgroundColour("Red")
self.color = "Green"
self.thickness = 10
#创建一个画笔
self.pen = wx.Pen(self.color, self.thickness, wx.SOLID)
self.lines = []
self.curLine = []
self.pos = (0, 0)
self.InitBuffer()
#连接事件
self.Bind(wx.EVT_LEFT_DOWN, self.OnLeftDown)
self.Bind(wx.EVT_LEFT_UP, self.OnLeftUp)
self.Bind(wx.EVT_MOTION, self.OnMotion)
self.Bind(wx.EVT_SIZE, self.OnSize)
self.Bind(wx.EVT_IDLE, self.OnIdle)
self.Bind(wx.EVT_PAINT, self.OnPaint)
def InitBuffer(self):
size = self.GetClientSize()
#创建缓存的设备上下文
self.buffer = wx.EmptyBitmap(size.width, size.height)
dc = wx.BufferedDC(None, self.buffer)
#使用设备上下文
dc.SetBackground(wx.Brush(self.GetBackgroundColour()))
dc.Clear()
self.DrawLines(dc)
self.reInitBuffer = False
def GetLinesData(self):
return self.lines[:]
def SetLinesData(self, lines):
self.lines = lines[:]
self.InitBuffer()
self.Refresh()
def OnLeftDown(self, event):
self.curLine = []
#获取鼠标位置
self.pos = event.GetPositionTuple()
self.CaptureMouse()
def OnLeftUp(self, event):
if self.HasCapture():
self.lines.append((self.color,
self.thickness,
self.curLine))
self.curLine = []
self.ReleaseMouse()
def OnMotion(self, event):
if event.Dragging() and event.LeftIsDown():
dc = wx.BufferedDC(wx.ClientDC(self), self.buffer)
self.drawMotion(dc, event)
event.Skip()
def drawMotion(self, dc, event):
dc.SetPen(self.pen)
newPos = event.GetPositionTuple()
coords = self.pos + newPos
self.curLine.append(coords)
dc.DrawLine(*coords)
self.pos = newPos
def OnSize(self, event):
self.reInitBuffer = True
def OnIdle(self, event):
if self.reInitBuffer:
self.InitBuffer()
self.Refresh(False)
def OnPaint(self, event):
dc = wx.BufferedPaintDC(self, self.buffer)
def DrawLines(self, dc):
for colour, thickness, line in self.lines:
pen = wx.Pen(colour, thickness, wx.SOLID)
dc.SetPen(pen)
for coords in line:
dc.DrawLine(*coords)
def SetColor(self, color):
self.color = color
self.pen = wx.Pen(self.color, self.thickness, wx.SOLID)
def SetThickness(self, num):
self.thickness = num
self.pen = wx.Pen(self.color, self.thickness, wx.SOLID)
class PaintFrame(wx.Frame):
def __init__(self, parent):
self.title = "Paint Frame"
wx.Frame.__init__(self, parent, -1, self.title, size = (800, 600))
self.paint = PaintWindow(self, -1)
#状态栏
self.paint.Bind(wx.EVT_MOTION, self.OnPaintMotion)
self.InitStatusBar()
#创建菜单
self.CreateMenuBar()
self.filename = ""
def InitStatusBar(self):
self.statusbar = self.CreateStatusBar()
#将状态栏分割为3个区域,比例为1:2:3
self.statusbar.SetFieldsCount(3)
self.statusbar.SetStatusWidths([-1, -2, -3])
def OnPaintMotion(self, event):
#设置状态栏1内容
self.statusbar.SetStatusText(u"鼠标位置:" + str(event.GetPositionTuple()), 0)
#设置状态栏2内容
self.statusbar.SetStatusText(u"当前线条长度:%s" % len(self.paint.curLine), 1)
#设置状态栏3内容
self.statusbar.SetStatusText(u"线条数目:%s" % len(self.paint.lines), 2)
event.Skip()
def MenuData(self):
'''
菜单数据
'''
#格式:菜单数据的格式现在是(标签, (项目)),其中:项目组成为:标签, 描术文字, 处理器, 可选的kind
#标签长度为2,项目的长度是3或4
return [("&File", ( #一级菜单项
("&New", "New paint file", self.OnNew), #二级菜单项
("&Open", "Open paint file", self.OnOpen),
("&Save", "Save paint file", self.OnSave),
("", "", ""), #分隔线
("&Color", (
("&Black", "", self.OnColor, wx.ITEM_RADIO), #三级菜单项,单选
("&Red", "", self.OnColor, wx.ITEM_RADIO),
("&Green", "", self.OnColor, wx.ITEM_RADIO),
("&Blue", "", self.OnColor, wx.ITEM_RADIO))),
("", "", ""),
("&Quit", "Quit", self.OnCloseWindow)))
]
def CreateMenuBar(self):
'''
创建菜单
'''
menuBar = wx.MenuBar()
for eachMenuData in self.MenuData():
menuLabel = eachMenuData[0]
menuItems = eachMenuData[1]
menuBar.Append(self.CreateMenu(menuItems), menuLabel)
self.SetMenuBar(menuBar)
def CreateMenu(self, menuData):
'''
创建一级菜单
'''
menu = wx.Menu()
for eachItem in menuData:
if len(eachItem) == 2:
label = eachItem[0]
subMenu = self.CreateMenu(eachItem[1])
menu.AppendMenu(wx.NewId(), label, subMenu) #递归创建菜单项
else:
self.CreateMenuItem(menu, *eachItem)
return menu
def CreateMenuItem(self, menu, label, status, handler, kind = wx.ITEM_NORMAL):
'''
创建菜单项内容
'''
if not label:
menu.AppendSeparator()
return
menuItem = menu.Append(-1, label, status, kind)
self.Bind(wx.EVT_MENU, handler,menuItem)
def OnNew(self, event):
pass
def OnOpen(self, event):
'''
打开开文件对话框
'''
file_wildcard = "Paint files(*.paint)|*.paint|All files(*.*)|*.*"
dlg = wx.FileDialog(self, "Open paint file...",
os.getcwd(),
style = wx.OPEN,
wildcard = file_wildcard)
if dlg.ShowModal() == wx.ID_OK:
self.filename = dlg.GetPath()
self.ReadFile()
self.SetTitle(self.title + '--' + self.filename)
dlg.Destroy()
def OnSave(self, event):
'''
保存文件
'''
if not self.filename:
self.OnSaveAs(event)
else:
self.SaveFile()
def OnSaveAs(self, event):
'''
弹出文件保存对话框
'''
file_wildcard = "Paint files(*.paint)|*.paint|All files(*.*)|*.*"
dlg = wx.FileDialog(self,
"Save paint as ...",
os.getcwd(),
style = wx.SAVE | wx.OVERWRITE_PROMPT,
wildcard = file_wildcard)
if dlg.ShowModal() == wx.ID_OK:
filename = dlg.GetPath()
if not os.path.splitext(filename)[1]: #如果没有文件名后缀
filename = filename + '.paint'
self.filename = filename
self.SaveFile()
self.SetTitle(self.title + '--' + self.filename)
dlg.Destroy()
def OnColor(self, event):
'''
更改画笔内容
'''
menubar = self.GetMenuBar()
itemid = event.GetId()
item = menubar.FindItemById(itemid)
color = item.GetLabel() #获取菜单项内容
self.paint.SetColor(color)
def OnCloseWindow(self, event):
self.Destroy()
def SaveFile(self):
'''
保存文件
'''
if self.filename:
data = self.paint.GetLinesData()
f = open(self.filename, 'w')
cPickle.dump(data, f)
f.close()
def ReadFile(self):
if self.filename:
try:
f = open(self.filename, 'r')
data = cPickle.load(f)
f.close()
self.paint.SetLinesData(data)
except cPickle.UnpicklingError:
wx.MessageBox("%s is not a paint file."
% self.filename, "error tip",
style = wx.OK | wx.ICON_EXCLAMATION)
if __name__ == '__main__':
app = wx.PySimpleApp()
frame = PaintFrame(None)
frame.Show(True)
app.MainLoop()
~~~
测试:
1、保存对话框:

2、打开对话框:

知识点介绍:
wx.FileDialog原型:
wxFileDialog([wxWindow](http://www.cnblogs.com/dyx1024/admin/)* parent, const [wxString](http://www.cnblogs.com/dyx1024/admin/)& message = "Choose a file", const [wxString](http://www.cnblogs.com/dyx1024/admin/)& defaultDir = "", const [wxString](http://www.cnblogs.com/dyx1024/admin/)&defaultFile = "", const [wxString](http://www.cnblogs.com/dyx1024/admin/)& wildcard = "*.*", long style = wxFD_DEFAULT_STYLE, const [wxPoint](http://www.cnblogs.com/dyx1024/admin/)& pos = wxDefaultPosition,const [wxSize](http://www.cnblogs.com/dyx1024/admin/)& sz = wxDefaultSize, const [wxString](http://www.cnblogs.com/dyx1024/admin/)& name = "filedlg")
方法:
- wxFileDialog::wxFileDialog
- wxFileDialog::~wxFileDialog
- wxFileDialog::GetDirectory
- wxFileDialog::GetFilename
- wxFileDialog::GetFilenames
- wxFileDialog::GetFilterIndex
- wxFileDialog::GetMessage
- wxFileDialog::GetPath
- wxFileDialog::GetPaths
- wxFileDialog::GetWildcard
- wxFileDialog::SetDirectory
- wxFileDialog::SetFilename
- wxFileDialog::SetFilterIndex
- wxFileDialog::SetMessage
- wxFileDialog::SetPath
- wxFileDialog::SetWildcard
- wxFileDialog::ShowModal
参数:
- parentParent window.
- messageMessage to show on the dialog.
- defaultDirThe default directory, or the empty string.
- defaultFileThe default filename, or the empty string.
- wildcard
A wildcard, such as "*.*" or "BMP files (*.bmp)|*.bmp|GIF files (*.gif)|*.gif".
Note that the native Motif dialog has some limitations with respect to wildcards; see the Remarks section above.
- styleA dialog style. See wxFD_* styles for more info.
- posDialog position. Not implemented.
- sizeDialog size. Not implemented.
- name
Dialog name. Not implemented.
附:Style取值
| wxFD_DEFAULT_STYLE | Equivalent to wxFD_OPEN. |
|-----|-----|
| wxFD_OPEN | This is an open dialog; usually this means that the default button's label of the dialog is "Open". Cannot be combined with wxFD_SAVE. |
| wxFD_SAVE | This is a save dialog; usually this means that the default button's label of the dialog is "Save". Cannot be combined with wxFD_OPEN. |
| wxFD_OVERWRITE_PROMPT | For save dialog only: prompt for a confirmation if a file will be overwritten. |
| wxFD_FILE_MUST_EXIST | For open dialog only: the user may only select files that actually exist. |
| wxFD_MULTIPLE | For open dialog only: allows selecting multiple files. |
| wxFD_CHANGE_DIR | Change the current working directory to the directory where the file(s) chosen by the user are. |
| wxFD_PREVIEW | Show the preview of the selected files (currently only supported by wxGTK using GTK+ 2.4 or later). |
';
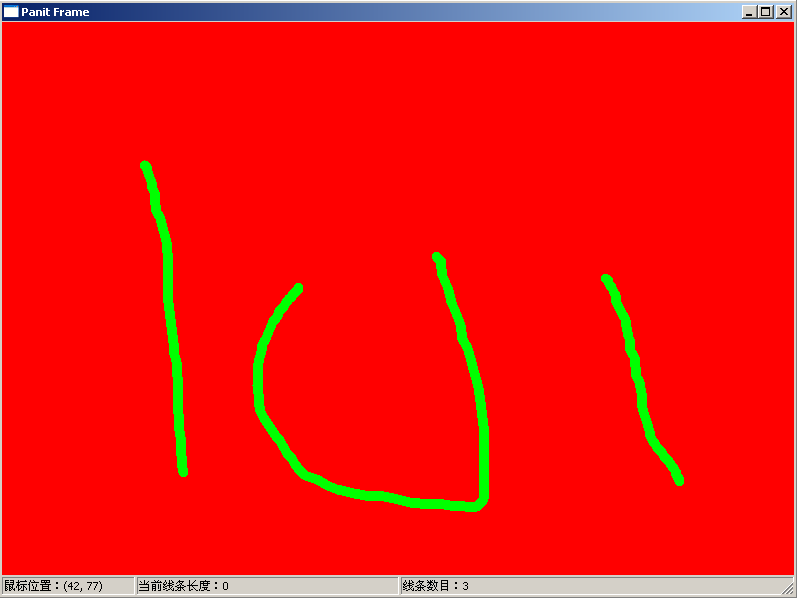
wxPython:菜单介绍
最后更新于:2022-04-01 19:41:32
本节看看菜单的创建及使用,直接看代码。
~~~
#!/usr/bin/env python
# -*- coding: utf-8 -*-
'''
Function:绘图
Input:NONE
Output: NONE
author: socrates
blog:http://www.cnblogs.com/dyx1024/
date:2012-07-13
'''
import wx
class PaintWindow(wx.Window):
def __init__(self, parent, id):
wx.Window.__init__(self, parent, id)
self.SetBackgroundColour("Red")
self.color = "Green"
self.thickness = 10
#创建一个画笔
self.pen = wx.Pen(self.color, self.thickness, wx.SOLID)
self.lines = []
self.curLine = []
self.pos = (0, 0)
self.InitBuffer()
#连接事件
self.Bind(wx.EVT_LEFT_DOWN, self.OnLeftDown)
self.Bind(wx.EVT_LEFT_UP, self.OnLeftUp)
self.Bind(wx.EVT_MOTION, self.OnMotion)
self.Bind(wx.EVT_SIZE, self.OnSize)
self.Bind(wx.EVT_IDLE, self.OnIdle)
self.Bind(wx.EVT_PAINT, self.OnPaint)
def InitBuffer(self):
size = self.GetClientSize()
#创建缓存的设备上下文
self.buffer = wx.EmptyBitmap(size.width, size.height)
dc = wx.BufferedDC(None, self.buffer)
#使用设备上下文
dc.SetBackground(wx.Brush(self.GetBackgroundColour()))
dc.Clear()
self.DrawLines(dc)
self.reInitBuffer = False
def GetLinesData(self):
return self.lines[:]
def SetLinesData(self, lines):
self.lines = lines[:]
self.InitBuffer()
self.Refresh()
def OnLeftDown(self, event):
self.curLine = []
#获取鼠标位置
self.pos = event.GetPositionTuple()
self.CaptureMouse()
def OnLeftUp(self, event):
if self.HasCapture():
self.lines.append((self.color,
self.thickness,
self.curLine))
self.curLine = []
self.ReleaseMouse()
def OnMotion(self, event):
if event.Dragging() and event.LeftIsDown():
dc = wx.BufferedDC(wx.ClientDC(self), self.buffer)
self.drawMotion(dc, event)
event.Skip()
def drawMotion(self, dc, event):
dc.SetPen(self.pen)
newPos = event.GetPositionTuple()
coords = self.pos + newPos
self.curLine.append(coords)
dc.DrawLine(*coords)
self.pos = newPos
def OnSize(self, event):
self.reInitBuffer = True
def OnIdle(self, event):
if self.reInitBuffer:
self.InitBuffer()
self.Refresh(False)
def OnPaint(self, event):
dc = wx.BufferedPaintDC(self, self.buffer)
def DrawLines(self, dc):
for colour, thickness, line in self.lines:
pen = wx.Pen(colour, thickness, wx.SOLID)
dc.SetPen(pen)
for coords in line:
dc.DrawLine(*coords)
def SetColor(self, color):
self.color = color
self.pen = wx.Pen(self.color, self.thickness, wx.SOLID)
def SetThickness(self, num):
self.thickness = num
self.pen = wx.Pen(self.color, self.thickness, wx.SOLID)
class PaintFrame(wx.Frame):
def __init__(self, parent):
wx.Frame.__init__(self, parent, -1, "Panit Frame", size = (800, 600))
self.paint = PaintWindow(self, -1)
#状态栏
self.paint.Bind(wx.EVT_MOTION, self.OnPaintMotion)
self.InitStatusBar()
#创建菜单
self.CreateMenuBar()
def InitStatusBar(self):
self.statusbar = self.CreateStatusBar()
#将状态栏分割为3个区域,比例为1:2:3
self.statusbar.SetFieldsCount(3)
self.statusbar.SetStatusWidths([-1, -2, -3])
def OnPaintMotion(self, event):
#设置状态栏1内容
self.statusbar.SetStatusText(u"鼠标位置:" + str(event.GetPositionTuple()), 0)
#设置状态栏2内容
self.statusbar.SetStatusText(u"当前线条长度:%s" % len(self.paint.curLine), 1)
#设置状态栏3内容
self.statusbar.SetStatusText(u"线条数目:%s" % len(self.paint.lines), 2)
event.Skip()
def MenuData(self):
'''
菜单数据
'''
#格式:菜单数据的格式现在是(标签, (项目)),其中:项目组成为:标签, 描术文字, 处理器, 可选的kind
#标签长度为2,项目的长度是3或4
return [("&File", ( #一级菜单项
("&New", "New paint file", self.OnNew), #二级菜单项
("&Open", "Open paint file", self.OnOpen),
("&Save", "Save paint file", self.OnSave),
("", "", ""), #分隔线
("&Color", (
("&Black", "", self.OnColor, wx.ITEM_RADIO), #三级菜单项,单选
("&Red", "", self.OnColor, wx.ITEM_RADIO),
("&Green", "", self.OnColor, wx.ITEM_RADIO),
("&Blue", "", self.OnColor, wx.ITEM_RADIO))),
("", "", ""),
("&Quit", "Quit", self.OnCloseWindow)))
]
def CreateMenuBar(self):
'''
创建菜单
'''
menuBar = wx.MenuBar()
for eachMenuData in self.MenuData():
menuLabel = eachMenuData[0]
menuItems = eachMenuData[1]
menuBar.Append(self.CreateMenu(menuItems), menuLabel)
self.SetMenuBar(menuBar)
def CreateMenu(self, menuData):
'''
创建一级菜单
'''
menu = wx.Menu()
for eachItem in menuData:
if len(eachItem) == 2:
label = eachItem[0]
subMenu = self.CreateMenu(eachItem[1])
menu.AppendMenu(wx.NewId(), label, subMenu) #递归创建菜单项
else:
self.CreateMenuItem(menu, *eachItem)
return menu
def CreateMenuItem(self, menu, label, status, handler, kind = wx.ITEM_NORMAL):
'''
创建菜单项内容
'''
if not label:
menu.AppendSeparator()
return
menuItem = menu.Append(-1, label, status, kind)
self.Bind(wx.EVT_MENU, handler,menuItem)
def OnNew(self, event):
pass
def OnOpen(self, event):
pass
def OnSave(self, event):
pass
def OnColor(self, event):
'''
更改画笔内容
'''
menubar = self.GetMenuBar()
itemid = event.GetId()
item = menubar.FindItemById(itemid)
color = item.GetLabel() #获取菜单项内容
self.paint.SetColor(color)
def OnCloseWindow(self, event):
self.Destroy()
if __name__ == '__main__':
app = wx.PySimpleApp()
frame = PaintFrame(None)
frame.Show(True)
app.MainLoop()
~~~
测试:


';
wxPython:状态栏介绍
最后更新于:2022-04-01 19:41:30
本节看一下wxPython中状态栏的编程,先看个例子,此程序中其他部分代码略,如需要请看上一篇文章。
~~~
class PaintFrame(wx.Frame):
def __init__(self, parent):
wx.Frame.__init__(self, parent, -1, "Panit Frame", size = (800, 600))
self.paint = PaintWindow(self, -1)
#状态栏
self.paint.Bind(wx.EVT_MOTION, self.OnPaintMotion)
self.statusbar = self.CreateStatusBar()
#将状态栏分割为3个区域,比例为1:2:3
self.statusbar.SetFieldsCount(3)
self.statusbar.SetStatusWidths([-1, -2, -3])
def OnPaintMotion(self, event):
#设置状态栏1内容
self.statusbar.SetStatusText(u"鼠标位置:" + str(event.GetPositionTuple()), 0)
#设置状态栏2内容
self.statusbar.SetStatusText(u"当前线条长度:%s" % len(self.paint.curLine), 1)
#设置状态栏3内容
self.statusbar.SetStatusText(u"线条数目:%s" % len(self.paint.lines), 2)
event.Skip()
if __name__ == '__main__':
app = wx.PySimpleApp()
frame = PaintFrame(None)
frame.Show(True)
app.MainLoop()
~~~
测试:
其中:
CreateStatusBar()用来增加一个状态栏。
SetFieldsCount()方法设置将状态分为几个区。
SetStatusText()用于设置状态栏内容。
SetStatusWidth()用于设置各栏宽度,该方法要求一个整数的Python列表作为参数,列表的长度必须和状态栏中哉的数量一致。按列表中整数的顺序来计算对应域的宽度。如果整数是正值,那么宽度是固定的。如果你想域的宽度随框架的变化而变化,那么应该使用负值。负值的绝对值代表域的相对宽度;可以把它认为是所占总宽度的比例。例如调用statusbar.SetStatusWidth([-1, -2,-3])方法所导致的各域从左到右的宽度比例是1:2:3。
';
wxPython: 简单的绘图例子
最后更新于:2022-04-01 19:41:27
一个绘图的例子:
~~~
#!/usr/bin/env python
# -*- coding: utf-8 -*-
'''
Function:绘图
Input:NONE
Output: NONE
author: socrates
blog:http://www.cnblogs.com/dyx1024/
date:2012-07-11
'''
import wx
class PaintWindow(wx.Window):
def __init__(self, parent, id):
wx.Window.__init__(self, parent, id)
self.SetBackgroundColour("Red")
self.color = "Green"
self.thickness = 10
#创建一个画笔
self.pen = wx.Pen(self.color, self.thickness, wx.SOLID)
self.lines = []
self.curLine = []
self.pos = (0, 0)
self.InitBuffer()
#连接事件
self.Bind(wx.EVT_LEFT_DOWN, self.OnLeftDown)
self.Bind(wx.EVT_LEFT_UP, self.OnLeftUp)
self.Bind(wx.EVT_MOTION, self.OnMotion)
self.Bind(wx.EVT_SIZE, self.OnSize)
self.Bind(wx.EVT_IDLE, self.OnIdle)
self.Bind(wx.EVT_PAINT, self.OnPaint)
def InitBuffer(self):
size = self.GetClientSize()
#创建缓存的设备上下文
self.buffer = wx.EmptyBitmap(size.width, size.height)
dc = wx.BufferedDC(None, self.buffer)
#使用设备上下文
dc.SetBackground(wx.Brush(self.GetBackgroundColour()))
dc.Clear()
self.DrawLines(dc)
self.reInitBuffer = False
def GetLinesData(self):
return self.lines[:]
def SetLinesData(self, lines):
self.lines = lines[:]
self.InitBuffer()
self.Refresh()
def OnLeftDown(self, event):
self.curLine = []
#获取鼠标位置
self.pos = event.GetPositionTuple()
self.CaptureMouse()
def OnLeftUp(self, event):
if self.HasCapture():
self.lines.append((self.color,
self.thickness,
self.curLine))
self.curLine = []
self.ReleaseMouse()
def OnMotion(self, event):
if event.Dragging() and event.LeftIsDown():
dc = wx.BufferedDC(wx.ClientDC(self), self.buffer)
self.drawMotion(dc, event)
event.Skip()
def drawMotion(self, dc, event):
dc.SetPen(self.pen)
newPos = event.GetPositionTuple()
coords = self.pos + newPos
self.curLine.append(coords)
dc.DrawLine(*coords)
self.pos = newPos
def OnSize(self, event):
self.reInitBuffer = True
def OnIdle(self, event):
if self.reInitBuffer:
self.InitBuffer()
self.Refresh(False)
def OnPaint(self, event):
dc = wx.BufferedPaintDC(self, self.buffer)
def DrawLines(self, dc):
for colour, thickness, line in self.lines:
pen = wx.Pen(colour, thickness, wx.SOLID)
dc.SetPen(pen)
for coords in line:
dc.DrawLine(*coords)
def SetColor(self, color):
self.color = color
self.pen = wx.Pen(self.color, self.thickness, wx.SOLID)
def SetThickness(self, num):
self.thickness = num
self.pen = wx.Pen(self.color, self.thickness, wx.SOLID)
class PaintFrame(wx.Frame):
def __init__(self, parent):
wx.Frame.__init__(self, parent, -1, "Panit Frame", size = (800, 600))
self.paint = PaintWindow(self, -1)
if __name__ == '__main__':
app = wx.PySimpleApp()
frame = PaintFrame(None)
frame.Show(True)
app.MainLoop()
~~~
测试:

';
wxPython:事件处理介绍二
最后更新于:2022-04-01 19:41:25
事件处理流程,如下:

wxPython首先在触发对象中查找匹配事件类型的被绑定的处理器函数,如果找到,刚相应方法被执行。如果没找到,wxPython将检查该事件是否传送到了上一级的容器,如果是,父窗口被检查,如此一级级向上查找,直到找到一个处理函数或到达顶层窗口。
看一个触发多个事件的实例:
~~~
#!/usr/bin/env python
# -*- coding: utf-8 -*-
'''
Function:常用对话框实例
Input:NONE
Output: NONE
author: socrates
blog:http://www.cnblogs.com/dyx1024/
date:2012-07-07
'''
import wx
class MyFrame(wx.Frame):
def __init__(self, parent, id):
wx.Frame.__init__(self, parent, id, u'测试面板Panel', size = (600, 300))
#创建面板
self.panel = wx.Panel(self)
#在Panel上添加Button
self.button = wx.Button(self.panel, label = u'关闭', pos = (150, 60), size = (100, 60))
#绑定单击事件
self.Bind(wx.EVT_BUTTON, self.OnCloseMe, self.button)
#绑定鼠标位于按钮上事件
self.button.Bind(wx.EVT_ENTER_WINDOW, self.OnEnterWindows)
#绑定鼠标离开事件
self.button.Bind(wx.EVT_LEAVE_WINDOW, self.OnLeaveWindows)
def OnCloseMe(self, event):
self.panel.SetBackgroundColour('Red')
self.panel.Refresh()
def OnEnterWindows(self, event):
self.panel.SetBackgroundColour('Blue')
self.panel.Refresh()
self.button.SetLabel(u"鼠标在我上面")
event.Skip()
def OnLeaveWindows(self, event):
self.panel.SetBackgroundColour('Green')
self.panel.Refresh()
self.button.SetLabel(u"鼠标离开我了")
event.Skip()
# #消息对话框
# def OnCloseMe(self, event):
# dlg = wx.MessageDialog(None, u"消息对话框测试", u"标题信息", wx.YES_NO | wx.ICON_QUESTION)
# if dlg.ShowModal() == wx.ID_YES:
# self.Close(True)
# dlg.Destroy()
#
# #文本输入对话框
# def OnCloseMe(self, event):
# dlg = wx.TextEntryDialog(None, u"请在下面文本框中输入内容:", u"文本输入框标题", u"默认内容")
# if dlg.ShowModal() == wx.ID_OK:
# message = dlg.GetValue() #获取文本框中输入的值
# dlg_tip = wx.MessageDialog(None, message, u"标题信息", wx.OK | wx.ICON_INFORMATION)
# if dlg_tip.ShowModal() == wx.ID_OK:
# self.Close(True)
# dlg_tip.Destroy()
# dlg.Destroy()
#列表选择对话框
# def OnCloseMe(self, event):
# dlg = wx.SingleChoiceDialog(None, u"请选择你喜欢的水果:", u"列表选择框标题",
# [u"苹果", u"西瓜", u"草莓"])
# if dlg.ShowModal() == wx.ID_OK:
# message = dlg.GetStringSelection() #获取选择的内容
# dlg_tip = wx.MessageDialog(None, message, u"标题信息", wx.OK | wx.ICON_INFORMATION)
# if dlg_tip.ShowModal() == wx.ID_OK:
# self.Close(True)
# dlg_tip.Destroy()
# dlg.Destroy()
if __name__ == '__main__':
app = wx.PySimpleApp()
frame = MyFrame(parent = None, id = -1)
frame.Show()
app.MainLoop()
~~~
测试一下:
1、初始运行:

2、鼠标移动到按钮上:

3、鼠标左键单击:

4、鼠标离开按钮:

';
wxPython:事件处理介绍一
最后更新于:2022-04-01 19:41:23
事件处理是wxPython程序工作的基本机制,先看几个术语:
- 事件(event):应该程序期间发生的事情,要求有一个响应。
- 事件对象(event object):代表具体一个事件,包括事件的数据属性,为wx.Event或其子类的实例,如wx.CommandEvent/wx.MouseEvent。
- 事件类型(event type):wxPython分配给每个事件对象的一个整数ID。
事件驱动模型:

wx.Event的子类:
- wx.CloseEvent:框架关闭时触发,事件类型有普通框架关闭和系统关闭事件。
- wx.CommandEvent:与窗口部件的简单的交互都会触发此事件,如按钮单击,菜单项选择等。
- wx.KeyEvent:按键动作。
- wx.MouseEvent:鼠标事件。
- wx.PaintEvent:当窗口内容被重画时触发。
- wx.SizeEvent:窗口大小或布局改变时触发。
- wx.TimerEvent:由类wx.Timer创建,定期事件。
wx.EvtHandler的Bind方法:
它用来创建事件绑定,原型如下:
Bind(event, handler, source=None, id=wx.ID_ANY, id2=wx.ID_ANY)
它将一个事件和一个对象与一个事件处理函数绑定。
看一个菜单项选择事件绑定的实例:
~~~
#!/usr/bin/env python
# -*- coding: utf-8 -*-
'''
Function:常用对话框实例
Input:NONE
Output: NONE
author: socrates
blog:http://www.cnblogs.com/dyx1024/
date:2012-07-07
'''
import wx
import wx.py.images
class ToolbarFrame(wx.Frame):
def __init__(self, parent, id):
wx.Frame.__init__(self, parent, id, 'Toolbars', size = (300, 200))
panel = wx.Panel(self)
panel.SetBackgroundColour('White')
#创建状态栏
statusBar = self.CreateStatusBar()
#创建工具栏
toolbar = self.CreateToolBar()
#增加一个工具
toolbar.AddSimpleTool(wx.NewId(), wx.py.images.getPyBitmap(), "New", "Long help for 'New'")
toolbar.AddSimpleTool(wx.NewId(), wx.py.images.getPyBitmap(), "Edit", "Long help for 'Edit'")
#准备显示
toolbar.Realize()
#创建菜单
menuBar = wx.MenuBar()
menu1 = wx.Menu()
menuBar.Append(menu1, "&File") #菜单项目1
menu2 = wx.Menu()
#菜单内容&表示随后的字符为热键,参数3为在状态栏上显示的菜单项说明
menu_item1 = menu2.Append(wx.NewId(), "&Copy", "Copy in status bar")
menu2.Append(wx.NewId(), "C&ut", "")
menu2.Append(wx.NewId(), "Paste", "")
menu2.AppendSeparator()
menu2.Append(wx.NewId(), "&Options...", "Display Options")
menuBar.Append(menu2, "&Edit")
self.SetMenuBar(menuBar)
#菜单项事件绑定
self.Bind(wx.EVT_MENU, self.OnCloseMe, menu_item1)
#消息对话框
def OnCloseMe(self, event):
dlg = wx.MessageDialog(None, u"消息对话框测试", u"标题信息", wx.YES_NO | wx.ICON_QUESTION)
if dlg.ShowModal() == wx.ID_YES:
self.Close(True)
dlg.Destroy()
if __name__ == '__main__':
app = wx.PySimpleApp()
frame = ToolbarFrame(parent = None, id = -1)
frame.Show()
app.MainLoop()
~~~
测试一下:


';
wxPython:列表选择框SingleChoiceDialog
最后更新于:2022-04-01 19:41:21
列表选择框就是让用户从提供的列表中选择目标项,原型如下:
wxSingleChoiceDialog([wxWindow](http://www.cnblogs.com/dyx1024/admin/)* parent, const [wxString](http://www.cnblogs.com/dyx1024/admin/)& message, const [wxString](http://www.cnblogs.com/dyx1024/admin/)& caption, int n, const [wxString](http://www.cnblogs.com/dyx1024/admin/)* choices,void** clientData = NULL, long style = wxCHOICEDLG_STYLE, const [wxPoint](http://www.cnblogs.com/dyx1024/admin/)& pos = wxDefaultPosition)
支持的方法如下:
- wxSingleChoiceDialog::GetSelection 返回选项的index
- wxSingleChoiceDialog::GetSelectionClientData 返回与选项绑定的clientdata内容
- wxSingleChoiceDialog::GetStringSelection 返回选择的字符串内容
- wxSingleChoiceDialog::SetSelection 设置选项
- wxSingleChoiceDialog::ShowModal
看一下实例:
~~~
#!/usr/bin/env python
# -*- coding: utf-8 -*-
'''
Function:常用对话框实例
Input:NONE
Output: NONE
author: socrates
blog:http://www.cnblogs.com/dyx1024/
date:2012-07-07
'''
import wx
class MyFrame(wx.Frame):
def __init__(self, parent, id):
wx.Frame.__init__(self, parent, id, u'测试面板Panel', size = (600, 300))
#创建面板
panel = wx.Panel(self)
#在Panel上添加Button
button = wx.Button(panel, label = u'关闭', pos = (150, 60), size = (100, 60))
#绑定单击事件
self.Bind(wx.EVT_BUTTON, self.OnCloseMe, button)
# #消息对话框
# def OnCloseMe(self, event):
# dlg = wx.MessageDialog(None, u"消息对话框测试", u"标题信息", wx.YES_NO | wx.ICON_QUESTION)
# if dlg.ShowModal() == wx.ID_YES:
# self.Close(True)
# dlg.Destroy()
#
# #文本输入对话框
# def OnCloseMe(self, event):
# dlg = wx.TextEntryDialog(None, u"请在下面文本框中输入内容:", u"文本输入框标题", u"默认内容")
# if dlg.ShowModal() == wx.ID_OK:
# message = dlg.GetValue() #获取文本框中输入的值
# dlg_tip = wx.MessageDialog(None, message, u"标题信息", wx.OK | wx.ICON_INFORMATION)
# if dlg_tip.ShowModal() == wx.ID_OK:
# self.Close(True)
# dlg_tip.Destroy()
# dlg.Destroy()
#列表选择对话框
def OnCloseMe(self, event):
dlg = wx.SingleChoiceDialog(None, u"请选择你喜欢的水果:", u"列表选择框标题",
[u"苹果", u"西瓜", u"草莓"])
if dlg.ShowModal() == wx.ID_OK:
message = dlg.GetStringSelection() #获取选择的内容
dlg_tip = wx.MessageDialog(None, message, u"标题信息", wx.OK | wx.ICON_INFORMATION)
if dlg_tip.ShowModal() == wx.ID_OK:
self.Close(True)
dlg_tip.Destroy()
dlg.Destroy()
if __name__ == '__main__':
app = wx.PySimpleApp()
frame = MyFrame(parent = None, id = -1)
frame.Show()
app.MainLoop()
~~~
测试一下:

';
wxPython:文本对话框TextEntryDialog
最后更新于:2022-04-01 19:41:18
本节看看单行文本对话框的使用,先看函数原型:
wxTextEntryDialog([wxWindow](http://www.cnblogs.com/dyx1024/admin/)* parent, const [wxString](http://www.cnblogs.com/dyx1024/admin/)& message, const [wxString](http://www.cnblogs.com/dyx1024/admin/)& caption = "Please enter text", const[wxString](http://www.cnblogs.com/dyx1024/admin/)& defaultValue = "", long style = wxOK | wxCANCEL | wxCENTRE, const [wxPoint](http://www.cnblogs.com/dyx1024/admin/)& pos = wxDefaultPosition)
其支持的方法有:
wxTextEntryDialog::GetValue 获取文档框中的值
wxTextEntryDialog::SetValue 设置文本框中的值
wxTextEntryDialog::ShowModal 模态显示对话框
其它参数不详细做介绍。
看一下实例:
~~~
#!/usr/bin/env python
# -*- coding: utf-8 -*-
'''
Function:常用对话框实例
Input:NONE
Output: NONE
author: socrates
blog:http://www.cnblogs.com/dyx1024/
date:2012-07-07
'''
import wx
class MyFrame(wx.Frame):
def __init__(self, parent, id):
wx.Frame.__init__(self, parent, id, u'测试面板Panel', size = (600, 300))
#创建面板
panel = wx.Panel(self)
#在Panel上添加Button
button = wx.Button(panel, label = u'关闭', pos = (150, 60), size = (100, 60))
#绑定单击事件
self.Bind(wx.EVT_BUTTON, self.OnCloseMe, button)
# #消息对话框
# def OnCloseMe(self, event):
# dlg = wx.MessageDialog(None, u"消息对话框测试", u"标题信息", wx.YES_NO | wx.ICON_QUESTION)
# if dlg.ShowModal() == wx.ID_YES:
# self.Close(True)
# dlg.Destroy()
#
def OnCloseMe(self, event):
dlg = wx.TextEntryDialog(None, u"请在下面文本框中输入内容:", u"文本输入框标题", u"默认内容")
if dlg.ShowModal() == wx.ID_OK:
message = dlg.GetValue() #获取文本框中输入的值
dlg_tip = wx.MessageDialog(None, message, u"标题信息", wx.OK | wx.ICON_INFORMATION)
if dlg_tip.ShowModal() == wx.ID_OK:
self.Close(True)
dlg_tip.Destroy()
dlg.Destroy()
if __name__ == '__main__':
app = wx.PySimpleApp()
frame = MyFrame(parent = None, id = -1)
frame.Show()
app.MainLoop()
~~~
测试:

点击OK后:

';
wxPython:消息对话框MessageDialog
最后更新于:2022-04-01 19:41:16
消息对话框即我们平时说的Messagebox,看看它的原型,下面是wxWidgets中的原型定义,C++风格,与python风格的区别就是wx前缀与后面名称直接相连,例如wxMessageDialog,在wxpython中使用时就是wx.MessageDialog
wxMessageDialog([wxWindow](http://www.cnblogs.com/dyx1024/admin/)* parent, const [wxString](http://www.cnblogs.com/dyx1024/admin/)& message, const [wxString](http://www.cnblogs.com/dyx1024/admin/)& caption = "Message box", long style = wxOK | wxCANCEL, const [wxPoint](http://www.cnblogs.com/dyx1024/admin/)& pos = wxDefaultPosition)
其各参数不多做介绍,主要看看ShowModal()方法,它使用应用程序在对话框关闭前不能响应其它窗口的用户事件,返回一个整数,取值如下:
wx.ID_YES, wx.ID_NO, wx.ID_CANCEL, wx.ID_OK。
另外,style的取值主要有以下几种:
| wxOK | Show an OK button. |
|-----|-----|
| wxCANCEL | Show a Cancel button. |
| wxYES_NO | Show Yes and No buttons. |
| wxYES_DEFAULT | Used with wxYES_NO, makes Yes button the default - which is the default behaviour. |
| wxNO_DEFAULT | Used with wxYES_NO, makes No button the default. |
| wxICON_EXCLAMATION | Shows an exclamation mark icon. |
| wxICON_HAND | Shows an error icon. |
| wxICON_ERROR | Shows an error icon - the same as wxICON_HAND. |
| wxICON_QUESTION | Shows a question mark icon. |
| wxICON_INFORMATION | Shows an information (i) icon. |
| wxSTAY_ON_TOP | The message box stays on top of all other window, even those of the other applications (Windows only). |
还是看一个例子:
代码:
~~~
#!/usr/bin/env python
# -*- coding: utf-8 -*-
import wx
class MyFrame(wx.Frame):
def __init__(self, parent, id):
wx.Frame.__init__(self, parent, id, u'测试面板Panel', size = (600, 300))
#创建面板
panel = wx.Panel(self)
#在Panel上添加Button
button = wx.Button(panel, label = u'关闭', pos = (150, 60), size = (100, 60))
#绑定单击事件
self.Bind(wx.EVT_BUTTON, self.OnCloseMe, button)
def OnCloseMe(self, event):
dlg = wx.MessageDialog(None, u"消息对话框测试", u"标题信息", wx.YES_NO | wx.ICON_QUESTION)
if dlg.ShowModal() == wx.ID_YES:
self.Close(True)
dlg.Destroy()
if __name__ == '__main__':
app = wx.PySimpleApp()
frame = MyFrame(parent = None, id = -1)
frame.Show()
app.MainLoop()
~~~
测试:

';
wxPython:工具栏、状态栏、菜单实现
最后更新于:2022-04-01 19:41:14
与绘制按钮一样,很简单,直接看代码:
~~~
#!/usr/bin/env python
# -*- coding: utf-8 -*-
import wx
import wx.py.images
class ToolbarFrame(wx.Frame):
def __init__(self, parent, id):
wx.Frame.__init__(self, parent, id, 'Toolbars', size = (300, 200))
panel = wx.Panel(self)
panel.SetBackgroundColour('White')
#创建状态栏
statusBar = self.CreateStatusBar()
#创建工具栏
toolbar = self.CreateToolBar()
#增加一个工具
toolbar.AddSimpleTool(wx.NewId(), wx.py.images.getPyBitmap(), "New", "Long help for 'New'")
toolbar.AddSimpleTool(wx.NewId(), wx.py.images.getPyBitmap(), "Edit", "Long help for 'Edit'")
#准备显示
toolbar.Realize()
#创建菜单
menuBar = wx.MenuBar()
menu1 = wx.Menu()
menuBar.Append(menu1, "&File") #菜单项目1
menu2 = wx.Menu()
#菜单内容&表示随后的字符为热键,参数3为在状态栏上显示的菜单项说明
menu2.Append(wx.NewId(), "&Copy", "Copy in status bar")
menu2.Append(wx.NewId(), "C&ut", "")
menu2.Append(wx.NewId(), "Paste", "")
menu2.AppendSeparator()
menu2.Append(wx.NewId(), "&Options...", "Display Options")
menuBar.Append(menu2, "&Edit")
self.SetMenuBar(menuBar)
if __name__ == '__main__':
app = wx.PySimpleApp()
frame = ToolbarFrame(parent = None, id = -1)
frame.Show()
app.MainLoop()
~~~
测试:


';
wxPython:面板Panel的使用
最后更新于:2022-04-01 19:41:12
Panel是窗口的容器,通常其大小与Frame一样,在其上放置各种控件,这样可将窗口内容与工具栏及状态栏区分开,能过TAB键可遍历Panel中的元素,直接看个例子:
~~~
#!/usr/bin/env python
# -*- coding: utf-8 -*-
import wx
class MyFrame(wx.Frame):
def __init__(self, parent, id):
wx.Frame.__init__(self, parent, id, u'测试面板Panel', size = (600, 300))
#创建面板
panel = wx.Panel(self)
#在Panel上添加Button
button = wx.Button(panel, label = u'关闭', pos = (150, 60), size = (100, 60))
#绑定单击事件
self.Bind(wx.EVT_BUTTON, self.OnCloseMe, button)
def OnCloseMe(self, event):
self.Close(True)
if __name__ == '__main__':
app = wx.PySimpleApp()
frame = MyFrame(parent = None, id = -1)
frame.Show()
app.MainLoop()
~~~
测试:

';
wxPython:Frame类介绍
最后更新于:2022-04-01 19:41:09
Frame即为框架,可以直接理解为一个窗口。要创建一个Frame的子类,需要调用Frame类的构造函数,原型如下:
wx.Frame(parent, id=-1, title=””, pos=wx.DefaultPosition, size=wx.DefaultSize, style=wx.DEFAULT_FRAME_STYLE, name=”frame”)
各参数含义:
parent:顶级窗口直接使用None。
id:标识,有三种赋值方式:1、自己指定一个正数,但确保同一窗体中不能重复;2、取值-1或wx.ID_ANY,表示由系统自动分配,可以通过frame.GetId()来获取此值;3、使用wx.NewId()函数来创建。
pos:窗口位置。
size:窗口大小。
style:样式,其中,wx.DEFAULT_FRAME_STYLE的值为:wx.MAXIMIZE_BOX | wx.MINIMIZE_BOX | wx.RESIZE_BORDER | wx.SYSTEM_MENU | wx.CAPTION | wx.CLOSE_BOX
增加一个样式使用“|”, 去除一个样式使用"^"
';