标准库(6)
最后更新于:2022-04-01 11:36:21
## urllib
urllib模块用于读取来自网上(服务器上)的数据,比如不少人用python做爬虫程序,就可以使用这个模块。先看一个简单例子:
~~~
>>> import urllib
>>> itdiffer = urllib.urlopen("http://www.itdiffer.com")
~~~
这样就已经把我的网站[www.itdiffer.com](http://www.itdiffer.com/)首页的内容拿过来了,得到了一个类似文件的对象。接下来的操作跟操作一个文件一样(如果忘记了文件怎么操作,可以参考:[《文件(1)](https://github.com/qiwsir/StarterLearningPython/blob/master/126.md))
~~~
>>> print itdiffer.read()
<!DOCTYPE HTML>
<html>
<head>
<title>I am Qiwsir</title>
....//因为内容太多,下面就省略了
~~~
就这么简单,完成了对一个网页的抓取。当然,如果你真的要做爬虫程序,还不是仅仅如此。这里不介绍爬虫程序如何编写,仅说明urllib模块的常用属性和方法。
~~~
>>> dir(urllib)
['ContentTooShortError', 'FancyURLopener', 'MAXFTPCACHE', 'URLopener', '__all__', '__builtins__', '__doc__', '__file__', '__name__', '__package__', '__version__', '_asciire', '_ftperrors', '_have_ssl', '_hexdig', '_hextochr', '_hostprog', '_is_unicode', '_localhost', '_noheaders', '_nportprog', '_passwdprog', '_portprog', '_queryprog', '_safe_map', '_safe_quoters', '_tagprog', '_thishost', '_typeprog', '_urlopener', '_userprog', '_valueprog', 'addbase', 'addclosehook', 'addinfo', 'addinfourl', 'always_safe', 'base64', 'basejoin', 'c', 'ftpcache', 'ftperrors', 'ftpwrapper', 'getproxies', 'getproxies_environment', 'i', 'localhost', 'noheaders', 'os', 'pathname2url', 'proxy_bypass', 'proxy_bypass_environment', 'quote', 'quote_plus', 're', 'reporthook', 'socket', 'splitattr', 'splithost', 'splitnport', 'splitpasswd', 'splitport', 'splitquery', 'splittag', 'splittype', 'splituser', 'splitvalue', 'ssl', 'string', 'sys', 'test1', 'thishost', 'time', 'toBytes', 'unquote', 'unquote_plus', 'unwrap', 'url2pathname', 'urlcleanup', 'urlencode', 'urlopen', 'urlretrieve']
~~~
选几个常用的介绍,其它的如果读者用到,可以通过查看文档了解。
**urlopen()**
urlopen()主要用于打开url文件,然后就获得指定url的数据,接下来就如同在本地操作文件那样来操作。
> Help on function urlopen in module urllib:
>
> urlopen(url, data=None, proxies=None) Create a file-like object for the specified URL to read from.
得到的对象被叫做类文件。从名字中也可以理解后面的操作了。先对参数说明一下:
* url:远程数据的路径,常常是网址
* data:如果使用post方式,这里就是所提交的数据
* proxies:设置代理
关于参数的详细说明,还可以参考[python的官方文档](https://docs.python.org/2/library/urllib.html),这里仅演示最常用的,如前面的例子那样。
当得到了类文件对象之后,就可以对它进行操作。变量itdiffer引用了得到的类文件对象,通过它查看:
~~~
>>> dir(itdiffer)
['__doc__', '__init__', '__iter__', '__module__', '__repr__', 'close', 'code', 'fileno', 'fp', 'getcode', 'geturl', 'headers', 'info', 'next', 'read', 'readline', 'readlines', 'url']
~~~
读者从这个结果中也可以看出,这个类文件对象也是可迭代的。常用的方法:
* read(),readline(),readlines(),fileno(),close():都与文件操作一样,这里不再赘述。可以参考前面有关文件章节
* info():返回头信息
* getcode():返回http状态码
* geturl():返回url
简单举例:
~~~
>>> itdiffer.info()
<httplib.HTTPMessage instance at 0xb6eb3f6c>
>>> itdiffer.getcode()
200
>>> itdiffer.geturl()
'http://www.itdiffer.com'
~~~
更多情况下,已经建立了类文件对象,通过对文件操作方法,获得想要的数据。
**对url编码、解码**
url对其中的字符有严格要求,不许可某些特殊字符,这就要对url进行编码和解码了。这个在进行web开发的时候特别要注意。urllib模块提供这种功能。
* quote(string[, safe]):对字符串进行编码。参数safe指定了不需要编码的字符
* urllib.unquote(string) :对字符串进行解码
* quote_plus(string [ , safe ] ) :与urllib.quote类似,但这个方法用'+'来替换空格`' '`,而quote用'%20'来代替空格
* unquote_plus(string ) :对字符串进行解码;
* urllib.urlencode(query[, doseq]):将dict或者包含两个元素的元组列表转换成url参数。例如{'name': 'laoqi', 'age': 40}将被转换为"name=laoqi&age=40"
* pathname2url(path):将本地路径转换成url路径
* url2pathname(path):将url路径转换成本地路径
看例子就更明白了:
~~~
>>> du = "http://www.itdiffer.com/name=python book"
>>> urllib.quote(du)
'http%3A//www.itdiffer.com/name%3Dpython%20book'
>>> urllib.quote_plus(du)
'http%3A%2F%2Fwww.itdiffer.com%2Fname%3Dpython+book'
~~~
注意看空格的变化,一个被编码成`%20`,另外一个是`+`
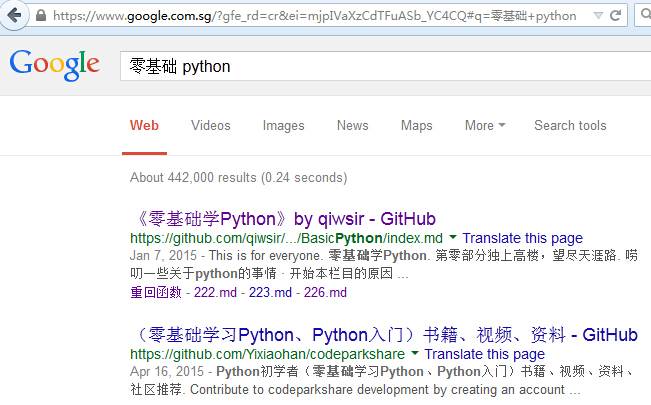
再看解码的,假如在google中搜索`零基础 python`,结果如下图:
[](https://github.com/qiwsir/StarterLearningPython/blob/master/2images/22501.jpg)
我的教程可是在这次搜索中排列第一个哦。
这不是重点,重点是看url,它就是用`+`替代空格了。
~~~
>>> dup = urllib.quote_plus(du)
>>> urllib.unquote_plus(dup)
'http://www.itdiffer.com/name=python book'
~~~
从解码效果来看,比较完美地逆过程。
~~~
>>> urllib.urlencode({"name":"qiwsir","web":"itdiffer.com"})
'web=itdiffer.com&name=qiwsir'
~~~
这个在编程中,也会用到,特别是开发网站时候。
**urlretrieve()**
虽然urlopen()能够建立类文件对象,但是,那还不等于将远程文件保存在本地存储器中,urlretrieve()就是满足这个需要的。先看实例:
~~~
>>> import urllib
>>> urllib.urlretrieve("http://www.itdiffer.com/images/me.jpg","me.jpg")
('me.jpg', <httplib.HTTPMessage instance at 0xb6ecb6cc>)
>>>
~~~
me.jpg是一张存在于服务器上的图片,地址是:[http://www.itdiffer.com/images/me.jpg,把它保存到本地存储器中,并且仍旧命名为me.jpg。注意,如果只写这个名字,表示存在启动python交互模式的那个目录中,否则,可以指定存储具体目录和文件名。](http://www.itdiffer.com/images/me.jpg%EF%BC%8C%E6%8A%8A%E5%AE%83%E4%BF%9D%E5%AD%98%E5%88%B0%E6%9C%AC%E5%9C%B0%E5%AD%98%E5%82%A8%E5%99%A8%E4%B8%AD%EF%BC%8C%E5%B9%B6%E4%B8%94%E4%BB%8D%E6%97%A7%E5%91%BD%E5%90%8D%E4%B8%BAme.jpg%E3%80%82%E6%B3%A8%E6%84%8F%EF%BC%8C%E5%A6%82%E6%9E%9C%E5%8F%AA%E5%86%99%E8%BF%99%E4%B8%AA%E5%90%8D%E5%AD%97%EF%BC%8C%E8%A1%A8%E7%A4%BA%E5%AD%98%E5%9C%A8%E5%90%AF%E5%8A%A8python%E4%BA%A4%E4%BA%92%E6%A8%A1%E5%BC%8F%E7%9A%84%E9%82%A3%E4%B8%AA%E7%9B%AE%E5%BD%95%E4%B8%AD%EF%BC%8C%E5%90%A6%E5%88%99%EF%BC%8C%E5%8F%AF%E4%BB%A5%E6%8C%87%E5%AE%9A%E5%AD%98%E5%82%A8%E5%85%B7%E4%BD%93%E7%9B%AE%E5%BD%95%E5%92%8C%E6%96%87%E4%BB%B6%E5%90%8D%E3%80%82)
在[urllib官方文档](https://docs.python.org/2/library/urllib.html)中有一大段相关说明,读者可以去认真阅读。这里仅简要介绍一下相关参数。
`urllib.urlretrieve(url[, filename[, reporthook[, data]]])`
* url:文件所在的网址
* filename:可选。将文件保存到本地的文件名,如果不指定,urllib会生成一个临时文件来保存
* reporthook:可选。是回调函数,当链接服务器和相应数据传输完毕时触发本函数
* data:可选。如果用post方式所发出的数据
函数执行完毕,返回的结果是一个元组(filename, headers),filename是保存到本地的文件名,headers是服务器响应头信息。
~~~
#!/usr/bin/env python
# coding=utf-8
import urllib
def go(a,b,c):
per = 100.0 * a * b / c
if per > 100:
per = 100
print "%.2f%%" % per
url = "http://youxi.66wz.com/uploads/1046/1321/11410192.90d133701b06f0cc2826c3e5ac34c620.jpg"
local = "/home/qw/Pictures/g.jpg"
urllib.urlretrieve(url, local, go)
~~~
这段程序就是要下载指定的图片,并且保存为本地指定位置的文件,同时要显示下载的进度。上述文件保存之后,执行,显示如下效果:
~~~
$ python 22501.py
0.00%
8.13%
16.26%
24.40%
32.53%
40.66%
48.79%
56.93%
65.06%
73.19%
81.32%
89.46%
97.59%
100.00%
~~~
到相应目录中查看,能看到与网上地址一样的文件。我这里就不对结果截图了,唯恐少部分读者鼻子流血。
## [](https://github.com/qiwsir/StarterLearningPython/blob/master/225.md#urllib2)urllib2
urllib2是另外一个模块,它跟urllib有相似的地方——都是对url相关的操作,也有不同的地方。关于这方面,有一篇文章讲的不错:[Python: difference between urllib and urllib2](http://www.hacksparrow.com/python-difference-between-urllib-and-urllib2.html)
我选取一段,供大家参考:
> urllib2 can accept a Request object to set the headers for a URL request, urllib accepts only a URL. That means, you cannot masquerade your User Agent string etc.
>
> urllib provides the urlencode method which is used for the generation of GET query strings, urllib2 doesn't have such a function. This is one of the reasons why urllib is often used along with urllib2.
所以,有时候两个要同时使用,urllib模块和urllib2模块有的方法可以相互替代,有的不能。看下面的属性方法列表就知道了。
~~~
>>> dir(urllib2)
['AbstractBasicAuthHandler', 'AbstractDigestAuthHandler', 'AbstractHTTPHandler', 'BaseHandler', 'CacheFTPHandler', 'FTPHandler', 'FileHandler', 'HTTPBasicAuthHandler', 'HTTPCookieProcessor', 'HTTPDefaultErrorHandler', 'HTTPDigestAuthHandler', 'HTTPError', 'HTTPErrorProcessor', 'HTTPHandler', 'HTTPPasswordMgr', 'HTTPPasswordMgrWithDefaultRealm', 'HTTPRedirectHandler', 'HTTPSHandler', 'OpenerDirector', 'ProxyBasicAuthHandler', 'ProxyDigestAuthHandler', 'ProxyHandler', 'Request', 'StringIO', 'URLError', 'UnknownHandler', '__builtins__', '__doc__', '__file__', '__name__', '__package__', '__version__', '_cut_port_re', '_opener', '_parse_proxy', '_safe_gethostbyname', 'addinfourl', 'base64', 'bisect', 'build_opener', 'ftpwrapper', 'getproxies', 'hashlib', 'httplib', 'install_opener', 'localhost', 'mimetools', 'os', 'parse_http_list', 'parse_keqv_list', 'posixpath', 'proxy_bypass', 'quote', 'random', 'randombytes', 're', 'request_host', 'socket', 'splitattr', 'splithost', 'splitpasswd', 'splitport', 'splittag', 'splittype', 'splituser', 'splitvalue', 'sys', 'time', 'toBytes', 'unquote', 'unwrap', 'url2pathname', 'urlopen', 'urlparse', 'warnings']
~~~
比较常用的比如urlopen()跟urllib.open()是完全类似的。
**Request类**
正如前面区别urllib和urllib2所讲,利用urllib2模块可以建立一个Request对象。方法就是:
~~~
>>> req = urllib2.Request("http://www.itdiffer.com")
~~~
建立了Request对象之后,它的最直接应用就是可以作为urlopen()方法的参数
~~~
>>> response = urllib2.urlopen(req)
>>> page = response.read()
>>> print page
~~~
因为与前面的`urllib.open("http://www.itdiffer.com")`结果一样,就不浪费篇幅了。
但是,如果Request对象仅仅局限于此,似乎还没有什么太大的优势。因为刚才的访问仅仅是满足以get方式请求页面,并建立类文件对象。如果是通过post向某地址提交数据,也可以建立Request对象。
~~~
import urllib
import urllib2
url = 'http://www.itdiffer.com/register.py'
values = {'name' : 'qiwsir',
'location' : 'China',
'language' : 'Python' }
data = urllib.urlencode(values) # 编码
req = urllib2.Request(url, data) # 发送请求同时传data表单
response = urllib2.urlopen(req) #接受反馈的信息
the_page = response.read() #读取反馈的内容
~~~
注意,读者不能照抄上面的程序,然后运行代码。因为那个url中没有相应的接受客户端post上去的data的程序文件。上面的代码只是以一个例子来显示Request对象的另外一个用途,还有就是在这个例子中是以post方式提交数据。
在网站中,有的会通过User-Agent来判断访问者是浏览器还是别的程序,如果通过别的程序访问,它有可能拒绝。这时候,我们编写程序去访问,就要设置headers了。设置方法是:
~~~
user_agent = 'Mozilla/4.0 (compatible; MSIE 5.5; Windows NT)'
headers = { 'User-Agent' : user_agent }
~~~
然后重新建立Request对象:
~~~
req = urllib2.Request(url, data, headers)
~~~
再用urlopen()方法访问:
~~~
response = urllib2.urlopen(req)
~~~
除了上面演示之外,urllib2模块的东西还很多,比如还可以:
* 设置HTTP Proxy
* 设置Timeout值
* 自动redirect
* 处理cookie
等等。这些内容不再一一介绍,当需要用到的时候可以查看文档或者google。