PS图层混合模式之明度模式
最后更新于:2022-04-01 06:47:06
本文将介绍PS图层混合模式中比较复杂 的“明度”模式的算法原理及代码实现内容。
说到PS的图层混合模式,计算公式都有,具体代码实现也能找到,但是,都没有完整介绍所有图层混合模式的代码,比如“明度”模式,公式如下:
假设两张图的HSY颜色模式分别为: Hb,Sb,Yb---Hm,Sm,Ym
明度混合结果HSY = HbSbYm
这个公式很简单,无非就是原图的H,S分量+混合图的Y分量而已,但是具体代码如何实现,却很少有人分享,今天,我将给大家分享本人的代码。
HSY模式是一种彩色传输模型,传输基本的色差和亮度信号。如果直接使用HSY颜色空间,这个颜色空间好像很少见,具体HSY计算公式如下:
Y = 0.299R + 0.587G + 0.114B;
Cr = R - Y;
Cb = B - Y;
H = arctan(Cr/Cb);
S = sqrt(Cr * Cr + Cb * Cb);
大家可以看到,这个公式中运算复杂,但是是基于Cr, Cb分量计算的,而且,明度图层混合模式结果中实际上只改变了Y分量,因此,我们这里可以使用YCbCr颜色空间来代替HSY颜色空间实现这个功能。
YCbCr与RGB转换公式如下:
Y = 0.257*R+0.564*G+0.098*B+16
Cb = -0.148*R-0.291*G+0.439*B+128
Cr = 0.439*R-0.368*G-0.071*B+128
R = 1.164*(Y-16)+1.596*(Cr-128)
G = 1.164*(Y-16)-0.392*(Cb-128)-0.813*(Cr-128)
B = 1.164*(Y-16)+2.017*(Cb-128)
因此,按照上面的公式我们编码实现如下:
~~~
#include"TRGB2YCbCr.h"
#include <stdlib.h>
#include <stdio.h>
#include "math.h"
#include <string.h>
const float YCbCrYRF = 0.299F; // RGB转YCbCr的系数(浮点类型)
const float YCbCrYGF = 0.587F;
const float YCbCrYBF = 0.114F;
const float YCbCrCbRF = -0.168736F;
const float YCbCrCbGF = -0.331264F;
const float YCbCrCbBF = 0.500000F;
const float YCbCrCrRF = 0.500000F;
const float YCbCrCrGF = -0.418688F;
const float YCbCrCrBF = -0.081312F;
const float RGBRYF = 1.00000F; // YCbCr转RGB的系数(浮点类型)
const float RGBRCbF = 0.0000F;
const float RGBRCrF = 1.40200F;
const float RGBGYF = 1.00000F;
const float RGBGCbF = -0.34414F;
const float RGBGCrF = -0.71414F;
const float RGBBYF = 1.00000F;
const float RGBBCbF = 1.77200F;
const float RGBBCrF = 0.00000F;
const int Shift = 20;
const int HalfShiftValue = 1 << (Shift - 1);
const int YCbCrYRI = (int)(YCbCrYRF * (1 << Shift) + 0.5); // RGB转YCbCr的系数(整数类型)
const int YCbCrYGI = (int)(YCbCrYGF * (1 << Shift) + 0.5);
const int YCbCrYBI = (int)(YCbCrYBF * (1 << Shift) + 0.5);
const int YCbCrCbRI = (int)(YCbCrCbRF * (1 << Shift) + 0.5);
const int YCbCrCbGI = (int)(YCbCrCbGF * (1 << Shift) + 0.5);
const int YCbCrCbBI = (int)(YCbCrCbBF * (1 << Shift) + 0.5);
const int YCbCrCrRI = (int)(YCbCrCrRF * (1 << Shift) + 0.5);
const int YCbCrCrGI = (int)(YCbCrCrGF * (1 << Shift) + 0.5);
const int YCbCrCrBI = (int)(YCbCrCrBF * (1 << Shift) + 0.5);
const int RGBRYI = (int)(RGBRYF * (1 << Shift) + 0.5); // YCbCr转RGB的系数(整数类型)
const int RGBRCbI = (int)(RGBRCbF * (1 << Shift) + 0.5);
const int RGBRCrI = (int)(RGBRCrF * (1 << Shift) + 0.5);
const int RGBGYI = (int)(RGBGYF * (1 << Shift) + 0.5);
const int RGBGCbI = (int)(RGBGCbF * (1 << Shift) + 0.5);
const int RGBGCrI = (int)(RGBGCrF * (1 << Shift) + 0.5);
const int RGBBYI = (int)(RGBBYF * (1 << Shift) + 0.5);
const int RGBBCbI = (int)(RGBBCbF * (1 << Shift) + 0.5);
const int RGBBCrI = (int)(RGBBCrF * (1 << Shift) + 0.5);
void RGBToYCbCr(int R, int G, int B, int*Y,int*Cb, int* Cr)
{
*Y = ((YCbCrYRI * R + YCbCrYGI * G + YCbCrYBI * B + HalfShiftValue) >> Shift);
*Cb = (128 + ((YCbCrCbRI * R + YCbCrCbGI * G + YCbCrCbBI * B + HalfShiftValue) >> Shift));
*Cr = (128 + ((YCbCrCrRI * R + YCbCrCrGI * G + YCbCrCrBI * B + HalfShiftValue) >> Shift));
}
void YCbCrToRGB(int Y, int Cb, int Cr, int*R,int*G, int* B)
{
Cb = Cb - 128; Cr = Cr - 128;
*R = Y + ((RGBRCrI * Cr + HalfShiftValue) >> Shift);
*G = Y + ((RGBGCbI * Cb + RGBGCrI * Cr + HalfShiftValue) >> Shift);
*B = Y + ((RGBBCbI * Cb + HalfShiftValue) >> Shift);
if (*R > 255) *R = 255; else if (*R < 0) *R = 0;
if (*G > 255) *G = 255; else if (*G < 0) *G = 0;
if (*B > 255) *B = 255; else if (*B < 0) *B = 0;
}
int ColorBlendModeBrightness(unsigned char* baseData, unsigned char* mixData, int width, int height, int stride)
{
int i, j, pos;
int bY, bCb, bCr, mY, mCb, mCr, br, bg, bb, mr, mg, mb;
unsigned char* pBase = baseData;
unsigned char* pMix = mixData;
int offset = stride - width * 4;
for(j = 0; j < height; j++)
{
for(i = 0; i < width; i++)
{
bb = pBase[0];
bg = pBase[1];
br = pBase[2];
mb = pMix[0];
mg = pMix[1];
mr = pMix[2];
RGBToYCbCr(mr,mg,mb,&mY,&mCb,&mCr);
RGBToYCbCr(br,bg,bb,&bY,&bCb,&bCr);
YCbCrToRGB((mY+bY)/2, bCb, bCr, &br,&bg,&bb);//(mY+bY)/2表示透明度为50%
pBase[0] = bb;
pBase[1] = bg;
pBase[2] = br;
pBase += 4;
pMix += 4;
}
pBase += offset;
pMix += offset;
}
return 0;
}
~~~
这个就是所有编码了,而且这个颜色空间转换的代码已经经过优化,大家可以直接使用,下面我给出效果图(该效果是按照明度图层混合模式50%透明度设置得到的):

大家可以看到,效果图和PS的效果图几乎一致,最后,给出一个DEMO下载链接:[点击打开链接](http://download.csdn.net/detail/trent1985/9377913)
流行艺术风滤镜特效PS实现
最后更新于:2022-04-01 06:47:03
今天,本人给大家介绍一款新滤镜:流行艺术风效果,先看下效果吧!

原图

流行艺术风效果图
上面的这款滤镜效果是不是很赞,呵呵,按照本人以往的逻辑,我会先介绍PS实现过程,然后,在下一篇博客中将介绍完整的C#代码实现,并附上程序DEMO给大家分享!
现在开始PS过程:
1,打开图像,复制两份图层A,B:

2,将B图层隐藏,对图层A执行:
反相操作-“明度”图层混合-透明度“50%”
如图所示:

3,可见B图层,对B执行:
阈值(128)-“正片叠底”图层混合,效果图如下:

4,最后,对原始“背景”图层执行一定的饱和度调节:

5,点解确定,得到最终效果图,保存。
以上就是整个滤镜特效的PS实现过程,看起来非常简单,下一篇博客我们就具体介绍如何使用C#代码来实现这个滤镜特效!
保留细节的磨皮之C#程序实现
最后更新于:2022-04-01 06:47:01
上一篇博文“[保留细节的磨皮滤镜之PS实现](http://blog.csdn.net/trent1985/article/details/50260881)”一文中,我简单介绍了本人自己总结的一种非常简单的磨皮滤镜,这个滤镜在磨光皮肤的同时,会保留很不错的细节,今天,我将介绍使用C#程序实现这个磨皮的过程。
这里,我们同样是使用ZPhotoEngine库来实现,毕竟这个库中实现的效果跟PS是几乎一模一样的,关于下载地址,文章最后会给出,废话不多说了,磨皮步骤如下:
一,对原图的副本a执行表面模糊,半径15;
二,对原图执行高反差保留,半径1.0;
三,对高反差结果与原图做线性光图层处理,50%透明度即可;
根据以上三步,我的磨皮类主要代码如下:
~~~
using System;
using System.Collections.Generic;
using System.Linq;
using System.Text;
using System.Drawing;
using System.Drawing.Imaging;
namespace TestDemo
{
unsafe class ImageFilter
{
ZPhotoEngineDll zp = new ZPhotoEngineDll();
public Bitmap SoftSkinFilter(Bitmap src, int blurRadius)
{
//表面模糊图层
Bitmap a = zp.SurfaceBlur(src, 28, blurRadius);
//高反差图层
Bitmap highPass = zp.HighPassProcess(src, 1.0f);
BitmapData srcData = a.LockBits(new Rectangle(0, 0, a.Width, a.Height), ImageLockMode.ReadWrite, PixelFormat.Format32bppArgb);
BitmapData dstData = highPass.LockBits(new Rectangle(0, 0, highPass.Width, highPass.Height), ImageLockMode.ReadWrite, PixelFormat.Format32bppArgb);
byte* p = (byte*)srcData.Scan0;
byte* dstP = (byte*)dstData.Scan0;
int offset = srcData.Stride - a.Width * 4;
int temp = 0;
for (int j = 0; j < a.Height; j++)
{
for (int i = 0; i < a.Width; i++)
{
////////////////Process image...
//线性光图层混合
temp = zp.ModeLinearLight(p[0], dstP[0]);
//透明度50%
dstP[0] = (byte)((p[0] + temp) >> 1);
temp = zp.ModeLinearLight(p[1], dstP[1]);
dstP[1] = (byte)((p[1] + temp) >> 1);
temp = zp.ModeLinearLight(p[2], dstP[2]);
dstP[2] = (byte)((p[2] + temp) >> 1);
dstP += 4;
p += 4;
}
dstP += offset;
p += offset;
}
a.UnlockBits(srcData);
highPass.UnlockBits(dstData);
return highPass;
}
}
}
~~~
界面部分主要代码如下:
~~~
using System;
using System.Collections.Generic;
using System.ComponentModel;
using System.Data;
using System.Drawing;
using System.Linq;
using System.Text;
using System.Windows.Forms;
using System.Drawing.Imaging;
namespace TestDemo
{
public partial class Form1 : Form
{
public Form1()
{
InitializeComponent();
}
#region 变量声明
//图像路径
private String curFileName = null;
//当前图像变量
private Bitmap curBitmap = null;
//原始图像变量
private Bitmap srcBitmap = null;
//
ImageFilter imfilter = new ImageFilter();
#endregion
#region 图像打开保存模块
//打开图像函数
public void OpenFile()
{
OpenFileDialog ofd = new OpenFileDialog();
ofd.Filter = "所有图像文件 | *.bmp; *.pcx; *.png; *.jpg; *.gif;" +
"*.tif; *.ico; *.dxf; *.cgm; *.cdr; *.wmf; *.eps; *.emf|" +
"位图( *.bmp; *.jpg; *.png;...) | *.bmp; *.pcx; *.png; *.jpg; *.gif; *.tif; *.ico|" +
"矢量图( *.wmf; *.eps; *.emf;...) | *.dxf; *.cgm; *.cdr; *.wmf; *.eps; *.emf";
ofd.ShowHelp = true;
ofd.Title = "打开图像文件";
if (ofd.ShowDialog() == DialogResult.OK)
{
curFileName = ofd.FileName;
try
{
curBitmap = (Bitmap)System.Drawing.Image.FromFile(curFileName);
srcBitmap = new Bitmap(curBitmap);
}
catch (Exception exp)
{ MessageBox.Show(exp.Message); }
}
}
//保存图像函数
public void SaveFile()
{
SaveFileDialog sfd = new SaveFileDialog();
sfd.Filter = "PNG文件(*.png)|*.png";
if (sfd.ShowDialog() == DialogResult.OK)
{
pictureBox1.Image.Save(sfd.FileName, ImageFormat.Png);
}
}
//打开图像
private void openBtn_Click(object sender, EventArgs e)
{
OpenFile();
if (curBitmap != null)
{
pictureBox1.Image = (Image)curBitmap;
}
}
//保存图像
private void saveBtn_Click(object sender, EventArgs e)
{
if (pictureBox1.Image != null)
SaveFile();
}
#endregion
//确定
private void okBtn_Click(object sender, EventArgs e)
{
if (pictureBox1.Image != null)
{
int radius = Convert.ToInt32(textBox1.Text.ToString());
if (radius >= 0 && radius <= 20)
{
pictureBox1.Image = (Image)imfilter.SoftSkinFilter(curBitmap, radius);
}
}
}
}
}
~~~
程序界面如下:

最后,放上效果图:
原图 C#程序效果图
PS效果图
大家可以对比一下,PS效果跟本文实现效果是一模一样的,差别几乎是肉眼看不到的呵呵。
最后,放上一些下载连接:
1,ZPhotoEngine库下载连接:[点击打开链接](http://www.zealpixel.com/portal.php?mod=view&aid=45)
2,磨皮代码DEMO免费下载连接:[点击打开链接](http://download.csdn.net/detail/trent1985/9353265)
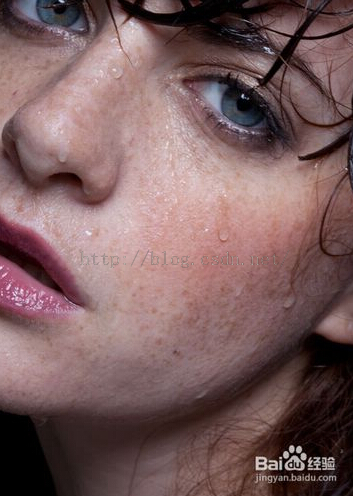
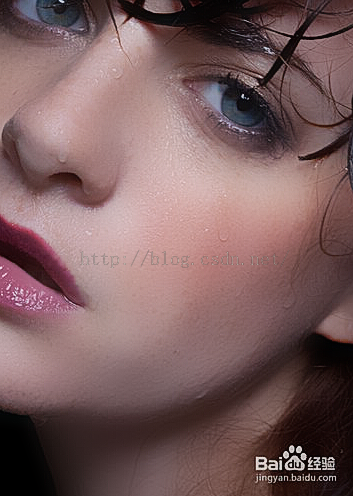
保留细节的磨皮滤镜之PS实现
最后更新于:2022-04-01 06:46:59
目前,对于人物照片磨皮滤镜,相信大家没用过也听过吧,这个滤镜的实现方法是多种多样,有难有简,有好有差,本人经过长时间的总结,得出了一种最简单,效果又不失细节与真实感的方法,对于这个方法,本人将先介绍它的PS实现,在下一篇博客中,我们将具体介绍它的C#代码实现。
PS实现过程如下:
1,打开人物图像,复制图层,命名为“HighPass”:

2,对HighPass执行“滤镜-表面模糊”,半径-15即可,这里可以根据具体图像,适当调整半径大小:

3,复制原始图层,命名为“HighPass副本”,将改图层置顶,对该图层执行“高反差保留”,半径-1.0:

4,对“HighPass副本”图层执行“线性光”图层混合模式,调节不透明度为50:

5,对于上面这张图,磨皮就已经完成了,大家可以看下最终效果:

原图 磨皮效果图
6,这里注意一点,对于这张图我是直接进行的全图磨皮,因为这个图中基本都是皮肤。但是,对于其他的图像,我们需要手工选择人脸区域,然后对人脸区域执行上述过程即可,最后,总结一下上述步骤如下:
一,对原图的副本a执行表面模糊:抹掉丑陋的皮肤,同时保留一定的边缘;
二,对原图执行高反差保留:得到图像的细节内容;
三,对高反差结果与原图做线性光图层处理,50%透明度即可;
大家可以看下,上述过程是否相当的简单,而效果又非常不错呢?
以上就是PS实现磨皮的最简过程,大家不要觉得这是网上已经泛滥的PS技术,下一篇本人将使用C#代码实现这个效果,并且这里可以保证和PS的效果一模一样,呵呵。
乐高像素拼图特效滤镜的代码实现
最后更新于:2022-04-01 06:46:56
这篇博客承接上一篇http://blog.csdn.net/trent1985/article/details/50195747乐高像素拼图特效的PS实现,主要是一些博友告诉我如何用代码实现这个PS的特效,为此,这里以这个特效为例,来说一下。
这个特效的实现我们将使用ZPhotoEngine库来完成,采用C#编程,步骤如下:
1,打开VS构建工程TestDemo,添加一些基本功能:打开图像,保存图像,这个代码我会给出连接,这个不是重点,大家接着往下看。
2,在工程中导入ZPhotoEngine的dll,放在bin/debug,bin/Release文件夹中,主要包含这几个:pthreadVC2.dll、ZPhotoEngine.dll,ZEffectEngine.dll不添加也没关系,这个特效中没有使用到这个滤镜模块库。
3,根据ZPhotoEngine库的说明文档,或者ZPhotoEngine.h的接口说明,对接口进行封装。
实际上ZPhotoEngine库的DEMO中已经有了大部分的封装,都在ZPhotoEngineDll.cs中,这里只缺少了图层混合模式的接口封装,我们封装之后,所有代码如下,大家只需要把这个文件添加到你的工程中即可:
~~~
using System;
using System.Collections.Generic;
using System.Linq;
using System.Text;
using System.Drawing;
using System.Drawing.Imaging;
using System.Runtime.InteropServices;
namespace TestDemo
{
unsafe class ZPhotoEngineDll
{
#region PS基本变换模块
[DllImport("ZPhotoEngine.dll", CallingConvention = CallingConvention.Cdecl, CharSet = CharSet.Unicode, ExactSpelling = true)]
private static extern int ZPHOTO_Desaturate(byte* srcData, int width, int height, int stride);
[DllImport("ZPhotoEngine.dll", CallingConvention = CallingConvention.Cdecl, CharSet = CharSet.Unicode, ExactSpelling = true)]
private static extern int ZPHOTO_Threshold(byte* srcData, int width, int height, int stride, int threshold);
[DllImport("ZPhotoEngine.dll", CallingConvention = CallingConvention.Cdecl, CharSet = CharSet.Unicode, ExactSpelling = true)]
private static extern int ZPHOTO_SaturationAdjust(byte* srcData, int width, int height, int stride, int hue);
[DllImport("ZPhotoEngine.dll", CallingConvention = CallingConvention.Cdecl, CharSet = CharSet.Unicode, ExactSpelling = true)]
private static extern int ZPHOTO_Posterize(byte* srcData, int width, int height, int stride, int clusterNum);
[DllImport("ZPhotoEngine.dll", CallingConvention = CallingConvention.Cdecl, CharSet = CharSet.Unicode, ExactSpelling = true)]
private static extern int ZPHOTO_OverExposure(byte* srcData, int width, int height, int stride);
[DllImport("ZPhotoEngine.dll", CallingConvention = CallingConvention.Cdecl, CharSet = CharSet.Unicode, ExactSpelling = true)]
private static extern int ZPHOTO_LightnessAdjust(byte* srcData, int width, int height, int stride, int lightness);
[DllImport("ZPhotoEngine.dll", CallingConvention = CallingConvention.Cdecl, CharSet = CharSet.Unicode, ExactSpelling = true)]
private static extern int ZPHOTO_Invert(byte* srcData, int width, int height, int stride);
[DllImport("ZPhotoEngine.dll", CallingConvention = CallingConvention.Cdecl, CharSet = CharSet.Unicode, ExactSpelling = true)]
private static extern int ZPHOTO_HueAndSaturationAdjust(byte* srcData, int width, int height, int stride, int hue, int saturation);
[DllImport("ZPhotoEngine.dll", CallingConvention = CallingConvention.Cdecl, CharSet = CharSet.Unicode, ExactSpelling = true)]
private static extern int ZPHOTO_HistagramEqualize(byte* srcData, int width, int height, int stride);
[DllImport("ZPhotoEngine.dll", CallingConvention = CallingConvention.Cdecl, CharSet = CharSet.Unicode, ExactSpelling = true)]
private static extern int ZPHOTO_CurveAdjust(byte* srcData, int width, int height, int stride, int DestChannel, int InputLeftLimit, int InputMiddle, int InputRightLimit, int OutputLeftLimit, int OutputRightLimit);
[DllImport("ZPhotoEngine.dll", CallingConvention = CallingConvention.Cdecl, CharSet = CharSet.Unicode, ExactSpelling = true)]
private static extern int ZPHOTO_NLinearBrightContrastAdjust(byte* srcData, int width, int height, int stride, int bright, int contrast, int threshold);
[DllImport("ZPhotoEngine.dll", CallingConvention = CallingConvention.Cdecl, CharSet = CharSet.Unicode, ExactSpelling = true)]
private static extern int ZPHOTO_LinearBrightContrastAdjust(byte* srcData, int width, int height, int stride, int brightness, int contrast, int threshold);
[DllImport("ZPhotoEngine.dll", CallingConvention = CallingConvention.Cdecl, CharSet = CharSet.Unicode, ExactSpelling = true)]
private static extern int ZPHOTO_AutoContrastAdjust(byte* srcData, int width, int height, int stride);
[DllImport("ZPhotoEngine.dll", CallingConvention = CallingConvention.Cdecl, CharSet = CharSet.Unicode, ExactSpelling = true)]
private static extern int ZPHOTO_AutoColorGradationAdjust(byte* srcData, int width, int height, int stride);
[DllImport("ZPhotoEngine.dll", CallingConvention = CallingConvention.Cdecl, CharSet = CharSet.Unicode, ExactSpelling = true)]
private static extern int ZPHOTO_ChannelMixProcess(byte* srcData, int width, int height, int stride, int channel, int kr, int kg, int kb, int N, bool singleColor, bool constAdjust);
[DllImport("ZPhotoEngine.dll", CallingConvention = CallingConvention.Cdecl, CharSet = CharSet.Unicode, ExactSpelling = true)]
private static extern int ZPHOTO_Fragment(byte* srcData, int width, int height, int stride);
[DllImport("ZPhotoEngine.dll", CallingConvention = CallingConvention.Cdecl, CharSet = CharSet.Unicode, ExactSpelling = true)]
private static extern int ZPHOTO_SurfaceBlur(byte* srcData, int width, int height, int stride, int threshold, int radius);
[DllImport("ZPhotoEngine.dll", CallingConvention = CallingConvention.Cdecl, CharSet = CharSet.Unicode, ExactSpelling = true)]
private static extern int ZPHOTO_RadialBlur(byte* srcData, int width, int height, int stride, int cenX, int cenY, int amount);
[DllImport("ZPhotoEngine.dll", CallingConvention = CallingConvention.Cdecl, CharSet = CharSet.Unicode, ExactSpelling = true)]
private static extern int ZPHOTO_ZoomBlur(byte* srcData, int width, int height, int stride, int cenX, int cenY, int sampleRadius, int amount);
[DllImport("ZPhotoEngine.dll", CallingConvention = CallingConvention.Cdecl, CharSet = CharSet.Unicode, ExactSpelling = true)]
private static extern int ZPHOTO_Relief(byte* srcData, int width, int height, int stride, int angle, int amount);
[DllImport("ZPhotoEngine.dll", CallingConvention = CallingConvention.Cdecl, CharSet = CharSet.Unicode, ExactSpelling = true)]
private static extern int ZPHOTO_Mosaic(byte* srcData, int width, int height, int stride, int size);
[DllImport("ZPhotoEngine.dll", CallingConvention = CallingConvention.Cdecl, CharSet = CharSet.Unicode, ExactSpelling = true)]
private static extern int ZPHOTO_ColorBalance(byte* srcData, int width, int height, int stride, int cyan, int magenta, int yellow, int channel, bool preserveLuminosity);
[DllImport("ZPhotoEngine.dll", CallingConvention = CallingConvention.Cdecl, CharSet = CharSet.Unicode, ExactSpelling = true)]
private static extern int ZPHOTO_Diffusion(byte* srcData, int width, int height, int stride, int intensity);
[DllImport("ZPhotoEngine.dll", CallingConvention = CallingConvention.Cdecl, CharSet = CharSet.Unicode, ExactSpelling = true)]
private static extern int ZPHOTO_FastGaussFilter(byte* srcData, int width, int height, int stride, byte* dstData, float radius);
[DllImport("ZPhotoEngine.dll", CallingConvention = CallingConvention.Cdecl, CharSet = CharSet.Unicode, ExactSpelling = true)]
private static extern int ZPHOTO_HighPass(byte* srcData, int width, int height, int stride, byte* dstData, float mRadius);
[DllImport("ZPhotoEngine.dll", CallingConvention = CallingConvention.Cdecl, CharSet = CharSet.Unicode, ExactSpelling = true)]
private static extern int ZPHOTO_USM(byte* srcData, int width, int height, int stride, byte* dstData, float radius, int amount, int threshold);
[DllImport("ZPhotoEngine.dll", CallingConvention = CallingConvention.Cdecl, CharSet = CharSet.Unicode, ExactSpelling = true)]
private static extern int ZPHOTO_FindEdges(byte* srcData, int width, int height, int stride, byte* dstData);
[DllImport("ZPhotoEngine.dll", CallingConvention = CallingConvention.Cdecl, CharSet = CharSet.Unicode, ExactSpelling = true)]
private static extern int ZPHOTO_ShadowAdjust(byte* srcData, int width, int height, int stride, int intensity, int ratio);
[DllImport("ZPhotoEngine.dll", CallingConvention = CallingConvention.Cdecl, CharSet = CharSet.Unicode, ExactSpelling = true)]
private static extern int ZPHOTO_HighlightAdjust(byte* srcData, int width, int height, int stride, int intensity, int ratio);
[DllImport("ZPhotoEngine.dll", CallingConvention = CallingConvention.Cdecl, CharSet = CharSet.Unicode, ExactSpelling = true)]
private static extern int ZPHOTO_ExposureAdjust(byte* srcData, int width, int height, int stride, int intensity);
[DllImport("ZPhotoEngine.dll", CallingConvention = CallingConvention.Cdecl, CharSet = CharSet.Unicode, ExactSpelling = true)]
private static extern int ZPHOTO_ColorTemperatureAdjust(byte* srcData, int width, int height, int stride, int intensity);
[DllImport("ZPhotoEngine.dll", CallingConvention = CallingConvention.Cdecl, CharSet = CharSet.Unicode, ExactSpelling = true)]
private static extern int ZPHOTO_CalcWH(int[] inputImgSize, float angle, float scale, int transform_method, int[] outputImgSize, float[] H);
[DllImport("ZPhotoEngine.dll", CallingConvention = CallingConvention.Cdecl, CharSet = CharSet.Unicode, ExactSpelling = true)]
private static extern int ZPHOTO_ImageTransformation(byte* pSrc, int[] srcImgSize, byte* pDst, int[] dstImgSize, float[] H, int Interpolation_method, int transform_method);
[DllImport("ZPhotoEngine.dll", CallingConvention = CallingConvention.Cdecl, CharSet = CharSet.Unicode, ExactSpelling = true)]
private static extern int ZPHOTO_MotionBlur(byte* srcData, int width, int height, int stride, int angle, int distance);
[DllImport("ZPhotoEngine.dll", CallingConvention = CallingConvention.Cdecl, CharSet = CharSet.Unicode, ExactSpelling = true)]
private static extern int ZPHOTO_Mean(byte* srcData, int width, int height, int stride);
[DllImport("ZPhotoEngine.dll", CallingConvention = CallingConvention.Cdecl, CharSet = CharSet.Unicode, ExactSpelling = true)]
private static extern int ZPHOTO_FastMeanFilter(byte* srcData, int width, int height ,int stride, byte* dstData,int radius);
[DllImport("ZPhotoEngine.dll", CallingConvention = CallingConvention.Cdecl, CharSet = CharSet.Unicode, ExactSpelling = true)]
private static extern int ZPHOTO_ColorLevelAdjust(byte* srcData, int width, int height, int stride, int destChannel, byte inputLeftLimit, float inputMiddle, byte inputRightLimit, byte outputLeftLimit, byte outputRightLimit);
[DllImport("ZPhotoEngine.dll", CallingConvention = CallingConvention.Cdecl, CharSet = CharSet.Unicode, ExactSpelling = true)]
private static extern int ZPHOTO_Blackwhite(byte* srcData, int width, int height, int stride, int kRed, int kGreen, int kBlue, int kYellow, int kCyan, int kMagenta);
[DllImport("ZPhotoEngine.dll", CallingConvention = CallingConvention.Cdecl, CharSet = CharSet.Unicode, ExactSpelling = true)]
private static extern int ZPHOTO_GammaCorrect(byte* srcData, int width, int height, int stride, int intensity);
[DllImport("ZPhotoEngine.dll", CallingConvention = CallingConvention.Cdecl, CharSet = CharSet.Unicode, ExactSpelling = true)]
private static extern int ZPHOTO_ImageBlendEffect(byte* baseData, int width, int height, int stride, byte* mixData, int blendMode);
[DllImport("ZPhotoEngine.dll", CallingConvention = CallingConvention.Cdecl, CharSet = CharSet.Unicode, ExactSpelling = true)]
private static extern int ZPHOTO_ModeLinearLight(int basePixel, int mixPixel);
////////////////////////////////////////////////////////////////////////////////////////////////////////////////////////////////
#endregion
#region 颜色空间转换模块
[DllImport("ZPhotoEngine.dll", CallingConvention = CallingConvention.Cdecl, CharSet = CharSet.Unicode, ExactSpelling = true)]
private static extern void ZPHOTO_RGBToYUV(int Red, int Green, int Blue, ref int Y, ref int U, ref int V);
[DllImport("ZPhotoEngine.dll", CallingConvention = CallingConvention.Cdecl, CharSet = CharSet.Unicode, ExactSpelling = true)]
private static extern void ZPHOTO_YUVToRGB(int Y, int U, int V, ref int Red, ref int Green, ref int Blue);
[DllImport("ZPhotoEngine.dll", CallingConvention = CallingConvention.Cdecl, CharSet = CharSet.Unicode, ExactSpelling = true)]
private static extern void ZPHOTO_RGBToYCbCr(int R, int G, int B, ref int Y, ref int Cb, ref int Cr);
[DllImport("ZPhotoEngine.dll", CallingConvention = CallingConvention.Cdecl, CharSet = CharSet.Unicode, ExactSpelling = true)]
private static extern void ZPHOTO_YCbCrToRGB(int Y, int Cb, int Cr, ref int Red, ref int Green, ref int Blue);
[DllImport("ZPhotoEngine.dll", CallingConvention = CallingConvention.Cdecl, CharSet = CharSet.Unicode, ExactSpelling = true)]
private static extern void ZPHOTO_RGBToXYZ(int Red, int Green, int Blue, ref int X, ref int Y, ref int Z);
[DllImport("ZPhotoEngine.dll", CallingConvention = CallingConvention.Cdecl, CharSet = CharSet.Unicode, ExactSpelling = true)]
private static extern void ZPHOTO_XYZToRGB(int X, int Y, int Z, ref int Red, ref int Green, ref int Blue);
[DllImport("ZPhotoEngine.dll", CallingConvention = CallingConvention.Cdecl, CharSet = CharSet.Unicode, ExactSpelling = true)]
private static extern void ZPHOTO_RGBToHSL(int Red, int Green, int Blue, ref int h, ref int s, ref int l);
[DllImport("ZPhotoEngine.dll", CallingConvention = CallingConvention.Cdecl, CharSet = CharSet.Unicode, ExactSpelling = true)]
private static extern void ZPHOTO_HSLToRGB(int h, int s, int l, ref int Red, ref int Green, ref int Blue);
[DllImport("ZPhotoEngine.dll", CallingConvention = CallingConvention.Cdecl, CharSet = CharSet.Unicode, ExactSpelling = true)]///////////////
private static extern void ZPHOTO_RGBToHSV(int Red, int Green, int Blue, ref double h, ref double s, ref double v);
[DllImport("ZPhotoEngine.dll", CallingConvention = CallingConvention.Cdecl, CharSet = CharSet.Unicode, ExactSpelling = true)]
private static extern void ZPHOTO_HSVToRGB(double h, double s, double v, ref int Red, ref int Green, ref int Blue);
[DllImport("ZPhotoEngine.dll", CallingConvention = CallingConvention.Cdecl, CharSet = CharSet.Unicode, ExactSpelling = true)]
private static extern void ZPHOTO_RGBToYIQ(int Red, int Green, int Blue, ref double Y, ref double I, ref double Q);
[DllImport("ZPhotoEngine.dll", CallingConvention = CallingConvention.Cdecl, CharSet = CharSet.Unicode, ExactSpelling = true)]
private static extern void ZPHOTO_YIQToRGB(double Y, double I, double Q, ref int Red, ref int Green, ref int Blue);
[DllImport("ZPhotoEngine.dll", CallingConvention = CallingConvention.Cdecl, CharSet = CharSet.Unicode, ExactSpelling = true)]
private static extern void ZPHOTO_RGBToYDbDr(int Red, int Green, int Blue, ref int Y, ref int Db, ref int Dr);
[DllImport("ZPhotoEngine.dll", CallingConvention = CallingConvention.Cdecl, CharSet = CharSet.Unicode, ExactSpelling = true)]
private static extern void ZPHOTO_YDbDrToRGB(int Y, int Db, int Dr, ref int Red, ref int Green, ref int Blue);
[DllImport("ZPhotoEngine.dll", CallingConvention = CallingConvention.Cdecl, CharSet = CharSet.Unicode, ExactSpelling = true)]
private static extern void ZPHOTO_RGBToCMYK(int Red, int Green, int Blue, ref int C, ref int M, ref int Y, ref int K);
[DllImport("ZPhotoEngine.dll", CallingConvention = CallingConvention.Cdecl, CharSet = CharSet.Unicode, ExactSpelling = true)]
private static extern void ZPHOTO_CMYKToRGB(int C, int M, int Y, int K, ref int Red, ref int Green, ref int Blue);
#endregion
public Bitmap GammaCorrectProcess(Bitmap src, int intensity)
{
Bitmap dst = new Bitmap(src);
BitmapData srcData = dst.LockBits(new Rectangle(0, 0, dst.Width, dst.Height), ImageLockMode.ReadWrite, PixelFormat.Format32bppArgb);
ZPHOTO_GammaCorrect((byte*)srcData.Scan0, dst.Width, dst.Height, srcData.Stride, intensity);
dst.UnlockBits(srcData);
return dst;
}
public Bitmap ImageBlendEffectProcess(Bitmap baseBmp,Bitmap mixBmp, int blendEffect)
{
Bitmap dst = new Bitmap(baseBmp);
//Bitmap mix = new Bitmap(mixBmp);
BitmapData srcData = dst.LockBits(new Rectangle(0, 0, dst.Width, dst.Height), ImageLockMode.ReadWrite, PixelFormat.Format32bppArgb);
BitmapData mixData = mixBmp.LockBits(new Rectangle(0, 0, mixBmp.Width, mixBmp.Height), ImageLockMode.ReadOnly, PixelFormat.Format32bppArgb);
ZPHOTO_ImageBlendEffect((byte*)srcData.Scan0, dst.Width, dst.Height, srcData.Stride, (byte*)mixData.Scan0, blendEffect);
dst.UnlockBits(srcData);
return dst;
}
public int ModeLinearLight(int basePixel, int mixPixel)
{
return ZPHOTO_ModeLinearLight(basePixel, mixPixel);
}
////////////////////////////////////////////////////////////////////////////////////////////////////////////////////////////////
public Bitmap ChannelMixProcess(Bitmap src, int channel, int kr, int kg, int kb, int N, bool singleColor, bool constAdjust)
{
Bitmap dst = new Bitmap(src);
BitmapData srcData = dst.LockBits(new Rectangle(0, 0, dst.Width, dst.Height), ImageLockMode.ReadWrite, PixelFormat.Format32bppArgb);
ZPHOTO_ChannelMixProcess((byte*)srcData.Scan0, dst.Width, dst.Height, srcData.Stride, channel, kr, kg, kb, N, singleColor, constAdjust);
dst.UnlockBits(srcData);
return dst;
}
////////////////////////////////////////////////////////////////////////////////////////////////////////////////////////////////
public Bitmap MeanProcess(Bitmap src)
{
Bitmap dst = new Bitmap(src);
BitmapData srcData = dst.LockBits(new Rectangle(0, 0, dst.Width, dst.Height), ImageLockMode.ReadWrite, PixelFormat.Format32bppArgb);
ZPHOTO_Mean((byte*)srcData.Scan0, dst.Width, dst.Height, srcData.Stride);
dst.UnlockBits(srcData);
return dst;
}
public Bitmap AutoColorGradationAdjust(Bitmap src)
{
Bitmap dst = new Bitmap(src);
BitmapData srcData = dst.LockBits(new Rectangle(0, 0, dst.Width, dst.Height), ImageLockMode.ReadWrite, PixelFormat.Format32bppArgb);
ZPHOTO_AutoColorGradationAdjust((byte*)srcData.Scan0, dst.Width, dst.Height, srcData.Stride);
dst.UnlockBits(srcData);
return dst;
}
////////////////////////////////////////////////////////////////////////////////////////////////////////////////////////////////
public Bitmap AutoContrastAdjust(Bitmap src)
{
Bitmap dst = new Bitmap(src);
BitmapData srcData = dst.LockBits(new Rectangle(0, 0, dst.Width, dst.Height), ImageLockMode.ReadWrite, PixelFormat.Format32bppArgb);
ZPHOTO_AutoContrastAdjust((byte*)srcData.Scan0, dst.Width, dst.Height, srcData.Stride);
dst.UnlockBits(srcData);
return dst;
}
public Bitmap HistagramEqualize(Bitmap src)
{
Bitmap dst = new Bitmap(src);
BitmapData srcData = dst.LockBits(new Rectangle(0, 0, dst.Width, dst.Height), ImageLockMode.ReadWrite, PixelFormat.Format32bppArgb);
ZPHOTO_HistagramEqualize((byte*)srcData.Scan0, dst.Width, dst.Height, srcData.Stride);
dst.UnlockBits(srcData);
return dst;
}
////////////////////////////////////////////////////////////////////////////////////////////////////////////////////////////////
public Bitmap MotionBlur(Bitmap src, int angle, int distance)
{
Bitmap dst = new Bitmap(src);
BitmapData srcData = dst.LockBits(new Rectangle(0, 0, dst.Width, dst.Height), ImageLockMode.ReadWrite, PixelFormat.Format32bppArgb);
ZPHOTO_MotionBlur((byte*)srcData.Scan0, dst.Width, dst.Height, srcData.Stride, angle, distance);
dst.UnlockBits(srcData);
return dst;
}
public Bitmap TransformRotation(Bitmap src, float angle, int transform_method, int Interpolation_method)
{
BitmapData srcData = src.LockBits(new Rectangle(0, 0, src.Width, src.Height), ImageLockMode.ReadWrite, PixelFormat.Format32bppArgb);
int[] srcImgSize = new int[3] { src.Width, src.Height, srcData.Stride };
int[] dstImgSize = new int[3];
float[] H = new float[6];
ZPHOTO_CalcWH(srcImgSize, angle, 1.0f, transform_method, dstImgSize, H);
Bitmap dst = new Bitmap(dstImgSize[0], dstImgSize[1]);
BitmapData dstData = dst.LockBits(new Rectangle(0, 0, dst.Width, dst.Height), ImageLockMode.ReadWrite, PixelFormat.Format32bppArgb);
dstImgSize[2] = dstData.Stride;
ZPHOTO_ImageTransformation((byte*)srcData.Scan0, srcImgSize, (byte*)dstData.Scan0, dstImgSize, H, Interpolation_method, transform_method);
src.UnlockBits(srcData);
dst.UnlockBits(dstData);
return dst;
}
public Bitmap TransformScale(Bitmap src, float scale, int transform_method, int Interpolation_method)
{
BitmapData srcData = src.LockBits(new Rectangle(0, 0, src.Width, src.Height), ImageLockMode.ReadWrite, PixelFormat.Format32bppArgb);
int[] srcImgSize = new int[3] { src.Width, src.Height, srcData.Stride };
int[] dstImgSize = new int[3];
float[] H = new float[6];
ZPHOTO_CalcWH(srcImgSize, 0, scale, transform_method, dstImgSize, H);
Bitmap dst = new Bitmap(dstImgSize[0], dstImgSize[1]);
BitmapData dstData = dst.LockBits(new Rectangle(0, 0, dst.Width, dst.Height), ImageLockMode.ReadWrite, PixelFormat.Format32bppArgb);
dstImgSize[2] = dstData.Stride;
ZPHOTO_ImageTransformation((byte*)srcData.Scan0, srcImgSize, (byte*)dstData.Scan0, dstImgSize, H, Interpolation_method, transform_method);
src.UnlockBits(srcData);
dst.UnlockBits(dstData);
return dst;
}
public Bitmap TransformRotationScale(Bitmap src, float angle, float scale, int transform_method, int Interpolation_method)
{
BitmapData srcData = src.LockBits(new Rectangle(0, 0, src.Width, src.Height), ImageLockMode.ReadWrite, PixelFormat.Format32bppArgb);
int[] srcImgSize = new int[3] { src.Width, src.Height, srcData.Stride };
int[] dstImgSize = new int[3];
float[] H = new float[6];
ZPHOTO_CalcWH(srcImgSize, angle, scale, transform_method, dstImgSize, H);
Bitmap dst = new Bitmap(dstImgSize[0], dstImgSize[1]);
BitmapData dstData = dst.LockBits(new Rectangle(0, 0, dst.Width, dst.Height), ImageLockMode.ReadWrite, PixelFormat.Format32bppArgb);
dstImgSize[2] = dstData.Stride;
ZPHOTO_ImageTransformation((byte*)srcData.Scan0, srcImgSize, (byte*)dstData.Scan0, dstImgSize, H, Interpolation_method, transform_method);
src.UnlockBits(srcData);
dst.UnlockBits(dstData);
return dst;
}
public Bitmap TransformAffine(Bitmap src, float[] H, int transform_method, int Interpolation_method)
{
BitmapData srcData = src.LockBits(new Rectangle(0, 0, src.Width, src.Height), ImageLockMode.ReadWrite, PixelFormat.Format32bppArgb);
int[] srcImgSize = new int[3] { src.Width, src.Height, srcData.Stride };
int[] dstImgSize = new int[3];
//float[] H = new float[6];
ZPHOTO_CalcWH(srcImgSize, 0, 1.0f, transform_method, dstImgSize, H);
Bitmap dst = new Bitmap(dstImgSize[0], dstImgSize[1]);
BitmapData dstData = dst.LockBits(new Rectangle(0, 0, dst.Width, dst.Height), ImageLockMode.ReadWrite, PixelFormat.Format32bppArgb);
dstImgSize[2] = dstData.Stride;
ZPHOTO_ImageTransformation((byte*)srcData.Scan0, srcImgSize, (byte*)dstData.Scan0, dstImgSize, H, Interpolation_method, transform_method);
src.UnlockBits(srcData);
dst.UnlockBits(dstData);
return dst;
}
public Bitmap Threshold(Bitmap src, int threshold)
{
Bitmap dst = new Bitmap(src);
BitmapData srcData = dst.LockBits(new Rectangle(0, 0, dst.Width, dst.Height), ImageLockMode.ReadWrite, PixelFormat.Format32bppArgb);
ZPHOTO_Threshold((byte*)srcData.Scan0, dst.Width, dst.Height, srcData.Stride, threshold);
dst.UnlockBits(srcData);
return dst;
}
public Bitmap TransformMirror(Bitmap srcBitmap, int transform_method)
{
Bitmap src = new Bitmap(srcBitmap);
BitmapData srcData = src.LockBits(new Rectangle(0, 0, src.Width, src.Height), ImageLockMode.ReadWrite, PixelFormat.Format32bppArgb);
int[] srcImgSize = new int[3] { src.Width, src.Height, srcData.Stride };
int[] dstImgSize = new int[3];
float[] H = new float[6];
ZPHOTO_CalcWH(srcImgSize, 0, 1.0f, transform_method, dstImgSize, H);
Bitmap dst = new Bitmap(dstImgSize[0], dstImgSize[1]);
BitmapData dstData = dst.LockBits(new Rectangle(0, 0, dst.Width, dst.Height), ImageLockMode.ReadWrite, PixelFormat.Format32bppArgb);
dstImgSize[2] = dstData.Stride;
int Interpolation_method = 0;
ZPHOTO_ImageTransformation((byte*)srcData.Scan0, srcImgSize, (byte*)dstData.Scan0, dstImgSize, H, Interpolation_method, transform_method);
src.UnlockBits(srcData);
dst.UnlockBits(dstData);
return dst;
}
////////////////////////////////////////////////////////////////////////////////////////////////////////////////////////////////
public Bitmap Fragment(Bitmap src)
{
Bitmap dst = new Bitmap(src);
BitmapData srcData = dst.LockBits(new Rectangle(0, 0, dst.Width, dst.Height), ImageLockMode.ReadWrite, PixelFormat.Format32bppArgb);
ZPHOTO_Fragment((byte*)srcData.Scan0, dst.Width, dst.Height, srcData.Stride);
dst.UnlockBits(srcData);
return dst;
}
public Bitmap HueSaturationAdjust(Bitmap src, int hue, int saturation)
{
Bitmap dst = new Bitmap(src);
BitmapData srcData = dst.LockBits(new Rectangle(0, 0, dst.Width, dst.Height), ImageLockMode.ReadWrite, PixelFormat.Format32bppArgb);
ZPHOTO_HueAndSaturationAdjust((byte*)srcData.Scan0, dst.Width, dst.Height, srcData.Stride, hue, saturation);
dst.UnlockBits(srcData);
return dst;
}
////////////////////////////////////////////////////////////////////////////////////////////////////////////////////////////////
public Bitmap ColorTemperatureProcess(Bitmap src, int intensity)
{
Bitmap dst = new Bitmap(src);
BitmapData srcData = dst.LockBits(new Rectangle(0, 0, dst.Width, dst.Height), ImageLockMode.ReadWrite, PixelFormat.Format32bppArgb);
ZPHOTO_ColorTemperatureAdjust((byte*)srcData.Scan0, dst.Width, dst.Height, srcData.Stride, intensity);
dst.UnlockBits(srcData);
return dst;
}
////////////////////////////////////////////////////////////////////////////////////////////////////////////////////////////////
public Bitmap Posterize(Bitmap src, int clusterNum)
{
Bitmap dst = new Bitmap(src);
BitmapData srcData = dst.LockBits(new Rectangle(0, 0, dst.Width, dst.Height), ImageLockMode.ReadWrite, PixelFormat.Format32bppArgb);
ZPHOTO_Posterize((byte*)srcData.Scan0, dst.Width, dst.Height, srcData.Stride, clusterNum);
dst.UnlockBits(srcData);
return dst;
}
public Bitmap Desaturate(Bitmap src)
{
Bitmap dst = new Bitmap(src);
BitmapData srcData = dst.LockBits(new Rectangle(0, 0, dst.Width, dst.Height), ImageLockMode.ReadWrite, PixelFormat.Format32bppArgb);
ZPHOTO_Desaturate((byte*)srcData.Scan0, dst.Width, dst.Height, srcData.Stride);
dst.UnlockBits(srcData);
return dst;
}
////////////////////////////////////////////////////////////////////////////////////////////////////////////////////////////////
public Bitmap OverExposure(Bitmap src)
{
Bitmap dst = new Bitmap(src);
BitmapData srcData = dst.LockBits(new Rectangle(0, 0, dst.Width, dst.Height), ImageLockMode.ReadWrite, PixelFormat.Format32bppArgb);
ZPHOTO_OverExposure((byte*)srcData.Scan0, dst.Width, dst.Height, srcData.Stride);
dst.UnlockBits(srcData);
return dst;
}
////////////////////////////////////////////////////////////////////////////////////////////////////////////////////////////////
public Bitmap ExposureAdjust(Bitmap src, int intensity)
{
Bitmap dst = new Bitmap(src);
BitmapData srcData = dst.LockBits(new Rectangle(0, 0, dst.Width, dst.Height), ImageLockMode.ReadWrite, PixelFormat.Format32bppArgb);
ZPHOTO_ExposureAdjust((byte*)srcData.Scan0, dst.Width, dst.Height, srcData.Stride, intensity);
dst.UnlockBits(srcData);
return dst;
}
public Bitmap LightnessAdjustProcess(Bitmap src, int lightness)
{
Bitmap dst = new Bitmap(src);
BitmapData srcData = dst.LockBits(new Rectangle(0, 0, dst.Width, dst.Height), ImageLockMode.ReadWrite, PixelFormat.Format32bppArgb);
ZPHOTO_LightnessAdjust((byte*)srcData.Scan0, dst.Width, dst.Height, srcData.Stride, lightness);
dst.UnlockBits(srcData);
return dst;
}
////////////////////////////////////////////////////////////////////////////////////////////////////////////////////////////////
public Bitmap ShadowAdjust(Bitmap src, int intensity, int ratio)
{
Bitmap dst = new Bitmap(src);
BitmapData srcData = dst.LockBits(new Rectangle(0, 0, dst.Width, dst.Height), ImageLockMode.ReadWrite, PixelFormat.Format32bppArgb);
ZPHOTO_ShadowAdjust((byte*)srcData.Scan0, dst.Width, dst.Height, srcData.Stride, intensity, ratio);
dst.UnlockBits(srcData);
return dst;
}
public Bitmap HighlightAdjust(Bitmap src, int intensity, int ratio)
{
Bitmap dst = new Bitmap(src);
BitmapData srcData = dst.LockBits(new Rectangle(0, 0, dst.Width, dst.Height), ImageLockMode.ReadWrite, PixelFormat.Format32bppArgb);
ZPHOTO_HighlightAdjust((byte*)srcData.Scan0, dst.Width, dst.Height, srcData.Stride, intensity, ratio);
dst.UnlockBits(srcData);
return dst;
}
public Bitmap Invert(Bitmap src)
{
Bitmap dst = new Bitmap(src);
BitmapData srcData = dst.LockBits(new Rectangle(0, 0, dst.Width, dst.Height), ImageLockMode.ReadWrite, PixelFormat.Format32bppArgb);
ZPHOTO_Invert((byte*)srcData.Scan0, dst.Width, dst.Height, srcData.Stride);
dst.UnlockBits(srcData);
return dst;
}
public Bitmap SurfaceBlur(Bitmap src, int threshold, int radius)
{
Bitmap dst = new Bitmap(src);
BitmapData srcData = dst.LockBits(new Rectangle(0, 0, dst.Width, dst.Height), ImageLockMode.ReadWrite, PixelFormat.Format32bppArgb);
ZPHOTO_SurfaceBlur((byte*)srcData.Scan0, dst.Width, dst.Height, srcData.Stride, threshold, radius);
dst.UnlockBits(srcData);
return dst;
}
public Bitmap NLinearBrightContrastAdjust(Bitmap src, int bright, int contrast, int threshold)
{
Bitmap dst = new Bitmap(src);
BitmapData srcData = dst.LockBits(new Rectangle(0, 0, dst.Width, dst.Height), ImageLockMode.ReadWrite, PixelFormat.Format32bppArgb);
ZPHOTO_NLinearBrightContrastAdjust((byte*)srcData.Scan0, dst.Width, dst.Height, srcData.Stride, bright, contrast, threshold);
dst.UnlockBits(srcData);
return dst;
}
public Bitmap LinearBrightContrastAdjust(Bitmap src, int bright, int contrast, int threshold)
{
Bitmap dst = new Bitmap(src);
BitmapData srcData = dst.LockBits(new Rectangle(0, 0, dst.Width, dst.Height), ImageLockMode.ReadWrite, PixelFormat.Format32bppArgb);
ZPHOTO_LinearBrightContrastAdjust((byte*)srcData.Scan0, dst.Width, dst.Height, srcData.Stride, bright, contrast, threshold);
dst.UnlockBits(srcData);
return dst;
}
public Bitmap FindEdgesProcess(Bitmap src)
{
Bitmap a = new Bitmap(src);
BitmapData srcData = a.LockBits(new Rectangle(0, 0, a.Width, a.Height), ImageLockMode.ReadWrite, PixelFormat.Format32bppArgb);
Bitmap dst = new Bitmap(src);
BitmapData dstData = dst.LockBits(new Rectangle(0, 0, dst.Width, dst.Height), ImageLockMode.ReadWrite, PixelFormat.Format32bppArgb);
ZPHOTO_FindEdges((byte*)srcData.Scan0, a.Width, a.Height, srcData.Stride, (byte*)dstData.Scan0);
a.UnlockBits(srcData);
dst.UnlockBits(dstData);
return dst;
}
public Bitmap GaussFilterProcess(Bitmap src, float radius)
{
Bitmap a = new Bitmap(src);
BitmapData srcData = a.LockBits(new Rectangle(0, 0, a.Width, a.Height), ImageLockMode.ReadWrite, PixelFormat.Format32bppArgb);
Bitmap dst = new Bitmap(src);
BitmapData dstData = dst.LockBits(new Rectangle(0, 0, dst.Width, dst.Height), ImageLockMode.ReadWrite, PixelFormat.Format32bppArgb);
ZPHOTO_FastGaussFilter((byte*)srcData.Scan0, a.Width, a.Height, srcData.Stride, (byte*)dstData.Scan0, radius);
a.UnlockBits(srcData);
dst.UnlockBits(dstData);
return dst;
}
public Bitmap MeanFilterProcess(Bitmap src, int radius)
{
Bitmap a = new Bitmap(src);
BitmapData srcData = a.LockBits(new Rectangle(0, 0, a.Width, a.Height), ImageLockMode.ReadWrite, PixelFormat.Format32bppArgb);
Bitmap dst = new Bitmap(src);
BitmapData dstData = dst.LockBits(new Rectangle(0, 0, dst.Width, dst.Height), ImageLockMode.ReadWrite, PixelFormat.Format32bppArgb);
ZPHOTO_FastMeanFilter((byte*)srcData.Scan0, a.Width, a.Height, srcData.Stride, (byte*)dstData.Scan0, radius);
a.UnlockBits(srcData);
dst.UnlockBits(dstData);
return dst;
}
public Bitmap HighPassProcess(Bitmap src, float radius)
{
Bitmap a = new Bitmap(src);
BitmapData srcData = a.LockBits(new Rectangle(0, 0, a.Width, a.Height), ImageLockMode.ReadWrite, PixelFormat.Format32bppArgb);
Bitmap dst = new Bitmap(src);
BitmapData dstData = dst.LockBits(new Rectangle(0, 0, dst.Width, dst.Height), ImageLockMode.ReadWrite, PixelFormat.Format32bppArgb);
ZPHOTO_HighPass((byte*)srcData.Scan0, a.Width, a.Height, srcData.Stride, (byte*)dstData.Scan0, radius);
a.UnlockBits(srcData);
dst.UnlockBits(dstData);
return dst;
}
public Bitmap USMProcess(Bitmap src, float radius, int amount, int threshold)
{
Bitmap a = new Bitmap(src);
BitmapData srcData = a.LockBits(new Rectangle(0, 0, a.Width, a.Height), ImageLockMode.ReadWrite, PixelFormat.Format32bppArgb);
Bitmap dst = new Bitmap(src);
BitmapData dstData = dst.LockBits(new Rectangle(0, 0, dst.Width, dst.Height), ImageLockMode.ReadWrite, PixelFormat.Format32bppArgb);
ZPHOTO_USM((byte*)srcData.Scan0, a.Width, a.Height, srcData.Stride, (byte*)dstData.Scan0, radius, amount, threshold);
a.UnlockBits(srcData);
dst.UnlockBits(dstData);
return dst;
}
public Bitmap SaturationProcess(Bitmap src, int hue)
{
Bitmap dst = new Bitmap(src);
BitmapData srcData = dst.LockBits(new Rectangle(0, 0, dst.Width, dst.Height), ImageLockMode.ReadWrite, PixelFormat.Format32bppArgb);
ZPHOTO_SaturationAdjust((byte*)srcData.Scan0, dst.Width, dst.Height, srcData.Stride, hue);
dst.UnlockBits(srcData);
return dst;
}
public Bitmap ColorBalanceProcess(Bitmap src, int cyan, int magenta, int yellow, int channel, bool preserveLuminosity)
{
Bitmap dst = new Bitmap(src);
BitmapData srcData = dst.LockBits(new Rectangle(0, 0, dst.Width, dst.Height), ImageLockMode.ReadWrite, PixelFormat.Format32bppArgb);
ZPHOTO_ColorBalance((byte*)srcData.Scan0, dst.Width, dst.Height, srcData.Stride, cyan, magenta, yellow, channel, preserveLuminosity);
dst.UnlockBits(srcData);
return dst;
}
public Bitmap Relief(Bitmap src, int angle, int amount)
{
Bitmap dst = new Bitmap(src);
BitmapData srcData = dst.LockBits(new Rectangle(0, 0, dst.Width, dst.Height), ImageLockMode.ReadWrite, PixelFormat.Format32bppArgb);
ZPHOTO_Relief((byte*)srcData.Scan0, dst.Width, dst.Height, srcData.Stride, angle, amount);
dst.UnlockBits(srcData);
return dst;
}
public Bitmap DiffusionProcess(Bitmap src, int intensity)
{
Bitmap a = new Bitmap(src);
BitmapData srcData = a.LockBits(new Rectangle(0, 0, a.Width, a.Height), ImageLockMode.ReadWrite, PixelFormat.Format32bppArgb);
ZPHOTO_Diffusion((byte*)srcData.Scan0, a.Width, a.Height, srcData.Stride, intensity);
a.UnlockBits(srcData);
return a;
}
public Bitmap MosaicProcess(Bitmap src, int size)
{
Bitmap a = new Bitmap(src);
BitmapData srcData = a.LockBits(new Rectangle(0, 0, a.Width, a.Height), ImageLockMode.ReadWrite, PixelFormat.Format32bppArgb);
ZPHOTO_Mosaic((byte*)srcData.Scan0, a.Width, a.Height, srcData.Stride, size);
a.UnlockBits(srcData);
return a;
}
public Bitmap RadialBlurProcess(Bitmap src, int amount)
{
Bitmap dst = new Bitmap(src);
BitmapData srcData = dst.LockBits(new Rectangle(0, 0, dst.Width, dst.Height), ImageLockMode.ReadWrite, PixelFormat.Format32bppArgb);
ZPHOTO_RadialBlur((byte*)srcData.Scan0, dst.Width, dst.Height, srcData.Stride, dst.Width / 2, dst.Height / 2, amount);
dst.UnlockBits(srcData);
return dst;
}
public Bitmap ZoomBlurProcess(Bitmap src, int radius, int amount)
{
Bitmap dst = new Bitmap(src);
BitmapData srcData = dst.LockBits(new Rectangle(0, 0, dst.Width, dst.Height), ImageLockMode.ReadWrite, PixelFormat.Format32bppArgb);
ZPHOTO_ZoomBlur((byte*)srcData.Scan0, dst.Width, dst.Height, srcData.Stride, dst.Width / 2, dst.Height / 2, radius, amount);
dst.UnlockBits(srcData);
return dst;
}
public Bitmap ColorLevelProcess(Bitmap src, int DestChannel, int InputLeftLimit, float InputMiddle, int InputRightLimit, int OutputLeftLimit, int OutputRightLimit)
{
Bitmap dst = new Bitmap(src);
BitmapData srcData = dst.LockBits(new Rectangle(0, 0, dst.Width, dst.Height), ImageLockMode.ReadWrite, PixelFormat.Format32bppArgb);
//f_TCurveAdjust((byte*)srcData.Scan0, dst.Width, dst.Height, srcData.Stride, DestChannel, InputLeftLimit, InputMiddle, InputRightLimit, OutputLeftLimit, OutputRightLimit);
ZPHOTO_ColorLevelAdjust((byte*)srcData.Scan0, dst.Width, dst.Height, srcData.Stride, DestChannel, (byte)InputLeftLimit, InputMiddle, (byte)InputRightLimit, (byte)OutputLeftLimit, (byte)OutputRightLimit);
dst.UnlockBits(srcData);
return dst;
}
public Bitmap BlackwhiteProcess(Bitmap src, int kRed, int kGreen, int kBlue, int kYellow, int kCyan, int kMagenta)
{
Bitmap dst = new Bitmap(src);
BitmapData srcData = dst.LockBits(new Rectangle(0, 0, dst.Width, dst.Height), ImageLockMode.ReadWrite, PixelFormat.Format32bppArgb);
ZPHOTO_Blackwhite((byte*)srcData.Scan0, dst.Width, dst.Height, srcData.Stride, kRed, kGreen, kBlue, kYellow, kCyan, kMagenta);
dst.UnlockBits(srcData);
return dst;
}
}
}
~~~
4,有了上述步骤后,我们就完成了一个测试DEMO中,添加ZPhotoEngine.dll的过程,下面我们就可以使用了,其实主要就是两步:添加DLL库+ZPhotoEngineDll.cs。
5,下面我们按照上一篇博文中PS的实现步骤,写出代码如下:
大家可以看到,就上面这一点代码,就轻松实现了乐高像素拼图特效的滤镜,最后放上效果图对比:

原图

PS实现效果图

程序实现效果图
大家可以对比一下,几乎是一模一样的呵呵,以上就是整个过程了,代码我写的都是主要代码,这里给出整个工程的源代码免费下载地址:[点击打开链接](http://download.csdn.net/detail/trent1985/9336019)
最后在给出ZPhotoEngine库的下载地址:[点击打开链接](http://www.zealpixel.com/portal.php?mod=view&aid=45)
乐高像素拼图特效
最后更新于:2022-04-01 06:46:54
本文介绍乐高像素拼图特效滤镜的实现,这里仅仅介绍PS实现过程,关于程序的实现,大家可以使用ZPhotoEngine来实现,这个引擎可以在www.zealpixel.com上下载,是免费的。
现在介绍PS的实现过程:
1,打开一张美丽的图像:

原图
复制图层,命名为”马赛克“,然后对该图层执行”滤镜-像素化-马赛克-20“:

2,复制”马赛克“图层,命名为”马赛克副本“:

3,对马赛克副本图层执行”调整-色调分离-4“,然后选择图层混合模式”叠加“:

4,在PS中打开如下乐高像素模板图像,并执行”编辑-定义图案-图案1“:

5,复制马赛克副本图层,命名为”乐高像素模板“,填充图案1:

6,对该图层执行图层混合模式”线性光“:

7,这样乐高像素拼图效果就完成了,这里跟大家分享一下,希望大家喜欢!最后放上效果图:

ZPhotoEngine超级算法库
最后更新于:2022-04-01 06:46:52
一直以来,都有个想法,想要做一个属于自己的图像算法库,这个想法,在经过了几个月的努力之后,终于诞生了,这就是ZPhotoEngine算法库。

这个算法库目前包含两个模块:基础图像算法模块+滤镜模块,使用C语言实现,现在免费分享给大家,可以适用于PC/Android/Ios三大平台。
**1,基础图像算法模块**
这个模块,本人以Photoshop基础算法为原形,模拟出了PS大部分的基础算法。
为什么选择Photoshop算法?这个也是我的算法库一个优势,目前开源算法库多如牦牛,但是,能和PS媲美的,少之又少。毕竟现在从摄影照相,到工业设计等等,都在使用Photoshop,试想一下,对于一个图像特效团队来说,如果产品设计人员使用PS设计了一种图像特效,而特效团队又拥有PS的图像算法库,那么,实现这种特效岂不是SO EASY?这不单单是提高效率的问题,更是提高产品的质量,提高产能的事情!
目前,基础算法模块都包含在ZPhotoEngine里面,其中包含了如下功能:
**1.1,基础功能**
ZPHOTO_SaturationAdjust饱和度调节
ZPHOTO_HueAndSaturationAdjust色相 饱和度调节
ZPHOTO_LightnessAdjust明度调节
ZPHOTO_LinearBrightContrastAdjust线性对比度亮度调节
ZPHOTO_NLinearBrightContrastAdjust非线性对比度亮度调节
ZPHOTO_AutoContrastAdjust自动对比度调节
ZPHOTO_AutoColorGradationAdjust自动色阶调节
ZPHOTO_CurveAdjust曲线调节调节
ZPHOTO_ColorLevelAdjust色阶调节
ZPHOTO_Posterize色调分离
ZPHOTO_OverExposure多度曝光
ZPHOTO_Invert反相
ZPHOTO_HistagramEqualize色调均化
ZPHOTO_Desaturate去色
ZPHOTO_Blackwhite黑白
ZPHOTO_Threshold阈值
ZPHOTO_FastGaussFilter高斯模糊
ZPHOTO_HighPass高反差保留
ZPHOTO_USM USM锐化
ZPHOTO_FindEdges查找边缘
ZPHOTO_ChannelMixProcess通道混合器
ZPHOTO_Fragment 碎片
ZPHOTO_MotionBlur 运动模糊
ZPHOTO_SurfaceBlur 表面模糊
ZPHOTO_RadialBlur旋转模糊
ZPHOTO_ZoomBlur缩放模糊
ZPHOTO_Relief浮雕
ZPHOTO_Mean平均
ZPHOTO_Mosaic马赛克
ZPHOTO_ColorBalance色彩平衡
ZPHOTO_Diffusion扩散
**1.2,扩展功能**
ZPHOTO_ColorTemperatureAdjust色温调节
ZPHOTO_ShadowAdjust阴影调节
ZPHOTO_HighlightAdjust高光调节
ZPHOTO_ExposureAdjust曝光调节
ZPHOTO_FastMeanFilter均值模糊
ZPHOTO_LSNBlur LSN模糊
ZPHOTO_SobelFilter Sobel边缘检测
ZPHOTO_ImageTransformation图像变换(缩放,旋转,镜像,翻转,仿射变换)
ZPHOTO_RGBA2BGRA 图像RGBA转BGRA(Android定制)
ZPHOTO_BGRA2RGBA 图像BGRA转RGBA(Android定制)
**1.3,图层混合算法**
ZPHOTO_ImageBlendEffect双图层混合接口
ZPHOTO_ModeDarken变暗图层混合模式
ZPHOTO_ModeMultiply正片叠底图层混合模式
ZPHOTO_ModeColorBurn颜色加深图层混合模式
ZPHOTO_ModeLinearBurn线性渐变图层混合模式
ZPHOTO_ModeDarkness深色图层混合模式
ZPHOTO_ModeLighten变亮图层混合模式
ZPHOTO_ModeScreen滤色图层混合模式
ZPHOTO_ModeColorDodge颜色减淡图层混合模式
ZPHOTO_ModeColorLinearDodge颜色线性减淡图层混合模式
ZPHOTO_ModeColorDodge浅色图层混合模式
ZPHOTO_ModeOverlay叠加图层混合模式
ZPHOTO_ModeSoftLight柔光图层混合模式
ZPHOTO_ModeHardLight强光图层混合模式
ZPHOTO_ModeVividLight亮光图层混合模式
ZPHOTO_ModeLinearLight线性光图层混合模式
ZPHOTO_ModePinLight点光图层混合模式
ZPHOTO_ModeSolidColorMixing实色图层混合模式
ZPHOTO_ModeDifference差值图层混合模式
ZPHOTO_ModeExclusion排除图层混合模式
ZPHOTO_ModeSubtraction减去图层混合模式
ZPHOTO_ModeDivide划分图层混合模式
ZPHOTO_ModeDesaturate去色模式
ZPHOTO_ModeColorInvert反相模式
**1.4,颜色空间转换**
包含RGB与YUV、YCbCr、XYZ、HSL、HSV、CMYK、YDbDr、YIQ、LAB等颜色空间的相互转换接口
**2,滤镜模块ZEffectEngine**
滤镜模块ZEffectEngine,也是我们算法库的一个特色。目前市面上的滤镜特效可谓是层出不穷,以Instagram/Camera360/美图秀秀+美颜相机等为代表,他们的滤镜几乎涵盖了我们的日常生活使用的一大半,而我们的ZEffectEngine,主要是参考借鉴他们的特效,取长补短,实现了差不多上百款滤镜,这些滤镜算法不仅效果不错,而且速度快,调用简单,极大方便了图像应用app的开发。
现在主要包含的滤镜如下:
//////////////////////////模拟实现Instagram滤镜//////////////////////////
FILTER_IDA_NONE
FILTER_IDA_1977
FILTER_IDA_INKWELL
FILTER_IDA_KELVIN
FILTER_IDA_NASHVILLE
FILTER_IDA_VALENCIA
FILTER_IDA_XPROII
FILTER_IDA_BRANNAN
FILTER_IDA_WALDEN
FILTER_IDA_ADEN
FILTER_IDA_ASHBY
FILTER_IDA_BROOKLYN
FILTER_IDA_CHARMES
FILTER_IDA_CLARENDON
FILTER_IDA_CREMA
FILTER_IDA_DOGPACH
FILTER_IDA_GINGHAM
FILTER_IDA_GINZA
FILTER_IDA_HEFE
FILTER_IDA_HELENA
FILTER_IDA_JUNO
FILTER_IDA_LARK
FILTER_IDA_LUDWIG
FILTER_IDA_MAVEN
FILTER_IDA_MOON
FILTER_IDA_REYES
FILTER_IDA_SKYLINE
FILTER_IDA_SLUMBER
FILTER_IDA_STINSON
FILTER_IDA_VESPER
//////////////////////////模拟实现美图滤镜//////////////////////////
FILTER_IDB_WARMER //一键美颜_暖暖
FILTER_IDB_CLEAR //一键美颜_清晰
FILTER_IDB_WHITESKINNED //一键美颜_白皙
FILTER_IDB_COOL //一键美颜_冷艳
FILTER_IDB_ELEGANT //LOMO_淡雅
FILTER_IDB_ANCIENT //LOMO_复古
FILTER_IDB_GETE //LOMO_哥特风
FILTER_IDB_BRONZE //LOMO_古铜色
FILTER_IDB_LAKECOLOR //LOMO_湖水
FILTER_IDB_SLLY //LOMO_深蓝泪雨
FILTER_IDB_SLIVER //格调_银色
FILTER_IDB_FILM //格调_胶片
FILTER_IDB_SUNNY //格调_丽日
FILTER_IDB_WWOZ //格调_绿野仙踪
FILTER_IDB_LOVERS //格调_迷情
FILTER_IDB_LATTE //格调_拿铁
FILTER_IDB_JAPANESE //格调_日系
FILTER_IDB_SANDGLASS //格调_沙漏
FILTER_IDB_AFTEA //格调_午茶
FILTER_IDB_SHEEPSCROLL //格调_羊皮卷
FILTER_IDB_PICNIC //格调_野餐
FILTER_IDB_ICESPIRIT //美颜_冰灵
FILTER_IDB_REFINED //美颜_典雅
FILTER_IDB_BLUESTYLE //美颜_蓝调
FILTER_IDB_LOLITA //美颜_萝莉
FILTER_IDB_LKK //美颜_洛可可
FILTER_IDB_NUANHUANG //美颜_暖黄
FILTER_IDB_RCOOL //美颜_清凉
FILTER_IDB_JSTYLE //美颜_日系人像
FILTER_IDB_SOFTLIGHT //美颜_柔光
FILTER_IDB_TIANMEI //美颜_甜美可人
FILTER_IDB_WEIMEI //美颜_唯美
FILTER_IDB_PURPLEDREAM //美颜_紫色幻想
FILTER_IDB_FOOD //智能_美食
//////////////////////////模拟实现Camera360滤镜效果//////////////////////////
FILTER_IDC_MOVIE //LOMO_电影
FILTER_IDC_MAPLELEAF //LOMO_枫叶
FILTER_IDC_COOLFLAME //LOMO_冷焰
FILTER_IDC_WARMAUTUMN //LOMO_暖秋
FILTER_IDC_CYAN //LOMO_青色
FILTER_IDC_ZEAL //LOMO_热情
FILTER_IDC_FASHION //LOMO_时尚
FILTER_IDC_EKTAR //弗莱胶片 -- Ektar
FILTER_IDC_GOLD //弗莱胶片 -- Gold
FILTER_IDC_VISTA //弗莱胶片 -- Vista
FILTER_IDC_XTAR //弗莱胶片 -- Xtra
FILTER_IDC_RUDDY //魔法美肤 -- 红润
FILTER_IDC_SUNSHINE //魔法美肤 -- 暖暖阳光
FILTER_IDC_FRESH //魔法美肤 -- 清新丽人
FILTER_IDC_SWEET //魔法美肤 -- 甜美可人
FILTER_IDC_BLACKWHITE //魔法美肤 -- 艺术黑白
FILTER_IDC_WHITENING //魔法美肤 -- 自然美白
FILTER_IDC_JPELEGANT //日系 -- 淡雅
FILTER_IDC_JPJELLY //日系 -- 果冻
FILTER_IDC_JPFRESH //日系 -- 清新
FILTER_IDC_JPSWEET //日系 -- 甜美
FILTER_IDC_JPAESTHETICISM //日系 -- 唯美
FILTER_IDC_JPWARM //日系 -- 温暖
//////////////////////////其他滤镜效果//////////////////////////
FILTER_IDD_CARTOON //卡通
FILTER_IDD_DARK //暗调
FILTER_IDD_GLOW //Glow
FILTER_IDD_LOMO //LOMO
FILTER_IDD_NEON //霓虹
FILTER_IDD_OILPAINT //油画
FILTER_IDD_PUNCH //冲印
FILTER_IDD_REMINISCENT //怀旧
FILTER_IDD_SKETCH //素描
FILTER_IDD_GRAPHIC //连环画
FILTER_IDD_ABAOSE //阿宝色
具体效果,简单分享几个:

原图
Instagram 1977滤镜效果

Instagram Kelvin滤镜效果
Instagram Nashville滤镜效果

Camera360 电影 滤镜效果

美图秀秀 紫色幻想 滤镜效果
以上就是目前ZPhotoEngine的主要功能,未来我们还将实现美颜等模块,来跟大家分享一下!
最后,我给个下载连接:
PC版DEMO下载连接:[点击打开链接](http://download.csdn.net/detail/trent1985/9247631)
ZPhotoEngine库下载连接(包含PC版+Android版):[点击打开链接](http://download.csdn.net/detail/trent1985/9237423)
注意:接口说明文档包含在下载连接中,大家有兴趣的可以根据说明文档来调用,实现自己的美图秀秀和PS!
Photoshop实现Instagram之Mayfair滤镜效果
最后更新于:2022-04-01 06:46:50
本文介绍一下如何使用Photoshop来实现Instagram中的Mayfair滤镜的效果。


以上就是这个滤镜实现的全过程,这个过程可以完全使用程序实现的,如果大家想要使用程序实现,这里我可以
Photoshop实现Instagram之Sierra滤镜
最后更新于:2022-04-01 06:46:47
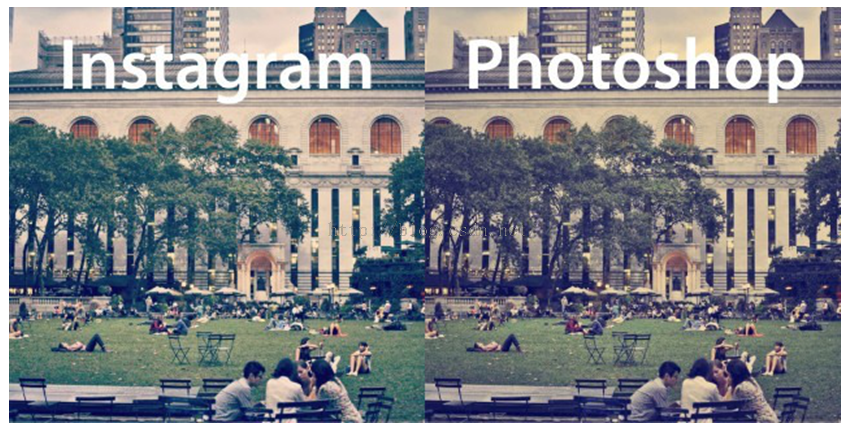
本文介绍PS实现Instagram中的Sierra滤镜,内容如下:
先看下效果图:
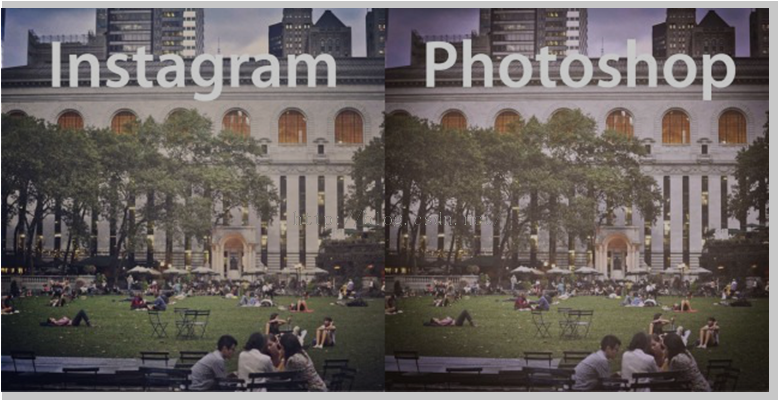
下面是具体实现步骤:
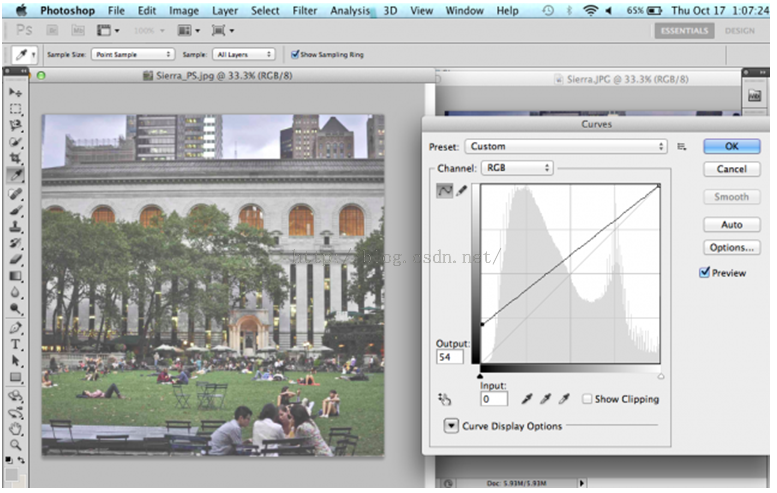
1. To replicate the faded look of Sierra, adjust the Curves of the photo with Command / Ctrl + M, or Image > Adjustments > Curves. Move the left point of the curve directly up the y-axis.
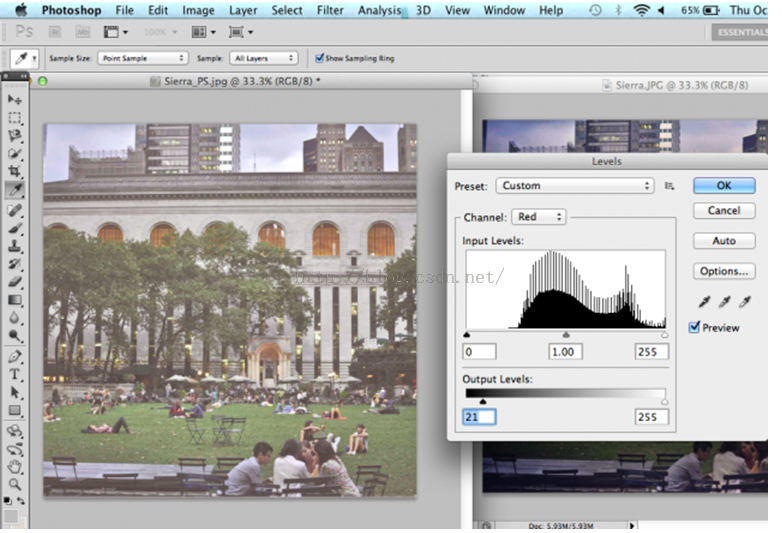
2. Adjust the levels with Command / Ctrl + L, or Image > Adjustments > Levels. Select "Red" in the "Channel" dropdown menu and increase the Output Levels to 21 by moving the left slider toward the center.
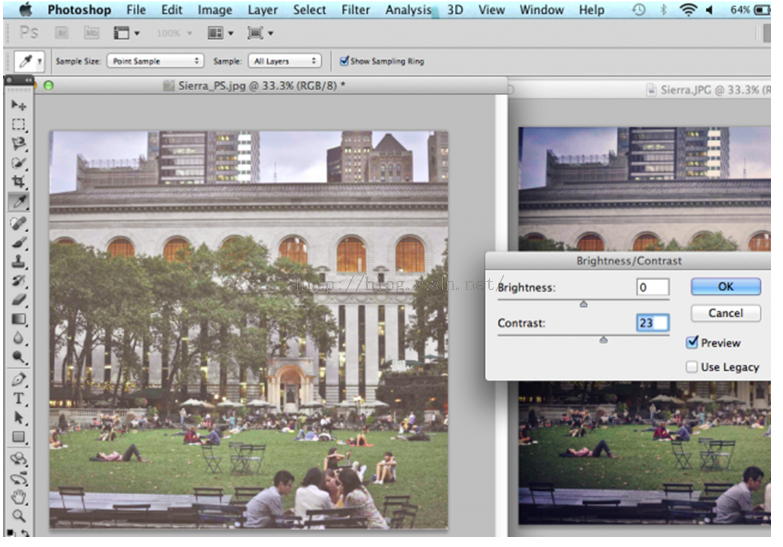
[](http://mashable.com/2013/10/20/photoshop-instagram-filters/)[](http://mashable.com/2013/10/20/photoshop-instagram-filters/)[](http://mashable.com/2013/10/20/photoshop-instagram-filters/)3. Increase the Contrast by going to Image > Adjustments > Brightness/Contrast.
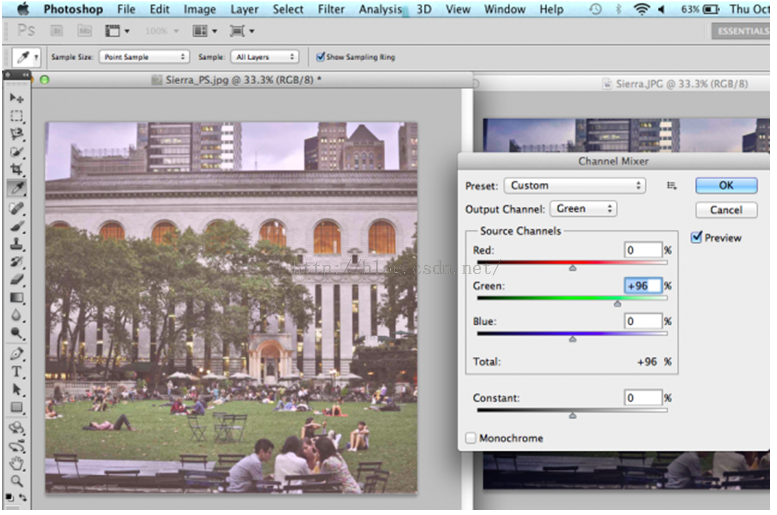
4. Adjust the channels by going to Image > Adjustments > Channel Mixer. Select "Green" in the "Output Channel" dropdown menu and move the Green slider to the right, giving the photo less of a green tint.
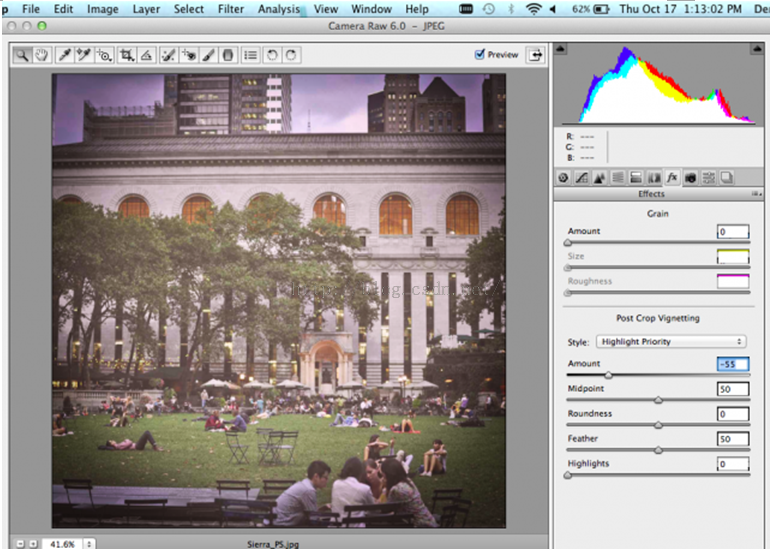
[](http://mashable.com/2013/10/20/photoshop-instagram-filters/)[](http://mashable.com/2013/10/20/photoshop-instagram-filters/)[](http://mashable.com/2013/10/20/photoshop-instagram-filters/)5. Save the image as is and reopen it in Camera Raw to add a vignette frame. You can do this by exiting out of the current window, then going to File > Open. Select the correct file, then select "Camera Raw" in the "Format" dropdown menu.
6. Once you have the file open in Camera Raw, select the Effects menu on the right-hand side of the editor. Make sure that "Highlight Priority" is selected in the "Style" dropdown menu. Move the "Amount" slider left to make a black vignette around the edges of the photo. Click "Save Image" to save the final result.
**以上就是整个实现过程,如果大家需要用程序实现上述过程,可以使用ZPhotoEngine库来轻松实现,下载地址为**:[点击打开链接](http://www.zealpixel.com/portal.php?mod=list&catid=14)
Photoshop实现Instagram之Nashville滤镜
最后更新于:2022-04-01 06:46:45
本文继续介绍使用PS来实现Instagram中的Nashville滤镜特效,有人说这个没什么用,直接用INSTAGRAM就可以了,干嘛用PS,问一下,PS可以处理单反高清照片,Instagram可以么?呵呵,开个玩笑,下面进入正题。
先看效果图:
接着是PS实现,这里还是英文的,不过有图示,不懂英文也没关系呵呵,资料来自网络搜集,所以本人也懒得翻译了。
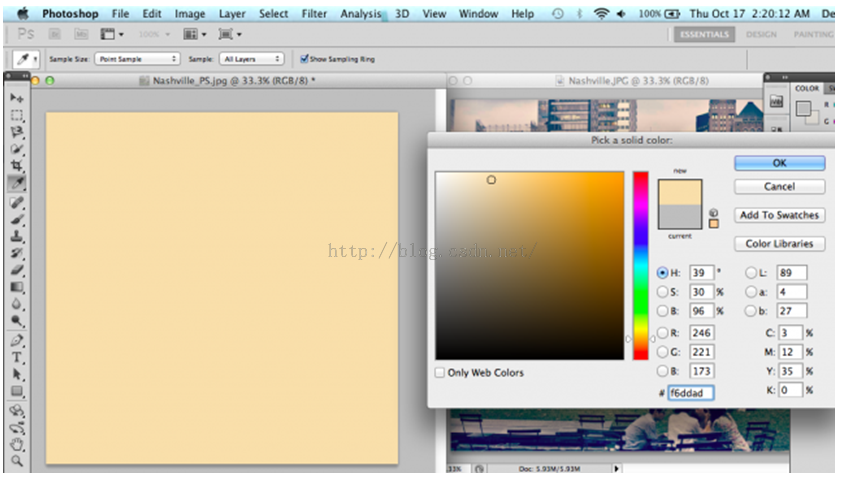
1. To mimic the soft purple tint of the Nashville filter, open up the Levels menu with Command / Ctrl + L or Image > Adjustments > Levels. Select "Blue" in the dropdown menu for "Channel." Increase the Output Levels at the bottom of the menu from 0 to 58 by dragging the left slider toward the center of the spectrum.

[](http://mashable.com/2013/10/20/photoshop-instagram-filters/)[](http://mashable.com/2013/10/20/photoshop-instagram-filters/)[](http://mashable.com/2013/10/20/photoshop-instagram-filters/)[](http://mashable.com/2013/10/20/photoshop-instagram-filters/)2. To soften the blue tint a bit, add a new layer of light yellow by going to Layer > New Fill Layer > Solid Color. The hex color #f6ddad adds a peachy tone to contrast the blue.
3. Next, increase by Brightness and decrease the Contrast by going to Image > Adjustments > Brightness/Contrast.

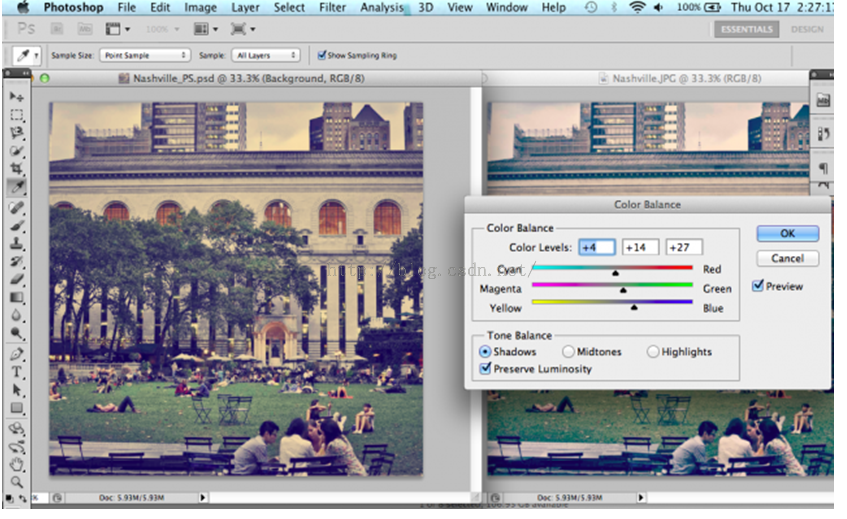
4. Change the Color Balance with Command / Ctrl + B, or Image > Adjustments > Color Balance. Increase the Cyan, Green and Blue levels.
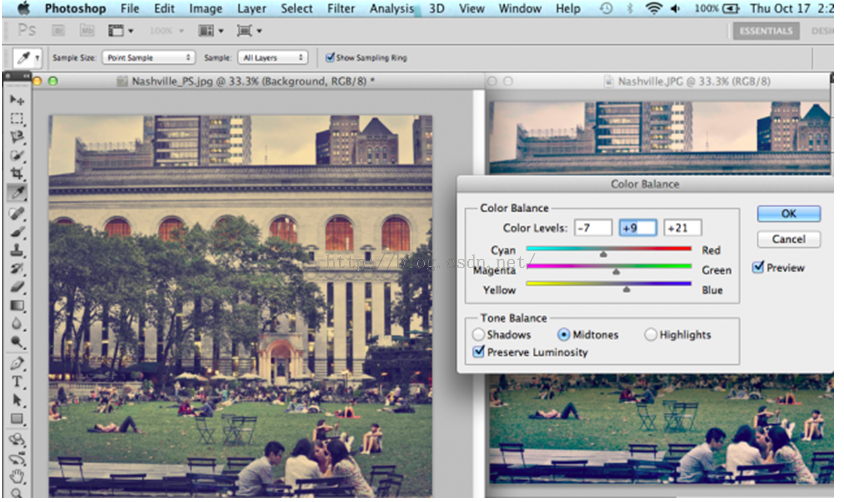
[](http://mashable.com/2013/10/20/photoshop-instagram-filters/)[](http://mashable.com/2013/10/20/photoshop-instagram-filters/)[](http://mashable.com/2013/10/20/photoshop-instagram-filters/)[](http://mashable.com/2013/10/20/photoshop-instagram-filters/)5. If the color is still not quite right, change the hue with Command / Ctrl + U, or Image > Adjustments > Hue/Saturation. I moved the Hue slider just a bit to the right to emphasize the blue a bit more.

[](http://mashable.com/2013/10/20/photoshop-instagram-filters/)[](http://mashable.com/2013/10/20/photoshop-instagram-filters/)[](http://mashable.com/2013/10/20/photoshop-instagram-filters/)6. From here, I went back and adjusted the Color Balance a bit more by moving all sliders just a bit to the right for the final result.
上述实现均可以使用编程实现,有兴趣的同学们可以使用ZPhotoEngine库来实现,这个库是一个免费的PS功能库,适用于PC、Android、IOS等平台,很不错,下载地址:[点击打开链接](http://www.zealpixel.com/portal.php?mod=list&catid=14)
Photoshop实现Instagram Amaro滤镜特效
最后更新于:2022-04-01 06:46:43
本文是我收集的一些使用Photoshop来实现Instagram滤镜的一些内容,在这里跟大家分享一下,这些效果是完全可以使用程序实现的,这个感兴趣的可以使用ZPHOTOENGINE库来实现,这个PS算法库的下载地址:[点击打开链接](http://www.zealpixel.com/portal.php?mod=list&catid=14)
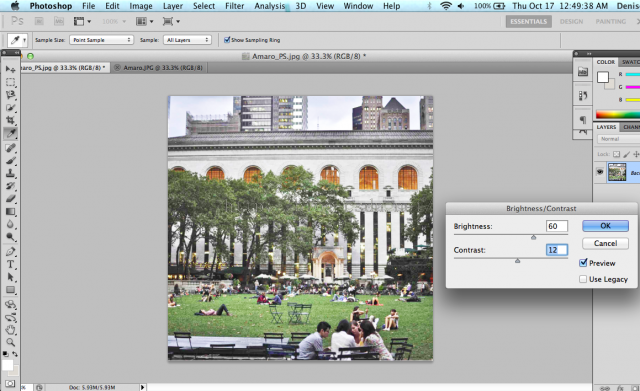
下面开始介绍Amaro滤镜实现的内容,这些内容是英文版的,对于不懂英文的,直接看PS操作图即可。
## 1. Amaro
[](http://mashable.com/2013/10/20/photoshop-instagram-filters/)[](http://mashable.com/2013/10/20/photoshop-instagram-filters/)1. First, increase the brightness and contrast of your picture. Do this by going to Image > Adjustments > Brightness/Contrast.
2. To add a soft yellow light, create a new fill layer over the photo. Go to Layer > New Fill Layer > Solid Color. Play around until you find a good shade, or you could just enter the shade I used in the hex color code field: #f4eabd.
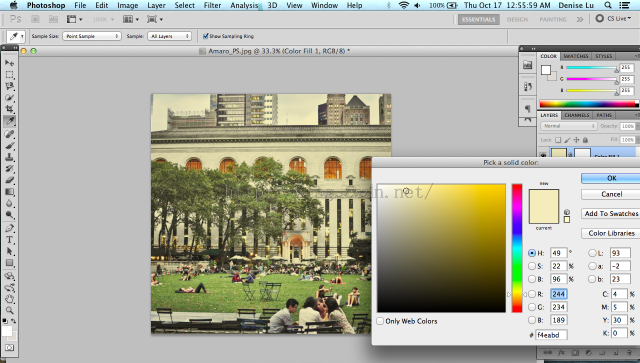
3. Click OK. While you still have the layer selected, click on the dropdown menu right above it and select "Multiply" instead of the default of "Normal." This will add a soft light over your photo as opposed to an opaque layer.
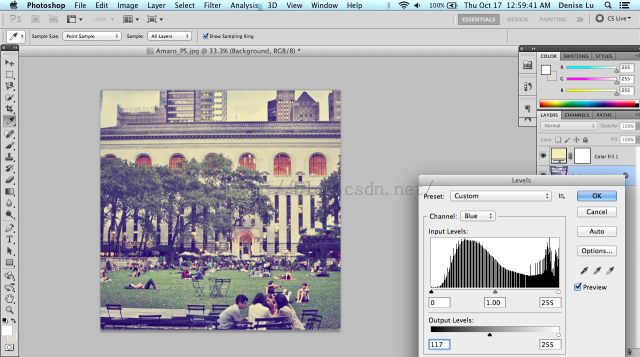
4. Next, open up the Levels menu. You can do this with Command / Ctrl + L, or you can go to Image > Adjustments > Levels. In the dropdown menu for "Channel," select "Blue." Increase the Output Levels at the bottom of the menu from 0 to 117 by dragging the left slider towards the center of the spectrum. This will add a blue tint to the photo.
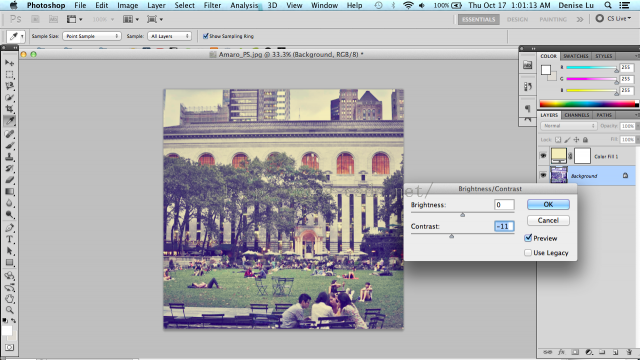
5. From here, I had to make some more minor adjustments by decreasing the Contrast a bit more to give it a faded look.
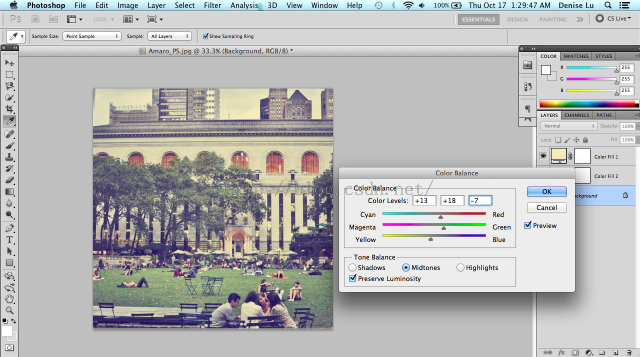
6. Next, open up Color Balance with Command / Ctrl + B, or Image > Adjustments > Color Balance. Make sure the radio dial below is set to "Midtones." Play around until you have a good blend of colors, but I chose to increase my Red, Green and Yellow levels.
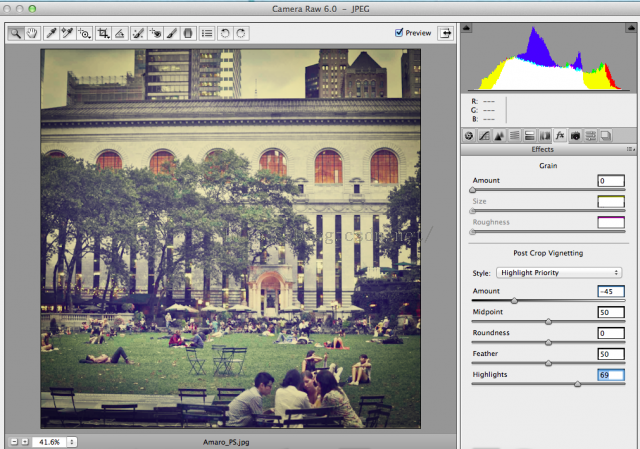
7. Finally, save the image as is and reopen it up in Camera Raw to add a vignette frame. You can do this by exiting out of the current window, then going to File > Open. Select the correct file, then select "Camera Raw" in the "Format" dropdown menu.
8. Once you have the file open in Camera Raw, select the Effects menu on the right-hand side of the editor. Make sure that "Highlight Priority" is selected in the "Style" dropdown menu. Move the "Amount" slider left to make a black vignette around the edges of the photo. Once you're satisfied with the vignette, move the "Highlights" slider to the right so that the vignette will not affect the highlights as much. Click "Save Image" once you're done.
到此,Amaro滤镜已经实现完成了,虽然无法和Instagram一模一样,但是整体效果已经出来了。如果大家需要一模一样的效果,那么可以直接联系我:QQ1358009172
PS平均(滤镜-模糊-平均)效果
最后更新于:2022-04-01 06:46:40
本文介绍PS中滤镜-模糊-平均模糊的效果实现:
这个效果很简单,原理如下:
1,统计全图像素的R,G,B值得和sumR,sumG,sumB;
2,计算平均R,G,B(R = sumR/(width*height)...);
3,用平均R,G,B代替全图所有像素即可。
代码实现如下:
~~~
public static Bitmap Mean(Bitmap src)
{
Bitmap dst = new Bitmap(src);
BitmapData srcData = dst.LockBits(new Rectangle(0, 0, dst.Width, dst.Height), ImageLockMode.ReadWrite, PixelFormat.Format32bppArgb);
byte* p = (byte*)srcData.Scan0;
int i, j;
int sumR, sumG, sumB;
int pos;
int width = dst.Width;
int height = dst.Height;
int stride = srcData.Stride;
sumB = 0; sumG = 0; sumR = 0;
for (j = 0; j < height; j++)
{
for (i = 0; i < width; i++)
{
pos = i * 4 + j * stride;
sumB += p[pos];
sumG += p[pos + 1];
sumR += p[pos + 2];
}
}
pos = width * height;
sumB = sumB / pos;
sumG = sumG / pos;
sumR = sumR / pos;
for (j = 0; j < height; j++)
{
for (i = 0; i < width; i++)
{
pos = i * 4 + j * stride;
p[pos] = (byte)sumB;
p[pos + 1] = (byte)sumG;
p[pos + 2] = (byte)sumR;
}
}
dst.UnlockBits(srcData);
return dst;
}
~~~
效果与PS一模一样:

原图

本文算法效果图

PS效果图
跟大家分享一下!
图像滤镜晕影调节算法研究
最后更新于:2022-04-01 06:46:38
## 本文对滤镜中常见的晕影,晕角效果的实现做了研究,具体如下:
## 1 晕影调整算法
所谓晕影就是给图像四个角添加暗影效果,这暗影向图像中心逐渐淡化。我们使用如下公式来实现:
假设图像宽度高度分别为w,h:
~~~
double d = Math.Sqrt((i - w / 2) * (i - w / 2) + (j - h / 2) * (j - h / 2));
double dmax = 1.0 / Math.Sqrt(w * w / 4 + h * h / 4);
double lum = 0.75 / (1.0 + Math.Exp((d * dmax - cRadius) * cGradient)) + cLight;
//eg:double lum = 0.75 / (1.0 + Math.Exp((d * dmax - 0.85) * 5)) + 0.35;
r = (int)((double)r * lum);
g = (int)((double)g * lum);
b = (int)((double)b * lum);
~~~
注释:
cRadius (cRadius=0.73)这个参数控制晕影的半径,值越大,半径越大;
cLight (cLight=0.25)控制中心圆形区域内的像素亮度,值越大,图像越亮;
cGradient (cGradient=20)这个参数控制中心区域与晕影过渡部分的梯度,值越小,过渡越自然,越不明显;
上述算法实现的是圆形晕影。
有了晕影图像之后,我们采用K比例混合算法来实现晕影强度的可调性,假设晕影图像为S(n,m),原图为X(n,m),效果图为Y(n,m),晕影强度因子为K,K属于[0,1],混合公式如下:
Y(n,m)=K*X(n,m)+(1-K)*S(n,m)
这样就实现了晕影效果从无到有的调节过程。
## 2 晕影调节快速算法
晕影调节的快速算法主要是改进晕影图像的生成过程。我们可以按照自己的需求使用PS制作出一张晕影效果图,来代替算法生成晕影图像的过程,这样就可以节省算法生成的时间了,之后的调节过程不变。
当然,这个算法的缺点就是晕影的半径,过渡程度和亮度无法调整。
目前,这里给出Instagram里使用的晕角模板:
[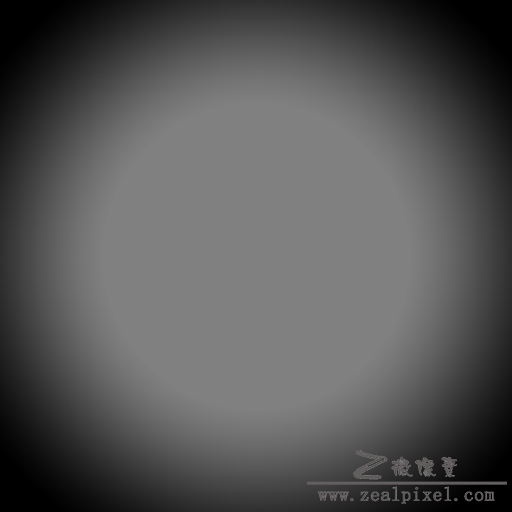](http://www.zealpixel.com/data/attachment/portal/201509/26/081917r0qevid2d1q3e3tt.png)
在Instagram中,是使用这个模板与目标图像执行“柔光”混合图层算法,得到晕角效果的,然后使用1中的K比例混合算法,来快速调节。
最后给出android 中C代码,可以直接使用。
## 附录 Android C Code with RGB565
~~~
void THaloEffect(int* srcData, int width, int height) {
int gray = 0, green = 0, blue = 0, red = 0, i = 0, j = 0, alpha = 0xFF << 24;
for(j = 0; j < height; j++)
{
for(i = 0; i < width; i++)
{
gray = srcData[i + j * width];
red = ((gray >> 16) & 0xFF);
green = ((gray >> 8) & 0xFF);
blue = (gray & 0xFF);
double d = sqrt((i - width / 2) * (i - width / 2) + (j - height / 2) * (j - height / 2));
double dmax = 1.0 / sqrt(width * width / 4 + height * height / 4);
//double lum = 0.75 / (1.0 + Math.Exp((d * dmax - 0.73) * 20)) + 0.25;
double lum = 0.75 / (1.0 + exp((d * dmax - 0.73) * 20)) + 0.25;
red = (int)((double)red * lum);
red = CheckRange(red);
green = (int)((double)green * lum);
green = CheckRange(green);
blue = (int)((double)blue * lum);
blue = CheckRange(blue);
srcData[i + j * width] = alpha | (red << 16) | (green << 8) | blue;
}
}
};
void THaloEffect_F(int* srcData, int* mask, int width, int height, int ratio)
{
int gray = 0,green = 0,blue = 0,red = 0,i = 0, mRed = 0, mGreen = 0, mBlue = 0, alpha = 0xFF << 24;
int length = width * height;
for (i = 0; i < length; i++) {
gray = srcData[i];
red = ((gray >> 16) & 0xFF);
green = ((gray >> 8) & 0xFF);
blue = (gray & 0xFF);
gray = mask[i];
mRed = ((gray >> 16) & 0xFF);
mGreen = ((gray >> 8) & 0xFF);
mBlue = (gray & 0xFF);
mRed = ModeSmoothLight(red, mRed);
mGreen = ModeSmoothLight(green, mGreen);
mBlue = ModeSmoothLight(blue, mBlue);
red = (mRed * ratio + (100 - ratio) * red) / 100;
green = (mGreen * ratio + (100 - ratio) * green) / 100;
blue = (mBlue * ratio + (100 - ratio) * blue) / 100;
srcData[i] = alpha | (red << 16) | (green << 8) | blue;
}
};
~~~
霓虹、浮雕、木刻滤镜
最后更新于:2022-04-01 06:46:36
图像特效往往可以将普通的照片呈现出一种令人耳目一新的效果,特效的种类繁多,比如各种流行的
滤镜特效等等,今天,我们介绍几种最简单的滤镜:霓虹效果,浮雕效果和木刻效果。
##1,霓虹滤镜
霓虹是用来描绘图像的轮廓,勾画出颜色变化的边缘,加强其过度效果,使图像产生轮廓发光的效果。主要原理是根据当前像素与其右方和下方像素的梯度运算,然后将结果值作为当前像素值,即将原图当前下像素的RGB分量与其右方和下方像素做梯度 运算(差的平方和平方根),然后将梯度值作为处理后的像素的RGB三个分量。
算法过程如下公式所示:
[](http://www.zealpixel.com/data/attachment/portal/201507/18/090043ylfludurz3bgkm3g.png)
其中,P(x,y)为3X3模板中心位置像素。
## 2,浮雕滤镜
浮雕滤镜是将图像变换为灰色的浮雕效果。算法过程如下公式所示:
[](http://www.zealpixel.com/data/attachment/portal/201507/19/093434e1y6s14jz2f44fjk.png)
##3,木刻滤镜
木刻滤镜比较简单,实际上就是图像二值化的效果,设置一个阈值,大于阈值的像素值赋值为255,否则为0,具体公式请看二值化篇幅介绍。
以上就是三个最简单的滤镜效果,最后放上效果图如下(图像依次为原图,霓虹滤镜,浮雕滤镜,木刻滤镜):
[](http://www.zealpixel.com/data/attachment/portal/201507/19/094224a2933623ujpvmi6v.jpg)[](http://www.zealpixel.com/data/attachment/portal/201507/19/094231stii6z7i7o18iz85.png)[](http://www.zealpixel.com/data/attachment/portal/201507/19/094241cs3tv8wc3xn937wi.png)[](http://www.zealpixel.com/data/attachment/portal/201507/19/094242p8lvjl88fmvamm4g.png)
以上是三个滤镜效果展示,希望大家喜欢,在以后的篇幅里,我们将介绍各种新奇的滤镜效果,努力给大家耳目一新的感觉!我们的目标是:做最专业的图像滤镜效果!
最后放上完整版C#程序DEMO下载链接:
霓虹滤镜:[http://www.zealpixel.com/forum.php?mod=viewthread&tid=47&extra=page%3D1](http://www.zealpixel.com/forum.php?mod=viewthread&tid=47&extra=page%3D1)
浮雕滤镜:[http://www.zealpixel.com/forum.php?mod=viewthread&tid=48&extra=page%3D1](http://www.zealpixel.com/forum.php?mod=viewthread&tid=48&extra=page%3D1)
旋转模糊滤镜
最后更新于:2022-04-01 06:46:34
本文介绍一种旋转模糊滤镜的实现算法。
旋转模糊主要特点是:整张图像围绕一个中心点做旋转变换,同时有个控制旋转程度的变量和一个控制模糊程度的变量,来完成这个效果。图像中距离中心点越近,旋转和模糊的程度都越小,反之,越大。
假设中心点O坐标为(cenX,cenY),当前点位置为P(x,y):
1,PO距离Dis=Math.Sqrt((y - cenY) * (y - cenY) + (x - cenX) * (x - cenX));
2,PO和水平方向夹角angle=Math.Atan2((double)(y - cenY), (double)(x - cenX));
3,当前点P对应的旋转后新的坐标newX,newY计算:
newX = Dis * Math.Cos(angle) + cenX;
newY = Dis * Math.Sin(angle) + cenY;
下面给出完整的C#代码:
~~~
/// <summary>
/// Rotate Blur
/// </summary>
/// <param name="src">Source image.</param>
/// <param name="cenX">The X position of Blur.</param>
/// <param name="cenY">The Y position of Blur.</param>
/// <param name="intensity">The intensity of blur,0-100.</param>
/// <returns>The result image.</returns>
private Bitmap RotateBlurProcess(Bitmap srcBitmap, int cenX, int cenY, int intensity)
{
Bitmap a = new Bitmap(srcBitmap);
int w = a.Width;
int h = a.Height;
cenX = Math.Min(w - 1, Math.Max(0, cenX));
cenY = Math.Min(h - 1, Math.Max(0, cenY));
Bitmap dst = new Bitmap(w, h);
System.Drawing.Imaging.BitmapData srcData = a.LockBits(new Rectangle(0, 0, w, h), System.Drawing.Imaging.ImageLockMode.ReadWrite, System.Drawing.Imaging.PixelFormat.Format32bppArgb);
System.Drawing.Imaging.BitmapData dstData = dst.LockBits(new Rectangle(0, 0, w, h), System.Drawing.Imaging.ImageLockMode.ReadWrite, System.Drawing.Imaging.PixelFormat.Format32bppArgb);
unsafe
{
byte* pIn = (byte*)srcData.Scan0.ToPointer();
byte* pOut = (byte*)dstData.Scan0.ToPointer();
byte* p = null;
int stride = srcData.Stride - w * 4;
int newX = 0, newY = 0;
double angle = 0;
double temp = 0, r = 0, g = 0, b = 0;
for (int y = 0; y < h; y++)
{
for (int x = 0; x < w; x++)
{
r = 0;
g = 0;
b = 0;
temp = Math.Sqrt((y - cenY) * (y - cenY) + (x - cenX) * (x - cenX));
angle = Math.Atan2((double)(y - cenY), (double)(x - cenX));
for (int n = 0; n < intensity; n++)
{
angle = angle + 0.005;
newX = (int)(temp * Math.Cos(angle) + (double)cenX);
newY = (int)(temp * Math.Sin(angle) + (double)cenY);
newX = Math.Min(w - 1, Math.Max(0, newX));
newY = Math.Min(h - 1, Math.Max(0, newY));
p = pIn + newY * srcData.Stride + newX * 4;
b = b + p[0];
g = g + p[1];
r = r + p[2];
}
b = Math.Min(255, Math.Max(0, b / intensity));
g = Math.Min(255, Math.Max(0, g / intensity));
r = Math.Min(255, Math.Max(0, r / intensity));
pOut[0] = (byte)b;
pOut[1] = (byte)g;
pOut[2] = (byte)r;
pOut[3] = (byte)255;
pOut += 4;
}
pOut += stride;
}
a.UnlockBits(srcData);
dst.UnlockBits(dstData);
}
return dst;
}
~~~
最后,看下效果图:
[](http://www.zealpixel.com/data/attachment/portal/201509/15/143909xts7rcps466mst27.jpg)
原图
[](http://www.zealpixel.com/data/attachment/portal/201509/15/143912qmvpwqpqvrvj1m1p.png)
效果图
给出一个完整DEMO程序的下载地址:[http://www.zealpixel.com/forum.php?mod=viewthread&tid=148&extra=page%3D1](http://www.zealpixel.com/forum.php?mod=viewthread&tid=148&extra=page%3D1) 跟大家分享一下!
挤压(Pinch)滤镜
最后更新于:2022-04-01 06:46:31
Pinch滤镜
Pinch滤镜是通过坐标变换来实现以某个点(cenX,cenY)为中心,某个半径R内图像向其挤压变形的效果。实现这个滤镜的算法很多,主要是数学公式的不同,大家可以自行设计,这里给个代码示例,大家可以直接使用。
代码如下:
~~~
/// <summary>
/// Pinch Filter
/// </summary>
/// <param name="src">Source image.</param>
/// <param name="cenX">The X position of sun.</param>
/// <param name="cenY">The Y position of sun.</param>
/// <returns>The result image.</returns>
private Bitmap PinchFilterProcess(Bitmap srcBitmap, int cenX, int cenY)
{
Bitmap a = new Bitmap(srcBitmap);
int w = a.Width;
int h = a.Height;
int radius = 0;
Bitmap dst = new Bitmap(w, h);
System.Drawing.Imaging.BitmapData srcData = a.LockBits(new Rectangle(0, 0, w, h), System.Drawing.Imaging.ImageLockMode.ReadWrite, System.Drawing.Imaging.PixelFormat.Format32bppArgb);
System.Drawing.Imaging.BitmapData dstData = dst.LockBits(new Rectangle(0, 0, w, h), System.Drawing.Imaging.ImageLockMode.ReadWrite, System.Drawing.Imaging.PixelFormat.Format32bppArgb);
unsafe
{
byte* pIn = (byte*)srcData.Scan0.ToPointer();
byte* pOut = (byte*)dstData.Scan0.ToPointer();
byte* p = null;
int sWidth = srcData.Stride;
int stride = sWidth - w * 4;
int offsetX = 0, offsetY = 0;
int newX = 0, newY = 0;
double radian = 0,degree = 10;
for (int y = 0; y < h; y++)
{
for (int x = 0; x < w; x++)
{
offsetX = x - cenX;
offsetY = y - cenY;
radian = Math.Atan2(offsetY, offsetX);
radius = (int)(Math.Sqrt(offsetX * offsetX + offsetY * offsetY));
radius = (int)(Math.Sqrt(radius) * degree);
newX = (int)(radius * Math.Cos(radian)) + cenX;
newY = (int)(radius * Math.Sin(radian)) + cenY;
newX = Math.Min(w - 1, Math.Max(0, newX));
newY = Math.Min(h - 1, Math.Max(0, newY));
p = pIn + newY * srcData.Stride + newX * 4;
pOut[0] = (byte)p[0];
pOut[1] = (byte)p[1];
pOut[2] = (byte)p[2];
pOut[3] = (byte)255;
pOut += 4;
}
pOut += stride;
}
a.UnlockBits(srcData);
dst.UnlockBits(dstData);
}
return dst;
}
~~~
效果图如下:
[](http://www.zealpixel.com/data/attachment/portal/201507/21/221354xqq5q0fkq5fqn0fj.jpg)
原图
[](http://www.zealpixel.com/data/attachment/portal/201507/21/221353y6czmsej4ces55jk.png)
Pinch滤镜效果图
最后放上一个完整的C#版程序Demo给大家下载使用:[http://www.zealpixel.com/forum.php?mod=viewthread&tid=55&extra=page%3D1](http://www.zealpixel.com/forum.php?mod=viewthread&tid=55&extra=page%3D1)
球面(Spherize)滤镜
最后更新于:2022-04-01 06:46:29
球面(Spherize)滤镜
球面滤镜是通过极坐标变换实现图像的球面特效。
代码如下:
~~~
/// Pinch Filter
/// /// Source image.
/// The X position of sun.
/// The Y position of sun.
/// The result image.
private Bitmap SpherizeFilterProcess(Bitmap srcBitmap, int cenX, int cenY)
{
Bitmap a = new Bitmap(srcBitmap);
int w = a.Width;
int h = a.Height;
int radius = 0;
Bitmap dst = new Bitmap(w, h);
System.Drawing.Imaging.BitmapData srcData = a.LockBits(new Rectangle(0, 0, w, h), System.Drawing.Imaging.ImageLockMode.ReadWrite, System.Drawing.Imaging.PixelFormat.Format32bppArgb);
System.Drawing.Imaging.BitmapData dstData = dst.LockBits(new Rectangle(0, 0, w, h), System.Drawing.Imaging.ImageLockMode.ReadWrite, System.Drawing.Imaging.PixelFormat.Format32bppArgb);
unsafe
{
byte* pIn = (byte*)srcData.Scan0.ToPointer();
byte* pOut = (byte*)dstData.Scan0.ToPointer();
byte* p = null;
int sWidth = srcData.Stride;
int stride = sWidth - w * 4;
int offsetX = 0, offsetY = 0;
int newX = 0, newY = 0;
double radian = 0;
for (int y = 0; y < h; y++)
{
for (int x = 0; x < w; x++)
{
offsetX = x - cenX;
offsetY = y - cenY;
radian = Math.Atan2(offsetY, offsetX);
radius = (int)((offsetX * offsetX + offsetY * offsetY) / Math.Max(cenX, cenY));
newX = (int)(radius * Math.Cos(radian)) + cenX;
newY = (int)(radius * Math.Sin(radian)) + cenY;
newX = Math.Min(w - 1, Math.Max(0, newX));
newY = Math.Min(h - 1, Math.Max(0, newY));
p = pIn + newY * srcData.Stride + newX * 4;
pOut[0] = (byte)p[0];
pOut[1] = (byte)p[1];
pOut[2] = (byte)p[2];
pOut[3] = (byte)255;
pOut += 4;
}
pOut += stride;
}
a.UnlockBits(srcData);
dst.UnlockBits(dstData);
}
return dst;
}
~~~
效果图如下:
[](http://www.zealpixel.com/data/attachment/portal/201507/22/100134x8r00yswklrrxrlr.jpg)
原图
[](http://www.zealpixel.com/data/attachment/portal/201507/22/100127rl5wnwv9rau053po.png)
效果图(X=240,Y=240)
最后放上一个完整的C#板程序DEMO:[http://www.zealpixel.com/forum.php?mod=viewthread&tid=56&extra=page%3D1](http://www.zealpixel.com/forum.php?mod=viewthread&tid=56&extra=page%3D1)
Wave滤镜
最后更新于:2022-04-01 06:46:27
Wave Filter水波滤镜
水波滤镜是通过坐标变换来模拟水波效果,使图像呈现出水波的特效。这个滤镜有一个可调参数:水波的扭曲程度。
代码如下;
~~~
/// Wave Filter
///
/// Source image.
/// The degree of wave,0-100.
/// The result image.
private Bitmap WaveFilterProcess(Bitmap srcBitmap, int degree)
{
Bitmap a = new Bitmap(srcBitmap);
int w = a.Width;
int h = a.Height;
degree = degree * 32 / 100;
degree = Math.Max(0, Math.Min(32, degree));
Bitmap dst = new Bitmap(w, h);
System.Drawing.Imaging.BitmapData srcData = a.LockBits(new Rectangle(0, 0, w, h), System.Drawing.Imaging.ImageLockMode.ReadWrite, System.Drawing.Imaging.PixelFormat.Format32bppArgb);
System.Drawing.Imaging.BitmapData dstData = dst.LockBits(new Rectangle(0, 0, w, h), System.Drawing.Imaging.ImageLockMode.ReadWrite, System.Drawing.Imaging.PixelFormat.Format32bppArgb);
unsafe
{
byte* pIn = (byte*)srcData.Scan0.ToPointer();
byte* pOut = (byte*)dstData.Scan0.ToPointer();
byte* p = null;
int stride = srcData.Stride - w * 4;
int newX = 0, newY = 0;
double PI2 = Math.PI * 2.0;
for (int y = 0; y < h; y++)
{
for (int x = 0; x < w; x++)
{
newX = (int)(degree * Math.Sin(PI2 * y / 128.0)) + x;
newY = (int)(degree * Math.Cos(PI2 * x / 128.0)) + y;
newX = Math.Min(w - 1, Math.Max(0, newX));
newY = Math.Min(h - 1, Math.Max(0, newY));
p = pIn + newY * srcData.Stride + newX * 4;
pOut[0] = (byte)p[0];
pOut[1] = (byte)p[1];
pOut[2] = (byte)p[2];
pOut[3] = (byte)255;
pOut += 4;
}
pOut += stride;
}
a.UnlockBits(srcData);
dst.UnlockBits(dstData);
}
return dst;
}
~~~
效果图如下:
[](http://www.zealpixel.com/data/attachment/portal/201507/22/180109cnnki2ihzwsbo08b.jpg)
原图
[](http://www.zealpixel.com/data/attachment/portal/201507/22/180108r10lxojc94k8l4cc.png)
水波滤镜效果图
最后放上一个完整的C#版程序Demo下载地址:http://www.zealpixel.com/thread-59-1-1.html
Swirl滤镜
最后更新于:2022-04-01 06:46:25
Swirl Filter
Swirl 滤镜是实现图像围绕中心点(cenX,cenY)扭曲旋转的效果,效果图如下:
[](http://www.zealpixel.com/data/attachment/portal/201507/22/180505r368gml8r6yzlwdu.jpg)
原图
[](http://www.zealpixel.com/data/attachment/portal/201507/22/180503in1w3vgh3b3zhs8a.png)
效果图
代码如下:
~~~
/// Swirl Filter
///
/// Source image.
/// The X position of Swirl.
/// The Y position of Swirl.
/// The degree of swirl,0-360.
/// The result image.
private Bitmap SwirlFilterProcess(Bitmap srcBitmap, int cenX, int cenY, int swilDegree)
{
Bitmap a = new Bitmap(srcBitmap);
int w = a.Width;
int h = a.Height;
int radius = 0;
swilDegree = Math.Max(0, Math.Min(360, swilDegree));
double k = swilDegree / 3600.0;
Bitmap dst = new Bitmap(w, h);
System.Drawing.Imaging.BitmapData srcData = a.LockBits(new Rectangle(0, 0, w, h), System.Drawing.Imaging.ImageLockMode.ReadWrite, System.Drawing.Imaging.PixelFormat.Format32bppArgb);
System.Drawing.Imaging.BitmapData dstData = dst.LockBits(new Rectangle(0, 0, w, h), System.Drawing.Imaging.ImageLockMode.ReadWrite, System.Drawing.Imaging.PixelFormat.Format32bppArgb);
unsafe
{
byte* pIn = (byte*)srcData.Scan0.ToPointer();
byte* pOut = (byte*)dstData.Scan0.ToPointer();
byte* p = null;
int stride = srcData.Stride - w * 4;
int offsetX = 0, offsetY = 0;
int newX = 0, newY = 0;
double radian = 0;
for (int y = 0; y < h; y++)
{
for (int x = 0; x < w; x++)
{
offsetX = x - cenX;
offsetY = y - cenY;
radian = Math.Atan2(offsetY, offsetX);
radius = (int)(Math.Sqrt(offsetX * offsetX + offsetY * offsetY));
newX = (int)(radius * Math.Cos(radian + k * radius)) + cenX;
newY = (int)(radius * Math.Sin(radian + k * radius)) + cenY;
newX = Math.Min(w - 1, Math.Max(0, newX));
newY = Math.Min(h - 1, Math.Max(0, newY));
p = pIn + newY * srcData.Stride + newX * 4;
pOut[0] = (byte)p[0];
pOut[1] = (byte)p[1];
pOut[2] = (byte)p[2];
pOut[3] = (byte)255;
pOut += 4;
}
pOut += stride;
}
a.UnlockBits(srcData);
dst.UnlockBits(dstData);
}
return dst;
}
~~~
最后放上一个完整的C#程序Demo下载地址:http://www.zealpixel.com/thread-58-1-1.html,另外,推荐一个网址www.zealpixel.com,有很多不错的图像处理开源代码!
Oilpaint油画滤镜
最后更新于:2022-04-01 06:46:22
Oilpaint油画滤镜
图像油画效果实际上是将图像边缘产生一种朦胧,雾化的效果,同时,将一定的边缘模糊化,这样图像整体上看去像素与像素之间就像雾一样随机呈现。
算法过程如下:
假设当前像素为P(x,y),他的随机位置为Pd(dx,dy),那么算法公式如下:
[](http://www.zealpixel.com/data/attachment/portal/201507/19/124640k94d1gpdecvpctte.png)
其中,K(v)为最大值不大于v的随机数正数,v为雾化阈值,v值越大,雾化程度越明显,反之,雾化程度越小,v=0时,图像无变化效果。
核心代码如下:
~~~
/// <summary>
/// Mosaic filter.
/// </summary>
/// <param name="src">Source image.</param>
/// <param name="blockSize">The size of mosaic effect.</param>
/// <returns>Resullt image.</returns>
public Bitmap OilpaintFilter(Bitmap src, int intensity)
{
Bitmap srcBitmap = new Bitmap(src);
int w = srcBitmap.Width;
int h = srcBitmap.Height;
System.Drawing.Imaging.BitmapData srcData = srcBitmap.LockBits(new Rectangle(0, 0, w, h), System.Drawing.Imaging.ImageLockMode.ReadWrite, System.Drawing.Imaging.PixelFormat.Format32bppArgb);
IntPtr ptr = srcData.Scan0;
int bytes = h * srcData.Stride;
byte[] srcValues = new byte[bytes];
System.Runtime.InteropServices.Marshal.Copy(ptr, srcValues, 0, bytes);
byte[] tempValues = (byte[])srcValues.Clone();
int stride = srcData.Stride;
Random ran = new Random();
int k = 0;
int dx = 0;
int dy = 0;
for (int j = 0; j < h; j++)
{
for (int i = 0; i < w; i++)
{
k = ran.Next(intensity);
dx = (i + k) >= w ? w - 1 : (i + k);
dy = (j + k) >= h ? h - 1 : (j + k);
tempValues[i * 4 + j * w * 4] = (byte)srcValues[dx * 4 + dy * w * 4];
tempValues[i * 4 + 1 + j * w * 4] = (byte)srcValues[dx * 4 + 1 + dy * w * 4];
tempValues[i * 4 + 2 + j * w * 4] = (byte)srcValues[dx * 4 + 2 + dy * w * 4];
}
}
srcValues = (byte[])tempValues.Clone();
System.Runtime.InteropServices.Marshal.Copy(srcValues, 0, ptr, bytes);
srcBitmap.UnlockBits(srcData);
return srcBitmap;
}
~~~
图像油画滤镜效果如下:
[](http://www.zealpixel.com/data/attachment/portal/201507/19/124819mlyntu43nlt3rt38.jpg)
原图
[](http://www.zealpixel.com/data/attachment/portal/201507/19/124820l5tvmt2pggmzbvkb.png)
Oilpaint滤镜效果
最后,放上一个完整的C#版程序Demo下载链接:[http://www.zealpixel.com/forum.php?mod=viewthread&tid=52&extra=page%3D1](http://www.zealpixel.com/forum.php?mod=viewthread&tid=52&extra=page%3D1)