Brannan滤镜
最后更新于:2022-04-01 06:45:34
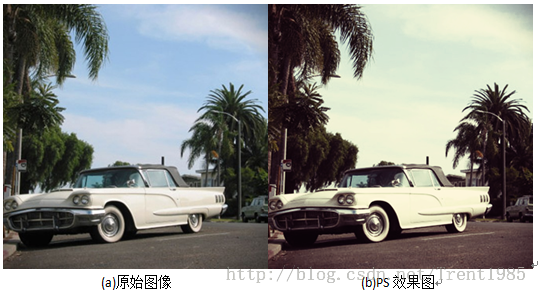
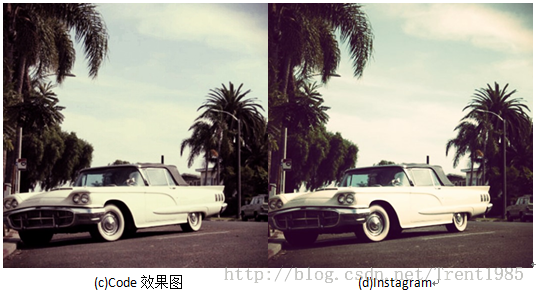
作为第一篇文章,本人将介绍Instagram中Brannan 滤镜的实现过程,当然,是自己的模拟而已,结果差异敬请谅解。
先看下效果图:


1 PS实现步骤:
1.1 打开测试图像,复制图层,命名为图层a;
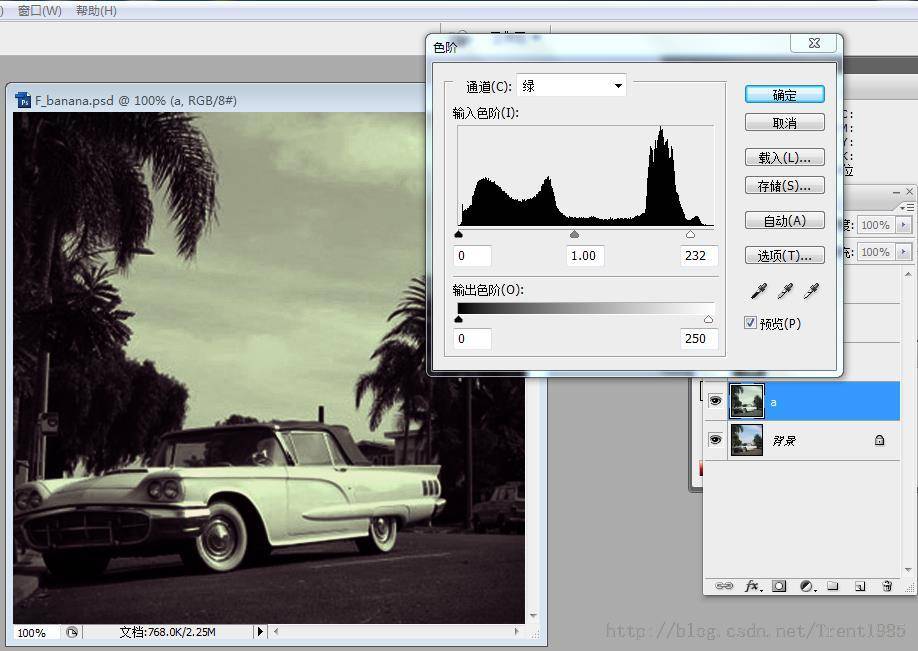
1.2 对图层a进行去色操作,然后,打开色阶-绿色-调整如下:

1.3对当前图层a选择图层混合模式-滤色;
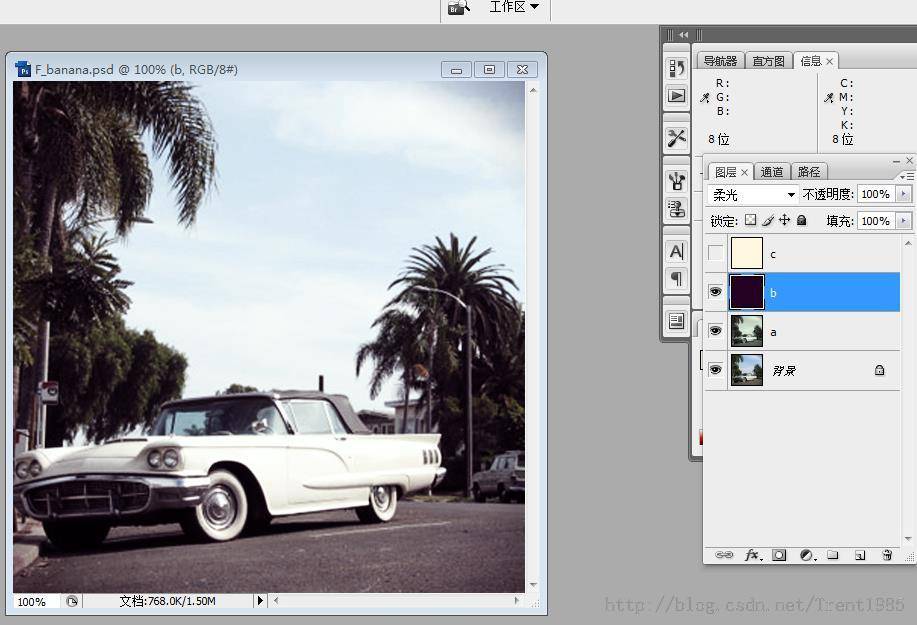
1.4新建图层b,填充颜色RGB(36,1, 34),选择图层混合模式-柔光,不透明度60%:

1.5新建图层c,填充颜色RGB(253,253,241),选择图层混合模式-正片叠底:
1.6合并所有图层,即可得到相应的效果图了;
2,程序实现:
~~~
<span style="font-size:14px;">public static Bitmap DoGrayEffect(Bitmap srcBitmap, int pxMode)
{
Bitmap src = new Bitmap(srcBitmap);
int w = src.Width;
int h = src.Height;
PixelFormat format = (pxMode == 0 ? PixelFormat.Format24bppRgb : PixelFormat.Format32bppArgb);
BitmapData srcData = src.LockBits(new Rectangle(0, 0, w, h), ImageLockMode.ReadWrite, format);
Desaturate((byte*)srcData.Scan0, w, h, srcData.Stride, pxMode);
src.UnlockBits(srcData);
return src;
}</span>
~~~
~~~
<span style="font-size:14px;"> //色阶调整
public static Bitmap DoLevelAdjust(Bitmap srcBitmap, int DestChannel, int InputLeftLimit, int InputMiddle, int InputRightLimit, int OutputLeftLimit, int OutputRightLimit, int pxMode)
{
Bitmap src = new Bitmap(srcBitmap);
int w = src.Width;
int h = src.Height;
PixelFormat format = (pxMode == 0 ? PixelFormat.Format24bppRgb : PixelFormat.Format32bppArgb);
BitmapData srcData = src.LockBits(new Rectangle(0, 0, w, h), ImageLockMode.ReadWrite, format);
LevelAdjust((byte*)srcData.Scan0, w, h, srcData.Stride, DestChannel, InputLeftLimit, InputMiddle, InputRightLimit, OutputLeftLimit, OutputRightLimit, pxMode);
src.UnlockBits(srcData);
return src;
}</span>
~~~
~~~
<span style="font-size:14px;">//图层混合模式
public static Bitmap DoEffect(Bitmap srcBitmap, Bitmap mxBitmap, int pxMode, int effectMode)
{
Bitmap src = new Bitmap(srcBitmap);
Bitmap mx = new Bitmap(mxBitmap);
int w = src.Width;
int h = src.Height;
PixelFormat format = (pxMode == 0 ? PixelFormat.Format24bppRgb : PixelFormat.Format32bppArgb);
BitmapData srcData = src.LockBits(new Rectangle(0, 0, w, h), ImageLockMode.ReadWrite, format);
BitmapData mxData = mx.LockBits(new Rectangle(0, 0, w, h), ImageLockMode.ReadWrite, format);
DoSpecialEffect((byte*)srcData.Scan0, (byte*)mxData.Scan0, w, h, srcData.Stride, pxMode, effectMode);
src.UnlockBits(srcData);
mx.UnlockBits(mxData);
return src;
}
//单色图层混合模式
public static Bitmap DoSingleColorEffect(Bitmap srcBitmap, int r, int g, int b, int pxMode, int effectMode)
{
Bitmap src = new Bitmap(srcBitmap);
int w = src.Width;
int h = src.Height;
PixelFormat format = (pxMode == 0 ? PixelFormat.Format24bppRgb : PixelFormat.Format32bppArgb);
BitmapData srcData = src.LockBits(new Rectangle(0, 0, w, h), ImageLockMode.ReadWrite, format);
byte* p = (byte*)srcData.Scan0;
int seg = (pxMode == 0 ? 3 : 4);
for (int y = 0; y < h; y++)
{
for (int x = 0; x < w; x++)
{
DoPixelEffect(p, r, g, b, effectMode);
}
}
src.UnlockBits(srcData);
return src;
}</span>
~~~
~~~
<span style="font-size:14px;"> //Brannan 滤镜
public static Bitmap BrannanFilter(Bitmap srcBitmap, int pxMode)
{
Bitmap temp = DoGrayEffect(srcBitmap, 0);//去色
Bitmap leBmp = DoLevelAdjust(temp, 2, 0, 128, 232, 0, 250, 0);//绿色色阶调整
Bitmap filterBmp = DoEffect(srcBitmap, leBmp, 0, (int)EffectMode.MODE_FILTERCOLOR);//滤色
temp = DoSingleColorEffect(filterBmp, 22, 1, 20, 0, (int)EffectMode.MODE_SMOOTHLIGHT);//柔化
temp = DoSingleColorEffect(temp, 253, 253, 241, 0, (int)EffectMode.MODE_MULTIPLY);//正片叠底
return temp;
}</span>
~~~
PSD文件及C代码DEMO免费下载链接:[点击打开链接](http://download.csdn.net/detail/trent1985/8055639)
**最后,分享一个专业的图像处理网站(微像素),里面有很多源代码下载:**
[http://www.zealpixel.com/portal.php](http://www.zealpixel.com/portal.php)